 To Set Up the OTP High Availability Framework on the Additional OTP Hosts
The OTP high availability framework must be set up on each host in your clustered OTP system. Perform the following steps on each host.
Before You Begin
The OTP high availability framework must be set up on the First OTP Host as described in the previous procedure.
-
Open a Web browser and log in to the external OTP installation server service provisioning service.
Go to URL http://install server:9090 where install server is either the IP address or the fully-qualifed name of the external OTP installation server.
-
Click OEM OTP to display the Open Telecommunications Platform home page.
-
Click Step 2. OTP High Availability Framework on Additional Hosts: Install and Configure.
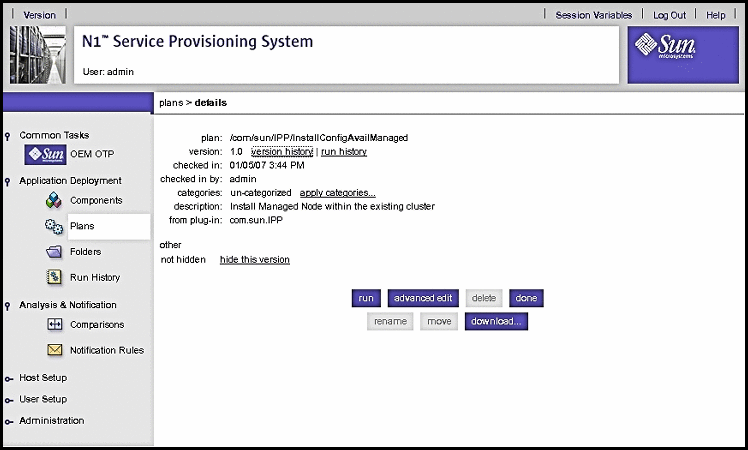
The edit availability plan page appears.
Figure 5–15 Clustered OTP Hosts Edit Availability Plan Page

-
Click run.
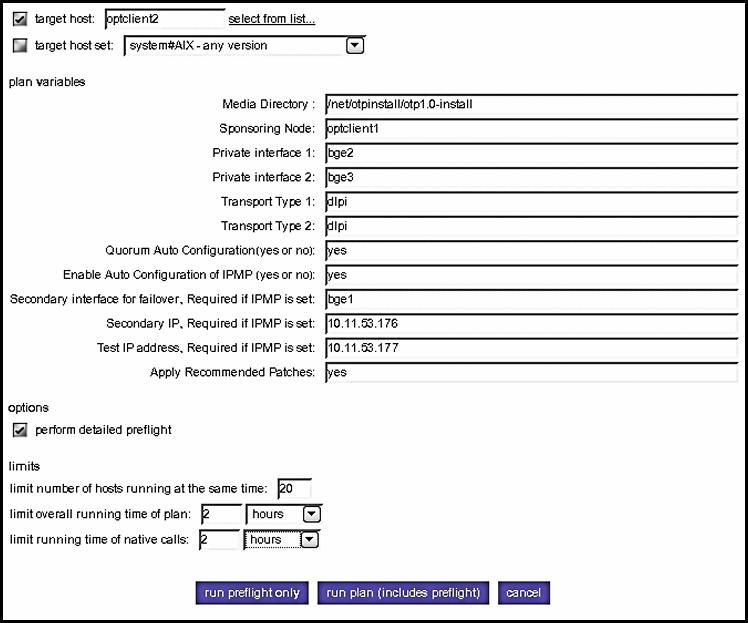
The Availability Plan Variables page appears. Scroll the page down to view the variables:
Figure 5–16 Clustered OTP Hosts Availability Plan Variables Page

Type the information in the plan variables fields according to your Clustered OTP Host Plan Worksheet. Refer to the OTP System Plan Settings Descriptions for information about each variable.
 Caution –
 Set limit overall running time of plan and limit running time of native calls to 2 hours each.
-
Click run plan (includes preflight).
The page refreshes, and a progress bar is displayed during the provisioning process.
The provisioning process:
-
Installs required Solaris OS patches
-
Installs the OTP high availability framework
-
Configures the clustered OTP host
-
Reboots the clustered OTP host
-
Verifies the clustered OTP host configuration
-
-
If you chose no for Quorum Auto Configuration on a two-host cluster, you must manually select and configure the quorum disk as follows.
Note –The following sub-steps apply only to a two-host cluster. If you are setting up the OTP high availability framework on a three-host or more clustered OTP system, this step is optional.
-
Open a separate terminal window and log in as root to the first OTP host.
-
Type /usr/cluster/bin/scdidadm -L to display the cluster disk information. For example:
# /usr/cluster/bin/scdidadm -L
                1        otpclient1:/dev/rdsk/c0t8d0     /dev/did/rdsk/d1
                1        otpclient2:/dev/rdsk/c0t8d0     /dev/did/rdsk/d1
                2        otpclient1:/dev/rdsk/c0t9d0     /dev/did/rdsk/d2
                2        otpclient2:/dev/rdsk/c0t9d0     /dev/did/rdsk/d2
                3        otpclient1:/dev/rdsk/c1t0d0     /dev/did/rdsk/d3
                4        otpclient1:/dev/rdsk/c1t1d0     /dev/did/rdsk/d4
                5        otpclient2:/dev/rdsk/c1t0d0     /dev/did/rdsk/d5
                6        otpclient2:/dev/rdsk/c1t1d0     /dev/did/rdsk/d6
In the above example, disks d1 and d2 are shared by both hosts of the two-host cluster. The quorum disk must be a shared disk.
-
Configure a quorum disk.
Type /usr/cluster/bin/scconf -a -q globaldev=shared disk ID where shared disk ID is a shared disk ID. For example:
# /usr/cluster/bin/scconf -a -q globaldev=d1
-
Type /usr/cluster/bin/scconf -c -q reset to reset the two-host cluster to normal mode.
-
- © 2010, Oracle Corporation and/or its affiliates
