| May 2007 [Part number: 820-0466-10] |
|
|
This tutorial introduces the Sun
Java™ Enterprise System
(Java ES) installer, the Java ES
components, and the key tasks involved with installing Java ES.
|
Java ES is a collection of server-side
product components and shared components that work together to
support
distributed
enterprise applications across a network. All
Java ES components are installed using
the Java ES installer. Installation happens one host at a time. After
you have
completed installation on one host, you then install the
software on another host if desired.
This
tutorial walks you through the basics of installation and assumes you
have already downloaded and expanded the software and are ready to run
the installer.
See Java
ES 5 Installation FAQs for information about getting to this point.
The tutorial does not show all pages in the Java ES installer nor
provide all details necessary to perform a
successful
installation. The goal of this tutorial is to help you become familiar
with the
installer and the choices you make during installation.
For
detailed installation instructions, see the Java ES 5
Installation Guide.
When you install Java ES you perform the following general steps, which
correspond to sections in this tutorial:
- Start the installer
- Choose
components for installation
- Choose when to
configure components
- Configure components
during installation
- Install the software
- Complete the
installation
This tutorial also contains a Troubleshooting
and Resources section.
Start the Installer
Java ES has three
installation modes as follows:
- Graphical mode provides
an interactive graphical wizard that walks you through the
installation.
- Text-based mode provides
the same functionality as graphical mode but prompts you for responses
line by line in a terminal window.
- Silent mode is a repeatable method used to install Java
ES on multiple hosts that share similar configurations. You first run
an interactive installation and capture responses to the installer in a
state file. You then run the installer on other hosts using the state
file as input.
This tutorial uses the graphical mode. For more information about using
the
other modes, see the Installation Guide.
To Start the Installer in Graphical Mode
The following procedure uses the ./installer
-no command, which enables you to practice with the installer
before you perform an actual installation. The -no
option runs the installer but does not
install the
software and is available in all installation modes.
- As superuser, navigate to the
directory in which you downloaded and expanded the software. For
example:
cd
/java_es_5/Solaris_sparc
- Run the installer with the following
command:
./installer -no
Note: To
perform an actual installation, use ./installer for the
command in
step 2.
The Welcome page
is displayed and provides the URL for Java ES system documentation.
Click the link and bookmark the page for
future
reference.

Buttons on pages in the installer are used as follows:
- To move to the next page, click Next.
- To exit the installer without performing any installation,
click Cancel.
- To display documentation for the page
currently displayed, click Help.
- To review or change your input on a previous page, click
Back.
Click Next on the Welcome page to display the Software License
Agreement.

Take the desired action:
- To accept the agreement and
proceed with the installation, click Yes, Accept License.
- To exit the installer without performing any installation,
click Decline.
After you accept the agreement the Java ES installer surveys the
software on your host and displays
the Choose Software
Components page. This process can take a few
seconds.
Choose
Components for Installation
Java ES consists of product components (with subcomponents) and shared
components. Product
components and their subcomponents can be selected for installation in
the Java ES installer. Shared
components support product components and are selected
automatically when a product component that depends on them is
selected. Product components are also selected automatically
if another product component requires their services. To better
understand component dependencies,
see Are
There Component Interdependencies that I Need to Know About?
The Choose Software Components page lists the product components and
subcomponents you can select to install.
To
see subcomponents, click the symbol to the left of a product component
check box, as shown for Portal Server Secure Remote Access in the
following screen capture.
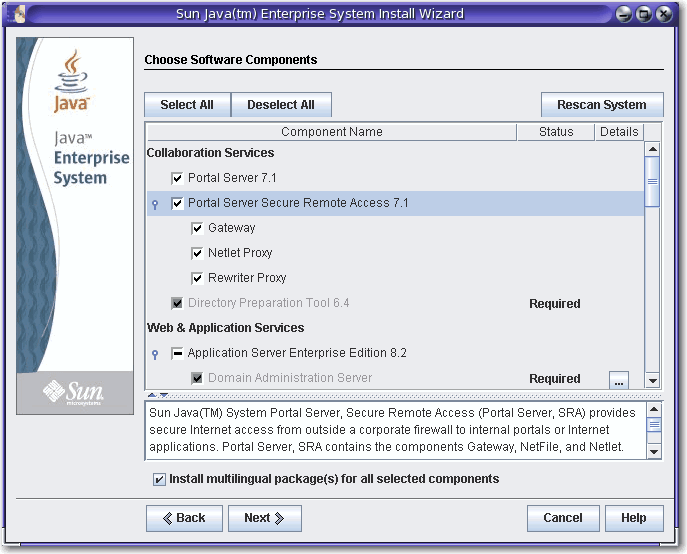
The
marks in
the check boxes on the Choose Software Components
page indicate the following:
- A checkmark in an unshaded box indicates a component
or subcomponent is
selected for installation.
- A dash (as shown for Application Server) indicates a
component's subcomponents are in a mixed state. For example, some
subcomponents are already installed, some will be installed through the
new installation, and some have been deselected.
- A checkmark in a shaded, unselectable box next to a dimmed
name (shown for
Domain
Administration Server) indicates that a correct version of the
component is already installed on the host.
Use the buttons and other interface elements on the page to do the
following:
- To select all components and
subcomponents, click Select All.
Tip: To install many components but
not
all, click
Select All and then deselect the components or subcomponents you do not
want.
- To deselect all components and
subcomponents, click Deselect All.
- To rescan your system for existing
components and update the Status and Details information, click Rescan
System.
- To select components and
subcomponents for installation, select component check boxes. Click the
symbol to the left of the check box to see a component's subcomponents.
When you select a component that has
subcomponents,
the subcomponents are selected automatically.
- To upgrade all shared components to the
current Java ES release, select All Shared Components under Shared
Services. If
you do not select this check box, the installer installs or upgrades
only shared components for the product
components you
select.
The Monitoring
Console and Java
DB are also listed under Shared Services. Monitoring is a new
feature in Java ES 5 and includes the
Monitoring Console. For
more information about monitoring, see the Java ES 5 Monitoring
Guide. Java DB is Sun's supported distribution
of the open source
Apache Derby 100% Java database (formerly called Derby Database).
- To see information about
the installation status of components and subcomponents, review the
Status and Details columns. These columns
are usually empty, indicating that the component or subcomponent is not
installed on the system. Other values for Status include the following:
- Installed: The current version is already installed.
- Required: Another selected component requires this
one.
- Upgradable: A previous version is installed and the
installer can upgrade that version to the current one.
- Nonupgradable: A previous version is installed but
the installer cannot upgrade that version to the current one. For
information about upgrade issues, see the Java ES 5 Upgrade
Guide.
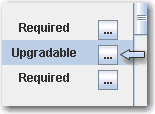
For
information about items listed in the Status column, click the
corresponding icon in the Details column as shown in the following
screen capture.
- If you do not want to install multilingual packages for the
selected components, deselect the multilingual packages
check box at the bottom of the Choose Software Components page. If you
deselect
this option, multilingual packages are not installed and cannot be
added later using the Java ES installer. You must add them manually.
For more information
about languages and the installer, see How
Language Selection Works.
Note: For information
about dependencies and remote hosts, see Does
the Installer Check Dependencies on Remote Components?
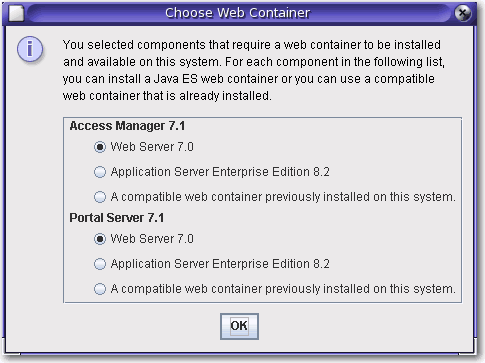
When you click
Next on the Choose Software Components page and
component dependencies
have not yet been met, messages tell you what you need to do. Take the
appropriate action and then proceed with the installation. Typical
issues include such things as a web container is required but is not
selected, or required components or subcomponents are not
selected. An example advisory message is shown in the following screen
capture. (For information
about third-party web containers supported in
Java ES, see How
Do I Use a Third-Party Web Container?)
Upgrading the J2SE SDK
On the Solaris™ Operating System (Solaris OS), after clicking Next on
the Choose Software Components page you might
see the following page regarding the Java 2 Software
Development
Kit, Standard Edition (J2SE SDK).
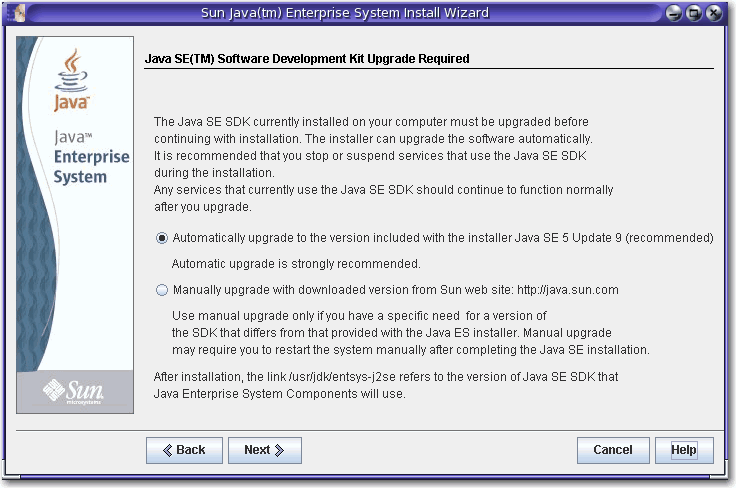
This page is displayed if the installer detects an incompatible
system-wide version of the J2SE SDK. Keep the default selection of an
automatic upgrade, which brings the version up to date.
Note: If the installer
encounters a higher
version of the JDK and one or more
JDK packages are missing (for example, the 64–bit JVM™ software), the
installer
treats
this version as incompatible. In that case, when you keep the automatic
upgrade option the JDK is downgraded to the version of the JDK required
by
Java ES.
Component Version
Compatibility
If
incompatible versions of product components exist on the host on which
you are installing the software, you must remove the incompatible
components. Product
components generally cannot be upgraded by the installer, but there are
some exceptions. For detailed information about version compatibility
issues, see Does
it Matter if Other Java ES Components are Already on My Host?
During installation, the installer automatically
installs the required shared components if they are not already
installed on the host. If some shared components are already on the
host but
the versions do not match the
Java ES release
requirements, the Shared Component Upgrades Required page is displayed,
listing the
incompatibilities. You cannot proceed in the installer until
compatibility issues are
resolved.
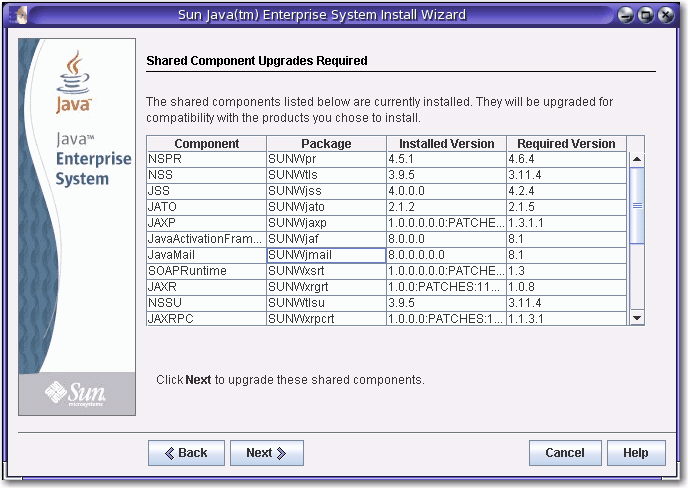
Take the desired action:
- To direct the installer to
automatically upgrade the
shared components to the correct versions, click Next.
- To specify you do not want the installer to
automatically upgrade the shared components, click Cancel to exit the
installer. Upgrade the incompatible shared components and then run the
installer again.
- To proceed without exiting the installer, click Back and
modify the selection of components you want to install, removing those
for which there are compatibility issues.
After you click Next on
the shared components page, the Specify
Installation Directories page
displays the default
installation directories for the selected components.
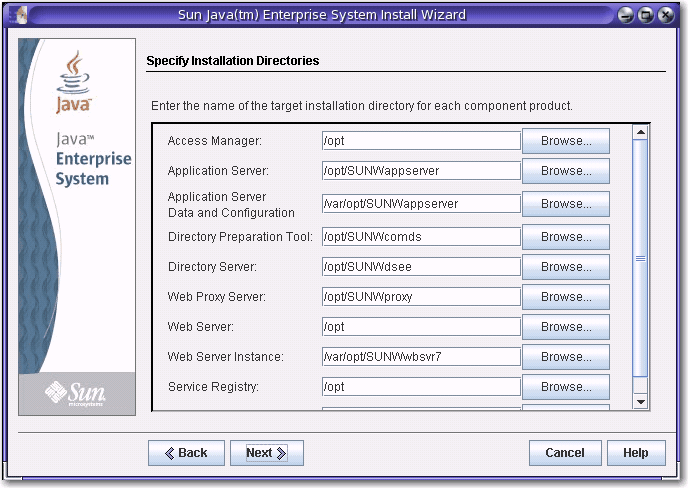
If the default
directories are not
acceptable, browse for alternate paths and change as needed. Make note
of these alternate path names because you must specify the
information whenever path names are requested by the installer or a
configurator. To see a complete list of default directories and
ports, see Default
Installation Directories and Ports.
When you click Next, the
installer runs a system check to verify that all system requirements
are
met. This process checks system resources such as disk space, memory,
swap
space,
and patches based on the
components you selected. When the installer completes the check, the
Verify System Requirements
page is displayed and lists the results.
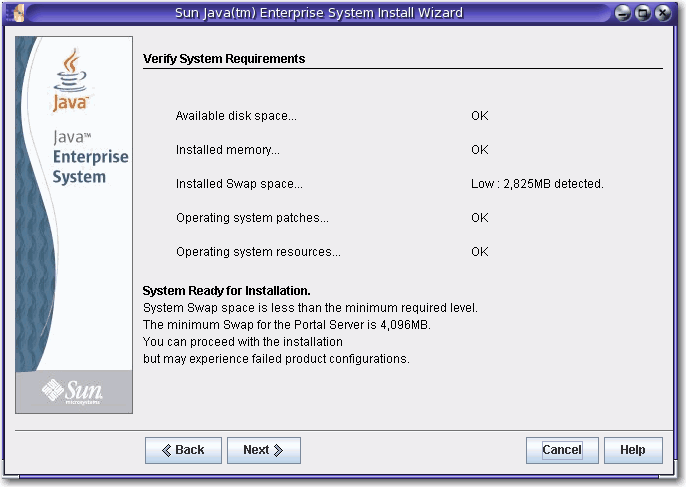
If requirements are not met, messages tell you
what you
need to do. Take the desired action based on the system check:
- If your system meets requirements, System Ready For
Installation appears on the page without any qualifications. Click
Next to proceed
with the installation.
- If your system does not meet the minimum memory
or swap space recommendation, System Ready For Installation appears
on the page with
qualifications (as shown in the previous screen capture). Click Next to
continue,
but add memory or swap space when installation is complete or you might
encounter degraded performance and other serious problems.
- If your system does not meet the requirements to proceed
with the installation, System Not Ready for Installation appears on the
page and
you must take action before you can proceed. Click
View Report to identify the problems, then fix the specified
errors and click Check Again to recheck the system (if the problems can
be fixed without stopping the installer). If your system
continues to fail to meet
the requirements, click Cancel to exit the installer, troubleshoot
and resolve the
problems, and then run the installer again.
When the system check
is complete and you are satisfied
with the state of the system, click Next.
Choose When to
Configure Components
The
Choose a Configuration Type page specifies whether you want to
configure certain components through the installer
during installation or run their configurators at a later time.
You have two choices on this page: Configure Now or Configure Later.
Configure Now
Configure Now is selected by default and enables you to configure
certain components in the installer during installation. Components
that can be
configured during installation are as follows:
- Access Manager
- Application Server
- Directory Server
- HADB
- Portal Server
- Portal Server Secure Remote Access
- Web Server
- Proxy Server
Components that cannot be
configured during installation and must be configured later are as
follows:
- Directory Proxy Server
- Java DB
- Sun Cluster
- Sun Cluster Agents
- Sun Cluster Geographic Edition
- Monitoring Console
- Service Registry
Note: Although Sun
Cluster software cannot be configured
during installation, if you select Configure Now for these components
the installer offers you the option of enabling remote
support
to simplify postinstallation configuration.
When you select Configure Now for components that can be configured
during installation, the installer prompts you for configuration
information and walks you through several configuration pages for each
component. Runnable instances are created and components
configured during installation can be started
and verified after the installation is complete.
When you select Configure Now for components that cannot be configured
during installation, you will be advised as such by a page in the
installer. You later create runnable instances by
providing configuration values in the configuration wizards or
configuration files of the individual components.
Configure Later
If you select Configure Later, the installer copies component software
files to the host, but no configuration is
performed. The
installer proceeds
without further configuration, and no runnable instances are
created. You create runnable
instances by
providing configuration values in the configuration wizards or
configuration files of the individual components. All components
can be configured after installation.
Common reasons for choosing Configure
Later include the following:
- The components that you selected can only be configured
later. If you select Configure Now for these components, you are
advised
that the components cannot be configured during installation.
- You want to perform special configuration of components
after
installation.
If you select Configure Later, you proceed to the Ready to Install page. If you
select Configure Now, you proceed through configuration pages.
Configure Components
During Installation
If you selected more
than one component to Configure Now, you first specify
administrator
information on the Specify
Administrator Account Preferences page. If you selected just one
component, you skip this page and specify the administrator user
ID and password on the Specify Common Server Settings page.
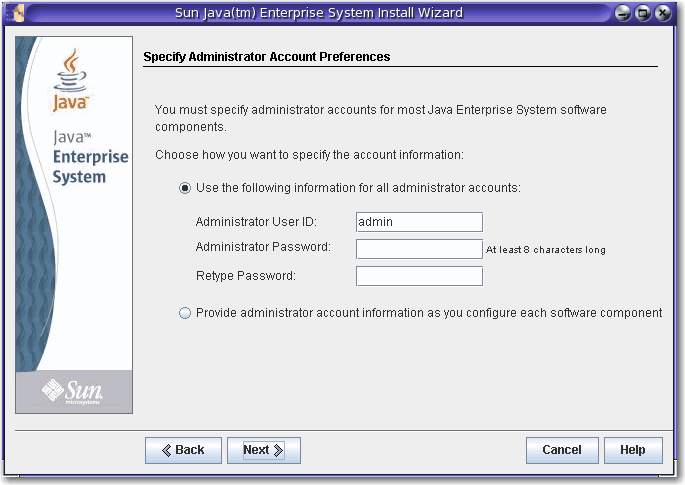
The account preferences page specifies whether you want
to use the same
administrator
account for all product components or provide account information
component by component. The result of each choice is as follows:
- If you use the same administrator information for
all product components, the installer does not prompt you for this
information on
subsequent pages in the installer but uses the
values that you provide on this page.
- If you provide administrator information for each
product component, the installer prompts you for
this information during
installation as you configure each component.
Note: Do not use white
space or the following symbols for administrator passwords in Java ES:
; & ( ) ! |
< >
' “ $ ^ \ # / , @ %
When you click Next, the
Specify Common Server
Settings page is displayed.
Note: In the following
screen capture, fields
associated with the administrator user ID and administrator password
are
not displayed because a choice was
made on the previous account preferences page to
use a single administrator account and password for all components.
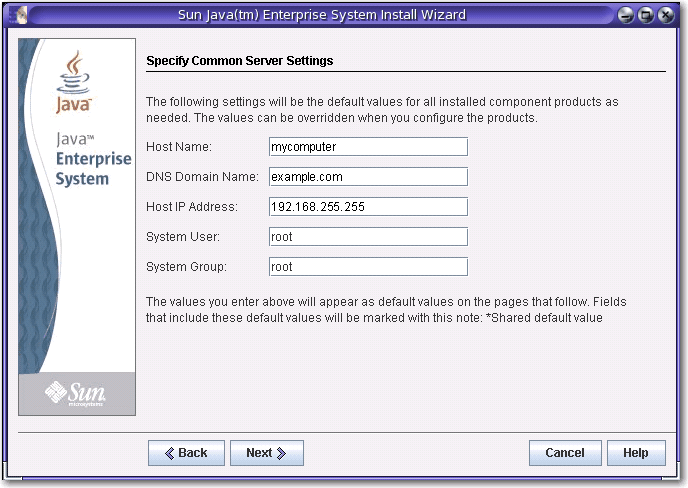
Common server
settings are
parameters used by multiple components. Accept the defaults or
use alternate data to answer the installer
questions regarding these global fields. Values that you enter on this
page appear
as default values on subsequent product component configuration pages.
Refer
to online help or to Common
Settings for information about these fields.
Click Next to proceed to the
configuration pages for components
selected for a Configure Now installation. The configuration pages
are displayed one by one. The following screen capture shows a typical
component
configuration page.

Some fields on
configuration pages display default values from the Specify Common
Server Settings page. If you choose to enter alternate values on the
configuration pages instead
of accepting the
defaults, you must specify the chosen alternate
values whenever the item is requested by the installer or a
configurator.
Note: Click Help for detailed descriptions of the
information requested. This field-specific information is not
provided in
the instructions in the Installation Guide. Descriptions of all
configuration fields are also grouped in Configuration
Information. Use this information to complete the configuration
worksheets
before starting an actual installation.
When you click Next
on the last configuration
page, the Ready to Install page is displayed. If issues exist that
prevent you from installing the software,
messages tell you what you need to do.
The Ready to Install page lists the components you selected
for installation. Although shared components are not explicitly
listed, they have already been verified and are installed if they
are
needed.
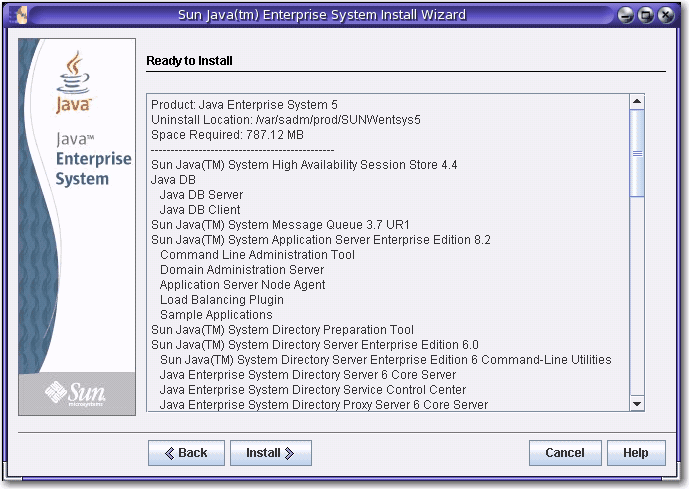
Review the information and proceed
as desired:
- To change the selected components, click Back until you
reach
the Choose Software Components page. Make changes, then click Next to
move forward through the installer and return to the Ready to Install
page. The installer retains previously entered values so you do not
need to reenter them.
Dependencies are rechecked
and the system check is repeated.
- To change information about a particular component's
configuration, click Back until you
reach the desired configuration page, make the changes, and then click
Next
to move forward through the installer. You do not need to
reenter any previously entered values.
- To exit the installer without
installing any software, click Cancel.
- To proceed with the installation, click Install to start
installing the component packages.
The
Installing page displays and the
installer starts installing the software.
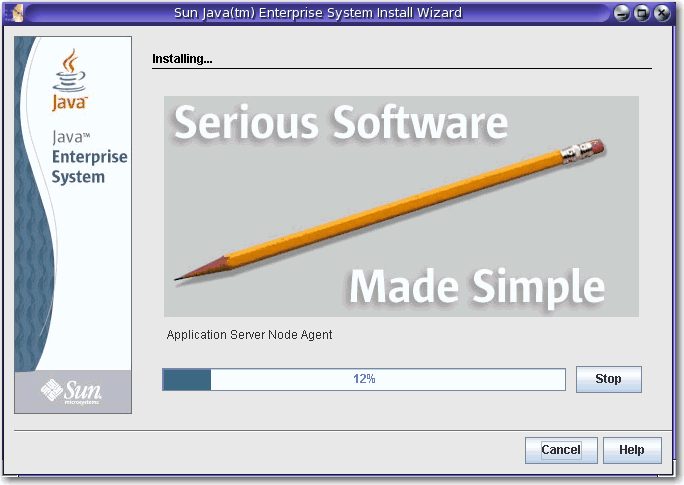
The Installing page displays a progress bar and the names of packages
as they are
installed. Take action if desired:
- To stop the installation and uninstall any component
packages that have already been installed, click Stop.
- To cancel the installation without uninstalling any
component packages that have already been installed,
click Cancel. This action is useful if you want to retain some
component packages that have been installed, but cancel the
installation of others.
If the installation is allowed to proceed without stopping or
canceling, the installer installs or upgrades shared components and
then does the same for product components. How long an
installation
takes
depends on the size and
complexities of your installation.
Complete the
Installation
If installation is successful, the Installation Complete page
is displayed. If installation is unsuccessful, the Installation
Failed page is displayed.
Installation Complete
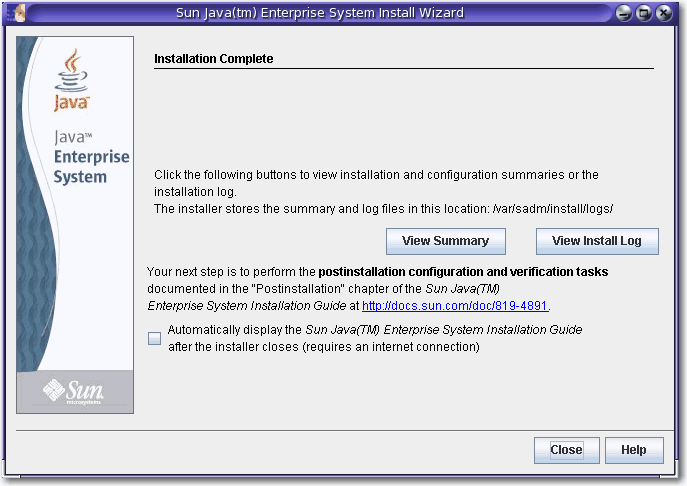
Take action as desired:
- To examine
information about each
component
installed and the settings you specified, click View Summary. If you
chose Configure
Now, this
summary lists all configuration values.
- To examine the
installer’s
log messages for the components, click View Install Log. You can also
access this information
any time from the following locations:
Solaris
OS: /var/sadm/install/logs
Linux and
HP-UX: /var/opt/sun/install/logs
For more
information about Java ES logs, see Examining
Installation Log Files.
- To access postinstallation instructions and continue with
the final steps of installation, select the check box to automatically
display the Installation Guide. Even if you performed
extensive
configuration during installation, most product components
still require additional configuration. At least
some manual configuration is required
after
every installation. For instructions, see Completing
Postinstallation Configuration in the Installation Guide. Also see
the postinstallation
configuration questions
in the
Installation FAQs.
- To exit the installer, click
Close. Your installation
session is done. Product components that were installed must be started
after you have completed postinstallation configuration (the packages
are installed
but
nothing is
started, including the configured components). For more information
about starting product components, see Verifying
After Postinstallation Configuration.
- To begin using Java ES components after
they have been installed and started, see the documentation for a
particular Java ES component. If you are a new user, look
for introductory or getting started material, which is often found in a
document called Technical Overview.
- To start over if
the resulting
installation does not meet your needs, run the uninstaller to
uninstall
all product components and then perform a new installation. For more
information, see Uninstalling.
Java ES Reporter
Java ES Reporter is a command-line utility that performs product
registration after a successful Java ES installation. The utility
starts automatically in the console or terminal window in which
you started the installer. You are asked if you want to install Java ES
Reporter, and if so, to provide the URL or IP
address of a
proxy Java ES Reporter will use to access Sun through the Internet. For
more
information, see How
Java ES Reporter Works.
Adding Components After Installation
To install additional components after installation is complete, run
the installer again to add them.
The
installer detects installed components and uses them to satisfy
dependencies
of components you are adding. Installed product components are
shown as shaded and dimmed on the Choose Software Components
page. For
example, if you installed Access Manager and its required components
during one installation session and later decide you want to install
Portal
Server, the
existing instance of Access Manager is used to meet the Portal
Server dependency on Access Manager. You are not asked to reinstall
Access Manager.
Installation Failed
If installation was unsuccessful, the
Installation Failed page is displayed.

Click View Summary or View Install Log to access information that will
help to diagnose the problems. For more
information about using Java ES logs for troubleshooting, see Examining
Installation Log Files.
Troubleshooting and Resources
For problems specific to
installation, see the troubleshooting
questions in the Installation FAQs and Troubleshooting
in the Installation Guide.
For troubleshooting information that covers a range of Java ES issues
and
product components, visit the troubleshooting
task page on the Java ES 5 BigAdmin
hub.
Other resources will also be helpful as you install Java ES and work
with its components. These resources include the following:
- For general product information, see the Java ES product
site.
|
