Chapter 3 Preparing Servers for Open Telecommunications Platform Installation
This chapter provides the procedures for downloading and uncompressing the combined Open Telecommunications Platform (OTP) and Solaris 10 Update 2 installation image, and the procedures for installing and configuring the Solaris OS on the external OTP installation server and on theOTP host or hosts you chose for the OTP system.
Solaris 10 Update 2 must be installed and configured on the external OTP installation server and on each OTP host before you can install the Open Telecommunications Platform.
The following topics are discussed:
-
Downloading and Uncompressing the OTP and Solaris OS Software
-
Installing Solaris 10 Update 2 and the Remote Agent on the OTP Hosts
-
Installing the Open Telecommunications Platform Patches On Sun Fire T2000 Servers
Note –
If you have purchased the OTP installation DVD-ROM, go to To Install Solaris 10 Update 2 on the External OTP Installation Server.
Downloading and Uncompressing the OTP and Solaris OS Software
This section provides the procedures for downloading the Open Telecommunications Platform installation zip files and creating the Solaris 10 Update 2 OS installation image and the Open Telecommunications Platform installation directory and files.
 To Download and Uncompress the OTP and Solaris
OS Installation Zip Files
Before You Begin
The server to which you download the Open Telecommunications Platform installation zip files must be network-accessible by the external OTP installation servers and by the OTP hosts, and have at least 6 Gbytes of available free disk space
-
Log in as root (su - root) to a server that is network-accessible by your OTP system.
-
(Optional) Download and install the Sun Download Manager.
Downloads of large files using Web browsers can sometimes fail. For this reason, use the Sun Download Manager to download the Open Telecommunications Platform installation zip files. For instructions about how to download, install, and use the Sun Download Manager, go to http://www.sun.com/download/sdm/index.xml.
-
Create a directory into which the installation zip files are to be saved.
For example:
# mkdir /otp-download
-
Open a web browser and go to the Tech/OEM Web site https://sdlc2j.sun.com/eeAdmin/AdminActionServlet?LMLoadBalanced=. Access is password protected. Your password for the Tech/OEM site is provided at the time of the order.
-
Download the following five Solaris 10 Update 2zip files to the directory you created in Step 3:
-
sol-10-u2-ga-sparc-dvd-iso-a.zip
-
sol-10-u2-ga-sparc-dvd-iso-b.zip
-
sol-10-u2-ga-sparc-dvd-iso-c.zip
-
sol-10-u2-ga-sparc-dvd-iso-d.zip
-
sol-10-u2-ga-sparc-dvd-iso-e.zip
-
-
Download the following four Open Telecommunications Platform installation zip files to the directory you created in Step 8:
-
otp1.1.zip-a
-
otp1.1.zip-b
-
otp1.1.zip-c
-
-
-
Change directory to the installation directory you created in Step 3.
-
Create the single Solaris 10 Update 2 ISO image.
-
Unzip each of the ISO image zip files.
For example:
# unzip sol-10-u21-ga-sparc-dvd-iso-a.zip
# unzip sol-10-u21-ga-sparc-dvd-iso-b.zip
# unzip sol-10-u21-ga-sparc-dvd-iso-c.zip
# unzip sol-10-u21-ga-sparc-dvd-iso-d.zip
# unzip sol-10-u21-ga-sparc-dvd-iso-e.zip
-
Concatenate the unzipped ISO files to a single ISO image.
For example:
# cat sol-10-u2-ga-sparc-dvd-iso-a sol-10-u2-ga-sparc-dvd-iso-b \
	sol-10-u2-ga-sparc-dvd-iso-c sol-10-u2-ga-sparc-dvd-iso-d \
	sol-10-u2-ga-sparc-dvd-iso-e > sol10u2-ga-sparc-dvd.iso
-
-
Prepare the Solaris 10 Update 2 ISO image.
Use any of the three following three methods to prepare the Solaris 10 Update 2 ISO image for installation on the each server selected for the Open Telecommunications Platform system.
-
Burn the Solaris 10 Update 2 ISO image you created to a DVD-R.
-
Set up a JumpStart server to install Solaris 10 Update 2.
-
Create an empty NFS-mounted directory and then mount the Solaris 10 Update 2 to the NFS-mounted directory as follows:
-
Create an empty directory that will be used as the Solaris 10 Update 2 ISO image mount-point directory. For example: mkdir /sol10u2
-
Add the mount-point directory name to the /etc/dfs/dfstab file.
For example: echo `share -F nfs -o ro,log=global -d "Sol10U2 ISO mount point" /sol10u2' >> /etc/dfs/dfstab
-
Type svcadm restart nfs/server to stop and then restart NFS.
-
Mount the Solaris 10 Update 2 ISO image to the mount-point directory. For example:
mount -F hsfs -o ro `lofiadm -a /otp-download/sol10u2-ga-sparc-dvd.iso` /sol10u2
-
-
-
Create the Open Telecommunications Platform installation directory and files.
-
Concatenate the zipped Open Telecommunications Platform files to a single zip file.
For example:
# cat otp1.1.zip-a otp1.1.zip-b otp1.1.zip-c> otp1.1.zip
-
Unzip the Open Telecommunications Platform zip file you created to create the installation directory and files.
For example:
# unzip otp1.1.zip
The Open Telecommunications Platform installation directory otp1.1 is created.
-
-
Move the otp1.1 directory to the root file system.
For example:
# mv otp1.1 /
-
NFS-mount the /otp1.1 directory.
-
Add the fully-qualified path name of the /otp1.1 installation directory to the /etc/dfs/dfstab file.
For example:
echo `share -F nfs -o ro,log=global -d "OTP 1.1 Installation Directory" /otp1.1' >> /etc/dfs/dfstab
-
Type svcadm restart nfs/server to stop and then restart NFS and NFS-mount the /otp1.1 OTP installation directory.
NFS-mounting the /otp1.1 simplifies setting up the external OTP installation server.
-
Next Steps
Set up the external OTP installation server as described in the next section.
Setting Up the External OTP Installation Server
This section provides the procedures for installing Solaris 10 Update 2 on the external OTP installation server, creating the OTP installation directory, and for installing the OTP OS provisioning plug-in on the external OTP installation server.
The following topics are discussed:
-
To Install Solaris 10 Update 2 on the External OTP Installation Server
-
To Create the OTP Installation Directory on the External OTP Installation Server
 To Install Solaris 10 Update 2 on the External OTP Installation Server
This procedure provides the procedural summary for installation of Solaris 10 Update 2 on the external OTP installation server.
You can use a JumpStart server or the Solaris 10 Update 2 installation DVD-ROM to install the Solaris OS on the external OTP installation server.
Before You Begin
-
Review the following Solaris 10 Update 2 installation guides: Solaris 10 Installation Guide: Basic Installations, and Solaris 10 Installation Guide: Custom JumpStart and Advanced Installations.
-
If the hard drive contains partitions, delete the partitions before installing the Solaris OS.
-
When prompted for the Type of Install, choose Custom Install.
-
When prompted to provide the Ethernet port selections, assign the IP addresses, netmask, and gateway values according to your network architecture.
-
When prompted for the Software Group, choose Entire Distribution Plus OEM.
 Caution –
 If you do not choose Entire Distribution plus OEM, Open Telecommunications Platform installation and configuration will fail.
-
When prompted for disk selection, choose all available disks.
-
When prompted to lay out file systems, partition the system disk according to the requirements listed in Table 3–1.
Next Steps
-
Configure Solaris 10 Update 2 as described in Configuring Solaris 10 Update 2
-
Create the OTP installation directory on the external OTP installation server as described in the next procedure.
 To Create the OTP Installation Directory
on the External OTP Installation Server
Before You Begin
-
The OTP 1.1 installation source must be available, either on DVD-ROM, or as an NFS-mounted directory on a server in your network as described in Downloading and Uncompressing the OTP and Solaris OS Software
-
Solaris 10 Update 2 must be installed on the external OTP installation server
-
Log in as root (su - root) to the external OTP installation server.
-
Create the OTP installation directory /otp1.1.
-
Copy the OTP installation source files to /otp1.1.
-
If you purchased the OTP Installation DVD-ROM, copy the contents of /cdrom/otp_11_dvd/otp1.1 to the /otp1.1 directory. For example:
# cp -r /cdrom/otp_11_dvd/otp1.1/* /otp1.1
-
If you downloaded the OTP installation source to an external download server as described in Downloading and Uncompressing the OTP and Solaris OS Software, copy the contents of the NFS-mounted /otp1.1 directory on the download server to the /otp1.1 on the external OTP installation server.
For example, if the name of the download server is downloads and the domain is mycompany, you would then type:
# cp -r /net/downloads.mycompany/otp1.1/* /otp1.1
-
-
NFS-mount the /otp1.1 directory.
-
Add the fully-qualified path name of the /otp1.1 installation directory to the /etc/dfs/dfstab file.
For example:
share -F nfs -o ro,log=global -d "OTP 1.1 Installation Directory" /otp1.1
This eliminates the need to type long directory path names during installation.
Note –The /otp1.1 directory is referred to throughout this document as the OTP installation directory.
-
Type svcadm restart nfs/server to stop and then restart NFS and NFS-mount the /otp1.1 OTP installation directory.
-
Next Steps
Install the OTP services, agent, and plug-ins as described in the next procedure.
 To Install the OTP Services, Agent, and Plug-ins on
the External OTP Installation Server
Before You Begin
The OTP 1.1 installation source directory must created and NFS-mounted on the external OTP installation server as described in To Create the OTP Installation Directory on the External OTP Installation Server.
-
Log in as root (su - root) to the external OTP installation server.
-
Install the SUNWotpcli package.
Type # pkgadd -d /otp1.1/Products/packages -R / SUNWotpcli.
-
Set up the external installation server.
Type /opt/SUNWotp10/CLI/setupExternalInstallServer /otp1.1
The setupExternalInstallServer script performs the following tasks:
-
Installs the master server and the OTP Application Provisioning Service remote agent
-
Loads the OTP and OSP plug-ins
-
Installs the OSP server and JET Boot/Install server.
-
Changes the default DHCP lease time for Solaris OS provisioning from 5 to 15 minutes.
Wait for the installation process to complete. The installation process can take up to 35 minutes to complete.
-
-
Go to URL http://install server:9090 where install server is either the IP address or the fully qualified name of the external OTP installation server.
If installation was successful, the service provisioning system log in page appears.
-
(Optional) Click change password and change the password on the next page.
Type the default user name and password admin in the user name: and current password: fields.
Type the new password in the new password: and confirm new password: fields, and then click continue to change password.
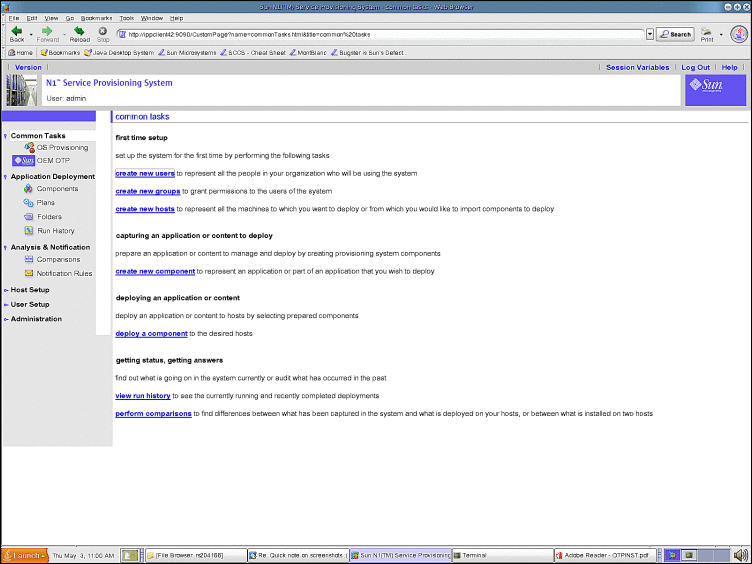
The log in page appears. Log in to the service provisioning system. The Common Tasks page appears.
Figure 3–1 Common Tasks Page
-
Click OEM OTP under Common Tasks in the left menu to display the Open Telecommunications Platform home page.
Figure 3–2 Open Telecommunications Platform Tasks Page

-
Click Plans under Application Deployment to display the plans screen.
If you do not see the plans screen, click change folder and navigate to /com/sun/OTP.
Figure 3–3 Plans Screen
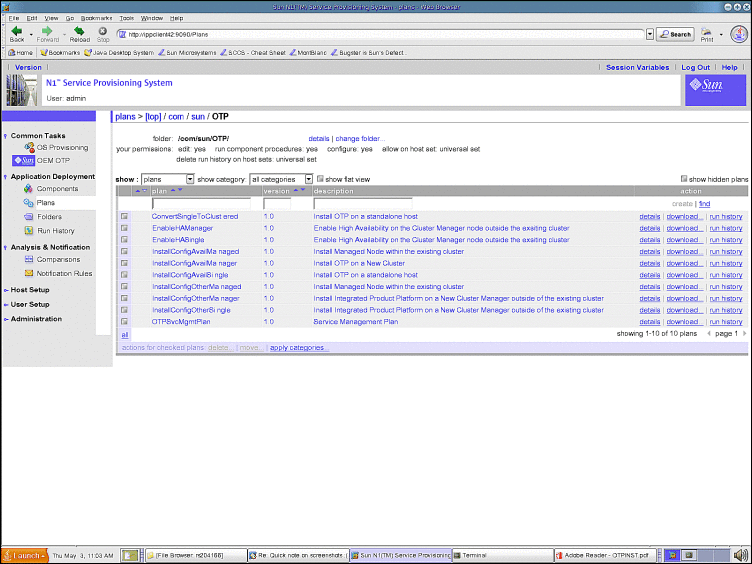
Successful display of the screens verifies installation of the service provisioning system and the Open Telecommunications Platform plug-in.
-
Next Steps
Install Solaris 10 Update 2 on the OTP hosts as described in the next section.
Installing Solaris 10 Update 2 and the Remote Agent on the OTP Hosts
This section provides the procedures for installing Solaris 10 Update 2 on the OTP host or hosts you chose for the OTP system. You must install and configure Solaris 10 Update 2 on each OTP host before you can install the Open Telecommunications Platform.
The following topics are discussed:
Note –
Before you install Solaris 10 Update 2, review the OTP host disk drive partitioning requirements listed in the following table.
If you have chosen to use JumpStart to install the Solaris OS to the OTP host or hosts selected for OTP, also ensure that the JumpStart scripts remove all existing partitions from earch server's hard drive, and that the JumpStart scripts allocate the new partitions on each server's hard drive as described in the following table.
Table 3–1 OTP Host Disk Drive Partition Requirements
|
Slice |
Partition |
Size |
|
0 |
/ (root) |
All remaining free space on the disk after allocating space for slices 2 through 7. |
|
1 |
swap |
Two to three times total system ram, or 4 Gbytes, whichever is greater. |
|
2 |
overlap |
The entire system disk. |
|
3 |
/globaldevices |
512 Mbytes minimum. The OTP high availability framework later assigns this slice a different mount point and mounts the slice as a cluster file system. Note – /globaldevices can reside on any unused slice on any disk on the server. Failure to allocate /globaldevices on an OTP systemwill cause Open Telecommunications Platform to fail. |
|
4 through 6 |
unused |
Not used. |
|
7 |
Solaris Volume Manager |
20 Mbytes Used by Solaris Volume Manager software for the state database replica. |
Manually Installing the Solaris OS and the Remote Agent on a New OTP Host
The following procedure provides the steps for manually installing the Solaris OS and service provisioning remote agent on a new OTP host.
 To Manually Install the Solaris OS and the Remote
Agent on a New OTP Host
-
Install the Solaris OS on the OTP host as described in described in To Install Solaris 10 Update 2 on the External OTP Installation Server.
The requirements and procedures for installing the Solaris OS on a new OTP hostare identical to those for the external OTP installation server.
Note –Ensure that you specify Entire Distribution Plus OEM and that you partition the OTP host disk drive as described in Table 3–1.
-
Log in as root (su - root) to the new OTP host.
-
Configure the Solaris OS on the OTP host as described in Configuring Solaris 10 Update 2.
-
If you did not create the /globaldevices file system on the OTP host, create the file system as described in Creating the /globaldevices File System on the OTP Hosts.
-
Install the SUNWotpcli package on the OTP host.
Type the command:
pkgadd -d /net/OTP_install_server.domain_name/media_path/Products/packages -R / SUNWotpcli
where OTP_install_server is the name of the external OTP installation server, domain_name is your company's domain name, and media_path is the fully qualified path of the OTP installation directory on the external OTP installation server.
For example, if the name of the external OTP installation server is otpsource, your company domain name is mycompany.com, and the OTP installation source directory is otp1.1, you would then type:
# pkgadd -d /net/otpsource.mycompany.com/otp1.1/Products/packages -R / SUNWotpcli
-
Install the service provisioning remote agent on the OTP host.
Type the command
/opt/SUNWotp10/CLI/setupRemoteAgent OTP_installation_directory
where OTP_installation_directory is the fully qualified path to the NFS-mounted OTP installation source directory you created on the external OTP installation server as described in To Create the OTP Installation Directory on the External OTP Installation Server.
For example, if your external OTP installation server is named otpsource, the domain name is mycompany.com, and the NFS-mounted OTP installation directory on otpsource is /otp1.1, you would then type:
# /opt/SUNWotp10/CLI/setupRemoteAgent /net/otpsource.mycompany.com/otp1.1
The setupRemoteAgent script creates the service provisioning user account and installs the remote agent.
Next Steps
When you have completed installing and configuring Solaris 10 Update 2 and the remote agent on each OTP host, install the Open Telecommunications Platform on the OTP host.
-
To install OTP on one or more OTP hosts using the command line, see Chapter 4, Installing the Open Telecommunications Platform For the First Time Using the Command Line
-
To install OTP on one or more OTP hosts using the graphical user interface, see Chapter 5, Installing the Open Telecommunications Platform For the First Time Using the Graphical User Interface
-
To install OTP on one or more OTP hosts using a production standalone or a clustered OTP host, see Chapter 6, Installing the Open Telecommunications Platform Using the Provisioning Service On an Existing OTP System
Installing the Solaris OS and Remote Agent on a New OTP Host Using the External Installation Server OSP Plug-in Graphical User Interface
This section provides the procedures for using the OSP plug-in graphical user interface on the external OTP installation server to install the Solaris OS and the service provisioning remote agent on a new OTP host.
The following topics are discussed:
Note –
The external OTP installation server must already be set up and configured as described in Setting Up the External OTP Installation Server.
 To Create and Register the Subnet
-
Open a Web browser and go to URL http://external OTP installation server:9090 where external OTP installation server is either the IP address or the fully qualified name of the external OTP installation server.
The OTP provisioning service log in screen appears. Log in to the service provisioning system.
-
Click OS Provisioning.
The OS Provisioning screen appears.
-
Scroll down and locate OSP Subnets.
Figure 3–4 OS Provisioning Screen: Selecting OSP Subnets Create

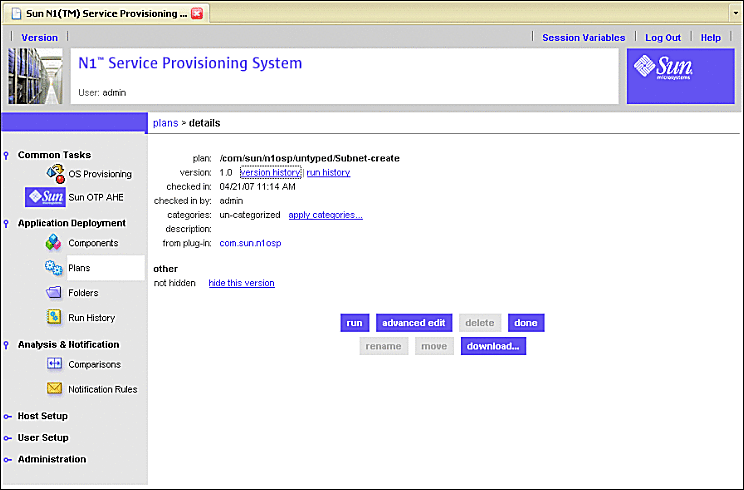
Click Create. The Subnet-create screen appears.
Figure 3–5 Create Subnet Plan Screen
-
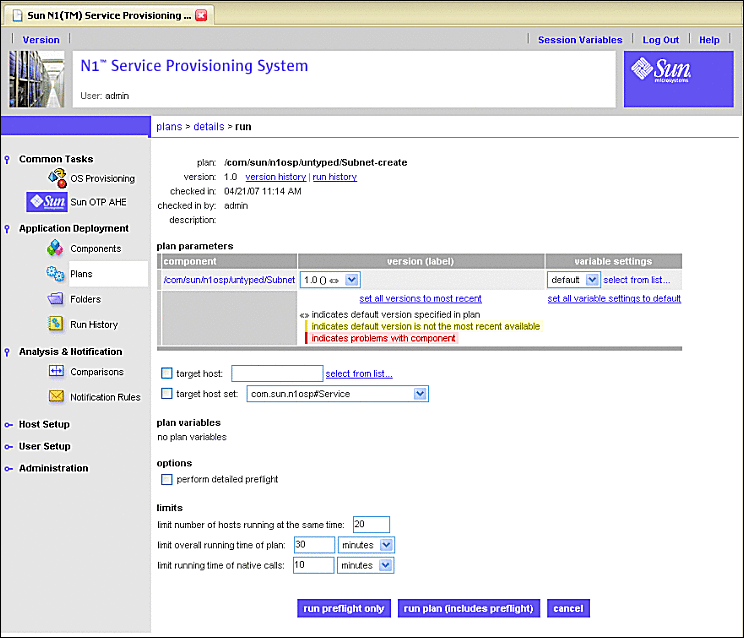
Click run.
The Create Subnet Plan Run screen appears.
Figure 3–6 Create Subnet Plan Run Screen
-
Click select from list... beneath variable settings.
The select variable setting from list... screen appears.
Figure 3–7 Create Subnet Plan: Select Variable Setting From List Screen

-
Click create set in the Variable Setting From List screen as shown by the following figure.
Figure 3–8 Create Subnet Plan: Create Set Screen

When you click create set, the subnet variables screen appears:
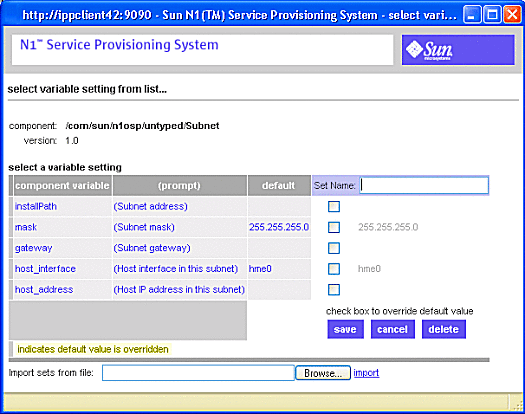
Figure 3–9 Create Subnet Plan: Create Set Variables Screen
-
Enter the values on the Create Set Variables Screen as follows:
-
Type a name for the subnet set in the Set Name field.
For example, subnet53
-
Click the installPath check box.
A text field appears to the right of the check box. Type the base IP address of the subnet.
-
Click the mask check box.
A text field appears to the right of the check box populated with the default subnet mask 255.255.255.0. If needed, type in a different subnet mask in the text field. .
-
Click the gateway check box.
Type the gateway IP address in the text field that appeared.
-
Click the host_interface check box.
Type the name of the external OTP installation server's provisioning interface, for example, bge0. Do not specify the logical interface.
-
Click the host_address check box.
Type the IP address of the provisioning interface..
The Create Set Variables screen should be similar to the following:
Figure 3–10 Create Subnet Plan: Example of Completed Create Set Variables Screen

-
Click save.
The Create Set Variables Screen refreshes and displays your entries:
Figure 3–11 Create Subnet Plan: Example of Saved Create Set Variables Screen

-
Click the right-most select button.
The Create Set Variables screen closes. and the Subnet Plan Run Screen is updated.
If the variable settings field does not display the plan set you created, click select from list... and click the name of the set you created.
-
-
Click on the target host field select from list... link on the Subnet Plan Run screen as shown by the following figure.
Figure 3–12 Create Subnet Plan: Selecting Target Host Select From List
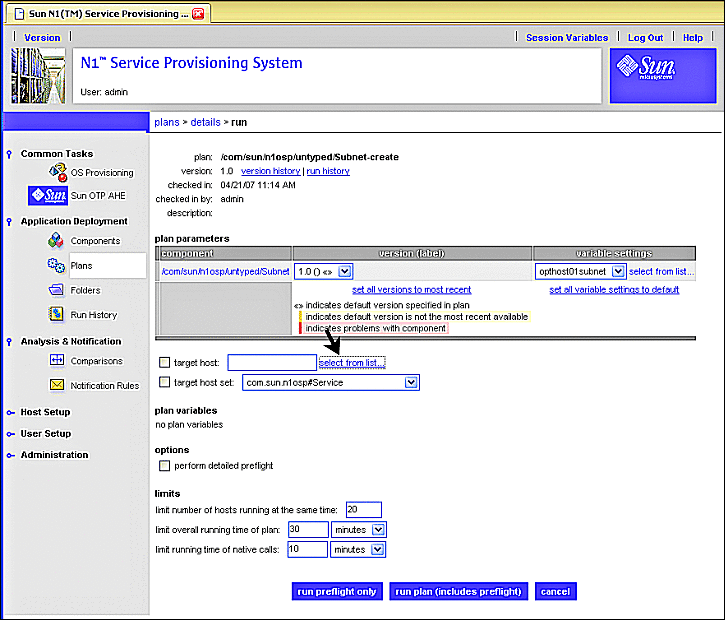
When you click the target host select from list... link, the target host select from list screen appears:
Figure 3–13 Create Subnet Plan: Target Host Select From List Screen

-
Click masterserver-osp, then click add hosts to main window.
The Target Host Select From List screen closes, and the target host field on the Subnet Plan Run screen is populated with masterserver-osp.
-
Click run plan (includes preflight).
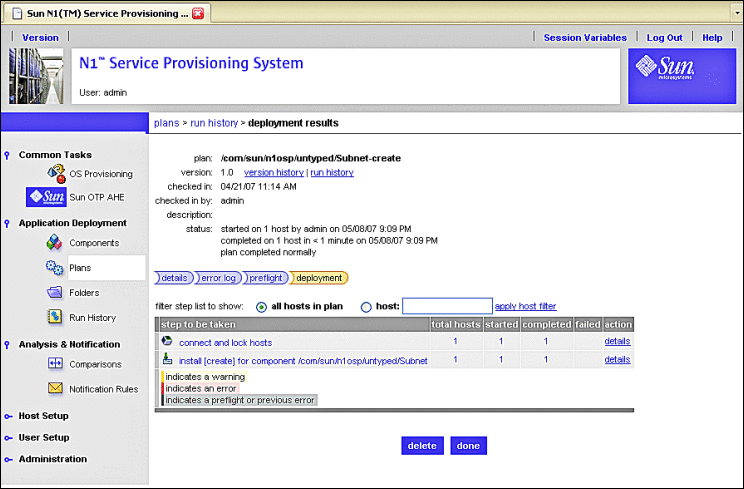
Several screens are displayed as the plan runs. When the plan completes, the deployment results screen appears. Your screen should be similar to the following example.
Figure 3–14 Create Subnet Plan: Example Deployment Results
-
Click done.
Next Steps
Create the Solaris 10 Update 2 image as described in the next procedure.
 To Create the Solaris 10 Update 2 Image
-
Open a Web browser and go to URL http://external OTP installation server:9090 where external OTP installation server is either the IP address or the fully qualified name of the external OTP installation server.
The OTP provisioning service log in screen appears. Log in to the service provisioning system.
-
Click OS Provisioning.
The OS Provisioning screen appears:
Figure 3–15 OS Provisioning Screen: Selecting Solaris Images Import

-
Click the Solaris Images Import link.
The Solaris Image Import plans screen appears.
Figure 3–16 Solaris Images Import Plan Screen
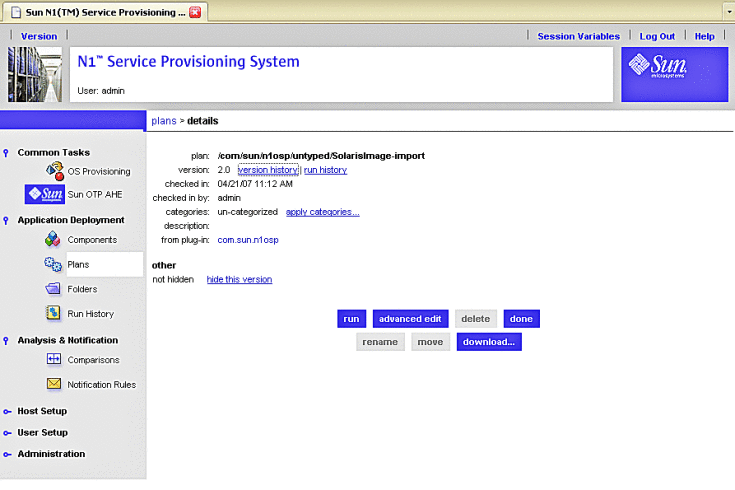
-
Click run.
The Solaris Image Plan Variables screen appears.
Figure 3–17 Solaris Images Import Plan Variables Screen

-
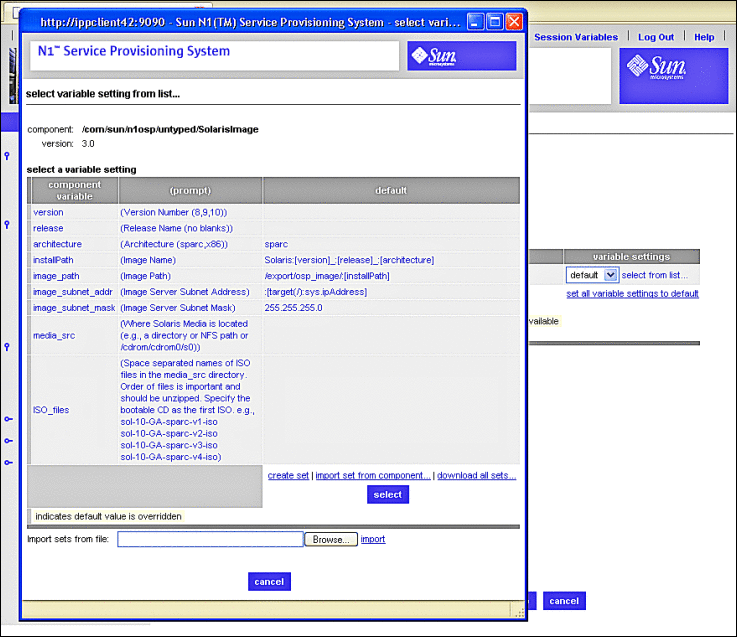
Click select from list... beneath variable settings.
The select variable setting from list... screen appears.
Figure 3–18 Solaris Images Select Variable Setting From List Screen
-
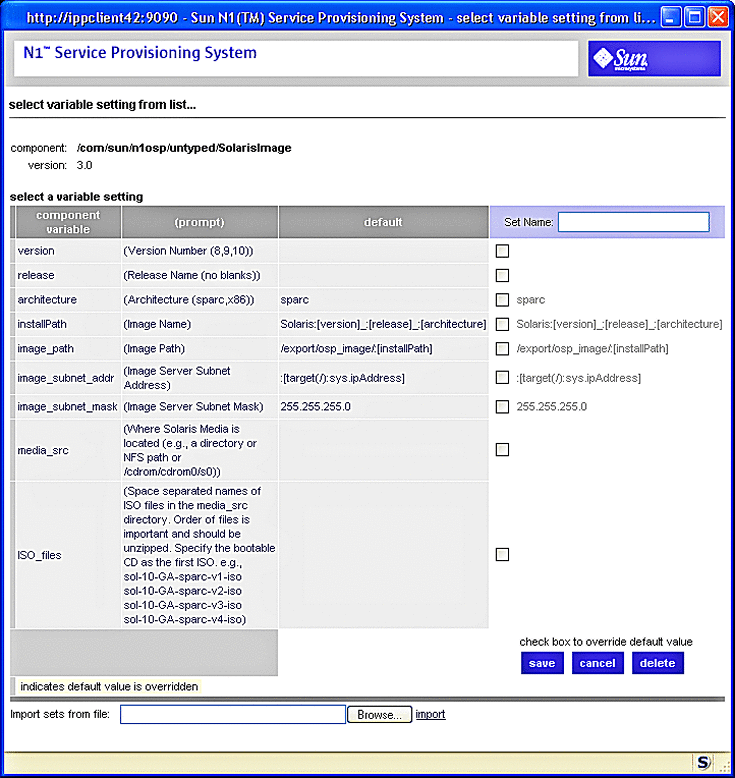
Click create set in the Select Variable Setting From List screen.
The Solaris Images Create Set variables screen appears:
Figure 3–19 Solaris Images Create Set Variables Screen
-
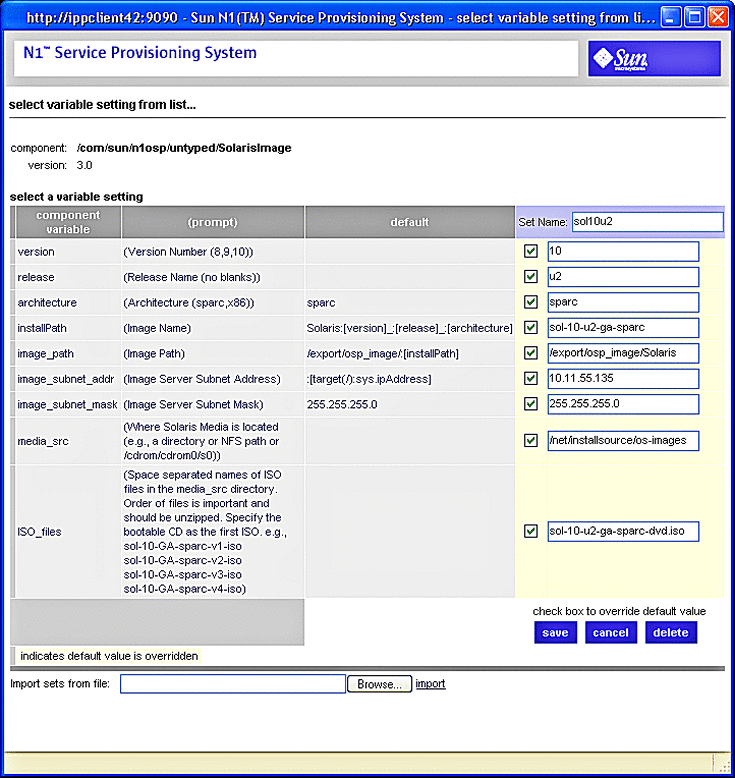
Enter the values on the Solaris Images Create Set Variables Screen as follows:
-
Type a name for the Solaris OS image in the Set Name field.
For example, sol10u2. The name must start with an alphabetic character.
-
Click the version check box.
A text field appears to the right of the check box. Type the Solaris OS version number, for example, 10.
-
Click the release check box.
A text field appears to the right of the check box. Type the Solaris release version, for example u2.
-
Click the architecture check box.
The text field is populated with the default value sparc.
-
Click the installPath check box.
Type the name of the Solaris OS image, for example sol-10–u2–ga-sparc
-
Click the image_path check box.
Type the full path to which to the Solaris OS ISO image will be copied. This can be a shared file system on the external OTP installation server or an shared file system on a clustered OTP host.
-
Click the image_subnet_addr check box.
Type the IP address of the server on which the OS image is to be copied.
-
Click the image_subnet_mask check box.
A text field appears to the right of the check box populated with the default subnet mask 255.255.255.0. If needed, type in a different subnet mask in the text field. .
-
Click the media_src check box.
Type the full path to the source Solaris OS image. This can be an NFS-mounted ISO image as described in To Download and Uncompress the OTP and Solaris OS Installation Zip Files.
-
Click the ISO_files check box.
Type the names of the Solaris OS ISO files as directed.
The Solaris Images Create Set Variables Screen should be similar to the following example:
Figure 3–20 Solaris Images: Example Create Set Variables Screen
-
Click save.
The Create Set Variables Screen refreshes and displays your entries
-
Click the right-most select button.
The Create Set Variables screen closes. and the Solaris Images Plan Run Screen is updated.
If the variable settings field does not display the plan set you created, click select from list... and click the name of the set you created.
-
-
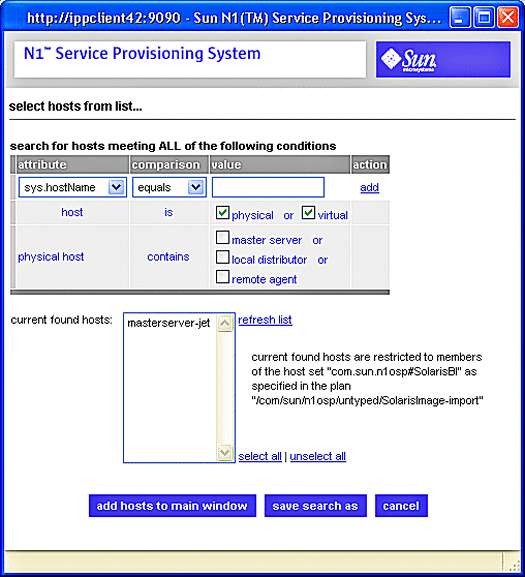
Click on the target host field select from list... link on the Solaris Images Plan Run screen.
The target host select from list screen appears:
Figure 3–21 Solaris Images Target Host Select From List Screen
-
Click masterserver-jet, then click add hosts to main window.
The Target Host Select From List screen closes, and the target host field on the Solaris Images Plan Run screen is populated with masterserver-jet.
-
Change limit overall running time of plan to two hours.
-
Change limit running time of native calls to two hours.
-
Click run plan (includes preflight).
The Solaris Images plan will take about an hour to complete. When the plan completes, the deployment results screen appears.
-
Click done.
Next Steps
Create the Solaris OS provisioning profile as described in the next procedure.
 To Create the Solaris OS Provisioning Profile
-
Log in as root (su - root) to the external OTP installation server.
-
Type the following command to populate the custom packages with the appropriate JET path:
/opt/SUNWjet/bin/copy_custom_packages /OTP_media_path/Products/packages sparc SUNWotpra SUNWotpcli SUNWotputil
where /OTP_media_path is the fully-qualifed path to the OTP installation directory you created in To Create the OTP Installation Directory on the External OTP Installation Server. For example:
# /opt/SUNWjet/bin/copy_custom_packages \
/otp1.1/Products/packages sparc SUNWotpra SUNWotpcli SUNWotputil
The media is copied to the directory /export/install/pkgs/custom/sparc by default. To change the default directory, modify the setting in /opt/SUNWjet/etc/jumpstart.conf.
For further information, see Chapter 5, Provisioning the Solaris Operating System, in Sun N1 Service Provisioning System User’s Guide for OS Provisioning Plug-In 3.1.
-
Open a Web browser and go to URL http://external OTP installation server:9090 where external OTP installation server is either the IP address or the fully qualified name of the external OTP installation server.
The OTP provisioning service log in screen appears. Log in to the service provisioning system.
-
Click OS Provisioning.
The OS Provisioning screen appears.
-
Click the Solaris Images Create Profile link.
The Create Profile run screen appears.
-
Click run.
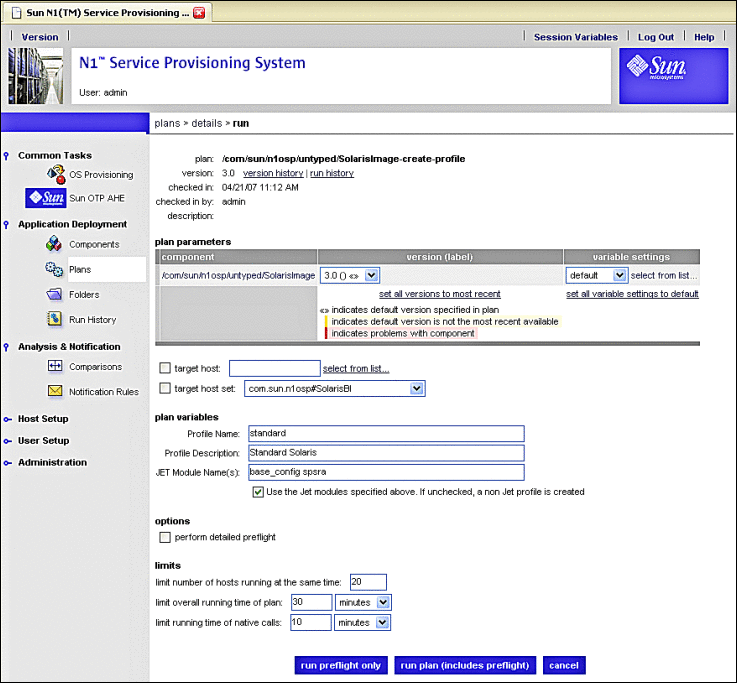
The Create Profile variable settings run screen appears.
Figure 3–22 Create OS Profile Plan Variable Settings Run Screen
-
Click the drop-down list beneath variable settings, and choose the OS image you created in the previous procedure.
For example, sol10u2.
-
Click on the target host field select from list... link on the Solaris Images Plan Run screen.
The target host select from list screen appears.
-
Click masterserver-jet, then click add hosts to main window.
The Target Host Select From List screen closes, and the target host field on the Solaris Images Plan Run screen is populated with masterserver-jet.
-
Add custom to the text in the JET Module Name(s) field.
Ensure that the check box beneath the JET Module Name(s) field is checked.
The custom module ensures that the service provisioning remote agent is installed to the new OTP host after OS installation has completed.
The Create OS Profile Plan run screen should be similar to the following example:
Figure 3–23 Create OS Profile Plan Variable Settings Run Screen Example

-
Click run plan (includes preflight).
The Create OS Profile plan will take a few minutes to complete. When the plan completes, the deployment results screen appears.
-
Click done.
Next Steps
Create the ALOM target host as described in the next procedure.
 To Create the ALOM Target Host
-
Open a Web browser and go to URL http://external OTP installation server:9090 where external OTP installation server is either the IP address or the fully qualified name of the external OTP installation server.
The OTP provisioning service log in screen appears. Log in to the service provisioning system.
-
Click OS Provisioning.
The OS Provisioning screen appears.
-
Click the Sun ALOM Target Create link.
The Create ALOM Targets run screen appears.
-
Click run.
The Create ALOM Targets variable settings run screen appears.
Figure 3–24 Create ALOM Target Variable Settings Run Screen

-
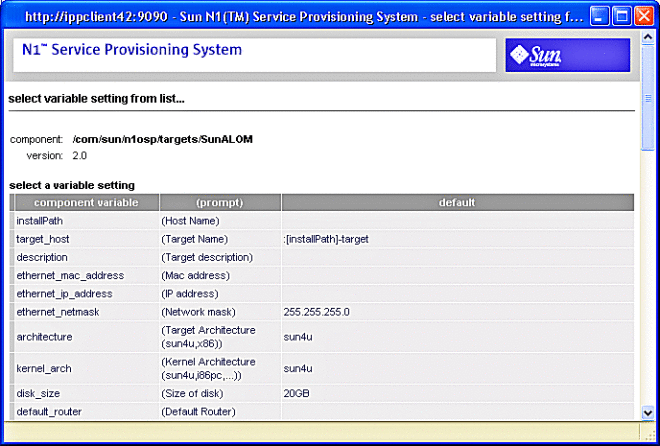
Click select from list... beneath variable settings.
The select variable setting from list... screen appears.
Figure 3–25 Create ALOM Target Select Variable Settings Screen
-
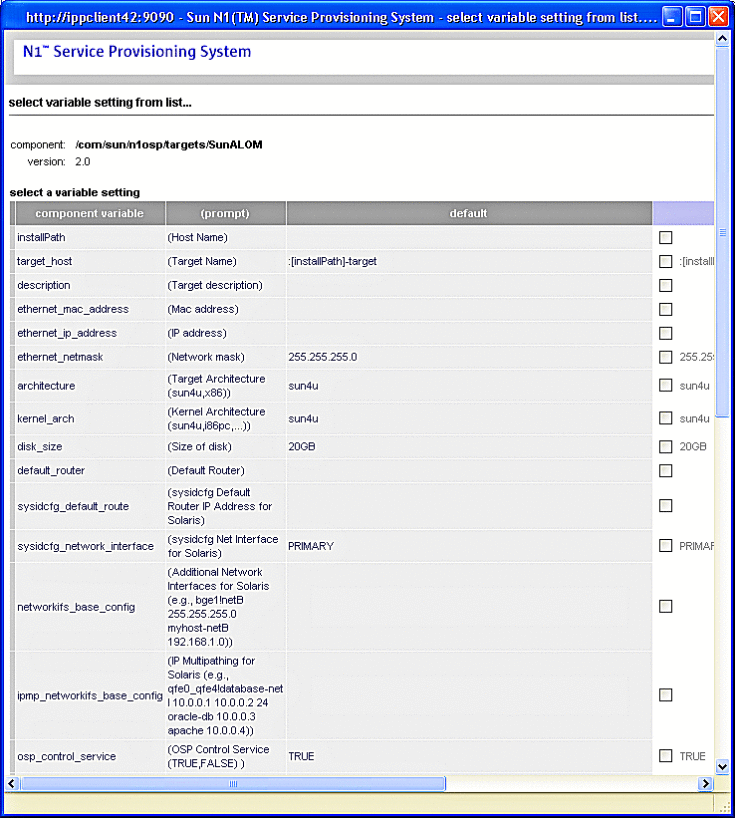
Scroll to the bottom of the select variable settings screen and click create set.
The Create ALOM Target Create Set variables screen appears:
Figure 3–26 Create ALOM Target Create Set Variables Screen
-
Enter the values on the Create ALOM Target Create Set Variables Screen as follows.
Scroll as needed, and click check boxes to activate text entry fields.
The following list describes only the required fields. All other fields are optional.
- Set Name
-
Type a name for the ALOM target in the Set Name field.
For example, otphost01. The name must start with an alphabetic character.
- installPath
-
The name to be assigned to the new OTP host.
- ethernet_mac_address
-
The MAC address of the new OTP host.
- ethernet_ip_address
-
The IP address of the primary Ethernet port of the new OTP host.
- disk_size
-
(Optional) The size of the new OTP host hard drive in Gbytes.
- default_router
-
(Optional) The IP address of the default router for the subnet to which the new OTP host is assigned.
- alom_ip_address
-
The IP address assigned to the service processor of the new OTP host.
- alom_access_userid
-
The ALOM user account name.
- alom_access_password
-
The encrypted ALOM user account password.
Create the encrypted password as described in Password Encryption in Sun N1 Service Provisioning System User’s Guide for OS Provisioning Plug-In 3.1. For example:
# /opt/SUNWn1osp/sbin/n1osp_encrypter admin
	Encrypted Text: Clz6pK2b6qw=
-
Click save.
The ALOM Target Create Set Variables screen refreshes and displays the values you entered.
-
Click the right-most select button.
The Create Set Variables screen closes. and the Create ALOM Target Variable Settings Plan Run Screen is updated.
If the variable settings field does not display the plan set you created, click select from list... and click the name of the set you created.
-
Click on the target host field select from list... link on the Settings Plan Run screen.
The target host select from list screen appears.
-
Click masterserver-osp, and then click add hosts to main window.
The Target Host Select From List screen closes, and the target host field on the Solaris Images Plan Run screen is populated with masterserver-osp.
-
Under plan variables, click the check box If you are specifying the ALOM password below.
Type the ALOM password in the Password to access ALOM: field.
-
Click run plan (includes preflight).
The Create ALOM Target plan will take about a minute to complete. When the plan completes, the deployment results screen appears.
-
Click done.
Next Steps
Install the Solaris OS on the new OTP host as described in the next procedure.
 To Install the Solaris OS on a New OTP Host
-
Open a Web browser and go to URL http://external OTP installation server:9090 where external OTP installation server is either the IP address or the fully qualified name of the external OTP installation server.
The OTP provisioning service log in screen appears. Log in to the service provisioning system.
-
Click OS Provisioning.
The OS Provisioning screen appears.
-
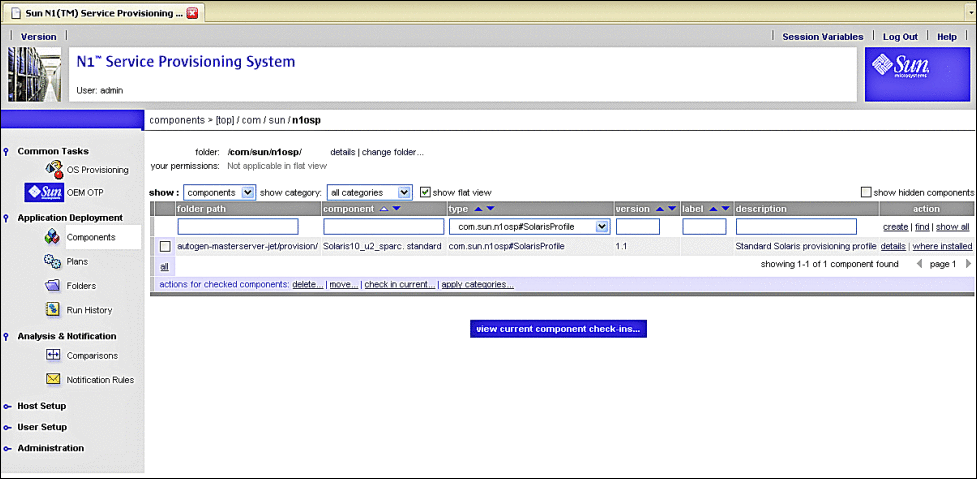
Click the Solaris Images Provision OS** link.
The components screen appears.
Figure 3–27 OS Provisioning Components Screen
-
Click Solaris10_u2_sparc. standard or Standard Solaris provisioning profile.
The Components Details screen appears.
Figure 3–28 OS Provisioning Component Details Screen

-
Scroll to the bottom and click run as shown by the following figure.
Figure 3–29 OS Provisioning Component Details Screen, Selecting Run
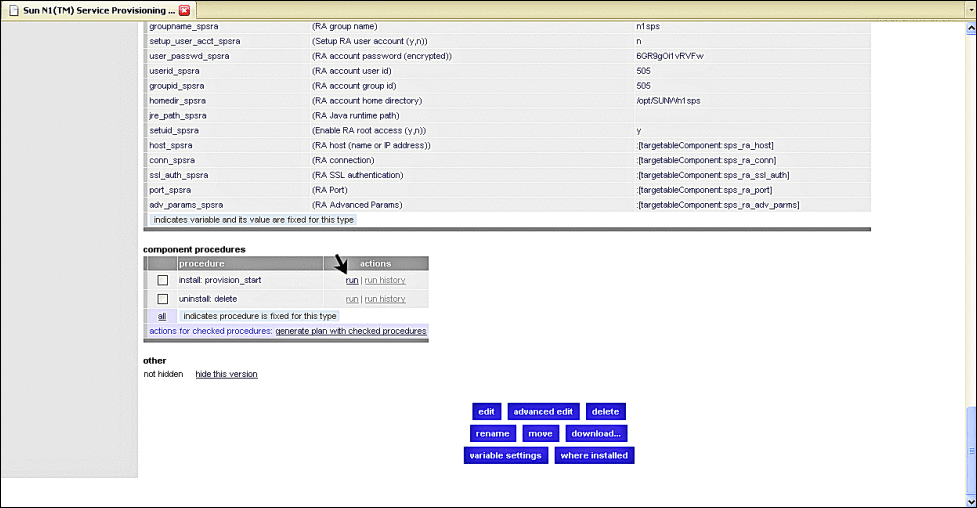
The Plans Details Run screen appears.
Figure 3–30 OS Provisioning Plans Details Run Screen

-
Click select from list... beneath variable settings.
The select variable setting from list... screen appears.
-
Scroll to the bottom of the select variable setting from list screen and click create set.
The create set variables screen appears.
Figure 3–31 OS Provisioning Create Set Variables Screen

-
Enter the values on the Create OS Provisioning Set Variables Screen as follows:
The following list describes only the required fields. All other fields are optional.
-
Type a name for the OS Provisioning variables set in the Set Name field.
For example, otpclient35–set. The name must start with an alphabetic character.
-
Click the profile_cluster_base_config check box.
Type SUNWCXall in the field to install Entire Distribution plus OEM.
-
Make certain that the profile_del_cluster_base_config check box is unchecked.
-
Click the profile_swap_base_config check box.
Type 4096 in the field.
-
Click the profile_s3_mtpt_base_config check box.
Type /globaldevices in the field.
-
Click the profile_s3_size_base_config check box.
Type 512 in the field.
-
Click the profile_s5_mtpt_base_config check box.
Clear the field.
-
Click the profile_s6_mtpt_base_config check box.
Clear the field.
-
Click the profile_s7_mtpt_base_config check box.
Clear the field.
-
Click the profile_s7_size_base_config check box.
Type 128 in the field.
-
Click the sysidcfg_root_password_base_config check box.
Copy and paste the encrypted root password from the file /etc/shadow in to the field.
For further information about generating and entering encrypted passwords, see Password Encryption in Sun N1 Service Provisioning System User’s Guide for OS Provisioning Plug-In 3.1.
-
Click the install_spsra and setuid_spsra check boxes.
Type n in both fields to prevent installation of the service provisioning remote agent. The remote agent is installed at a later point.
-
Click the packages_m_custom check box.
Note –This key is displayed only if the JET server custom modules were included in the OS Profile.
Type SUNWotpra SUNWotpcli SUNWotputil to install the required OTP packages.
The SUNWotpra package is required in order to install the remote agent after the Solaris OS installation completes.
-
-
Click save.
-
Click the right-most select button.
The create set screen closes, and the variable set name you created is displayed in the OS Provisioning Plans Details Run screen variable settings field.
-
Click on the target host field select from list... link on the Settings Plan Run screen.
The select hosts from list screen appears.
-
Click the names of the hosts you want to jumpstart.
-
Click add hosts to main window.
The select hosts from list screen closes, and the hosts you selected are added to the Plans Details Run screen.
-
Click run plan (includes preflight).
The OS provisioning plan will take a few minutes to complete. OS provisioning takes about a hour to complete.
To check the OS provisioning status:
-
In the Common Tasks section of the N1 SPS browser interface, select OS Provisioning.
-
On the OS Provisioning Common Tasks page, click Status in the OS Provisioning Administration Tasks section.
-
On the Plans Details page, click Run.
-
On the Plan Details Run page, select the OTP host on which you provisioned the OS.
-
Click run plan (includes preflight).
-
Follow the Details links to view the status.
When the plan completes, the results screen appears. Click Done.
Note –The OSP plug-in also installs the SUNWotpra, SUNWotpcli, and SUNWotputil packages. You do not need to add the SUNWotpcli package or setup the remote agent on the target host as these steps are done as part of the post OS installation processing by the OSP plug-in.
-
Next Steps
-
Configure the Solaris OS on the OTP host as described in Configuring Solaris 10 Update 2.
-
If you did not create the /globaldevices file system on the OTP host, create the file system as described in Creating the /globaldevices File System on the OTP Hosts.
-
If the OTP host is a Sun Fire T2000, install the OTP patches on the OTP host as described in Installing the Open Telecommunications Platform Patches On Sun Fire T2000 Servers.
When you have completed configuring Solaris 10 Update 2 on each new OTP host, install the Open Telecommunications Platform on the OTP host.
-
To install OTP on one or more OTP hosts using the command line, see Chapter 4, Installing the Open Telecommunications Platform For the First Time Using the Command Line
-
To install OTP on one or more OTP hosts using the graphical user interface, see Chapter 5, Installing the Open Telecommunications Platform For the First Time Using the Graphical User Interface
-
To install OTP on one or more OTP hosts using a production standalone or clustered OTP system, see Chapter 6, Installing the Open Telecommunications Platform Using the Provisioning Service On an Existing OTP System
Installing the Solaris OS and Remote Agent on a New OTP Host Using the External Installation Server OSP Plug-in Command Line Interface
This section provides the procedures for using the OSP plug-in command line interface on the external OTP installation server to install the Solaris OS and the service provisioning remote agent on a new OTP host.
The following topics are discussed:
Tip –
Add /var/otp/spsotp/N1_Service_Provisioning_System_5.2/cli/bin to the root account PATH statement before performing the following procedures. Type rehash after you have set the path.
The following procedures assume you have added /var/otp/spsotp/N1_Service_Provisioning_System_5.2/cli/bin to the root account PATH statement in the root account initialization script.
 To Create and Register the Subnet
For detailed instructions, Creating and Registering the Subnet in Sun N1 Service Provisioning System User’s Guide for OS Provisioning Plug-In 3.1.
-
Log in as root (su - root) to the external OTP installation server.
-
Create the subnet variable list.
Type the command
cr_cli -cmd cdb.vs.add -comp NM:/com/sun/n1osp/untyped/Subnet -name "subnet_name" -u admin -p admin -vars "installPath=install path IP adddress;mask=subnet mask IP address;gateway=gateway IP address;host_interface=interface name;host_address=host IP address"
where:
-
subnet_name is the name of the subnet , for example subnet53
-
install path IP adddress is the base IP address of the subnet, for example 10.11.53.0.
-
subnet mask IP addressis the subnet mask, for example 255.255.255.0.
-
gateway IP address is the subnet gateway IP address, for example 10.11.53.1.
-
interface name is the name of the provisioning interface of the external OTP installation server, for example bge0. Do not specify the logical interface.
-
host IP address is the IP address of the provisioning interface, for example 10.11.53.200.
-
-
Initialize the subnet.
Type the command
cr_cli -cmd pe.p.run -u admin -p admin -PID NM:/com/sun/n1osp/untyped/Subnet-create -tar H:NM:masterserver-osp -comp - -vs subnet_name -pto 30 -nto 10
where subnet_name is the name of the subnet , for example subnet53.
Next Steps
Create the Solaris 10 Update 2 image as described in the next procedure.
 To Create the Solaris 10 Update 2 Image
For detailed instructions, see Creating Solaris Images and Profiles in Sun N1 Service Provisioning System User’s Guide for OS Provisioning Plug-In 3.1.
-
Log in as root (su - root) to the external OTP installation server.
-
Create the Solaris OS image import variable list.
Type the command
cr_cli -cmd cdb.vs.add -comp NM:/com/sun/n1osp/untyped/SolarisImage -name "image name" -u admin -p admin -vars "version=OS version;release=OS release;architecture=architecture;image_subnet_addr=image subnet adress;image_subnet_mask=subnet mask;media_src=media_source;ISO_files=OS ISO file name"
where:
-
image name is the name assigned to the imported Solaris OS image, for example s10u2.
-
OS version is the Solaris OS version number, for example 10.
-
OS release is the Solaris OS release, for example u2.
-
architecture is the platform architecture for the Solaris OS, for example sparc
-
image subnet adress is the IP address of the server on which the OS image is to be copied, for example 10.11.53.200.
-
subnet mask is the subnet mask IP address, for example 255.255.255.0.
-
media_source is the full path to the source Solaris OS image. This can be an NFS-mounted ISO image as described in To Download and Uncompress the OTP and Solaris OS Installation Zip Files
-
OS ISO file name is the name of Solaris OS ISO image, for example sol-10-u2-ga-sparc-dvd.iso
-
-
Import the Solaris OS image.
Type cr_cli -cmd pe.p.run -u admin -p admin -PID NM:/com/sun/n1osp/untyped/SolarisImage-import -tar H:NM:masterserver-jet -comp + -vs s10u2 -pto 300 -nto 100 where s10u2 is the name you assigned to the import image in the previous step.
Next Steps
Create the Solaris OS provisioning profile as described in the next step.
 To Create the Solaris OS Provisioning Profile
-
Log in as root (su - root) to the external OTP installation server.
-
Type the following command to populate the custom packages with the appropriate JET path:
/opt/SUNWjet/bin/copy_custom_packages /OTP_media_path/Products/packages sparc SUNWotpra SUNWotpcli SUNWotputil
where /OTP_media_path is the fully-qualifed path to the OTP installation directory you created in To Create the OTP Installation Directory on the External OTP Installation Server. For example:
# /opt/SUNWjet/bin/copy_custom_packages \
/otp1.1/Products/packages sparc SUNWotpra SUNWotpcli SUNWotputil
The media is copied to the directory /export/install/pkgs/custom/sparc by default. To change the default directory, modify the setting in /opt/SUNWjet/etc/jumpstart.conf.
For further information, see Chapter 5, Provisioning the Solaris Operating System, in Sun N1 Service Provisioning System User’s Guide for OS Provisioning Plug-In 3.1.
-
Create the file /tmp/solaris-profile with the following text.
standard
Standard Solaris
base_config spsra custom
true
Save and close the file.
-
Type the following command to create the OS profile.
# cr_cli -cmd pe.p.run -u admin -p admin \
-PID NM:/com/sun/n1osp/untyped/SolarisImage-create-profile \
-tar H:NM:masterserver-jet -comp + -vs s10u2  -pto 300 -nto 300 \
-f /tmp/solaris-profile
For further information, see Creating Solaris Images and Profiles in Sun N1 Service Provisioning System User’s Guide for OS Provisioning Plug-In 3.1.
Note –Ensure that the provisioning profiles specify Entire Distribution Plus OEM and that the profiles partition the OTP host disk drive as described in Table 3–1.
Next Steps
Create the ALOM target host as described in the next procedure.
 To Create the ALOM Target Host
-
Log in as root (su - root) to the external OTP installation server.
-
Create the encrypted password for the ALOM account.
Create the encrypted password as described in Password Encryption in Sun N1 Service Provisioning System User’s Guide for OS Provisioning Plug-In 3.1. For example, if the ALOM account password is admin, you would type:
# /opt/SUNWn1osp/sbin/n1osp_encrypter admin
	Encrypted Text: Clz6pK2b6qw=
You will need the encrypted password in the next step.
-
Type the following command to create the ALOM target host variable set.
cr_cli -cmd cdb.vs.add -comp NM:/com/sun/n1osp/targets/SunALOM -name "new OTP host name" -u admin -p admin -vars "installPath=new OTP host name;ethernet_mac_address=MAC address1;ethernet_ip_address=IP address; alom_ip_address=ALOM IP address;alom_access_userid=admin;alom_access_password=encrypted password" where:
-
new OTP host name is the name of the new OTP host
-
MAC address is the new OTP host MAC address
-
IP address is the new OTP host provisioning interface IP address
-
ALOM IP address is the ALOM interface IP address
-
encrypted password is the encrypted password you generated in the previous step
For example
# cr_cli -cmd cdb.vs.add -comp NM:/com/sun/n1osp/targets/SunALOM \
-name "pcl1-ipp1" -u admin -p admin \
-vars "installPath=pcl1-ipp1;ethernet_mac_address=0:3:ba:9:6a:51;\
ethernet_ip_address=10.11.52.61;\alom_ip_address=10.11.52.51;\
alom_access_userid=admin;alom_access_password=Clz6pK2b6qw="
-
-
Create the file /tmp/OTP hostname.
For example, /tmp/pcl1-ipp1
Add the following four lines to the file.
true
admin
false
admin
The second line is the password for the new OTP host ALOM. The fourth line is the password for the external OTP installation server.
Save and close the file.
-
Type the following command to create the ALOM target.
#  cr_cli -cmd pe.p.run -u admin -p admin \
-PID NM:/com/sun/n1osp/targets/SunALOM-create \
-tar H:NM:masterserver-osp -comp + -vs pcl1-ipp1 -pto 300 \
-nto 100 -f /tmp/OTP hostname
where OTP hostname is the name of the file you created in the previous step.
For detailed information, see Example Tasks for Defining Target Hosts in Sun N1 Service Provisioning System User’s Guide for OS Provisioning Plug-In 3.1 and Sun ALOM Target Host Variables in Sun N1 Service Provisioning System User’s Guide for OS Provisioning Plug-In 3.1.
Next Steps
Install the Solaris OS on the new OTP host as described in the next procedure.
 To Install the Solaris OS on a New OTP Host
-
Log in as root (su - root) to the external OTP installation server.
-
Type the following command to create the OS provisioning variables set.
# cr_cli -cmd cdb.vs.add \
-comp NM:/com/sun/n1osp/autogen-masterserver-jet/provision/Solaris10_u2_sparc.standard \
-name "variables set name" -u admin -p admin \
-vars "sysidcfg_default_route_base_config=default router IP address;\
sysidcfg_root_password_base_config=encryped OTP host password;\
profile_cluster_base_config=SUNWCXall;profile_del_clusters_base_config=;\
profile_swap_base_config=4096;profile_s3_mtpt_base_config=/globaldevices;\
profile_s3_size_base_config=512;profile_s5_mtpt_base_config=;\
profile_s6_mtpt_base_config=;profile_s7_mtpt_base_config=;\
profile_s7_size_base_config=128;install_spsra=n;setuid_spsra=n;\
packages_m_custom=SUNWotpra SUNWotpcli SUNWotputil
where
-
variables set name is the name to be assigned to the variables set, for example sfv240–target.
-
default router IP address is the IP address of the default router, for example 10.11.12.0.
-
encryped OTP host password is the encrypted password, which can be copied from the file /etc/shadow.
-
-
Type the following command to provision the OS to the new OTP host.
# cr_cli -cmd pe.p.run -u admin -p admin -PID \
NM:/com/sun/n1osp/autogen-masterserver-jet/provision/SolarisProfile-provision-start-Solaris10_u2_sparc.standard \
-tar H:NM:variables set name -comp + -vs new OTP host host name -pto 600 -nto 600
where variables set name is the name you assigned to the variables set in the previous step, and new OTP host host name is the name of the new OTP host to which the OS is to be provisioned.
Repeat this step for each new OTP host.
For detailed instructions, see Installing the Solaris OS on the Target Host in Sun N1 Service Provisioning System User’s Guide for OS Provisioning Plug-In 3.1 and Appendix B, Solaris Profile Component Variables, in Sun N1 Service Provisioning System User’s Guide for OS Provisioning Plug-In 3.1
Note –The OSP plug-in also installs the SUNWotpra, SUNWotpcli, and SUNWotputil packages. You do not need to add the SUNWotpcli package or setup the remote agent on the target host as these steps are done as part of the post OS installation processing by the OSP plug-in.
Next Steps
-
Configure the Solaris OS on the OTP host as described in Configuring Solaris 10 Update 2.
-
If you did not create the /globaldevices file system on the OTP host, create the file system as described in Creating the /globaldevices File System on the OTP Hosts.
-
If the OTP host is a Sun Fire T2000, install the OTP patches on the OTP host as described in Installing the Open Telecommunications Platform Patches On Sun Fire T2000 Servers.
When you have completed installing and configuring Solaris 10 Update 2 on each OTP host, install the Open Telecommunications Platform on the OTP host.
-
To install OTP on one or more OTP hosts using the command line, see Chapter 4, Installing the Open Telecommunications Platform For the First Time Using the Command Line
-
To install OTP on one or more OTP hosts using the graphical user interface, see Chapter 5, Installing the Open Telecommunications Platform For the First Time Using the Graphical User Interface
-
To install OTP on one or more OTP hosts using a production standalone or clustered OTP system, see Chapter 6, Installing the Open Telecommunications Platform Using the Provisioning Service On an Existing OTP System
Configuring Solaris 10 Update 2
After completing installation of Solaris 10 Update 2 on the external OTP installation server or on an OTP host, you must configure Solaris 10 Update 2 as described in the following procedures before you can install the Open Telecommunications Platform on the OTP host.
 To Update the /etc/default/nfs file
The Open Telecommunications Platform supports only NFS version 3. To ensure system integrity and availability, update the /etc/default/nfs file as follows:
-
log in as root (su - root) to the server.
-
Add the following line to the file /etc/default/nfs:
NFS_SERVER_VERSMAX=3
-
Save and close the /etc/default/nfs file.
Next Steps
Update the /etc/hosts file as described in the next procedure.
 To Update the /etc/hosts file
The IP address and the name of the server must be added to the /etc/hosts on that server. Failure to add the IP address and name will cause Open Telecommunications Platform installation to fail.
-
Log in as root (su - root) to the server.
-
Verify that the /etc/hosts file has entries for loopback and the server primary and secondary Ethernet interfaces.
-
Make certain that either of the following loopback entries is in the /etc/hosts file.
127.0.0.1 localhost
or
127.0.0.1 localhost.localdomain localhost
-
Make certain that an entry exists for the server primary and secondary Ethernet IP address.
For example:
111.11.111.11 server_name_interface1.domain_name
111.11.111.22 server_name_interface2.domain_name
where:
-
111.11.111.11 is the IP address of the primary Ethernet interface
-
server_name_interface1 is the primary name of the server being configured such as the external OTP installation server, the first OTP host, or the additional OTP host
-
111.11.111.22 is the IP address of the secondary Ethernet interface
-
server_name_interface2 is the secondary name of the server being configured
-
domain_name is your corporate domain name
The /etc/hosts should be similar to the following example.
127.0.0.1    localhost.localdomain    localhost
10.11.123.15 management-server.company.com
10.11.123.16 management-server-port2.company.com
-
-
Save and close the /etc/hosts file.
-
-
Reboot the server.
Next Steps
Ensure port 162 is not in use as described in the next procedure.
 To Determine Whether Port 162 is in use
The OTP system management service requires exclusive use of port 162 for SNMP trap notifications. To determine if port 162 is assigned to any process, proceed as follows:
-
log in as root (su - root) to the server.
-
Type grep 162 /etc/services to determine whether port 162 has been assigned to a process.
-
If only the command prompt is returned, then port 162 has not been assigned to a process. No further action is required.
-
If port 162 is assigned to a process on the server, then results similar to the following are displayed:
# grep 162 /etc/services
snmpd     162/udp    daemon name     #daemon description
You must disable the daemon or the application that is using port 162. To disable a daemon, refer to the operating system documentation. To disable an application that is using the port, refer to the application documentation.
-
Next Steps
Enable FTP on the server as described in the next procedure.
 To Enable FTP
To manage clustered OTP systems using the OTP system management service, you must enable the FTP service.
-
Log in as root (su - root) to the server.
-
Enable the FTP service by typing the command svcadm -v enable network/ftp.
The FTP service is enabled, and starts when the server is rebooted. After the system is rebooted, you can verify whether the FTP service has start using the inetadm command:
# inetadm | grep network/ftp
enabled   online         svc:/network/ftp:default
Next Steps
Label all the disks available in the new OTP host.
 To Label All the Disks Available in the New OTP Host
The Open Telecommunications Platform requires all the available disks to be labeled prior to the Sun OTP deployment. The boot disk is already labeled and should be excluded from the procedure. For all the remaining disks, perform the following steps.
-
Log in as root (su - root) to the server.
-
Start the format utility. The output similar to the following will be displayed:
# format
Searching for disks...done AVAILABLE DISK SELECTIONS: 0. c1t0d0 <SUN72G cyl 14087 alt 2 hd 24 sec 424> /pci@1f,700000/pci@0/pci@2/pci@0/pci@8/LSILogic,sas@1/sd@0,0 1. c1t1d0 <SUN72G cyl 14087 alt 2 hd 24 sec 424> /pci@1f,700000/pci@0/pci@2/pci@0/pci@8/LSILogic,sas@1/sd@1,0 2. c2t8d0 <SUN72G cyl 14087 alt 2 hd 24 sec 424> /pci@1f,700000/pci@0/pci@2/pci@0/pci@8/scsi@2/sd@8,0 3. c2t9d0 <SUN72G cyl 14087 alt 2 hd 24 sec 424> /pci@1f,700000/pci@0/pci@2/pci@0/pci@8/scsi@2/sd@9,0 4. c2t10d0 <SUN72G cyl 14087 alt 2 hd 24 sec 424> /pci@1f,700000/pci@0/pci@2/pci@0/pci@8/scsi@2/sd@a,0 5. c2t11d0 <SUN72G cyl 14087 alt 2 hd 24 sec 424> /pci@1f,700000/pci@0/pci@2/pci@0/pci@8/scsi@2/sd@b,0 Specify disk (enter its number): -
Select the disk that needs to be labeled by entering its number:
Specify disk (enter its number): 3
selecting c2t9d0
[disk formatted]
Disk not labeled.  Label it now?
-
Enter y.
Note –If there is no “Disk not labeled. Label it now?” prompt, it means that the disk was previously labeled and no further action is required for it. Go to step 5
Disk not labeled. Label it now? y FORMAT MENU: disk - select a disk type - select (define) a disk type partition - select (define) a partition table current - describe the current disk format - format and analyze the disk repair - repair a defective sector label - write label to the disk analyze - surface analysis defect - defect list management backup - search for backup labels verify - read and display labels save - save new disk/partition definitions inquiry - show vendor, product and revision volname - set 8-character volume name !<cmd> - execute <cmd>, then return quit format> -
To label another disk enter disk and repeat steps 3 and 4. If all disks are already labeled then type quit to close the format utility.
format> disk
AVAILABLE DISK SELECTIONS:
       0. c1t0d0 <SUN72G cyl 14087 alt 2 hd 24 sec 424>
          /pci@1f,700000/pci@0/pci@2/pci@0/pci@8/LSILogic,sas@1/sd@0,0
       1. c1t1d0 <SUN72G cyl 14087 alt 2 hd 24 sec 424>
          /pci@1f,700000/pci@0/pci@2/pci@0/pci@8/LSILogic,sas@1/sd@1,0
       2. c2t8d0 <SUN72G cyl 14087 alt 2 hd 24 sec 424>
          /pci@1f,700000/pci@0/pci@2/pci@0/pci@8/scsi@2/sd@8,0
       3. c2t9d0 <SUN72G cyl 14087 alt 2 hd 24 sec 424>
          /pci@1f,700000/pci@0/pci@2/pci@0/pci@8/scsi@2/sd@9,0
       4. c2t10d0 <SUN72G cyl 14087 alt 2 hd 24 sec 424>
          /pci@1f,700000/pci@0/pci@2/pci@0/pci@8/scsi@2/sd@a,0
       5. c2t11d0 <SUN72G cyl 14087 alt 2 hd 24 sec 424>
          /pci@1f,700000/pci@0/pci@2/pci@0/pci@8/scsi@2/sd@b,0
Specify disk (enter its number)[3]:
Next Steps
-
Ensure that each OTP system server and storage device meets the firmware versions requirements listed in OTP System Hardware and Firmware Requirements. If necessary, update the server and storage firmware as directed by the hardware documentation.
-
If one or more of your OTP system servers is a Sun Fire T2000 server, you must install the e1000g transition patches 118833-24 and 123334-04 on each Sun Fire T2000 as described in the next section before installing the Open Telecommunications Platform.
If your clustered OTP systems do not include any Sun Fire T2000 servers, go to Creating the /globaldevices File System on the OTP Hosts.
Installing the Open Telecommunications Platform Patches On Sun Fire T2000 Servers
 To Install Required Patches On Sun Fire T2000 Servers
Before You Begin
-
The Solaris 10 Update 2 OS must be installed on each T2000 as described in Setting Up the External OTP Installation Server
-
The T2000 and storage device firmware versions must be at the required version levels as described in OTP System Hardware and Firmware Requirements
-
Log in as root (su - root) to the Sun Fire T2000.
-
Open a web browser and download the following two patches from http://sunsolve2.central.sun.com/pub-cgi/show.pl?target=patches/patch-access.
-
118833-24
-
123334-04
-
-
Change directory to the directory in which you downloaded the T2000 patches.
-
Type patchadd 118833-24 to install the first patch.
Wait for patch installation to complete.
-
Type patchadd 123334-04 to install the second patch.
Wait for patch installation to complete.
-
Type init s to enter single user mode.
-
Type /usr/sbin/e1000g_transition -e -f to complete the transition to the e1000g driver.
You are asked whether you want to reboot.
-
Type y to reboot.
Next Steps
Ensure that the /globaldevices file system has been created on each clustered OTP system as described in the next section.
Creating the /globaldevices File System on the OTP Hosts
If you have not partitioned each clustered OTP system server's hard drive to include the /globaldevices file system as described in Table 3–1 when installing Solaris 10 Update 2, then you must create and configure the /globaldevices file system on each server in order to enable management of global devices.
The OTP high availability framework requires the /globaldevices file system on one of the local disks on each clustered OTP system server's hard drive. The /globaldevices file system is later mounted as the OTP cluster file system.
For further information about global devices, see the Sun Cluster Concepts Guide for Solaris OS. For information on planning for the global devices file system, see Sun Cluster Software Installation Guide for Solaris OS.
Skip the following procedure If you have already created a /globaldevices file system containing at least 512 Mbytes on the hard drive of each of the clustered OTP systems.
 To Create the /globaldevices File
System on the OTP SystemServers
If you have not allocated the /globaldevices file system on one of the local disks on each clustered OTP system server, then you must perform the following procedure on each server in the clustered OTP system.
-
Log on to the server as root (su - root)
-
Type newfs /dev/dsk/c0t0d0s3 to create the cluster file system
Note –In this step and the following steps, the file system is mounted on disk slice 3. You can create and mount the file system on any available slice.
If the server has more than one disk, the /globaldevices file system can be created on a disk other than the disk containing the root file system.
-
Add the following line to the file /etc/vfstab.
/dev/dsk/c0t0d0s3 /dev/rdsk/c0t0d0s3 /globaldevices ufs 2 no global,logging
-
Type mkdir /globaldevices to create the cluster global devices directory.
-
Type mount /globaldevices to mount the /globaldevices file system
Next Steps
When you have completed installing and configuring Solaris 10 Update 2 on each OTP host, install the Open Telecommunications Platform on the OTP host.
-
To install OTP on one or more OTP hosts using the command line, see Chapter 4, Installing the Open Telecommunications Platform For the First Time Using the Command Line
-
To install OTP on one or more OTP hosts using the graphical user interface, see Chapter 5, Installing the Open Telecommunications Platform For the First Time Using the Graphical User Interface
-
To install OTP on one or more OTP hosts using a production standalone or clustered OTP system, see Chapter 6, Installing the Open Telecommunications Platform Using the Provisioning Service On an Existing OTP System
- © 2010, Oracle Corporation and/or its affiliates
