Converting a Standalone OTP Host to a Clustered OTP Host
This section provides the procedure to convert a standalone OTP host to a clustered OTP host.
 To Convert a Standalone OTP Host to a Clustered OTP Host
-
Log in as root (su - root) to the external OTP installation server.
-
Copy /opt/SUNWotp10/CLI/templates/inputOTPSingleNode.dat /var/tmp/inputOTPSingleNode.dat.
-
Edit the /var/tmp/inputOTPSingleNode.dat file.
Specify the values for each keyword as described by Open Telecommunications Platform Plan Worksheets and the standalone OTP host Plan worksheet.
-
Convert the standalone OTP host to aclustered OTP host.
-
Using the command line, type:
/opt/SUNWotp10/CLI/deployOTPSingleNode -convertToManager /var/tmp/inputOTPSingleNode.dat
-
Using the graphical user interface:
-
Open a Web browser and go to URL https://OTP host:9090 where OTP host is either the IP address or the fully qualified name of the OTP host on which the resource group is active.
The OTP provisioning service log in screen appears.
-
Click OEM OTP.
-
Click Utility Plans.
-
Click Convert Standalone system to Clustered System.
-
Click Configure.
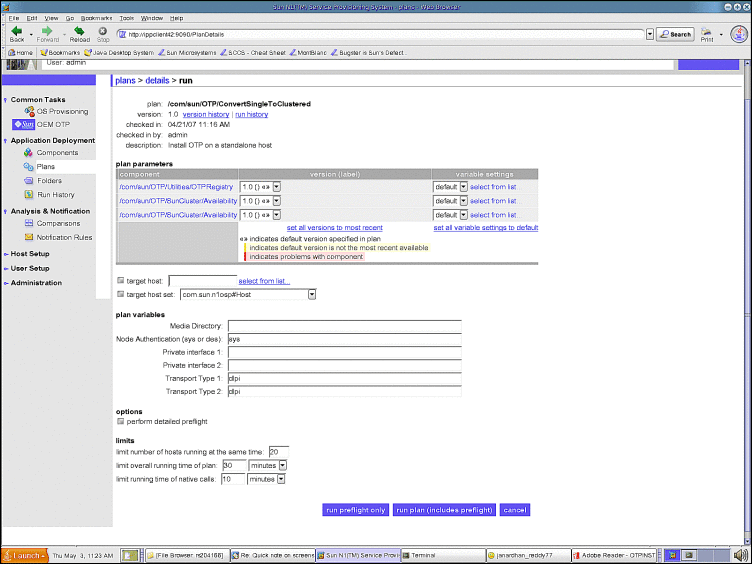
The Convert Single to Clustered page appears:
Figure 9–4 Convert Standalone OTP Host to Clustered OTP Host Page

-
Type the name of the standalone OTP host that you want to convert to a clustered OTP host in the target host field. Do not modify the target host set.
-
In the Media Directory field, type the fully-qualified name of the NFS-mounted OTP installation directory.
For example: /net/otpsource.mycompany.com/otp1.1
-
In the Private interface 1 field, type the name of the private interface.
For example, ce0.
-
In the Private interface 2 field, type the name of the private interface.
For example, ce1.
-
Click the perform detailed preflight checkbox.
-
Click run plan (includes preflight)
-
-
-
Create the system shared storage as described in To Create Shared Storage on the Clustered OTP System.
-
Create a temporary mount point.
mkdir -p /var/tmp_otp
-
Mount the shared volume onto the temporary mount point.
mount /dev/md/sps-dg/dsk/d0 /var/tmp_otp
-
Bring the resource group offline.
scrgadm -c -g otp-system-rg -y RG_system=false
scswitch -F -g otp-system-rg
-
Move the OTP contents from the local disk to the shared volume.
mv /var/otp/* /var/tmp_otp
umount /var/tmp_otp
-
Disable the resources in the following order.
scswitch -nj otp-spsms-rs
scswitch -nj otp-spsra-rs
scswitch -nj otp-sps-hastorage-plus
-
Modify the HAStoragePlus resource properties.
scrgadm -c -j otp-sps-hastorage-plus -x FilesystemMountPoints="/var/otp"
scrgadm -c -j otp-sps-hastorage-plus -x GlobalDevicePaths=/dev/md/sps-dg/dsk/d0
-
Enable the resources in the following order.
scswitch -ej otp-sps-hastorage-plus
scswitch -ej otp-spsra-rs
scswitch -ej otp-spsms-rs
-
Bring the resource group online.
scswitch -z -g otp-system-rg -h host name
-
Set the system property for the otp-system-rg resource group to true.
scrgadm -c -g otp-system-rg -y RG_system=true
- © 2010, Oracle Corporation and/or its affiliates
