| Oracle® VM User's Guide Release 3.0 for x86 Part Number E18549-03 |
|
|
PDF · Mobi · ePub |
| Oracle® VM User's Guide Release 3.0 for x86 Part Number E18549-03 |
|
|
PDF · Mobi · ePub |
In this chapter we describe in detail all types of virtual machine activities. A virtual machine is a guest operating system, for example, Linux, Windows, or Solaris, and it's associated application software. A virtual machine runs on an Oracle VM Server in a server pool. Full management of a virtual machine is performed using Oracle VM Manager.
This chapter describes how to create and use virtual machines. It includes the following sections:
The terms domain, guest and virtual machine are often used interchangeably, but they have subtle differences. A domain is a configurable set of resources, including memory, virtual CPUs, network devices and disk devices, in which virtual machines run. A domain is granted virtual resources and can be started, stopped and restarted independently. A guest is a virtualized operating system running within a domain. A guest operating system may be paravirtualized, hardware virtualized, or hardware virtualized with paravirtualized drivers. Multiple guests can run on the same Oracle VM Server. A virtual machine is a guest operating system and its associated application software. For the sake of simplicity, in this Guide we use the term virtual machine to encompass domain, guest and virtual machine. They are synonymous with each other and may be used interchangeably.
Virtual machines can be created using:
ISO files in a repository (hardware virtualized only)
Mounted ISO files on an NFS, HTTP or FTP server (paravirtualized only)
Virtual machine templates (by cloning a template)
Existing virtual machine (by cloning the virtual machine)
Virtual machine assemblies
Virtual machines require most installation resources to be in a storage repository, managed by Oracle VM Manager, with the exception of mounted ISO files for paravirtualized guests. See Section 8.5, "Virtual Machine Resources" for information on importing and managing virtual machine resources.
Before you create a virtual machine that requires network connectivity, or a paravirtualized machine which requires network connectivity to perform the operating system install, you should generate some virtual network interfaces using the VNIC Manager. See Section 8.6, "Using the VNIC Manager" for information on using the VNIC Manager.
Virtual machines may run in one of two main modes, paravirtualized (PVM) or hardware virtualized (HVM). In paravirtualized mode, the kernel of the guest operating system is recompiled to be made aware of the virtual environment. This allows the paravirtualized guest to run at near native speed, since most memory, disk and network accesses are optimized for maximum performance.
If support for hardware virtualization is available (either Intel VT or AMD-V), the guest operating system may run completely unmodified. This hardware virtualized guest is carefully monitored and trapped by Oracle VM Server when any instruction is executed which would violate the isolation with other guests or dom0. In the current implementation, there may be performance penalty for certain types of guests and access types, but hardware virtualization also allows many Microsoft Windows™ operating systems and legacy operating systems to run unmodified.
The third virtualization mode is hardware virtualized, with paravirtualized drivers (PVHVM). This mode is identical to hardware virtualized, but with additional paravirtualized drivers installed in the guest's operating system to improve virtual machine performance.
Oracle recommends you create paravirtualized virtual machines if possible, as the performance of a paravirtualized virtual machine is superior to that of a hardware virtualized guest.
There are three virtual machine virtualization modes, or domain types, as shown in Table 8-1. When you create a virtual machine using the Virtual Machine wizard you must select which mode to use.
| Domain Type | Description |
|---|---|
|
Hardware virtualized (HVM) |
Hardware virtualization, or fully virtualized. When you create an HVM guest, you must supply an ISO file in a repository from which to create the virtual machine. See Section 8.5.5, "ISO Files (CD/DVD Images)" for information on importing an ISO file into a repository. To create HVM guests, you may need to activate the hardware virtualization in the BIOS of the server on which you install the Oracle VM Server. |
|
Hardware virtualized, with paravirtualized drivers (PVHVM) |
Identical to HVM, but with additional paravirtualized drivers for improved performance of the virtual machine. See Section 8.11, "Installing Paravirtualized Drivers" for more information about using paravirtualized drivers. This Domain Type is used to run Microsoft Windows guest operating systems with an acceptable performance level. |
|
Paravirtualized (PVM) |
Paravirtualized. Enables you to select a location for the mounted ISO file from which to create the virtual machine. Before you create the virtual machine using the paravirtualized method, mount the ISO file on an NFS share, or HTTP or FTP server. You supply the location of the mounted ISO file in the Boot Options step of the wizard. For information on creating a mounted ISO file, see Section 8.4, "Virtual Machine Installation Media". |
An operating system installed in a virtual machine is known as a guest operating system. Oracle VM supports a variety of guest operating systems. For a list of the supported guest operating systems, see the Oracle VM Release Notes.
Virtual machines require some form of installation media, whether it be a template, assembly, ISO file, or mounted ISO file. Different domain types may require slightly different installation source files. Table 8-2 lists the installation sources available for HVM and PVM guests.
Table 8-2 Virtual machine installation sources
| Installation Source | HVM | PVM |
|---|---|---|
|
Template (clone) |
Yes |
Yes |
|
ISO file in repository |
Yes |
No |
|
Mounted ISO file on NFS, HTTP or FTP server |
No |
Yes |
|
Assembly |
Yes |
Yes |
When you create an HVM guest from an ISO file, you must supply an ISO file which has been preloaded into a storage repository that is presented to the Oracle VM Server on which the virtual machine is to be deployed. See Section 8.5.5, "ISO Files (CD/DVD Images)" for information on importing ISO files.
When you create a PVM guest from an ISO file, you cannot use an ISO file from a repository to install the operating system. Instead, you must use a mounted ISO file. A mounted ISO file explodes the contents of the ISO file on to disk and makes the operating system installation tree available to the virtual machine. The mounted ISO file can be made available via an NFS, HTTP or FTP server. When you specify the location of the installation media in the Network Boot Path field in the Create Virtual Machine wizard, you enter the NFS, HTTP or FTP path to the mounted ISO file. The following examples show how to create and use mounted ISO files on an NFS share, and on an HTTP server.
Example 8-1 Creating an installation tree on an NFS share
This example creates an installation tree for paravirtualized guests by mounting an ISO file. The installation tree is made available via an NFS share. On the NFS server, enter
# mkdir -p /isos/EL5u6-x86_64
# mount -o ro,loop /path/Enterprise-R5-U6-Server-x86_64-dvd.iso /isos/EL5u6-x86_64
# exportfs *:/isos/EL5u6-x86_64/
When you create the virtual machine, enter the installation location in the Network Boot Path field in the Create Virtual Machine wizard as:
nfs:example.com:/isos/EL5u6-x86_64
Example 8-2 Creating an installation tree on an HTTP server
This example creates an installation tree from an ISO file that can be accessed via HTTP. On the HTTP server, enter
# cd /var/www/html
# mkdir EL5u6-x86_64
# mount -o ro,loop /path/Enterprise-R5-U6-Server-x86_64-dvd.iso EL5u6-x86_64
When you create the virtual machine, enter the installation location in the Network Boot Path field in the Create Virtual Machine wizard as:
http://example.com/Enterprise-R5-U6-Server-x86_64-dvd.iso/
Tip:
If you have multiple ISO files (CDs), you can mount each ISO file (CD) and copy the contents into a single directory. All the ISO files are then available from the same location.The resources required to create virtual machines are stored in a storage repository. This section provides information on the structure of storage repositories, and describes how you manage virtual machine resources in storage repositories. It includes the following sections:
A storage repository is used to store virtual machine resources, so that these resources can be made available to Oracle VM Servers in a server pool, without having to copy the resources to each Oracle VM Server. The Oracle VM Servers in a server pool gain access to these virtual machine resources by having the storage repository presented to the them. If your storage is file-based storage, you can present a storage repository to multiple server pools.
The types of virtual machine resources can be categorized as:
Virtual machine templates: Reusable virtual machine templates used to create multiple virtual machines.
Assemblies: Template containing a configuration of multiple virtual machines with their virtual disks and the inter connectivity between them.
ISO files: DVD/CD image files used to create virtual machines from scratch using the installation media.
Virtual disks: Virtual disks used by virtual machines to perform boot operations, to run the operating system, and to extend the storage capability of virtual machines.
Virtual machine files: Configuration files of your virtual machines.
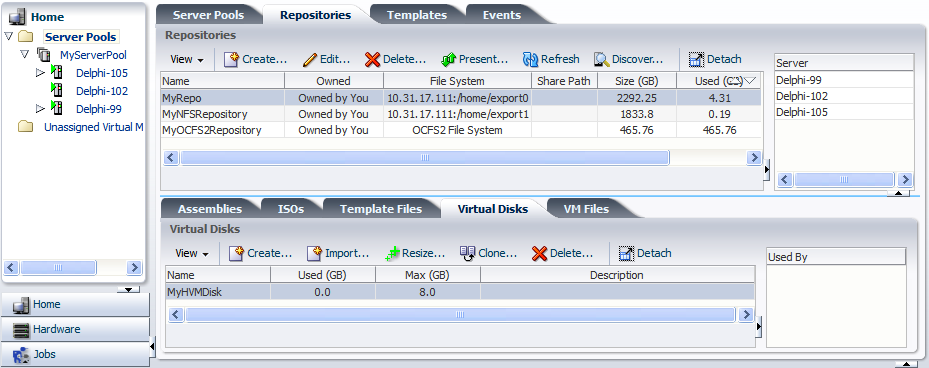
You access and manage virtual machine resources in a storage repository using the Home view, selecting Server Pools in the navigation pane, and selecting the Repositories tab in the management pane.
The following sections describe the structure of a storage repository, and how to manage their contents.
Each storage repository has a predefined structure, which is visible in Oracle VM Manager, and maps to the directory structure of the underlying physical storage. Figure 8-1 shows the repository as seen through the Oracle VM Manager user interface. The directory structure is listed in Table 8-3, "Storage Repository Directory Structure".
The directories listed in Table 8-3 are subdirectories of a storage repository file system. On disk they are, in fact, located under the path:
/OVS/Repositories/repository_id/...
Table 8-3 Storage Repository Directory Structure
| Directory Name | Description |
|---|---|
|
This tab is one level up from the other tabs: it is placed alongside the Repositories tab to allow the user to manage templates within the managed environment more easily. This is the directory that contains guest virtual machine templates. See Section 8.5.3, "Virtual Machine Templates" for information on working with virtual machine templates. |
|
|
Contains preconfigured sets of virtual machines, typically created with Oracle Assembly Builder. See Section 8.5.4, "Assemblies" for information on working with assemblies. |
|
|
ISO files |
Contains ISO files that can be mounted as virtual DVD drives on guest virtual machines. See Section 8.5.5, "ISO Files (CD/DVD Images)" for information on working with ISO files. |
|
Contains virtual disks, which can be either dedicated to a virtual machine or shared by multiple virtual machines. See Section 8.5.6, "Virtual Disks" for information on working with virtual disks. |
|
|
Contains virtual machine configuration files. See Section 8.5.7, "Virtual Machine Configuration Files" for information on working with virtual machine configuration files. |
A virtual machine template is a fully pre-installed, pre-configured virtual machine that can be repeatedly used to create new virtual machines. Typically, a virtual machine template might contain:
An operating system.
A file which contains the basic configuration information, such as the number of virtual CPUs, the amount of memory, the size of disk, and so on.
Pre installed applications.
Virtual machine templates contain the configuration of a single virtual machine. Virtual machine templates are shared among users to create new virtual machines. New virtual machines inherit the same contents and configuration from the template. Typically, a virtual machine template contains basic configuration, such as the number of virtual CPUs, the size of memory, virtual disks, virtual network interfaces (VIFs), and so on. It may also contain some software applications.
You can obtain or create a virtual machine template by:
Downloading an Oracle VM template from the Oracle Technology Network, and importing it into Oracle VM Manager. See Section 2.10, "Oracle VM Pre-built Templates" for more information on downloading a template.
Cloning an existing virtual machine or template as a template in Oracle VM Manager. For information on cloning virtual machine templates, see Section 8.8, "Cloning a Virtual Machine or Template".
This section contains:
Before you can use a virtual machine template, you must import it into Oracle VM Manager and make it available to your server pool(s). Virtual machine templates are stored in the server pool's storage repository by importing them from a web server into Oracle VM Manager.
In a storage repository, templates are typically imported as an archive (.tgz, .tar or other). The archive contains a virtual machine configuration file (.cfg) file, and at least one virtual disk image (.img file).
Note:
On disk, a template archive is unpacked after import. The .cfg file of the virtual machine is always referenced from the Templates folder, but the virtual disk image files (.img) are placed in the VirtualDisks folder. This makes the creation of virtual machines from template a lot faster, which also applies to cloning of virtual machines.To import a virtual machine template:
Place the archive containing the Oracle VM template in a location accessible from your Oracle VM environment using either of these protocols: HTTP, HTTPS or FTP.
In the Home view click Server Pools in the navigation pane, then open the Templates tab in the management pane.
Click Import to open the Import Template dialog box. Select or edit the following:
Repository: The storage repository in which to import the template.
Server: The Oracle VM Server to use the perform the template import.
Template URLs: The URLs for the templates. You can enter multiple URLs in a comma separated list.
Click OK to import the template(s). When the import is complete, the new template(s) appear in the Templates table.
Optionally, click Edit to change the name of the template and add a description.
To remove a template from the storage repository, select it and click Delete.
For information about creating a virtual machine from a template, see Section 8.8, "Cloning a Virtual Machine or Template".
A virtual machine template can be used to create virtual machines, and to create new templates based on the original. To create a virtual machine, or another template from the original, you clone the template. You can either create a simple, or advanced clone, the latter giving you the opportunity to modify the configuration and deployment options for the template. If you used an advanced clone, you must first create a clone definition for the template, then use the clone definition to create a virtual machine, or another template. See Section 8.8, "Cloning a Virtual Machine or Template" for information on cloning.
You can edit some basic meta information about a virtual machine template.
To edit a virtual machine template:
In the Home view click Server Pools in the navigation pane, then open the Templates tab in the management pane.
Select a template to edit and click Edit... to display the Edit Template dialog box.
Edit the following:
Template Name: The name of the template
Description: A description of the template.
Click OK to save the template information.
You can delete a virtual machine template, and the virtual disks associated with it.
To delete a virtual machine template:
In the Home view click Server Pools in the navigation pane, then open the Templates tab in the management pane.
Select a template to edit and click Delete... to display the Delete Confirmation dialog box.
Select the virtual disks associated with the template you want to delete. Click OK to delete the template.
An assembly is a kind of infrastructure template containing a configuration of multiple virtual machines with their virtual disks and even the inter connectivity between them. Assemblies can be created as a set of .ovf (Open Virtualization Format) and .img (disk image) files, or may all be contained in a single .ova (Open Virtualization Format Archive) file.
To use an assembly, you must first import it into a repository, then create one or more templates from the assembly. You create one virtual machine template for each virtual machine in the assembly. You can then use the template(s) to deploy the virtual machines that originated from the assembly. You cannot deploy all virtual machines in an assembly in one step; you must deploy each virtual machine individually. To perform deployment of all virtual machines, including the associated networking configuration, you should use Oracle Enterprise Manager.
For ease of use, you should use a single .ova file when working with assemblies in Oracle VM. You can also use the .ovf format with the associated disk image files, but you must import all the disk files individually as virtual disks, then import the .ovf file as an assembly before you can use the assembly to create a template.
To import an assembly:
Create or locate an assembly file. This should be a single .ova file, which contains the .ovf descriptive file(s), and disk image file(s) for the assembly. If you do not have the assembly in the archive (.ova) format, but instead have a series of virtual disk images and the .ovf file, you must first import all the virtual disk files, then continue with this procedure to import the .ovf file. See Section 8.5.6, "Virtual Disks" for information on importing virtual disk files.
Place the assembly file in a location accessible from your Oracle VM Manager host computer using either of these protocols: HTTP, HTTPS or FTP.
In the Home view click Server Pools in the navigation pane, then open the Repositories tab in the management pane.
Select the storage repository of your choice and open the Assemblies tab below.
Click Import to open the Import Assembly dialog box. Select an Oracle VM Server from the Server list to perform the import, and enter the URL to the assembly file you want to import.
Click OK to import the assembly file. When the import is complete, the assembly file appears in the table. The virtual machines contained in the assembly are listed in the Assembly Virtual Machines pane.
When the assembly file(s) are imported, you can use the assembly to create a template for each virtual machine in the assembly. Select the assembly and click the Create Template icon in the Assemblies sub-tab to create a template for a virtual machine in the assembly. The template is created in the same repository as the assembly is located. When you have created a template from the assembly, you can use the template to create and deploy virtual machines. See Section 8.5.3.2, "Using a Virtual Machine Template" for information on using a template to create a virtual machine.
Virtual machines have no access to the physical DVD or CD-ROM drive. You can assign virtual drives to virtual machines by offering ISO files containing the image of a DVD or CD-ROM. These image files can be found in the ISOs tab of the storage repository.
You can import ISO files from a web server into Oracle VM Manager. You can then select the installation media as an ISO file when you create a virtual machine. To create a virtual machine using an ISO file, see Section 8.7, "Creating a Virtual Machine".
To be able to use an ISO file with your virtual machine you must first import the file into an appropriate storage repository, namely one that can be accessed by the server pool where the virtual machine is to be created. If your storage repository uses file-based storage, you can make repository available to multiple server pools, therefore making an ISO file available to multiple server pools. If you are using storage array-based storage, you can only make a repository available to a single server pool. Virtual machines can only access ISO files that have been assigned to the server pool to which they belong.
To import and make available an ISO file:
Create or locate an ISO file that contains the disk image of the DVD or CD-ROM you want to make available to your virtual machines.
Place the ISO file in a location accessible from your Oracle VM Manager host computer using either of these protocols: HTTP, HTTPS or FTP.
In the Home view click Server Pools in the navigation pane, then open the Repositories tab in the management pane.
Select the storage repository of your choice and open the ISOs tab below.
Click Import to open the Import ISO dialog box. Select an Oracle VM Server from the Server list to perform the import, and enter the URL to the ISO file you want to import. The ISO file must be available via HTTP, HTTPS or FTP. For example, enter:
http://example.com/isos/myiso.iso
Click OK to import the ISO file. When the import is complete, the ISO file appears in the table.
Select the ISO file you just imported and click Assign to open the Assign ISO to Server Pools dialog box.
If you are using file-based storage for the storage repository, use the arrow buttons to move the server pools to the right pane to make the ISO file available to them.
When finished, click OK. The pane to the right of the ISOs table displays the server pools to which the selected ISO file has been assigned.
Optionally, click Edit to change the name of the ISO file and add a description.
To remove an ISO file from the storage repository, select it and click Delete.
To use an ISO as a virtual DVD drive with your virtual machine, you must add the ISO file in the storage configuration of your virtual machine first, and possibly modify its boot configuration. For details, see Section 8.7, "Creating a Virtual Machine".
A virtual machine needs at least one disk – that is, a disk to boot from and to run the operating system. Virtual disks can be part of a template, can be created as part of the virtual machine creation process, or can be created independently inside the storage repository. Virtual disks can be shared across virtual machines, or dedicated to one virtual machine. All virtual disks available in the storage repository appear in the Virtual Disks tab, regardless of how they are created.
In addition to the standard create and delete operations, Oracle VM Manager also allows you to resize a virtual disk, provided the storage repository has sufficient disk space to offer the requested size.
To create a new virtual disk:
In the Home view click Server Pools in the navigation pane, then open the Repositories tab in the management pane.
Select the storage repository of your choice and open the Virtual Disks tab below.
Click Create... to open the Create Virtual Disk dialog box. Enter the following information in the fields:
Virtual Disk Name: A name for the virtual disk.
Size (GB): The size of the disk, in GB.
Description: A description of the virtual disk.
Shareable: Whether the virtual disk is shareable. Shareable disks have read/write privileges in multiple virtual machines and should be used with caution.
Click OK to create the new disk. It appears in the table.
To remove a virtual disk from the storage repository, select it and click Delete.
When you create a virtual machine from scratch, you are given the opportunity to either create a new virtual disk or use an existing one. The virtual disk you created above is available for selection. For more information about creating a virtual machine from scratch, see Section 8.7, "Creating a Virtual Machine".
Note:
The pane to the right of the Virtual Disks table displays the virtual machine to which the selected virtual disk is attached.To import a virtual disk:
In the Home view click Server Pools in the navigation pane, then open the Repositories tab in the management pane.
Select the storage repository of your choice and open the Virtual Disks tab below.
Click the Import Virtual Disk icon to display the Import Virtual Disk dialog box. Select an Oracle VM Server from the Server list to perform the import, and enter the URL to the virtual disk file you want to import.
Click OK to import the virtual disk file. When the import is complete, the virtual disk file appears in the table.
To resize a virtual disk:
In the table of the Virtual Disks tab, select the virtual disk you wish to resize.
Click Resize to open the Resize Virtual Disk dialog box. Enter a new size in GB for the selected virtual disk and click OK.
Note:
When resizing a disk there is always a risk of data corruption. Also, the file system on the virtual disk may not be aware of the resize operation, so you may have to run a certain procedure to make the guest aware of the change in disk size.The final tab in the storage repository contents section is the VM Files tab. In the Create Virtual Machine wizard you specify which storage repository to use to store the configuration file of your virtual machine. Consider the VM Files tab to be the home location of all the virtual machines that have been created in the selected storage repository.
When a virtual machine template is imported into a repository, the template is unpacked on disk and the virtual machine configuration file (.cfg) is saved to the Templates folder, and the virtual disk image files (.img) are saved in the VirtualDisks folder.
As well as providing a convenient overview of the virtual machines you deployed, this tab also offers you the possibility to remove virtual machine configuration files from the storage repository by selecting the file and clicking Delete. After this, the virtual machine no longer exists, even if its virtual disks remain in the storage repository.
The VNIC Manager creates virtual NICs, which are used by virtual machines. Basically, you provide virtual network interfaces by defining a range of MAC addresses. Each MAC address corresponds with a single virtual NIC, which is used by a virtual machine.
To create a VNIC:
Select Vnic Manager... from the Tools menu.
Click Next in the MAC Selector panel to get the next available MAC address.
Alternatively you can enter a specific MAC address.
Select the number of addresses that you want to create, and click Generate.
Click OK to close the Vnic Manager.
After the creation of the VNICs you are able to use them when you create virtual machines. For more information on creating virtual machines, see Chapter 8, "Managing Virtual Machines".
Caution:
If you run more than one Oracle VM Manager instance, you must not have overlapping MAC address ranges. If you create a MAC address that is already in the Oracle VM Manager database, an error message is displayed.Before you create a new virtual machine, make sure that the following resources are available:
A server pool. See Section 7.6, "Creating a Server Pool" for information on creating server pools.
An Oracle VM Server as part of the server pool.
Source file(s) in a repository from which to create the virtual machine. The source files can be any of the following:
Imported ISO file. See Section 8.5.5, "ISO Files (CD/DVD Images)" for more information on how to import ISO files.
Virtual machine template. See Section 8.5.3, "Virtual Machine Templates" for more information on how to import a virtual machine template.
Virtual machine assembly. See Section 8.5.4, "Assemblies" for more information on how to import an assembly.
To create a virtual machine:
Select the Home view and select Create Virtual Machine from the Actions menu.
The Create Virtual Machine step is displayed in the wizard.
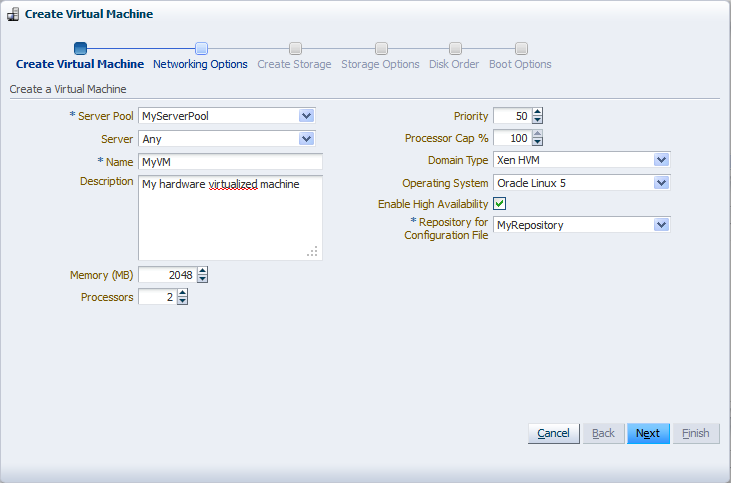
Enter or select the following:
Server Pool: The server pool on which to create the virtual machine.
Server: A Oracle VM Server on which to run the virtual machine. If you do not have a preference as to which Oracle VM Server to use, select Any and the Oracle VM Server with the most available resources is selected to host the virtual machine.
Name: A name for the virtual machine.
A virtual machine name must consist of alphanumeric characters, and must not contain spaces or special characters, except the underscore (_) or hyphen (-) characters. The maximum name length is 200 characters. The name need not be unique.
Description: A description of your virtual machine.
Memory (MB): The size of the memory the virtual machine is to be allocated.
Processors: The number of processors to be used by the virtual machine. The number of processors is expressed in number of physical CPU cores, and is limited to 128.
Priority: The CPU priority of the virtual machine. You can select a high (100), intermediate (50), or low (1) priority for the virtual CPUs, or a self-defined priority, by moving the slider. The higher the priority, the more physical CPU cycles are given to the virtual machine.
Processor Cap %: Increase or decrease the percentage to which the virtual CPUs can receive scheduled time. This parameter defines the maximum percentage to which the virtual CPUs can receive scheduled time. You can select a high (100), intermediate (50), or low (1) percentage of scheduled time for the virtual CPUs, or a custom percentage, by moving the slider. Use this parameter to keep low priority virtual machines from consuming too many CPU cycles on a Virtual Machine Server.
Domain Type: The domain type of the virtual machine. Oracle recommends you create paravirtualized virtual machines if possible, as the performance of a paravirtualized virtual machine is superior to that of a hardware virtualized guest.
Xen HVM: Hardware virtualization, or fully virtualized. When you select this option you must supply an ISO file in a repository (in the Create Storage step of the wizard) from which to create the virtual machine. See Section 8.5.5, "ISO Files (CD/DVD Images)" for information on importing an ISO file into a repository.
Xen HVM, PV Drivers: Identical to Xen HVM, but with additional paravirtualized drivers for improved performance of the virtual machine. See Section 8.11, "Installing Paravirtualized Drivers" for more information about using paravirtualized drivers. This Domain Type is used to run Microsoft Windows guest operating systems with an acceptable performance level.
Xen PVM: Paravirtualized. Enables you to select a location for the mounted ISO file from which to create the virtual machine. Before you create the virtual machine using the paravirtualized method, mount the ISO file on an NFS share, or HTTP or FTP server. You supply the location of the mounted ISO file in the Network Boot Path field in the Boot Options step of the wizard.
For information on creating a mounted ISO file, see Section 8.4, "Virtual Machine Installation Media".
Operating System: The operating system of your virtual machine. This setting enables or disables certain virtual machine settings that your guest operating system may require.
Enable High Availability: Select to enable HA. See Section 7.4, "High Availability (HA)" for more information on HA.
Repository for Configuration File: Select the repository in which to create the virtual machine configuration file.
The Priority and Processor Cap% parameters are passed to the hypervisor, which determines the percentage. These two parameters are always combined by the hypervisor and are a key factor for the performance of the virtual machine.
Click Next.
The Networking Options step is displayed in the wizard.
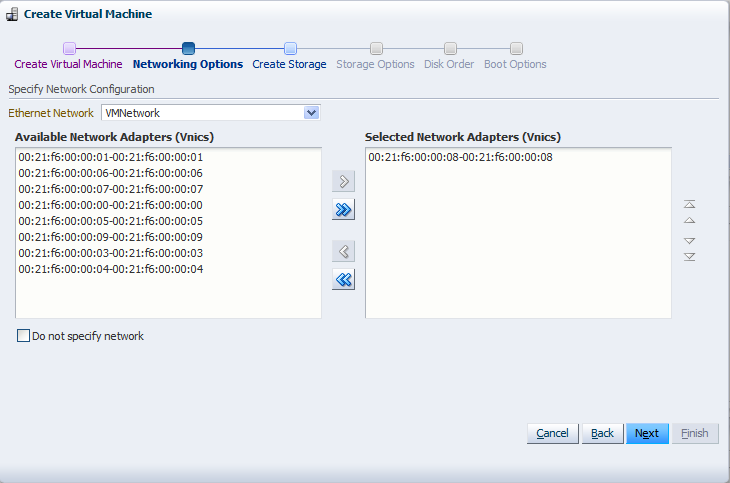
Select one or more VNICs from the Network Adapter (Vnics) column and add them to the virtual machine. A virtual machine can have up to eight virtual network interfaces for emulated guests and up to 31 for PVM guests.
A PVM guest requires network connectivity to perform the operating system install and must have a VNIC.
To select VNICs from another network, select the network in the Ethernet Network drop down. The available VNICs for that network are then displayed in the Network Adapter (Vnic) column.
If you do not want to specify any network settings, check the Do not specify network box.
Click Next.
The Create Storage step is displayed in the wizard.
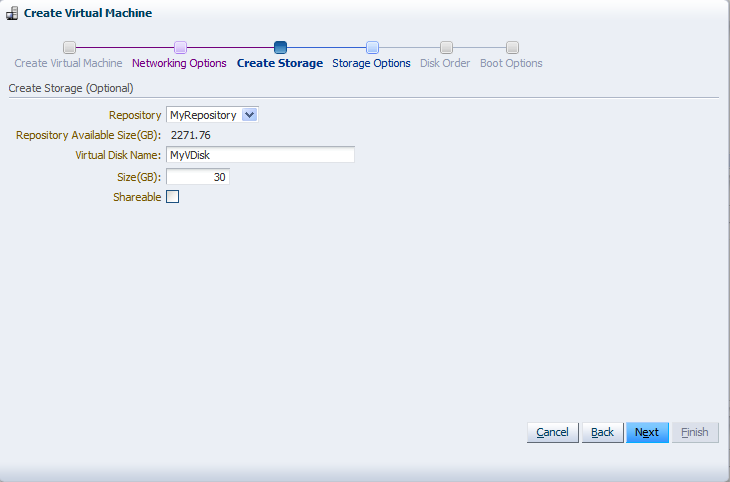
In the Create Storage step, optionally create a virtual disk. Enter or select the following to create a virtual disk:
Repository: The repository on which the virtual disk is to be created.
Virtual Disk Name: The name of the virtual disk to be created and made available to the virtual machine. See Section 8.5.6, "Virtual Disks" for more information about using virtual disks.
Size (GB): The disk size in GB of the virtual disk.
Shareable: Whether the virtual disk should be shareable (read/write) with other virtual machines.
Click Next.
Note:
If your virtual machine needs more than one disk, you can create the disk(s) afterwards in the repository, and add them to the virtual machine. See Section 8.5.6, "Virtual Disks" for more information.The Storage Options step is displayed in the wizard.
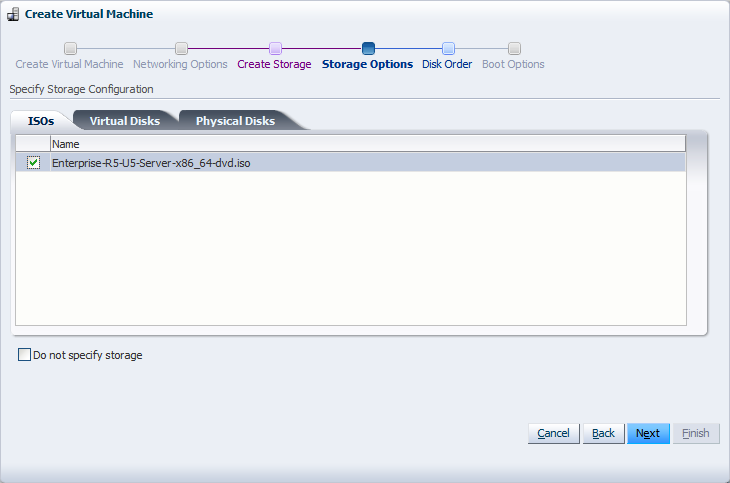
Select the desired storage configuration of your virtual machine, such as virtual and physical disk(s) and ISO file(s).
ISOs: Select the ISO files to add to the virtual machine. ISO files are used to create HVM and PVHVM virtual machines. When creating a virtual machine from an ISO file, you must use a single file. Installations that span multiple ISO files are not supported. ISO files cannot be used to create PVM virtual machines.
Virtual Disks: Select the desired virtual disk(s) to add to the virtual machine.
Physical Disks: Select the physical disks to add to the virtual machine. The physical disks are the disks in a storage array. Physical disks can be shared by virtual machines.
If you do not want to specify any storage settings, check the Do not specify storage box.
Click Next.
The Disk Order step is displayed in the wizard.
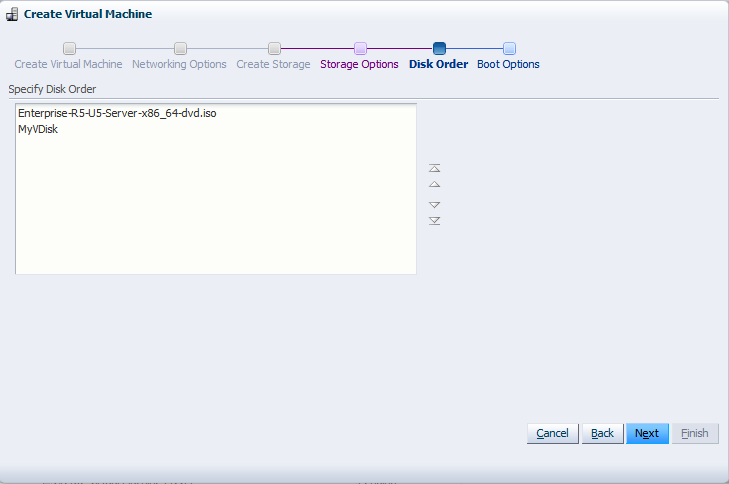
Set the order the disks should appear in the virtual machine. The disk with the boot partition or installation media should be the first disk listed.
Click Next.
The Boot Options step is displayed in the wizard.

Select the boot media and order for your virtual machine.
If you are creating a hardware virtualized virtual machine (HVM), you can choose the PXE boot option (not shown above) as well. If so, remember to put PXE first in the Boot Order field, and change the boot order again after installation and before rebooting the VM. To use PXE, you must configure a PXE/tftp environment to offer the necessary boot media and instructions to the VM.
If you are creating a paravirtualized virtual machine (PVM), specify Network to be at the top of the Boot Order column, and enter the location of the mounted ISO file from which to perform the operating system installation in the Network Boot Path field, for example
http://example.com/Enterprise-R5-U6-Server-x86_64-dvd.iso/
For information on creating a mounted ISO file, see Section 8.4, "Virtual Machine Installation Media".
You cannot use the Network Boot Path field to boot a virtual machine using PXE. This field can only be used to specify the path to a mounted ISO file to use when installing a PVM guest.
Note:
If you are creating an Oracle Linux 6 PVM you must also add thekernel and ramdisk parameters in the Network Boot Path field, for example:
--kernel images/pxeboot/vmlinuz --ramdisk images/pxeboot/initrd.img http://example.com/OracleLinux-R6-U1-Server-x86_64-dvd.iso/
Click Finish.
The virtual machine is created. The status of the virtual machine is Stopped. Now you can start and log in to the virtual machine.
To access the virtual machine, select the Home view, and go to the Server Pools folder. Select the server pool and find the virtual machine in the Virtual Machines tab in the management pane.
If you created a PVM, there are some steps you should take after the operating system installation is completed:
Stop the virtual machine.
Edit the virtual machine and remove PXE from the Boot Order column in the Boot Options step of the Edit Virtual Machine wizard.
Start the virtual machine and complete the installation if necessary.
To edit the virtual machine configuration information, see Section 8.9.9, "Editing a Virtual Machine".
Cloning a virtual machine or template enables you to create multiple virtual machines or templates based on the original. There are two methods of cloning virtual machines; a simple clone, and an advanced clone. A simple clone sets up the clone with the same configuration information as the original. An advanced clone enables you to create and use a clone definition with differing configuration from the original. For example, you can change the cloned virtual machine or template to deploy to a different server pool or repository, with changed memory, virtual CPU number, network settings, and so on. Figure Figure 8-2 shows the process of creating a clone of a virtual machine or template.
To modify the clone parameters, such as virtual disks, network, memory, and so on, you should use a clone definition, and use that clone definition to perform cloning. See Section 8.8.1, "Creating a Clone Definition" to create a clone definition to during cloning.
A cold clone is a clone created from a stopped virtual machine. A cold clone performs a clone of the virtual machine, with safe and consistent virtual disk status. This is useful for creating a virtual machine or template from the original virtual machine. A hot clone is created from a running virtual machine. A hot clone creates a clone with inconsistent disk status, and should only be used as a snapshot or back up of a virtual machine, perhaps on a virtual machine that requires 100% uptime and cannot be shut down. If you want to use the hot-cloned virtual machine, you should first repair any virtual disks, using a disk repair utility such as fsck. Do not use hot cloning for virtual machines running an Oracle Database. Instead, you should use an Oracle Database backup strategy, such as the rman utility.
A thin clone means copies the virtual machine files and only take up the mount of disk space actually used, not the full specified disk size. Thin cloning can only be used when cloning from and to the same repository, and when the storage used for the storage repository is non-generic (for example, a Sun 7000 or NetApp Storage Connect plug in). Thin cloning is the fastest and most efficient cloning method.
A clone can also be performed using two other file copy methods: sparse copy, and non-sparse copy. These two cloning methods can be used when cloning from and to different repositories, and when the storage used for the storage repository uses a generic Storage Connect plug in. These cloning methods are slower than thin cloning, but more versatile.
To create a clone:
Select the virtual machine or template to clone and display the Clone Virtual Machine or Template dialog box. You display this dialog box from different locations, depending on whether you are cloning a virtual machine or a template.
Virtual Machine: In the Home view, select the virtual machine to clone in the navigation pane, right click and select Clone from the menu.
Virtual Machine Template: In the Home view click Server Pools in the navigation pane, then open the Templates tab in the management pane. Select the template to clone and click Clone
Select the clone type radio button, either Simple Clone or Advanced Clone. Select or enter the following:
Clone Definition: Click Search to find the clone definition to use, or to create a new one to use. See Section 8.8.1, "Creating a Clone Definition". This field is only displayed if you select Advanced Clone.
Tip:
If you clone a virtual machine or template using the Simple Clone option, the storage repository is locked for the duration of the cloning job; this may be some time in some circumstances. To quickly create clones and not lock the storage repository, use the Advanced Clone option with a clone definition.Target Clone Type: Select the clone type, either Template or Virtual Machine, to specify the object to create from the clone.
Name: A name for the virtual machine or template.
Description: A description for the virtual machine or template.
Target Repository: The repository to store the clone files, such as virtual disks. This field is only displayed if you select Advanced Clone.
Target Server Pool: The server pool on which the clone is to be deployed.
Click OK.
Cloning a virtual machine or template means making a copy of it, so that you can create multiple virtual machines or templates from the original. When you create an advanced clone a virtual machine or template, you must first create a clone definition to set up the clone parameters, such as networking, and the virtual disk, and ISO resources.
To create a clone definition:
Select the virtual machine or template and display the Clone Virtual Machine or Template dialog box by:
Virtual Machine: In the Home view, select the virtual machine to clone in the navigation pane, right click and select Clone... from the menu.
Virtual Machine Template: In the Home view click Server Pools in the navigation pane, then open the Templates tab in the management pane. Select the template to clone and click Clone...
Select Create New Clone Definition and click Next.
Enter a Name and Description for the clone definition, and click Next.
Select the virtual disks in the template that you want to include in the clone from the Disk column, and the type of storage on which to store the cloned virtual disks from the Clone Target Type drop down. Click Next.
Select the storage location for the cloned virtual disks from the Clone Target drop down, and click Next.
Select whether to use sparse or non-sparse files for the virtual disks, or to use thin cloning in the Clone Type drop down.
If you select thin cloning of a virtual disk, you can create a cloned virtual disk with minimal disk space usage. The original virtual disk is used as a base read-only disk, and any copies created from this clone definition only require disk space to store differences in the new virtual disks.
Click Next.
Select the VNICs from the template that you want to include in your clone definition, and the Ethernet Network to which they should belong. Click Finish.
The clone definition is now available to use to create a virtual machine, or template. See Section 8.8, "Cloning a Virtual Machine or Template" for information on using the clone definition to create a virtual machine or template.
You cannot display a list of all the available clone definitions. To see the clone definitions for a virtual machine or template, select the virtual machine or template and display the Clone Virtual Machine or Template dialog box.
When you have created a virtual machine, there are a number of actions you can perform on them in Oracle VM Manager. This section describes the actions you can perform on virtual machines and contains:
After a virtual machine is created, you can start it. Starting a virtual machine is analogous to starting a computer by pressing the Power On button.
To start a virtual machine:
Select the Home view, and select the virtual machine in the Server Pools folder.
Right-click on the virtual machine and select Start from the menu.
The virtual machine is started.
Live migration is a process to move a running virtual machine from one Oracle VM Server to another, while applications on the existing virtual machine continue to run. Live migration ensures high availability of virtual machines. This feature is important, and useful, when the existing Oracle VM Server may be out of commission, or on a planned shutdown for maintenance purposes.
You can only migrate one virtual machine at a time. Cross-server pool live migration is not allowed. You can only migrate virtual machines from one Oracle VM Server to another within the same server pool. You must use identical computers to perform live migrations, that is, the computer make and model number of both the source computer and the destination computer must be identical.
To migrate a virtual machine:
Select the Home view, and select the virtual machine in the Server Pools folder.
Right-click the virtual machine, and select Migrate from the context menu.
Select the Oracle VM Server to which you want to migrate your virtual machine and click OK.
The virtual machine is migrated.
Suspending a virtual machine is analogous to putting a computer into sleep mode. When a virtual machine is suspended, the current state of the operating system, and applications is saved, and the virtual machine put into a suspended mode. When you resume the virtual machine, the operating system and applications continue from the same point you suspended the virtual machine.
The Oracle VM Server resources used by the virtual machine are not released. If you want to release these resources, you should shut down the virtual machine.
To suspend a virtual machine:
Select the Home view, and select the virtual machine in the Server Pools folder.
Right-click on the virtual machine and select Suspend from the menu.
The virtual machine state is saved and the virtual machine suspended.
To resume the virtual machine, see Section 8.9.4, "Resuming a Virtual Machine".
Resuming a suspended virtual machine is analogous to waking up a computer that has been in sleep mode. When you resume a suspended virtual machine, the operating system and applications continue from the same point you suspended the virtual machine.
The Oracle VM Server resources used by the virtual machine are not released. If you want to release these resources, you should shut down the virtual machine.
To resume a virtual machine:
Select the Home view, and select the virtual machine in the Server Pools folder.
Right-click on the virtual machine and select Resume from the menu.
The virtual machine state is retrieved and the virtual machine started.
When a virtual machine is not in use, you should shut it down to release system resources. Stopping a virtual machine is analogous to a normal shutdown of a physical computer.
If you want to save the state of the virtual machine, you should suspend it. See Section 8.9.3, "Suspending a Virtual Machine" for information on suspending a virtual machine.
To shut down a virtual machine:
Select the Home view, and select the virtual machine in the Server Pools folder.
Right-click on the virtual machine and select Stop from the menu.
Note:
You can also shut down a virtual machine from within your virtual machine, the same way you shut down a physical computer.Note
After issuing the stop command, the status of the VM is changed to "Stopped". However, this only indicates that the command was acknowledged. There is no guarantee that the VM is effectively shut down correctly. This is expected behavior since an operating system running on a physical pc may also "hang" during the shutdown sequence.
If the virtual machine fails to shut down, you can power it off using the kill virtual machine option, which is similar to unplugging the power cable from a physical machine. To perform a power off (kill) of a virtual machine, see Section 8.9.6, "Killing a Virtual Machine".
To kill a virtual machine is equivalent to performing a power off of a virtual machine, similar to unplugging the power cable from a physical machine. This is not the recommended method of shutting down a virtual machine, but may be used if the shut down command fails to shut down the virtual machine.
To kill a virtual machine:
Select the Home view, and select the virtual machine in the Server Pools folder.
Right-click on the virtual machine and select Kill from the menu.
Restarting a virtual machine is analogous to rebooting a computer. You may need to restart a virtual machine if an operating system update requires you to restart the virtual machine, for example Microsoft Windows updates.
To restart a virtual machine:
Select the Home view, and select the virtual machine in the Server Pools folder.
Right-click on the virtual machine and select Restart from the menu.
You can view information about a virtual machine on the virtual machine's Info tab. The Info tab contains information about the configuration, networks and storage, and jobs associated with the virtual machine.
To view details of a virtual machine:
Select the Home view.
Select the virtual machine from the Server Pools folder. The configuration information about the virtual machine is displayed in the Info tab.
The Configuration management pane contains information about the virtual machine's operating system, processors, memory, repository location, and so on. The Networks & Storage management pane contains information on the virtual machine's network configuration, virtual disks, ISOs, repository contents, and so on. The Jobs management pane lists all the jobs associated with the virtual machine.
All events associated with the virtual machine are displayed in the Events tab.
To edit the virtual machine details, see Section 8.9.9, "Editing a Virtual Machine".
To edit a virtual machine:
Select the Home view, and select the virtual machine from the Server Pools folder.
Right-click the virtual machine and select Edit from the menu.
The Edit Virtual Machine wizard starts. Follow the steps in the wizard to edit the virtual machine. See Section 8.7, "Creating a Virtual Machine" for the details of the wizard.
When you delete a virtual machine, all the files and data associated with this virtual machine are removed from Oracle VM Manager. Before deleting a virtual machine, make sure you do not need it any longer.
Note:
Delete the virtual machine only when the virtual machine status is Stopped or Error.To delete a virtual machine in the Stopped or Error status:
Select the Home view, and select the virtual machine from the Server Pools folder.
In the Toolbar, click the Delete button.
Select any virtual disks associated with the virtual machine that you want to delete. Click OK to delete the virtual machine and the selected virtual disks.
You can connect to a virtual machine using its console. The console is the remote control system of Oracle VM, and enables you to work and interact with your virtual machines.
If you have VNC Viewer (from RealVNC), or TightVNC Viewer installed on your client computer, the Oracle VM Manager user interface finds the installation and uses it to create the connection with the virtual machine. Oracle recommends you install RealVNC on the client computer as it renders more quickly, and has less mouse control issues than Tight VNC.
If no client viewer is available, the Oracle VM Manager user interface looks for TightVNC on the Oracle VM Manager host computer and uses this to create the connection with the virtual machine. See Oracle VM Installation and Upgrade Guide for information on installing TightVNC on the Oracle VM Manager host computer.
To connect to a virtual machine's console:
Select the Home view, and select the virtual machine in the Server Pools folder in the navigation pane.
Select Launch Console from the Actions menu.
A dialog box is displayed requesting to start a Java proxy to connect to the virtual machine. Click OK.
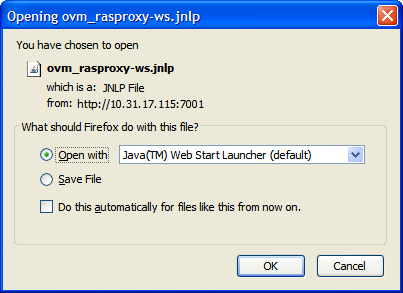
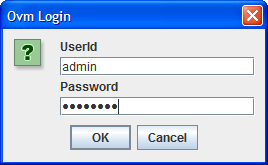
If a VNC viewer is found, it is started. A console login dialog box is displayed. Enter the login you use for Oracle VM Manager and click OK.
If the console does not start, check that your browser allows pop-ups to be displayed.
You can configure which VNC viewer to use with the Options > Configuration menu item of the Java proxy window. Enter the path to the VNC client and click OK. Use quotes around the path if it contains spaces.
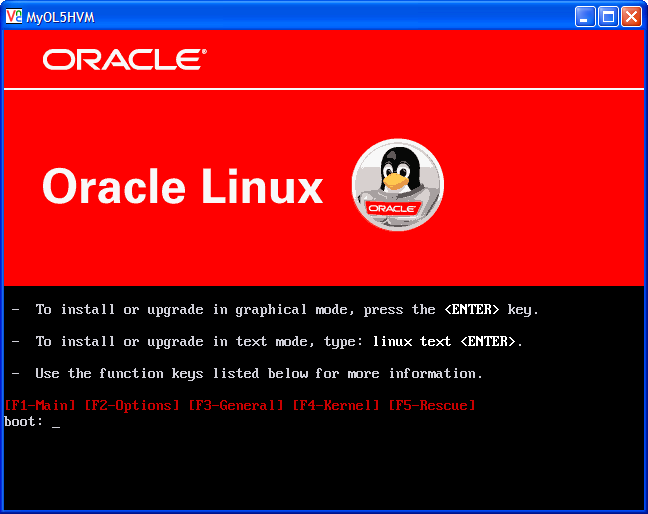
The virtual machine console is displayed. Log in and interact with the virtual machine as you would through any other VNC session. This example shows the initial installation screen for a virtual machine created with an Oracle Linux operating system ISO file.
If required, enter the user name and password of the guest operating system to log in to the operating system.
Depending on the method by which you created the virtual machine, you may need to continue with some further tasks before you can use the virtual machine.
If you created the virtual machine based on a template, you can directly use the guest operating system and applications installed in advance, without any further configuration.
If you created the virtual machine using the fully virtualized method, the installation of the guest operating system is triggered after your first login. Follow the installation wizard to install the guest operating system. For more information on creating virtual machines using the fully virtualized method, see Section 8.7, "Creating a Virtual Machine".
Note:
You must install the guest operating system using a single ISO file. If your operating system installer consists of multiple ISO files, you cannot install it.For information on the supported guest operating systems, see Oracle VM Release Notes.
For optimized performance, you can install paravirtualized drivers on hardware virtualized machines. Paravirtual drivers are optimized and improve the performance of the operating system in a virtual machine. These drivers enable high performance throughput of I/O operations in guest operating systems on top of the Oracle VM Server hosts.
Creating hardware virtualized machines may require that you install paravirtual drivers for your hardware on the guest operating system.
To install paravirtual drivers on an Oracle Linux guest operating system:
Download the paravirtualized kernel on the virtual machine, for example for an Oracle Enterprise Linux 5.5 64-bit guest, download:
http://public-yum.oracle.com/repo/EnterpriseLinux/EL5/5/base/x86_64/kernel-xen-2.6.18-194.el5.x86_64.rpm
Install the paravirtualized kernel on the virtual machine:
# rpm -ivh kernel-xen-version.type.rpm
 Preparing...                ########################################### [100%]
    1:kernel-xen             ########################################### [100%]
Back up the old initrd file, and make the new one with xennet, xenblk driver:
# mv initrd-oldversion.el5xen.img initrd-oldversion.el5xen.img.old
# mkinitrd initrd-newversion.el5xen.img newversion.el5xen --with=xenblk --with=xennet --preload=xenblk --preload=xennet
Edit the /boot/grub/grub.conf file to be:
default=0
timeout=5
splashimage=(hd0,0)/grub/splash.xpm.gz
hiddenmenu
title Enterprise Linux Enterprise Linux Server (version.el5xen)
        root (hd0,0)
        kernel /vmlinuz-version.el5xen ro root=LABEL=/
        initrd /initrd-version.el5xen.img
Modify the /etc/modprobe.conf file to include:
alias scsi_hostadapter xenblk
alias eth0 xennet
Shut down the virtual machine. See Section 8.9.5, "Shutting Down a Virtual Machine" for information on shutting down a virtual machine.
Edit the virtual machine and change the Domain Type to Xen PVM. See Section 8.9.9, "Editing a Virtual Machine" for information on editing a virtual machine.
Start the virtual machine. See Section 8.9.1, "Starting a Virtual Machine" for information on starting a virtual machine.
|
Copyright © 2011, Oracle and/or its affiliates. All rights reserved. Legal Notices |
|