| Oracle® Enterprise Data Quality for Product Data R12 PIM Connector User's Guide Release 5.6.2 Part Number E23408-01 |
|
|
View PDF |
| Oracle® Enterprise Data Quality for Product Data R12 PIM Connector User's Guide Release 5.6.2 Part Number E23408-01 |
|
|
View PDF |
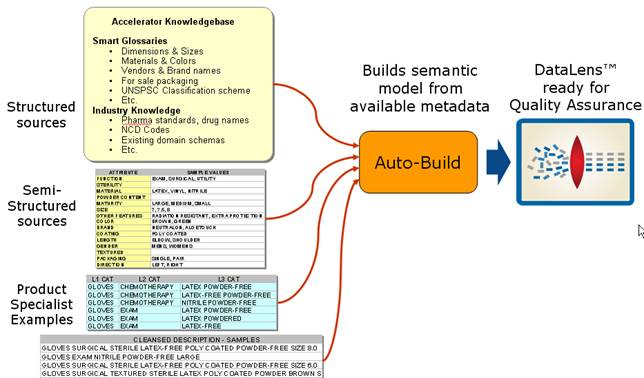
AutoBuild constructs a data lens by examining the available product metadata. Given sufficient information, AutoBuild can accomplish the following.
Construct a full Item Definition hierarchy, complete with required, scoring, and optional attributes
Construct rich term and phrase recognition rules
Provide an initial set of classification rules
AutoBuild offers a familiar, easy-to-use graphical wizard interface that guides you through the process from start to finish.
You create an initial data lens using AutoBuild, which extracts the Display Format metadata from the Oracle Item Class tables and retrieves sample data from the Product Data Hub Production tables. The Create Semantic Model Data Service Application (DSA) is run as a job from the EDQP Services for Excel and requires the ICC name as a parameter. The Create Semantic Model DSA looks for a Display Format name associated with the ICC string that matches the name configured in the system profile table for the DLS user. The default Display Format name is "SemanticModel" though any name can be configured as the default Display Format name. For more information about configuring this option, see Oracle Enterprise Data Quality for Product Data PIM Connector Implementation Guide.
The Create Semantic Model DSA and corresponding metadata pull process extracts the attributes for the ICC and all of its children. The parent catalog name is also extracted. The Display Format specifies which attributes will be inserted into a worksheet in Excel. The ICC determines which sections of the Item Class Hierarchy are extracted and the Display Format determines which attribute metadata to extract and create the initial data lens.
Once the attributes for the ICC (specified by the Display Format) have been extracted, EDQP AutoBuild is used to create a new data lens that represents the internal Semantic Model of the specified ICC in the EBS PIM. The data lens is then modified with additional grammar rules, standardization, and classification to improve the quality of the data loaded into EBS PIM.
The user profile options must be set for use with the R12 PIM Connector as follows:
Note:
The following steps are based on the EBS Release 12.1.3.0.0.Browse to the EBS Web site:
http://rws3210039.us.oracle.com:8095/OA_HTML/AppsLogin
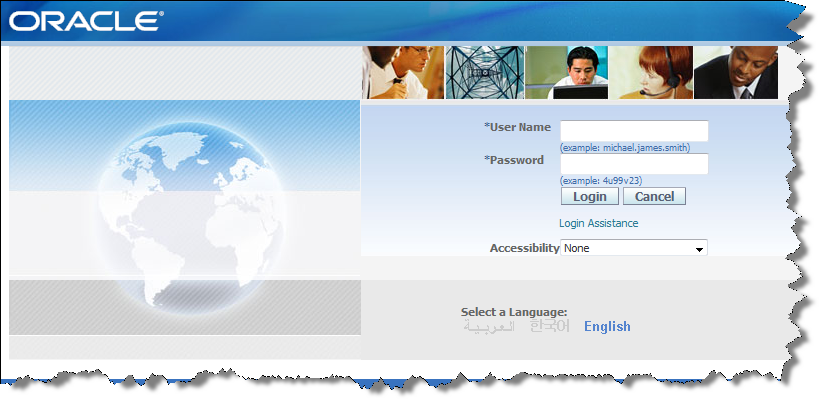
Log in to EBS as a user that has System Administrator privileges.
The Oracle Applications Home Page is displayed.
Click System Administrator.
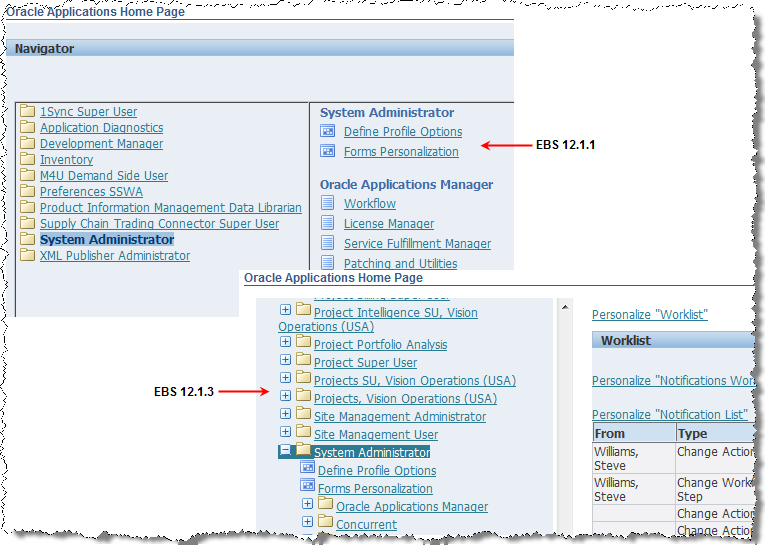
Click Define Profile Options.
An Oracle Forms application is started. If you are prompted to verify its digital signature, click Run to allow Oracle Applications to install and run.
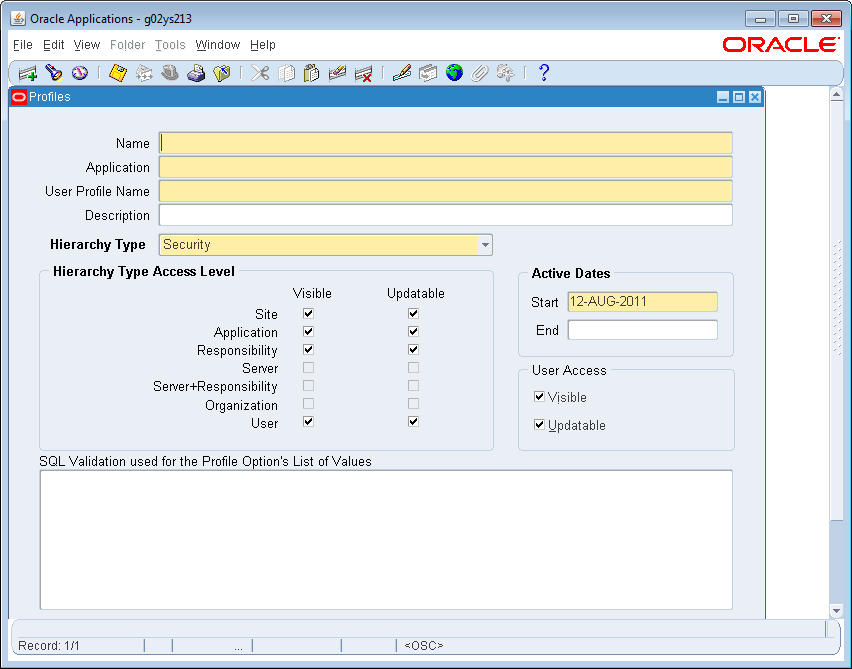
Close the Profiles dialog.
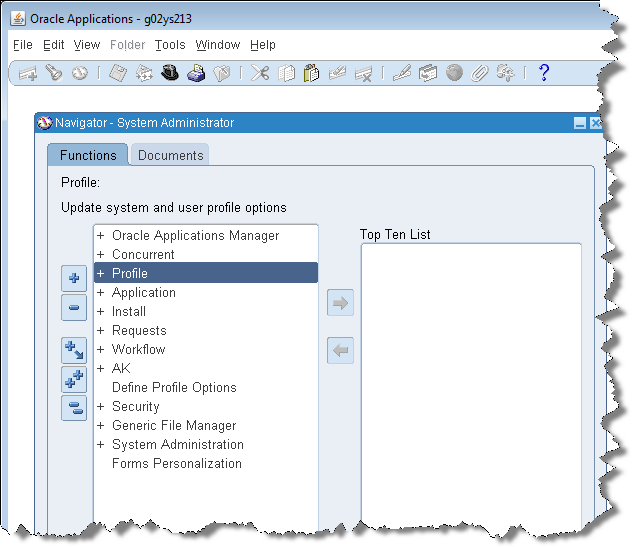
Double-click Profile to expand it.
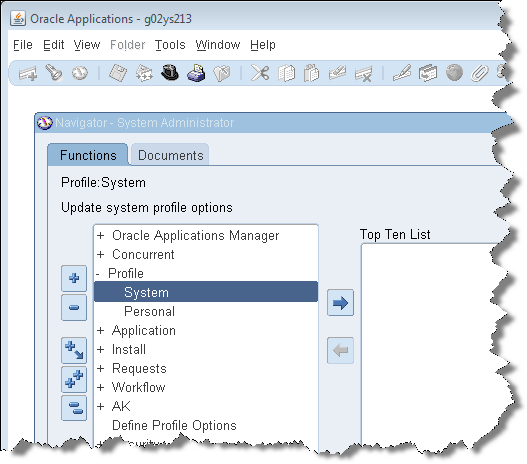
Double-click System.
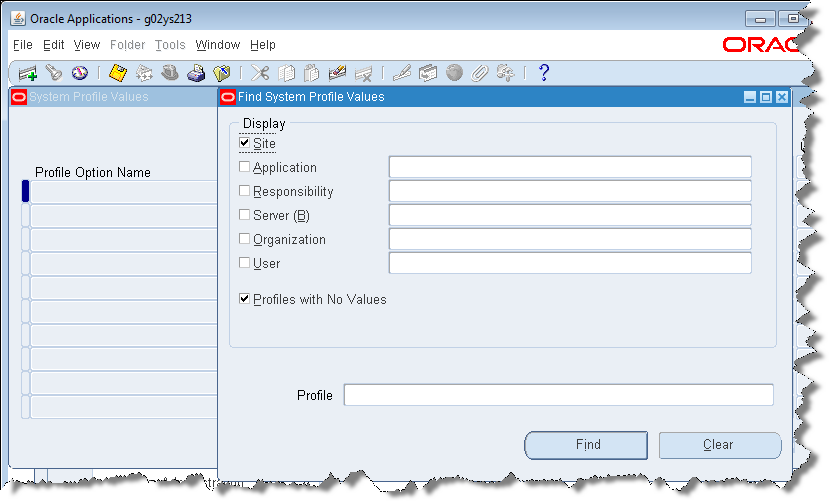
Enter DLS% in the Profile field and click Find to search for the profile options that must be updated.
You should use an existing user with correct rights, for example, PIMMGR or PLMMGR. The PLMMGR user has the necessary roles thus avoiding further configuration. The Vision Database user, PIMMGR, can be used as well. If you do not have a PLMMGR user, create the DLSUSER and DLSMANAGER users as described in "Creating R12 PIM Connector Users".
The Product Information Manager Data Librarian is used for two of these profile options.
These default values are populated during the R12 PIM Connector installation.
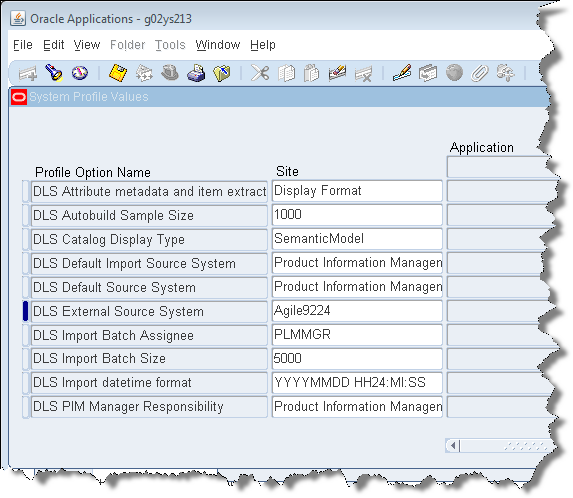
These system profile options are described as follows:
| Profile Option | Description |
|---|---|
| DLS Attribute Metadata & item extract | This option is not used in this release. A switch to toggle the method of metadata extraction. The two values are:
|
| DLS Autobuild Sample Size | Contains the number of rows pulled in the metadata pull for each ICC. |
| DLS Catalog Display Type | Matches the Display Format Type that was setup for the attributes at the catalog level. This is used to define the subset of item form, fit, and function attributes that EDQP will process. |
| DLS Default Source System | The name of the source system where the new batch is created and this is set to Product Information Management Data Hub. For example, a production pull that you are going use to clean the production data, you pull all the information and put it in the Staging or Interface Tables, and then create the batch against this source. |
| DLS External Source System | The default external system source name if one is not included with the external batch load. You must select one of the existing names from the list. In this example, it shows as Agile9224. |
| DLS Import Batch Assignee | Once the batch is created, you assign the batch to this user. If this is left blank, then the Production API will assign this to the PIM Manager User. For example, you enter PLMMGR or PIMMGR. This parameter is a fallback if the API is called without specifying the Import Batch Assignee. |
| DLS Import Batch Size | This is the "chunk size" for creating batches that contain a large number of records. For example, if you are creating a batch for a large set of data such as PLM High Tech. These separate batches are tied together with the DLS Job Id. This parameter is a fallback if it is not passed with the DLS API call. |
| DLS Import datetime format | When importing User Defined Attribute data, this holds the expected date and time format of the data. |
| DLS PIM Manager Responsibility | The user and the responsibility together set the context for the execution of the API. This information is used when the EDQPGovernance Studio needs to do a production pull. This information is passed to the Oracle APIs to pull the attribute information. For example, Product Information Management Data Librarian. |
| DLS PIM Manager User | The user that has the privilege to create the batch. This parameter is a fallback if the API is called without specifying the PIM Manager User. As an example, you enter PLMMGR or PIMMGR. |
| DLS import date format | The default date format. For example, you could enter YYYYMMDD. |
Click anywhere in the DLS External Source System field, and then click the ellipses to activate the associated list of DLS External Source Systems.
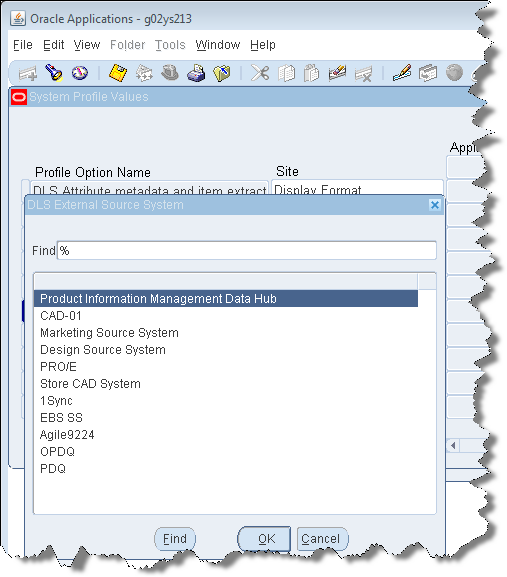
Select one of the default external source system value that you want to use, and click OK. This name must exist in the EBS PIM system.
Exit Oracle Applications.
An informational message that your changes to the form have been saved is displayed.
Click OK to close the dialog.
You must determine the target ICC before a data lens can be created. This requires the creation of an Oracle ICC Name.
The data lens creation process relies on each ICC Name being setup correctly and named correctly. The data lens is associated with the Item Catalog hierarchy. The following shows the "Capacitor" hierarchy, as laid out in the Vision Operations ICC.
- PLM High Tech
- Electronic Components
- Passives
- Capacitors
Set the display format:
Browse to the EBS Web site:
http://rws3210039.us.oracle.com:8095/OA_HTML/AppsLogin
Log in to EBS.
The Oracle Applications Home Page is displayed.
For EBS 12.1.3, click Favorites to display the menu.
From the Favorites list, click Setup Workbench.
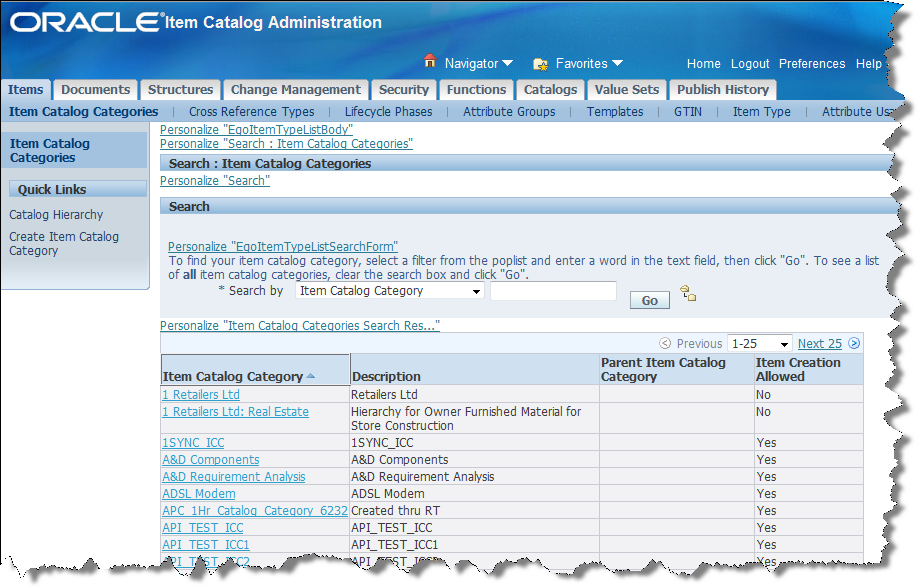
Search the Item Catalog Category for the category you want to create a semantic model for by entering a search term then click Go.
For this example, enter "Capacitors" into the search field and click Go.
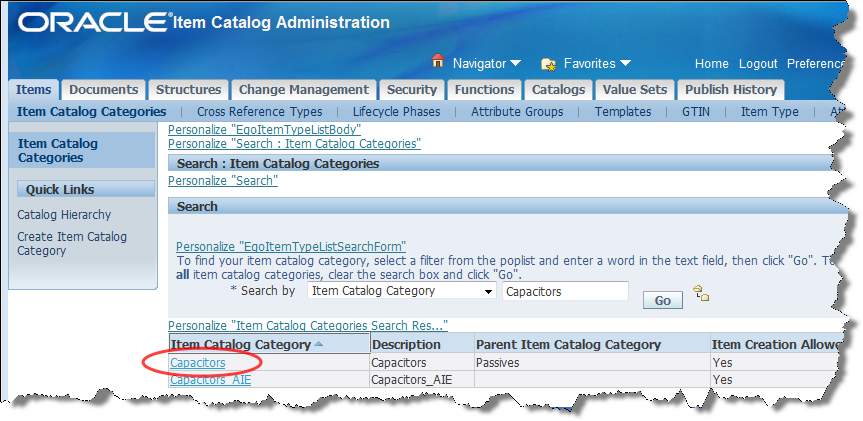
Click Capacitors.

From the left navigation menu, click Display Formats to create the Semantic Model definition created from a set of attributes available in the Product Data Hub.
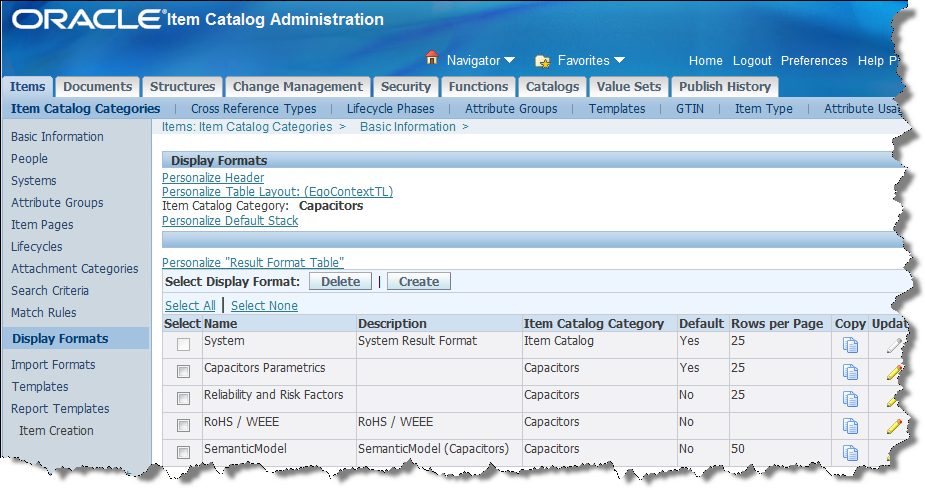
The Display Formats page allows you to create, copy, edit (update), or delete a Display Model.
Begin creating the Display Format as follows by clicking the Create button.
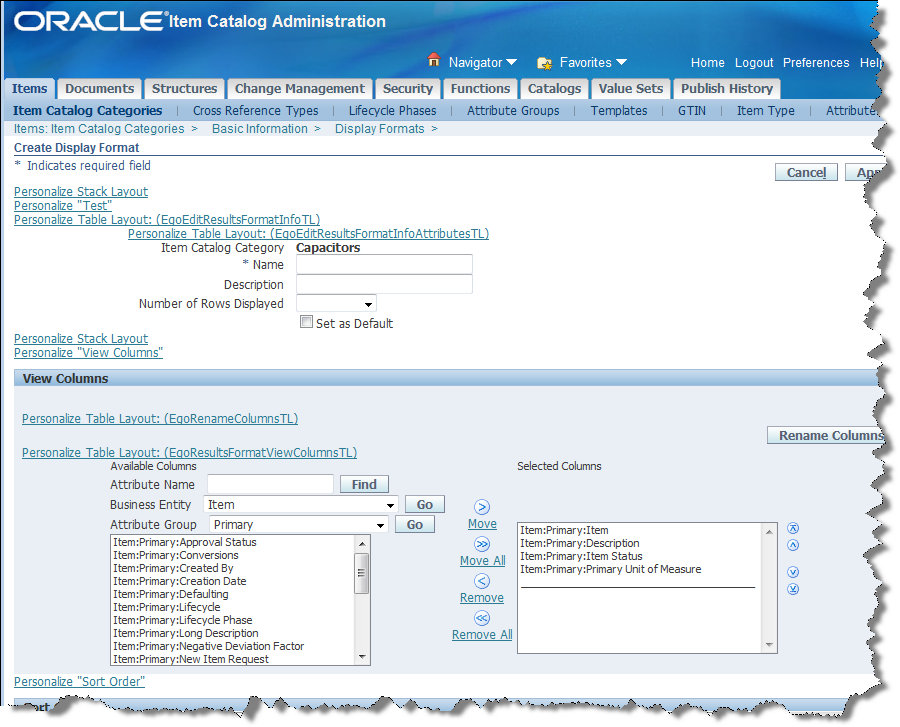
Enter "SemanticModel" into the Name field.
Enter "DataLens Semantic Model Attributes" into the Description field.
Select 100 from the Number of Rows Displayed list.
Select the Set as Default check box.

Select Attributes from the Attribute Columns list on the left side (there are a set from the Primary Attribute Group by default in the Selected Columns list).
Click Remove All to remove all of the Item:Primary: attributes from the Selected Columns pane.
From the Business Entity list, select Item.
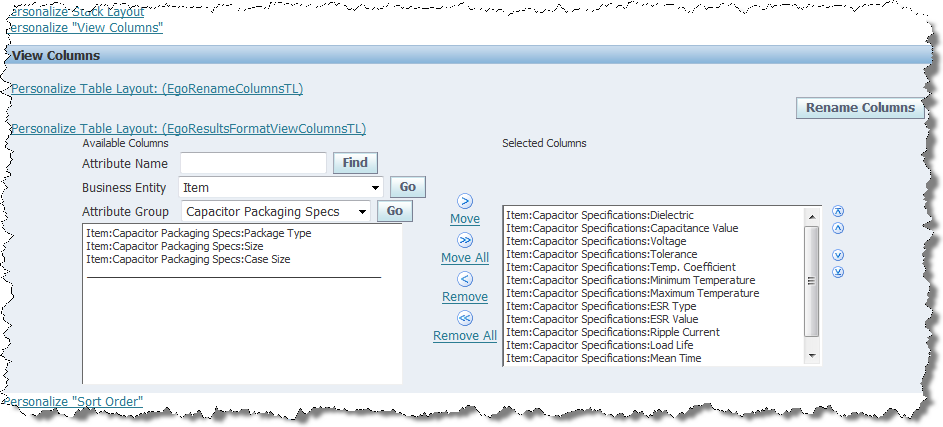
Each Attribute Group has a set of Attributes values. From the Attribute Group list, select Capacitor Specifications, and then click Go.
The set of attributes associated with that Attribute Group is displayed.
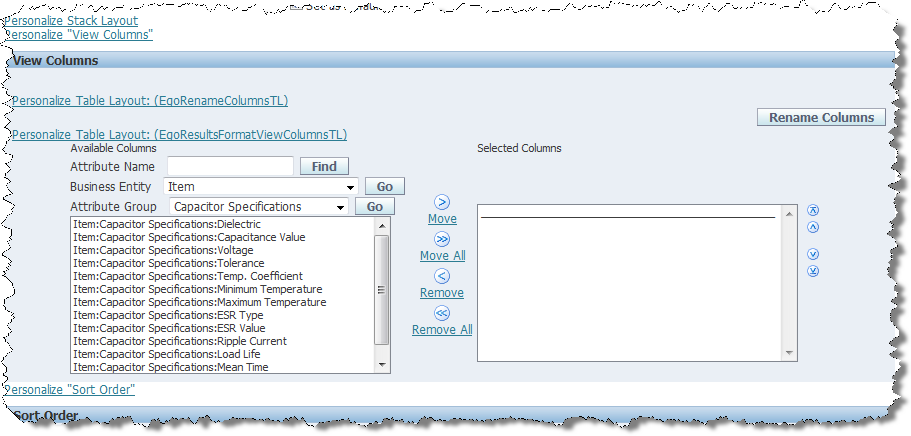
From the Available Columns list, select all of the Item:Capacitor Specifications attributes, and then click Move All.
All of the Capacitor attributes are moved to the Selected Columns list.
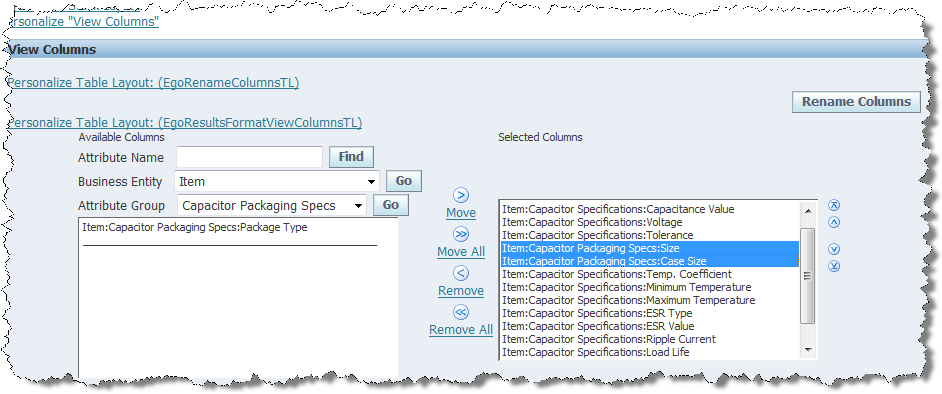
From the Attribute Group list, select Capacitor Packing Specs, and then click Go.
From the Available Columns list, select Item:Capacitor Packing Specs:Case and Item:Capacitor Packing Specs:Case Size, and then click Move.
The attributes in the Selected Columns list should be the following:
| Business Entity | Attribute Group | Attribute |
|---|---|---|
| Item | Capacitor Specifications | Capacitance |
| Item | Capacitor Specifications | Dielectric |
| Item | Capacitor Specifications | Voltage |
| Item | Capacitor Specifications | Tolerance1 |
| Item | Capacitor Packing Specs | Case |
| Item | Capacitor Packing Specs | Case_Size |
| Item | Capacitor Specifications | Temp_Coefficient |
| Item | Capacitor Specifications | Min_Temperature |
| Item | Capacitor Specifications | Maximum_Temperature |
| Item | Capacitor Specifications | Mount |
| Item | Capacitor Specifications | ESR_Type |
| Item | Capacitor Specifications | ESR_Value |
| Item | Capacitor Specifications | Ripple_Current |
| Item | Capacitor Specifications | Load_Life |
| Item | Capacitor Specifications | Mean_Time |
The attribute order is important because it will be the default attribute order in the data lens that you create using AutoBuild.
Reorder the attribute order in the Selected Columns list using the arrow buttons to the right so that theItem:Capacitor Packing Specs:Case and Item:Capacitor Packing Specs:Case Size attributes immediately follow Item:Capacitor Specifications:Tolerance.
Click the Apply button.
A new Display Format named "SemanticModel" with all of the specified attributes is created for input into the AutoBuild process.
You must create a database connection for use by the EDQP DSAs to process data. This database connection is created in the EDQP Oracle DataLens Administration Server using the Oracle DataLens Administration Server Web pages. For more information, see Oracle Enterprise Data Quality for Product Data Oracle DataLens Server Administration Guide.
Browse to the Oracle DataLens Administration Server Web pages:
Where server is the name of your Oracle DataLens Server.
Log in.
From the Configuration section of the menu, click Database Connections.
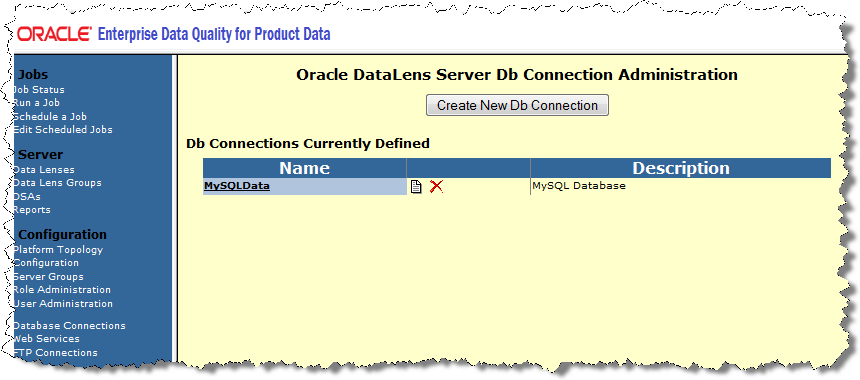
Click Create New Db Connection.
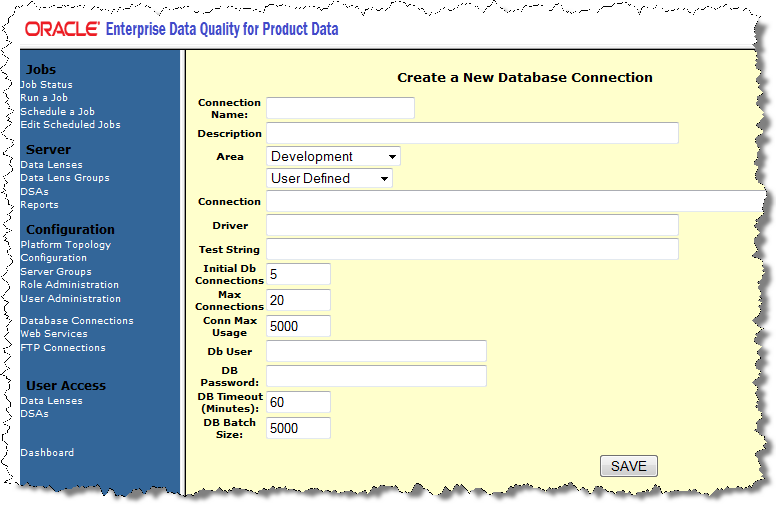
From the list above the Connection field, select Oracle as the connection type. The form is then populated for you with default information.
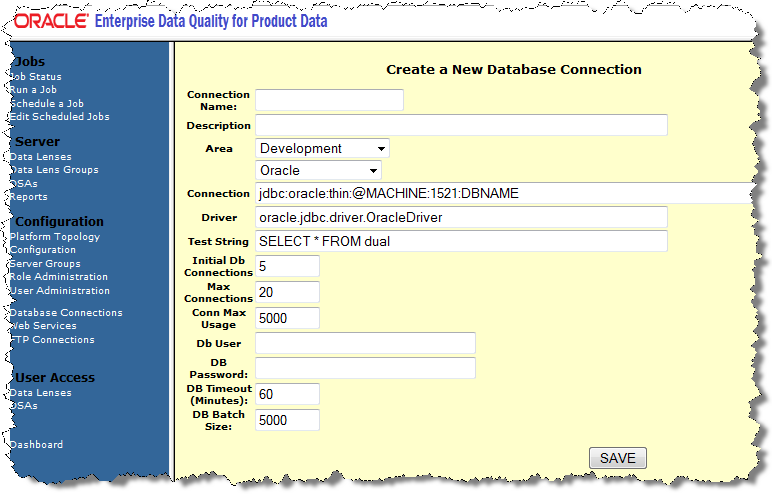
In the Connection Name field, enter PIM_Connector.
The Connection Name must be this exact name or the process will not work correctly. The DSAs rely on the presence of this exactly named connection.
Complete the form:
Enter a description for this database connection.
In the Connection field, edit the machine name, Oracle Database Port, and Database SID to match your environment.
In the following example, these values are set to:
rws3210039.us.oracle.com:1616:pim1213
The Oracle Database Port default value is 1521.
Enter the Db User name.
Enter the DB User password.
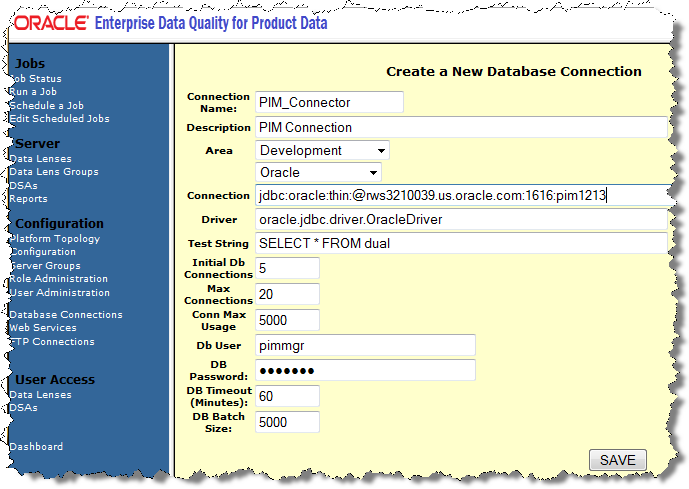
Click Save.
Save the connection information and it is added to the list of database connections to which you are returned.
Click the PIM_Connector database connection.
Click the Test Saved Development Connection button to verify that your EDQP Named Development Database Connection is working properly. The following message should be displayed:
SUCCESSFUL test of the database connection
You use Services for Excel to import the ICC and Attribute metadata from the Oracle PIM Data Hub system to create the import files for use by AutoBuild. For more information about Services for Excel, see Oracle Enterprise Data Quality for Product Data Services for Excel Reference Guide.
Start Excel.
From the Services for Excel toolbar on the Add-Ins tab, click the DataLens Tools and select Job Options to set the necessary job parameters.
You are prompted to log in to your Oracle DataLens Server.
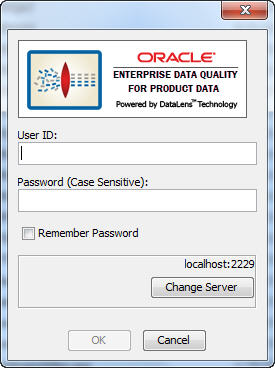
Enter your user id and password, and then click OK.
Optional: Use the Change Server button to login to a different server or use Secure HTTP.
Select the AUPIM_CREATE_SEMANTIC_MODEL DSA from the DSA list.
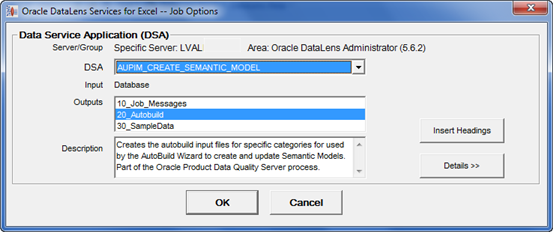
Click Insert Headings to update your open Excel workbook with the correct input and output column headings as defined by the DSA, and then click OK.
The following three sheets are created:
The 10_Job_Messages worksheet contains information about DSA jobs that have run and any messages that occurred.
The 20_Autobuild worksheet contains the following columns:
| Columns | Definition |
|---|---|
parent_catalog_group_id |
System ID |
parent_catalog_group |
ICC Parent Hierarchy Node Name |
catalog_group_id |
System ID |
catalog_group |
ICC Name |
attr_id |
System ID |
attr_name |
Attribute name |
attr_value |
Attribute value |
attr_uom |
Attribute is a Unit of Measure |
valueset |
Set attribute values to be used |
These exact columns must be present and in this order for the DSA job to run correctly.
The 30_SampleData worksheet contains the following columns
| Columns | Definition |
|---|---|
catalog_group |
ICC Name |
item_number |
Part number |
description |
Attribute description |
Click the Process Records button to run the AUPIM_CREATE_SEMANTIC_MODEL DSA to create the AutoBuild input sheets for use by the R12 PIM Connector.
The AUPIM_CREATE_SEMANTIC_MODEL DSA is then run.
Note:
If the following message is displayed, then the DSA Job Options are not set properly: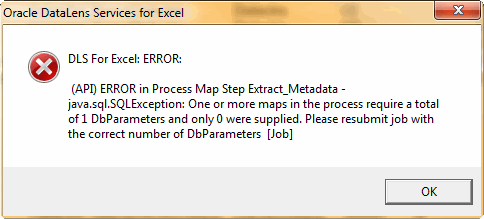
Click the DataLens Tools button and select Job Options, and then return to step 4.
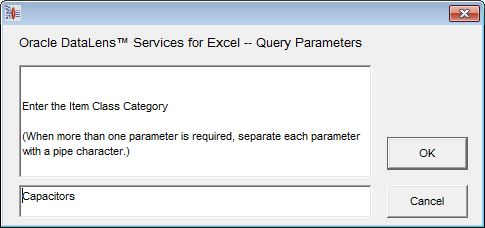
Enter the ICC parameter associated with the data lens that you are building and click OK. For example, "Capacitors".
The job is submitted to the server for processing.
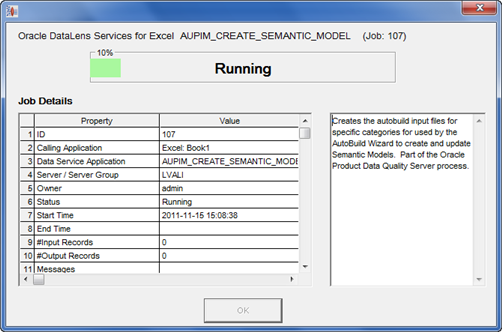
Click OK.
The 10_Job_Messages, 20_Autobuild, and 30_SampleData sheets are populated with data for use by AutoBuild.
Continue to the next section, "5. Using AutoBuild Wizard in Excel to Create a Data Lens".
AutoBuild constructs a data lens from the available product data metadata. This worksheet is prepopulated by Services for Excel with all of the necessary AutoBuild values. Also, if product data is available in PIM, the DSA job pulls a distinct set of product data, writes it to the 30_SampleData worksheet, and that data is used to create sample data files in the data lens.
Given the correctly formatted information, AutoBuild will accomplish the following.
Construct a full Item Definition hierarchy based on the ICC, complete with required and scoring attributes
Construct rich term and phrase recognition rules
Create Match Rules (Exact and Close Match)
Create Standardizations Types
Create Value Sets
Construct a data lens using AutoBuild and the metadata you created in the previous section:
Ensure you have completed the steps in "4. Processing the ICC Import from Excel".
Select the 20_AutoBuild sheet.
From the Services for Excel Add-In tab, click the AutoBuild button to start the AutoBuild process.
Select the Generate a new DataLens option.
AutoBuild automatically recognizes the headers created from the AUPIM_CREATE_SEMANTIC_MODEL DSA run and will prepopulate the values in each of the steps.
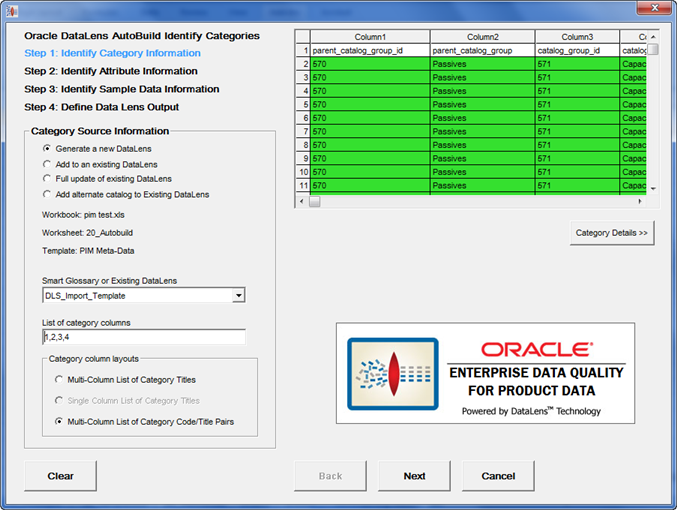
The following values are prepopulated in the AutoBuild wizard when you have selected the Generate a new DataLens option:
| Step and Option | Value |
|---|---|
| Step 1: Identify Category Information | |
| Generate a new DataLens | Selected |
| Smart Glossary | DLS_Import_Template |
| List of category columns | 1,2,3,4 |
| Category column layouts | Multi-Column List of Category Code/Title Pairs |
| Step 2: Identify Attribute Information | |
| Required Attributes Options | |
| Add Required Attributes | Selected |
| Item Name Column(s) | 4 |
| Scoring Attributes Options | |
| Add Scoring Attributes | Selected |
| Attribute names are in the same row at the category | Selected |
| Row contains Attribute Name/Value pairs/UOM | Selected |
| Scoring Attributes | 6,7,8 |
| Single term columns | 6,7,8 |
| Attribute Details | Select Attribute Details << |
| Phrase Separator | ; |
| Maximum Terms in a Phrase | 5 |
| Step 3: Identify Sample Data Information | |
| File Selection Options | |
| Use current file | Selected |
| Sample Data Worksheet | 30_SampleData |
| Sample Data Rows and Columns Options | |
| Id Column | 2 |
| Group By Column | 1 |
| List of Sample Data Columns | 3 |
| Step 4: Identify Sample Data Information | |
| Data Lens Options | |
| Generate / Update Data Lens | Selected |
| Open New / Updated Data Lens | Selected |
| New / Updated Data Lens | Enter a unique Data Lens Name |
| Output Details Options | Select Output Details << |
| Create Match Rules | Selected |
| Define Exact Match | Exact_Match 4 |
| Define Close Match | Close_Match 1 |
| Generate Report | Selected |
| Use alias for Ids | Selected |
Click Next on Steps 1 through 3 of the AutoBuild Wizard to advance it.
On Step 4 of the AutoBuild Wizard, click the Output Details button.
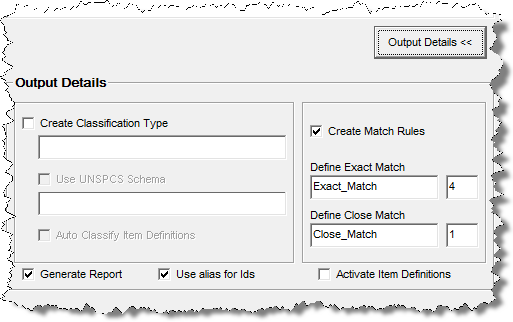
These two check boxes are optionally used as follows:
Generate Report - Select to generate a set of AutoBuild reports that is added to the open workbook as new sheets. These reports include, AutoLearning Metrics Report, Semantic Knowledge Structure, and AutoBuild Details Report. These reports represent the results of the AutoBuild knowledge building process and correspond to the data lens that is built.
For more information about AutoBuild Reports, see Oracle Enterprise Data Quality for Product Data AutoBuild Reference Guide.
Use alias for Ids - Automatically selected to use the worksheet headers generated as the alias for Item Definitions and attributes.
Activate Item Definitions - Select to activate the Item Definitions created in your data lens from your source data.
The Item Definitions created by AutoBuild may be incomplete, so if the Item Definitions are not closely reviewed in Knowledge Studio before the data lens is checked in for production use, the result is that many matches are found for incomplete Item Definitions. You can set the Item Definitions in the data lens to be included in the output data by setting the active and inactive flags using this check box. The Knowledge Studio recognizes your data using all Item Definitions though does not standardize the output data in Production mode if the inactive flag is set. In other words, all Item Definitions are always used for recognition, but does not extract or standardize the output data. This is applicable to Production and QA Oracle DataLens Servers only; Development servers ignore the inactive flag.
By default, Item Definitions created by AutoBuild are set to inactive so this check box is not selected.
Click Finish to complete the AutoBuild Wizard.
The initial data lens is built with the Item Definition (Category) and attribute structure shown in the pre-configured AutoBuild settings.
EDQP is started and you are prompted to log in.
Enter your user id and password, and then click OK.
The Knowledge Studio is started and you are prompted to select a data file.
Click Browse.
Select a data file and click Open.
In the Check-Outs dialog, click OK to close it.
You data lens is opened so that you can review and refine it.
For more information about the Knowledge Studio, see Oracle Enterprise Data Quality for Product Data Knowledge Studio Reference Guide.
Continue to the next section, "6. Reviewing and Refining the Data Lens".
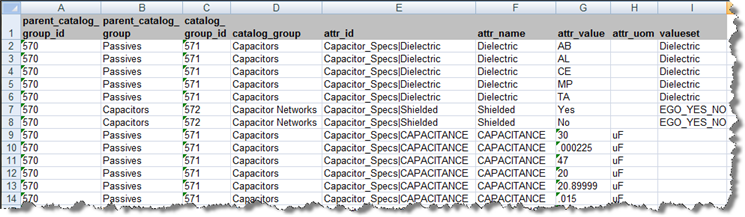
Certain attributes may have been set up in PIM to have value sets and valid values. The attribute values are restricted such that only the values specified are valid. When you create a Semantic Model, this value set and valid information is exported from the R12 PIM Connector and it appears in your metadata worksheet. The data lens created from the metadata will reflect the valid value and value set information from the metadata worksheet. If there is a value set for an attribute, the valueset column will be populated with the name of the valueset, and the valid values appear in the attr_value column as in the following example:
There are two types of value sets: Standard Value Sets and Yes/No Value Sets. The following describe how the R12 PIM Connector handles them in a data lens:
In a standard value set, the valid values correspond to the standardized forms of attribute values that are likely to be found in product data. In this example, 'Dielectric' is the attribute identified in the 'value set' column and 'AB', 'AL', 'CE', 'MP', and 'TA' in the 'attr_value' column. The value is considered to be an abbreviation unless it exceeds four characters, in which case, the fullform in the EDQP Knowledge Studio is set to this value. For example using the metadata in "Value Set Example Spreadsheet", 'AL' would set the term as an abbreviation while 'Aluminum' would set it to the full form. The phrase structure for the abbreviation is:
The Yes/No value set is a special form of the value set; this value set has 'yes' and 'no' (and alternate forms, such as 'y' and 'n') as the valid values. For example, using the metadata in "Value Set Example Spreadsheet", the value set is a yes/no value set, and the valid values are "yes" and "no". The data lens is created such that there are phrase and term rules to recognized forms of "shielded" and "not-shielded". Additionally, the standardization rules for these 'y' and 'n' attributes will be set to "yes" and "no". The phrase structure for the yes, or shielded, term is:
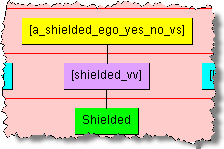
All variations of both yes and no are created in the data lens. For example, the variations of 'not shielded' would be:
In the data lens, all value set phrase rule names are created with a '_vs' appended to the attribute and '_vv' appended to the term rule name so that they are easily identified in phrase structures.
When using value sets, be sure to refine your data lens as described in "Refining Value Sets in a Data Lens".
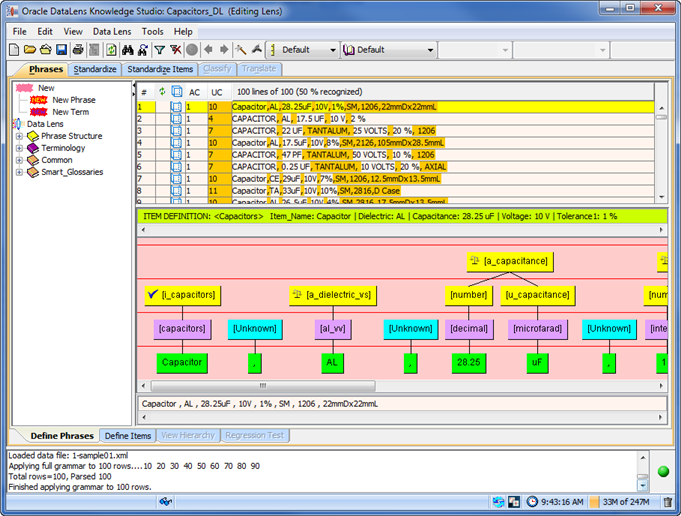
Review the data lens to confirm proper creation. The data lens should have the correct Item Definitions, Attributes, Phrases, and Terminology as defined by the AutoBuild process.
You should review the data lens and add any undefined terminology to complete the process. The following example shows the term "Tantalum" not being recognized by the "capacitors" Item Definition thus it is "Unknown".
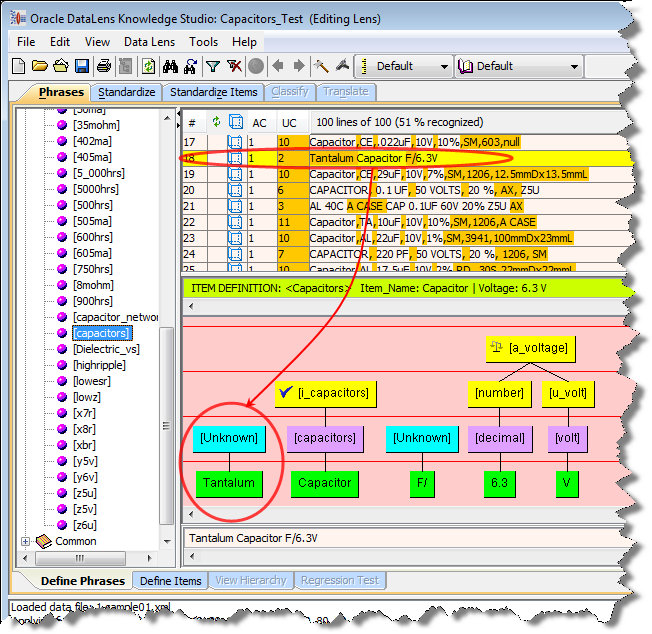
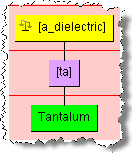
This is a variant of 'ta', which is a type of dielectric. You would make the addition to refine the data lens as in the following example:
For more information, see Oracle Enterprise Data Quality for Product Data Knowledge Studio Reference Guide
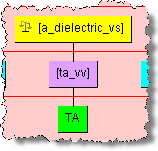
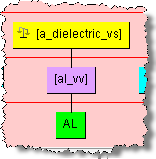
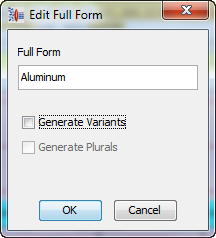
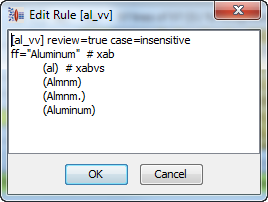
Refining value set phrase structures in the Knowledge Studio is the same as described in the previous section. Since it is possible for some terms to become reassociated with other phrases, it is necessary to review those attributes in your data lens that are based on value sets. For example, the 'Aluminum' attribute could be a production of the 'a_dielectric_vs' phrase rule as intended in "Value Set Example Spreadsheet". When appropriate, it is important to refine your data lens value sets by adding the full forms for the valid value term rules which are abbreviations. For example, you will need to add the term variant 'aluminum' to the term rule 'al_vv'. Additionally, set the full form to be 'aluminum. Using the 'Aluminum' example as in the following phrase rule:
You would edit the 'al_vv' term and add the 'Aluminum' full form (variants can be generated as well):
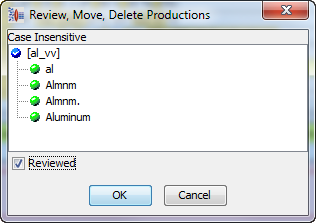
Then review the phrase rule to ensure that it was added properly:
Finally, review the productions of the 'a_dielectic_vs' phrase rule:
Note:
Since AutoBuild ignores duplicate phrase productions when created from a value set, you should review all productions carefully.For the R12 PIM Connector, the relevant rules are located in the 'Match_Attributes' Standardization Type. For standardization of data related to R12 PIM Connector loads, all of your refinements should be made to the 'Match_Attributes' Standardization Type.
You can view the available standardizations from the Standardizations list on the toolbar.
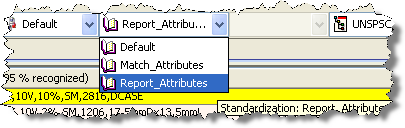
Note:
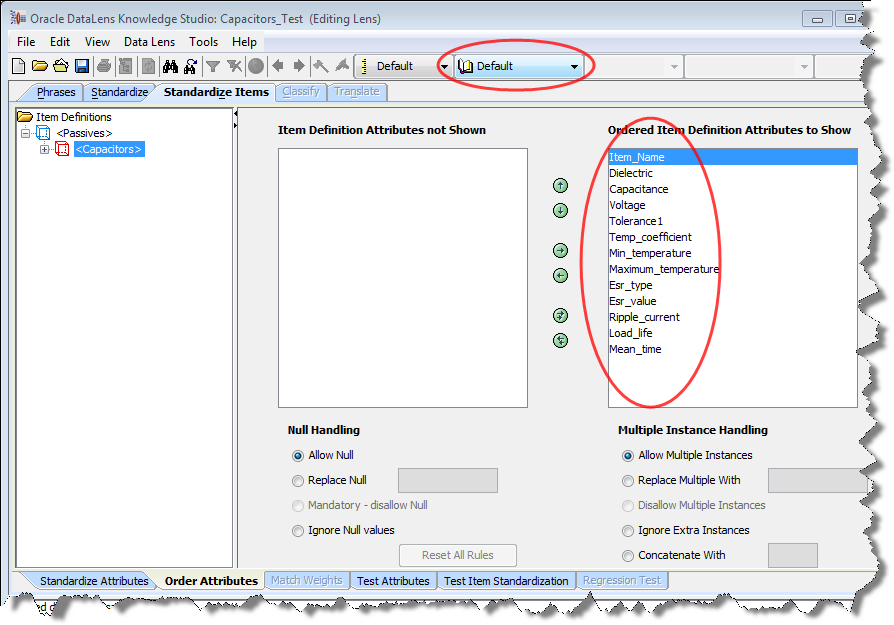
The attribute order is the same order as the name/value attribute order in the20_AutoBuild worksheet of the open workbook, which is based on the Display Format order.
For the Match_Attributes standardization, there should be two Match types created (Exact_Match with four attributes and Close_Match with one attribute).
For example, the Match_Attributes Standardization Type has the following attribute order:
You should review and change the attribute ordering if necessary, create phrase standardizations and replacements appropriate to the data lens, and then check the data lens in.
The purpose of regression testing is to validate that maintenance to the data lens has not created any ambiguities or issues compared to a previously saved version of the data lens. This important step should be performed after changes have been made to a mature data lens.
Regression testing can be accessed from the phrases, standardization and classification tabs. You should set the Regression Testing Active option from the DataLens Options to create the base file to enable Regression testing.
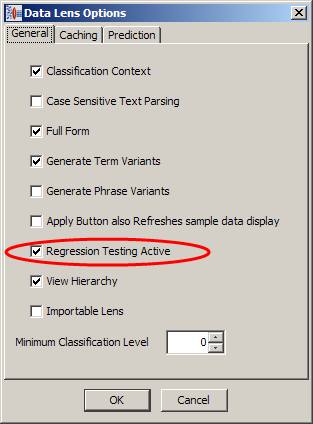
Description of the illustration image029.png
For more information about setting up and using Regression tests, see Oracle Enterprise Data Quality for Product Data Knowledge Studio Reference Guide.
Once you are happy with the data lens works, you should contact your Administrator to associate this new data lens with the cleansing and matching process.
Enterprise DQ for Product uses patented Semantic technology to create a set of standardized attributes that are output to generate a set of master data or Semantic Key 1 Cache. The cache represents a "semantic" index created from the extracted and standardized attribute information from the R12 PIM Connector.
After you have created the cache, it can be used to rapidly match (compare) requested products to the items found in the cache. Any matches are returned to enable further processing such as form, fit or functional equivalents or duplicate detection to protect the R12 PIM Connector from the addition of identical records.
Open the Governance Studio and run the Update_Semantic_Cache job. You are prompted to enter the Category (for example, Capacitors). Once this job has run, it produces the Semantic Key 1 Cache for that Category with typically no results shown in a Governance Studio tab for successful items. Two review tabs, Unassigned_Semantic_Key and Unassigned_Item_Class, are created to provide you with information about exceptions.
At the end of the process, you will have a complete Semantic Key 1 Cache. This is really an IT function and can only be confirmed by looking at the database. For more details, see Oracle Enterprise Data Quality for Product Data PIM Connector Implementation Guide.
The process is typically run on a periodic basis (for example, nightly) to ensure that new updates to the R12 PIM Connector are included in the cache.
|
Copyright © 2001, 2011, Oracle and/or its affiliates. All rights reserved. Legal Notices |
|