| Oracle® Enterprise Data Quality for Product Data AutoBuild Reference Guide Release 5.6.2 Part Number E23608-02 |
|
|
View PDF |
| Oracle® Enterprise Data Quality for Product Data AutoBuild Reference Guide Release 5.6.2 Part Number E23608-02 |
|
|
View PDF |
The AutoBuild function is accessed using the AutoBuild button on the Services for Excel toolbar as shown in the following:
Tip:
The tooltips appear when you rest your mouse pointer on a menu item, button, tab, icon, or similar content.Tip:
If you press and hold the Shift key and click the AutoBuild button, you are advanced directly to Step 4 of the AutoBuild User Interface Wizard. For more information, see "Step 4: Define Data Lens Output".If this toolbar does not appear in Excel, then Services for Excel may not be installed.For installation instructions and more information, see Oracle Enterprise Data Quality for Product Data Services for Excel Reference Guide.
When you click the AutoBuild button, the following message may be displayed:
No data lenses were found.
Source DataLens DLS_Import_Template not found -- please select another lens or check out this lens before running AutoBuild
This means that the DLS_Import_Template Smart Glossary data lens has not been checked out of Knowledge Studio. Ensure that you open Knowledge Studio and check out the DLS_Import_Template data lens as read-only from your Oracle DataLens Server. For installation instructions, see Oracle Enterprise Data Quality for Product Data Knowledge Studio Reference Guide.
The AutoBuild user interface is a four-step wizard that allows you to select how you want your initial data lens to be created. You start the wizard by clicking on the AutoBuild button on the AutoBuild toolbar.
Tip:
It is good practice to save all open Excel workbooks before you start the AutoBuild wizard.The first step of the AutoBuild wizard is Identify Category Information.
Note:
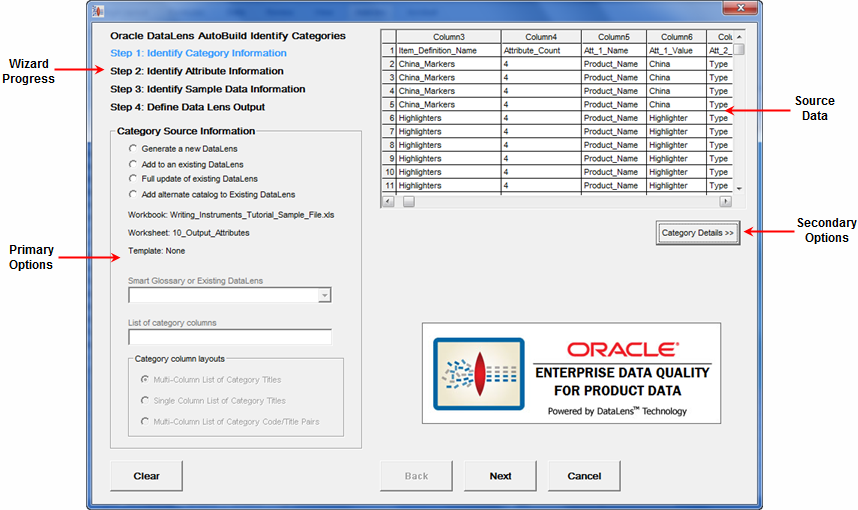
The active Excel Workbook cannot be accessed while the AutoBuild wizard is in use.Each step of the wizard contains the four following four areas:
The title of the active step of the wizard is colored blue.
The metadata from the active Excel worksheet is displayed. The columns can be resized as in Excel and you can use the arrows to scroll up and down to view more metadata. The columns are colorized as you make selections.
The controls in this area allow you to select the necessary (primary) options for the step.
The button in this area activates the additional (secondary) options that you can select for the step. The default secondary options are selected for you if no changes are made or the area is not activated.
The following buttons appear in each step and are active when appropriate:
Resets the wizard selections so that you can start a new data lens creation process with the active Excel workbook.
Returns the wizard to the previous step to review or make changes in selections.
Advances the wizard to the next step in the process.
Exits the AutoBuild wizard; does not save any selections.
The first step of the AutoBuild wizard is to identify category information and its use is described in this section. The first time the AutoBuild wizard is opened from a worksheet, the active Excel worksheet is chosen by default as the data source.
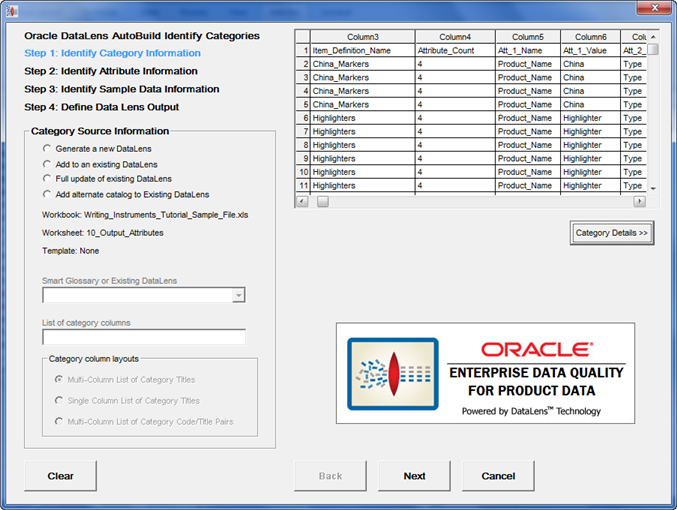
The controls in this section are used as follows:
These options operate in conjunction with your selection from the Smart Glossary or Existing DataLens list and are active based on this list. Select how you want AutoBuild to generate your data lens from the following options:
Generate a new DataLens
Creates a new data lens and is active when the DLS_Import_Template data lens is selected.
The following three options are visible when a data lens other than DLS_Import_Template is selected from the Smart Glossary or Existing DataLens list:
Add to an existing DataLens
Adds new attributes and item definitions to an existing data lens.
Full update of existing DataLens
Adds new and updates existing attributes and item definitions to an existing data lens. Classification schemas can also be updated using this option.
Add alternate catalog to Existing DataLens
Adds a new user-defined classification schema to the selected existing data lens. This new alternate catalog may either be added to a data lens as simply a new classification schema or it can be added and at the same time classification rules can be automatically created as follows:
Adding an alternate catalog to a data lens (does not create classification rules) -
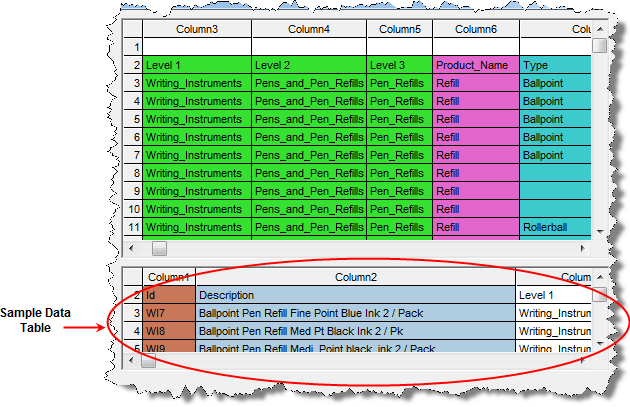
You can add a classification schema to a data lens, the alternate catalog must have the following format and column names:
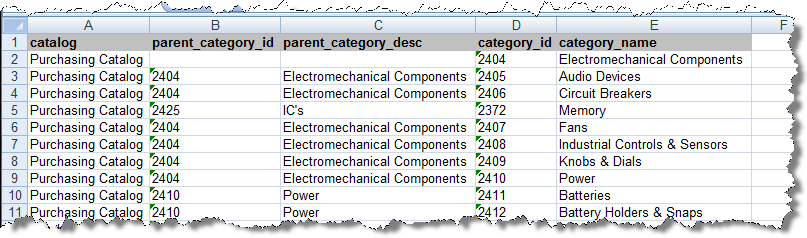
After you have added this catalog to your data lens, you can manually create classification rules within the data lens (using Item Definitions and/or rules).
Note:
This functionality can also be used more generally for creating classification schemas to add to data lenses. As long as the classification schema has the correct format, Autobuild will create a classification schema for use in a data lens.Adding an alternate catalog to a data lens and create classification rules -
You can create classification rules at the same time that you add an alternate catalog. When this function is performed, you are creating classification rules that map Item Definitions in your existing data lens to the categories in your new alternate catalog (classification schema). To do this, you must meet the following requirements:
The alternate catalog spreadsheet must contain the columns described in "Adding an alternate catalog to a data lens (does not create classification rules) -".
The Item Definitions in your existing data lens must have the Description fields populated.
The alternate catalog spreadsheet must contain the column, mapped_primary _catgories.
If you have a mapping for a alternate catalog to your Item Definition, the mapped_primary _catgories column must contain the Description of the Item Definition that should be classified to that category.
The following is an example of these requirements:

Note:
Since the category to Item Definition mapping is performed using the Item Definition description, the Item Definition description field (in the data lens) must be populated, and values in themapped_primary _catgories column must reference the Item Definition descriptions (not the Item Definition names).AutoBuild displays the current Excel workbook, worksheet, and template information.
Select a Smart Glossary or data lens to be used for data lens generation. You can create and use your own combination of Smart Glossaries that is most applicable to your domain data.
Note:
The "DLS_" prefix to a data lens name is reserved to indicate a Smart Glossary thus the selection of any data lens using this naming convention is assumed to be a Smart Glossary. For example, the default Smart Glossary is DLS_Import_Template.Note:
If the data lens names do not display properly (as is sometimes the case with double-byte characters), ensure that your Windows region and language options are set properly. For more information, see Windows Help.Use this field to specify the columns to use for the item definition hierarchy in the data lens. For example, the item definitions in the data lens will correspond to the item catalog categories in your item master. The column order is assumed to be from left to right with the parent categories to the left and the child categories to the right. You can use numbers, dashes, and commas to specify a range of columns, or a combination of range(s) and single column(s).
You must confirm your category column list entry by pressing the Tab key or selecting another user interface option. Once the column list is confirmed, the source metadata table is updated colorizing your category column selections in green.
The three possible category column layouts to choose from are as follows:
Multi-Column List of Category Titles
This column layout assumes that there are multiple levels in the category hierarchy and that each column represents one level in the hierarchy. AutoBuild assumes that the category hierarchy is expressed left to right with the first column starting from the left as the highest level in the category hierarchy, and the last column on the right is the lowest level in the hierarchy. This option is active and selected by default when the List of category columns field contains more than one column.
Single Column List of Category Titles
This layout is active and selected for you automatically when you list only one category column. It is the default when the AutoBuild wizard first opens; it is the only option that is active when one column is selected in the List of category columns field.
Multi-Column List of Category Code/Title Pairs
This layout is similar to the Multi-Column List of Category Titles with the addition that each category is expressed as a pair of columns. The first column contains a category code and the second column contains the category name. This option is active when the column list contains more than one column.
The Category/Attribute Metadata table section is displayed as follows:
The metadata table displays the first 30 rows and 80 columns of the structured Excel worksheet metadata source. As the columns are identified in the List of category columns field, they are colorized green as in the preceding example.
The Category Details section is activated by clicking on the button of the same name and is used as follows:
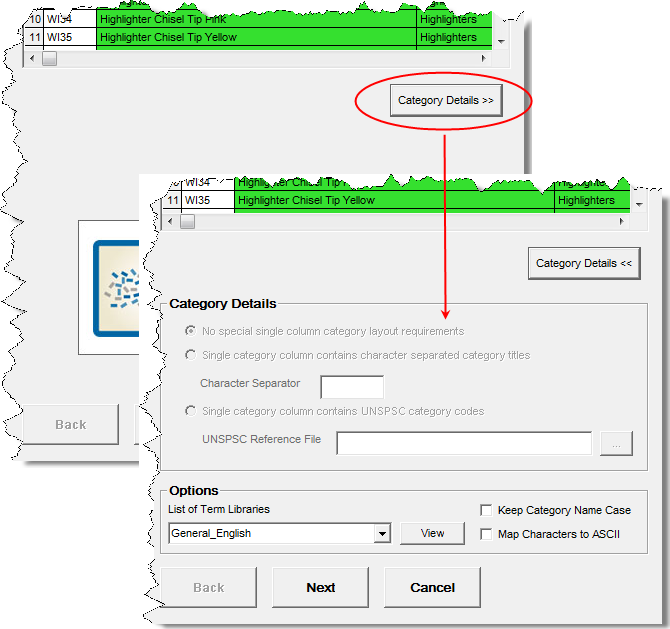
None of the Category Details options are active unless you select only one column in the List of category columns field. These options are used as follows:
This option is automatically selected for you when a single category column is identified. It indicates that either the column contents are not delimited or that they contain category codes.
This option indicates that there are multiple character separated category names in the defined category column. Selecting this option activates the following:
Character Separator Field
When the previous option is selected, use this field to inform the system of the character used to separate the category titles.
This option indicates that the single identified category column contains UNSPSC category codes. AutoBuild is UNSPSC aware and can automatically build the complete UNSPSC hierarchy for you from a UNSPSC reference file that you supply with the following:
Note:
The Enterprise DQ for Product ships with several versions of the UNSPSC classification system.UNSPSC Reference File Browser Button
Use to locate and select the UNSPSC reference file that you want to use. The file browser automatically opens a local directory. You can select a file of your own or a UNSPSC file installed with the product and is found in:
C:\Users\user1\AppData\Roaming\DataLens\system\schemas
You must select this option to output the UNSPSC schema as a classification type in Step 4 of the wizard. For more information, see "Output Details".
Select the Term Library that you want to apply to the data lens being created. If there is a match between a metadata attribute value and the defined full-form in the term library, the term variants from the term library are added to the generated data lens.
Starts Internet Explorer and displays the available list of Term Libraries based on your selection in the List of Term Libraries list.
This option ensures that the category name case in your worksheet is used to create the corresponding Item Definition rather than the case rules in the selected Smart Glossary or data lens. Selecting this option ensures that AutoBuild applies proper case to the category name with the use of underscores. For example, 'Ink Pen' is changed to 'Ink_Pen' rather than 'Ink_pen'.
This option will map the metadata source diacritical characters (for example, à and ñ) to their ASCII equivalents. It is useful when the input data is a romance language containing diacritical characters and you want to create a data lens with the ASCII version of categories and rules.
The second step of the AutoBuild wizard is to identify attribute information and its use is described in this section.
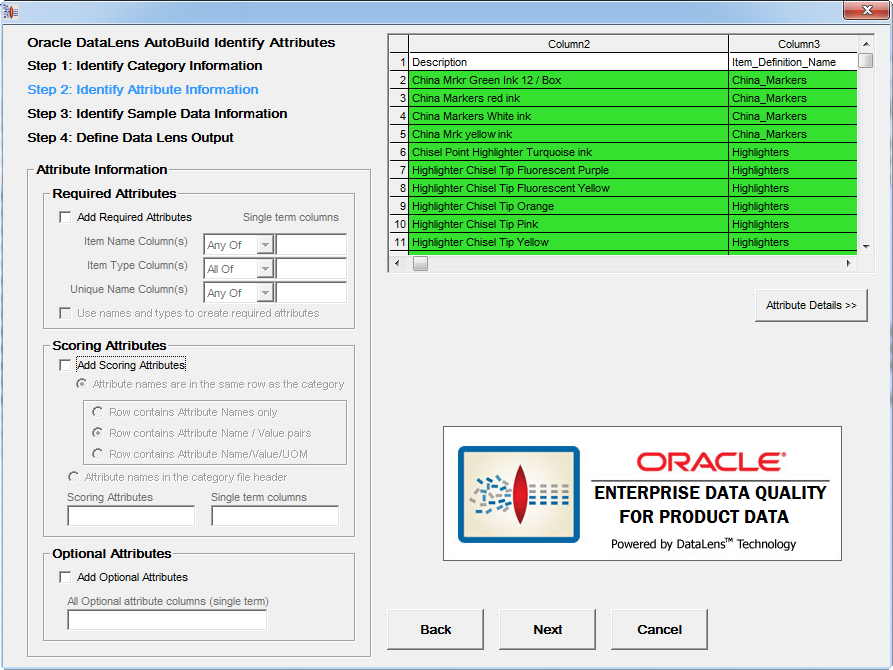
The following section describes each option in the Attribute Information section.
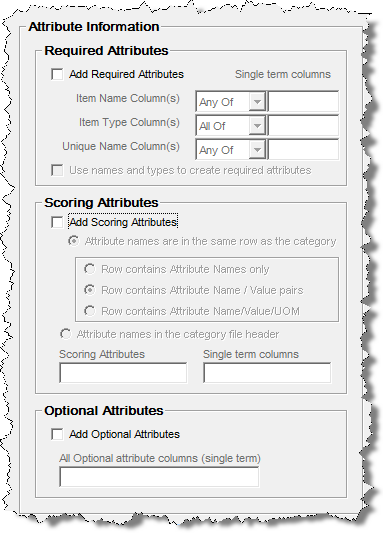
The purpose of these options is to identify attributes that can be used to identify each item uniquely. The controls in this section are used as follows:
This check box activates the controls in this box so that you can select which columns of the source metadata will be the required attributes in the Item Definition.
Item Name, Item Type, and Unique Name Columns Fields
Use these fields to specify the columns that are to be used to define the required logic name attributes, which are the item name, item type, and a unique name respectively.
To specify the list of attributes, you can use numbers, dashes, and commas to specify a single column, a range of columns, or a combination of ranges and single columns. You confirm your entry by pressing the Tab key or selecting another control in the step. Once the column list is confirmed, the metadata table is updated by colorizing your item name columns in violet.
Use names and types to create required attributes Check box
When this option is selected, the required logic attributes are generated by AutoBuild. The attribute names are used for the Required Attribute names, rather than using the default Item_Name and Item_Type as attribute names. Required attribute logic attempts to add attributes to the set of required items automatically by determining the uniqueness of the attributes. Some scoring or form/fit/function attributes are unique to a category or unique to a set of sibling categories (categories that are at the same level and report to the same parent category).
Use of enhanced attribute logic works best when the structured source contains a broad range of categories and most categories contain attribute definitions. This allows the system to analyze the uniqueness of the attribute information across the category hierarchy. If your structured source metadata only contains a couple of categories, or if your attribute information is sparse across your categories, then you should not select this option.
Unique names are considered to be uniquely associated with a single category of product so the first category associated with a specific brand name will be recorded as the category identified by that brand name.
Note:
A Unique Name as defined for required logic must be a unique identifier. If your brand names are not unique across categories then you should use your unique names just as item names.Logic generated if this option is selected is as follows:
The default "Any Of" and "All Of" nodes described in the following examples are generated by AutoBuild when the Use names and types to create required attributes check box is selected and attribute selections are made using the controls in the Attribute Information box:
| Example | Required logic generated for each Item Definition |
|---|---|
| No item name, item type, or brand name columns are defined and Add Required Attributes is selected | Required
All Of: Item_Name: Item_Type: |
| Only item name columns are defined | Required
All Of: Any Of: Name_Attr1: Name_Attr2: Attributes that are unique to my sibling categories if any … |
| Only item type columns are defined | Required
All Of: All Of: Type_Attr1: Type_Attr2: Attributes that are unique to this category alone if any … |
| One or more columns of both item names and item types are define | Required
All Of: Any Of: Name_Attr1: Name_Attr2: Attributes that are unique to my sibling categories if any … All Of: Type_Attr1: Type_Attr2: Attributes that are unique to this category alone if any … |
| One or more brand name columns are defined | Required
Any Of: All Of: Item_Name: Item_Type: Any Of: Brand: [a_brand]\[some_brand_name1] [a_brand]\[some_brand_name2] … |
| One or more brand name columns and item name and item type columns are defined | Required
Any Of: All Of: Any Of: Name_Attr1: Name_Attr2: Attributes that are unique to my sibling categories if any … All Of: Type_Attr1: Type_Attr2: Attributes that are unique to this category alone if any … Any Of: Brand: [a_brand]\[some_brand_name1] [a_brand]\[some_brand_name2] … |
Logic generated if this option is not selected
The following examples describe the required logic attributes that are generated by AutoBuild when the Use names and types to create required attributes check box is not selected:
| Example | Required logic generated for each item definition |
|---|---|
| If no item name or item type columns are defined | Required
All Of: Item_Name: Item_Type: |
| If only item name columns are defined | Required
All Of: Item_Name: [i_column1] [i_column2] … Item_Type: |
| If only item type columns are defined | Required
All Of: Item_Name: Item_Type: [t_column1] [t_column2] … |
| If one or more columns of both item names and item types are defined | Required
All Of: Item_Name: [i_column1] [i_column2] … Item_Type: [t_column1] [t_column2] … |
| If one or more brand name columns are defined | Required
Any Of: All Of: (item name and item type logic as previously described) Brand: [a_brand]\[some_brand_name1] [a_brand]\[some_brand_name2] … |
The following section describes each option found in the Scoring Attributes box.
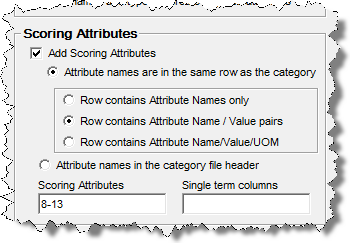
Select this option to add scoring attributes to your new data lens Item Definitions.
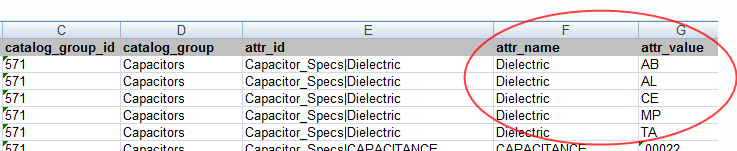
Select this option when your attribute information is located in the same row as the associated categories. In this case, one or more columns contain the different category levels and in the same worksheet, there are adjacent columns that contain the attribute names and possibly example attribute values. The headers for the attribute columns are typically generic, like "Attribute Name 1" or "Attribute Value 1", and so on. The attribute value information found in each row is specific to the category defined by that row as in the following example:
The following three options are active only when this option is selected.
Row contains Attribute names only Option
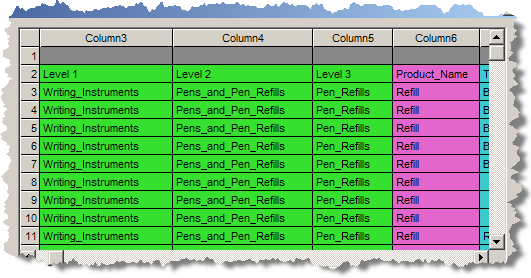
Select this option to instruct AutoBuild that attribute names, but not attribute values, are available in the structured metadata source as in the following example:
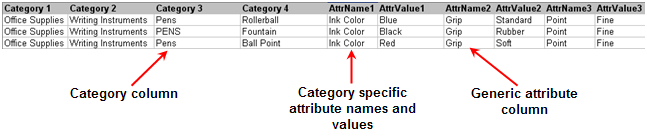
Row contains attribute name / value columns Option
Select this option to instruct AutoBuild that the associated attribute columns contain both attribute names and attribute values as paired columns as in the following example:
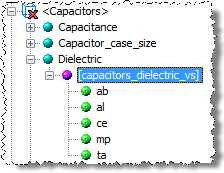
If your metadata contains valuesets, the names of terms built using valuesets are appended with '_vs' and Smart Glossary terms that may exist are ignored. If the attributes in the preceding example were valuesets, the [capacitors_dielectric_vs] term is built and contains the ab, al, ce, mp, and ta valueset as in the following:
If the valueset is 'Yes' and 'No' (or equivalent variations such as Y and N), the rules are created to recognize both the presence and absence of the attribute (for example, [shielded] and [not][shielded]). Additionally the valueset values are used to create the standardization rules for these attributes.
Note:
Your product description data may or may not conform to the Y/N rules created by AutoBuild. Thus, when your metadata contains Y/N valueset values, it is recommended that you closely review the grammar and standardization rules to ensure that they will work for your particular product data.Row contains attribute name / value / UOM columns Option
Select this option to instruct AutoBuild that the associated attribute columns contain attribute names, attribute values, and units of measure grouped together as three columns sets as in the following example:

When your source metadata includes a UOM column named, attr_uom, this option is automatically selected and the selection of the Single term columns Scoring Attribute option is forced.
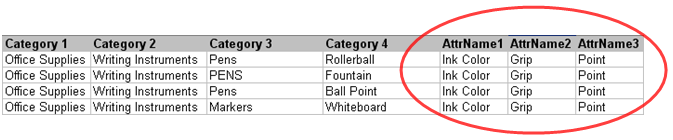
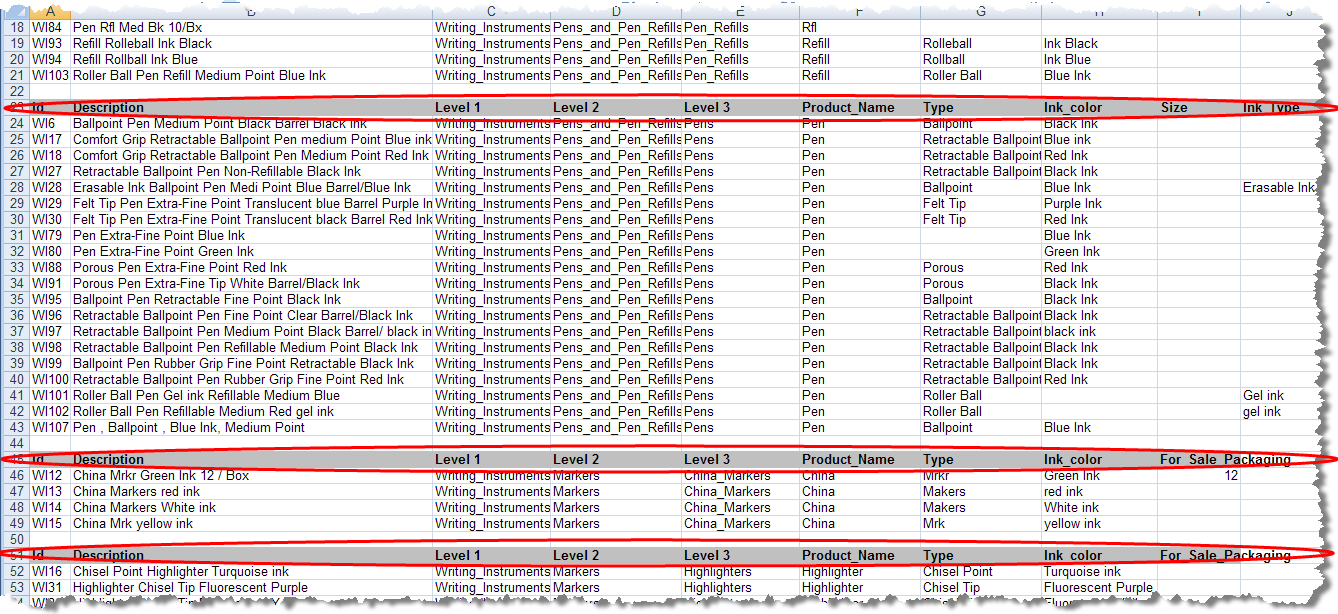
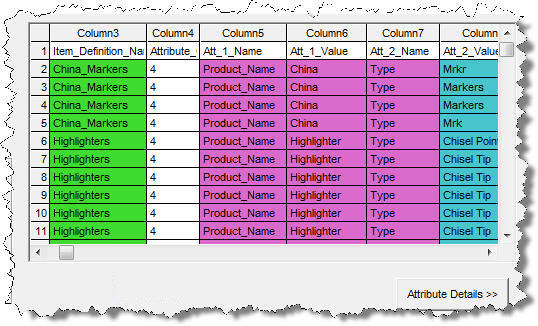
Select this option when the attribute names reside in the header row (row 1) of the structured metadata source. This worksheet structure is often used when the worksheet contains either a single category or a set of closely related categories that all share the same attribute information. An example would be many different types of pens, specifically different types of pens where each pen type has the same attributes.
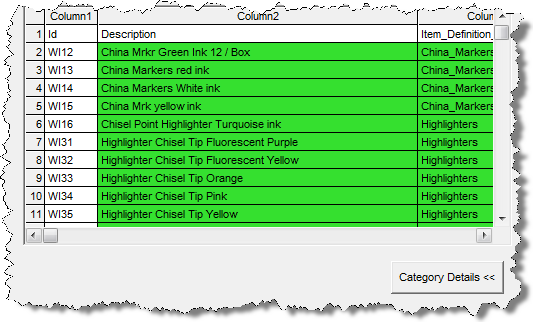
The following is an example of a worksheet with one table three related categories:

You can process several tables containing different source metadata when the attribute names in the header row of each table are the same (for at least the first five columns) as in the following example:
Use this field to specify scoring attribute columns. The order of addition of your attributes is from the lowest column to the highest column number. To specify the list of attributes, you may use numbers, dashes, and commas to specify a single column, a range of columns, or a combination of range(s) and single column(s). You confirm your attribute column list entry by pressing the Tab key or selecting another user interface option. Once the column list is confirmed, the Category/Attribute Data table is updated and colorizes your selected scoring attribute columns blue.
Use this option to force the creation of a single term for an attribute value containing more than one word. When AutoBuild creates the data lens phrases and terms for identified attributes values, and the attribute values are identified as single term columns, then AutoBuild creates a single term to recognize the attribute value no matter how many words (tokens) are in the attribute value. For example, when the attribute value is "pens" setting this option has no effect. However, if the attribute value is "rollerball pens" then both words are used to create a single term, "[rollerball_pens]".
Note:
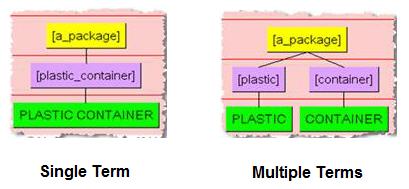
The Predict and AutoSuggest functions operate best when terms are single-termed. Typically, columns with text are single termed while UOM columns are not.The following example shows how the terms are built when the attribute value is two words 'PLASTIC' and 'CONTAINER' for either single term or multiple terms:
The following section describes each option found in the Optional Attributes box.

Select this option to add optional attributes and activate the Add Optional Attributes columns (single term) check box.
Select this option to add data lens primary business attributes common to all items like 'Manufacturer', 'Brand_or_Model_Name', 'Model_or_Part_Number', 'Units_per_Package', 'Additional_Information', and 'URL'. Optional attributes are created as for any attributes that you provide in the field.
The Category/Attribute Metadata table section is displayed as follows:
The metadata table displays the first 30 rows and 80 columns of the structured Excel worksheet metadata source. As you identify category and attribute information, the appropriate columns are colorized as in the preceding example. The category columns are colorized as follows:
| Color | Meaning |
|---|---|
| Green | category |
| Violet | item name, item type, and brand names |
| Blue | scoring attributes |
The Attribute Details section is activated by clicking on the button of the same name and is used as follows:
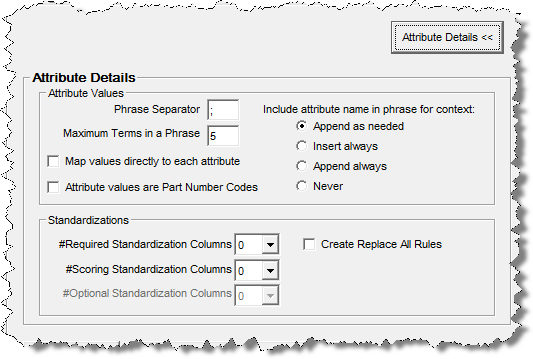
The following section describes each option in the Attribute Values box.
Use this field to list the characters used to delimit multiple attribute values in a single attribute value column. The list must be a space-separated list of punctuation characters. AutoBuild creates a separate attribute value for each value that is separated by one the defined character separators. By default, the phrase separate character list is set to a semi-colon (;).
Use this field to control the maximum number of terms in an attribute value that AutoBuild will attempt to add to the associated phrase. If the number of attribute value terms is greater than the number found in this field, AutoBuild ignores the extra attribute values. This option must be set to a number between 1 and 50. The default value is set to five.
Use this check box when your attribute values are well defined and structured (considered to be gold data) and you want only these values assigned. The generated or updated data lens will contain full phrase and term context associations to the scoring attributes of Item Definitions.
Use this check box to indicate that your attribute values are part numbers.
Select one of the three options to control the context that is added to attribute values by AutoBuild to create unique attribute value recognition. AutoBuild adds the attribute name to the attribute value; this combination of terms becomes a production in the phrase rule. This eliminates the possible ambiguities, allowing attribute values to be uniquely recognized.
Append as needed
Select this option to append the attribute name to the end of the attribute value only when the attribute value is not unique, or when the attribute value is a number or a unit of measure.
Append always
Select this option to append the attribute name to the end of the attribute value for all attribute values.
Insert always
Select this option to insert (prepend) the attribute name at the beginning of the attribute value for all attribute values.
Never
Select this option so that attribute names are never added to the attribute values.
The following section describes each option in the Standardizations box.
If your metadata worksheet contains target standardization forms for the attribute values, you can use this information to automatically create standardization rules in the datalens being autobuilt.These options allow you to select of the number of standardization columns that appear to the right of each associated attribute column that contains the corresponding standardized attribute values. For each identified standardization column, the column header is used to create a unique standardization type in the new lens.
Creates standardization rules for all attributes in the default standardization. These rules are all of the type 'Replace all'.
The third step of the AutoBuild wizard is to identify the sample data information and its use is described in this section.
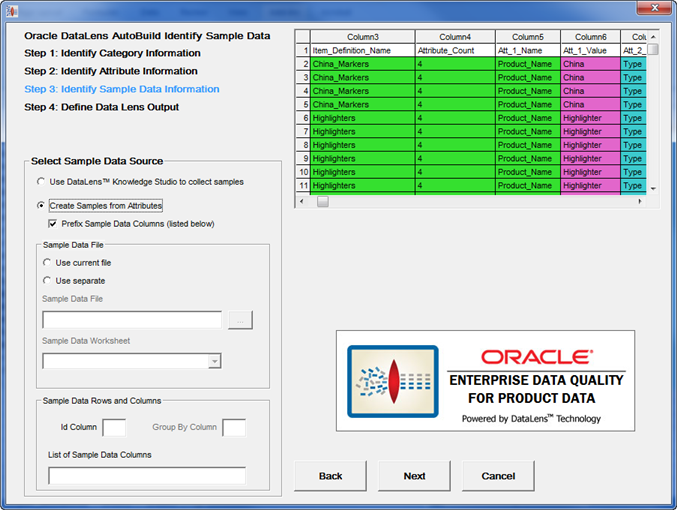
The following section describes each option in the Select Sample Data Source section.
Select this option when you want to collect your sample data for data lens maintenance using the Knowledge Studio. Use this selection when your sample text is not immediately available during the AutoBuild process.
Select this option when you want to create your sample data directly from the attribute values identified through the AutoBuild wizard. Use this selection when sample text is not available and you feel that the existing attribute values are representative of the metadata that you need to process via the Oracle DataLens Server. When this option is selected, the Sample Data Rows and Columns box and the following check box is active:
Prefix Sample Data Columns (listed below) Check Box
Select this option when you want to prefix the sample data created from your attribute values with names, types, brands, or short descriptions found in other columns of your example structured metadata. When this check box is checked, use must use the List of Sample Data Columns field to define the columns to be prefixed with the attribute values.
This box contains the options that you use to identify the file or worksheet containing your sample data. As you make your file selections, the example sample data file display is updated with colorized columns to provide feedback on the options you have selected. The file you select can be the file that you are currently using as the source of example-structured data.
Use current file Option
Use this option to activate the Sample Data Worksheet list to select the worksheet you want to use from the open Excel workbook.
Use separate Option
Use this option to activate the Sample Data File field to enter the full file path to your sample data file or click the button adjacent to this field to locate the file.
Sample Data File Field
This field displays the full file path to the currently selected Excel workbook (or Excel compatible file). Use it to locate and select, or enter the attribute directory (folder) path name that you want to use.
Sample Data Worksheet List
Use this list to select the worksheet you want to use in the selected Excel workbook.
This box contains options for you to use in specifying how you wish to create sample data files using the available columns of your sample data file.
Id Column Field
Use this option to identify the unique id column found in your sample data source. A unique id is required when creating sample data from attribute values. This value must be a single column number.
Group By Column Field
Use this option to identify a column to be used to create sample files that are grouped by the unique values found in the specified column. By default, AutoBuild creates the data lens standard 100 record, randomly selected sample files from your identified source file. When this option is specified, the group by files are also created. The benefit of using this option is to allow your category experts to perform lens maintenance on a single related set of items at one time. This option is not available when creating samples from the attribute values; AutoBuild automatically creates the group by samples from the supplied category information when creating samples from the attribute values.
List of Sample Data Columns Field
Use this option to specify the columns that are to be concatenated together to create your data samples. The data in the specified columns are concatenated together with a space between each column value. Your columns will be concatenated in lowest column number to highest column number order. To specify the list of columns, you may use any combination of numbers, dashes, and commas to specify a single column, a range of columns, or a combination of range(s) and single column(s). For example, 5-8 or 5,6,8,9, 5-8,10. You confirm your column list entry by selecting the Tab key or selecting another user interface option.
The following describes the Category/Attribute Metadata table on the Identify Attribute Information dialog.
The metadata table displays the first 30 rows and 80 columns of the structured Excel worksheet metadata source. As you identify category and attribute information, the appropriate columns are colorized as in the preceding example. The category columns are colorized as follows:
| Color | Meaning |
|---|---|
| Green | category |
| Violet | item name, item type, and brand names |
| Blue | scoring attributes |
The final step of the AutoBuild wizard is defining the data lens output and its use is described in this section.
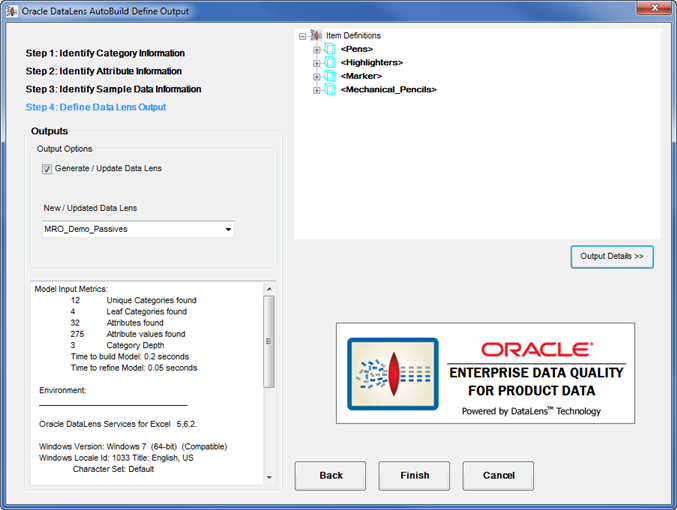
The controls in this section are used as follows:
Default selection to create or update a data lens.
Use this field to name your new data lens or select an existing data lens to add to update. Your name must be unique when creating a new data lens and you can select an existing data lens to use as the basis for a new data lens name.
This read-only field contains a report that provides metrics on the model generated for your new data lens. AutoBuild reports all warning messages concerning the model generation process in this field. For example, the presence of duplicate category names results in a warning message.
If there are warning or error messages reported you should take time to review the messages to determine whether action is needed to correct the structured metadata input before proceeding. AutoBuild generates a data lens when the Finish button is selected whether or not there are warning messages. Warning messages indicate that AutoBuild may not interpret your structured metadata correctly.
The Item Definition Explorer provides a way to review the lens model created by AutoBuild. The generated model reflects the structured metadata provided and your option selections.
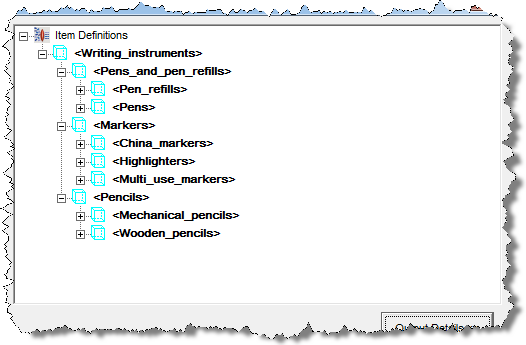
The AutoBuild Item Definition Explorer provides a way to review the result of your selections prior to generating the data lens. If you find inconsistencies in the model, you can return to previous AutoBuild wizard steps and make the necessary adjustments or corrections to ensure that your data lens is created properly.
The AutoBuild Item Definition Explorer displays the hierarchy of item definitions as a set of indented nodes; each node with a blue cube icon indicates an item definition or a level in the item definition hierarchy. For any node in the explorer, you can view more details by clicking on the plus icon, or fewer details by clicking on the minus icon.
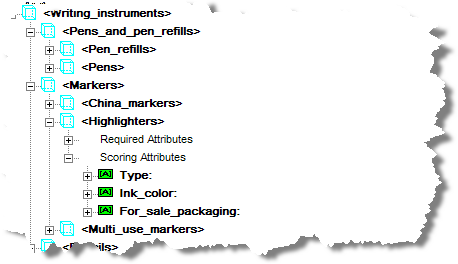
Finally, you can drill down deeper into each phrase and view the phrase productions as a set of one or more grouped term names. For each attribute, you can view the assigned phrase(s) if any. A phrase generally has an associated lens phrase yellow ball icon as in the following example.

The Output Details section is used activated by clicking on the button of the same name and is used as follows:
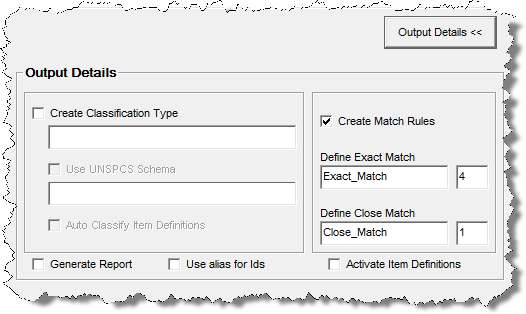
Select this check box to add a classification to your new lens. When this check box is selected, the field below it and the Auto Classify Item Definitions check box are activated.
Name Field
Use this field to name your new classification type.
Use UNSPSC Schema Check Box
This check box is active when the Single category column contains UNSPSC category codes option is set in "Step 1: Identify Category Information".
When your categories are defined by UNSPSC category codes, you can use this selection to add the associated UNSPSC reference schema as the schema file for the defined classification type. If this check box is selected, the read-only field below it displays the name of the selected UNSPSC reference schema file. For more information about configuring a UNSPSC schema, see "Category Details".
Auto Classify Item Definitions Check Box
Use this field to ensure that AutoBuild creates a classification type (the same as your Item Definition structure) and creates the appropriate classification rules.
Use this check box to generate AutoBuild metrics reports that contain all of the information found in the model metrics report described in "Step 3: Identify Sample Data Information", as well as details on the generated data lens, and a complete list of the option selections used during the AutoBuild session. For more information, see "AutoBuild Report".
Select this check box if you want your item definition and attribute alias fields to be populated with their respective identifiers. Your metadata may have specific identifiers for categories and attributes. If your metadata does not have specific identifiers, checking this box results in populating the item definition alias with the category name, exactly as it appears in the metadata worksheet.
If your metadata does contain category and attribute identifiers, these values are also stored in the system_id and group_id internal fields and can be viewed in the Item Definition Alias field.
Select this check box to activate the Item Definitions created in your data lens from your source metadata. If an Item Definition is activated, it can be used for attribute extraction and standardization on the Production or QA Transform Servers. If an Item Definition is inactive, than an item recognized by that Item Definition may be processed only by the Development Transform Server.
The Item Definitions created by AutoBuild may be incomplete, so the Item Definitions must be closely reviewed in Knowledge Studio before the data lens is checked in for production use. If a data lens is checked in for production use without being reviewed, one possible result may be an unexpectedly high number of returned records upon running a match application. This is applicable to Production and QA Oracle DataLens Servers only; Development servers ignore the inactive flag.
By default, Item Definitions created by AutoBuild are set to inactive so this check box is not selected.
Select this check box to create default matching rules. A default attribute order for each item definition, containing only scoring attributes in the order specified in the worksheet columns, is automatically created. The match types 'Exact_Match' and 'Close_Match' are created based on the standardization type 'Match_Attributes'.
When this check box is selected, the Define Exact Match and Define Close Match controls are activated and used as follows:
Define Exact Match Controls
Defines the number of required attributes for the Exact_Match rule per item definition.
Define Close Match Controls
Defines the number of required attributes for the Close_Match rule per item definition.
The AutoBuild application can automatically generate a Semantic Knowledge Structure report about your data lens. This report is created after your data lens is constructed if you have selected the Generate Report option. For more information about setting this option, see "Output Details".
The report is added to your Excel workbook as a new worksheet so that you can easily review and save the information. It is updated in your Excel workbook each time you run AutoBuild to generate a data lens. This is applicable whether there are one or multiple worksheets in your workbook.
Tip:
You can keep prevent the report from being overwritten and keep it for future use by renaming the worksheet.The Semantic Knowledge Structure report details all action taken related to item definitions, phrases, terminology, and alternate catalogs in the creation or update of your data lens.
In an incremental update of a data lens, additions are made to an existing data lens, but deletions must be made manually.
This report describes what items should be manually deleted from your data lens, based on the differences between the original data lens and the metadata structure used in the incremental AutoBuild update. Use this report as a guide for making deletions from your updated data lens.

You can use the links at the beginning of the report to navigate to the specific data indicated.
You can delete this report by selecting the DataLens Tools menu and selecting Remove AutoBuild Reports….
A deletion confirmation prompt is displayed and selecting Yes deletes the AutoBuild report from the active workbook.
|
Copyright © 2001, 2013, Oracle and/or its affiliates. All rights reserved. Legal Notices |
|