| Oracle® Healthcare Master Person Index WebLogic User's Guide Release 1.1 E18593-01 |
|
 Previous |
 Next |
| Oracle® Healthcare Master Person Index WebLogic User's Guide Release 1.1 E18593-01 |
|
 Previous |
 Next |
This chapter provides procedures for configuring an Oracle WebLogic Server, including installing a database driver, creating JDBC data resources, creating JMS resources, and setting up a user.
This chapter includes the following section:
Before using your Oracle WebLogic Server you must prepare it to host your Master Person Index (MPI) Application or your IHE Profiles Application, using the following procedures:
"Configuring the HL7 v2 Server (only for IHE Profiles Application)"
"Configuring the Audit Client (only for IHE Profiles Application)"
Specific to an IHE Profiles Application project
Specific to an MPI Application project
After building an IHE Profiles Application project, unzip hl7v2.zip to a directory of your choice (for example, your OHMPI installation directory).
Set the OHMPI_IHE_HL7V2_HOME environment variable to the unzipped hl7v2 directory from the previous step.
Follow the existing instructions to configure and deploy the IHE Profiles Application to the WebLogic Server.
|
Note: The rest of the HL7 v2 server configuration and the SSL configuration for WebLogic is the same as for GlassFish. For detailed information, see "Configuring an IHE Profiles Application Project" in Chapter 2 in Oracle Healthcare Master Person Index Working With IHE Profiles (Part Number E18591-01). |
When you build the IHE Profiles Application project for WebLogic, five artifacts are created:
<Project_Name>.ear: The IHE Profiles Application.
hl7v2.zip: The HL7 v2 lifecycle module.
The hl7v2.zip is an HL7 v2 server package that includes all artifacts required to run the IHE OHMPI HL7 v2 server and HL7 v2 lifecycle model which manages the server. You unzip it to the location where you run the server. The unzipped folder includes:
hl7v2
config
The config sub folder includes all the configuration files.
lib
The lib sub folder includes all the required jar files.
audit-repo-syslog-client.jar
ihe-atna-audit-client.jar
ohmpi_audit_client.properties
After building a WebLogic-targeted IHE Profiles Application project (and before starting WebLogic Application Server), manually copy the following three files from the IHE Profiles Application project's dist directory to the appropriate WebLogic domain's lib directory (for example, user_projects\domains\<domain_name>\lib):
audit-repo-syslog-client.jar: The JAR file that contains the functionality of the audit repository syslog client.
ihe-atna-audit-client.jar: The JAR file that contains the functionality of the IHE ATNA audit client.
ohmpi_audit_client.properties: The property file used to configure where the audit server is located.
The section provides instructions for installing a database driver if you are using a non-Oracle database.
This section provides instructions for creating the JDBC data resources and defining the JDBC connections for an IHE Profile Application Project.
For instructions on how to start and stop your Oracle WebLogic Server, see Starting and Stopping Servers: Quick Reference at http://download.oracle.com/docs/cd/E14571_01/wls.htm.
Launch the Oracle WebLogic Server Administration Console.
Log in using the default user Name (weblogic) and Password (welcome1).
The Oracle WebLogic Administration Console appears.
On the left panel, under Domain Structure, expand Services, click JDBC, and then choose Data Sources.
Figure 2-1 WebLogic Administration Console - Summary of JDBC Data Sources
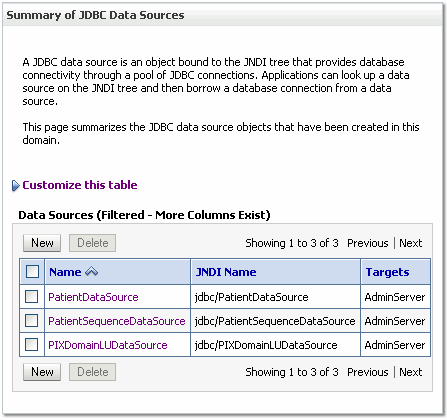
A Summary of JDBC Data Sources appears in the right panel.
To create a new JDBC Data Source click New at the bottom of the right panel.
Settings for a new JDBC Data Source appears in the right panel of the page. It is here that you will create a new JDBC Data Source.
Figure 2-2 Create a New JDBC Data Source Panel
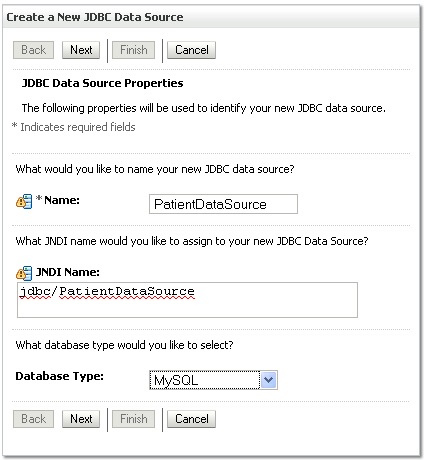
In the Name field, type <name>DataSource.
The name you enter here will propagate elsewhere, so choose a name that is meaningful (for example, PatientDataSource).
In the JNDI Name field, type jdbc/<name>DataSource.
Use the name you entered in step 6 here (for example, jdbc/PatientDataSource).
Click Save.
A new page appears in the right panel which is for setting the Database Type.
In the Database Type drop-down list, choose the appropriate type (for example: MySQL).
In the Database Driver drop-down list, choose the appropriate driver; for example: MySQL's Driver (Type 4) Versions:using com.mysql.jdbc.Driver.
Make sure that your data source supports Global Transactions.
At this step, for MySQL only, select Emulate Two-Phase Commit.
Click Next.
Figure 2-3 Create a New JDBC Data Source Panel - Connection Properties
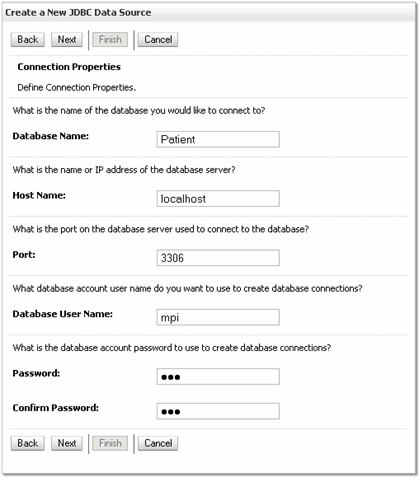
In the Database Name field, type a name for the database to which you want to connect (for example: Patient).
In the Host Name field, type the name or the IP address of the database server (for example: localhost).
In the Port field, type the port on the database server that is used to connect to the database (for example: 3306).
In the Database User Name field, type the database account user name you want to use to create database connections (for example: root).
In the Password field, type a password for your database account to use to create database connections.
In the Confirm Password field, re-type the password to confirm it.
Click Next.
The Settings for PatientDataSource page appears in the right panel.
Click the Connection Pool tab, click Test Configuration, and then click Next.
Select Targets appears on the Create a New JDBC Data Source page in the right panel. Here you select one or more targets to deploy the new JDBC data source.
In the Servers check list, select one or more target servers and click Finish.
|
Note: If you do not select a target, the data source will be created but not deployed. You will need to deploy the data source at a later time. |
Repeat the above steps to create jdbc/PatientSequenceDataSource.
Repeat the above steps to create jdbc/PIXDomainLUDataSource. However, this time, make sure that you do not select Support Global Transactions, for it should not be checked.
Repeat the above steps to create jdbc/PIMPendingLinksDataSource.
For instructions on how to start and stop your Oracle WebLogic Server, see Starting and Stopping Servers: Quick Reference at http://download.oracle.com/docs/cd/E14571_01/wls.htm.
Launch the Oracle WebLogic Server Administration Console.
Log in using the default user Name (weblogic) and Password (welcome1).
The Oracle WebLogic Administration Console appears.
On the left panel, under Domain Structure, expand Services, click JDBC, and then choose Data Sources.
A Summary of JDBC Data Sources appears in the right panel.
To create a new JDBC Data Source click New at the bottom of the right panel.
Settings for a new JDBC Data Source appears in the right panel of the page. It is here that you will create a new JDBC Data Source.
In the Name field, type <name>DataSource.
The name you enter here will propagate elsewhere, so choose a name that is meaningful (for example, PatientDataSource).
In the JNDI Name field, type jdbc/<name>DataSource.
Use the name you entered in step 6 here (for example, jdbc/PatientDataSource).
Click Save.
A new page appears in the right panel which is for setting the Database Type.
In the Database Type drop-down list, choose the appropriate type (for example: Oracle).
In the Database Driver drop-down list, choose the appropriate driver; for example: Oracle's Driver (Thin XA) for Instance Connections; Versions: 9.0.1; 9.2.0; 10, 11.
Click Next.
Click Next.
Connection Properties appears on the Create a New JDBC Data Source panel. Use it to define the connection properties.
In the Database Name field, type a name for the database to which you want to connect (for example: Patient).
In the Host Name field, type the name or the IP address of the database server (for example: localhost).
In the Port field, type the port on the database server that is used to connect to the database (for example: 1521).
In the Database User Name field, type the database account user name you want to use to create database connections (for example: sys).
In the Password field, type a password for your database account to use to create database connections.
In the Confirm Password field, re-type the password to confirm it.
Click Next.
The Settings for PatientDataSource page appears in the right panel.
Click the Connection Pool tab, click Test Configuration, and then click Next.
Select Targets appears on the Create a New JDBC Data Source page in the right panel. Here you select one or more targets to deploy the new JDBC data source.
In the Servers check list, select one or more target servers and click Finish.
|
Note: If you do not select a target, the data source will be created but not deployed. You will need to deploy the data source at a later time. |
Repeat the above steps to create jdbc/PatientSequenceDataSource.
Repeat the above steps to create jdbc/PIXDomainLUDataSource.
Repeat the above steps to create jdbc/PIMPendingLinksDataSource.
JMS servers act as management containers for the queues and topics in the JMS modules that are targeted to them.
The following procedure includes instructions for creating JMS resources, which includes a:
JMS Server
JMS Module
JMS Connection Factory in the specific JMS Module
JMS Topic in the specific JMS Module
On the left panel, under Domain Structure, expand Services, click Messaging, and then choose JMS Servers.
A Summary of JMS Servers appears in the right panel. It includes a table that summarizes the JMS servers that have been created in the current WebLogic Server domain.
|
Note: The JDNI name you created in "To Create JDBC Data Resources for an IHE Profiles Application Project for MySQL" appears in the table of previously created JMS Servers; that is, PatientJMSServer. |
In the table of previously created JMS Servers, click New.
The Create a New JMS Server panel appears.
In the Name field, type the name for your new JMS Server.
|
Note: This name already exists in the table of previously created JMS Servers (in the example, PatientJMSServer). |
Click Next.
Select targets appears in the right panel under Create a New JMS Server.
From the Target drop-down list select a target server instance or migratable target on which you want to deploy the JMS Server.
|
Note: The default server instance is exampleServer. |
Click Finish.
On the left panel, under Domain Structure, expand Services, click Messaging, and then choose JMS Modules.
The JMS Modules panel appears.
In the JMS Modules table, click New to add a new JMS Module.
The Create JMS System Module panel appears.
In the Name field, type the new JMS Module name.
|
Note: Again, remain consistent to the name chosen for the JDBC Data Source and the JMS Server (in the previous examples the key word was "Patient," making this name PatientJMSModule). |
Click Next.
Targets appears in the right panel under Create a New JMS System Module.
In the Servers area, select the server or cluster on which you want to deploy this JMS system module.
|
Note: Retain the default, examplesServer. |
Click Finish.
On the left panel, under Domain Structure, expand Services, click Messaging, and then choose JMS Modules.
Choose the JMS Module (in the example, PatientJMSModule) from the table of JMS Modules.
The Settings for PatientJMSModule page appears in the right panel.
In the Summary of Resources table, click New.
Under the Type column in the Summary of Resources table choose Connection Factory and click Next.
Another panel of Create a New JMS System Module Resource appears.
In the Name field, type PatientOutBoundSender.
In the JNDI Name field, type jms/PatientOutBoundSender.
Click Next
In the Target field, retain the default server instance, which is exampleServer, and click Finish.
Click the Transaction tab for a newly created connection factory.
Select XA Transaction Enabled and click Save.
On the left panel, under Domain Structure, expand Services, click Messaging, and then choose JMS Modules.
In the right panel, choose the JMS Module you created (in the example, PatientJMSModule) from the table of JMS Modules.
Settings for PatientJMSModule appears in the right panel with a Summary of Resources table.
Figure 2-7 JMS Module Panel - Summary of Resources
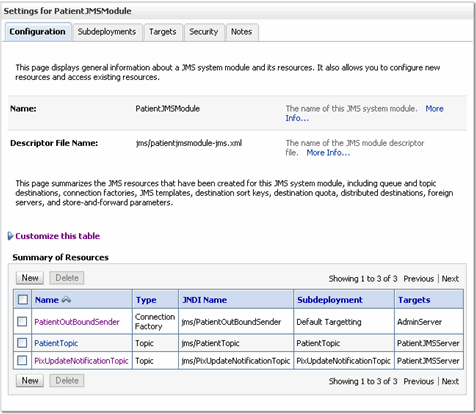
In the Summary of Resources table, click New, select Topic, and then click Next.
The Create a New JMS System Module Resource panel appears on the right side of the window. Use this panel to set the properties that identify the new topic.
In the Name field, under JMS Destination Properties, type <name>Topic (for example, PatientTopic).
Set jms/PatientTopic as the JNDI Name and click Next.
The Create a New JMS System Module Resource page appears in the right panel. Use this page to set the properties that will be used to target your new JMS system module resource.
In the Subdeployments drop-down list, select the topic name you just created (for example, Patient Topic) and click Create a New Subdeployment.
In the Subdeployment Name field, type <name>Topic (for example, PatientTopic), and click OK.
In the Targets table of JMS Servers, select <name>JMSServer (for example, PatientJMSServer).
Click Finish.
In the Summary of Resources table (see Figure 2-8, "WebLogic Administration Console - Summary of JDBC Data Sources"), click New, select Topic, and then click Next.
The Create a New JMS System Module Resource panel appears on the right side of the window. Use this panel to set the properties that identify the new topic.
In the Name field, under JMS Destination Properties, type <name>Topic (for example, PixUpdateNotificationTopic).
Set jms/PixUpdateNotificationTopic as the JNDI Name and click Next.
The Create a New JMS System Module Resource page appears in the right panel. Use this page to set the properties that will be used to target your new JMS system module resource.
In the Subdeployments drop-down list, select the topic name you just created (for example, PixUpdateNotification Topic) and click Create a New Subdeployment.
In the Subdeployment Name field, type <name>Topic (for example, PixUpdateNotificationTopic), and click OK.
In the Targets table of JMS Servers, select <name>JMSServer (for example, PatientJMSServer).
Click Finish.
This section provides instructions for creating the JDBC data resources and defining the JDBC connections for an MPI Application Project.
For instructions on how to start and stop your Oracle WebLogic Server, see Starting and Stopping Servers: Quick Reference at http://download.oracle.com/docs/cd/E14571_01/wls.htm.
Launch the Oracle WebLogic Server Administration Console.
Log in using the default user Name (weblogic) and Password (welcome1).
The Oracle WebLogic Administration Console appears.
On the left panel, under Domain Structure, expand Services, click JDBC, and then choose Data Sources.
Figure 2-8 WebLogic Administration Console - Summary of JDBC Data Sources
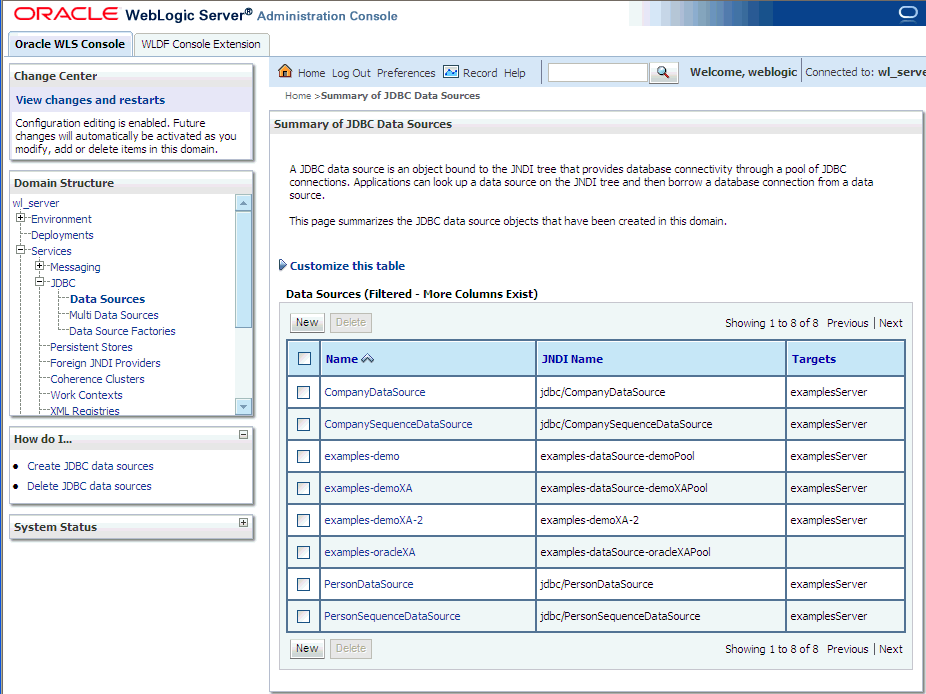
A Summary of JDBC Data Sources appears in the right panel.
To create a new JDBC Data Source click New at the bottom of the right panel.
Settings for a new JDBC Data Source appears in the right panel of the page. It is here that you will create a new JDBC Data Source.
Figure 2-9 Create a New JDBC Data Source Panel
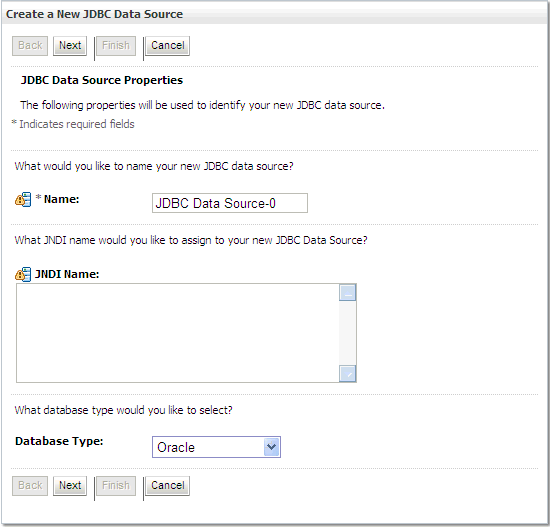
In the Name field, type <name>DataSource.
The name you enter here will propagate elsewhere, so choose a name that is meaningful (for example, PersonDataSource).
In the JNDI Name field, type jdbc/<name>DataSource.
Use the name you entered in step 6 here (for example, jdbc/PersonDataSource).
Click Save.
A new page appears in the right panel which is for setting the Database Type.
In the Database Type drop-down list, choose the appropriate type (for example: MySQL).
In the Database Driver drop-down list, choose the appropriate driver; for example: MySQL's Driver (Type 4) Versions:using com.mysql.jdbc.Driver.
Make sure that your data source supports Global Transactions.
Click Next.
Connection Properties appears on the Create a New JDBC Data Source panel. Use it to define the connection properties.
Figure 2-10 Create a New JDBC Data Source Panel - Connection Properties
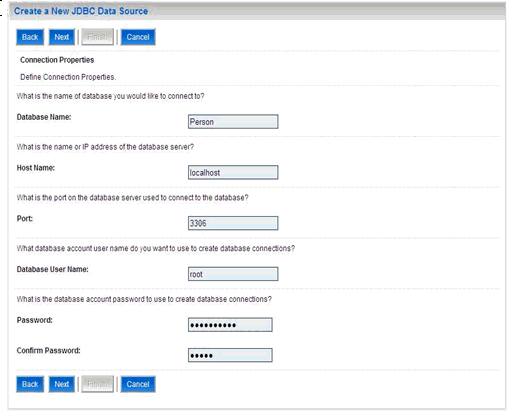
In the Database Name field, type a name for the database to which you want to connect (for example: Person).
In the Host Name field, type the name or the IP address of the database server (for example: localhost).
In the Port field, type the port on the database server that is used to connect to the database (for example: 3306).
In the Database User Name field, type the database account user name you want to use to create database connections (for example: root).
In the Password field, type a password for your database account to use to create database connections.
In the Confirm Password field, re-type the password to confirm it.
Click Next.
The Settings for PersonDataSource page appears in the right panel.
Click the Connection Pool tab, click Test Configuration, and then click Next.
Select Targets appears on the Create a New JDBC Data Source page in the right panel. Here you select one or more targets to deploy the new JDBC data source.
In the Servers check list, select one or more target servers and click Finish.
|
Note: If you do not select a target, the data source will be created but not deployed. You will need to deploy the data source at a later time. |
Repeat the above steps to create jdbc/PersonSequenceDataSource.
For instructions on how to start and stop your Oracle WebLogic Server, see Starting and Stopping Servers: Quick Reference at http://download.oracle.com/docs/cd/E14571_01/wls.htm.
Launch the Oracle WebLogic Server Administration Console.
Log in using the default user Name (weblogic) and Password (welcome1).
The Oracle WebLogic Administration Console appears.
On the left panel, under Domain Structure, expand Services, click JDBC, and then choose Data Sources.
A Summary of JDBC Data Sources appears in the right panel.
To create a new JDBC Data Source click New at the bottom of the right panel.
Settings for a new JDBC Data Source appears in the right panel of the page. It is here that you will create a new JDBC Data Source.
In the Name field, type <name>DataSource.
The name you enter here will propagate elsewhere, so choose a name that is meaningful (for example, PersonDataSource).
In the JNDI Name field, type jdbc/<name>DataSource.
Use the name you entered in step 6 here (for example, jdbc/PersonDataSource).
Click Save.
A new page appears in the right panel which is for setting the Database Type.
In the Database Type drop-down list, choose the appropriate type (for example: Oracle).
In the Database Driver drop-down list, choose the appropriate driver; for example: Oracle's Driver (Thin XA) for Instance Connections; Versions: 9.0.1; 9.2.0; 10, 11.
Click Next.
Click Next.
Connection Properties appears on the Create a New JDBC Data Source panel. Use it to define the connection properties.
In the Database Name field, type a name for the database to which you want to connect (for example: Person).
In the Host Name field, type the name or the IP address of the database server (for example: localhost).
In the Port field, type the port on the database server that is used to connect to the database (for example: 1521).
In the Database User Name field, type the database account user name you want to use to create database connections (for example: root).
In the Password field, type a password for your database account to use to create database connections.
In the Confirm Password field, re-type the password to confirm it.
Click Next.
The Settings for PersonDataSource page appears in the right panel.
Click the Connection Pool tab, click Test Configuration, and then click Next.
Select Targets appears on the Create a New JDBC Data Source page in the right panel. Here you select one or more targets to deploy the new JDBC data source.
In the Servers check list, select one or more target servers and click Finish.
|
Note: If you do not select a target, the data source will be created but not deployed. You will need to deploy the data source at a later time. |
Repeat the above steps to create jdbc/PersonSequenceDataSource.
JMS servers act as management containers for the queues and topics in the JMS modules that are targeted to them.
The following procedure includes instructions for creating JMS resources, which includes a:
JMS Server
JMS Module
JMS Connection Factory in the specific JMS Module
JMS Topic in the specific JMS Module
On the left panel, under Domain Structure, expand Services, click Messaging, and then choose JMS Servers.
A Summary of JMS Servers appears in the right panel. It includes a table that summarizes the JMS servers that have been created in the current WebLogic Server domain.
|
Note: The JDNI name you created in "To Create JDBC Data Resources for an MPI Application Project for MySQL" appears in the table of previously created JMS Servers; that is, PersonJMSServer. |
In the table of previously created JMS Servers, click New.
The Create a New JMS Server panel appears.
Figure 2-12 Create a New JMS Server Panel
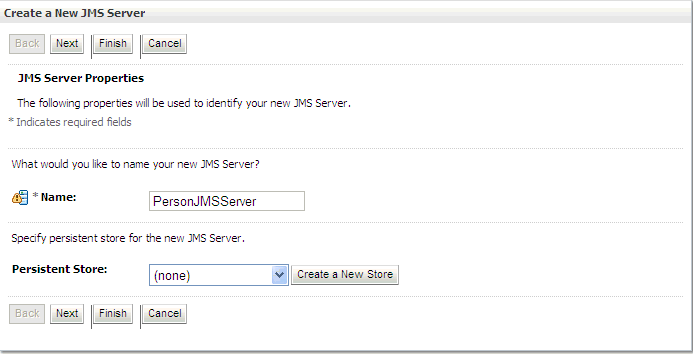
In the Name field, type the name for your new JMS Server.
|
Note: This name already exists in the table of previously created JMS Servers (in the example, PersonJMSServer). |
Click Next.
Select targets appears in the right panel under Create a New JMS Server.
From the Target drop-down list select a target server instance or migratable target on which you want to deploy the JMS Server.
|
Note: The default server instance is exampleServer. |
Click Finish.
On the left panel, under Domain Structure, expand Services, click Messaging, and then choose JMS Modules.
The JMS Modules panel appears.
Figure 2-13 JMS Modules Panel - JMS Modules Table
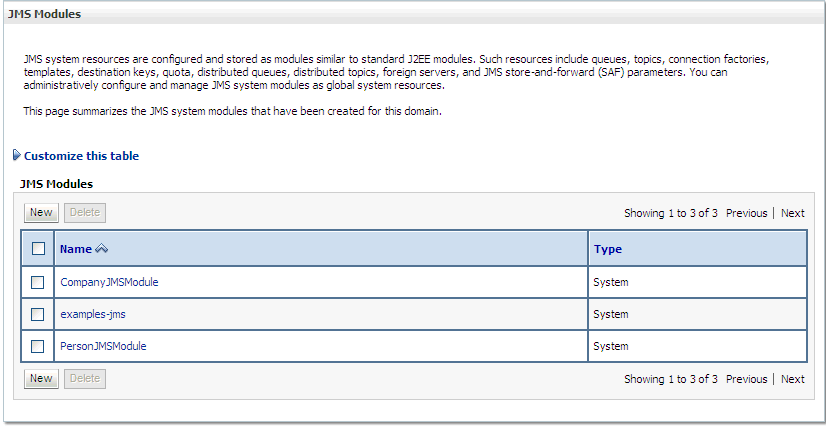
In the JMS Modules table, click New to add a new JMS Module.
The Create JMS System Module panel appears.
In the Name field, type the new JMS Module name.
|
Note: Again, remain consistent to the name chosen for the JDBC Data Source and the JMS Server (in the previous examples the key word was "Person," making this name PersonJMSModule). |
Click Next.
Targets appears in the right panel under Create a New JMS System Module.
In the Servers area, select the server or cluster on which you want to deploy this JMS system module.
|
Note: Retain the default, examplesServer. |
Click Finish.
On the left panel, under Domain Structure, expand Services, click Messaging, and then choose JMS Modules.
Choose the JMS Module (in the example, PersonJMSModule) from the table of JMS Modules.
The Settings for PersonJMSModule page appears in the right panel.
In the Summary of Resources table, click New.
Under the Type column in the Summary of Resources table choose Connection Factory and click Next.
Another panel of Create a New JMS System Module Resource appears.
In the Name field, type PersonOutBoundSender.
In the JNDI Name field, type jms/PersonOutBoundSender.
Click Next
In the Target field, retain the default server instance, which is exampleServer, and click Finish.
Click the Transaction tab for a newly created connection factory.
Select XA Transaction Enabled and click Save.
On the left panel, under Domain Structure, expand Services, click Messaging, and then choose JMS Modules.
In the right panel, choose the JMS Module you created (in the example, PersonJMSModule) from the table of JMS Modules.
Settings for PersonJMSModule appears in the right panel with a Summary of Resources table.
Figure 2-14 Settings for PersonJMSModule Panel - Summary of Resources Table
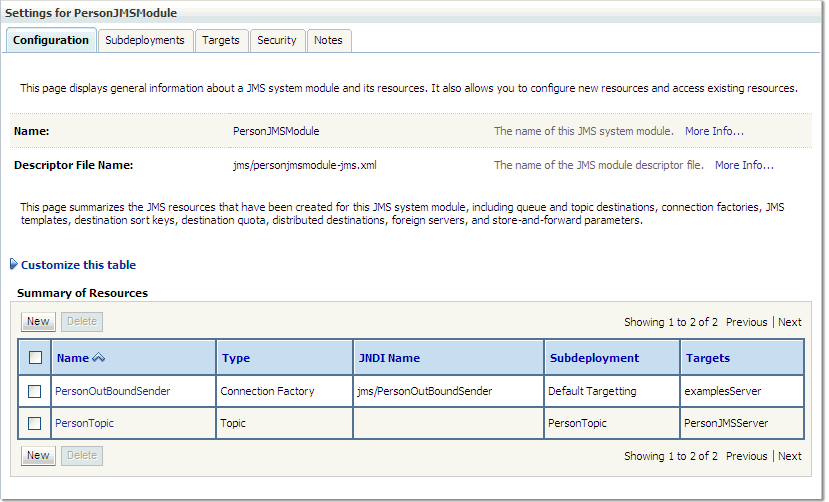
In the Summary of Resources table, click New, select Topic, and then click Next.
The Create a New JMS System Module Resource panel appears on the right side of the window. Use this panel to set the properties that identify the new topic.
In the Name field, under JMS Destination Properties, type <name>Topic (for example, PersonTopic).
Set jms/PersonTopic as the JNDI Name and click Next.
The Create a New JMS System Module Resource page appears in the right panel. Use this page to set the properties that will be used to target your new JMS system module resource.
In the Subdeployments drop-down list, select the topic name you just created (for example, PersonTopic) and click Create a New Subdeployment.
In the Subdeployment Name field, type <name>Topic (for example, PersonTopic), and click OK.
In the Targets table of JMS Servers, select <name>JMSServer (for example, PersonJMSServer).
Click Finish.
In this step you create the MasterIndex.Admin and Administrator groups, and then create a new user within the two groups.
On the left panel, under Domain Structure, expand Services, and then choose Security Realms.
In the table on the Summary of Security Realms panel, click myrealm, which is the name of the realm.
The Settings for myrealm panel appears.
Select the Users and Groups tab and then click Groups.
In the Groups table, click New.
In the Name field, type MasterIndex.Admin and click OK.
In the Groups table, click New.
In the Name field, type Administrator and click OK.
On the Settings for myrealm panel, select Users and Groups and then Users.
In the Users table, click New.
Type a name and a password for the new user you are creating and click OK.
Select User Group.
To add the two groups you created to the user you created, from the Available list, drag MasterIndex.Admin to the Chosen list, and then drag Administrator to the Chosen list.