| Skip Navigation Links | |
| Exit Print View | |

|
Sun Blade X3-2B (formerly Sun Blade X6270 M3) Administration Guide |
| Skip Navigation Links | |
| Exit Print View | |

|
Sun Blade X3-2B (formerly Sun Blade X6270 M3) Administration Guide |
Sun Blade X3-2B Model Name Change
Getting the Latest Firmware and Software
About the User Administration Guide
Planning the System Management Environment
Choosing Tools for Single System Management
Choosing Tools for Multiple System Management
System Management Tools Overview
Common System Management Tasks
Common System Administrative Tasks
Evaluating the Server Environment
Accessing System Management Tools
Access Oracle System Assistant
Access Oracle Hardware Management Pack
Setting Up Oracle System Assistant and Updating the Server
Setting Up Oracle System Assistant
Provisioning the Server for Operation
Oracle System Assistant Administrative Tasks
Troubleshooting and Verifying Oracle System Assistant
Performing Advanced Maintenance, Security, and Configuration Tasks
Recover Oracle System Assistant Software
Disable Oracle System Assistant Using the UI
Enable (or Disable) Oracle System Assistant Using the BIOS Setup Utility
Access the Firmware and Software on the Oracle System Assistant USB Flash Drive
Mounting the Oracle System Assistant USB Flash Drive
(Oracle VM 3.0) Mount the Oracle System Assistant USB Flash Drive
(Linux OS) Mount the Oracle System Assistant USB Flash Drive
(Oracle Solaris 10 OS) Mount the Oracle System Assistant USB Flash Drive
Access Oracle System Assistant Shell
Backup, Restore, and Revert BIOS Settings
View Oracle System Assistant Product Documentation From the OS
Setting Up Software and Firmware
Set Up Software and Firmware Using Oracle System Assistant
Set Up Software and Firmware Using Oracle ILOM
Set Up Software and Firmware Using Oracle Hardware Management Pack
Managing Server Policies Using Oracle ILOM
Oracle ILOM Features for x86 Sun Servers
Service Processor Power-On Policies
Power Management Policies Supported
Diagnostics Using Pc-Check and NMI
Switch Serial Port Output to Host Management Console
Back Up and Restore BIOS Configuration
Configure Management Policies Using Oracle ILOM Web Interface
Configure Management Policies Using Oracle ILOM CLI
Oracle Recommendations for Drive Slot Population and Virtual Drive Creation
Creating a RAID Volume Before Installing an Operating System
Creating a RAID Volume After Installing an Operating System
Setting Up the Server With BIOS Setup Utility
Access BIOS Setup Utility Menus
Navigate BIOS Setup Utility Menus
BIOS Setup Utility Menu Overview
Selecting Legacy and UEFI BIOS
Configuring the UEFI BIOS Boot Mode
Selecting Legacy BIOS or UEFI Boot Mode
Configuration Utilities for Add-In Cards
Select UEFI or Legacy BIOS Boot Mode
Common BIOS Setup Utility Tasks
Verify BIOS Factory Default Settings
Legacy BIOS Option ROM Allocation Considerations
Configuring Option ROM Settings
Enable or Disable I/O Resource Allocation
Configuring iSCSI Virtual Drives
BIOS Setup Utility Screen Reference
BIOS UEFI Driver Control Menu Selections
BIOS Save & Exit Menu Selections
BIOS LSI MegaRAID Configuration Utility Screen Reference
Accessing BIOS LSI MegaRAID Configuration Utility Controller Management Menus
BIOS LSI MegaRAID Configuration Utility Controller Management Selections
BIOS LSI MegaRAID Configuration Utility Drive Management Menu Selections
BIOS LSI MegaRAID Configuration Utility Virtual Drive Management Menu Selections
BIOS LSI MegaRAID Configuration Utility Enclosure Management Menu Selections
Identifying Hardware Components and SNMP Messages
Identifying System Hardware Components
System Board Components (Sensors)
Field Replaceable Units (FRUs)
Getting Server Firmware and Software
Firmware and Software Access Options
Available Software Release Packages
Oracle System Assistant allows you to view or modify a subset of Oracle ILOM settings, such as identification information, network configuration, user accounts, system clock, and DNS.
Use this procedure to view and modify Oracle ILOM settings from Oracle System Assistant.
The Server Processor Configuration screen appears.
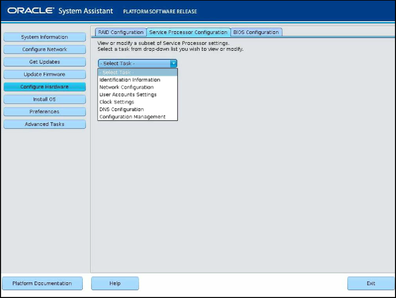
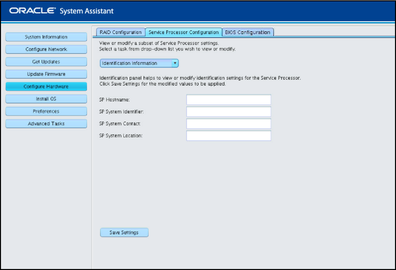
Identification Information— See Step 3.
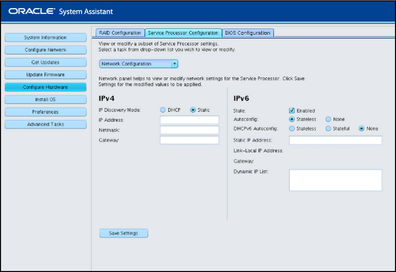
Network Configuration— See Step 4.
User Account Settings— See Step 5.
Clock Settings— See Step 6.
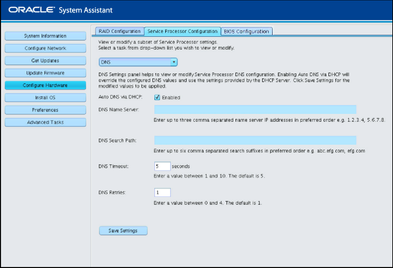
DNS Configuration— See Step 7.
Configuration Management— See Step 8.
Type Oracle ILOM hostname.
The hostname must start with a letter and can contain up to 60 alphanumeric characters, hyphens, and underscores.
Type the name that identifies the system. Use any characters except quotation marks.
Type the name of the person to contact. Use any characters except quotation marks.
Type the name of the physical location of the system. Use any characters except quotation marks.
Select whether the system uses Dynamic Host Control Protocol (DHCP) or a static IP assignment.
If you selected a static IP assignment, provide the IP address of the SP.
If you selected a static assignment, provide the netmask for the SP.
If you selected a static assignment, provide the gateway address of the SP.
Note - Oracle System Assistant does not support the creation of a user account with the user name, “user.” However, Oracle ILOM supports the creation of an account named as such, and while such an account can be viewed in Oracle System Assistant, it cannot be modified or deleted. If you need to create or manage this account, use Oracle ILOM.
Click to add a new user account. Type a unique user name, select the role (Basic or Advanced) from the drop-down list, set privileges, and type the password.
Note - If you want to choose specific privileges (not pre-set) for the user, choose Advanced.
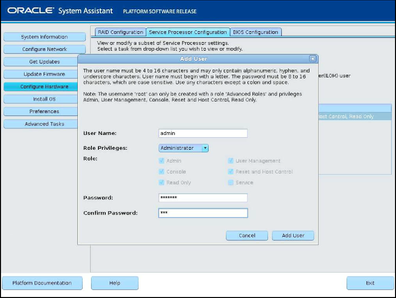
Highlight a user account in the list, and click Modify User to review or change the user account settings.
Highlight a user account in the list, and click Delete User to delete a user account.
Use the drop-down list to select the month, day, and year.
Use the drop-down list to set the time using 24-hour format.
Use the drop-down list to select the time zone.
Click the check box to enable synchronization with a Network Time Protocol (NTP) server.
Enter the information for the NTP servers.
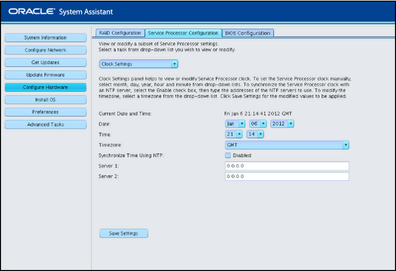
Check enabled or disabled.
Edit this only if Auto DNS is disabled.
Enter up to three comma separated name server IP addresses in preferred order, for example: 1.2.3.4,5.6.7.8.
Edit this only if Auto DNS is disabled.
Enter up to six comma separated search suffixes in preferred order, for example: abc.efg.com, efg.com.
Enter a value between 1 and 10. The default is 5.
Enter a value between 0 and 4. The default is 1.
