| Oracle® On Track Communication Installation Guide Release 1 (1.0) Part Number E20956-03 |
|
|
View PDF |
| Oracle® On Track Communication Installation Guide Release 1 (1.0) Part Number E20956-03 |
|
|
View PDF |
This chapter describes how to run the installation program both in graphical and silent modes.
It consists of the following sections:
This section describes how to start the installation program in graphical mode in different environments, and describes the sequence of screens that may appear in the installation process, depending on the type of installer that you are using.
Note:
In order to run the installation program in graphical mode, the console attached to the computer on which you are installing the software must support a Java-based GUI. All consoles for Windows systems support Java-based GUIs, but not all consoles for UNIX and Linux systems do. If you attempt to start the installation program in graphical mode on a system that cannot support graphical display, then the installation program automatically starts in console mode.This section contains the following subsections:
Start the Configuration Wizard as follows:
In Windows, double click setup.exe located in the shiphome. The Welcome screen opens.
In UNIX and Linux, perform the following steps to start the Oracle On Track installer:
Navigate to the directory Disk1 that has the installer.
Launch the installation:
./runInstaller
Specify the path of JDK when prompted.
Note:
If you are using Oracle JRockit, you might see a harmless warning during the installation. To avoid this warning, pass -jreLoc argument to ./runInstaller.
On Linux systems, if you are running the installer with 32-bit JDK in a 64-bit operating system, then run the command linux32 bash. Then run the installer.
In UNIX and LINUX, the Specify Inventory Location screen opens.
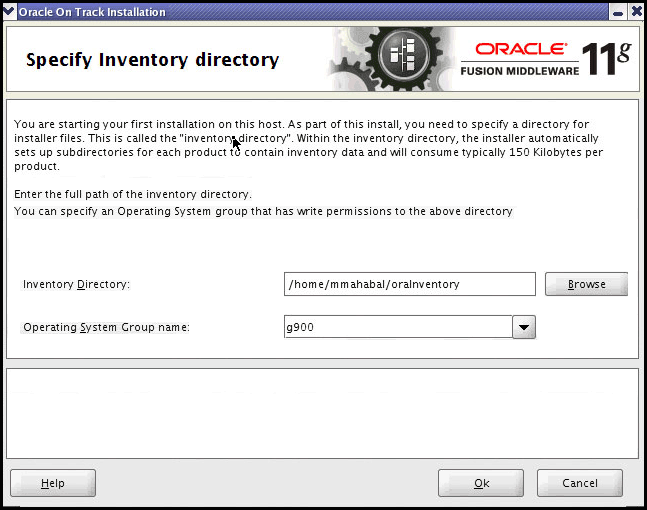
If this is your first Oracle installation on a host that is running UNIX or Linux, then you must use this screen to specify the location of the Oracle inventory directory.
The installer uses the inventory directory to keep track of all Oracle products installed on the computer.
The following table describes the fields on this page.
| Field | Description |
|---|---|
| Inventory Directory | Use this field to identify the complete path for the new Oracle inventory directory that is created.
By default the installer assumes you create the Oracle inventory in a directory, based on the following environment variable and path: $USER_HOME/oraInventory If this location is not appropriate for your environment, then enter a diiferent path for the location of the inventory directory. The inventory directory contains many files, including log files for each Oracle product you install on this computer. |
| Operating System Group Name | From the Operating System Group list, select the group whose members you want to grant access to the inventory directory. All members of this group are able to install products on this computer. |
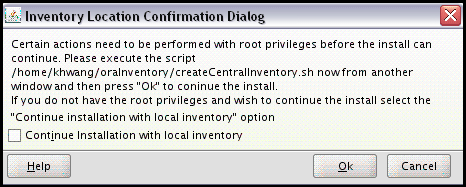
This dialog box appears only on UNIX and Linux systems. It prompts you to run a shell script that creates the Oracle inventory in the location you specified on the Inventory Location screen.
You must have root privileges to run the script.
If you do not have root privileges, but you want to continue with the installation, then select Continue Installation with Local Inventory.
Note:
The preferred method of managing your Oracle installations is to create a central inventory directory with the shell script. If you create a central inventory directory, then the next time you install any Oracle software on this machine, the installer automatically locates and updates the inventory without prompting you. The installer uses the inventory to identify what Oracle software is installed. It also saves all your installation log files to the inventory location.If you do not run the script and use a local inventory, a local copy of the inventory is created for this specific installation only. If you later run the installer to install additional Oracle software, the installer again prompts you to create an inventory.
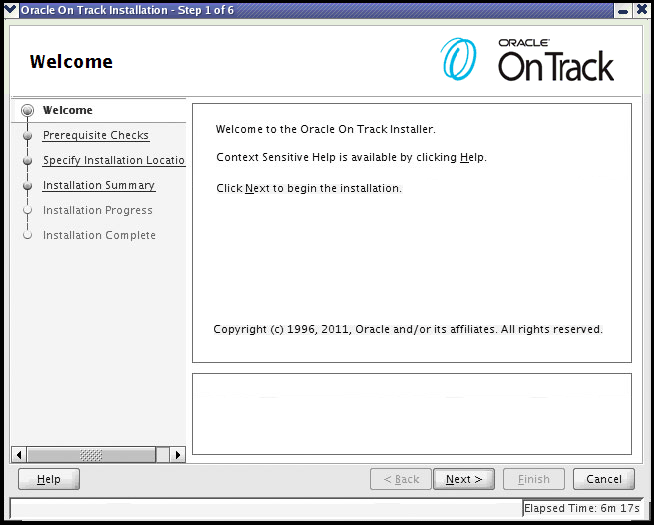
This page introduces you to the Oracle On Track installer and provides two important pieces of information:
A navigation pane on the left that summarizes the tasks the installer helps you complete. Each item in the navigation pane represents a specific installer screen that prompts you for information required to install the software.
Information about any prerequisites you might need to perform before continuing with the installation.
Review the information on this screen carefully to be sure you have performed all the necessary prerequisites.
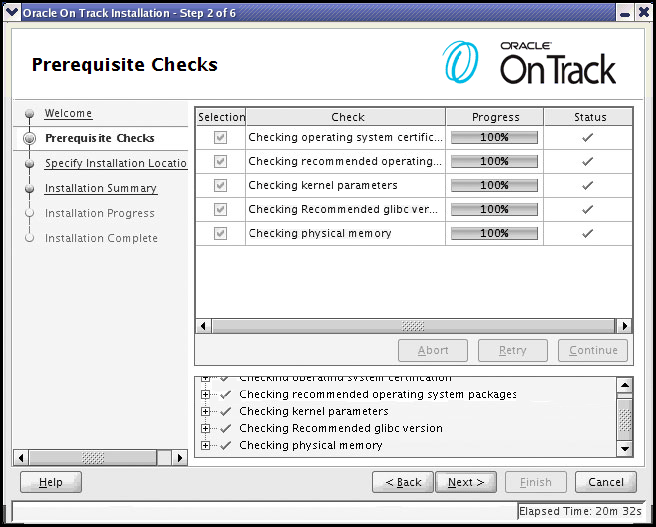
This screen analyzes the host computer to ensure that certain prerequisites are met.
If any of the prerequisite checks fail, then a short error message appears in the bottom portion of the screen. Fix the error and click Retry to try again. If you want to ignore the error or warning messages and continue with the installation, click Continue.
Click Abort to stop prerequisite checking for all components.
Note:
Before performing any installation you should read the system requirements and certification documentation to ensure that your environment meets the minimum installation requirements for the products you are installing. Both of these documents are available on Oracle Technology Network (OTN).For more information on system requirements, see System Requirements.
See the Certification Tab at
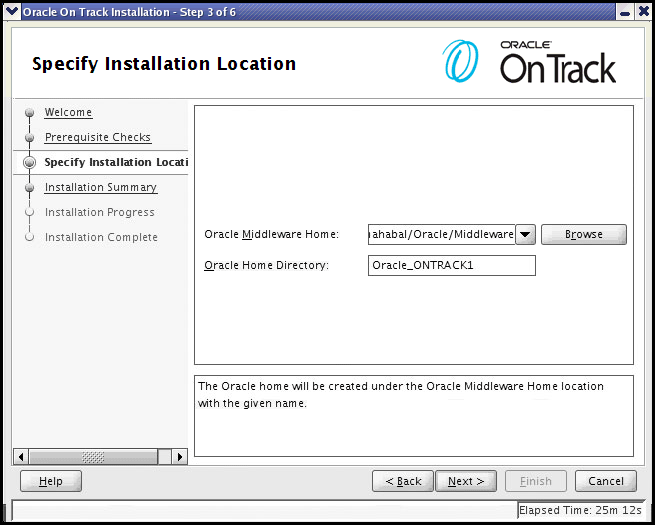
Use this screen to identify where you want to install Oracle On Track.
The following table describes the fields that appear on this page.
Note:
If you are performing an installation on a Windows operating system, be sure that your directory paths are valid and do not contain double backslashes (\\).| Field | Description |
|---|---|
| Oracle Middleware Home | From the list, select the Oracle Middleware home directory in which you want to install Oracle On Track. |
| Oracle Home Directory | Your products are installed in the Oracle home directory. All software binaries reside in this directory, and no runtime process can write to this directory.
Specify the directory inside the Oracle Middleware Home where you want to install your products, but note the following:
|
For more information about the Oracle Fusion Middleware home and the Oracle home requirements, see "Oracle Fusion Middleware Directory Structure and Concepts" in the Oracle Fusion Middleware Installation Planning Guide.
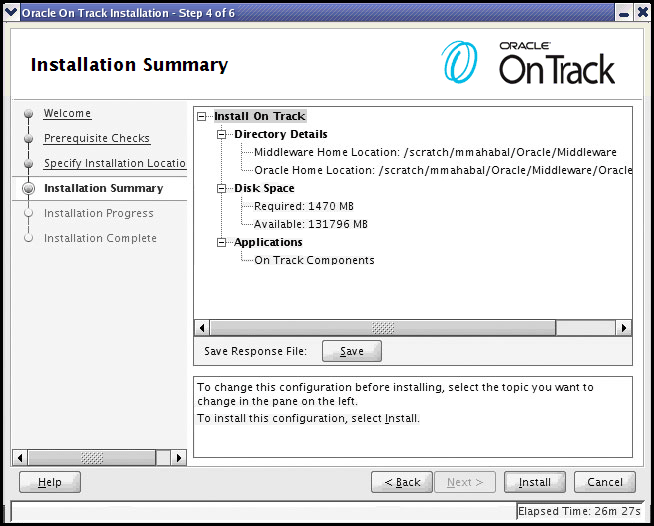
This screen summarizes the selections you have made during this installation session. It includes the following information:
The location of your installation.
The amount of disk space that will be used for the installation.
The applications that you have selected for installation.
Review the information on this screen carefully, and take one of the following actions:
If you want to make any changes to the configuration before starting the installation, then use the navigation pane to select the installer screen you want to return to and edit.
If you are satisfied with the information, then click Install to begin the installation procedure.
If you want to save this configuration to a text file (called a response file), then click Save. The resulting response file can be used later if you choose to perform the same installation from the command line.
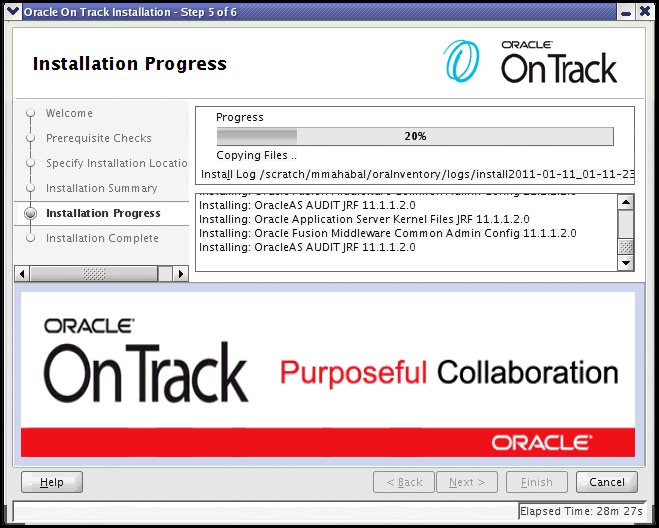
This screen shows you the progress of the installation.
If you want to quit before the installation is completed, then click Cancel. This results in a partial installation. The portion of the software that was installed on your system before you canceled the installation remains on your system, and you must remove it manually.
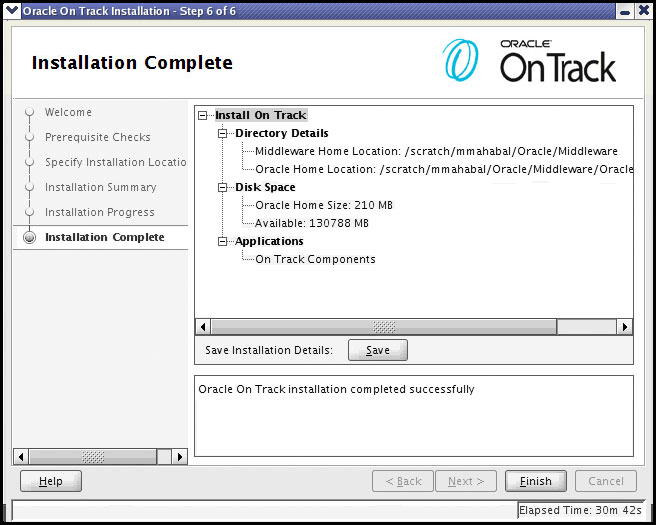
This screen summarizes the installation that was just completed.
If you want to save this summary information to a text file for future reference, then click Save.
Click Finish to dismiss the screen and end your installation session.
This section describes how to run the installation program in silent mode. Silent-mode installation is a way of setting installation configuration only once and then using those configuration to duplicate the installation on many machines. During installation in silent mode for Oracle On Track, the installation program reads the settings for your configuration from a .rsp file that you create before beginning the installation. The installation program does not display any configuration options during the installation process. Silent-mode installation works on all operating systems.
Note:
In this section, UNIX conventions (such as backslashes in path names) are used. When entering path names on a Windows system, be sure to use Windows conventions. For example, use backward slashes in path names in UNIX.Perform the silent mode installation as follows:
Locate the ontrack.rsp file on your system. It is usually available in your shiphome at Disk1/stage/Response/ontrack.rsp.
In ontrack.rsp, set the two parameters as follows:
MIDDLEWARE_HOME=/scratch/aime/Oracle/Middleware
ORACLE_HOME=/scratch/aime/Oracle/Middleware/Oracle_ONTRACK1
For UNIX and Linux, perform the installation by using ontrack.rsp with the following command:
[ runInstaller | runInstaller.sh ] -jreLoc <path to JDK 6 location> -silent -responseFile <full path to user modified response file> -invPtrLoc /var/opt/oracle/oraInst.loc
On Solaris, OraInst.loc is located in:
/var/opt/oracle/oraInst.loc
On Linux, OraInst.loc is located in:
/etc/oraInst.loc
If OraInst.loc does not exist in the above paths, then you can create the file in the /var/opt/oracle directory. To create this file on UNIX or Linux, you need root privileges.
On Windows, run the following command for silent mode installation:
setup -jreLoc <jdk location> -silent -responseFile <full path to user mmodified ontrack.rsp file> -nocheckForUpdates
For setting up the central inventory location, exit the installer and run the script located at the following location:
Disk1/stage/Response/createCentralInventory.sh inventory_location group_name
|
Copyright © 2011, Oracle and/or its affiliates. All rights reserved. Legal Notices |
|