| Oracle® Fusion Middleware User's Guide for Oracle Business Rules 11g Release 1 (11.1.1) E10228-03 |
|
 Previous |
 Next |
| Oracle® Fusion Middleware User's Guide for Oracle Business Rules 11g Release 1 (11.1.1) E10228-03 |
|
 Previous |
 Next |
You can use Oracle JDeveloper to create a rule-enabled non-SOA Java EE application with Oracle Business Rules. This chapter shows a sample application, a Java Servlet, that runs as a Java EE application using Oracle Business Rules (this describes using of Oracle Business Rules without an SOA composite).
This chapter includes the following sections:
Section 9.1, "Introduction to the Grades Sample Application"
Section 9.2, "Creating an Application and a Project for Grades Sample Application"
Section 9.3, "Creating Data Model Elements and Rules for the Grades Sample Application"
Section 9.4, "Adding a Servlet with Rules SDK Calls for Grades Sample Application"
Section 9.5, "Adding an HTML Test Page for Grades Sample Application"
Section 9.6, "Preparing the Grades Sample Application for Deployment"
Section 9.7, "Deploying and Running the Grades Sample Application"
The source code for Oracle Business Rules-specific samples is available online at
http://www.oracle.com/technology/sample_code/products/rules
For SOA samples online visit
http://www.oracle.com/technology/sample_code/products/soa
The Grades application provides a sample use of Oracle Business Rules in a Java Servlet. The servlet uses Rules SDK Decision Point API. This sample demonstrates the following:
Creating rules in an Oracle Business Rules dictionary using an XSD schema that defines the input and the output data, and the facts for the data model. In this case you provide the XSD schema in the file grades.xsd.
Creating a servlet that uses Oracle Business Rules to determine a grade for each test score that is input.
Creating a test page to supply input test scores and to submit the data to the grades servlet.
Deploying the application, running it, submitting test values, and seeing the output.
To create the application and the project for the grades sample application, you do the following:
Create a Fusion Web Application (ADF)
Create a project in the application
Add the schema to define the inputs, outputs, and the objects for the data model
Create an Oracle Business Rules dictionary in the project
To work with Oracle Business Rules and create a Java EE application, you first need to create the application in Oracle JDeveloper.
To create a fusion web application (ADF) for grades:
Create an application. You can do this in the Application Navigator by selecting New Application..., or from the Application menu by selecting New Application....
In the Name your application dialog enter the application options, as shown in Figure 9-1:
In the Application Template area, select Fusion Web Application.
In the Application Name field, enter an application name. For example, enter GradeApp.
In the Directory field, specify a directory name or accept the default.
In the Application Package Prefix field, enter an application package prefix. For example, com.example.grades.
The prefix, followed by a period applies to objects created in the initial project of an application.
Click Finish. After creating the application Oracle JDeveloper displays the file summary, as shown in Figure 9-2.
Figure 9-2 New Grades Application Named GradeApp
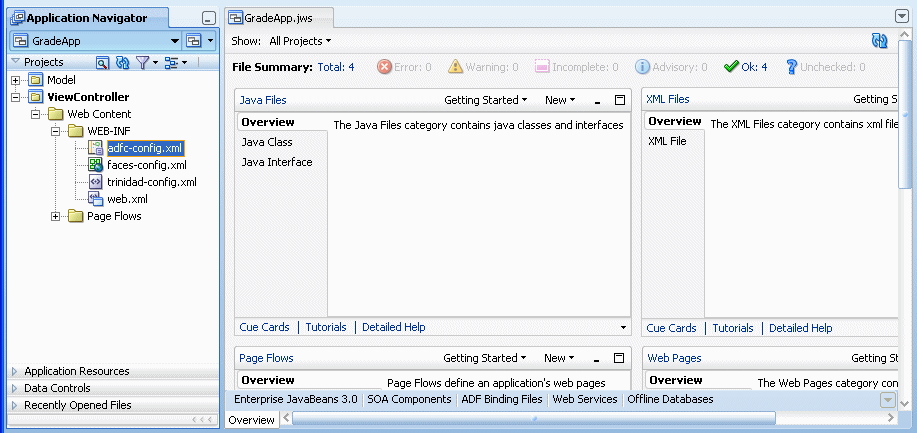
In the Grades sample application you do not use the Model or ViewController projects. You create a project in the application for the grades sample project.
To create a grades project:
In the GradeApp application, in the Application Navigator, from the Application Menu select New Project....
In the New Gallery, in the Items area select Generic Project.
Click OK.
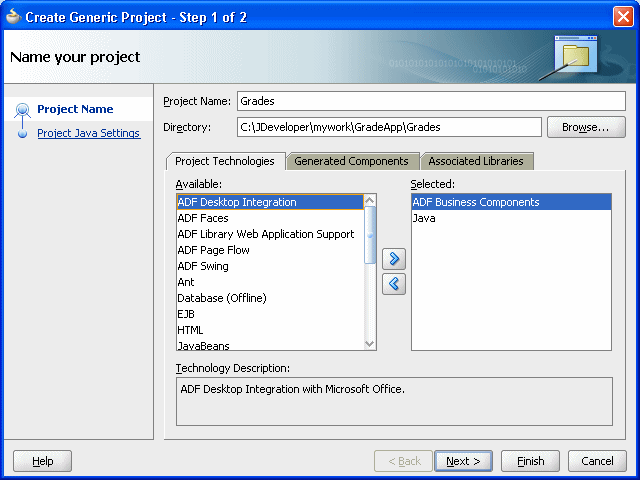
In the Name your project page enter the values as shown in Figure 9-3:
In the Project Name field, enter a name. For example, enter Grades.
Enter or browse for a directory name, or accept the default.
Select the Project Technologies tab.
In the Available area double-click ADF Business Components to move this item to the Selected area. This also adds Java to the Selected area as shown in Figure 9-3.
Figure 9-3 Adding Generic Project to the Grades Application
Click Finish. This adds the Grades project.
To create the Grades sample application you need to use the grades.xsd file, shown in Example 9-1. You can create and store the schema file locally and then use Oracle JDeveloper to copy the file to your project.
Example 9-1 grades.xsd Schema
<?xml version= '1.0' encoding= 'UTF-8' ?>
<xs:schema targetNamespace="http://example.com/grades"
        xmlns:xs="http://www.w3.org/2001/XMLSchema"
        xmlns:tns="http://example.com/grades"
        attributeFormDefault="qualified" elementFormDefault="qualified"
        xmlns:xjc="http://java.sun.com/xml/ns/jaxb/xjc"
        xmlns:jaxb="http://java.sun.com/xml/ns/jaxb"
        jaxb:extensionBindingPrefixes="xjc"
        jaxb:version="2.0">

    <xs:element name="TestScore">
        <xs:complexType>
            <xs:sequence>
                <xs:element name="name" type="xs:string"/>
                <xs:element name="testName" type="xs:string"/>
                <xs:element name="testScore" type="xs:double"/>
                <xs:element name="testCurve" type="xs:double"/>
            </xs:sequence>
        </xs:complexType>
    </xs:element>
    <xs:element name="TestGrade">
        <xs:complexType>
            <xs:sequence>
                <xs:element name="grade" type="tns:Grade"/>
            </xs:sequence>
        </xs:complexType>
    </xs:element>
    <xs:simpleType name="Grade">
        <xs:restriction base="xs:string">
            <xs:enumeration value="A"/>
            <xs:enumeration value="B"/>
            <xs:enumeration value="C"/>
            <xs:enumeration value="D"/>
            <xs:enumeration value="F"/>
        </xs:restriction>
    </xs:simpleType>
</xs:schema>
To add the XML schema to the grades project:
Save the schema file shown in Example 9-1 to a local file named grades.xsd .
In the Application Navigator select the Grades project.
Right-click and in the context menu select New....
In the New Gallery select the All Technologies tab.
In the Categories area, expand General and select XML.
In the Items area, select XML Schema.
Click OK.
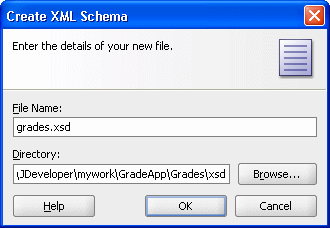
In the Create XML Schema dialog, in the File Name field enter grades.xsd.
In the Create XML Schema dialog, in the Directory field add the xsd directory to the Grades project path name, as shown in Figure 9-4.
Figure 9-4 Adding Schema to Grades Project in xsd Directory
Click OK.
In the grades.xsd file, select the Source tab.
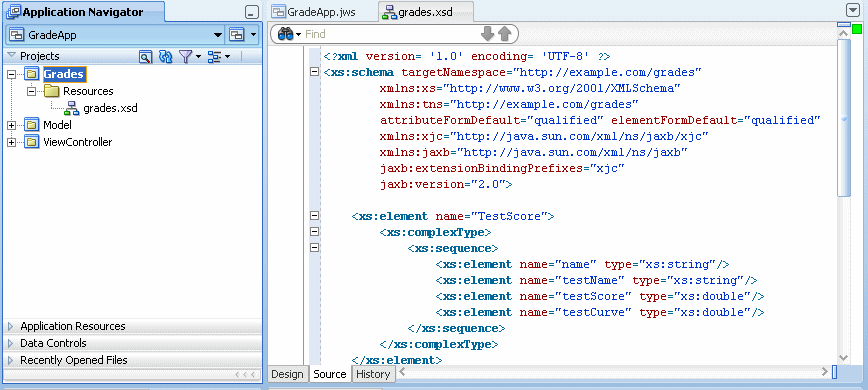
Copy the schema shown in Example 9-1 to the grades.xsd in the Grades project, as shown in Figure 9-5.
Figure 9-5 Shows the Grades.xsd Schema File in the Grades Project
To generate JAXB 2.0 content model from grades schema:
In the Application Navigator, in the Grades project expand Resources and select grades.xsd.
Right-click and in the context menu select Generate JAXB 2.0 Content Model.
In the JAXB 2.0 Content Model from XML Schema dialog, click OK.
After creating a project in Oracle JDeveloper create business rules within the Grades project.
To use business rules with Oracle JDeveloper, you do the following:
Add a business rule to the project and import grades.xsd schema
Create input and output variables
Create an Oracle Business Rules dictionary in the project
To create a business rules dictionary in the business tier:
In the Application Navigator, select the Grades project.
Right-click and in the context menu select New....
Select the All Technologies tab.
In the New Gallery, in the Categories area, expand Business Tier and select Business Rules.
In the New Gallery, in the Items area, select Business Rules.
Click OK. Oracle JDeveloper displays the Create Business Rules dialog, as shown in Figure 9-6.
Figure 9-6 Adding a Business Rule to Grades with the Create Business Rules Dialog
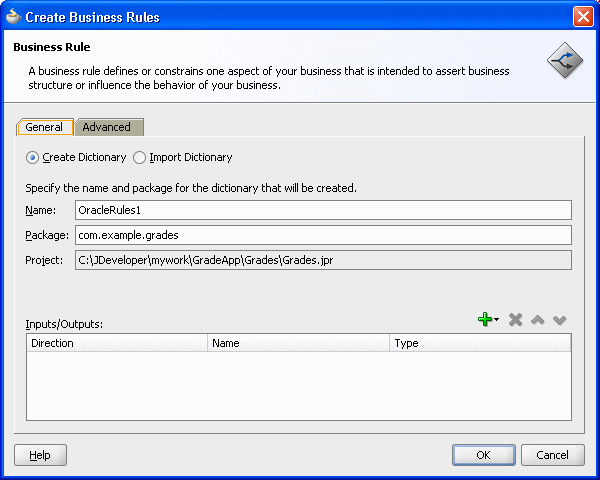
In the Name field, enter a name to name the dictionary. For example, enter GradingRules.
To add an input, from the list next to the Add icon select Input....
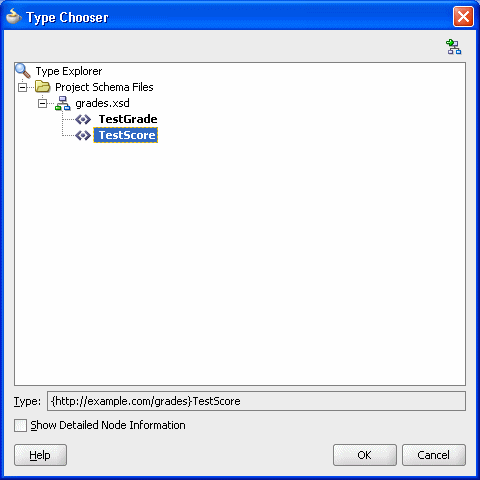
In the Type Chooser, expand the Project Schemas Files folder and expand grades.xsd.
Select the input TestScore, as shown in Figure 9-7.
Figure 9-7 Shows the Type Chooser Dialog with TestScore Element
On the Type Chooser window, click OK. This displays the Create Business Rules dialog.
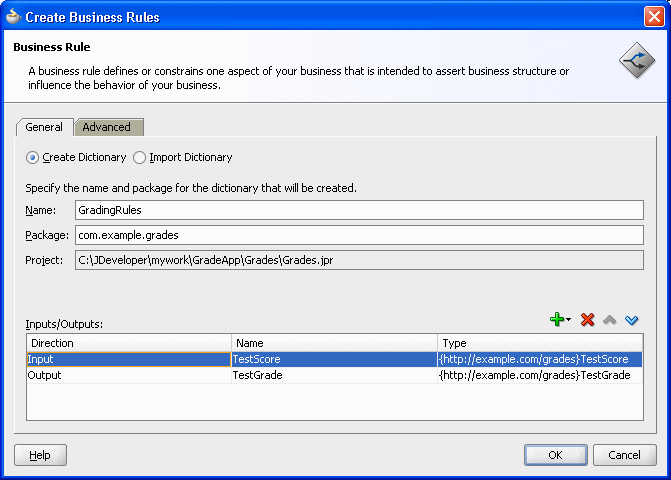
In the Create Business Rules dialog, in a similar manner to the input add the output by selecting Output... to add the output element TestGrade from the grades.xsd schema.
The resulting Create Business Rules dialog is shown in Figure 9-8.
Figure 9-8 Create Business Rules Dialog with Grades Input and Output
Click OK. Oracle JDeveloper creates the GradingRules dictionary as shown in Figure 9-9.
In the File menu, select Save All to save your work.
Figure 9-9 Shows the New Grading Rules Dictionary
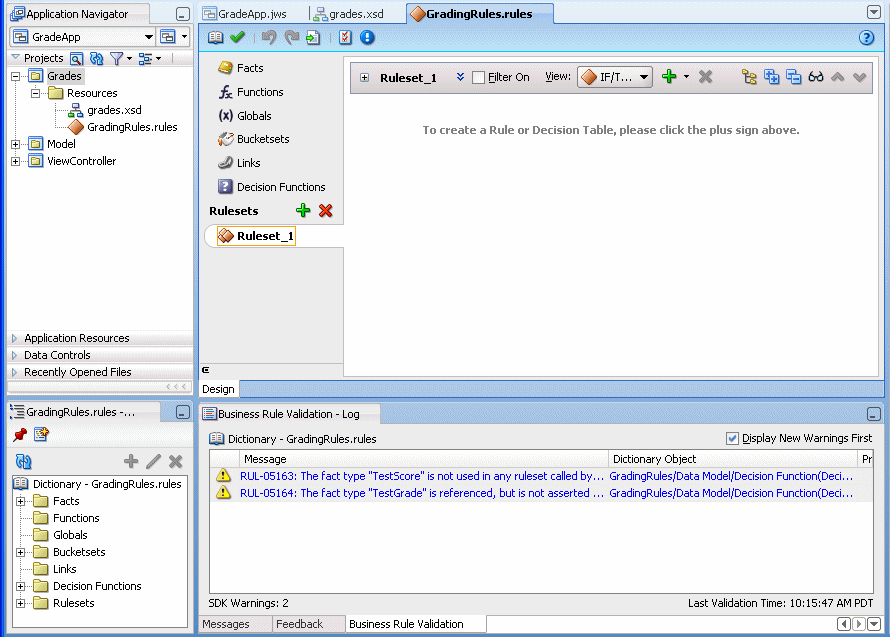
Note that the business rule validation log area for the new dictionary shows several validation warnings. You remove these validation warning messages as you modify the dictionary in later steps.
To create the data model and the business rules for the Grades sample application, you do the following:
Create Bucketsets for grades
Create rules by adding a Decision Table for grades
Split the Decision Table and add actions for rules
Rename the default decision function
In this example you associate a bucketset with a fact type. This supports using a Decision Table where you need bucketsets that specify how to draw values for each cell in the Decision Table (for the conditions in the Decision Table).
To create the bucketset for the grades sample application:
In Rules Designer, select the Bucketsets navigation tab.
From the list next to the Create BucketSet... icon, select List of Ranges.
For the bucketset, double-click in the Name field to select the default name.
Enter Grade Scale, and press Enter to accept the bucketset name.
In the Bucketsets table, double-click the bucket icon for the Grade Scale bucketset to display the Edit Bucketset dialog as shown in Figure 9-10.
In the Edit Bucketset dialog, click Add Bucket to add a bucket.
Click Add Bucket three times to add three more buckets.
In the Endpoint field, enter 90 for the top endpoint and press Enter to accept the new value.
For the next bucket, in the Endpoint field enter 80 and press Enter to accept the new value.
Similarly, for the next two buckets enter values in the Endpoint field, values 70 and 60.
In the Included Endpoint field for each bucket select each checkbox.
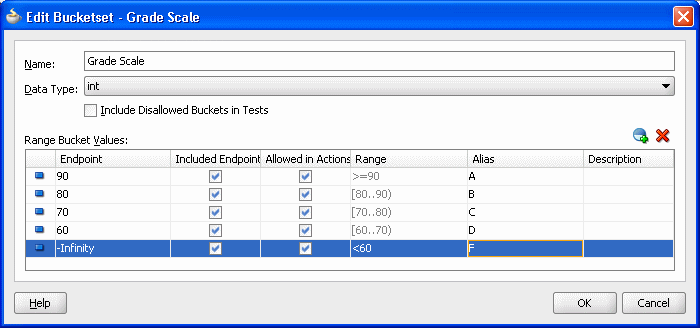
Modify the Alias field for each value to enter the values A, B, C, D, and F, for each corresponding range, as shown in Figure 9-11 (press Enter after you add each alias).
Figure 9-11 Grade Scale Bucketset with Grade Values Added
To associate a bucketset with a fact property:
To prepare for creating Decision Tables you can associate a global bucketset with fact properties in the data model. In this way condition cells in a Decision Table Conditions area can use the bucketset when you create a Decision Table.
In Rules Designer, select the Facts navigation tab.
In the Facts navigation tab select the XML Facts tab.
Double-click the XML fact icon for the TestScore fact. This displays the Edit XML Fact dialog.
In the Edit XML Fact dialog select the testScore property.
In the Bucketset field, from the list select Grade Scale.
Click OK.
You create rules in a Decision Table to process input facts and to produce output facts, or to produce intermediate conclusions that Oracle Business Rules can further process using additional rules or in another Decision Table.
To use a Decision Table for rules in this application you work with facts representing a test score. Then, you use a Decision Table to create rules based on the test score to produce a grade.
To add a decision table for Grades application:
In Rules Designer, select Ruleset_1 under the Rulesets navigation tab.
In Ruleset_1, click the Add icon and from the list select Create Decision Table. This creates DecisionTable_1. You can ignore the warning messages shown in the Business Rule Validation log area. You remove these warning messages in later steps.
In the Decision Table, DecisionTable_1, click the Add icon and from the list select Condition.
In the Decision Table, double-click <edit condition>. Then, in the variables navigator expand TestScore and select testScore. This enters the expression TestScore.testScore for condition C1.
If you view the rules validation log, you should see warning messages. You remove these warning messages as you modify the Decision Table in later steps.
To add an action to a decision table:
You add an action to the Decision Table to assert a new Grade fact.
In the Decision Table, click the Add icon and from the list select Action and select Assert New.
In the Actions area, double-click assert new (.
This displays the Action Editor dialog.
In the Action Editor dialog, in the Facts area select TestGrade.
In the Action Editor dialog, in the Properties table for the property grade, select the Parameterized checkbox and the Constant checkbox.
This specifies that each rule independently sets the grade.
In the Action Editor dialog select the Always Selected checkbox.
In the Action Editor dialog click OK.
Select Save All from the File main menu to save your work.
Next you add rules to the Decision Table and specify an action for each rule.
You can use the Decision Table split operation to create rules for the bucketset associated with the conditions row in the Decision Table. This creates one rule for every bucket.
To split the decision table:
Select the Decision Table.
Click the Split Table icon and from the list select Split Table.
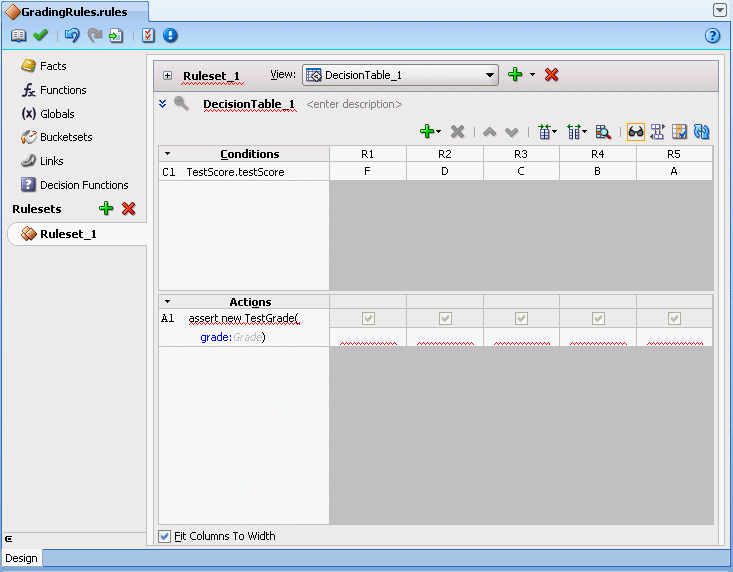
The split operation eliminates the "do not care" cells from the table. The table now shows five rules that cover all ranges, as shown in Figure 9-12.
These steps produce validation warnings for action cells with missing expressions. You fix these problems in later steps when you define actions for each rule.
Figure 9-12 Splitting a Decision Table Using Split Table Operation for Grades
To add actions for each rule in the decision table:
In the Decision Table you specify a value for the result, a grade property, associated with TestGrade for each action cell in the Actions area. The possible choices for each grade property are the valid grades. In this step you fill in a value for each of the rules. The values you enter correspond to the conditions that form each rule in the Decision Table.
In the Actions area, double-click the action cell for rule R1 as shown in Figure 9-13.
Figure 9-13 Adding Action Cell Values to Grades Decision Table
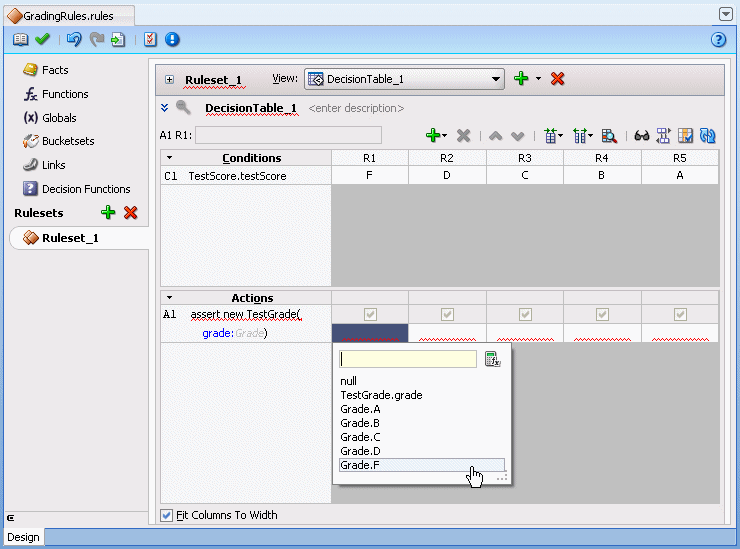
In the list select the corresponding value for the action cell. For example, select Grade.F.
For each of the remaining action cells select the appropriate value for the buckets for TestScore: D, C, B, and A.
The name you specify when you use a decision function with a Rules SDK Decision Point must match the name of a decision function in the dictionary. To make the name match, you can rename the decision function to any name you like. Thus, for this example you rename the default decision function to use the name GradesDecisionFunction.
To rename the decision function:
In the Application Navigator, in the Grades project, expand the Resources folder and double-click the dictionary GradingRules.rules.
Select the Decision Functions navigation tab.
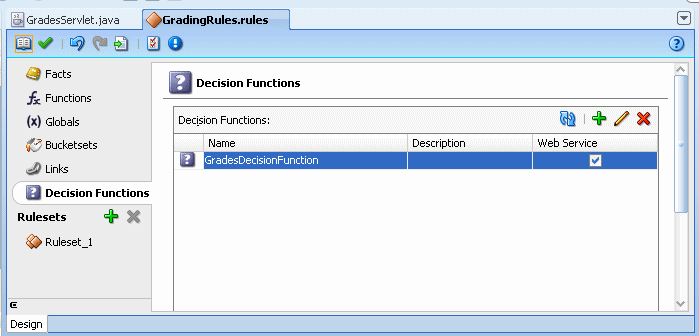
In the Name field in the Decision Functions table edit the decision function name to enter the value GradesDecisionFunction, and then press Enter, as shown in Figure 9-14.
Figure 9-14 Renaming Decision Function in Rules Designer
The Grades sample application includes a servlet that uses the Rules Engine.
To add this servlet with Oracle Business Rules you need to understand the important Rules SDK methods. Thus, to use the Oracle Business Rules dictionary you created with Rules Designer, you do the following:
Create initialization steps that you perform one time in the servlet init routine.
Create a servlet service routine using the Rules SDK Decision Point API.
Perform steps to add the servlet code in the project.
For more information on Rules SDK Decision Point API, see Chapter 7, "Working with Rules SDK Decision Point API".
You add a servlet to the grades project using the Create HTTP Servlet wizard.
To add a servlet to the Grades project with Oracle JDeveloper:
In the Application Navigator, select the Grades project.
Right-click the Grades project and in the context menu select New....
In the New Gallery, select the All Technologies tab.
In the New Gallery, in the Categories area expand Web Tier and select Servlets.
In the New Gallery, in the Items area select HTTP Servlet.
Click OK.
Oracle JDeveloper displays the Create HTTP Servlet Welcome page, as shown in Figure 9-15.
Figure 9-15 Create HTTP Servlet Wizard - Welcome
Click Next.
This displays the Web Application page, as shown in Figure 9-16.
Figure 9-16 Create HTTP Servlet Wizard - Web Application
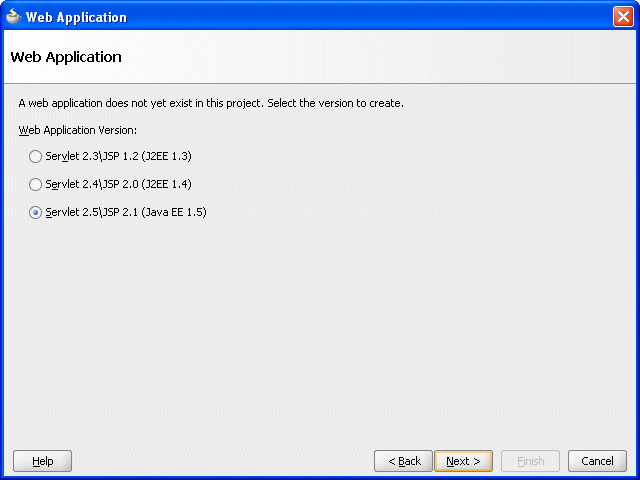
Select Servlet 2.5\JSP 2.1 (Java EE 1.5) and click Next.
This displays the Create HTTP Servlet - Step 1 of 3: Servlet Information page.
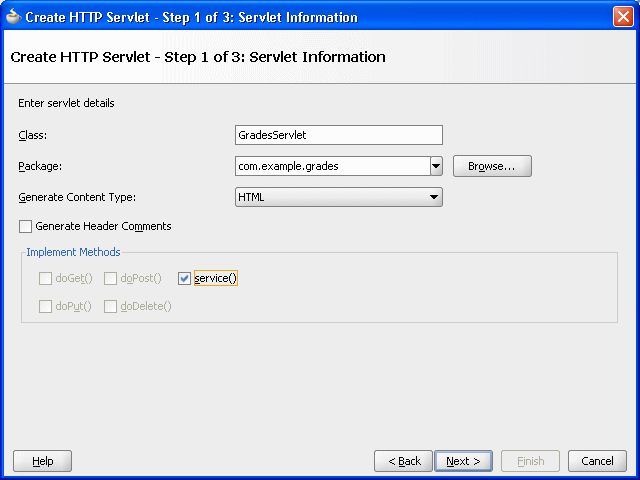
Enter values in Create HTTP Servlet - Step 1 of 3: Servlet Information page, as follows, and as shown in Figure 9-17.
Class: GradesServlet
Package: com.example.grades
Generate Content Type: HTML
Generate Header Comments: unchecked
Implement Methods: service() checked and all other checkboxes unchecked
Figure 9-17 Create HTTP Servlet Wizard - Step 1 of 3: Servlet Information
Click Next.
This displays the Create HTTP Servlet: Step 2 of 3: Mapping Information dialog as shown in Figure 9-18.
Figure 9-18 Create HTTP Servlet Wizard - Step 2 of 3: Mapping Information
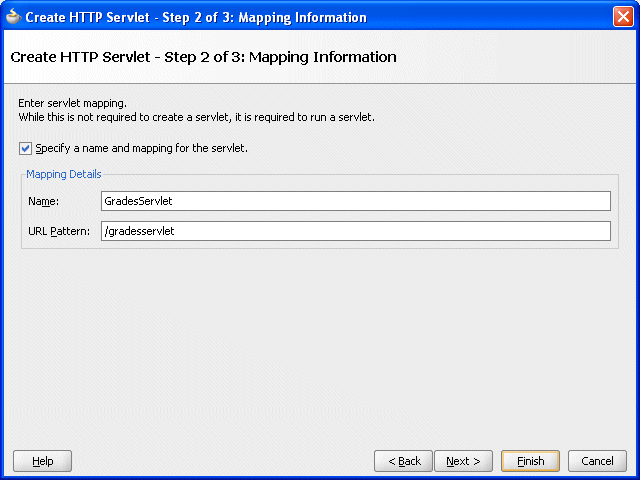
Configure this dialog as follows:
Name: GradesServlet
URL Pattern: /gradesservlet
Click Finish.
JDeveloper adds a Web Content folder to the project and creates a GradesServlet.java file and opens the file in the editor as shown in Figure 9-19.
Replace the generated servlet with the source shown in Example 9-2.
Example 9-2 Business Rules Using Servlet for Grades Application
package com.example.grades;

import java.io.IOException;
import java.io.PrintWriter;

import java.util.ArrayList;
import java.util.List;

import javax.servlet.ServletConfig;
import javax.servlet.ServletException;
import javax.servlet.http.HttpServlet;
import javax.servlet.http.HttpServletRequest;
import javax.servlet.http.HttpServletResponse;

import oracle.rules.rl.exceptions.RLException;
import oracle.rules.sdk2.decisionpoint.DecisionPoint;
import oracle.rules.sdk2.decisionpoint.DecisionPointBuilder;
import oracle.rules.sdk2.decisionpoint.DecisionPointInstance;
import oracle.rules.sdk2.exception.SDKException;
import oracle.rules.sdk2.repository.DictionaryFQN;

public class GradesServlet extends HttpServlet {

    private static final String CONTENT_TYPE = "text/html";
    private static final String DICT_PKG = "com.example.grades";
    private static final String DICT_NAME = "GradingRules";
    private static final DictionaryFQN DICT_FQN =
        new DictionaryFQN(DICT_PKG, DICT_NAME);
    private static final String DF_NAME = "GradesDecisionFunction";

    private DecisionPoint m_decisionPoint = null; // init in init()

    public void init(ServletConfig config) throws ServletException {
        super.init(config);

        try {

            // specifying the Decision Function and Dictionary FQN
            // load the rules from the MDS repository.
            m_decisionPoint = new DecisionPointBuilder()
                                .with(DF_NAME)
                                .with(DICT_FQN)
                                .build();
        } catch (SDKException e) {
            System.err.println("Failed to build Decision Point: " +
                               e.getMessage());
            throw new ServletException(e);
        }
    }

    public void service(HttpServletRequest request,
                        HttpServletResponse response) throws ServletException,
                                                             IOException {
        // retrieve parameters
        String name = request.getParameter("name");
        String strScore = request.getParameter("testScore");

        // open output document
        StringBuilder doc = new StringBuilder();
        addHeader(doc);

        // create TestScore object to assert
        final TestScore testScore = new TestScore();
        testScore.setName(name);

        try {
            testScore.setTestScore(Integer.parseInt(strScore));
        } catch (NumberFormatException e){ /* use default val */ }

        // get DecisionPointInstance for invocation
        DecisionPointInstance point = m_decisionPoint.getInstance();

        // set input parameters
        point.setInputs(new ArrayList() {{ add(testScore); }});

        // invoke decision point and get result value
        TestGrade testGrade = null;
        try {

            // invoke the decision point with our inputs
            List<Object> result = point.invoke();
            if (result.size() != 1){
                error(doc, testScore.getName(), "bad result", null);
            }
            // decision function returns a single TestGrade object
            testGrade = (TestGrade)result.get(0);
        } catch (RLException e) {
            error(doc, testScore.getName(), "RLException occurred: ", e);
        } catch (SDKException e) {
            error(doc, testScore.getName(), "SDKException occurred", e);
        }

        if (testGrade != null){
            // create output table in document
            openTable(doc);
            addRow(doc, testScore.getName(), strScore, testGrade.getGrade());
            closeTable(doc);
        }

        addFooter(doc);

        // write document
        response.setContentType(CONTENT_TYPE);
        PrintWriter out = response.getWriter();
        out.println(doc);
        out.close();
    }


    public static void addHeader(StringBuilder doc) {
        doc.append("<html>");
        doc.append("<head><title>GradesServlet</title></head>");
        doc.append("<body>");
        doc.append("<h1>Test Results</h1>");
    }

    public static void addFooter(StringBuilder doc) {
        doc.append("</body></html>");
    }

    public static void openTable(StringBuilder doc) {
        doc.append("<table border=\"1\"");
        doc.append("<tr>");
        doc.append("<th>Name</th>");
        doc.append("<th>Score</th>");
        doc.append("<th>Grade</th>");
        doc.append("</tr>");
    }

    public static void closeTable(StringBuilder doc) {
        doc.append("</table>");
    }

    public static void addRow(StringBuilder doc, String name, String score, Grade grade){
        doc.append("<tr>");
        doc.append("<td>"+ name +"</td>");
        doc.append("<td>"+ score +"</td>");
        doc.append("<td>"+ grade.value() +"</td>");
        doc.append("</tr>");
    }

    public static void error(StringBuilder doc, String name, String msg, Throwable t){
        doc.append("<tr>");
        doc.append("<td>"+ name +"</td>");
        doc.append("<td colspan=2>"+ msg + " " + t +"</td>");
        doc.append("</tr>");
    }
}
Example 9-2 includes a Oracle Business Rules Decision Point, that uses an MDS repository to access the dictionary. For more information, see Section 7.5, "What You Need to Know About Using Decision Point in a Production Environment".
When you add the Servlet shown in Example 9-2, note the following:
In the init() method the servlet uses the Rules SDK Decision Point API for Oracle Business Rules. For more information on using the Decision Point API, see Chapter 7, "Working with Rules SDK Decision Point API".
The DecisionPointBuilder() requires arguments including a decision function name and, in a production environment a dictionary FQN to access a dictionary in an MDS repository, as shown:
            m_decisionPoint = new DecisionPointBuilder()
                                .with(DF_NAME)
                                .with(DICT_FQN)
For more information on using the Decision Point API, see Chapter 7, "Working with Rules SDK Decision Point API".
The Grades sample application includes an HTML test page that you use to invoke the servlet you created in Section 9.4, "Adding a Servlet with Rules SDK Calls for Grades Sample Application".
To add an HTML page to the servlet you use the Create HTML File wizard.
To add an HTML test page:
In the Application Navigator, in the Grades project select the Web Content folder.
Right-click the Web Content folder project and in the context menu select New....
In the New Gallery, select the All Technologies tab.
In the New Gallery, in the Categories area expand Web Tier and select HTML.
In the New Gallery, in the Items area select HTML Page.
In the New Gallery click OK.
Oracle JDeveloper displays the Create HTML File dialog.
Configure this dialog as follows and as shown in Figure 9-20:
File Name: index.html
Directory: C:\JDeveloper\mywork\GradeApp\Grades\public_html
Click OK.
JDeveloper adds index.html to the Web Content folder and opens the editor.
In the editor for index.html, select the Source tab.
Copy and paste the HTML code from Example 9-3 to replace the contents of the index.html file.
Note that in the form element action attribute uses the URL Pattern you specified in Figure 9-18.
Example 9-3 HTML Test Page
<!DOCTYPE HTML PUBLIC "-//W3C//DTD HTML 4.01 Transitional//EN" "http://www.w3.org/TR/html4/loose.dtd">
<html>
  <head>
    <meta http-equiv="Content-Type" content="text/html; charset=windows-1252"></meta>
    <title>Test Grade Example Servlet</title>
  </head>
  <body>
    <form name="names_and_scores"
          method="post"
          action="/grades/gradesservlet" >
          <p>Name: <input type="text" name="name" /></p>
          <p>Test Score: <input type="text" name="testScore"/></p>
       <input type="submit" value="Submit">
    </form>
  </body>
</html>
Select Save All from the File main menu to save your work.
Business rules are deployed as part of the application for which you create a deployment profile in Oracle JDeveloper. You deploy the application to Oracle WebLogic Server.
You deploy the GradeApp sample application using JDeveloper with Oracle WebLogic Server.
To create the WAR file for the grades sample application:
In the Application Navigator, select the Grades project.
Right-click the Grades project and in the context menu select Project Properties.... This displays the Project Properties dialog for the project.
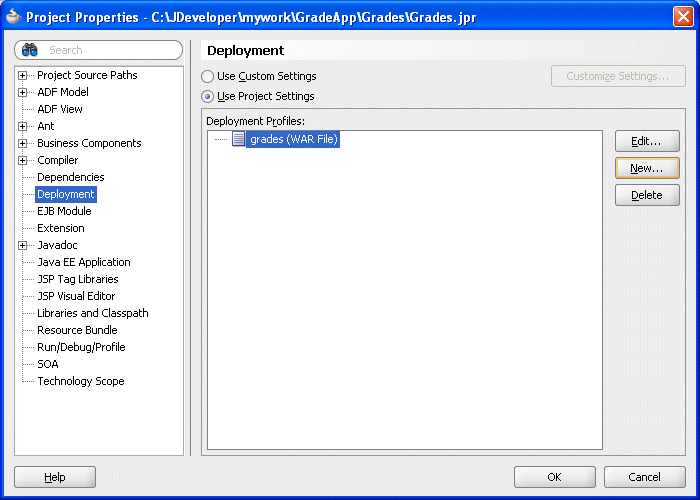
In the Project Properties navigator, select the Deployment item as shown in Figure 9-21.
Figure 9-21 Project Properties - Deployment
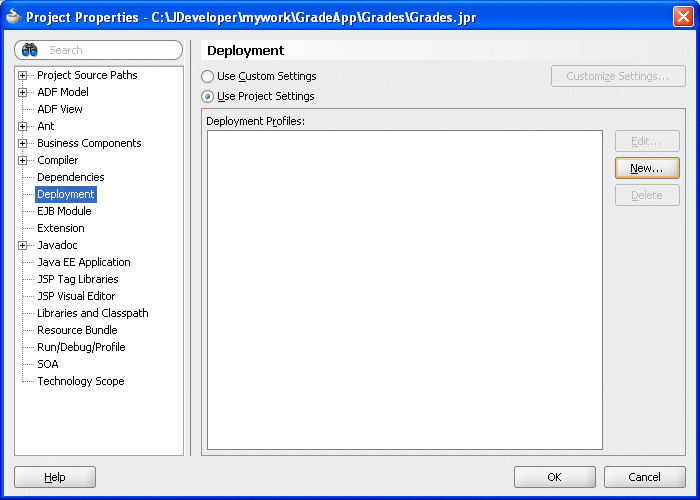
In the Project Properties dialog, click New....
This displays the Create Deployment Profile dialog.
In the Create Deployment Profile dialog, in the Archive Type list, select WAR File.
In the Create Deployment Profile dialog, in the Name field enter grades, as shown in Figure 9-22. Note the Name value uses the package value that you specified in the form element action attribute in Example 9-3.
Figure 9-22 Create Deployment Profile Dialog for WAR File
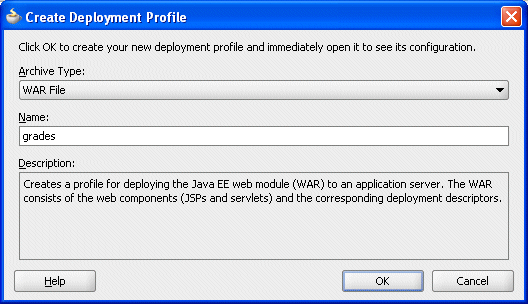
Click OK.
This displays the Edit WAR Deployment Profile Properties dialog.
In the Edit War Deployment Profile Properties dialog, select General and configure the General page as follows, as shown in Figure 9-23:
Set the WAR File: C:\JDeveloper\mywork\GradeApp\Grades\deploy\grades.war
In the Web Application Context Root area, select Specify Java EE Web Context Root:
In the Specify Java EE Web Context Root: text entry area, enter grades.
In the Deployment Client Maximum Heap Size (in Megabytes): list select Auto.
Figure 9-23 Edit WAR Deployment Properties - General
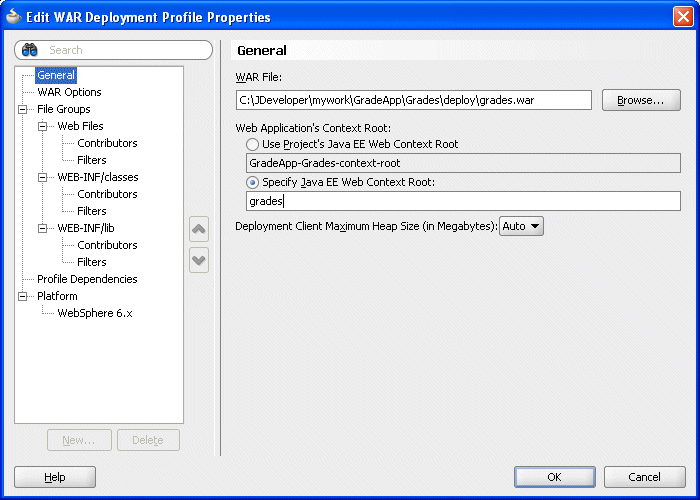
In the Edit WAR Deployment Profile Properties dialog, click OK.
JDeveloper creates a deployment profile named grades (WAR File) as shown in Figure 9-24.
Figure 9-24 Project Properties - Deployment Profile Created
In the Project Properties dialog, click OK.
To add the rules library to the weblogic-application file:
In the GradeApp application, in the Application Navigator expand Application Resources.
Expand Descriptors and expand META-INF and double-click to open weblogic-application.xml.
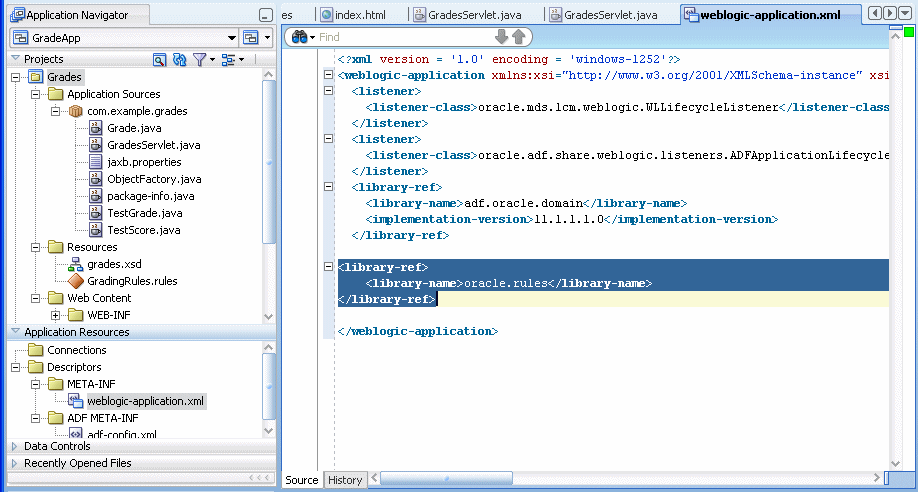
Add the oracle.rules library reference to the weblogic-application.xml file. Add the following lines, as shown in Figure 9-25.
<library-ref>
    <library-name>oracle.rules</library-name>
</library-ref>
Figure 9-25 Adding Oracle Rules Library Reference to WebLogic Descriptor
Save the weblogic-application.xml file.
To add the MDS deployment file:
In the Application Navigator, select the GradeApp application.
Right-click the GradeApp application and in the context menu select Application Properties....
This displays the Application Properties dialog.
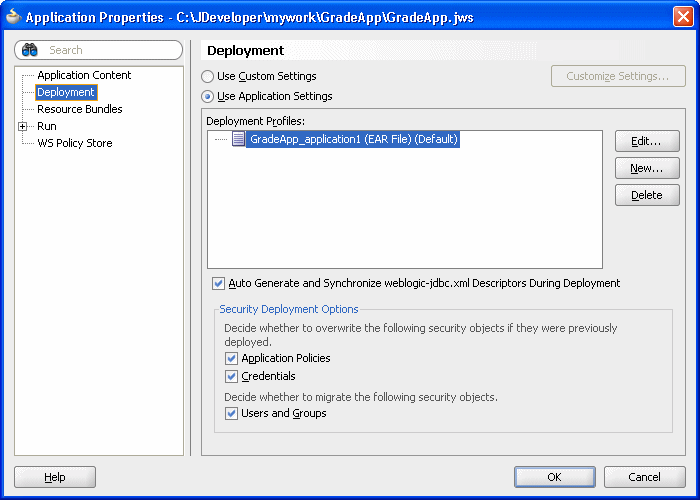
In the Application Properties navigator select the Deployment item, as shown in Figure 9-26.
Figure 9-26 Application Properties - Deployment
In the Application Properties dialog, click New....
This displays the Create Deployment Profile dialog.
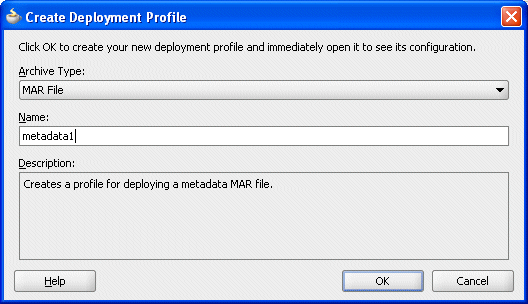
Configure this dialog as follows, as shown in Figure 9-27:
Archive Type: MAR File
Name: metadata1
Figure 9-27 Create Deployment Profile Dialog for MAR File
Click OK.
This displays the Edit MAR Deployment Properties dialog as shown in Figure 9-28.
Figure 9-28 Edit MAR Deployment Profile Properties - MAR Options
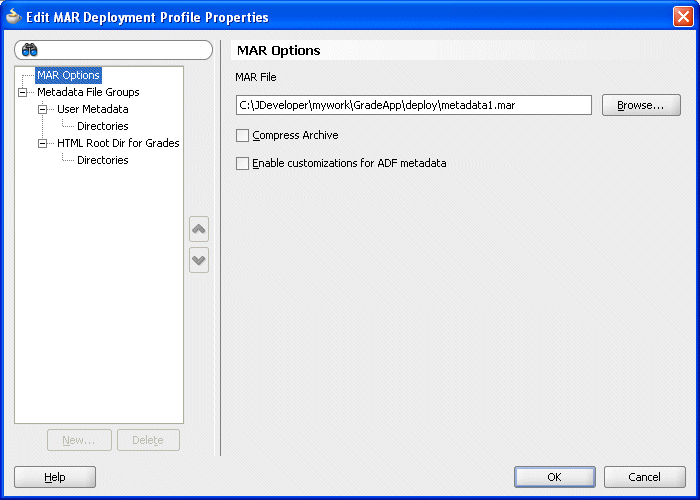
Expand the Metadata File Groups item and select the User Metadata item.
Click Add....
This displays the Add Contributor dialog.
In the Add Contributor dialog, click the Browse button and navigate to the directory for the project that contains the GradingRules.rules dictionary file.
In this example, navigate to C:\JDeveloper\mywork\GradeApp\Grades and click Select.
In the Add Contributor dialog, click OK to close the dialog. This displays the Edit MAR Deployment Properties dialog as shown in Figure 9-29
Figure 9-29 Edit MAR Deployment Profile Properties - User Metadata
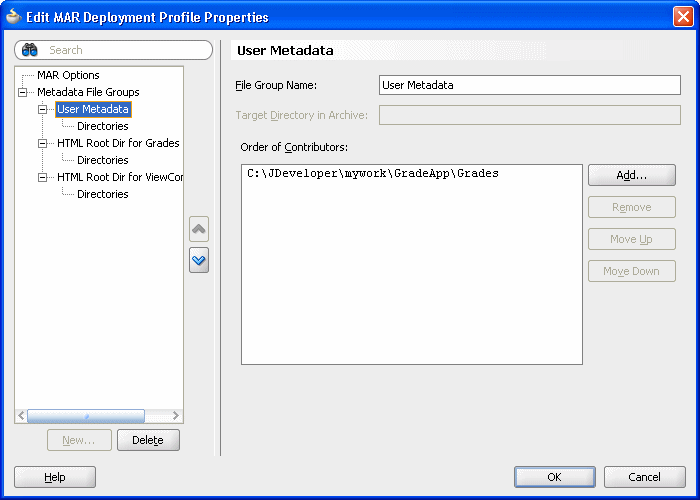
In the Edit MAR Deployment Profile Properties dialog, expand the Metadata File Groups and expand the User Metadata item and select Directories.
This displays the Directories page as shown in Figure 9-30.
Figure 9-30 Edit MAR Deployment Profile Properties - Directories
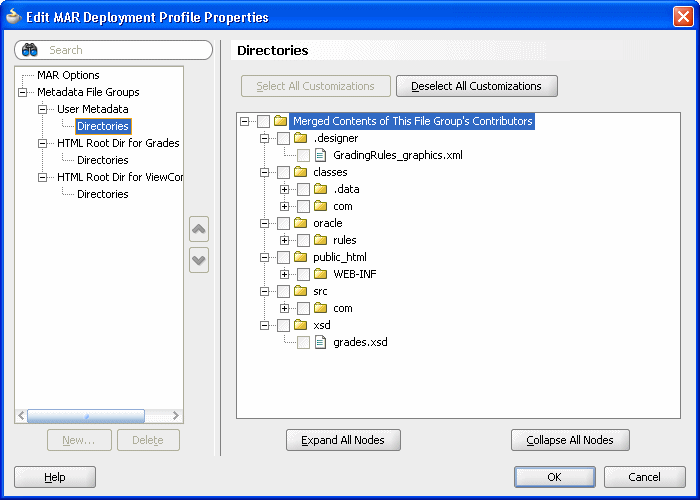
Select the oracle directory checkbox. This selects the GradingRules.rules dictionary to be included in the MAR.
Click OK.
JDeveloper creates an application deployment profile named metadata1 (MAR File) as shown in Figure 9-31.
Figure 9-31 Application Properties - Deployment - MAR
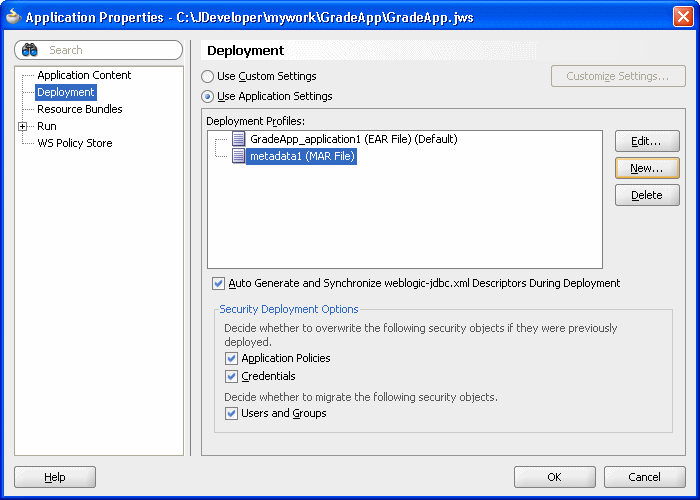
In the Application Properties dialog, click OK.
Add an EAR file to the Grades sample application.
To add the ear file to the grades sample application:
In the Application Navigator, select the GradeApp application.
Right-click and in the context menu select Application Properties....
In the Application Properties dialog, select Deployment and click New.... This displays the Create Deployment Profile dialog.
Configure this dialog as follows, as shown in Figure 9-32.
Archive Type: EAR
Name: grades
Figure 9-32 Create Deployment Profile Dialog for EAR File
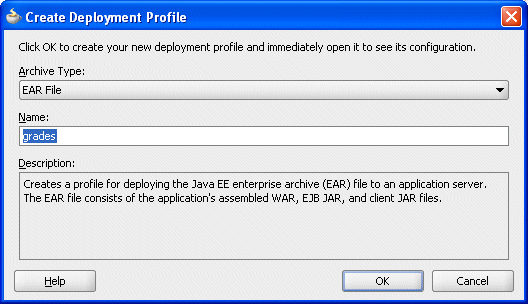
Click OK. This displays the Edit EAR Deployment Profile Properties dialog.
In the Edit Ear Deployment Profile Properties dialog, in the navigator select Application Assembly as shown in Figure 9-33.
Figure 9-33 Edit EAR Deployment Profile Properties - Application Assembly
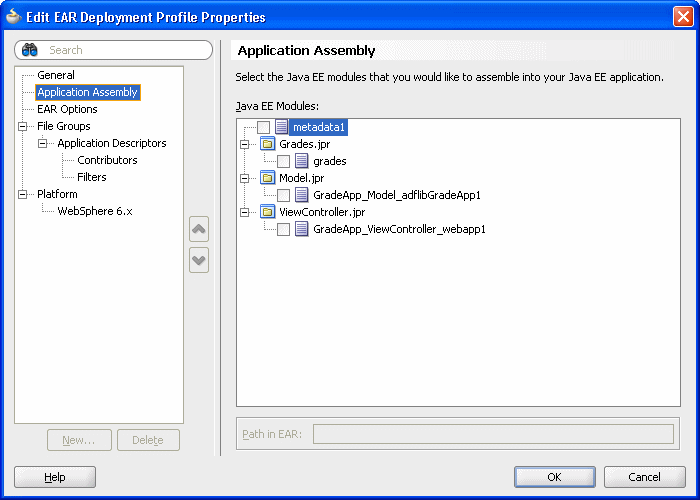
Configure this dialog as follows:
Select the metadata1 checkbox.
Expand the Grades.jpr item and select the grades checkbox.
In the Edit EAR Deployment Profile Properties dialog, click OK.
JDeveloper creates an application deployment profile named grades(EAR File) as shown in Figure 9-34.
Figure 9-34 Application Properties - Deployment - EAR
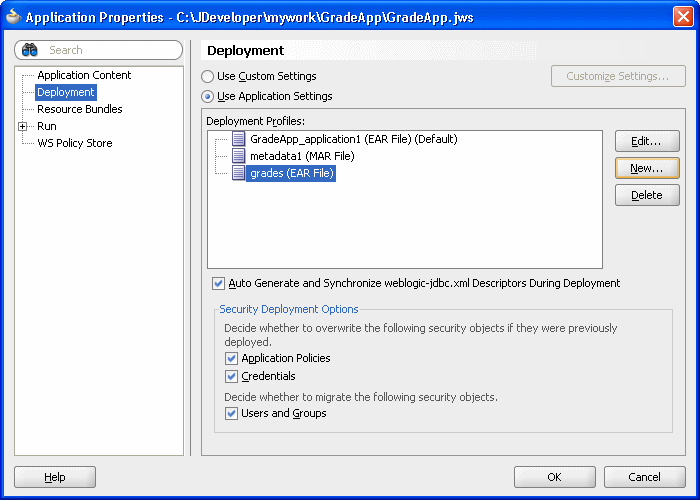
Click OK to close the Application Properties dialog.
Select Save All from the File main menu to save your work.
You can now deploy and run the grades sample application on Oracle WebLogic Server.
To deploy the grades sample application:
In the Application Navigator, select the GradeApp application.
Right-click the GradeApp application and in the context menu select Deploy > grades > to > and select either an existing connection or New Connection... to create a connection for the deployment. This starts the deployment to the specified Oracle WebLogic Server.
As the deployment proceeds, Oracle JDeveloper shows the Deployment Configuration dialog.
In the Deployment Configuration dialog enter the following values, as shown in Figure 9-32:
In the Repository Name field, from the list, select: mds-soa
In the Partition Name field, enter grades
Figure 9-35 Deployment Configuration Dialog for MDS with Repository and Partition
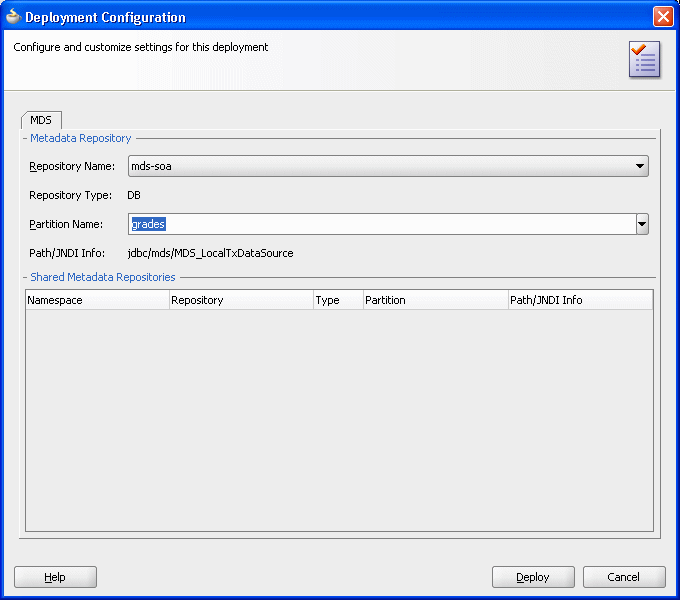
In the Deployment Configuration dialog, click Deploy.
After you deploy the grades sample application, you can run the application.
To run the grades sample application:
Point a web browser at,
http://yourServerName:port/grades/
This displays the test servlet as shown in Figure 9-36.
Figure 9-36 Grades Sample Application Servlet
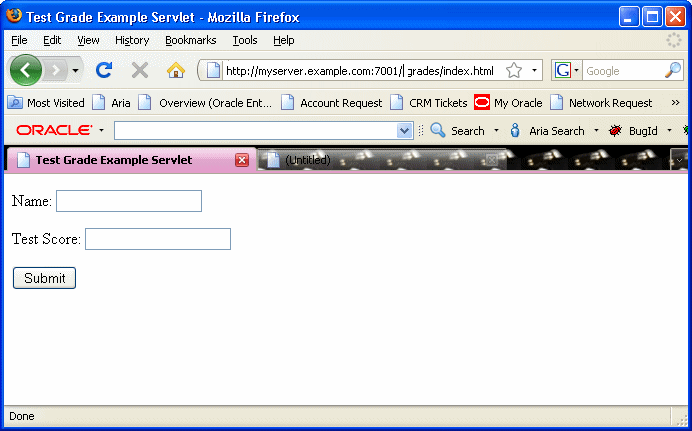
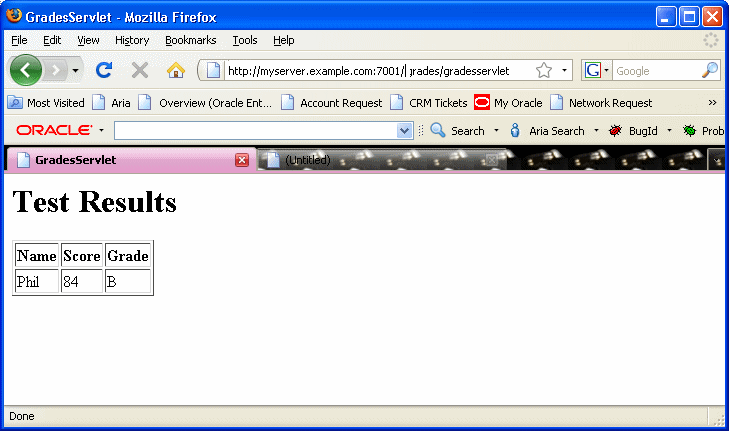
Enter a name and test score and click Submit. This returns results as shown in Figure 9-37.
The first time you run the servlet there may be a delay before any results are returned. The first time the servlet is invoked, during servlet initialization the runtime loads the dictionary and creates a rule session pool. Subsequent invocations do not perform these steps and should run much faster.
Figure 9-37 Grades Sample Application Servlet with Results
