| Skip Navigation Links | |
| Exit Print View | |

|
Designing with Oracle Java CAPS Application Adapters Java CAPS Documentation |
| Skip Navigation Links | |
| Exit Print View | |

|
Designing with Oracle Java CAPS Application Adapters Java CAPS Documentation |
Designing with Application Adapters
Building an Oracle Applications Custom Pre-Validation Package
Oracle Applications Adapter Pre-Validation Scripts
Oracle Application Adapter Pre-Validation Procedures
To Build a Custom Pre-Validation Package for a Non-Supported Open Interface
Oracle Application Adapter Concurrent Manager Request Function
Oracle Applications Adapter Template DTD
Naming Conventions for the Oracle Interface
Concurrent Manager Request Function
Oracle Applications Manufacturing Modules
Oracle Applications Inventory Module
Customer Items Cross-Reference
Oracle Applications Purchase Order Import Module
Oracle Applications Order Entry Module
Oracle Applications Financial Module
Oracle Applications Accounts Payable Module
Oracle Applications Accounts Receivable Module
Oracle Applications Cash Management Module
Oracle Applications Fixed Assets Module
Oracle Applications General Ledger Module
Oracle Applications Validation Error Codes
Oracle Applications Manufacturing Error Codes
Oracle Applications Financial Budget-GL Error Codes
Accounts Receivable Error Codes
Configuring the PeopleSoft Server for the PeopleSoft Adapter Projects
Configuring PeopleSoft for Enterprise Service Bus Posting
Additional HTTP Configurations
Starting and Stopping the JMS Listening Connector
Verifying PeopleSoft Server Logs
Notes on PeopleSoft Server Disconnections for JMS
To Create PeopleSoft Nodes to Receive Enterprise Service Bus HTTP Posts
To Activate the Message Definition to Receive Enterprise Service Bus Posts
Defining Message Channel Routing Rules
Adding the PeopleSoft Subscription Handler
Creating an HTTP Adapter Message Node
Activating the Message Definition for Subscription
Accessing Non-Local Queue Managers and Non-Local Queues
To Connect to a Remote WebSphere MQ Queue.
Creating the WebSphere MQ Queue
To Create the WebSphere MQ Queue
IBM WebSphere MQ Server and Queue Manager Limits and Settings
This section provides configuration information for the PeopleSoft Integration Gateway and Java CAPS postings.
For Java CAPS to post and receive messages from PeopleSoft, you must configure the PeopleSoft server. The configurations are different for PeopleTools 8.13 and 8.42. For PeopleTools 8.42, there are also different configurations depending on whether the PeopleSoft adapter Project uses JMS, HTTP, or both. The table summarizes the different configurations.
Table 27 Configuration Requirements for PeopleSoft
|
The sections describe how to configure PeopleSoft servers to communicate with the PeopleSoft adapter using PeopleTools 8.42 or 8.13. Information about the PeopleSoft server can be found in the PeopleBooks documentation provided by PeopleSoft.
This section describes how to configure PeopleTools 8.42 to integrate using Java CAPS. When you use this version of PeopleTools, you can create the PeopleSoft adapter Projects that use inbound and outbound JMS data flows, and inbound HTTP data flows. Inbound HTTP data flows are only supported when you use a Java CAPS Business Process Manager implementation of the adapter.
The following section describes how to create PeopleSoft nodes to receive and post messages with Oracle Java CAPS.
The procedure describes how to set up the PeopleSoft node to receive Enterprise Service Bus messages.
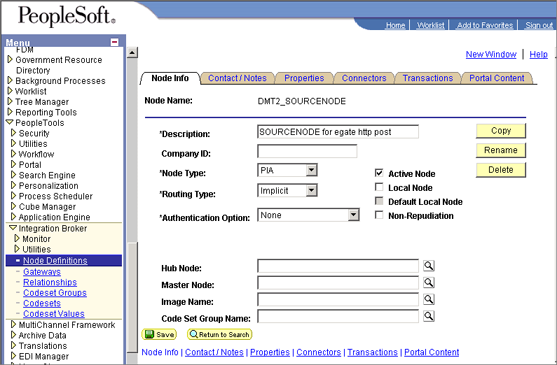
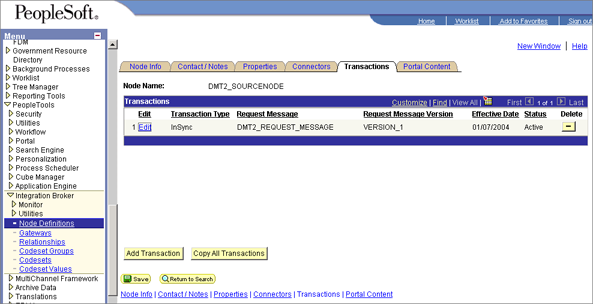
The Transaction Detail tab appears.
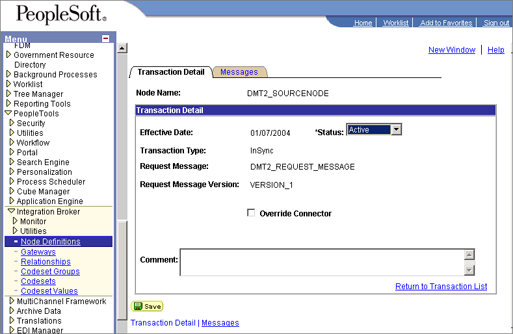
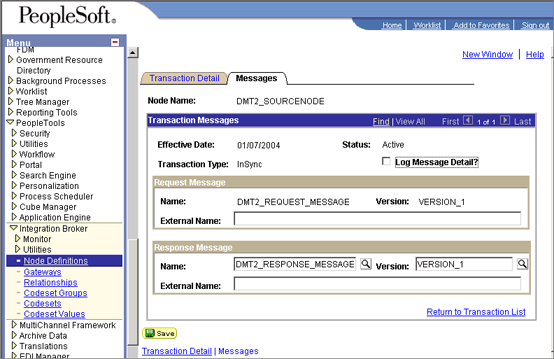
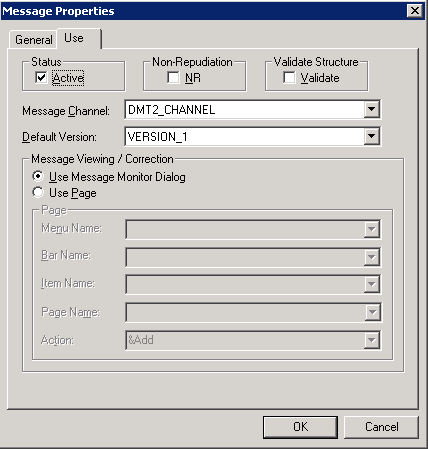
Each channel must be defined and activated before the adapter can post any data. The procedure describes how to activate the message channels for subscription to the PeopleSoft adapter.
The Message Properties dialog box appears.
Figure 1 Activating Message Channels
The procedure describes how to create and configure PeopleSoft nodes to post messages to Enterprise Service Bus using HTTP.
Figure 2 Creating Nodes to Post to Enterprise Service Bus
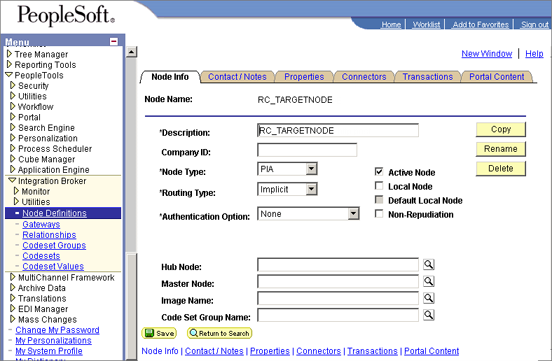
Figure 3 Configuring the Connector to Post to Enterprise Service Bus using HTTP
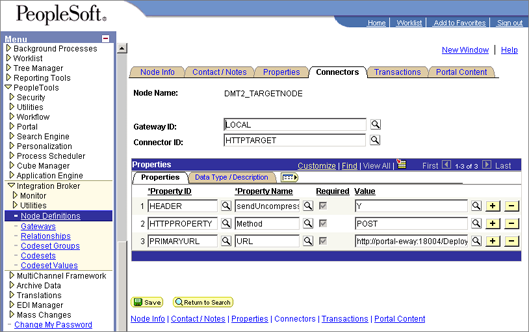
Use the following format for the PRIMARYURL property:
http://<yourmachinename>:18001/<yourdeploymentname>_servlet_<servletname>
/<servletname>
This property must match the logical Adapter Servlet-url property defined in the NetBeans IDE . The port number must match the default Web server port number specified in the application server properties in the Environment. The Deployment Profile is the name of the Project’s Deployment Profile defined in NetBeans. The Deployment Profile name must be followed by _servlet_servletname.
After creating the source node in PeopleTools, follow the procedure to create the JMS target node.
Figure 4 Creating Nodes to Post to Enterprise Service Bus Using JMS

Figure 5 Configuring the Connectors to Post to Enterprise Service Bus Using JMS
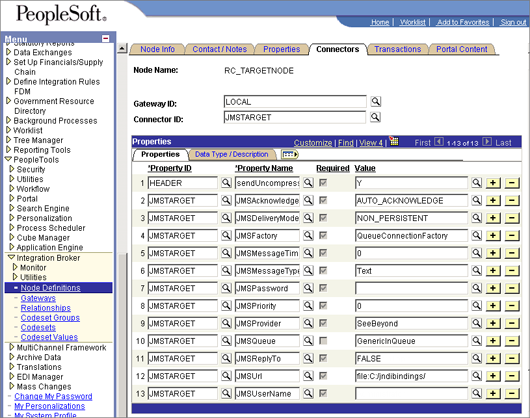
The JMS properties, such as persistence and acknowledgement modes, must match the settings for the JMS client as defined from the Connectivity Map. For information about JMS properties, refer to the Oracle Java CAPS JMS Reference .
The JMSQueue or JMSTopic property must match the name of the queue/topic in the Connectivity Map. The target destination must match the incoming queue/topic, and the source destination must match the outgoing queue/topic.
The JMSFactory property must point to the topic or queue ConnectionFactory for the topic or queue properties in the JNDI bindings file.
The JMSUrl property must point to your JNDI bindings file (see To Create the JNDI Bindings File).
Make sure that the node that uses JMSTargetConnector as the connector is setup correctly in regard to the JMSUserName and JMSPassword properties.
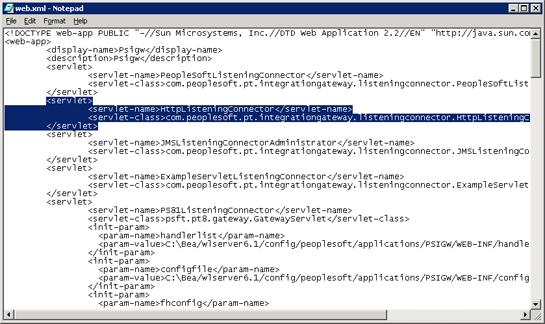
Two types of HTTP connectors are used with PeopleSoft adapter Projects that use HTTP to communicate to PeopleSoft: the HTTP listening connector and the HTTP target connector.
The PeopleSoft server uses the HTTP listening connector to receive messages from. The PeopleSoft adapter HTTP client external application is used to post to the HTTP listening connector. You do not have to configure the HTTP listening connector; the connector is started automatically by the PeopleSoft Integration Application.
However, you must set the location for the HTTP listening connector in the Environment properties of the PeopleSoft Adapter. The routing of messages in the PeopleSoft server is decided by the content of the message in the header section.
The HTTP target connector is used to send HTTP messages to Enterprise Service Bus. The Enterprise Service Bus component receiving the HTTP message is a servlet. The servlet name is specified in the Connectivity Map.
Figure 6 Verifying the HTTP Listening Connector
Additional JMS configuration tasks include the following:
To configure inbound JMS connections, edit the IntegrationGateway.properties file as described in the procedure.
You can configure multiple queues by using the convention ig.jms.queue1, ig.jms.queue2, ig.jms.queue3, and so on. The following table shows how the JMS listener is configured for the GenericOutQueue.
JMS Queue Listener Properties
|
You can configure multiple queues by using the convention ig.topic1, ig.topic2, ig.topic3, and so on. The table shows how to configure the JMS topic to use the GenericOutTopic.
JMS Queue Listener Properties
|
To enable the PeopleSoft Adapter to post to PeopleSoft using JMS, you must have a JNDI bindings file in place. You can generate the bindings file with any standard JNDI generation application. Oracle provides a sample generation application called PSFTBindJMS.java. This program and two associate applications, compile.bat and run.bat, are included in the sample Project file.
You must edit and recompile the PSFTBindJMS.java file before generating the bindings file.
Note - The latest version of the Enterprise Service Bus API Kit JAR files must be added to the WebLogic PeopleSoft-PIS server classpath. To confirm this, check the JAR files in the server’s setENV.cmd file located in the following location (or similar): WebLogic_Home\config\peoplesoft\setEnv.cmd. If you installed the PeopleSoft-PIA service as a Windows Service, you must uninstall and reinstall the service by running unInstallNTServicePIA.cmd first, then running installNTServicePIA.cmd. This is a runtime classpath requirement to confirm the new classpath.
This port number must match the Server port property for the JMS IQ Manager in the NetBeans. For more information, refer to the Oracle Java CAPS JMS Reference .
fcontextprops.put(Context.PROVIDER_URL, "file:C:\\CAPSExports\\PeopleSoft\\JMS");
Note - If you are installing Java CAPS and the PeopleSoft Adapter on a computer that had previous versions of Java CAPS or ICAN installed, be sure to delete all of the previously installed API JAR files, and follow the directions in the Enterprise Service Bus API Kit Developer’s Guide to modify your classpath to include the new API JAR files.
When you run the bindings generation application for the first time, the following message is displayed:
fcontext TopicConnectionFactory lookup exception, you never had this jndi entry
fcontext TopicConnectionFactory lookup is null... will bind to the jndi name
fcontext GenericInTopic lookup exception, it doesn’t exist
GenericInTopic is null...bind GenericInTopic as GenericInTopic
fcontext GenericOutTopic lookup exception, it doesn’t exist
GenericOutTopic is null...bind GenericOutTopic as GenericOutTopic
fcontext ErrorTopic lookup exception, it doesn’t exist
t is null...bind ErrorTopic as ErrorTopic
fcontext QueueConnectionFactory lookup exception it doesn’t exist
fcontext QueueConnectionFactory lookup is null...bind with new value
fcontext GenericInQueue lookup exception, it doesn’t exist
GenericInQueue is null...bind GenericInQueue as GenericInQueue
fcontext GenericOutQueue lookup exception
GenericOutQueue is null...bind GenericOutQueue as GenericOutQueue
In the subsequent runs, the following message is displayed:
fcontext TopicConnectionFactory is NOT null...unbind then re-bind
TopicConnectionFactory will overwrite old value
com.stc.jms.client.STCTopic
fcontext GenericInTopic is NOT null...unbind then re-bind GenericInTopic
will overwrite old valuecom.stc.jms.client.STCTopic
fcontext GenericOutTopic is NOT null...unbind then re-bind GenericOutTopic
will overwrite old valuecom.stc.jms.client.STCTopic
fcontext ErrorTopic is NOT null...unbind then re-bind ErrorTopic
will overwrite old value
fcontext QueueConnectionFactory is NOT null...unbind then re-bind
QueueConnectionFactorycom.stc.jms.client.STCQueue
fcontext GenericInQueue is NOT null...unbind then re-bind GenericInQueue
will overwrite old valuecom.stc.jms.client.STCQueue
fcontext GenericOutQueue is NOT null...unbind then re-bind GenericOutQueue
will overwrite old value
startIA.cmd
After you execute this command, monitor the PIA_weblogic.log file until you see the following output:
#### <> <000329>
This indicates that the PIA Service is started. If you use this method of starting the PIA service, be aware that the Windows Services console will not accurately reflect that the service has been started.
#### <> <> <101047> <[WebAppServletContext(2244929,PSIGW,
/PSIGW)] JMSListeningConnectorAdministrator: init>
#### <> <> <101047> <[WebAppServletContext(2244929,PSIGW,
/PSIGW)] PeopleSoftListeningConnector: init>
If you follow the procedure To Create the JNDI Bindings File before the PIA service is ready, the JMS Listening Connector will not be active, so it will not receive messages from Enterprise Service Bus.
To start the JMS Listening Connector, use the following command:
http://hostname:port/PSIGW/JMSListeningConnectorAdministrator?Activity=START
To stop the JMS Listening Connector, use the following command:
http://hostname:port/PSIGW/JMSListeningConnectorAdministrator?Activity=STOP
To verify if your JMS connection works, you can use the StartSendMaster.bat provided by PeopleSoft in the following location:
WebLogic_Home\config\peoplesoft\applications\PSIGW
You can verify log information for the PeopleSoft server in the following directory:
WebLogic_Home\config\peoplesoft\applications\PSIGW
If the domain is shut down during a JMS session with PeopleSoft, the PeopleSoft server may loose the session. You must reestablish the connection on the PeopleSoft server.
This section describes how to configure PeopleTools 8.13 to integrate using the Enterprise Service Bus. When you use this version of PeopleTools, you can create PeopleSoft Adapter Projects that use inbound HTTP Collaborations. Outbound HTTP Collaborations are only supported when you use Java CAPS Business Process Manager together with Enterprise Service Bus.
perform the following tasks to configure PeopleTools 8.13:
To Create PeopleSoft Nodes to Receive Enterprise Service Bus HTTP Posts
To Activate the Message Definition to Receive Enterprise Service Bus Posts
The procedure describes how to create and configure PeopleSoft nodes for Enterprise Service Bus HTTP posting.
The New dialog box appears.
The Location dialog box appears.
For Apache:
http://PSFTHOST/servlets/psft.pt8.gateway.GatewayServlet
For WebLogic:
http://PSFTHOST/servlets/gateway
where PSFTHOST is the name of the host computer where PeopleSoft runs.
The URL name displays in the Message Node dialog box similar to Figure 7.
Figure 7 PeopleSoft Node for Receiving Enterprise Service Bus HTTP Posts

The Open Object window appears.
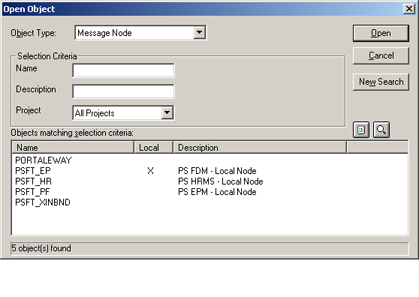
A list of all message nodes appears. The name of the new message node appears in the Objects Matching Selection criteria pane.
Message nodes with PSFT prefixes are created by the PeopleSoft installation. PSFT_EP is the PeopleSoft local node for the Financials application. It is specified as a subscriber to messages sent from the PeopleSoft Adapter, and a publisher of messages to the HTTP server.
Figure 8 Viewing Message Nodes
PeopleSoft comes with a set of predefined message definitions. The desired message definition is configurable in the adapter with the Subject property. The following instructions describe how to activate the message definition for subscription to the PeopleSoft Adapter.
Note - For purposes of this publication the ADVANCED_SHIPPING_RECEIPT Message Definition is activated for publish / subscribe.
Each message used for publication must be defined. This definition corresponds to the XML message the adapter publishes, and contains the elements of the data to be published. However, before the Adapter can publish any data, the message definition must be activated. The Application Designer includes a list of these definitions.
The Open Object dialog box appears.
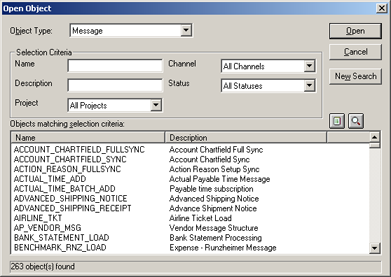
This displays all available PeopleSoft message definitions.
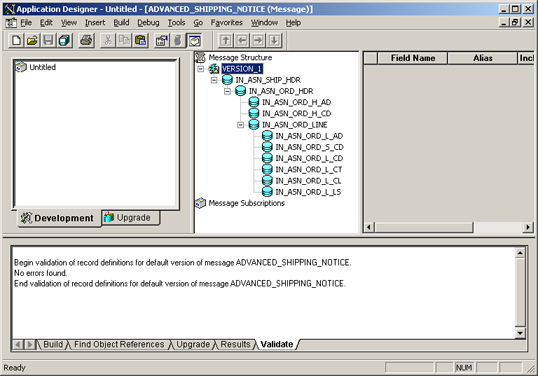
Figure 9 Viewing Available Message Destinations
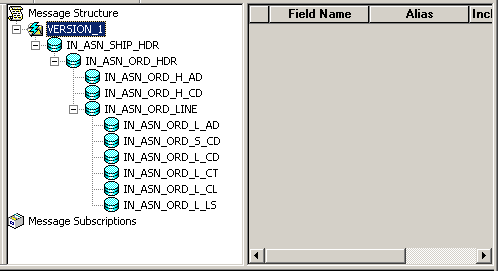
The Message window appears, displaying the record details of the chosen message structure.
Figure 10 Message Structure Details
The Message Properties dialog box appears.
Figure 11 Activating the Message Definition to Receive Enterprise Service Bus Posts
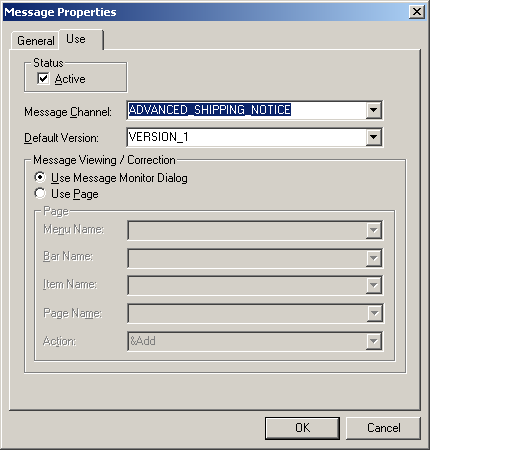
You have now activated the message definition for publishing or subscribing.
This procedure describes how to configure message channels. Before you start, determine which message channel you will use. You can configure the PeopleSoft Adapter for this message channel with the Channel property.
Each message channel logically groups messages together. For purposes of the procedure, the ADVANCED_SHIPPING_RECEIPT message is grouped into the ADVANCED_SHIPPING_NOTICE message channel.
The Open Object dialog box appears.
This displays all available message channels.
The Message Channel window appears for that channel.
The Insert Message Node dialog box appears, displaying the available message nodes.
The message is inserted into the routing rules table.
The message nodes are now defined on the Routing Rules tab of the Message Channel window.
Figure 12 Viewing the Message Nodes
Routing directions provide you with the ability to assign destinations (Publish To/Subscribe From) to a message node. This section describes the procedure for defining the routing directions for the adapter message node, Subscribe From.
The Routing Rules tab now shows that the adapter message node is subscribing to messages from PSFT_EP and is publishing to STCHTTP.
Figure 13 Viewing Routing Directions

You have now defined the routing rule that allows the appropriate message to be published from the adapter to PeopleSoft.
The procedure describes how to add the PeopleSoft subscription handler. Before you start the procedure, make a note of the following PeopleSoft configurations:
Jolt listener host
Jolt listener port
PeopleTools version
Operator ID
Operator ID password
For Apache:
http://PSFTHOST/servlets/psft.pt8config.ConfigServlet
For WebLogic:
http://PSFTHOST/servlets/gateway.administration
where PSFTHOST is the host where the PeopleSoft Application Messaging Gateway is installed.
The Handler Directory page appears.
Figure 14 Adding the PeopleSoft Handler Directory

The Add Handler page appears.
psft.pt8.psfthandler.PeopleSoftHandler
and click Save.
Figure 15 Viewing the New Handler

The status changes to Loaded successfully.
The Manage Lookup Table page for the PeopleSoft handler appears.
Figure 16 Managing the Lookup Table

The Add an Address window appears.
Figure 17 Adding an Address

The Manage Lookup Table page now displays the new node.
Figure 18 Viewing the New Node

The Application Messaging Gateway is now ready to receive XML messages from the adapter and publish the XML messages to PeopleSoft.
To configure PeopleSoft to publish XML messages to the PeopleSoft Adapter involves the following steps:
Refer to To Create PeopleSoft Nodes to Receive Enterprise Service Bus HTTP Posts to create a message node associated with the PeopleSoft Adapter. A message node called STCHTTP is used as an example.
Refer to To Activate the Message Definition to Receive Enterprise Service Bus Posts to activate the message to be published to the PeopleSoft Adapter. In this case, activate the PO-EXPECTED_RECEIPT_SHIPTO message.
Refer to Defining Message Channel Routing Rules to define the routing rules for the message channel to be used.
Insert the PSFT_EP message node and the HTTP message node previously created.
Define the routing direction. Select Subscribe From for PSFT_EP and Publish To for the HTTP message node (STCHTTP).
This procedure describes how to add the HTTP publication handler. Before you start, verify that the HTTP publication handler is installed. Also, obtain the HTTP configuration values for the adapter which is to receive the XML message(s) from PeopleSoft. These are required when configuring the message node corresponding to the subscription handler.
For Apache:
http://<yourmachinename>:18001/<yourdeploymentname>
_servlet_<servletname>/<servletname>.
For WebLogic:
http://<PSFTHOST>/servlets/gateway.administration
where, <PSFTHOST> is the host where the PeopleSoft Application Messaging Gateway is installed.
The Handler Directory page appears.
Figure 19 Adding the PeopleSoft Handler Directory

The Add Handler page appears.
com.stc.ewpsoft8.stchttphandler.HTTPHandler
The Handler Directory page displays the new handler.

The status changes to Loaded successfully.
The HTTP Handler Directory page appears.
The STCHTTP node entries appear. If the entries are correct, the Application Messaging Gateway now can receive XML messages from PeopleSoft and publish the XML messages to the PeopleSoft Adapter (in HTTP mode).
You can now ping the HTTP host from the system where the com.stc.eWays.psofthandler.jar file is installed. You may need to use the system’s full host name.