8 Configuring Access Manager Settings
This chapter describes Access Manager-specific settings. It provides the following topics:
-
Managing Access Manager Load Balancing and Secure Error Modes
-
Managing the Access Protocol for OAM Proxy Simple and Cert Mode Security
Prerequisites
This section identifies requirements for tasks in this chapter. Before you begin tasks in this chapter, be sure to review the following topics:
Introduction to Access Manager Settings
The Access Manager Setting section of the System Configuration tab provides a number of settings specific to Access Manager service operations.
Table 8-1 Access Manager Settings
| Setting | Described in ... |
|---|---|
|
Load Balancing |
Managing Access Manager Load Balancing and Secure Error Modes |
|
SSO |
|
|
Access Protocol |
Managing the Access Protocol for OAM Proxy Simple and Cert Mode Security |
|
Policy |
Managing Access Manager Load Balancing and Secure Error Modes
This section provides the following topics:
About Access Manager Load Balancing Settings and Secure Error Modes
Figure 8-3 shows the Load Balancing Settings section of the Access Manager Settings page. These were previously part of the SSO Engine settings. SSO Engine is the controller for user sessions; settings are global and common to all OAM Servers in the WebLogic administration domain. Table 8-4 describes each element and how it is used.
Figure 8-2 Access Manager Settings: Load Balancer
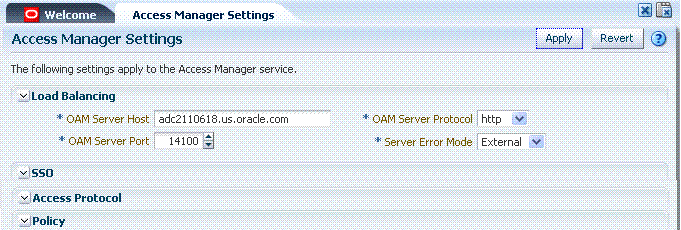
Description of "Figure 8-2 Access Manager Settings: Load Balancer"
Table 8-2 Access Manager Settings: Load Balancer
| Element | Description |
|---|---|
|
OAM Server Host |
The name of the computer on which OAM is installed. |
|
OAM Server Port |
The port on which the host is listening. Value between 1 and 65535 is supported |
|
OAM Server Protocol |
Either HTTP or HTTPS. See Also: "About Security Modes and X509Scheme Authentication" |
|
Server Error Mode |
The setting you choose determines the nature of error messages and error codes returned by the OAM Server when an operation fails (because of an invalid username or password, for example, or a server error (connection to the LDAP Server is down)). Choose one of the following settings to configure error messages with varying degrees of security for your custom login pages:
|
Table 8-3 identifies the error codes, trigger conditions, and recommended messages. These error codes are based on the Server Error Mode and are not exposed.
Table 8-3 External Error Codes, Trigger Conditions, and Recommended Messages
| External Error Code | Trigger Condition | Recommended Display Message |
|---|---|---|
|
OAM-1 |
Invalid login attempts less than the allowed count. |
An incorrect Username or Password was specified |
|
OAM-2 |
Invalid login attempts less than the allowed count. |
An incorrect Username or Password was specified |
|
OAM-3 |
Processing submitted credentials fails for some reason. For example: in WNA mode, the SPENGO token is not received. |
Internal Error. |
|
OAM-4 |
An authentication exception is raised for some reason. |
System error. Please contact the System Administrator. |
|
OAM-5 |
The user account gets locked because of certain conditions (exceeded invalid attempts, for instance). OIM Integration. The Error page appears with contact details after the password is validated. |
The user account is locked or disabled. Please contact the System Administrator. |
|
OAM-5 |
The user account gets locked because of certain conditions (exceeded invalid attempts, for instance). OID Without OIM Integration: The Error page appears with contact details after the password is validated. |
The user account is locked or disabled. Please contact the System Administrator. |
|
OAM-5 |
The user account is disabled. |
The user account is locked or disabled. Please contact the System Administrator. |
|
OAM-6 |
The user has exceeded the maximum number of allowed sessions, which is a configurable attribute. |
The user has already reached the maximum allowed number of sessions. Please close one of the existing sessions before trying to login again. |
|
OAM-7 |
Failure could be due to multiple reasons; the exact reason is not propagated to the user level for security reasons. For instance:
The default error message is displayed when no other specific messages are propagated up. |
System error. Please re-try your action. If you continue to get this error, please contact the Administrator. |
Managing OAM Server Load Balancing and Secure Error Modes
Users with valid Administrator credentials can perform the following task to modify Access Manager load balancing settings using the Oracle Access Manager Console.
To view or edit common load balancing specifications
-
From the System Configuration tab, Access Manager Settings section, open the Access Manager Settings to display the page.
-
On the Access Manager Settings page, expand the load balancing section:
-
View Only: Close the page when you finish.
-
Modify: Perform remaining steps to edit the configuration.
-
-
Edit settings as needed for your deployment, based on details in Table 8-2.
-
Click Apply to submit the changes (or close the page without applying changes).
-
Dismiss the Confirmation window.
-
Proceed to "Managing SSO Tokens and IP Validation".
Managing SSO Tokens and IP Validation
This section provides the following topics:
About Access Manager SSO Tokens and IP Validation Settings
Figure 8-3 shows the single-sign on (SSO) portion of the Access Manager Settings page. Table 8-4 describes each element and how it is used.
Table 8-4 Access Manager Settings: SSO
| Element | Description |
|---|---|
|
IP Validation |
Specific to Webgates and is used to determine whether a client's IP address is the same as the IP address stored in the ObSSOCookie generated for single sign-on. Check the box to enable IP Validation. Clear the box the disable IP Validation. |
|
SSO Token Version |
Select your SSO token version from the list. |
Managing SSO Tokens and IP Validation
Users with valid Administrator credentials can perform the following task to modify Access Manager load balancing settings using the Oracle Access Manager Console.
To view or edit Access Manager SSO specifications
-
From the System Configuration tab, Access Manager Settings section, open Access Manager Settings to display the page.
-
On the Access Manager Settings page, expand the SSO section:
-
View Only: Close the page when you finish.
-
Modify: Perform remaining steps to edit the configuration.
-
-
Edit settings as needed for your deployment, based on details in Table 8-4.
-
Click Apply to submit the changes (or close the page without applying changes).
-
Dismiss the Confirmation window.
-
Proceed to "Managing the Access Protocol for OAM Proxy Simple and Cert Mode Security".
Managing the Access Protocol for OAM Proxy Simple and Cert Mode Security
This section provides the following details:
About Simple and Cert Mode Transport Security
Table 8-5 outlines the similarities between Simple and Cert modes.
Table 8-5 Summary: Simple and Cert Mode
| Artifact or Process | Simple Mode | Cert Mode | Open Mode |
|---|---|---|---|
|
X.509 digital certificates only. |
X |
X |
N/A |
|
Communication between OAM Agents and OAM Servers is encrypted using Transport Layer Security, RFC 2246 (TLS v1). |
X |
X |
N/A |
|
For each public key there is a corresponding private key that Oracle Access Manager stores in a file: |
aaa_key.pem generated by openSSL |
aaa_key.pem generated by your CA |
N/A |
|
Signed certificates in Privacy Enhanced Mail (PEM) format |
aaa_cert.pem generated by openSSL |
aaa_cert.pem generated by your CA |
N/A |
|
During OAM Server configuration, secure the private key with a Global passphrase or PEM format details, depending on which mode you are using. Before an OAM Server or Webgate can use a private key, it must have the correct passphrase. |
Global passphrase stored in a nominally encrypted file:
|
PEM format:
|
N/A |
|
During OAM Agent or OAM Server registration, the communication mode is propagated to the Oracle Access Manager Console. |
Same passphrase for each Webgate and OAM Server instance. |
Different passphrase for each Webgate and OAM Server instance. |
N/A |
|
The certificate request for the Webgate generates the certificate request file, which you must send to a root CA that is trusted by the OAM Sever. The root CA returns the Webgate certificates, which can then be installed either during or after Webgate installation. |
cacert.pem The certificate request, signed by the Oracle-provided openSSL Certificate Authority |
aaa_req.pem The certificate request, signed by the your Certificate Authority |
N/A |
|
Encrypt the private key using the DES Algorithm. For example:
openssl rsa -in aaa_key.pem -passin pass: -out aaa_key.pem -passout pass: passphrase -des
|
N/A |
X |
N/A |
|
Agent Key Password |
N/A |
Enter a password during agent registration in Cert Security mode (see Table 9-4). |
N/A |
|
During Agent registration, ObAccessClient.xml is generated in: $DOMAIN_HOME/output/$Agent_Name/ |
ObAccessClient.xml Copy to: 11g Webgate: 11gWebgate_instance_dir/config/OHS/ohs1/webgate/config If: 11gWebgate_instance_dir=Oracle_Home/instance/instance1 10g Webgate: $Webgate_install_dir/oblix/lib |
ObAccessClient.xml Copy to: 11g Webgate: 11gWebgate_instance_dir/ 10g Webgate: $Webgate_install_dir/ |
ObAccessClient.xml Copy to: 11g Webgate: 11gWebgate_instance_dir/ 10g Webgate: $Webgate_install_dir/ |
|
During Agent registration, password.xml is generated in: $DOMAIN_HOME/output/$Agent_Name/ See Also: Appendix E |
password.xml Copy to: 11g Webgate: 11gWebgate_instance_dir/ 10g Webgate: $Webgate_install_dir/ |
password.xml Copy to: 11g Webgate: 11gWebgate_instance_dir/ 10g Webgate: $Webgate_install_dir/ |
N/A |
|
During Agent registration, aaa_key.pem is generated in: $DOMAIN_HOME/output/$Agent_Name/ See Also: Appendix E |
aaa_key.pem Copy to: 11g Webgate: 11gWebgate_instance_dir/ 10g Webgate: $Webgate_install_dir/ |
aaa_key.pem Copy to: 11g Webgate: 11gWebgate_instance_dir/ 10g Webgate: $Webgate_install_dir/ |
N/A |
About the Common OAM Proxy Page for Secure Server Communications
Table 8-6 describes the settings required for Simple or Cert mode configurations.
Table 8-6 Server Common OAM Proxy Secure Communication Settings
| Mode | Description |
|---|---|
|
Simple Mode Configuration |
The global passphrase for communication using OAM-signed X.509 certificates. This is set during initial OAM Server installation. Administrators can edit this passphrase and then reconfigure all existing OAM Agents to use it, as described in"Viewing or Editing Simple or Cert Settings for OAM Proxy". |
|
Cert Mode Configuration |
Details required for the Key KEYSTOREStore where the Cert mode X.509 certificates signed by an outside Certificate Authority reside:
Note: These are set during initial OAM Server installation. The certificates can be imported using the import certificate utility or the keytool shipped with JDK. Administrators can edit the alias and password and then reconfigure all existing OAM Agents to use them, as described in"Viewing or Editing Simple or Cert Settings for OAM Proxy". |
Viewing or Editing Simple or Cert Settings for OAM Proxy
Administrators can use this procedure to confirm or alter settings for the common OAM Proxy.
See Also:
To view or edit Simple or Cert mode settings for the OAM Proxy
-
From the System Configuration tab, Access Manager Settings section, open the Access Manager Settings page.
-
Expand the Access Protocol section of the page, if needed.
-
Simple Mode: Add or alter a Global Passphrase if you are using OAM-signed X.509 certificates.
-
Cert Mode Configuration: Specify the following details.
-
PEM Keystore Alias
-
PEM Keystore Alias Password
-
-
Click Apply to submit the changes and dismiss the Confirmation window (or close the page without applying changes).
-
Update Agent registration pages as needed to regenerate artifacts, and then replace the earlier artifacts as described in Chapter 9 or Chapter 10.
Managing Run Time Policy Evaluation Caches
This section explains:
See Also:
"About Run Time Resource Evaluation"About Run Time Policy Evaluation Caches
Figure 8-4 illustrates the Policy section of the Access Manager Settings page. This section provides settings for the Resource Matching Cache and the Authorization Result Cache, which come into play during policy evaluation at run time.
Figure 8-4 Common Policy Evaluation Caches
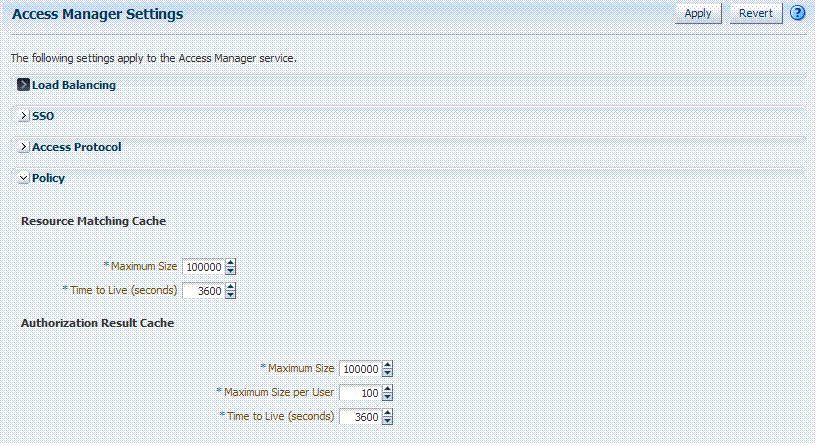
Description of "Figure 8-4 Common Policy Evaluation Caches"
Table 8-7 outlines these global settings that apply to all servers and requests.
Table 8-7 Policy Evaluation Caches
| Element | Description |
|---|---|
|
Resource Matching Cache |
Caches mappings between the requested URL and the policy holding the resource pattern that applies to the URL. Default Values:
|
|
Authorization Result Cache |
Caches policy decisions for the requested URL and user. Default Values:
See Also: "Tuning 10g and 11g Webgate Caches" |
Managing Run Time Policy Evaluation Caches
Administrators can use this procedure to manage the Access Manager policy evaluation caches.
To manage common run time policy evaluation cache settings
-
From the System Configuration tab, Access Manager Settings section, double-click Access Manager Settings to open the page.
-
On the Access Manager Settings page, expand the Policy section.
-
Resource Matching Cache: Specify details and click apply (Table 8-7).
-
Authorization Result Cache: Specify details and click apply (Table 8-7).
-
Click Apply to submit the changes and dismiss the Confirmation window (or close the page without applying changes).
Managing Authentication Modules
In Oracle Access Manager 11g, each authentication scheme requires an authentication module. This section describes the pre-configured authentication modules that are provided and describes how administrators can define a custom module. It is divided into the following topics:
About Default Authentication Modules and Pages
In the Oracle Access Manager Console, pre-configured authentication modules are organized with other system-level components under the System Configuration tab.
Only the following pre-configured authentication module types are allowed in an authentication scheme. However, you can create new modules of an existing type to use in authentication schemes. For more information, see:
See Also:
-
Oracle Fusion Middleware Developer's Guide for Oracle Access Manager and Oracle Security Token Service for details about custom authentication modules and plug-ins
Kerberos Authentication Module
The pre-configured Kerberos authentication module is illustrated in Figure 8-5. Additional details follow the figure.
Figure 8-5 Pre-configured Kerberos Authentication Module

Description of "Figure 8-5 Pre-configured Kerberos Authentication Module"
Table 8-8 describes the definition of the Kerberos authentication module. You can use the existing, pre-configured Kerberos authentication module or create one of your own.
Table 8-8 Kerberos Authentication Module Definition
| Element | Description |
|---|---|
|
Name |
The unique ID of this module, which can include upper and lower case alpha characters as well as numbers and spaces. |
|
Key Tab File |
The path to the encrypted, local, on-disk copy of the host's key, required to authenticate to the key distribution center (KDC). For example: /etc/krb5.keytab. The KDC authenticates the requesting user and confirms that the user is authorized for access to the requested service. If the authenticated user meets all prescribed conditions, the KDC issues a ticket permitting access based on a server key. The client receives the ticket and submits it to the appropriate server. The server can verify the submitted ticket and grant access to the user submitting it. The key tab file should be readable only by root, and should exist only on the machine's local disk. It should not be part of any backup, unless access to the backup data is secured as tightly as access to the machine's root password itself. |
|
Principal |
Identifies the HTTP host for the principal in the Kerberos database, which enables generation of a keytab for a host. |
|
Krb Config File |
Identifies the path to the configuration file that controls certain aspects of the Kerberos installation. A krb5.conf file must exist in the /etc directory on each UNIX node that is running Kerberos. krb5.conf contains configuration information required by the Kerberos V5 library (the default Kerberos realm and the location of the Kerberos key distribution centers for known realms). |
LDAP Authentication Modules
The pre-configured LDAP authentication module is illustrated in Figure 8-5. Additional details follow the figure.
Figure 8-6 Pre-Configured LDAP Authentication Module

Description of "Figure 8-6 Pre-Configured LDAP Authentication Module"
Table 8-9 describes the elements in an LDAP authentication module. The same elements and values are also used in LDAPNoPasswordAuthnModule.
Table 8-9 LDAP Authentication Module Definition
| Element | Description |
|---|---|
|
Name |
A unique name for this module. |
|
User Identity Store |
The primary user identity store that contains the user credentials required for authentication by this module. The LDAP store must be registered with OAM 11g to appear in this list. See Also: "Managing User Identity Stores". Upon installation, there is only one User Identity Store and it is also the System Store. If you add more identity stores and designate a different store as the System Store, be sure to change the LDAP module to point to the System Store. OAMAdminConsoleScheme (authentication scheme) relies on the LDAP module for Administrator Roles and credentials. If you change See Also: "Setting the Default Store and System Store". |
X509 Authentication Module
Oracle Access Manager provides a pre-configured X509 authentication module as a default. Administrators can also create new X509 authentication modules. In cryptographic terms, X.509 is a standard for digital public key certificates used for single sign-on (SSO). X.509 specifies standard formats for public key certificates, certificate revocation lists, and attribute certificates among other things.
With X.509 digital certificates you can assume a strict hierarchical system of certificate authorities (CAs) issuing the certificates. In the X.509 system, a CA issues a certificate that binds a public key to a particular Distinguished Name, or to an Alternative Name such as an e-mail address or a DNS-entry.
The trusted root certificates of an enterprise can be distributed to all employees so that they can use the company PKI system. Certain Web browsers provide pre-installed root certificates to ensure that SSL certificates work immediately.
Oracle Access Manager uses the Online Certificate Status Protocol (OCSP) Internet protocol to maintain the security of a server and other network resources. OCSP is used for obtaining the revocation status of an X.509 digital certificate. OCSP specifies the communication syntax used between the server containing the certificate status and the client application that is informed of that status.
When a user attempts to access a server, OCSP sends a request for certificate status information. OCSP discloses to the requester that a particular network host used a particular certificate at a particular time. The server returns a response of "current", "expired," or "unknown." OCSP allows users with expired certificates a configurable grace period, during which they can access servers for the specified period before renewing.
OCSP messages are encoded in ASN.1 and are usually transmitted over HTTP. The request and response characteristic of OCSP has led to the term "OCSP responders" when referring to OCSP servers. With Oracle Access Manager, the computer hosting the Oracle Access Manager Console is the OCSP responder.
An OCSP responder can return a signed response signifying that the certificate specified in the request is 'good', 'revoked' or 'unknown'. If OCSP cannot process the request, it can return an error code.
Figure 8-7 Pre-Configured X509 Authentication Module
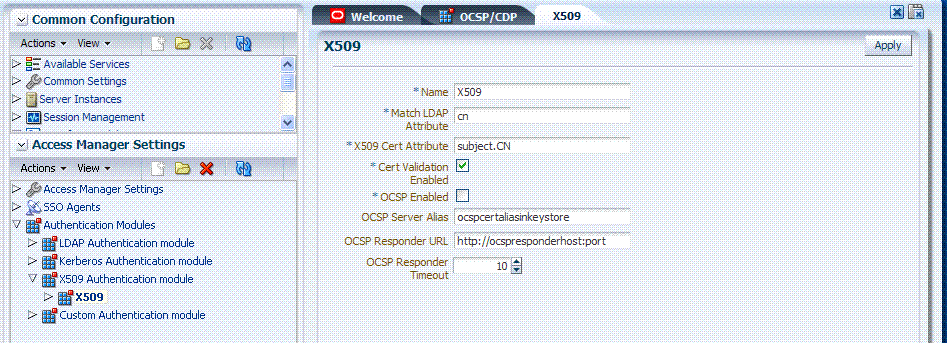
Description of "Figure 8-7 Pre-Configured X509 Authentication Module"
Table 8-10 describes the requirements of the X509 authentication module.
Table 8-10 X509 Authentication Module Definition
| Element | Description |
|---|---|
|
Name |
Identifies this module definition with a unique name. |
|
Match LDAP attribute |
Defines the LDAP distinguished name attribute to be searched against given the X509 Cert Attribute value. For example, if the certificate subject EMAIL is xyz@abc.com and it must be matched against the "mail" LDAP Attribute, an LDAP query must search LDAP against the "mail" attribute with a value "xyz@abc.com (cn). |
|
X509 Cert Attribute |
Defines the certificate attribute to be used to bind the public key(attributes within subject, issuer scope to be extracted from the certificate: subject.DN, issuer.DN, subject.EMAIL, for example). |
|
Cert Validation Enabled |
Enables (or disables when not checked) X.509 Certificate validation. |
|
OCSP Enabled |
Enables (or disables when not checked) the Online Certificate Status Protocol. Note: OCSP Server Alias, OCSP Responder URL and OCSP Responder Timeout are required only when OCSP Enabled is selected. |
|
OCSP Server Alias |
An aliased name for the OSCSP Responder pointing to CA certificates in .oamkeystore file--a mapping between the aliased name and the actual instance name or the IP address of the OSCSP Responder instance. |
|
OCSP Responder URL |
Provides the URL of the Online Certificate Status Protocol responder. |
|
OCSP Responder Timeout |
Specifies the grace period for users with expired certificates, which enables them to access OAM Servers for a limited time before renewing the certificate. |
Creating a New Authentication Module of an Existing Type
Users with valid Administrator credentials can use the following procedure to create a new authentication module of an existing type. You cannot duplicate a pre-configured module to use as a template.
Note:
Authentication modules are a core component of Authentication Schemes in access policies. Ensure that each Authentication Module points to the appropriate Identity Store.If you change the System Store, you must also change the LDAP Authentication Module to reference the newly designated System Store.
About Default Authentication Modules and Pages
See Also:
Oracle Fusion Middleware Developer's Guide for Oracle Access Manager and Oracle Security Token Service if you want to create an authentication module for a custom plug-in.To create a new authentication module of an existing type
-
From System Configuration tab, Access Manager Settings section, expand the Authentication Modules node.
-
From the Authentication Modules node, click the desired module type:
-
LDAP Authentication module
-
Kerberos Authentication module
-
X509 Authentication module
-
-
Click the Create button in the tool bar.
-
Add details for the new authentication module:
-
LDAP: See Table 8-9
-
Kerberos: See Table 8-8
-
X509: See Table 8-10 and Table 8-13
-
-
Click Apply to submit the new definition and close the Confirmation window (or close the page without applying changes).
-
Check the navigation tree to confirm the entry, and then close the page when you finish.
-
Add the authentication module to one or more authentication schemes, as described in "Managing Authentication Schemes".
Viewing or Editing Authentication Modules
Users with valid Administrator credentials can use the following procedure to modify an existing authentication module. This includes changing the name of an existing module as well as changing other attributes.
Modify each authentication scheme that references the module you will change, to use another authentication module.
To find, view, or edit an authentication module
-
Change to another authentication module in each authentication scheme that references this module.
-
From the System Configuration tab, Access Manager Settings section, expand the:
-
Authentication Modules node
-
Expand the module type node
-
-
Double-click the desired module name to display the configuration.
-
Optional: Close the page if you were simply viewing it.
-
On the Authentication Modules page, modify information as needed:
-
Kerberos Module: See Table 8-8
-
LDAP Module: See Table 8-9
-
X509 Module: See Table 8-10 and Table 8-13
-
-
Click Apply to submit the changes and close the Confirmation window (or close the page without applying changes).
-
Add the updated authentication module to authentication schemes, as described in "Managing Authentication Schemes".
Deleting an Authentication Module
Users with valid Administrator credentials can use the following procedure to delete an authentication module.
The following procedure is the same whether you are deleting a custom authentication module or a standard one.
In each authentication scheme that references the module to be deleted, specify another authentication module.
To delete an authentication module
-
In each authentication scheme that references this module, specify another authentication module.
-
From the System Configuration tab, Access Manager Settings section, expand the:
-
Authentication Modules node
-
Expand the module type node
-
-
Optional: Double-click the module name to display the configuration and then close the window.
-
Click the desired module name and then click the Delete button.
-
Confirm removal (or dismiss the confirmation window to retain the module).
Creating Custom Authentication Modules
This section provides the following topics:
About Creating Custom Authentication Modules
Each custom authentication module requires the following types of information:
-
General
-
Steps
-
Step Orchestration
Figure 8-8 shows the Custom Authentication Module within the Access Manager Settings section of the System Configuration tree. You can also see three subtabs where you enter information for the module.
Figure 8-8 Custom Authentication Modules Node and General Subtab
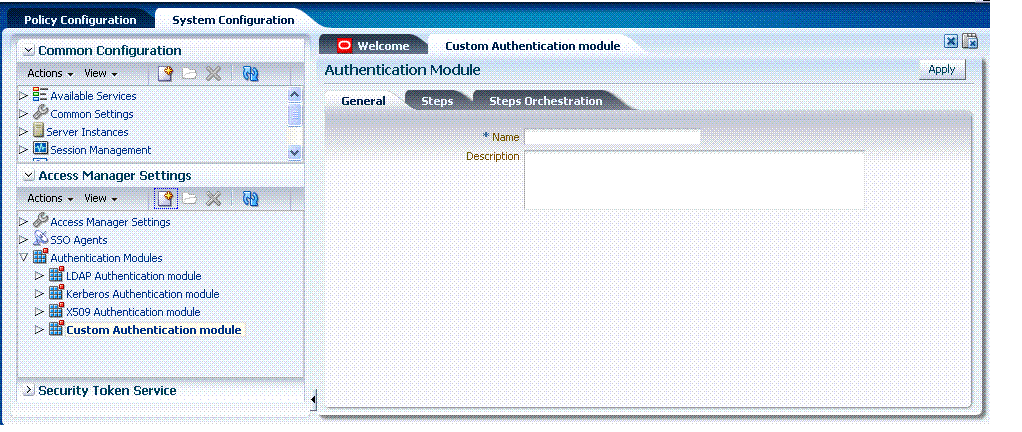
Description of "Figure 8-8 Custom Authentication Modules Node and General Subtab"
The General subtab provides space for the module Name and an optional description. The name can be up to 60 characters. The optional description can be up to 250 characters.
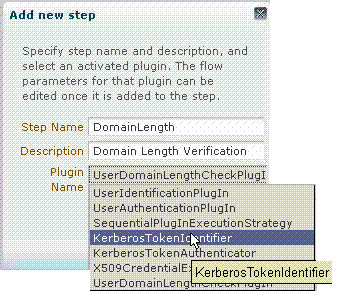
When you add a new Step, the following dialog box appears. Information that you enter is used to populate the table and Details sections of the page.
Figure 8-9 Adding a Step and Associating a Plug-in
Description of "Figure 8-9 Adding a Step and Associating a Plug-in"
Table 8-11 describes the information required for adding a new step.
Table 8-11 Add New Step Entries, Steps Results Table, and Details Section
| Element | Description |
|---|---|
|
Step Name |
The unique name you enter when adding the step. |
|
Description |
The optional description for this step, entered when adding the step. |
|
Plugin Name |
The plug-in name that you select when adding the step. |
|
Step Details |
Details of the selected step in the results table, and Plug-in configuration details that are set when the plug-in is added. These will differ depending on the selected plug-in, as described next. |
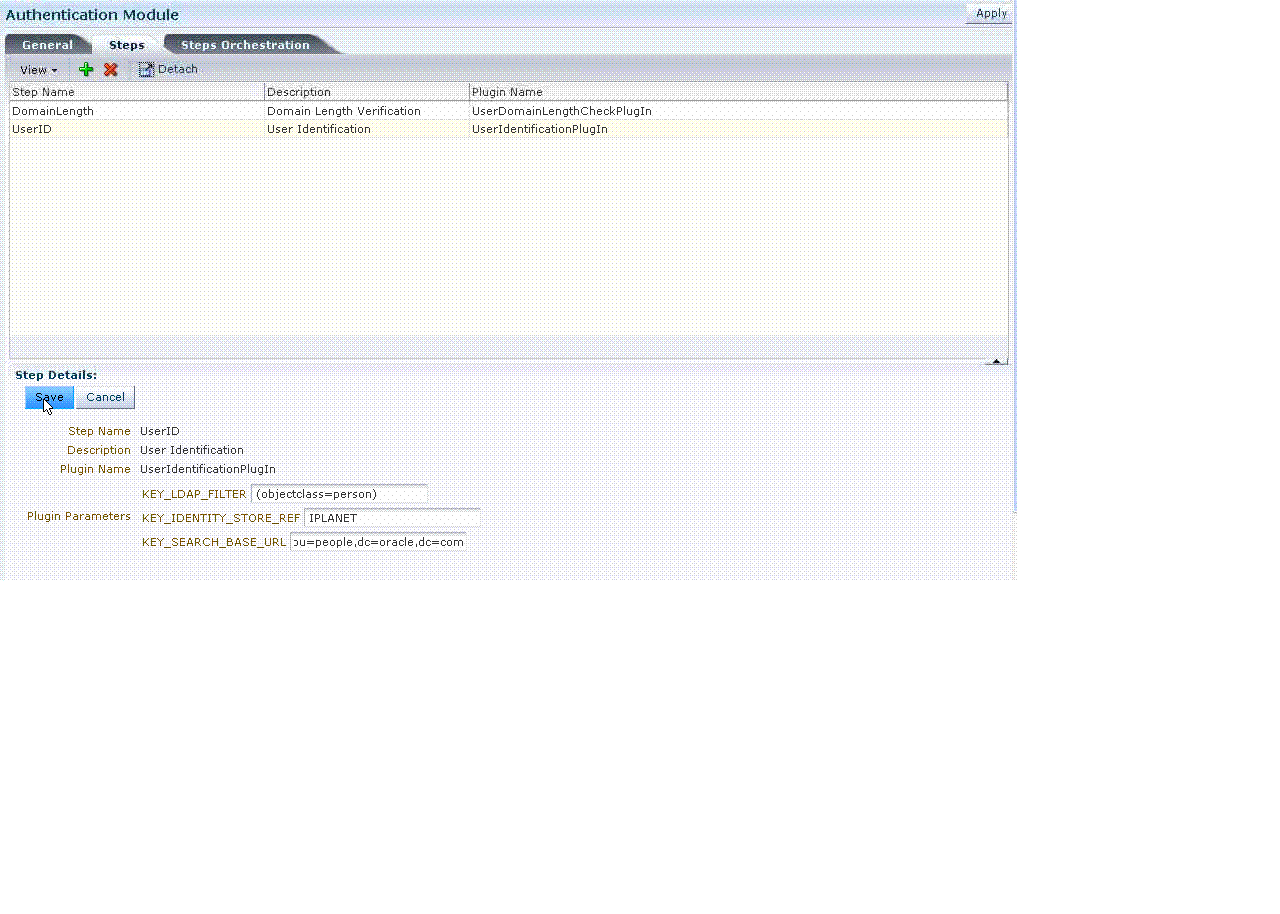
Figure 8-10 illustrates the Steps subtab and Details section for a custom authentication module. When you are adding Steps, there is no data to display in the table. However, once you add one or more Steps the table and Details sections are populated.
Figure 8-10 Custom Authentication Module Steps Subtab and Details Section
Description of "Figure 8-10 Custom Authentication Module Steps Subtab and Details Section"
Figure 8-11 illustrates the Steps Orchestration subtab of a custom authentication module, which is populated by information for each defined step (and the action you choose for each operational condition).
Figure 8-11 Custom Authentication Module Steps Orchestration Subtab

Description of "Figure 8-11 Custom Authentication Module Steps Orchestration Subtab"
Table 8-12 describes the elements on the Steps Orchestration subtab. The lists available for OnSuccess, OnFailure, and OnError include the following choices:
-
success
-
failure
-
StepName (any step in the module can be selected as the action for an operational condition)
Table 8-12 Steps Orchestration Subtab
| Element | Description |
|---|---|
|
Initial Step |
Choose the starting step from those listed. The list includes only those steps defined for this module. |
|
Name |
Each step that has been added is listed by the name that was entered when the step was added. |
|
Description |
The optional description for this step, entered when this step was added. |
|
OnSuccess |
The action selected for successful operation of this step. A list provides actions you can choose:
|
|
OnFailure |
The action selected for failure of this step. A list provides actions you can choose:
|
|
OnError |
The action selected for an error when executing this step. A list provides actions you can choose:
|
About the Custom Authentication Module Plug-ins
Oracle Access Manager 11g provides several Custom Authentication Module plug-ins that you can use to compose your own custom authentication modules and organize these into a multi-stepped authentication module that you can assign to authentication schemes. Each module can point to an independent user identity store.
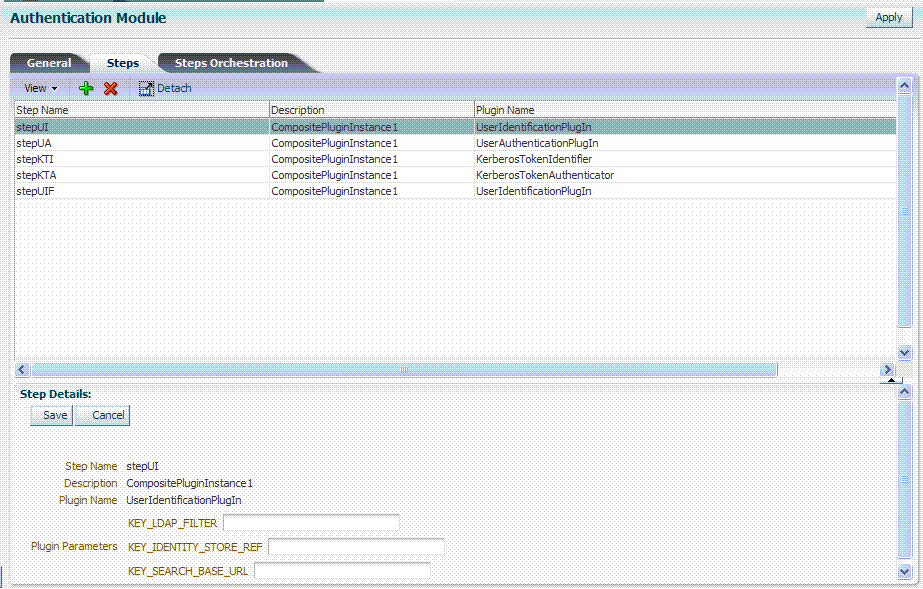
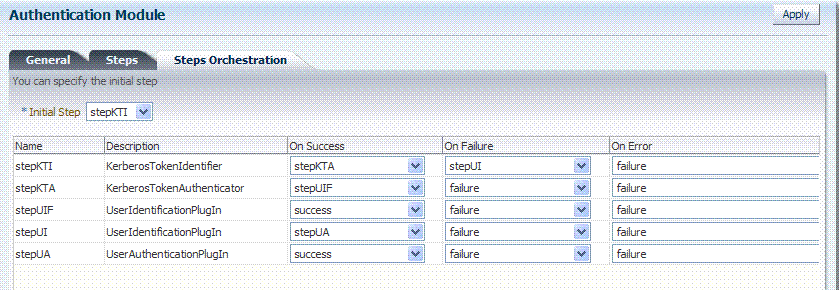
Figure 8-12 shows the KerberosPlugin that is bundled with Oracle Access Manager 11g. This is a credential mapping module that matches the credentials (username and password) of the user who requests a resource to the encrypted "ticket".
Figure 8-13 shows the default steps and details. Figure 8-14 shows the orchestration of the steps and conditions.
Figure 8-13 Default KerberosPlugin Steps and Details
Description of "Figure 8-13 Default KerberosPlugin Steps and Details"
Figure 8-14 Default KerberosPlugin Steps and Orchestration
Description of "Figure 8-14 Default KerberosPlugin Steps and Orchestration"
Figure 8-15 shows the LDAPPlugin that is bundled with Oracle Access Manager 11g. By default, LDAPPlugin has 2 steps, shown in Figure 8-16. Figure 8-17 shows the default orchestration of steps for LDAPplugin.
Figure 8-16 Default LDAPPlugin Steps and Details
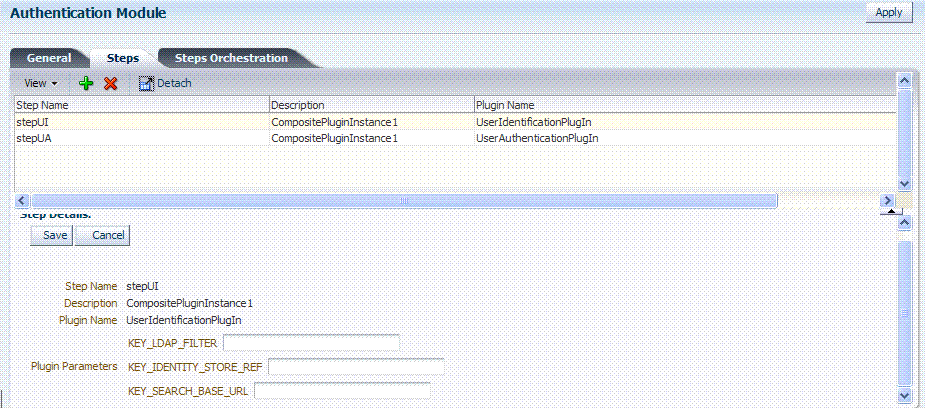
Description of "Figure 8-16 Default LDAPPlugin Steps and Details"
Figure 8-17 Default Orchestration of Steps for LDAPplugin

Description of "Figure 8-17 Default Orchestration of Steps for LDAPplugin"
Figure 8-18 shows the X509Plugin that is bundled with Oracle Access Manager 11g. The X509Plugin is similar to the LDAPPlugin with additional properties that indicate which attribute of the client's X.509 certificate should be validated against the user attribute in LDAP. Figure 8-19 shows default steps and details for this plug-in. Figure 8-20 shows the default orchestration of steps for the X509Plugin.
Figure 8-19 X509Plugin Default Steps and Details
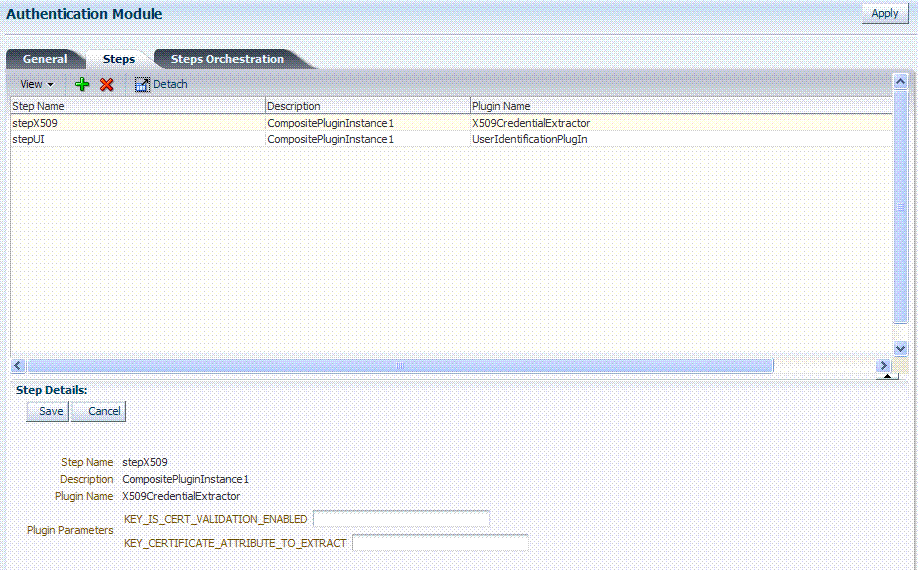
Description of "Figure 8-19 X509Plugin Default Steps and Details"
Table 8-13 liss the X509 Step Detail values for subject and Subject Alternative Names.
Table 8-13 X509 Step Details: Attributes to Extract from a Certificate
| issuer.D | Subject |
|---|---|
|
subject. |
EDIPI Note: EDIPI refers to the Electronic Data Interchange Personal Identifier. |
|
subjectAltName. |
OTHER_NAME (FASC-N) Note: FASC-N refers to the Federal Agency Smart Credential Number. |
|
subjectAltName. |
RFC822_NAME |
|
subjectAltName. |
UNIFORM_RESOURCE_IDENTIFIER |
Figure 8-20 Default Orchestration for X509Plugin Steps

Description of "Figure 8-20 Default Orchestration for X509Plugin Steps"
Example: Validate User Certificate using OCSP
In this example, you can see how to validate a user certificate using OpenSSL as the Online Certificate Status Protocol (OCSP).
-
Create a new X509 Authentication Module, as described in "Creating a New Authentication Module of an Existing Type".
-
Create a custom X509 Plugin, as follows (also, see "Creating a Custom Authentication Module").
System Configuration, Access Manager Settings, Custom Authentication Module
General Tab:
-
Name: CustomX509Plugin.
-
Description: Plugin for X509.
Steps Tab:
-
Click + to add a plugin.
-
Set the Name, Description, and select X509CredentialExtractor plugin.
Step Details:
-
Click + to add a plugin; set the Name, Description, and select X509CredentialExtractor plugin.
-
X509CredentialExtractor plugin: KEY_IS_CERT_VALIDATION_ENABLED is "true".
-
Certificate attributes to be extracted with this attribute KEY_CERTIFICATE_ATTRIBUTE_TO_EXTRACT (by default the value is set to subject.CN). See Table 8-13.
-
Click the Save button.
Add a plugin:
-
Click + to add a plugin.
-
Set the Name, Description, and select X509CredentialExtractor plugin.
Step Details:
-
Step Details: KEY_IDENTITY_STORE_REF must be set to the required identity store.
-
Add the LDAP filter to the KEY_LDAP_FILTER attribute. For example:
(&(uid= Unknown macro: {subject.CN} )(mail= Unknown macro: {subject.E} )) -
Add the user search base if required to the KEY_SEARCH_BASE_URL attribute.
-
Click the Save button.
Steps Orchestration:
-
Initial Step: Select the X509CredentialPlugin Step from the drop down.
-
On Success: X509CredentialPlugin step, select the UserIdentificationPlugin Step from drop down.
-
On Success: UserIdentificationPlugin step, select Success from drop down.
-
On Failure: Select Failure for X509CredentialPlugin and UserIdentificationPlugin steps.
-
On Error: Select Failure for X509CredentialPlugin and UserIdentificationPlugin steps.
-
Click the Apply button and review the confirmation window stating that the plug-in has been created successfully.
-
-
Set up the Certificate Validation Module for Certificate Validation and Certificate Revocation using OCSP:
-
From the Oracle Access Manager Console System Configuration tab, Common Configuration section, select Certificate Validation.
-
In the Certificate Revocation list section, confirm that the Enabled box is checked, and click Save.
-
In the OCSP/CDP section, enable OCSP, enter the OCSP URL and the Subject of the OCSP Server's certificate, then click Save.
-
On the command line, use the Java keytool application to import the trusted certificates into the $DOMAIN_HOME/config/fmwconfig/amtruststore keystore, as trusted certificate entries.
Note:
Initially the keystore is empty; its password is set the first time the Java keytool application is used.
-
Creating a Custom Authentication Module
Users with valid Administrator credentials can use the following procedure to create custom authentication module that uses one or more authentication plug-ins.
Ensure that any user identity store associated with the module is running and includes the required user population.
To create a custom authentication module using bundled plug-ins
-
From System Configuration tab, Access Manager Settings section, expand the Authentication Modules node.
-
Create New:
-
Click the Custom Authentication Module node.
-
Click the Create (+) button.
-
Add General Information: Name and optional Description. For example: CustomX509Plugin and Plugin for X509, respectively.
Click Apply to save general information.
-
-
Add Steps:
-
Click the Steps subtab.
-
Click the Add (+) button above the Steps table.
-
In the Add New Step dialog box, enter a unique Step Name and optional Description.
-
Browse for and select the desired plug-in name and click OK.
-
Confirm information in the results table.
-
Repeat b through e to add other steps until you have listed all required plug-ins for your module.
-
-
Configure Details for Each Step: Use appropriate values for requested parameters (Table 8-11 and Table 8-13):
-
Click a StepName in the table to reveal required details.
-
Enter appropriate values for the requested details.
-
Click the Save button.
-
Repeat a through d to configure each step appropriately.
-
Ensure that users are provisioned in any user identity stores assigned in steps.
-
-
Orchestrate Steps: See Table 8-12 as you perform following steps.
-
Click the Steps Orchestration subtab.
-
From the InitialStep list, choose the name of the first step to be used.
-
Select a StepName in the table.
-
From the OnSuccess List, choose a condition (success or failure) or a step name name.
-
From the OnFailure List, choose the desired condition or a StepName.
-
From the OnError List, choose the desired condition or a StepName.
-
Repeat c through e to orchestrate operations for each plug-in this module.
-
Review your orchestration.
-
-
Initiate Strategy Validation: Click Apply to initiate validation of your orchestration strategy:
-
Successful Strategy: The orchestration strategy is applied and the module is ready to include in an authentication scheme. Continue with Steps 9 and 10.
-
Invalid Strategy: Click OK in the Error box, then edit your OnSuccess, OnFailure, OnError strategies (or add or remove plug-ins) to correct the problem. Repeat this step until your strategy is successful.
-
-
In the navigation tree, confirm the new Custom Authentication Module is listed, and then close the page when you finish.
-
You are ready to use the custom module in an authentication scheme.


