Page Setup dialog: Table/Crosstab tab
Use this dialog to select page ordering, scaling, and whether to repeat worksheet headers on each printed page. For example, you might want Discoverer to adjust the scaling to fit an entire worksheet onto one printed page.
For more information, see:
"About printing in Discoverer Plus Relational"
"How to print Discoverer worksheets"
Use these options to specify how you want to print reports that do not fit onto one printed page.
-
Across, then Down
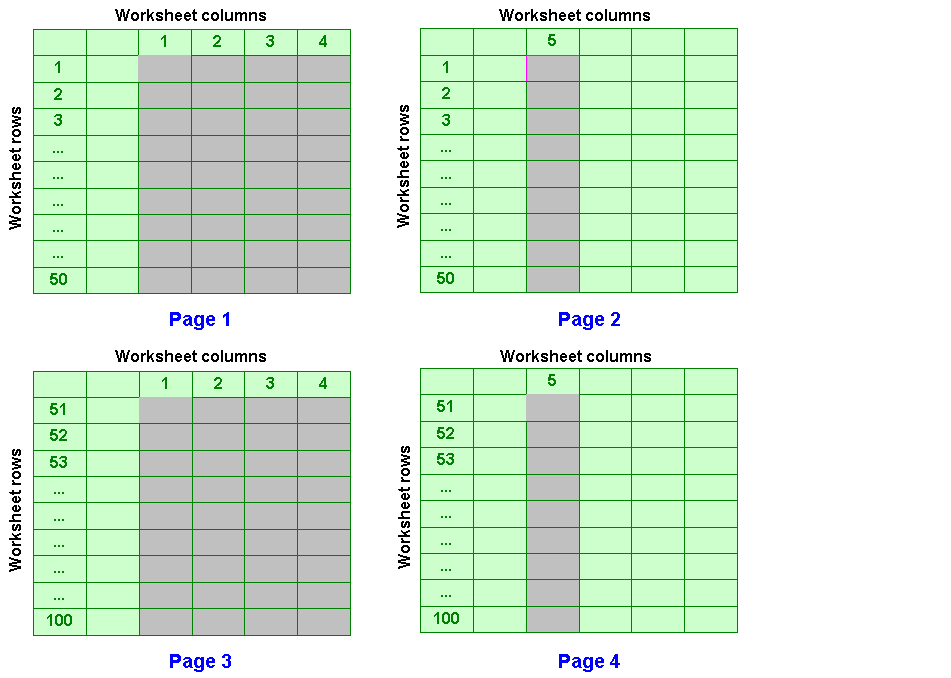
Use this option to print the all columns before printing the rows that do not fit on the first printed page. For example, you have a report with five columns and 100 rows. You can fit four columns and 50 rows on each printed page. Using this option prints:
-
Rows 1 to 50 for the first four columns on page one and rows 1 to 50 for column five on page two
-
Rows 51 to 100 for the first four columns on page three and rows 51 to 100 for column five on page four

-
-
Down, then Across
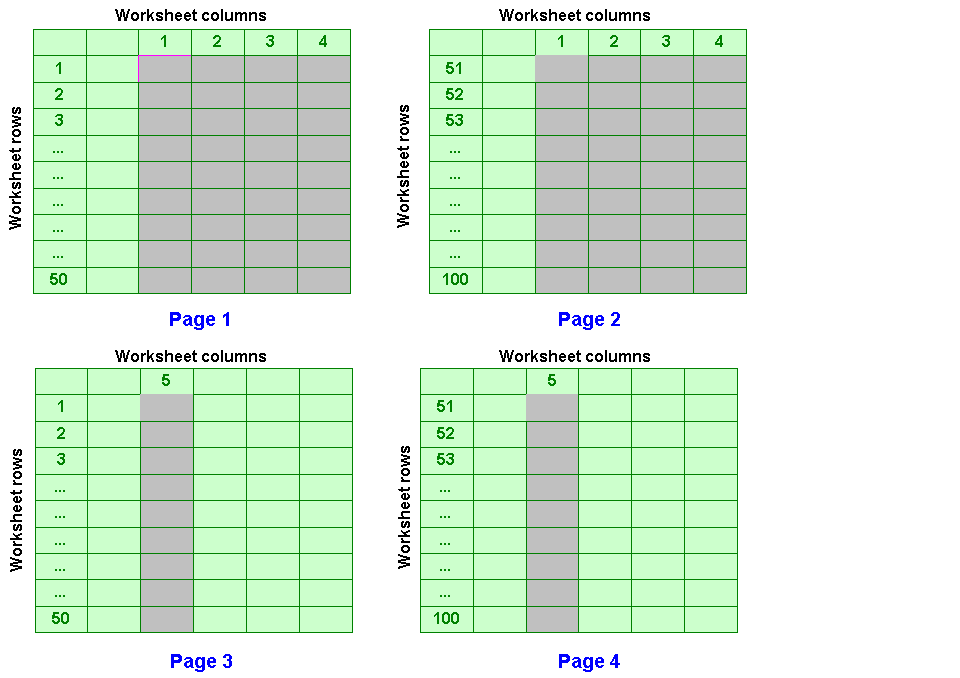
Use this option to print all rows for the first set of columns before printing the columns that do not fit on the first printed page. For example, you have a report with five columns and 100 rows. You can fit four columns and 50 rows on each printed page. Using this option prints:
-
Rows 1 to 50 for the first four columns on page one and rows 51 to 100 for the first four columns on page two
-
Rows 1 to 50 for column five on page three and rows 51 to 100 for column five on page four

-
Repeat Row, Column and Page Item Headers on Every Page
Use this check box to specify whether to print header information on every printed page.
Use these options to increase or decrease the amount of space occupied by the worksheet within the specified margins.
Hint: You can also increase the amount of space available on a printed page by changing the margin sizes (for more information, see "Page Setup dialog: Margins tab").
-
Adjust to
Use this option to increase or decrease the report size by the specified percentage. For example, you might want to make a report smaller, to fit on a half a printed page.
-
Fit to
Use this option when you want to increase or decrease the size of the report to fit a specified number of pages. For example, you might want to print a report that covers three printed pages in full size onto a single printed page.
-
Pages Wide
Use this field to specify the number of pages on which you want to print the worksheet. For example, you might want to fit six worksheet columns onto one printed page.
-
Pages Tall
Use this field to specify the number of pages on which you want to print the worksheet. For example, you might want to fit 100 worksheet rows onto one printed page.
-
Use this button to display the "Print Preview dialog", which enables you to check that the layout is correct before you print the worksheet.
Use this button to close the Page Setup dialog and return to the previous dialog. Discoverer applies the Page Setup options for the current session. To save the Page Setup options permanently for the selected worksheet, you must save the workbook (for more information, see "How to save workbooks").