4 Enhancing the Call Center Inline Service
In Chapter 2, we created an Inline Service that tracks and analyzes incoming data related to the reason for calls to a credit card call center. In Chapter 3, we used Load Generator to simulate client requests (through Informant calls) to our Inline Service.
In this chapter, we will enhance the Tutorial Inline Service to provide cross-selling advice to the CRM application. The process enhancement is this: after the agent has finished processing the customer's call in the normal way (Service Complete Informant called), the agent then takes the opportunity to present an offer to the customer. In Chapter 5, we will track the customer's response to the offer, and then use what was learned from the responses in presenting offers to other customers.
This chapter contains the following topics:
-
Section 4.1, "About Using Choice Groups and Scoring to Cross Sell"
-
Section 4.2, "Creating an Offer Inventory Using Choice Groups"
4.1 About Using Choice Groups and Scoring to Cross Sell
We will create a choice group of offers that can be extended to customers calling the service center. Choice scores are based on cost in order to support our Performance Metric of minimizing cost. Next, an Advisor is created to pass that cross sell recommendation to the CRM application, so that the call center agent can extend the offer.
4.2 Creating an Offer Inventory Using Choice Groups
To create an offer inventory using Choice Groups:
-
In the Inline Service Explorer, right-click the Choices folder and select New Choice Group. Name the group
Cross Selling Offerand click OK. -
Expand Choices and select/open the newly created group. Add a description.
-
In the Choice Attributes tab, click Add next to the Attributes table. Add the attributes shown in Table 4-1, making sure to select Send to client and Overridable.
Table 4-1 Attributes for Choice Attributes Tab
Attribute Name Data Type Send to client Overridable Offer Description
String
Selected
Selected
URL
String
Selected
Selected
Agent Script
String
Selected
Selected
Note:
These attributes are sent to the client because they are needed by the client (call center agent) to present the offer.The attributes should be overridable because their values will be different for each actual offer. Cross Selling offers will be represented by choices in this choice group.
In a real Inline Service, we are likely to see several levels of choice groups before we get to actual offers. Each choice group provides a logical group for offers, and may have attributes or business rules that apply uniformly to a group of offers.
-
In the Inline Service Explorer, under Choices, select the Cross Selling Offer choice group and add five choices with their attributes, as shown in Table 4-2. To add each of the choices, follow these steps:
-
Right-click Cross Selling Offer in the Inline Service Explorer and select New Choice. Add the following choices: Credit Card, Savings Account, Life Insurance, Roth IRA, and Brokerage Account.
-
In the Inline Service Explorer, under Choices, expand the Cross Selling Offer Group to show the choices. For each choice, follow these steps to add attributes:
-
Select the Choice in the Inline Service Explorer. In the Editor for that choice, add a description.
-
On the Attribute Values tab, you will see three attributes: Agent Script, Offer Description, and URL. Using Attribute Value, add the attribute values shown in Table 4-2.
-
Table 4-2 Attribute Values for Choices
Choice Name Agent Script Offer Description URL Brokerage Account
Would you like to try our new brokerage account?
Brokerage Account offer
http://www.offer.com/offer1.html
Credit Card
Would you like to try our new credit card?
Credit Card offer
http://www.offer.com/offer2.html
Life Insurance
Would you like to try our new life insurance?
Life Insurance offer
http://www.offer.com/offer3.html
Roth IRA
Would you like to try our new Roth IRA?
Roth IRA offer
http://www.offer.com/offer4.html
Savings Account
Would you like to try our new savings account?
Savings Account offer
http://www.offer.com/offer5.html
-
-
Save the configuration by choosing File > Save All.
4.3 Configuring Performance Goals
To configure performance goals:
-
In the Inline Service Explorer, double-click the Performance Goals element to open the editor. Click Add to add a Performance Metric. Name the metric
Cost. Click OK. -
In Optimization, choose Minimize and make the metric Required.
Note:
If you have more than one performance metric, you must use the Normalization Factor to normalize the values. For instance, if you had another metric called "Minimize hold time" measured in seconds, the normalization factor would be how many minimized seconds are worth a dollar (revenue) to your organization. -
Save the configuration by choosing File > Save All.
4.4 Scoring the Choices
Each product costs the company an average amount to maintain on a yearly basis. The cost in dollars represents the score for that product that we will associate to the Cost performance goal that we configured.
To score the choices:
-
In the Inline Service Explorer, under Choices, select and open the Cross Selling Offer choice group. In the Scores tab, click Select Metrics and choose the performance metric Cost, then click OK. This sets up the choice group with a Cost score. The actual score values will be set on a per-choice basis.
Score values do not have to be constants. In many cases, score for one type of customer can differ by a significant amount from another customer type. We can express such differences through the use of formulas or scoring rules. For example, the Cost to maintain a credit card account may be less for customers who are age 40 or under. We will define this logic in a Scoring Rule and then assign this rule to the Cost score for the Credit Card offer.
-
In the Inline Service Explorer, right-click the folder Scoring Rules and select New Scoring Rule. Name the scoring rule
Credit Card Score. The editor for this new rule opens. -
Click the Add conditional value icon to set up a rule condition in addition to the default:

A new row will appear, where the left cell is a two-sided rule and the right cell is the score value. The logic is as follows: "If the left cell evaluates to true, then the value in the right cell will be returned, otherwise use the value in the second row of the rule."
Click the left side of the rule and then on the ellipsis. An Edit Value dialog appears. Select Attribute, expand session attributes > customer and select Age, then click OK. Click the condition operator icon, then click the lower-right corner triangle:

Select the less than or equal to symbol (<=). Click in the right half of the rule and type the number
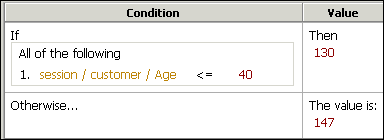
40. In the Then cell, type the number130. In the second row, select and type in the number147for the value. The full rule should look like the one shown in Figure 4-2.Save the Credit Card Score scoring rule. For the other offers, we will set constant values for the Cost score.
-
For each of the choices under the choice group Cross Selling Offer, open the Scores tab. In the Score column for the Cost metric, enter the values shown in Table 4-3. To set the Cost score for the Credit Card choice, click the ellipsis in the Score column, then select Function or rule call as the Value Source. In the Function to Call drop-down list, select Credit Card Score.
Table 4-3 Cost Scores for Choices
Choice Cost Score Brokerage Account
150
Credit Card
Credit Card Score Scoring Rule: 130 if Age <=40, Otherwise 147
Life Insurance
140
Roth IRA
145
Savings Account
135
Since our Performance Goal is to minimize costs, it is clear that the Savings Account offer (score =135) will be chosen unless the customer's age is 40 or below (score = 130), in which case the Credit Card offer will be chosen. In later sections of the tutorial, we will add another Performance Goal, Maximize Revenue, to see how these two competing performance metrics are optimized by the platform.
-
Save the configuration by choosing File > Save All.
4.5 About Advisors
When an external system needs a decision to be made on its behalf, it calls an Advisor. Here, we create the Advisor that will send back to the CRM application an offer selected for a specific customer.
The Advisor's internal structure includes a Decision which associates it with one or more Choice Groups. These Choice Groups contain the offers that are to be made. The result of the decision is the result sent to the Advisor.
An Advisor has two decisions, one for normal processing and the other for the control group. If used, the control group serves as a baseline to show performance gains achieved by Oracle RTD decisions.
Figure 4-3 Structure of Get Cross Sell Offer Advisor
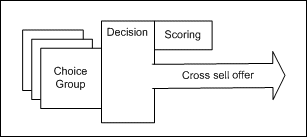
Description of "Figure 4-3 Structure of Get Cross Sell Offer Advisor"
4.6 Creating the Decisions
To create the decisions:
-
In the Inline Service Explorer, right-click the Decisions folder and select New Decision. Name the Decision
Select Offerand click OK. -
Add a description for Select Offer. On the Selection Criteria tab in the Decision editor, locate Select Choices from. Click Select, then select the Cross Selling Offer from the list and click OK.
-
For our control group, we will have a decision that chooses an offer randomly. Create a new Decision and name it
Random Choice. -
Add a description for Random Choice. On the Selection Criteria tab in the Decision editor, locate Select Choices from. Click Select, then select the Cross Selling Offer from the list and click OK.
-
Check the Select at random box.
Note:
The Control Group acts as a baseline so that the business user can compare the results of the predictive model against the pre-existing business process. It is important to correctly define the Control Group decision to truly reflect the decision as it would have been made if Oracle RTD was not installed. For example, in a cross-selling application for a call center, if agents randomly selected an offer before Oracle RTD was introduced, then the Control Group Decision should return a random selection. -
Save the configuration by choosing File > Save All.
4.7 Creating the Advisor
To create the Advisor:
-
In the Inline Service Explorer, under Integration Points, right-click the Advisors folder and select New Advisor. Name the element
Get Cross Sell Offerand click OK. -
To add a session key to the Get Cross Sell Offer Advisor, click Select under Session Keys in the Editor and select customerId. Click OK.
-
Under External System, select CRM. For Order, enter
3.Recall that we had set the Order for Informant 'Service Complete' to
2. We are preparing to call the Get Cross Sell Offer Advisor after this Informant, and thus the order number 3. Note that the Order is only used in Decision Center's integration map to help graphically describe the application process; Order does not force integration points to execute in any particular sequence. -
On the Response tab, select a Decision for both the normal processing and the control group. Select Select Offer for the Decision and Random Choice for the Control Group Decision.
-
In the Default Choices section, click Select, then choose Life Insurance from the list and click OK. This will make the selected Offer the default response for this Advisor. This default will be used when there is any problem in the computation (for instance, if there is a timeout).
-
In the Asynchronous Logic tab, enter the following code:
logInfo("Integration Point - Get Cross Sell Offer");
logInfo("  Customer age = " + session().getCustomer().getAge() );
// 'choices' is array returned by the 'Select Offer' decision
if (choices.size() > 0) {
  //Get the first offer from array
  Choice offer = choices.get(0);
  logInfo("  Offer presented: '" + offer.getSDOLabel() + "'");
}
If we had entered the code in the Logic tab, it would have been executed before the decision was made on which offer to return, and we would not be able to print the name of the offer returned. In the preceding code, we print the customer's age and the presented offer name. Recall that because we are minimizing on Cost, only the offers Savings Account and Credit Card will be presented, depending on the age of the customer.
-
Save the Inline Service. Click the Deploy button. Select Terminate Active Sessions (used for testing) to remove any session that is still currently active. Deploy.
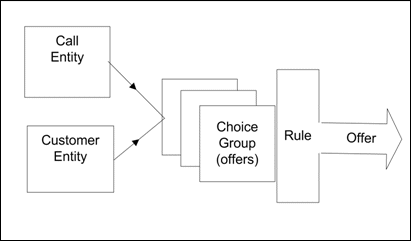
Figure 4-4 shows how the Get Cross Sell Offer Advisor retrieves an offer from the Cross Selling Offer choice group, based on the performance goal Cost.
Figure 4-4 Get Cross Sell Offer Advisor Retrieving an Offer from Cross Selling Offer Choice Group
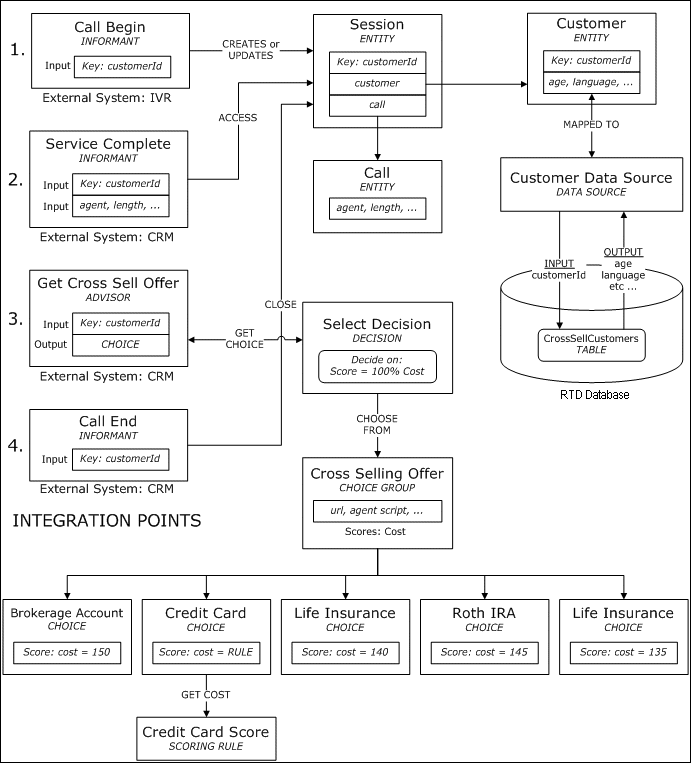
Description of "Figure 4-4 Get Cross Sell Offer Advisor Retrieving an Offer from Cross Selling Offer Choice Group"
4.8 Viewing the Integration Map
To view the Integration Map in Decision Center:
-
Open Decision Center by opening a Web browser and going to the URL
http://server_name:9704/ui. Log in using the default administrator credentials you created during installation. Real-Time Decision Server must be started for Decision Center to run. -
Click Open an Inline Service.
-
Select the Tutorial Inline Service.
-
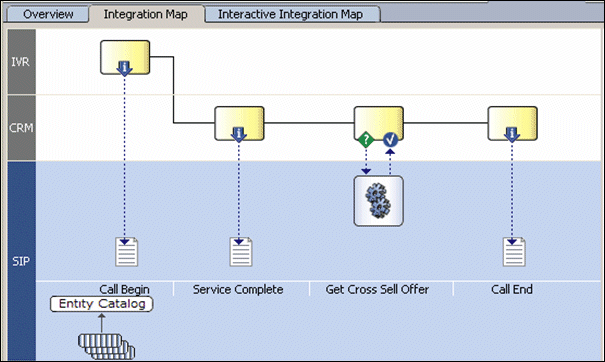
On the left-hand tree, click the root node Tutorial. In the right pane, on the Definition tab, click to view the Integration Map subtab. You should see something similar to the map shown in Figure 4-5.
The symbols shown in Table 4-4 are used on the Integration Map to indicate integration points, processing, entities, and information flow.
4.9 Testing the Advisor
To test the Advisor:
-
In Decision Studio, use the Test View to send a request integration point. Select the Service Complete Informant and fill in some values for the parameters. For example: customerId =
7, agent =John, length =21, reason code =18(others:17,19, or20). -
Click the Send icon:

Then, confirm in the Log subtab that the message was sent. This Informant call creates a new session based on the customer ID and registers the customer's call reason, agent's name, and call length.
-
Now select the Get Cross Sell Offer Advisor, leaving the customerId as it is, as we want to continue with the same session. Click Send.
The selected offer and its attributes are returned and displayed in the Response pane in the Test View.
In the Log subtab in the Test View, for customerId = 7, you should see something similar to the following:
00:24:40,764 Integration Point - Get Cross Sell Offer
00:24:40,764   Customer age = 38
00:24:40,764   Offer presented: 'Credit Card'
-
Repeat steps 1 to 3 with different values for customerId and other parameters. Notice that the Credit Card offer is returned if the customer's age is 40 or below, and the Savings Account offer is returned for all other ages. This is expected because so far, we have only optimized on the Cost performance metric, thus the lowest cost offer is either Savings Account or Credit Card, depending on the customer's age (see the Credit Card Score scoring rule in "Scoring the Choices").
-
In the Trace subtab of the Test View, you will find a description of the sequence taken to arrive at the offer, from determining which offers are eligible to computing scores for each offer, and finally choosing the offer that met the performance goal (minimize Cost).
