53 Creating Oracle BAM Enterprise Message Sources
This chapter contain the information required to create Enterprise Message Sources (EMS) in the Oracle BAM Architect application.
This chapter includes the following sections:
53.1 Introduction to Enterprise Message Sources
Enterprise Message Sources (EMS) are used by applications to provide direct Java Message Service (JMS) connectivity to the Oracle BAM Server. JMS is the standard messaging API for passing data between application components and allowing business integration in heterogeneous and legacy environments.
The EMS does not configure Extract Transform and Load (ETL) scenarios, but rather maps from a message directly to a data object on the Oracle BAM Server; however, you can still use XML Stylesheet Language (XSL) to perform a transformation in between. Each EMS connects to a specific JMS topic or queue, and the information is delivered into a data object in the Oracle BAM Active Data Cache. The Oracle BAM Architect web application is used to configure EMS definitions.
The following JMS providers are supported:
-
Messaging for Oracle WebLogic Server
-
Non-Oracle certified JMS providers:
-
IBM WebSphere MQ 6.0
-
Tibco JMS
-
Apache ActiveMQ
See Section 53.4, "Using Foreign JMS Providers" for more information.
-
The following message types are supported:
-
Map message
-
Text message with XML payload
The following XML formatting options are supported for Text message transformation:
-
Pre-processing
-
Message specification
-
Column value (Column values can be provided either as elements or attributes in the XML payload.)
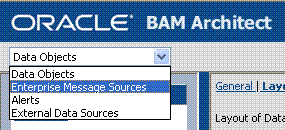
To view the existing EMS definitions, select Enterprise Message Sources from the Oracle BAM Architect function list.
Figure 53-1 Oracle BAM Architect Function List
Description of "Figure 53-1 Oracle BAM Architect Function List"
53.2 Creating Enterprise Message Sources
When you define an EMS, you specify all of the fields in the messages to be received. Some messaging systems have a variable number of user-defined fields, while other systems have a fixed number of fields.
For any string type field, you can apply formatting to that field to break apart the contents of the field into separate, individual fields. This is useful for messaging systems where you cannot create user-defined fields and the entire message body is received as one large field. The formatting specifications allow you to specify the path to a location in the XML tree, and then extract the attributes or tags as fields.
Before defining an EMS, you must be familiar with the third party application providing the messages so that you can specify the message source connection details in Oracle BAM Architect. Furthermore, note that the JMS server (where you host queues/topics) can be configured on a different system than that which hosts the Oracle BAM Server. (For Oracle Advanced Queuing (AQ) it is acceptable to host on the same server as Oracle BAM because the database hosts the JMS server, but for other cases it is recommended to host the JMS server on another system).
53.2.1 How to Create an Enterprise Message Source
-
Select Enterprise Message Sources from the Oracle BAM Architect function list (see Figure 53-1).
-
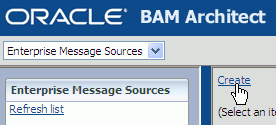
Click Create.
Description of the illustration bam_ar_ems_create.gif
-
Using Table 53-1 as a guide, enter the appropriate values in each of the fields. Examples given are for connecting to Messaging for Oracle WebLogic Server.
Caution:
A single or double quotation mark in an Oracle BAM object name, such as a data object, report, or EMS name, causes a runtime error. Do not include single or double quotation marks in an Oracle BAM object name.Do not configure two Enterprise Message Sources on the same topic or queue. If you require two Enterprise Message Sources on the same Queue, each EMS must have different Message Selector value specified; otherwise, the messages are duplicated on both of the Enterprise Message Sources.
If a non-Oracle WebLogic Server JMS server is used (such as Tibco) then the durable subscription name should not be repeated in any of the Enterprise Message Sources created. Some JMS servers do not allow the clients to have multiple ConnectionFactory for a single topic destination, and Oracle BAM does not support the ability to reuse the same ConnectionFactory for the same topic.
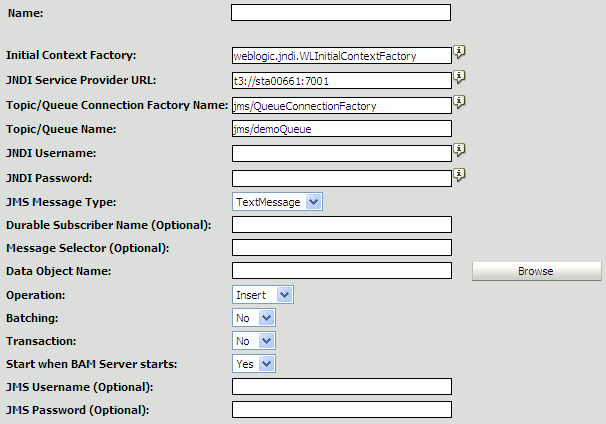
Description of the illustration bam_ar_ems_form.gif
-
If you are using TextMessage type, configure the appropriate parameters in the XML Formatting sections, using Table 53-2 as a guide.
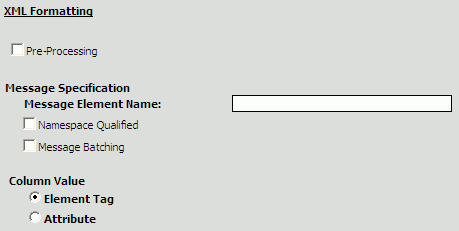
Description of the illustration bam_ar_ems_xmlform.gif
-
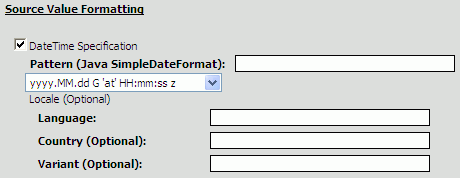
To configure the DateTime Specification in the Source Value Formatting section, see Section 53.2.2, "How to Configure DateTime Specification."
Note that when DateTime Specification is disabled (not checked), the incoming value must be in
xsd:dateFormat. That is,xsd:dateFormat([-]CCYY-MM-DDThh:mm:ss[Z|(+|-)hh:mm]) is the default format when DateTime Specification is not configured.Valid value patterns for
xsd:dateTimeinclude:-
2001-10-26T21:32:52
-
2001-10-26T21:32:52+02:00
-
2001-10-26T19:32:52Z
-
2001-10-26T19:32:52+00:00
-
-2001-10-26T21:32:52
-
2001-10-26T21:32:52.12679
-
-
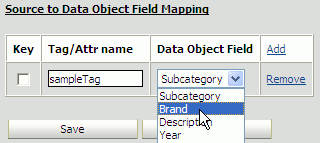
Map fields from the source message to the selected data object in the Source to Data Object Field Mapping section.
Description of the illustration bam_ar_ems_map.gif
-
Click Add to add a mapped field.
-
Select the Key checkbox if the field is a key.
-
Enter the source tag or attribute name in the Tag/Attr name field.
-
Select the target data object field from the Data Object Field list.
Note:
When a timestamp field is included in an EMS payload, the following must be considered:Inserting null in a timestamp field might not be in the control of a client like EMS.
When no value is given for a timestamp field (as in Oracle BAM Architect), EMS assigns the current datetime.
When the incoming timestamp value does not adhere to the
xsd:dateTimeor the datetime format specified in the EMS, the current datetime is inserted. -
-
Click Save to save the EMS.
Table 53-1 EMS Configuration Parameters
| Parameter | Description |
|---|---|
|
Name |
A unique display name that appears in the EMS list in Oracle BAM Architect. |
|
Initial Context Factory |
The initial context factory to be used for looking up specified JMS connection factory or destination. For example: weblogic.jndi.WLInitialContextFactory |
|
JNDI Service Provider URL |
Configuration information for the service provider to use. Used to set javax.naming.Context.PROVIDER_URL property and passed as an argument to initialContext(). An incorrect provider URL is the most common cause of errors. For example: t3://localhost:7001 |
|
Topic/Queue ConnectionFactory Name |
The name used in a JNDI lookup of a previously created JMS connection factory. For example: jms/QueueConnectionFactory |
|
Topic/Queue Name |
The name used in the JNDI lookup of a previously created JMS topic or queue. For example: jms/demoQueue jms/demoTopic |
|
JNDI Username |
The identity of the principal for authenticating the JNDI service caller. This user must have RMI login permissions. Used to set javax.naming.Context.SECURITY_PRINCIPAL and passed to initialContext(). |
|
JNDI Password |
The identity of the principal for authenticating the JNDI service caller. Used to set javax.naming.Context.SECURITY_CREDENTIALS and passed to initialContext(). |
|
JMS Message Type |
TextMessage or MapMessage. If TextMessage is selected, XML is used to specify the contents of the payload, and an additional set of XML Formatting configuration parameters must be completed. See Table 53-2 for more information. |
|
Durable Subscriber Name |
Enter the name of the subscriber, for example, BAMFilteredSubscription. The Durable Subscriber Name should match the event-publisher subscriber name property if it is provided. A durable subscription can preserve messages published on a topic while the subscriber is not active. It enables Oracle BAM to be disconnected from the JMS provider for periods of time, and then reconnect to the provider and process messages that were published during the disconnected period. See Section 53.3.3, "How to Subscribe and Unsubscribe Enterprise Message Sources" for information about unsubscribing an EMS from a durable subscription once the EMS is started. |
|
Message Selector (Optional) |
A single name-value pair (currently only one name-value pair is supported) that allows an application to have a JMS provider select, or filter, messages on its behalf using application-specific criteria. When this parameter is set, the application-defined message property value must match the specified criteria for it to receive messages. To set message property values, use stringProperty() method on the Message interface. he name value pair format should be |
|
Data Object Name |
Data object in Oracle BAM in which to deposit message data. Operations can be performed on only one data object per EMS. The data object can have Lookup columns. Click Browse to choose a data object. |
|
Operation |
Select the operation from the list: Insert inserts all new data as new rows Upsert merges data into existing rows Update updates existing rows Delete removes rows from the data object |
|
Batching |
Specify whether the EMS communicates with the Oracle BAM Active Data Cache API with batching enabled. Batching allows multiple messages to be inserted using a single Text Message. If Batching is disabled (the default state), each row read from JMS would be sent to the Active Data Cache as a separate unit and not part of a batch of rows. Batching properties are contained in configuration files. See Oracle Fusion Middleware Administrator's Guide for Oracle SOA Suite and Oracle BPM Suite for more information. |
|
Transaction |
Enabling Transaction ensures that the operation is atomic when Batching is enabled (Batching allows multiple messages to be inserted using a single Text Message). Transaction itself does not have any impact on Active Data Cache batching, but setting Transaction to true ensures that all of the messages in Messaging Batching (when many messages are batched in a single batch) are part of an atomic operation. See Message Batching inTable 53-2. |
|
Start when BAM Server starts |
Specify whether the EMS starts reading messages and sending them to the Active Data Cache as soon as the Oracle BAM Server starts (or restarts). |
|
JMS Username (Optional) JMS Password (Optional) |
You can optionally provide this information when a new JMS connection is created by a connection factory. Used to authenticate a connection to a JMS provider for either application-managed or container-managed authentication. |
Table 53-2 EMS XML Formatting Configuration Parameters
| Parameter | Description |
|---|---|
|
Pre-Processing |
XSL transformation can be applied to an incoming Text Message before message retrieval and column mapping are done. See Section 53.2.3, "How to Use Advanced XML Formatting" for more information. XML names can be qualified. If qualified, select the Namespace Qualified box and enter the namespace URI in the field. |
|
Message Element Name |
The parent element that contains column values in either its sub-elements or attributes. XML names can be qualified. If qualified, select the Namespace Qualified box and enter the namespace URI in the field. |
|
Message Batching |
Multiple messages can be batched in a single JMS message. If this is the case, a wrapper element must be specified as the containing element in Batch Element Name. If qualified, select the Namespace Qualified box and enter the namespace URI in the field. |
|
Column Value |
Column values can be provided using either elements or attributes in an XML payload. Specify which column value type is provided in the payload. |
53.2.2 How to Configure DateTime Specification
To configure DateTime Specification:
-
Select the DateTime Specification checkbox as shown in Figure 53-2.
-
Enter the date and time pattern in the Pattern field.
You can select one of the suggested supported patterns provided in the dropdown list, or enter it manually into the text box.
You must supply a valid date and time pattern that adheres to the Java SimpleDateFormat. Table 53-3 provides the syntax elements for SimpleDateFormat, and Table 53-4 provides some examples.
Note:
If you are sending datetime/timestamp data to an Oracle BAM EMS through Oracle AQ JMS, the following must be considered while configuring DateTime Specification:The default datetime formats in Oracle database are specified either explicitly, with the NLS session parameters
NLS_DATE_FORMAT,NLS_TIMESTAMP_FORMAT, andNLS_TIMESTAMP_TZ_FORMAT, or implicitly, with the NLS session parameterNLS_TERRITORY.If trigger processing code (PL/SQL) does not override the date format with explicit formatting, the dates are formatted according to the format specified by NLS parameters for the database session, and sent accordingly to EMS. This means that the EMS DateTime Specification must have the equivalent format of NLS parameters to parse and interpret the incoming data.
However, problems arise on the EMS side if a database administrator changes the NLS parameters. It is always safe to use explicit formatting using the
to_char()function, rather than rely on the default NLS parameters specified format.A line such as this example in Trigger processing code
'<HIREDATE>' || :new.HIREDATE || '</HIREDATE>' ||
should be changed to something similar to
'<HIREDATE>' || to_char(:new.HIREDATE, 'MM/dd/yy HH24:MI:SS') || '</HIREDATE>' ||
The corresponding format selected from EMS DateTime Specification drop down is
MM/dd/yy H:mm:ss.Similarly, for timestamp data, if the format selected on the database side with the
to_char()function isMM/dd/yy HH24:MI:SS.FF, the corresponding EMS DateTime Specification format isMM/dd/yy H:mm:ss:SSS.Note:
When you explicitly select theHH:mm:ssdatetime format, the default value1/1/1970is inserted for the date, EMS ignores the date value.When you explicitly select only the date (excluding the hour, minute, and second) as the datetime format, then the date is inserted with its hour, minute, and second set to
12:00:00 AM. EMS ignores the time value. -
Optionally, you can enter the locale information in the Language, Country, and Variant fields.
Figure 53-2 EMS Configuration Source Value Formatting Section
Description of "Figure 53-2 EMS Configuration Source Value Formatting Section"
Table 53-3 Syntax Elements for SimpleDateFormat
| Symbol | Meaning | Presentation | Example |
|---|---|---|---|
|
G |
Era |
Text |
AD |
|
y |
Year |
Number |
2003 |
|
M |
Month |
Text or Number |
July; Jul; 07 |
|
w |
Week in year (1-53) |
Number |
27 |
|
W |
Week in month (1-5) |
Number |
2 |
|
D |
Day in year (1-365 or 1-364) |
Number |
189 |
|
d |
Day in a month |
Number |
10 |
|
F |
Day of week in month (1-5) |
Number |
2 |
|
E |
Day in week |
Text |
Tuesday; Tue |
|
a |
AM/PM marker |
Text |
AM |
|
H |
Hour (0-23) |
Number |
0 |
|
k |
Hour (1-24) |
Number |
24 |
|
K |
Hour (0-11 AM/PM) |
Number |
0 |
|
h |
Hour (1-12 AM/PM) |
Number |
12 |
|
m |
Minute in an hour |
Number |
30 |
|
s |
Second in a minute |
Number |
55 |
|
S |
Millisecond (0-999) |
Number |
978 |
|
z |
Time zone |
General time zone |
Pacific Standard Time; PST; GMT-08:00 |
|
Z |
Time zone |
RFC 822 time zone |
-0800 |
|
' |
Escape for text |
Delimiter |
MMM ''01 -> Jul '01 |
The examples in Table 53-4 show how date and time patterns are interpreted in the United States locale. The date and time used in all of the examples are 2001-07-04 12:08:56 local time in the U.S. Pacific Time time zone.
Table 53-4 Date and Time Pattern Examples
| Date and Time Pattern | Result |
|---|---|
|
"yyyy.MM.dd G 'at' HH:mm:ss z" |
2001.07.04 AD at 12:08:56 PDT |
|
"EEE, MMM d, '' yy" |
Wed, Jul 4, '01 |
|
"h:mm a" |
12:08 PM |
|
"hh 'o''clock' a, zzzz" |
12 o'clock PM, Pacific Daylight Time |
|
"K:mm a, z" |
0:08 PM, PDT |
|
"yyyyy.MMMMM.dd GGG hh:mm aaa" |
02001.July.04 AD 12:08 PM |
|
"EEE, d MMM yyyy HH:mm:ss Z" |
Wed, 4 Jul 2001 12:08:56 -0700 |
|
"yyMMddHHmmssZ" |
010704120856-0700 |
|
"yyyy-MM-dd'T'HH:mm:ss.SSSZ" |
2001-07-04T12:08:56.235-0700 |
53.2.3 How to Use Advanced XML Formatting
The Advanced formatting options allow an EMS to contain a user-supplied XSL Transformation (XSLT) for each formatted field in the message.
Uses for XSLT include:
-
Handling of hierarchical data. The Data Flow does not handle hierarchical data. The XSLT can flatten the received XML into a single record with repeating fields.
-
Handling of message queues that contain messages of multiple types in a single queue. The Data Flow requires that all records from the Message Receiver be of the same schema. The EMS output can be defined as a combined superset of the message schemas that are received, and the XSL transformation can identify each message type and map it to the superset schema as appropriate.
-
Handling of XML that, while not expressing hierarchical data, does contain needed data at multiple levels in the XML. EMS formatting can only read from one level with the XML. The XSL transformation can identify the data needed at various levels in the input XML and output it all in new XML that contains all of the data combined at one level.
To specify an XSL transformation:
-
In an EMS that you are defining or editing, select Pre-Processing in the XML Formatting section.

Description of the illustration bam_ar_ems_advanced.gif
-
Click Advanced formatting options.
The Advanced Formatting dialog opens.
-
Type or paste the XSL markup for the transformation for the XML in this field. You might want to write the XSL markup in another editing tool and then copy and paste the code into this dialog.
-
In the Sample XML to transform field, type sample XML to test the transformation against. The sample XML is not saved in this dialog and is not displayed if you close and open this dialog.
-
Click Verify transformation syntax to validate the XSL syntax.
-
Click Test transformation on sample XML to test your transformation.
The results are displayed in the field underneath the links. If any errors are found in the XSL syntax, the sample XML syntax, or during the transformation, the error text is shown in this field.
53.3 Using Enterprise Message Sources
The Enterprise Message Sources page in Oracle BAM Architect is used to view the EMS definition, and perform operations on it. Select any EMS in the Enterprise Message Sources list to display information about it and work with it.

Description of the illustration bam_ar_ems_links.gif
Use the links displayed at the top of the EMS definition page (the pane on the right side of the browser window) to perform operations on the EMS.
The following topics describe the available operations:
-
Section 53.3.1, "How to Edit, Copy, and Delete Enterprise Message Sources"
-
Section 53.3.2, "How to Start and Stop Enterprise Message Sources"
-
Section 53.3.3, "How to Subscribe and Unsubscribe Enterprise Message Sources"
-
Section 53.3.6, "How to Monitor Enterprise Message Source Metrics"
53.3.1 How to Edit, Copy, and Delete Enterprise Message Sources
Use the Edit, Copy, and Delete links on an individual EMS definition page to edit, copy, or delete the current EMS definition.
53.3.2 How to Start and Stop Enterprise Message Sources
Use the Start and Stop links on an individual EMS definition page to start and stop the EMS, which makes the consumer inactive in Stopped status.
For a durable subscribed EMS, clicking on Stop only makes the consumer inactive. It does not unsubscribe the EMS from a durable subscription. See Section 53.3.3, "How to Subscribe and Unsubscribe Enterprise Message Sources" for more information.
By default the EMS starts when the Oracle BAM Server is started.
Click Edit to change the Start when BAM Server starts property.

Description of the illustration bam_ar_ems_start.gif
53.3.3 How to Subscribe and Unsubscribe Enterprise Message Sources
Use the Unsubscribe link on an individual EMS definition page to unsubscribe a durable subscribed EMS.
For a durable subscribed EMS, clicking on Stop only makes the consumer inactive with Stopped status.
Clicking on Unsubscribe unsubscribes it and the EMS status displays as Unsubscribed.
For non-durable subscribed EMS, clicking Unsubscribe does not have any effect. A message is displayed that the feature is not applicable in this case.
See Table 53-1 for information about configuring the Durable Subscriber Name property.
53.3.4 How to Test Enterprise Message Sources
Use the Test link on an individual EMS definition page to test the EMS definition against the data source and the mapped data object fields. The test results appear in the Status field in the EMS definition.
The status is reflected in the Status field as Test OK if the test is done successfully, or Test failed - exception are displayed when there is a problem. Also, when the Test link is clicked:
-
If the EMS is started already, then it stops it and starts it again.
-
If the EMS is in a stopped state, then it starts and stops again.
53.3.5 How to Refresh Enterprise Message Sources
Use the Refresh link on an individual EMS definition page to refresh the EMS definition page. Typically a user refreshes the page to obtain the current status of the EMS.
53.3.6 How to Monitor Enterprise Message Source Metrics
Use the Metrics link on an individual EMS definition page to monitor selected EMS statistics. The Metrics page displays the Total Messages Received, Total Messages committed in ADC, and Total Messages Lost counters. These values are accumulated since last start or reset.
Total Messages Lost is calculated by subtracting Total Messages committed in ADC from Total Messages Received.
Click Refresh to see these latest counter values.
Click Reset to set counter values to zero.
53.4 Using Foreign JMS Providers
Oracle WebLogic Server provides support for integrating non-Oracle WebLogic Server (foreign) JMS providers with applications deployed in it, such as Oracle BAM. Foreign JMS providers have their own JMS client and Java Naming and Directory Interface (JNDI) Client APIs. some configuration must be done to identify these depedencies and make these APIs available on Oracle WebLogic Server so that JMS resources hosted on a remote provider can be looked up by application deployed in Oracle WebLogic Server.
See "Configuring Foreign Server Resources to Access Third-Party JMS Providers" in Oracle Fusion Middleware Configuring and Managing JMS for Oracle WebLogic Server for more information.
Section 53.5.3, "Creating a Foreign JMS Server" in the "Use Case: Creating an EMS Against Oracle Streams AQ JMS Provider" provides a detailed example.
The high level configuration steps are:
-
Make the JMS and JNDI client library of the foreign the provider available to applications deployed on Oracle WebLogic Server.
Identify the JMS and JNDI client Java Archive (JAR) files of the foreign provider and place them in the
DOMAIN_HOME/libdirectory. -
Create a foreign server using Oracle WebLogic Server Administration Console.
Go to JMS Modules in Oracle WebLogic Server Administration Console, and create a new module.
Inside this module, click New, select Foreign Server, and create a new foreign server by navigating through all of the pages.
Provide appropriate JNDI properties for the remote provider for the foreign server definition.
-
Create JMS resources (that is, connection factories and destinations) for the foreign JMS server.
Inside the Foreign Server link, select the Destination tab and create links for
-
Remote ConnectionFactory
-
Remote Destination (Queue/Topic)
Local JNDI names configured for these destinations must be used while configuring EMS to consume messages from these destinations.
-
-
Configure an EMS definition in Oracle BAM Architect to consume messages from foreign destinations.
The whole process of accessing JMS resources hosted on foreign providers is transparent to Oracle BAM Server. After the previous steps have been followed correctly, remote destinations from foreign JMS providers are published on the local WL server JNDI tree, so that applications deployed on the server (like Oracle BAM EMS) can look them up, just like any other collocated Oracle WebLogic Server JMS resource. Oracle WebLogic Server takes care of communicating with the appropriate foreign JMS provider at runtime.
53.5 Use Case: Creating an EMS Against Oracle Streams AQ JMS Provider
The following are the steps to configure Oracle Streams AQ JMS Provider (AQ-JMS) in Oracle WebLogic Server, and an EMS definition in Oracle BAM Architect.
53.5.1 Creating a JMS Topic in AQ-JMS
Open a SQLplus command prompt and do the following:
-
Login as sysdba
sqlplus sys as sysdba
-
Enter the password for the system dba account when prompted.
-
Create and execute the following scripts in the following order (see Example 53-1, Example 53-2, and Example 53-3 for the contents of the scripts).
@<SCRIPT_PATH>/usertabletopiccreation.sql
@<SCRIPT_PATH>/createtable.sql
@<SCRIPT_PATH>/createtrigger.sql
The scripts do the following things:
-
Creates a fresh schema under user
MyChannelDemoUser. -
Creates a JMS a topic in AQ-JMS.
-
Creates a SQL table by name
EMP. -
Creates a trigger that publishes messages to AQ-JMS topic on inset/update on
EMP.
-
Example 53-1 Contents of usertabletopiccreation.sql
DROP USER MyChannelDemoUser CASCADE;

GRANT connect, resource,AQ_ADMINISTRATOR_ROLE TO MyChannelDemoUser IDENTIFIED BY
 MyChannelDemoPassword;
GRANT execute ON sys.dbms_aqadm TO MyChannelDemoUser;
GRANT execute ON sys.dbms_aq    TO MyChannelDemoUser;
GRANT execute ON sys.dbms_aqin  TO MyChannelDemoUser;
GRANT execute ON sys.dbms_aqjms TO MyChannelDemoUser;

connect MyChannelDemoUser/MyChannelDemoPassword;

BEGIN
--dbms_aqadm.stop_queue( queue_name => 'MY_TOPIC' );
--dbms_aqadm.drop_queue( queue_name  => 'MY_TOPIC');
--DBMS_AQADM.DROP_QUEUE_TABLE (queue_table => 'TTab');
dbms_aqadm.create_queue_table( queue_table => 'TTab', queue_payload_type =>
 'sys.aq$_jms_text_message', multiple_consumers => true );
dbms_aqadm.create_queue( queue_name  => 'MY_TOPIC', queue_table => 'TTab' );
dbms_aqadm.start_queue( queue_name => 'MY_TOPIC' );
END;
/
Example 53-2 Contents of createtable.sql
connect MyChannelDemoUser/MyChannelDemoPassword;

CREATE TABLE EMP ( EMPNO NUMBER(4), ENAME VARCHAR2(10),  JOB VARCHAR2(9), MGR
 NUMBER(4), HIREDATE DATE, SAL NUMBER(7,2), COMM NUMBER(7,2), DEPTNO NUMBER(2) );

quit;
Example 53-3 Contents of createtrigger.sql
connect MyChannelDemoUser/MyChannelDemoPassword;
create or replace
trigger employee AFTER INSERT OR Update ON EMP
 FOR each row
    declare
       xml_complete varchar2(1000);
       v_enqueue_options dbms_aq.enqueue_options_t;
       v_message_properties dbms_aq.message_properties_t;
       v_msgid raw(16);
       temp sys.aq$_jms_text_message;
       v_recipients        dbms_aq.aq$_recipient_list_t;

    Begin
         temp:=sys.aq$_jms_text_message.construct;
 xml_complete :=
 '<?xml version="1.0"?>' ||
 '<row>' ||
 '<EMPNO>' || :new.EMPNO || '</EMPNO>' ||
 '<ENAME>' || :new.ENAME || '</ENAME>' ||
 '<JOB>' || :new.JOB || '</JOB>' ||
 '<MGR>' || :new.MGR || '</MGR>' ||
 '<HIREDATE>' || :new.HIREDATE || '</HIREDATE>' ||
 '<SAL>' || :new.SAL || '</SAL>' ||
 '<COMM>' || :new.COMM || '</COMM>' ||
 '<DEPTNO>' || :new.DEPTNO || '</DEPTNO>' ||
 '</row>' ;
 temp.set_text(xml_complete);
      dbms_aq.enqueue(queue_name => 'MY_TOPIC',
         enqueue_options => v_enqueue_options,
         message_properties => v_message_properties,
         payload => temp,
         msgid => v_msgid );
  End ;
/
quit;
53.5.2 Creating a Data Source in Oracle WebLogic Server
You can skip this step if a data source exists. An existing data source can also be reused in this section.
-
Open Oracle WebLogic Server Administration Console at
http://hostname:7001/consolewhere hostname is the name of the system where Oracle BAM Server is installed.
-
After logging into the console click the Data Sources link in the JDBC section, and click New.
-
Enter a name for the data source (For example,
BAMAQDataSource). -
Enter a JNDI name from the data source (for example,
jdbc/oracle/bamaq). This name is used to configure the foreign JMS server. -
Select Oracle to be the Database Type.
-
Select Oracle's Driver (Thin) for Database Driver field, and click Next.
-
Uncheck Support Global Transaction, and click Next.
-
Enter your database SID in the Database Name field (for example,
ORCL). -
Enter the hostname of the system where the database is installed as the Host Name (for example,
localhost). -
Enter data base port number (for example, 1521).
-
Enter the user name (for example,
MyChannelDemoUser). -
Enter the password, and click Next.
-
Click Test Configuration to test the configuration.
-
After it is successful, click Finish.
53.5.3 Creating a Foreign JMS Server
To create a foreign JMS server:
-
Add as an Oracle WebLogic Server JMS module.
-
In the Oracle WebLogic Server Administration Console, from the home page, go to the JMS Modules page.
-
Click New to create an Oracle WebLogic Server JMS module.
-
Enter a name for the JMS module (for example,
BAMAQsystemModule). -
Click Next and assign appropriate targets.
-
Click Next, and click Finish.
-
-
Add an AQ-JMS foreign server to the JMS module.
-
Select the JMS module that you just created.
-
Click New, and go to the list of JMS resources to add.
-
Select the Foreign Server option, and click Next.
-
Enter a name for the foreign server (for example,
BAMAQForeignServer), and click Finish.
-
-
Configure the AQ-JMS foreign server.
-
Select the AQ-JMS foreign server that you created.
-
In the JNDI Initial Context Factory field, enter
oracle.jms.AQjmsInitialContextFactory
-
In the JNDI Properties area, enter
datasource=datasource_jndi_locationwhere
datasource_jndi_locationis the JNDI location of your data source (for example,jdbc/oracle/bamaq).
-
-
Add connection factories to the AQ-JMS foreign server.
-
Select the AQ-JMS foreign server that you created.
-
Select the Connection Factories tab.
-
Enter a name for the connection factory. This is a logical name referenced by Oracle WebLogic Server.
-
In the Local JNDI Name field, enter the local JNDI name that is used by The Oracle BAM EMS to look up this connection factory (For example,
jms/BAMAQTopicCF). -
In the Remote JNDI Name field, enter:
- TopicConnectionFactory (select for this use case)
- QueueConnectionFactory
- ConnectionFactory
-
Click OK.
-
-
Add destinations to the AQ-JMS foreign server.
-
Select the AQ-JMS foreign server that you created.
-
Select the Destinations tab.
-
Enter a name for this destination. This is a logical name referenced by Oracle WebLogic Server, and it has nothing to do with the destination name.
-
In the Local JNDI Name field, enter the local JNDI name that is used by the Oracle BAM EMS to lookup this destination (for example,
jms/BAMAQTopic). -
In the Remote JNDI Name field, if the destination is a queue, enter the following value:
Queues/queue_nameIf the destination is a topic enter the following value:
Topics/topic_name -
Click OK.
-
-
Restart Oracle WebLogic Server.
53.5.4 Defining an EMS in Oracle BAM Architect
-
Open Oracle BAM Architect, and select Enterprise Message Sources in the dropdown list.
-
Enter the message source information you just created.
-
Enter the Initial Context Factory value:
weblogic.jndi.WLInitialContextFactory
-
Enter the JNDI provider URL:
t3://hostname:7001 -
Enter the Connection Factory Name (for example,
jms/BAMAQTopicCF). -
Enter the Destination Name (for example,
jms/BAMAQTopic). -
Choose the Oracle BAM data object to send the values received from AQ-JMS server.
-
Complete the source-to-data object field mapping so that data from the incoming XML can be mapped to an appropriate field in selected data object.
53.5.5 Inserting and Updating Records in the SQL Table
Now you can test the functionality end to end by inserting or updating some records in the EMP database table.
You can use SQLPlus to run SQL queries.
Now you should see the values from the record being inserted into data object.
For example,
insert into emp values (25,'Ford','ANALYST',7566,sysdate,60000,3000,20);

update emp set ENAME='McOwen' where ENAME='Ford';