4 Designing a Navigation Model
Navigations enable users to see what your portal has to offer and to access those areas quickly. In WebCenter Spaces, navigations consist of two components: a navigation model, which defines the content, structure, and metadata of the navigation, and a navigation visualization, which determines how the navigation appears on the pages of the portal. You can visualize your navigation as a menu, tree, or breadcrumb. In other words, think of the navigation model as what you want to include in your navigation, and the navigation visualization as how those items should appear to users. You'll learn more about modeling and visualizing navigations in the next step when you actually use them in the template.
Navigations are just one of the building blocks of WebCenter portals called resources. WebCenter resources fall into three categories: Structure, Look and Layout, and Mashups. While navigation, page templates, and resource catalogs help you create the structure of your portal, skins, page styles, and mashup styles let you alter your portal's look and feel. Similarly, Content Presenter enables you to publish content in various layouts. In some cases, you'll want a developer to create or extend a resource for you in JDeveloper, so you can import it into WebCenter Spaces and add the finishing touches.
In this step, you will create a navigation model and associate the El Piju Space and its Subspaces with it. You'll also add admin links to the Space and Subspaces pages so that you, as the moderator, can access them.
4.1 Step 1: Create a Navigation Model
A well-planned navigation ensures that crucial information is easily navigable so that users can find it. A navigation model can include other resources such as Spaces, pages, content, other navigation models, task flows, and so on.
To create a navigation model:
-
While you are in El Piju, from the Actions menu, choose Manage, then All Settings.
-
Click the Resources tab.
-
Under Structure, click Navigations.
-
Click Create.
This displays the Create New Navigation dialog.
-
In the Name field, enter
El Piju Navigation, then click Create.
You've created the El Piju Navigation model, but now you need to populate that model with the pages in the El Piju Space and Subspaces.
4.2 Step 2: Add the Spaces Pages to the El Piju Navigation
To add the Spaces pages to the El Piju navigation model:
-
While you are still on the Resources tab, with El Piju Navigation selected, choose Edit from the Edit menu, as shown in Figure 4-1.
Figure 4-1 El Piju - Edit El Piju Navigation
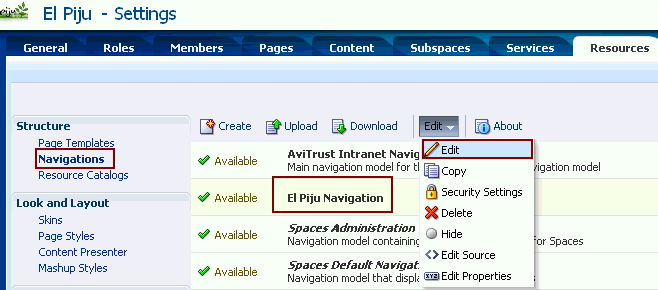
Description of "Figure 4-1 El Piju - Edit El Piju Navigation"
This displays the Edit - El Piju Navigation dialog
-
From the Add menu, choose Pages Query, as shown in Figure 4-2.
Figure 4-2 El Piju Navigation - Pages Query
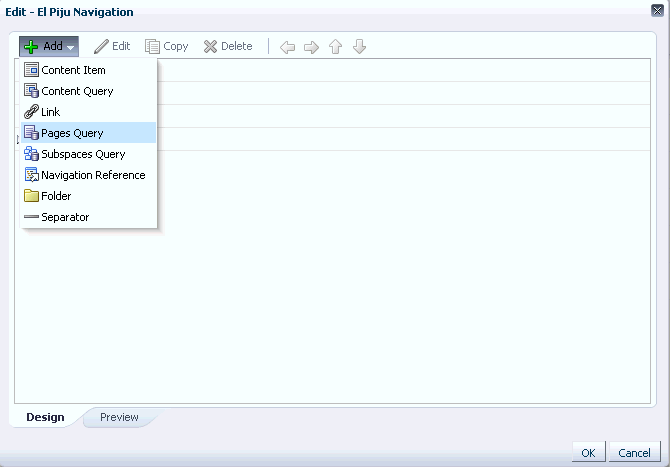
Description of "Figure 4-2 El Piju Navigation - Pages Query"
The Pages Query option displays a collection of pages when navigation is applied to a page template. These could be all the pages in the Home Space, all the pages in a Space, or all pages in a Subspace.
-
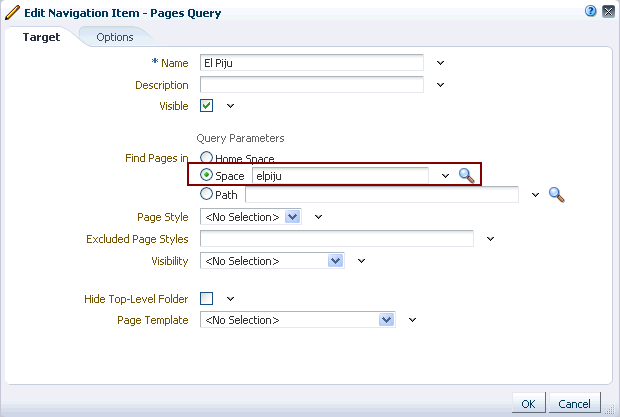
In the Name field, type
El Pijuso it matches the name of the Space that will be displayed. -
Under Find Pages in, note that the El Piju Space has been selected by default. Click OK.
-
Follow steps 2 to 4 to add Services and Advice Subspaces pages to the navigation model.
Be sure to use the Name field to reflect the name of each Subspace, as this is the name that appears in the navigation model. Similarly, in the Space field, select the appropriate Subspace using the Select Space (magnifying glass) icon.
-
Click the Preview tab at the bottom of the dialog.
Your screen should look like Figure 4-4. Use the arrows to expand and collapse the different nodes for each Space and Subspace.
Figure 4-4 El Piju Space and Subspace Pages in the El Piju Navigation
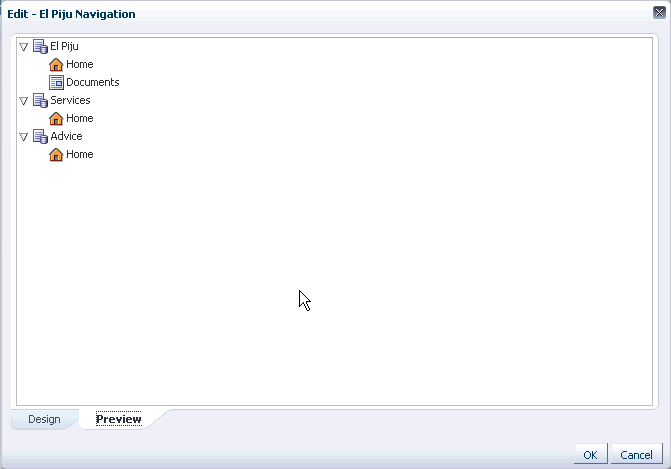
Description of "Figure 4-4 El Piju Space and Subspace Pages in the El Piju Navigation"
As soon as you apply the page template to the El Piju Space (which you will do in just a bit), you will no longer have a way to get to the Settings page, which you need in order to manage and control the operations of the Space. In the next step, we'll solve this problem by creating an administration link that only you (and other moderators) can see.
4.3 Step 3: Add Administration Links to the El Piju Space and Subspaces
Now add an administration link to the El Piju Space and its Subspaces (Services and Advice). Each administration link will serve as a gateway to its respective Space or Subspace so you can customize their look and feel and content, as well as control users' access.
To create administration links:
-
In the Edit - El Piju Navigation dialog, click the Design tab.
-
From the Add menu, choose Folder.
-
On the Target tab, in the Name field, type
Admin Links, then click OK. -
From the Add menu, choose Link.
This displays the Edit Navigation Item - Link dialog.
-
In the Name field, type
El Piju Admin, which will display the Settings tab set for El Piju. -
In the Path field, enter the URL in the following format:
http://<host name>:<port number>/webcenter/spaces/<name of the Space or Subspace>/admin
where:
-
<Host name>: Name or IP address of the server on which you created the El Piju Space. -
<Port number>: Port number of the server on which you created the El Piju Space. -
<Name of the Space or Subspace>: The pretty URL of the Space or Subspace you created in Building a Space. In this case, type
elpiju. -
admin: Pre-determined name of the page that displays the Settings tab set page for a Space.
-
-
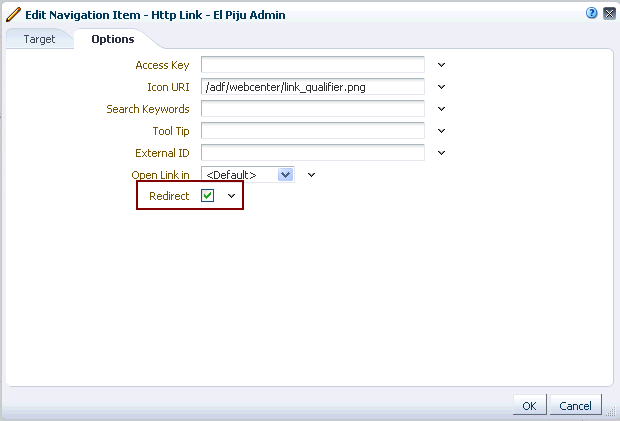
On the Options tab, select the Redirect checkbox, as shown in Figure 4-5, so that Settings tab set is shown in the content area of the page template, then click OK.
Figure 4-5 Edit Navigation Item - Redirect Option
Description of "Figure 4-5 Edit Navigation Item - Redirect Option"
-
Click the Preview tab to verify if the administration link was added successfully.
We also need a way to get back to the Services and Advice Subspaces, so let's first add an administration link for the Services Subspace.
-
On the Design tab, select El Piju Admin, then click Copy.
-
Select the copy of El Piju Admin, then click Edit.
-
On the Target tab, update Name (see step 5) and Path (see step 6) fields appropriately for the Services Admin link, then click OK.
-
Now create a copy of Services Admin and update the Name and Path fields for the Advice Admin link.
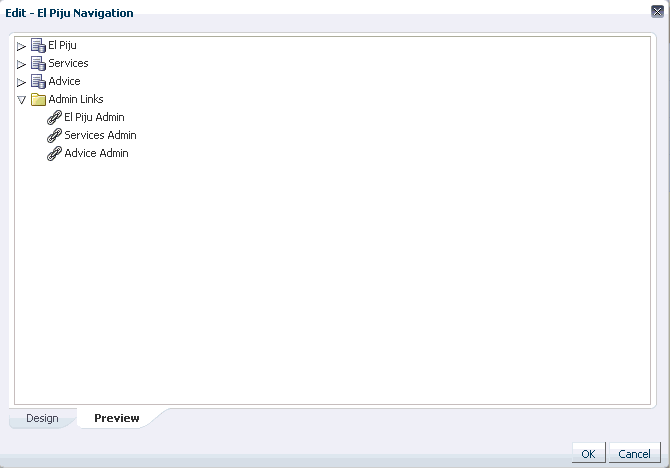
When you are finished, the Preview tab should look like Figure 4-6:
Figure 4-6 Administration Links for the El Piju Space
Description of "Figure 4-6 Administration Links for the El Piju Space"
Note:
The Admin links will be visible to all users, however, non-moderators won't be able to access the Settings page when they click these links. A page with the message "You do not have access." will display. -
Click OK to close the Edit - El Piju Navigation dialog.
-
On the Resource tab > Navigations, ensure that the newly created El Piju Navigation is selected, then choose Show from the Edit menu.
The new navigation model is now available to the El Piju Space. If you kept this resource hidden, it would not appear to other people who may have access to El Piju's resources. The Hide option allows you to keep resources from being exposed while they are still in development.
The El Piju Navigation is ready to be used in a page template, which you'll soon design and apply to El Piju pages.
4.4 Summary
You created a navigation model for the El Piju portal that reflects the pages in the El Piju, Services, and Advice. You also added administration links to the navigation so that you can continue to manage the El Piju Space, Services Subspace, and Advice Subspace for content, appearance, and users' accessibility.
