Oracle® On Track Communication
Add-In for Microsoft Office Outlook Help
Release 1 (1.0.5)
E20656-03
August 2011
Oracle On Track Add-In for Microsoft Office Outlook (On Track Add-In for Outlook) provides a subset of features available in Oracle On Track web client inside the familiar environment of Microsoft Office Outlook (Outlook).
| Getting Started | Top Questions |
|---|---|
Navigating Oracle On Track Add-In for Outlook
The following image map of the main components of Oracle On Track Add-In for Outlook will help you get familiar with the workspace. You can click any item to learn more about it.
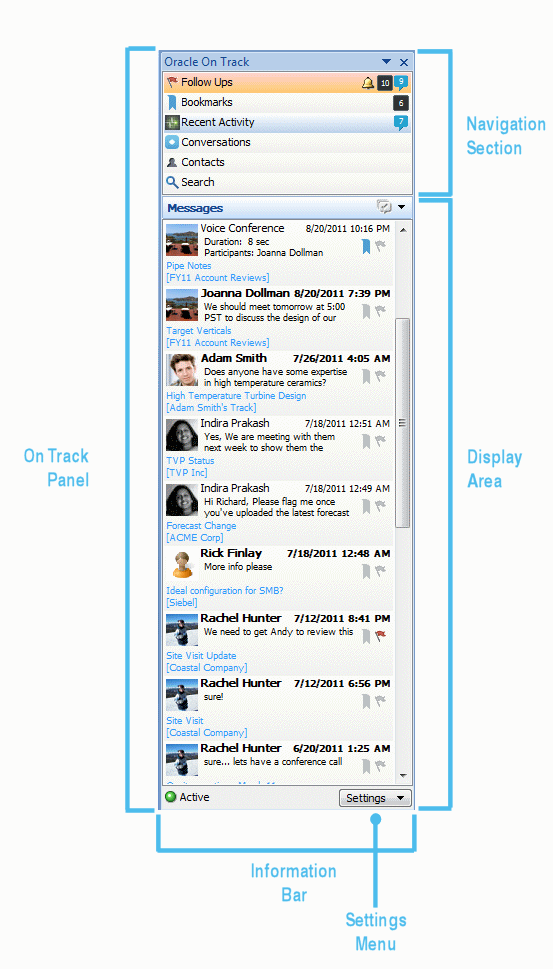
On Track Panel
Navigation Section: Select any of the options in the Navigation Section to appear in the Display Area: Follow-Ups, Bookmarks, Recent Activity, Conversations, Contacts, and Search.
On Track Display Area: The content displayed in this area corresponds to the option selected in the On Track Navigation Section.
Settings Menu: Use this menu to modify connection settings, change your user profile, manage your tabs, tracks, and conversations, open On Track web client, and access help.
Information Bar: Use this bar to see your connectivity status such as active, away, or offline.
On Track Tool Bar

Show Panel: Click this button to show or hide the Oracle On Track Panel. The Show Panel button is highlighted when the panel is visible.
Add to On Track: Use this button when you want to add an e-mail message from Outlook to On Track.
Conversations: Click this button to open the Browse Conversations dialog box and create or edit conversations, browse through available conversations, see the public conversations you may join or the closed conversations you are a member of.
Tracks: Click this button to open the Browse Tracks dialog box and browse through tracks, create, or edit tracks.
User Profile: Use this option to change your user information, and set your notifications and preferences.
Online Support: Click this button to open the On Track Add-In for Outlook online help guide.
About On Track: Click this button to open the About Oracle On Track Add-In for Outlook information box and to learn more about the current version and new updates.
Features and System Requirements
On Track Add-In for Outlook installs a comprehensive set of features to facilitate working with On Track directly from Outlook.
To learn more about system properties, constraints, and features, refer to the following sections:
-
What Features Are Not Included in On Track Add-In for Outlook?
-
What Operating Systems and Outlook Versions Does Oracle On Track Add-In for Outlook Support?
What Features Are Included in On Track Add-In for Outlook?
On Track Add-In for Outlook includes the following features:
Creating and Organizing Your Content:
Create, modify, and delete your conversations. Manage your conversations with tracks to easily identify them. To learn more about organizing your content using On Track Add-In for Outlook see section Creating and Organizing Content.
Sharing and Collaborating:
View, edit, or delete your messages or comments. Start a voice conference, record it, and play it back. Upload and download documents in your conversations. Bookmark messages to find them easily. Assign follow-ups to conversations, messages or other items to keep track of them. To learn more about sharing and collaborating using On Track Add-In for Outlook see section Sharing and Collaborating
Interacting with People:
Add, modify, and edit your contacts, groups and lists. To learn more about interacting with people using On Track Add-In for Outlook see section Interacting with People.
Modifying Your User Profile:
Customize your profile by modifying your name, phone numbers, time zone, locale, or other preferences and uploading your profile picture. To learn more about changing your settings using On Track Add-In for Outlook see section Modifying Your Settings.
Keyboard Shortcuts:
Use your keyboard to navigate through On Track Add-In for Outlook. To learn more about the available navigation shortcuts see section Keyboard Shortcuts.
What Features Are Not Included in On Track Add-In for Outlook?
The following features included in Oracle On Track Communication web client are not available in the On Track Add-In for Outlook:
-
Polls Gadget: Polls in On Track are an easy way to collect and visualize voting data from members in a conversation in the web client.
-
External Site Gadget: External Site Gadget enables you to share a website in a conversation in the web client. Members are able to browse through the selected website side-by-side with the conversation and to reference information from both sources at the same time without having to switch between windows.
-
Snapshot: You can use On Track to quickly take a screenshot of any of your running applications and share it in a conversation. To use the Add a Snapshot feature you require the Oracle On Track Real-Time Plug-In to be installed. This plug-in enables functionality for taking snapshots, and starting application sharing sessions in the web client.
-
Application Sharing: You can start an application sharing session to have other members of a conversation see your activity in that window in real-time to walk them through a presentation or show them a demo. Application sharing sessions are automatically recorded and stored in the conversation for easy playback and reference in the web client.
To access these features and experience the full power of On Track, use Oracle On Track Communication web client. To learn more about Oracle On Track Communication web client, refer to the following user guide: Oracle On Track Web Client Help.
To log in to On Track web client:
-
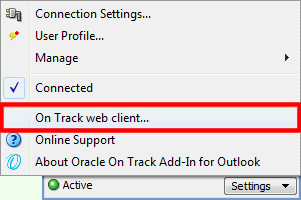
In the On Track Panel, click Settings to access the Settings Menu.
-
Select On Track web client.
-
On Track web client launches in your default browser.
What Operating Systems and Outlook Versions Does Oracle On Track Add-In for Outlook Support?
On Track Add-In for Outlook supports:
-
Operating systems: Microsoft® Windows® XP SP3, Microsoft® Windows® Vista, and Microsoft® Windows® 7.
-
Microsoft Outlook versions: Microsoft Office Outlook® 2007 and 2010.
Installation and Settings
On Track Add-in for Outlook needs to be downloaded and installed from the web client before you start using it. To learn more about Installation and Settings in On Track Add-In for Outlook refer to the following topics:
How Do I Download and Install On Track Add-In for Outlook?
To install or update Oracle On Track Add-In for Outlook:
-
Sign in to the On Track web client.
-
If the add-in is available, you see an On Track icon with a red dot in the Updates Area of the information bar. Click the icon with the red dot to see the available update.

-
Review the available update information, verify the update is the add-in for Outlook, and click the Update Available block to initiate the installation wizard.

-
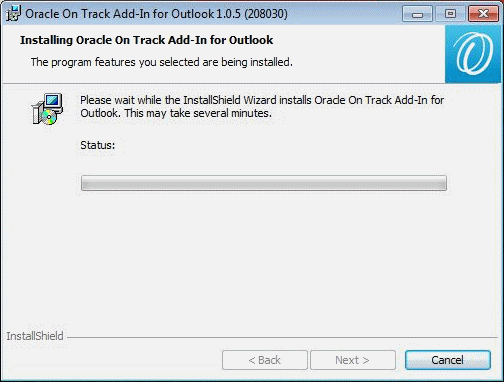
The installer is downloading. When the download finishes, run the installer to initiate the InstallShield wizard for On Track Add-In for Outlook. Click Next.

-
The InstallShield Wizard is ready for the installation. Click Install.

-
Please wait while the InstallShield Wizard installs On Track Add-In for Outlook. It may take several minutes.
-
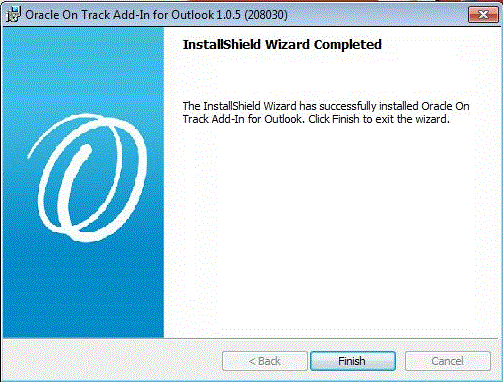
When the InstallShield Wizard completes the installation, click Finish.
-
Open your Outlook application.
-
Configure On Track Add-In for Outlook Connection Setting. To learn more about connection settings see section How Do I Configure My On Track Add-In Connection Settings?
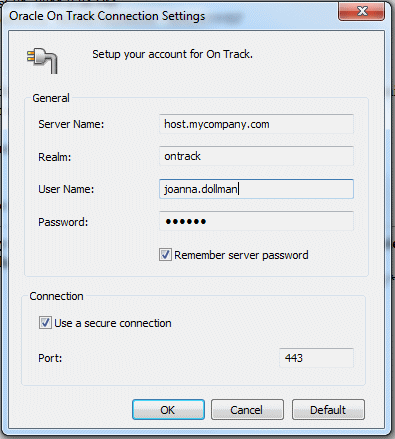
How Do I Configure My On Track Add-In Connection Settings?
After installing On Track Add-In for Outlook, start Outlook and enter your On Track account and password to log in the first time. The rest of the connection information is filled in for you. Connection information and log in credentials are saved for future access.
To see and modify your current connection settings you can:
-
In the On Track Panel, click Settings to access the Settings Menu.
-
Select Connection Settings from the menu. Connection settings display the following fields:
-
Server Name: Oracle On Track server name, for example, host.mycompany.com.
-
Realm: Oracle On Track application instance, for example, ontrack.
-
User Name: Oracle On Track user account.
-
Password: Oracle On Track user password
-
To learn more about modifying your settings see section Modifying Your Settings.
Creating and Organizing Content
On Track empowers you and other users to effectively communicate and collaborate by creating and sharing content within persistent public or private forums called Conversations. These individual Conversations can be grouped within Tracks. Tracks act like containers of related Conversations to facilitate organization and access to them.
You can collect bookmarks and flags of interesting and important items stored inside conversations. On Track stores and provides quick and organized views of such items for easy future reference and retrieval.
On Track is fully search enabled to facilitate finding and filtering content when you need it the most.
To learn more about ways of creating and organizing content in On Track refer to the following topics:
Tracks
Tracks let you organize your related conversations in groups or containers. When you create a new conversation and you do not specify in which track to include it, it is automatically created in your default track.
To learn more about working with Tracks to organize your content in On Track refer to the following topics:
How Do I Create a Track?
Create a new track to start grouping related conversations within it.
To create a track:
-
In the On Track Panel, click Settings to access the Settings Menu.
-
Select Manage.
-
Click Tracks. The Browse Tracks dialog box opens.
-
Click New.

-
Enter the name of your new track in the Name field.
-
Click OK to save.
-
Click OK to close the Browse Tracks dialog box.
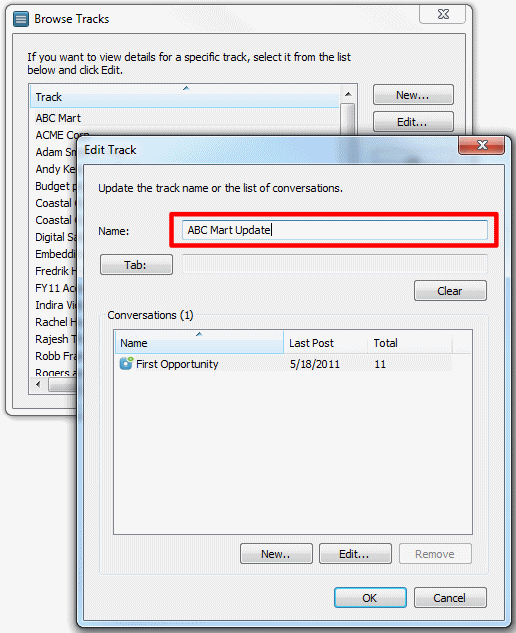
How Do I Change the Name of a Track?
You and other members of a conversation can change the name of a track at any given time.
To change the name of a track:
-
In the On Track Panel, click Settings to access the Settings Menu.
-
Select Manage.
-
Click Tracks. The Browse Tracks dialog box opens.
-
Select the desired track and click Edit.
-
Change the name in the Name field.
-
Click OK to close the Edit Track dialog box.
-
Click OK to close the Browse Tracks dialog box.
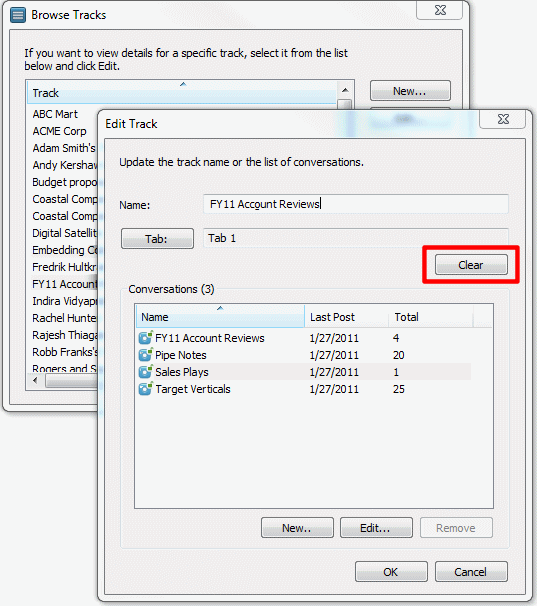
How Do I Remove a Track from a Tab?
Remove a track from a tab when you no longer want to monitor it closely or if you must make room for another track in that tab.
To remove a track from a tab:
-
In the On Track Panel, click Settings to access the Settings Menu.
-
Select Manage.
-
Click Tracks. The Browse Tracks dialog box opens.
-
Search the list and select the desired track.
-
Click Edit.
-
Click Clear.
-
Click OK to save.
The Clear button only removes the link between the specified track and tab. Both remain in the Oracle On Track system, but they are no longer associated.
How Do I Browse Available Tracks?
You can list tracks available to you and view details like the related conversations and the tab a track belongs to.
To view a list of tracks:
-
In the On Track Panel, click Settings to access the Settings Menu.
-
Select Manage.
-
Click Tracks. The Browse Tracks dialog box opens.
-
Optionally, select a track and click Edit to view details of that track.
-
Click OK to close the Edit Track dialog box.
-
Click OK to close the Browse Tracks dialog box.
How Do I View All Conversations Inside a Track?
Navigate to a track to see a list of all the conversations that are available to you inside of it.
To see a list of conversations inside a track:
-
In the On Track Panel, click Settings to access the Settings Menu.
-
Select Manage.
-
Click Tracks. The Browse Tracks dialog box opens.
-
Select the track you want to see the conversations.
-
Click Edit. The list of conversations appears.
-
Click OK to close the Browse Tracks dialog box.
-
Click OK to save.
How Do I Organize My Tracks?
Tracks can be organized in tabs to easily find, monitor, and access the ones you frequently need the most. A tab can contain a maximum of 9 tracks.
To add or move a track to a tab:
-
In the On Track Panel, click Settings to access the Settings Menu.
-
Select Manage.
-
Click Tracks. The Browse Tracks dialog box opens.
-
Select a track from the list.
-
Click Edit.
-
Click Tab.
-
Select a tab from the list or create a new tab.
-
Click OK to close the Browse Tracks dialog box.
-
Click OK to save.
Conversations
Conversations in On Track help you discuss topics and collaborate with the people you choose. You can post messages, upload files, and hold audio conferences. Features like polls publishing and external websites are not included. See section What Features Are Not Included in On Track Add-In for Outlook?. All activity in a conversation is recorded for future reference.
To learn more about Conversations refer to the following topics:
-
How Do I View a List of All the Public Conversations I Can Join?
-
How Do I View a List of All the Conversations I Am a Member Of?
-
How Do I View a List of the Closed Conversations I Am a Member Of?
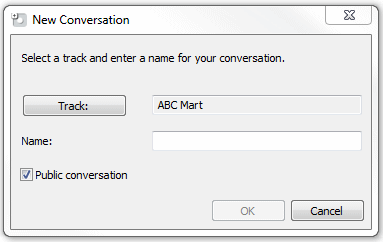
How Do I Create a Conversation?
Create a conversation to open a collaborative forum to share and store details about a certain topic. Conversations must belong to a track. A track is a container where you can group and organize related conversations. For more information, see section Tracks.
To create a new conversation:
-
In the On Track Panel, Click Conversations in the Navigation Section.
-
Click the New Conversation button in the options menu.

-
The New Conversation dialog box opens. Click Track from the New Conversation dialog box.
-
Click New to create a new track or select a track from the list.
-
Click OK to add the new conversation to the selected track.
-
Enter the new conversation name in the Name field.
-
Optionally, select Public Conversation to enable other On Track users that are not members of the Conversation, to see all the items in the conversation.
-
Click OK to save.
How Do I Change the Name of a Conversation?
You and other members of a conversation can change its name at any given time.
To change the name of a conversation:
-
In the On Track Panel, click Settings to access the Settings Menu.
-
Select Manage.
-
Click Conversations. The Browse Conversations dialog box opens.
-
Select the desired conversation and click Edit.
-
Change the name in the Name field.
-
Click OK to close the Edit Conversation dialog box.
-
Click OK to close the Browse Conversation dialog box.
How Do I Make a Conversation Public?
If you need your conversation to be publicly available for anyone in your organization to find and join, you must change its privacy and access settings.
To make your conversation public:
-
In the On Track Panel, click Settings to access the Settings Menu.
-
Select Manage.
-
Click Conversations. The Browse Conversations dialog box opens.

-
Select the desired conversation and click Edit.
-
Select the box for Public Conversation.

-
Click OK to close the Edit Conversation dialog box.
-
Click OK to close the Browse Conversation dialog box.
How Do I Make a Conversation Private?
If you must limit the visibility and access of a publicly available conversation you are a member of so only you and its members can continue to see, modify, and collaborate in it, change its privacy and access settings.
To make your conversation private:
-
In the On Track Panel, click Settings to access the Settings Menu.
-
Select Manage.
-
Click Conversations. The Browse Conversations dialog box opens.
-
Select the desired conversation and click Edit.
-
Unselect the box for Public Conversation.

-
Click OK to close the Edit Conversation dialog box.
-
Click OK to close the Browse Conversation dialog box.
How Do I Discard a Conversation?
A discarded conversation is no longer accessible. Before discarding a conversation you must remove all other members in the conversation.
To discard a conversation:
-
In the On Track Panel, click Conversations to access the Conversations List.
-
Select the conversation you want to discard.
-
Right click the desired conversation.
-
Select Discard Conversation.
How Do I Close a Conversation?
Close a conversation when you no longer want members to contribute content to it but you still want the conversation to be accessible to them or other new members who would like to reference stored material in it. You may re-open the conversation at a later time if new contributions must be made. Any user that is a member of a conversation can close a conversation.
To close a conversation:
-
In the On Track Panel, click Conversations to access the Conversations List.
-
Select the conversation you want to close.
-
Right click the conversation, and select Modify Conversation. Modify Conversation dialog box opens.
-
Uncheck the Opened conversation option.
-
Click OK.
How Do I Reopen a Conversation?
Reopen a closed conversation when you want to allow members to contribute content to a closed conversation again. Any current members of a closed conversation can re-open the conversation.
To reopen a conversation:
-
In the On Track Panel, click Conversations to access the Conversations List.
-
Select the conversation you want to reopen.
-
Right click the conversation, and select Modify Conversation. Modify Conversation dialog box opens.
-
Check the Opened conversation option.
-
Click OK.
How Do I Copy the URL of a Conversation to My Clipboard?
Copy a conversation URL to your clipboard to easily share a direct web address to it with people. When people navigate to the URL the conversation, they immediately view its content without having to spend time browsing for it.
To copy a conversation URL:
-
In the On Track Panel, locate the Navigation Section and click Conversations to access the Conversations list.
-
Select the desired conversation, and right click it.
-
Select Copy Conversation Link.

How Do I View a List of All the Public Conversations I Can Join?
Public conversations are open forums for any On Track user in your organization to see, join, and contribute to if interested.
To see a list of all the public conversations you can join:
-
In the On Track Panel, click Settings to access the Settings Menu.
-
Select Manage.
-
Click Conversations. The Browse Conversations dialog box opens.
-
Click Public Conversations tab.
-
Click OK to close the Browse Conversation dialog box.
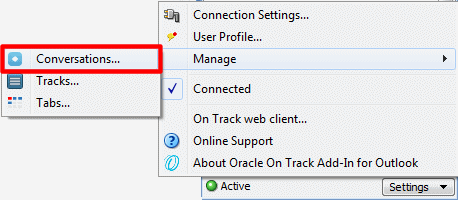
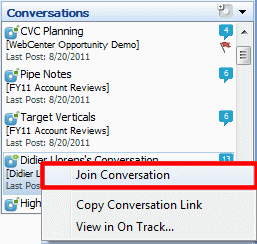
How Do I Join a Public Conversation?
Join a public conversation to be able to contribute content to it and make it easier to find it and keep track of it.
To join a public conversation:
-
In the On Track Panel, click Settings to access the Settings Menu.
-
Select Manage.
-
Click Conversations. The Browse Conversations dialog box opens.
-
Click Public Conversations tab.
-
Select the desired conversation and click Go to Conversation.
-
The conversation appears on your Conversations list.
-
Right click the conversation and select Join Conversation.
How Do I Remove Myself from a Conversation?
Remove yourself from a conversation if you do not need to collaborate in that forum anymore and would like to stop receiving updates about it in your digest.
To remove yourself from a conversation:
-
In the On Track Panel, click Settings to access the Settings Menu.
-
Select Manage.
-
Click Conversations. The Browse Conversations dialog box opens.
-
Select the desired conversation. Click Edit.
-
Go to Membership tab.
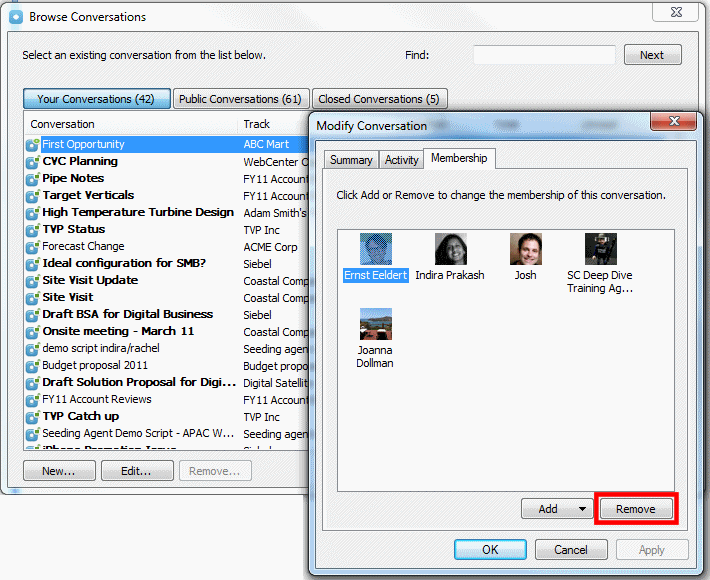
-
Select your name. Click Remove.
-
A confirmation message appears. Click Yes.
-
Click Apply on the Modify Conversation dialog box.
-
Click OK to save.
-
Click Close to exit the Browse Conversations dialog box.
Note:
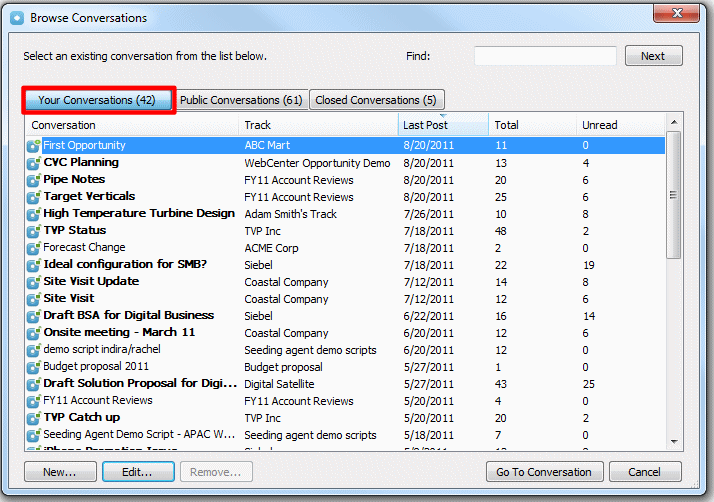
You cannot see the conversation in your list of available conversations anymore. If it is a Public Conversation you will be able to see it in the Public Conversations list.How Do I View a List of All the Conversations I Am a Member Of?
You can use this list to browse through the conversations you have joined or other people have added you to.
To view a list of all the conversations you are a member of:
-
In the On Track Panel, click Settings to access the Settings Menu.
-
Select Manage.
-
Click Conversations. The Browse Conversations dialog box opens.
-
Go to Your Conversations tab to see a list of all the conversations you are a member of.
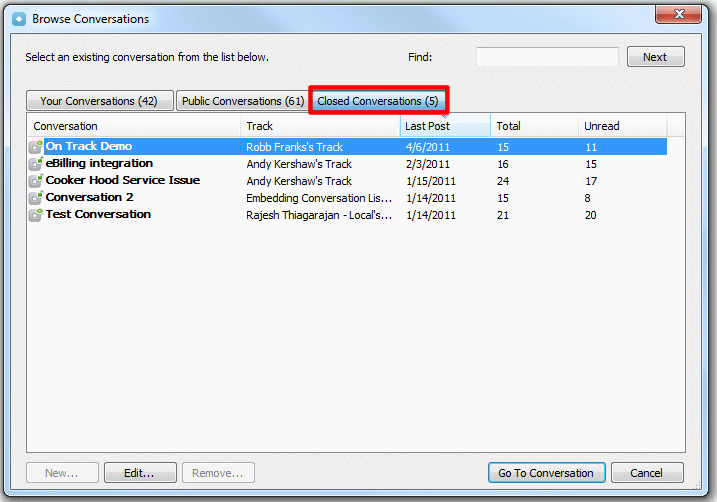
How Do I View a List of the Closed Conversations I Am a Member Of?
You can use this list to browse through the conversations you have joined or other people have added you to that have been closed.
To view a list of the closed conversations you are a member of:
-
In the On Track Panel, click Settings to access the Settings Menu.
-
Select Manage.
-
Click Conversations. The Browse Conversations dialog box opens.
-
Go to Closed Conversations tab to view the closed conversations.
How Do I View Conversations with Recent Activity?
Your Conversations list gives you quick and easy access to the conversations you are a member of that have been recently updated with new content.
To view your conversations list:
-
In the On Track Panel, locate the Navigation Section and click Conversations to access your Conversations list.
-
Browse your most recently active conversations.
How Do I Copy a Document to Another Conversation?
Copy an existing document or file from a source conversation to another conversation you have access to when you must share this document in both places and you do not want to upload the document again. The copied document evolves as an individual and independent file. Changes to the document in one conversation are not be reflected in the other conversation.
To copy an existing document to another conversation:
-
1. In the On Track Panel, locate the Navigation Section and click Conversations to access the Messages.
-
Select the conversation containing the desired document.
-
Right click the document.
-
Select Copy Document to Conversation from the menu.

-
Select the Conversation you want to add the document from the list.
-
Click Go to Conversation.
How Do I Add a Tag to a Conversation?
Tags are key words that describe the content of your conversation. Add tags to your conversations to make it easier for you and other users to find them when searching for certain topics.
To add a tag:
-
In the On Track Panel, locate the Navigation Section and click Conversations to access the Conversations list.
-
Select the desired conversation.
-
Right click the conversation.
-
Select Manage Tags from the menu.
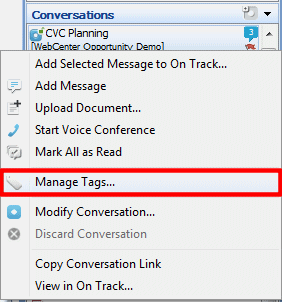
-
Click New.
-
Enter the name of the tag in the Tags field.
-
Click OK to save.
How Do I Delete a Tag from a Conversation?
Delete a tag from your conversation if that keyword no longer describes the content found in that forum and you no longer want the conversation to appear in search results related to that topic.
To delete a tag:
-
In the On Track Panel, locate the Navigation Section and click Conversations to access the Conversations list.
-
Select the desired conversation.
-
Right click the conversation.
-
Select Manage Tags from the menu.
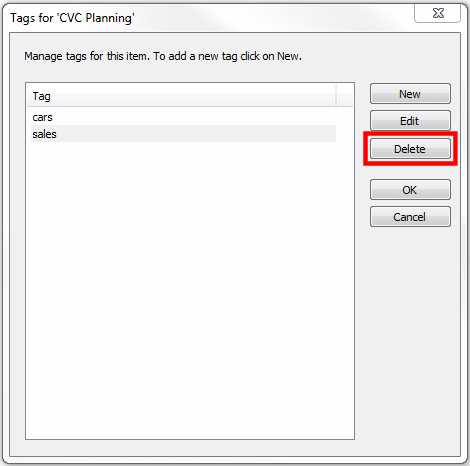
-
Select the tag you want to delete.
-
Click Delete.
-
Click OK to save.
Bookmarks
Create bookmarks to help you keep track of important items you must have readily available for reference. When you bookmark an item it gets added to your Bookmarks list.
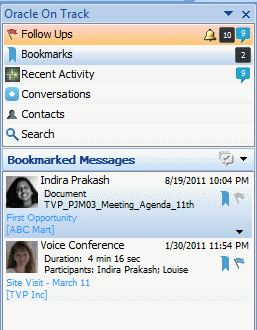
You can bookmark messages, files, application sharing sessions, voice conferences, polls, and other gadgets in a conversation.
To learn more about Bookmarks refer to the following topics:
How Do I Bookmark an Item?
Bookmark an item to add it to your Bookmarks List for quick access and future reference.
To set a bookmark to an item:
-
In the On Track Panel, locate the Navigation Section and click Conversations to access the Conversations list.
-
Select the conversation that includes the item to bookmark.
-
Select the desired item in the Messages list.
-
Right click the item and select Bookmark from the menu, or click the Bookmark icon in the message.

How Do I Clear a Bookmark for an Item?
Clear a bookmark when it is no longer a favorite or an item that you need available for reference. Clearing a bookmark removes it from your Bookmarks list.
To clear a bookmark:
-
In the On Track Panel, locate the Navigation Section and click Bookmarks to access the Bookmarked Messages list.
-
Select the desired message.
-
Click the Bookmark icon in the message.
How Do I View a List of My Bookmarks?
To quickly view and manage any of your stored bookmarks, access your Bookmarks list.
To view a list of your bookmarks:
-
In the On Track Panel, locate the Navigation Section and click Bookmarks to access the Bookmarked Messages list.
-
Browse through the Bookmarked messages list.
Follow-Ups
Assign a follow-up to remind you or other users to pay attention or act on a particular item. When you or another user assigns a follow up to you it gets added to your Follow-ups List.
You can mark for follow-up messages, files, application sharing sessions, voice conferences, polls, and other gadgets in a conversation.
To learn more about Follow-Ups refer to the following topics:
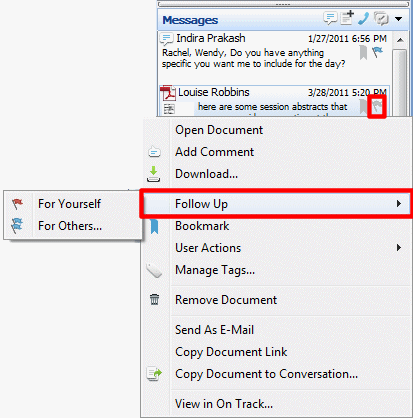
How Do I Assign Myself a Follow-Up?
Assign yourself a follow-up to add it to your Follow-Ups list for quick access and easy future reference when you are ready to act on it.
To assign yourself a follow-up:
-
In the On Track Panel, locate the Navigation Section and click Conversations to access the Conversations list.
-
Select a conversation.
-
In the Messages List, locate the message, comment, document, application sharing session, or voice conference you want to flag.
-
Click the flag icon corresponding to the desired item and select For Yourself. Alternatively, you can right click the item, navigate to option Follow Up, and then select For Yourself.
How Do I Clear My Follow-Ups?
Clear follow-ups assigned to you by yourself or other users when you have completed them and no longer want to see them in your follow-ups list.
To clear a follow-up that has been assigned to you:
-
In the On Track Panel, locate the Navigation Section and click Follow-Ups to access the Follow-Up list.
-
Select a message from the Follow-Up list.
-
Right click the message.
-
Select the Follow-Up icon and select For Yourself.
How Do I View a List of My Follow-Ups?
To quickly view and manage any of your assigned follow-ups, access your Follow-Up list.
To view a list of your follow-ups:
-
In the On Track Panel, locate the Navigation Section and click Follow-Ups to access the Follow-Up list.
-
Browse your follow-ups.
How Do I Assign a Follow-Up to a User?
Assign a follow-up to a user as a reminder to pay attention or act on a particular item. When you assign a follow-up to a user it is added to their Follow-Ups List and the user receives an e-mail notification if e-mail notifications have been configured accordingly.
To flag a follow-up for a user:
-
In the On Track Panel, locate the Navigation Section and click Conversations to access the Conversations list.
-
Select the desired conversation.
-
In the Messages list, locate the message, comment, document, application sharing session, or voice conference you want to flag.
-
Click the flag icon corresponding to the desired item and select For Others. Alternatively, you can right click the item, navigate to option Follow Up, and then select For Others.
How Do I Clear a Follow-Up for a User?
Clear a follow-up assigned to a user by you if you want to remove it from their follow-ups list either because it is no longer relevant to them or because you flagged them by mistake.
To clear a follow-up for a user:
-
1. In the On Track Panel, locate the Navigation Section and click Conversations to access the Conversations list.
-
Select the message you assigned the follow-up to.
-
Click the Follow-Up icon.

-
The Manage Follow-Ups dialog box opens.
-
Select the user you want to clear the follow-up.
-
Click Clear All.
-
Click OK.
How Do I Receive a Notification When a User Clears a Follow-Up I Assigned?
You can automatically receive a notification when a follow-up you assigned to a user is cleared to inform you that the flagged item has been taken care of.
To receive a notification when a user you flagged clears the follow-up:
-
Flag a Follow-Up for a user, see section How Do I Assign a Follow-Up to a User?
-
Select the checkbox at the bottom of the Manage Follow-ups dialog box.
-
Click OK.
Search
Search for content in On Track and specify where to look in. When your search results are displayed, you may also filter using more granular options to facilitate finding the items you need.
To learn more about Search refer to the following topics:
How Do I Search for Content in On Track?
You can search for messages, conversations, documents, tags, tracks, or users using the Search option in the Oracle On Track Panel.
To search for content in On Track Add-In for Outlook:
-
In the On Track Panel, locate the Navigation Section and click Search to access the Search field.
-
Enter keywords in the Search field.
-
By default, it searches in all On Track items. Optionally, choose a different filter. See section How Do I Use the Different Searck Filters Available in On Track?
-
Click the Search button. On Track Add-In for Outlook can return up to 20 search results.

How Do I Use the Different Searck Filters Available in On Track?
On Track filtering lets you determine where in the application you would like to look when searching for keywords.
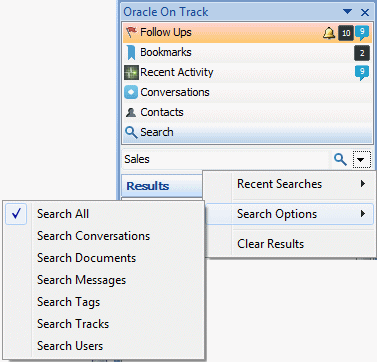
The following filtering options are available in On Track Add-In for Outlook:
In all: Searches for all kind of items in all the different containers available in On Track.
In Conversations: Limits your search results to include only conversations containing the keyword you entered in their name and its contents.
In Documents: Limits your search results to include only documents containing the keyword you entered in their name.
In Messages: Limits your search results to include only messages containing the keyword you entered in their body.
In Tags: Limits your search results to include tags, and their related items, containing the keyword you entered.
In Tracks: Limits your search results to include only Tracks containing the keyword you entered in their name.
In Users: Limits your search results to include only users containing the keyword you entered in their name.
How Do I View My Recent Searches?
You can look up search requests you recently made to easily find your desired On Track items.
To view your recent searches:
-
In the On Track Panel, locate the Navigation Section and click Search to access the Search field.
-
Click the Search button.
-
Select Recent Searches.
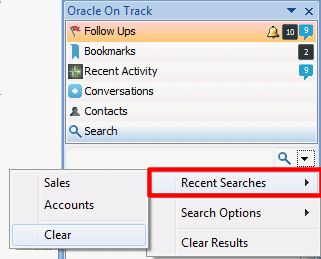
You can clear all your recent searches by clicking Clear in the search menu.
Sharing and Collaborating
You and other users can collaborate in On Track by creating and sharing content within conversations. Create and format messages and notes, upload files, and playback or start voice conferences.
Conversations in On Track are persistent forums, so everything you publish in them is stored for future reference.
To learn more about ways of Sharing and Collaborating in On Track refer to the following topics:
Messages
One of the quickest ways to contribute content to a conversation is posting messages. You can post simple text messages if you do not require extensive formatting options. If you require a fully functional text editor, then use the rich format text editor.
To learn more about working with Messages in On Track refer to the following topics:
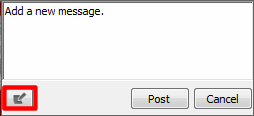
How Do I Post a Message in a Conversation?
Post a message in a conversation to share information with its members in a quick and straightforward manner akin to an e-mail or an instant message.
To post a message in a conversation:
-
In the On Track Panel, locate the Navigation Section and click Conversations to access the Conversations list.
-
Select the desired conversation to post a message.
-
Click Add a Message icon in the Messages list.
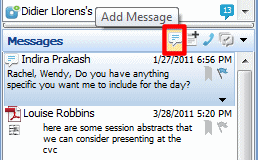
-
A text box appears. Post a message or click the Rich Text Editor icon to format your message.
How Do I Format a Message?
Quickly format a message to emphasize some of its content or to include links to external websites or items inside On Track to better convey an idea.
To format a message:
-
In the On Track Panel, locate the Navigation Section and click Conversations to access the Messages list.
-
Select the desired message.
-
Right click the message to access the Messages menu.
-
Click Edit Message.
-
Enter your edits in the Rich Text Editor.
-
Click OK
The following formatting options for messages are available:
Bold: Select the specific text you want to format and then click the Bold icon to highlight words in your message.
Italic: Select the specific text you want to format and then click the Italic icon to emphasize words in your message.
Underlined: Select the specific text you want to format and then click the Underline icon to stress words in your message.
Strikethrough: Select the specific text you want to format and then click the Strikethrough icon to make a horizontal line appear through the center of the selected text
Subscript: Select the specific text you want to format and then click the Subscript icon to make the selected text appear smaller than the normal text and slightly below it.
Superscript: Select the specific text you want to format and then click the Superscript icon to make the selected text appear smaller than the normal text and slightly above it.
Align Text Left: Select the specific text you want to format and then click the Justify Left icon to make each line of the selected text begin at the same distance from the left edge.
Center: Select the specific text you want to format and then click the Center icon to make each line of the selected text centered, leaving both margins ragged.
Align Text Right: Select the specific text you want to format and then click the Justify Right icon to make each line of the selected text begin at the same distance from the right edge leaving the left edge ragged.
Increase Indent: Select the specific text you want to format and then click the Indent icon to increase the space between the margin and the start of the selected text.
Decrease Indent: Select the specific text you want to format and then click the Decrease Indent icon to decrease the space between the margin and the start of the selected text.
Numbering: Select the specific lines of text you want to format and then click the Numbering icon to create a numbered list with the selected text.
Bullets: Select the specific lines of text you want to format and then click the Bullets icon to create a bulleted list with the selected text.
Horizontal Line: Click the Horizontal Line icon to insert a simple line that can act as a visual divider in your page.
Text Color: Select the specific text you want to format and then click the Text Color dropdown to change the color of the actual selected text.
Text Highlight Color: Select the specific text you want to format and then click the Text Highlight Color dropdown to change the color of the background of the selected text.
Insert Image: Click the Insert Image icon to include an image in your note. The image must be referenced from a website. Enter the URL of the image in the insert image dialog.
Hyperlink: Click to include an actionable link to an external website in your message. Insert the web address in the dialog that appears when you select this option and click OK. Users are able to click the link in your message and navigate to the website. The title of the link corresponds to the actual web address you entered. To change the title of a link, type the desired title and select it before clicking the link icon to insert a link.
Remove Hyperlink: Remove a link to no longer allow users to click it and automatically be taken to the specified web address. Select the active link when you are editing a message and click the Unlink icon. The link title remains in your message but it is no longer be clickable or active.
Reference: Click to see a list of all the items you can reference in your message, this includes conversations, tracks, and files that are accessible to you inside On Track. Select an item from the list and click Insert. A reference to the selected item is included in your message in the form of a link. The title of the link corresponds to the name of the item.
Font: Select the specific text you want to format and then click the Font dropdown to change the font face of the selected text.
Font Size: Select the specific text you want to format and then click the Size dropdown to change the font size of the selected text.
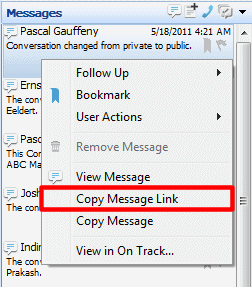
How Do I Copy the URL of a Message to My Clipboard?
Copy a message URL to your clipboard to easily share a direct web address to it with people. When people navigate to the URL the message, they immediately view its content without having to spend time browsing for it.
To copy a message URL:
-
In the On Track Panel, locate the Navigation Section and click Conversations to access the Conversations list.
-
Select the desired message, and right click it.
-
Select Copy Message Link.
How Do I Comment on an Item in a Conversation?
Comment on a message or any other kind of item in a conversation to reply to it or to share information related to that post. Commenting on items visually organizes and group related posts so it is easier to skim through conversations.

To comment on a message:
-
In the On Track Panel, locate the Navigation Section and click Conversations to access the Conversations list.
-
Select the conversation containing the message.
-
Select the desired message.
-
Right click the message to access the Messages menu.
-
Select Add comment.

-
Post a comment. Click the Rich Text Editor icon to format your message.
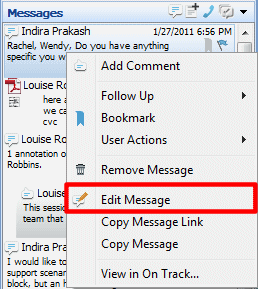
How Do I Edit a Message?
Edit a new message you have posted in a conversation, a comment in response to another message, or a description of an item you shared if you want to remove information that is not accurate, or you need to correct a mistake.
Only the author of a post may edit its content but other members of a conversation can view all revisions. An author can revise a post any number of times.
To edit a message:
-
In the On Track Panel, locate the Navigation Section and click Conversations to access the Conversations list.
-
Select the conversation containing the message.
-
Select the desired message.
-
Right click the message to access the Messages menu.
-
Click Edit Message.
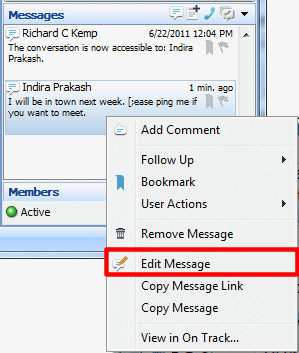
-
Enter your edits in the edit message field.
-
Click OK.
How Do I View a Message in a Conversation?
You can access three different available views for a message in On Track Add-In for Outlook.
-
The plaintext preview shown directly in the Messages list.
-
The plaintext view shown in the preview message box when you hover over a message in the Messages list.
-
The rich text version shown when you select View Message.
To view the rich text version of a message:
-
In the On Track Panel, locate the Navigation Section and click Conversations to access the Conversations list.
-
Select the conversation containing the message.
-
Select the desired message.
-
Right click the message to access the Messages menu.
-
Click View Message.

-
Click Close to close the View Message box.
Note:
Unread messages appear in bold in the Messages list.How Do I Remove a Message in a Conversation?
Remove a message or an item from a conversation when you no longer want its content to be visible to other members of a conversation. When you remove an item, a system message indicating the name of the user that removed the message is left in place of the original message.
To remove a message:
-
In the On Track Panel, locate the Navigation Section and click Conversations to access the Conversations list.
-
Select the conversation containing the message.
-
Select the desired message.
-
Right click the message to access the Messages menu.
-
Click Remove Message.
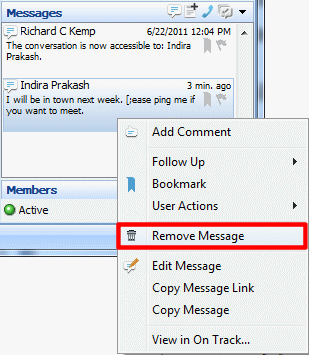
-
Confirmation message appears. Click Yes.
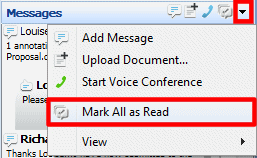
How Do I Mark All Messages in a Conversation As Read?
Mark all your messages as read when you no longer want them to be pending on your Messages list.
To mark all messages as read:
-
In the On Track Panel, locate the Navigation Section and click Conversations to access the Conversations list.
-
Select the conversation that includes the messages you want to mark as read.
-
Click the Options menu in the Messages list.
-
Select Mark All as Read from the menu.
Documents
Upload, view, download, and annotate all kind of files inside a conversation in On Track to facilitate file sharing and versioning.
The section consists of the following topics:
What Kind of Files Can I Share in On Track Add-In for Outlook?
On Track does not have restrictions on the type of files you may upload and share. This includes, but is not limited to, text documents, images, spreadsheets, and presentations
How Do I Upload a Document?
Upload a document or a file to a conversation to store, share, review, and easily manage versioning.
To upload a new document:
-
In the On Track Panel, locate the Navigation Section and click Conversations to access the Conversations list.
-
Select the conversation where you want to share the document.
-
In the Messages options click the Upload a Document button.
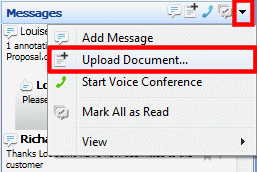
-
Select the document you want to share and click Open.
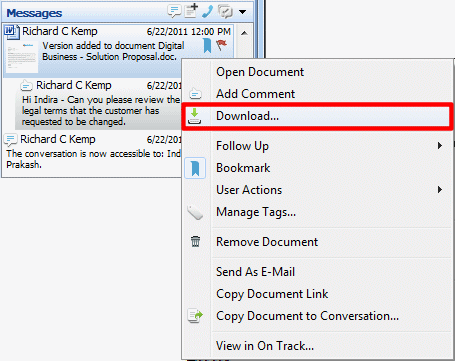
How Do I Open or Download a Document from a Conversation?
Open a document in place to quickly load the document content without launching its source application. You may open a file using a program in your computer or download a document from a conversation to save a copy of it in your computer.
To open or download a document:
-
In the On Track Panel, locate the Navigation Section and click Conversations to access the Conversations list.
-
Select the conversation that includes the document.
-
Select the document from the Messages list.
-
You can open or download the document.
-
To open the document: click the thumbnail of the document preview, or right click the thumbnail and select Open Document.
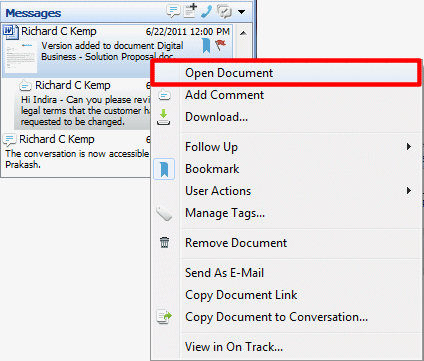
-
To download the document: right click the document and select Download from the menu.
-
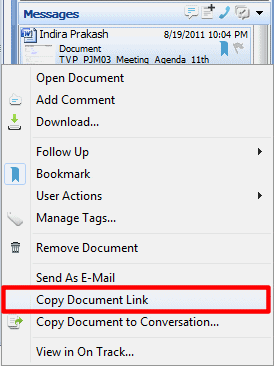
How Do I Copy the URL of a Document to My Clipboard?
Copy a document URL to your clipboard to easily share a direct web address to it with people. When people navigate to the URL the document, they immediately view its content without having to spend time browsing for it.
To copy a document URL:
-
In the On Track Panel, locate the Navigation Section and click Conversations to access the Conversations list.
-
Select the post including the document, and right click it.
-
Select Copy Document Link.
How Do I Add an E-mail to a Conversation?
On Track Add-In for Outlook enables you to add an e-mail from your messages list in Outlook to a conversation.
Before adding an e-mail to a conversation, you can edit the e-mail message, add or remove attachments, and add persons in the message to the conversation. You also have the option to post the e-mail to the conversation as a message, a Microsoft Word document, or an HTML document.
To copy an e-mail to a conversation:
-
In the On Track Panel, locate the Navigation Section and click Conversations to access the Conversations list.
-
Select the conversation you want to move your e-mail to.
-
Select the e-mail you want to move from tour Outlook's message list.
-
Click the Add to On Track button from the On Track Tool Bar.
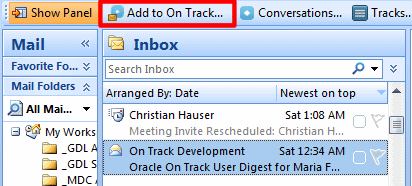
-
Select invitees to be included in the conversation. The Invitees section of the New On Track Item from dialog box is the list of persons in the To and CC fields of the email. If e-mail recipients are not members of the conversation yet, click the checkmark next to their names to add them as members, shown in the Not In Conversation list. Recipients who are current members of the conversation appear as selected in the In Conversation list and do not receive an invitation to join the conversation again.
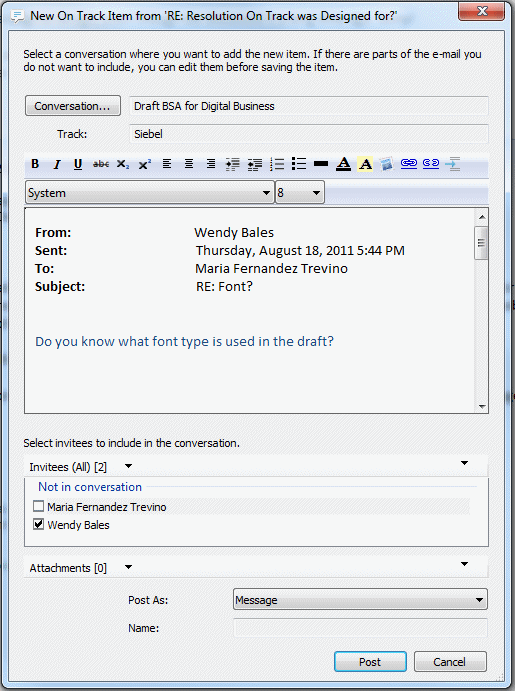
-
Optionally, add a new person to the Invitees section from your Outlook Contacts list by selecting the Invitees menu and then select Add Users, or select a user in the Not In Conversation list of the Invitees menu.
-
Add or remove attachments as required.
-
To attach a file, click the Attachments menu and select Add Document from the menu.
-
To remove a file, right click a document and select Remove Document from the menu.
-
-
Select how you want to post the message in the Post As menu, if it is a message, Word document or HTML document.
-
Click Post.
How Do I Send a Document in a Conversation as E-mail?
Send e-mail with documents that have been shared in your conversations using Outlook. Oracle On Track creates a new e-mail message with the document added as an attachment.
To send a document as e-mail:
-
In the On Track Panel, locate the Navigation Section and click Conversations to access the Conversations list.
-
Select the conversation containing the document.
-
Select the document from the Messages list.
-
Right click the document.
-
Select Send As E-Mail from the menu.
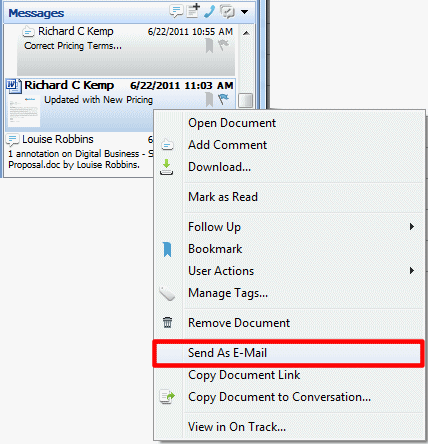
-
Fill in the recipient information and make any desired changes in the new e-mail message.
-
Click Send.
Voice Conferences
Start a voice conference and have other members of a conversation join the phone call. On Track is a call out system and requires you to enter the phone number you would like to be called at. Voice conferences are automatically recorded and stored in the conversation for easy playback and reference.
To learn more about working with voice conferences refer to the following topics:
Note:
Per Legal requirements, Voice Conferences and Application Sharing Sessions held using Oracle On Track Communication internal release 1.0.5 are not recorded.How Do I Start a Voice Conference in a Conversation?
Start a voice conference and discuss an issue collectively and in real-time with other members of a conversation while ensuring there is a record left for later reference by members who missed the call.
To start a voice conference:
-
In the On Track Panel, locate the Navigation Section and click Conversations to access the Conversations list.
-
Select the desired conversation to start a voice conference in.
-
Click the Voice Conference button in the Messages options.

-
Select a phone number you have set in your user profile or enter a new phone number.
-
Click Dial. Answer the call in your phone and listen to the welcome message.
After the welcome message finishes playing, the voice conference begins recording immediately and a yellow Voice Conference post appears in the conversation. Members of the conversation are able to join the voice conference by clicking on the yellow Voice Conference post.
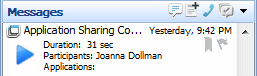
How Do I Disconnect a Voice Conference I Have Joined?
Disconnect from a voice conference you have joined when you are done participating in it and want to hang up.
To disconnect from a voice conference you have joined:
-
Hang up your phone or click the Voice Conference post drop down arrow to access its menu, and select Hang Up option.
After all members disconnect, the voice conference post reflects information about the duration of the call and the members who participated in it.
How Do I Join an Ongoing Voice Conference in a Conversation?
Join an ongoing voice conference initiated by another member of a conversation to participate collectively in the phone call with other participants.
To join an ongoing voice conference:
-
In the On Track Panel, locate the Navigation Section and click Conversations to access the Conversations list.
-
If there is a voice conference available for you to join, a voice conference message appears.
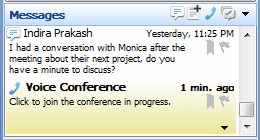
-
Click the message to join the voice conference in progress.
-
Select or enter your phone number. Click Dial.
-
The voice conference starts.
How Do I Playback a Voice Conference in a Conversation?
Playback a past voice conference stored in a conversation if you were not able to join the call live or to review the issues discussed at your convenience.
To playback a voice conference:
-
In the On Track Panel, locate the Navigation Section and click Conversations to access the Conversations list.
-
Select the conversation containing the voice conference.
-
Select the voice conference from the Messages list.
-
Click the Play button in the voice conference post.
Interacting with People
Interact with individual users or add them to your contacts to facilitate frequent collaboration. Create groups and lists to reach out to many people at once. To learn more about interacting with people refer to the following topics:
Users
You may interact with users even if you have not added them to your Contacts. Add users to your Contacts to facilitate frequent interaction with them.
To learn about the ways you can interact with contacts and users, refer to the following topics:
How Do I Find and Add a New Contact?
Add users to your Contacts List to be able to quickly start conversations with them, access their profile in fewer clicks, and readily see if they are currently active in a shared conversation or offline. Adding users to your Contacts List is immediate and does not require approval from them. Because users are not notified of your request to add them to your Contacts List, you do not automatically appear in their Contacts List unless they explicitly add you.
To add a contact:
-
In the On Track Panel, locate the Navigation Section and click Contacts to access the Contacts list.
-
Select Contacts in the Contacts list.
-
Click the Add Contact button.
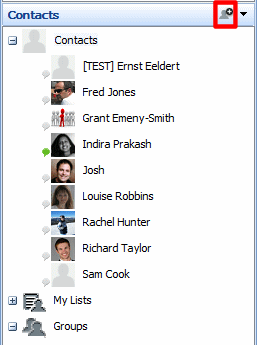
-
Enter the name of an On Track user in the Find field.
-
Double click the name of the user from the Results section.
-
Click OK.
How Do I Start a Conversation with a Contact?
You can quickly start a private conversation with a contact or a user to discuss a side issue or collaborate in that forum.
To start a conversation with a contact:
-
In the On Track Panel, locate the Navigation Section and click Contacts to access the Contacts list.
-
Select the contact you want to start a conversation with.
-
Right click and select Start Conversation.

-
Click OK.
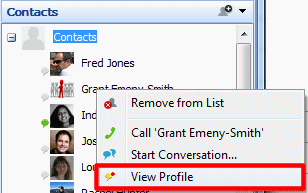
How Do I View a Contact or User Profile?
View a contact or a user profile to access information they have shared about them including their profile picture, email address, language, time zone, and description.
To view a contact user profile:
-
In the On Track Panel, locate the Navigation Section and click Contacts to access the Contacts list.
-
Select the desired contact.
-
Right click and select View Profile.
How Do I Call a Contact?
Call a contact to start a phone call using On Track and record it in the conversation. Other members in the conversation are able to see you are in a voice conference with the selected user but is not able to join you. As On Track is a call out system, you are prompted for the phone number you would like to be called at and the phone number to reach the other user. The On Track system calls you and then the other user to connect you both. To call a contact, the user you want to call must have the phone number set in On Track.
To call a contact:
-
In the On Track Panel, locate the Navigation Section and click Contacts to access the Contacts list.
-
Right click any of your contacts listed in the Contacts list.
-
Select Call.
-
On Track requests to start a new conversation. Optionally, modify the name, track or privacy information of the new conversation.
-
Click OK to create the new conversation.
-
Select a phone number or enter a new phone number.
-
Click Dial. The Oracle On Track system calls you.
-
After you are connected, select the phone number of the contact you want to call.
-
Click Dial. The Oracle On Track system calls the other user. When both of you are connected, the dialog box closes.
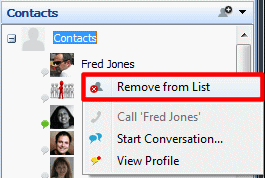
How Do I Remove a Contact from My List?
Remove users from your Contacts List if you no longer need to have quick access to their status and interaction options. You can still interact with users that have been removed from your Contacts List.
Removing contacts from your Contacts List is immediate and private. Affected users are not notified of your removal. Removing a user from your Contacts List do not automatically remove you or block you from theirs.
To remove a contact:
-
In the On Track Panel, locate the Navigation Section and click Contacts to access the Contacts list.
-
Expand Contacts in the Contacts list to see all your contacts.
-
Right click the desired contact.
-
Select Remove from List.
How Do I Buzz a User ?
Buzz a conversation member to call the attention of a user and indicate you would like their participation in a particular conversation. When you buzz a user a flashing orange notification appears in the user's Follow-Up List. The user also receives a buzz notification e-mail with easy access to the related conversation if e-mail notifications have been configured accordingly.
To buzz a user:
-
In the On Track Panel, locate the Navigation Section select one of the following options: Follow Ups, Bookmarks, Recent Activity, or Conversations.
-
Right click a message posted by the user you want to buzz in the Messages list.
-
Select User Actions.
-
Select Buzz.

How Do I Start a Conversation with a User?
You can quickly start a private conversation with a contact or a user to discuss a side issue or collaborate in that forum.
To start a conversation with a contact or a user:
-
If you have added the user to your Contacts list, in the On Track Panel, locate the Navigation Section, click Contacts to access your Contacts list, and right click the contact name to access the menu.
-
If the user is not in your Contacts list.
-
Select the user in any item such as message, follow-up, conversation, or bookmark.
-
Click the Members list.
-
Select the desired message and right click to open the Member menu.
-
-
Select Start a conversation. A private conversation between you and the selected user is created inside your own private track.
How Do I Add Members to a Conversation?
Add users to a conversation to give them access to that forum. Users that have been added to a conversation become members and are able to collaborate with you in that forum as well as add other users to it. To learn more about managing your conversations see section "Conversations".
To add members to a conversation:
-
In the On Track Panel, locate the Navigation Section and click Conversations to access the Conversations list.
-
Select the desired conversation.
-
Click the Options menu in the Members list.
-
Select Add to Membership. You can add members from:
-
Find in On Track, if the person is an On Track user.
-
Enter the name of the person in the Find field.
-
Double click the name of the person in the Results list.
-
Click OK to close the Select Members dialog box.
-
Click OK to add.
-
-
From Outlook Address book, if the person is part of your Outlook Contact list.
-
Double click the name of the person in the results list.
-
Click OK to close the Select Names dialog box.
-
Click OK to add.
-
-
How Do I Remove Members from a Conversation?
Remove members from a conversation to no longer have them collaborate in that forum or receive updates about it in their daily e-mail digest. To learn more about managing your conversations see section Conversations.
To remove members from a conversation:
-
In the On Track Panel, locate the Navigation Section and click Settings.
-
Select Manage.
-
Click Conversations. The Browse Conversations dialog box opens.
-
Select the desired conversation. Click Edit.
-
Go to Membership tab.
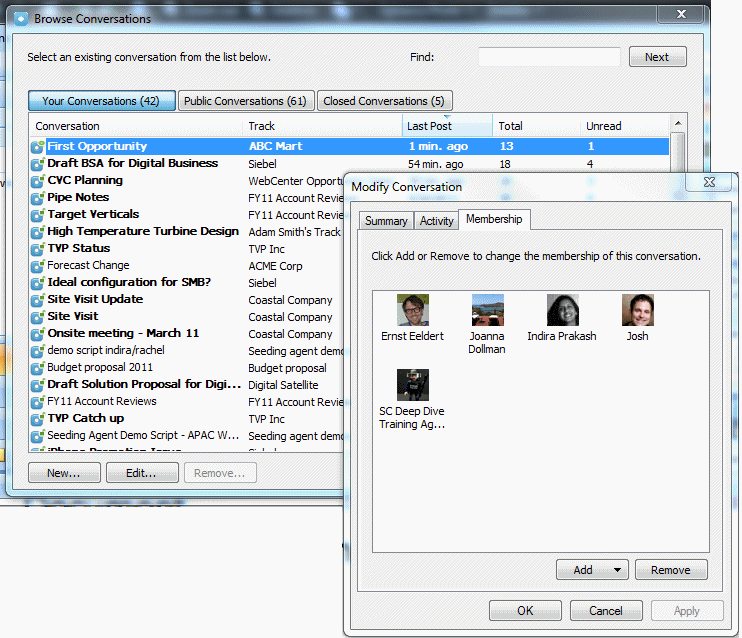
-
Select the user you want to remove. Click Remove.
-
A confirmation message appears. Click Yes.
-
Click Apply on the Modify Conversation dialog box.
-
Click OK to save.
-
Click Close to exit the Browse Conversations dialog box.
Groups
You can easily manage multiple people by creating Groups or Lists and adding them or removing them from conversations in a few clicks. The difference between Groups and Lists is that Groups are shared, public, and dynamic while Lists are private and static.
All members of a group are able to see the group in their Groups panel. When you or others add or remove a user from a group, the selected user gains or loses access to all the conversations the group belongs to.
When you create a list, you are the only user who can see it in your My Lists panel. If you remove members from your list they still have access to previous conversations you added the list to. If you add new members to your list, they do not have access to previous conversations you added the list to.
To learn more about working with groups refer to the following topics:
How Do I Create a Group?
Create a new group to easily manage multiple users at the same time and create conversations among them or share documents with them in fewer clicks.
To create a new group:
-
In the On Track Panel, locate the Navigation Section and click Contacts to access the Contacts list.
-
Select Groups in the Contacts list.
-
Click the Add Group button.

-
Enter the name of the Group in the Name field. Click Add to add group members. You can add members by selecting one of the following options:
-
Add users..: Allows you to find any On Track user, including your lists and groups. You can enter the name of an On Track user, group, or list in the Find field. Double click any user's name in the results section, and click OK.
-
My Lists..: Allows you to find any of your lists. You can select any of your lists from the list and click OK.
-
My Groups..: Allows you to find any of your Groups. You can select any of your Groups from the list and click OK.
-
From Memberships..: Allows you to find an On Track user in any of your available conversations. You can expand any of your conversations, select any user's name listed for that conversation, and click OK.
-
-
Click OK to save.
If there is an existing group with the name you entered, even if you are not a member and cannot see the group, a message box informing you the group name is already in use appears. Click OK to go back to the Create Group dialog and modify your group name. If there are no duplicate groups found, the new group you created appears in your Group panel. Because groups are public, all members of a group are able to see it listed in their Group panel and interact with the group.
How Do I Edit a Group?
Edit a group to add or remove members or change its name. Removing members from a group removes the selected users from all the conversations the group has previously been added to. Those users no longer see the group listed in their Groups panel.
Adding new members to a group automatically adds them to conversations the group was added to in the past.
To edit a group:
-
In the On Track Panel, locate the Navigation Section and click Contacts to access the Contacts list.
-
Expand Groups in the Contacts list to see all your groups.
-
Right click a group from your list.
-
Click Modify Group.
-
If you want to add members to the group, click Add. You can add members by selecting one of the following options:
-
Add users..: Allows you to find any On Track user, including your Lists and Groups. You can enter the name of an On Track user, Group, or List in the Find field. Double click any user's name in the Results section and click OK.
-
My Lists..: Allows you to find any of your Lists. You can select any of your Lists from the list and click OK.
-
My Groups..: Allows you to find any of your Groups. You can select any of your Groups from the list and click OK.
-
From Memberships..: Allows you to find an On Track user in any of your available Conversations. You can expand any of your Conversations, select any user's name listed for that Conversation, and click OK.
-
-
If you want to remove a member, select the user's name from the Membership section and click Remove.
-
Click OK to save.
How Do I Delete a Group?
Delete a group when you need to remove all members of a group from all the conversations the group was originally added to.
To delete a group:
-
In the On Track Panel, locate the Navigation Section and click Contacts to access the Contacts list.
-
Expand Groups in the Contacts list to see all your groups.
-
Right click a group from the list.
-
Select Delete Group.
-
Click Yes to remove.
Lists
You can easily manage multiple people by creating Groups or Lists and adding them or removing them from conversations in a few clicks. The difference between Groups and Lists is that Groups are shared, public, and dynamic while Lists are private and static. All members of a group are able to see the group in their Groups panel. When you or others add or remove a user from a group, the selected user gains or loses access to the conversations the group belongs to. When you create a list, you are the only user who can see it in your My Lists panel. If you remove members from your list they still have access to previous conversations you added the list to. If you add new members to your list, they do not have access to previous conversations you added the list to.
To learn more about working with lists refer to the following topics:
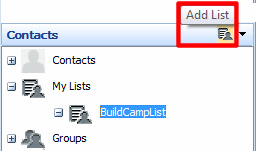
How Do I Create a List?
Create a new list to easily manage multiple users at the same time and create conversations among them or share documents with them in fewer clicks.
To create a new list:
-
In the On Track Panel, locate the Navigation Section and click Contacts to access the Contacts list.
-
Select My Lists in the Contacts list.
-
Click the Add List button and select Add List.
-
Enter the name of the List in the Name field.
-
Click Add to add List members. You can add members by selecting one of the following options:
-
Add users..: Allows you to find any On Track user, including your Lists and Groups. Enter the name of the On Track user, Group, or List in the Find field. Double click any user's name in the Results section, and click OK.
-
My Groups..: Allows you to find any of your Groups. You can select any of your Groups from the list and click OK.
-
From Memberships..: Allows you to find an On Track user in any of your available Conversations. You can expand any of your Conversations, select any user's name listed for that conversation, and click OK.
-
-
Click OK to save.
How Do I Edit a List?
Edit a list to add or remove members or change its name. Removing members from the list do not removes them from conversations the list has previously been added to. Likewise, adding new members to a list does not automatically add them to conversations the list was added to in the past.
To edit a list:
-
In the On Track Panel, locate the Navigation Section and click Contacts to access the Contacts list.
-
Expand My Lists in the Contacts list to see all your lists.
-
Right click one of your lists.
-
Select Modify List.
-
If you want to add a member to a list, click Add. You can add members by selecting one of the following options:
-
Add users..: Allows you to find any On Track user, including your Lists and Groups. Enter the name of the On Track user, Group, or List in the Find field. Double click any user's name in the Results section and click OK.
-
My Groups..: Allows you to find any of your Groups. You can select any of your Groups from the list and click OK.
-
From Memberships..: Allows you to find an On Track user in any of your available Conversations. You can expand any of your Conversations select the user's names from the conversation, and click OK.
-
-
If you want to remove members of a list, select the user's names in the Membership List and click Remove.
-
Click OK to save.
How Do I Delete a List?
Delete a list when you no longer need to interact with that set of people on a regular basis.
To remove a list:
-
In the On Track Panel, locate the Navigation Section and click Contacts to access the Contacts list.
-
Expand My Lists in the Contacts list to see all your lists.
-
Right click a list.
-
Select Delete List.
-
Click Yes to remove.
Modifying Your Settings
You can modify settings in On Track to change the information you display in your profile, the way you submit messages in conversations, and which notifications you want to receive in your e-mail. You may also change the default page you see when On Track starts.
To modify these settings refer to the following topics in this section:
How Do I Make Changes to My User Profile?
Change your profile to modify and update your name, job title, profile image, time zone, and language.
To edit your user information:
-
In the On Track Panel, click Settings.
-
Select User Profile.
-
Select the General tab.
-
Optionally, add an image to your user profile.
-
Click the Update button to select an image file from your desktop folders.
-
Click Open to set the file as your user profile image.
-
-
Modify any of the listed fields.
-
Click OK to save.
How Do I Add or Edit My Phone Numbers?
Add your phone numbers to quickly initiate voice conferences without having to enter your dialing information and to ensure users who call you can reach you at the right number. You must make at least one phone number in file public to enable users to call you using On Track. Users do not have access to your phone numbers, they only see the corresponding label describing the number they are calling: work, mobile, home.
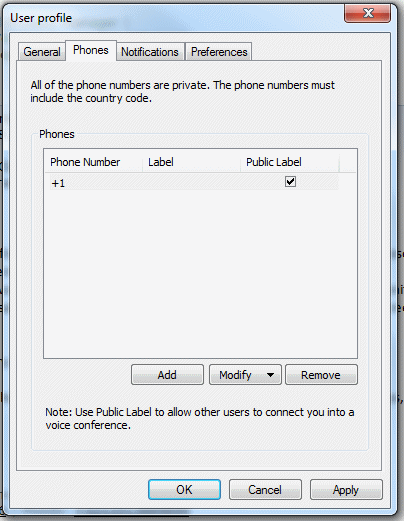
To add a phone number:
-
In the On Track Panel, click Settings.
-
Select User Profile.
-
Select the Phones tab.
-
Click Add.
-
Enter the phone number in the Phone Number field.
-
Add a label to the phone number.
-
Click Modify.
-
Click Label from the list.
-
Enter the name of the label in the Label field.
-
-
Click the public checkbox next to the selected phone number to make the number publicly available for other users to call you using On track. Users do not see the phone number, only its label.
-
Click OK to save.
How Do I Set My E-mail Notifications?
You can configure your profile to receive e-mail notifications when you are buzzed, added to a conversation, or assigned a follow-up. Additionally you can also receive an e-mail digest notification at the end of the day.
To set your user profile notifications:
-
In the On Track Panel, click Settings.
-
Select User Profile.
-
Select the Notifications tab.
-
Choose how you prefer to receive your e-mail notifications.
-
Click OK to save.
How Do I Set My Preferences to Mark Messages as Read Automatically?
Messages in your Messages list showing the user name of the author and the date it was posted in bold, indicate they have not been read. You may select from two options to automatically mark a message as read.
Mark messages as read when viewed from the tooltip: If you selected this option the preview box remains open for a certain period, the message is marked as read.
Mark messages as read when selection changes: If you select this option, your messages are marked as read after selecting and unselecting them.
To select a preference to mark messages as read:
-
In the On Track Panel, click Settings.
-
Select User Profile.
-
Select the Preferences tab.

-
Select your preferred option.
-
Click OK to save.
Keyboard Shortcuts
Use your keyboard to navigate through On Track Add-In for Outlook. To learn more about available navigation shortcuts refer to the following topics:
Basic Navigation
To navigate in On Track Add-In for Outlook press the following keyboard keys:
| To do this | Press |
|---|---|
| Switch to Oracle On Track Panel | Ctrl+Alt+Shift+O |
| Move between top section, the Conversations list, Messages list, and the Members list | Tab (use Shift + Tab to go back to the previous pane) |
| Move around within the panel | Up or Down Arrow Keys |
| Show/Hide On Track Panel | Ctrl+Alt+Shift+T |
Conversations and Messages
To navigate On Track Add-In for Outlook Conversations and Messages press the following keyboard keys:
| To do this | Press |
|---|---|
| View/Edit a Message | Select a message and press ENTER (opens the dialog to view/edit message) |
| View/Edit a Conversation | Select a conversation and press ENTER (opens the dialog view/modify Conversation) |
| Actions menu for Message | Select the message and use the Space key to activate the menu on a message |
| Browse Conversations Dialog (Sort Conversation list) | Select Conversation and use either Space or Shift + F10. From the Sort Menu use the Up/Down Arrow keys to sort the list of conversations. |
| When viewing/Edit a message and want to get out of the HTML Viewer section | Ctrl + Tab |
Glossary
buzz
A buzz is an immediate online notification to gain the attention of a member to a certain conversation.
contact
An On Track user that has been added to the your contact list.
conversation
A conversation is a discussion by the members on a particular topic. Conversations include messages, comments, documents, document versions, document annotations, voice conferencing and application sharing. Conversations have a set of members who may contribute to the content of a conversation. Conversations can be public or private. Public conversations can be viewed by any users of the system, but only members can contribute content.
digest
A digest is a compilation of all the follow-ups, new conversations and new messages occurring in the last day, which have not been read by the user. The digest is e-mailed to the user.
follow-up
A follow up is used to check if you have any messages that have been flagged for you to review.
group
A group is a set of users that can be added to a conversation as a single entity. Groups are dynamic and shared. When the group is added to a conversation, all of the members of the group, as well as the group name, are shown in the share bar of the conversation. If the group is modified, such as members added or removed from the group, all conversations in which the group is a member are updated accordingly.
item
Any element in the On Track Add-In for Outlook that is used for collaboration or communication such as: messages, conversations, follow-ups, bookmarks, tags or contacts.
list
Lists are static. When you add the list to a conversation, all of the members of the list are shown as individuals. There is no indication that these members were added through a list. If a list is modified, such as members added or removed from the list, then all conversations the list was added to are not be affected.
message
A message is part of the conversation that is sent by a participant.
public conversation
A public conversation can be accesses by all the members of the team.
track
A track is a container for a set of related conversations on similar topics.
tag
A tag is created by a user for conversations, documents, voice conferences and application sharing to enable easy access and search of content. All tags are public and, therefore, viewable and usable by all users of the system.
user
Any person that is on the On Track system logged in with an account, even if is not added to your contact list.
Documentation Accessibility
For information about Oracle's commitment to accessibility, visit the Oracle Accessibility Program website at http://www.oracle.com/pls/topic/lookup?ctx=acc&id=docacc.
Oracle customers have access to electronic support through My Oracle Support. For information, visit http://www.oracle.com/pls/topic/lookup?ctx=acc&id=info or visit http://www.oracle.com/pls/topic/lookup?ctx=acc&id=trs if you are hearing impaired.
Oracle On Track Add-In for Microsoft Office Outlook Help, Release 1 (1.0.5)
E20656-03
Copyright © 2011, Oracle and/or its affiliates. All rights reserved.
This software and related documentation are provided under a license agreement containing restrictions on use and disclosure and are protected by intellectual property laws. Except as expressly permitted in your license agreement or allowed by law, you may not use, copy, reproduce, translate, broadcast, modify, license, transmit, distribute, exhibit, perform, publish, or display any part, in any form, or by any means. Reverse engineering, disassembly, or decompilation of this software, unless required by law for interoperability, is prohibited.
The information contained herein is subject to change without notice and is not warranted to be error-free. If you find any errors, please report them to us in writing.
If this is software or related documentation that is delivered to the U.S. Government or anyone licensing it on behalf of the U.S. Government, the following notice is applicable:
U.S. GOVERNMENT RIGHTS Programs, software, databases, and related documentation and technical data delivered to U.S. Government customers are "commercial computer software" or "commercial technical data" pursuant to the applicable Federal Acquisition Regulation and agency-specific supplemental regulations. As such, the use, duplication, disclosure, modification, and adaptation shall be subject to the restrictions and license terms set forth in the applicable Government contract, and, to the extent applicable by the terms of the Government contract, the additional rights set forth in FAR 52.227-19, Commercial Computer Software License (December 2007). Oracle America, Inc., 500 Oracle Parkway, Redwood City, CA 94065.
This software or hardware is developed for general use in a variety of information management applications. It is not developed or intended for use in any inherently dangerous applications, including applications that may create a risk of personal injury. If you use this software or hardware in dangerous applications, then you shall be responsible to take all appropriate fail-safe, backup, redundancy, and other measures to ensure its safe use. Oracle Corporation and its affiliates disclaim any liability for any damages caused by use of this software or hardware in dangerous applications.
Oracle and Java are registered trademarks of Oracle and/or its affiliates. Other names may be trademarks of their respective owners.
Intel and Intel Xeon are trademarks or registered trademarks of Intel Corporation. All SPARC trademarks are used under license and are trademarks or registered trademarks of SPARC International, Inc. AMD, Opteron, the AMD logo, and the AMD Opteron logo are trademarks or registered trademarks of Advanced Micro Devices. UNIX is a registered trademark of The Open Group.
This software or hardware and documentation may provide access to or information on content, products, and services from third parties. Oracle Corporation and its affiliates are not responsible for and expressly disclaim all warranties of any kind with respect to third-party content, products, and services. Oracle Corporation and its affiliates will not be responsible for any loss, costs, or damages incurred due to your access to or use of third-party content, products, or services.