3 Working with Access Control
This chapter focuses on access control of TimesTen targets in Oracle Enterprise Manager Cloud Control.
Topics include:
Overview of access control
The Oracle Enterprise Manager uses privileges that are assigned to roles to manage targets and their operations. Targets can be grouped into groups. A TimesTen Enterprise Manager administrator can assign roles and groups to users to determine how and what they can manipulate in a TimesTen target.
Note:
The default super administrator of Enterprise Manager,SYSMAN, can view and control all TimesTen targets without having to belong to a group or be assigned a role.Creating a group
You must create these groups:
-
A group that contains the host or hosts that contains your TimesTen targets.
-
A group that contains the TimesTen targets that this group can view and control. You can combine TimesTen instances and databases into a single group or create multiple groups.
-
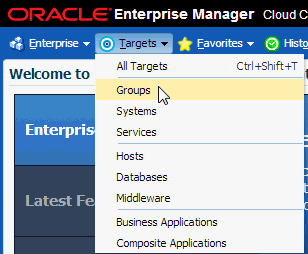
From the Targets menu, select Groups.
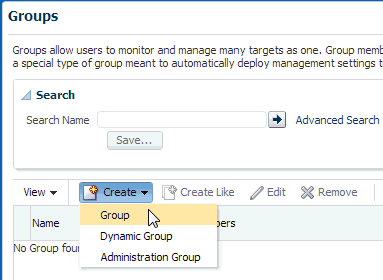
The Groups page displays. Locate the Create button above the group table.
-
Expand Create and select Group.
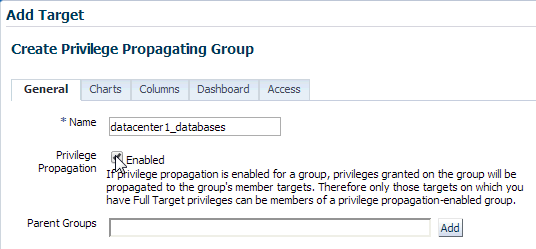
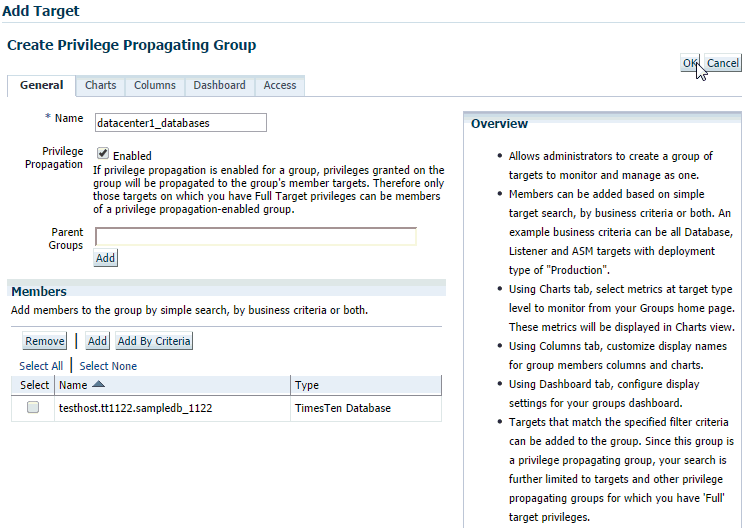
The Add Target Create Group page displays. Prepare to enter the properties for your group. The first property is the group name.
In the *Name text field, you define the group name. Choose a name that is a meaningful identifier. (For example,
datacenter1_hostsordatacenter1_databases.) -
Click in the check box to the right of Privilege Propagation. This setting allows group users to have access to new targets that are added to this group at a later date.
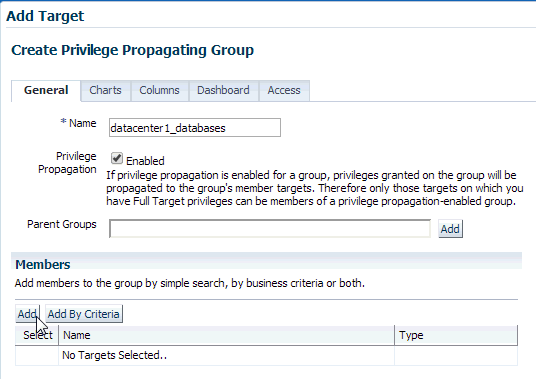
You are now ready to add member targets to your group. You can combine any type of Enterprise Manager target in your group, including TimesTen instance and TimesTen database targets. However, ensure that you create separate groups for hosts and TimesTen targets. For more information on adding TimesTen targets, see "Configure a TimesTen target".
Locate the Add button in the Members region.
-
Click Add.
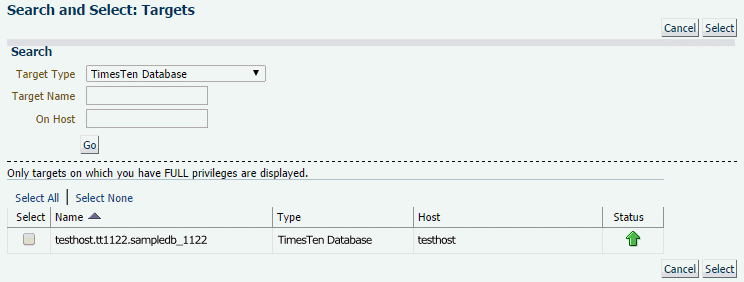
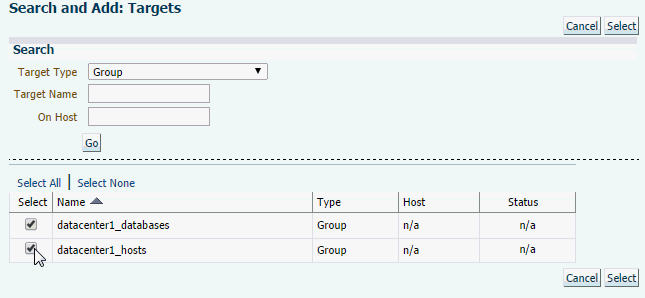
The Search and Select: Targets page displays. Locate the Target Type drop-down list in the Search region.
-
Expand the drop-down list labeled Target Type and select Host, TimesTen Instance, or TimesTen Database.
Note:
Ensure that you separate hosts and TimesTen targets into different groups.The page refreshes with the results of your search. In the Name column, locate the row that contains the target name that you want to add to the group. Confirm the status is a green up arrow.
-
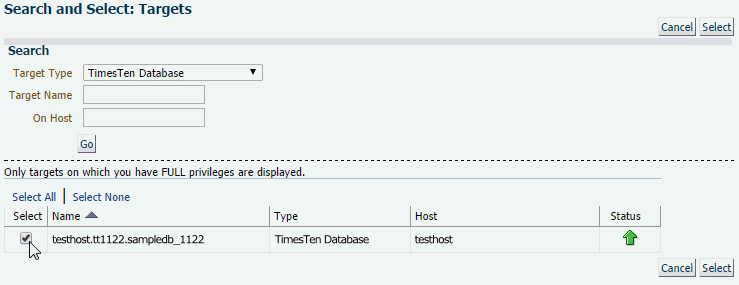
Select the check box of the row that identifies the Name of the row containing the target. If you want to add multiple targets, select the corresponding check box of any additional targets.
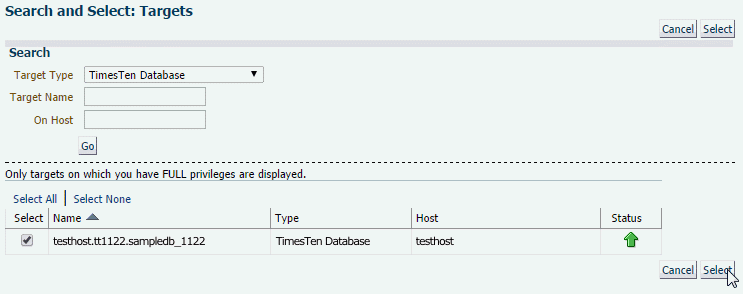
Locate the Select button.
-
Click Select.
The Search and Select: Targets page closes and the Add Target Create Privilege Propagating Group page refreshes. You should now see your selected target in the Members table. Locate the OK button in the top right corner of the page.
-
Click OK.
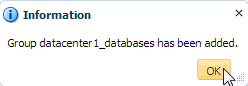
The Information Dialog displays. You should see the informational message "Group
group_namehas been added." Locate the OK button. -
Click OK.
The Information dialog closes. You successfully created an Enterprise Manager group.
Your Enterprise Manager group is created. Repeat steps 1-9 to create additional groups. If you have one host group and at least one TimesTen target group, you can define Enterprise Manager roles.
Defining roles
Create a role that contains the privileges that you want to assign to Enterprise Manager users.
Ensure that you have at least one host group and one TimesTen target group. For more information on the steps to create an Enterprise Manager group, see "Creating a group".
-
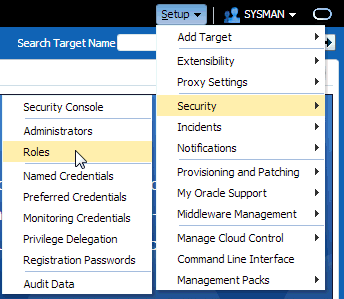
From the Setup menu, select Security, then select Roles.
The Security Roles page displays. Locate the Create button above the Roles table.
-
Click Create.
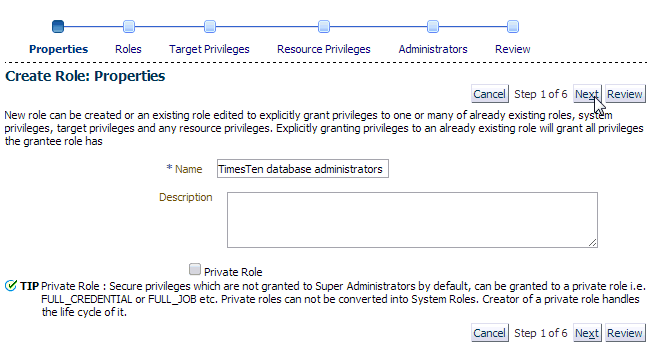
The Create Role: Properties page displays. You are now ready to enter the Enterprise Manager role properties. The first property is the role name.
In the *Name text field, you define the role name. Choose a name that is a meaningful identifier. (For example,
TimesTen database administrators.) -
In the *Name text field, type the Enterprise Manager role name.
Locate the Next button in the upper right corner of the page.
-
Click Next.
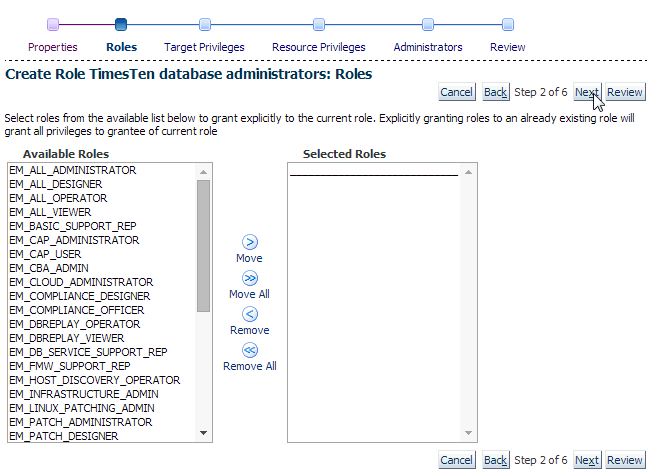
The Create Role
role_name: Roles page displays. Locate the Next button in the upper right corner of the page. -
Click Next.
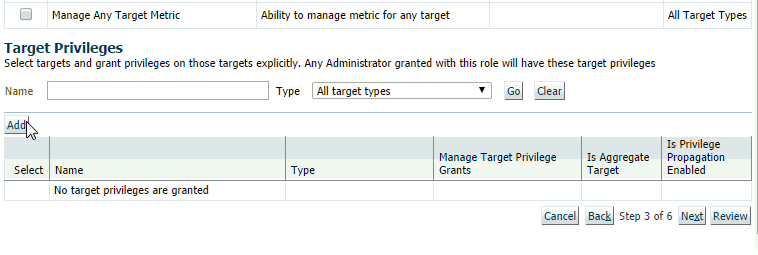
The Create Role
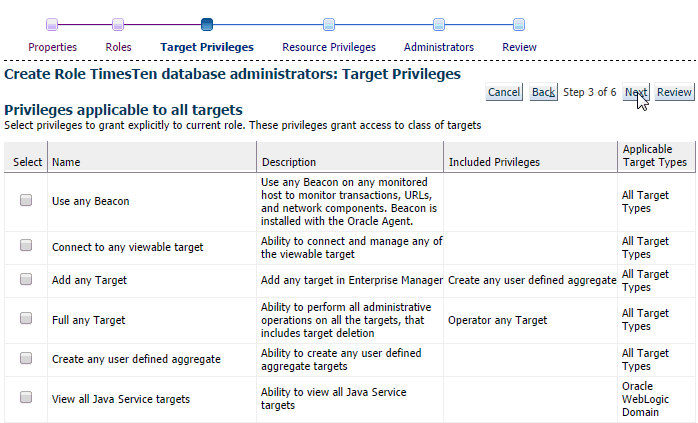
role_name: Target Privileges page displays. Locate the Target Privileges region at the bottom of the page. -
Click the Add button from the Target Privileges region.
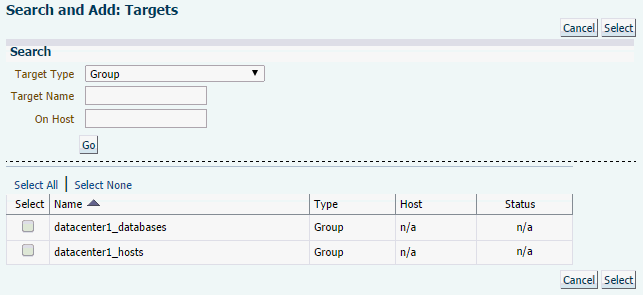
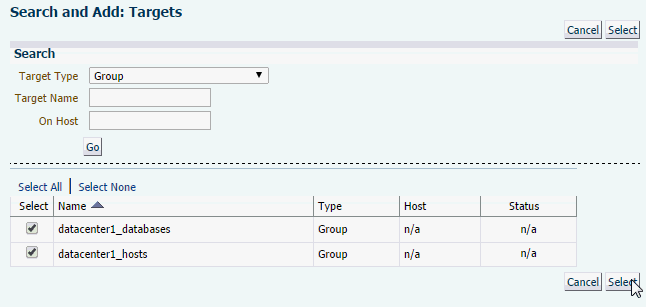
The Search and Add: Targets page displays. Locate the Target Type drop-down list in the Search region.
-
Expand the drop-down list labeled Target Type and select Group.
The page refreshes with the results of your search. In the Name column, locate the row that contains the group names that you want to add to the role. You should have at least one TimesTen target group and its respective host group.
-
Select the check boxes of the rows that identify the Name of the rows containing the groups. Ensure to select a TimesTen target group and its respective host group.
Locate the Select button.
-
Click Select.
The Search and Add: Targets page closes and the Create Role
role_name: Target Privileges page refreshes. You should now see your selected groups in the Target Privileges table. In the Target Privileges table, locate the row that contains your TimesTen target group. In the TimesTen target group row, locate the pencil button in the Manage Target Privilege Grants column. -
In the TimesTen target group row, click the pencil button in the Manage Target Privilege Grants column.
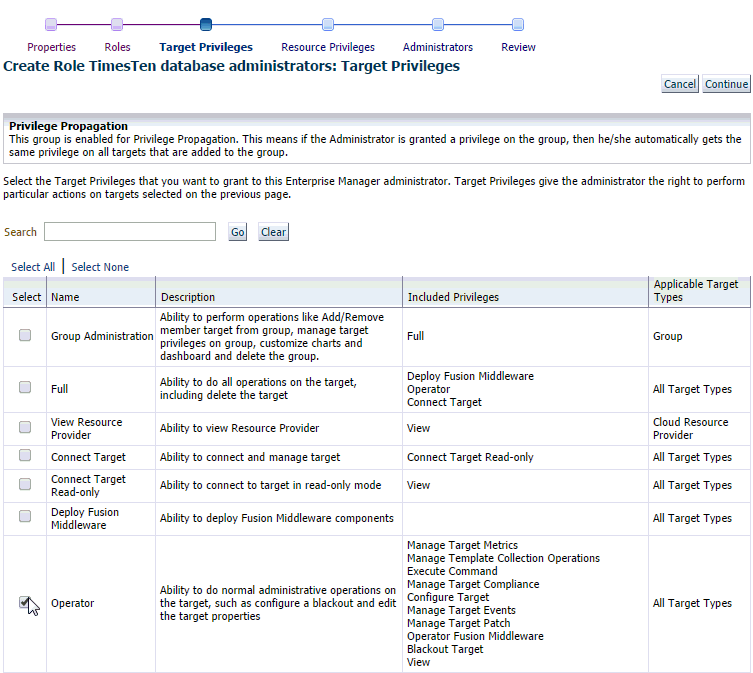
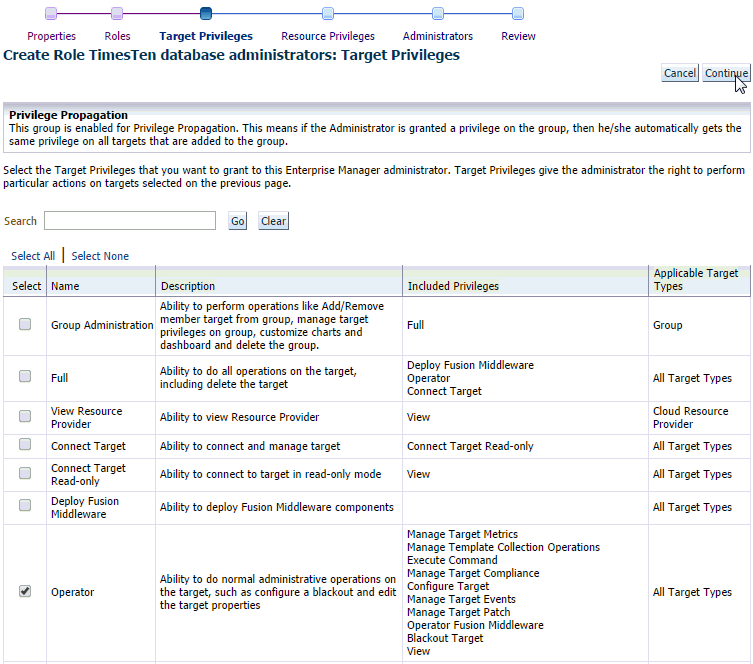
Figure 3-18 Manage target privilege grants
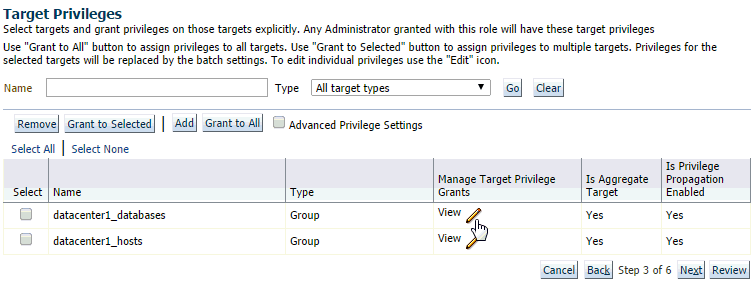
Description of "Figure 3-18 Manage target privilege grants"
The Create Role
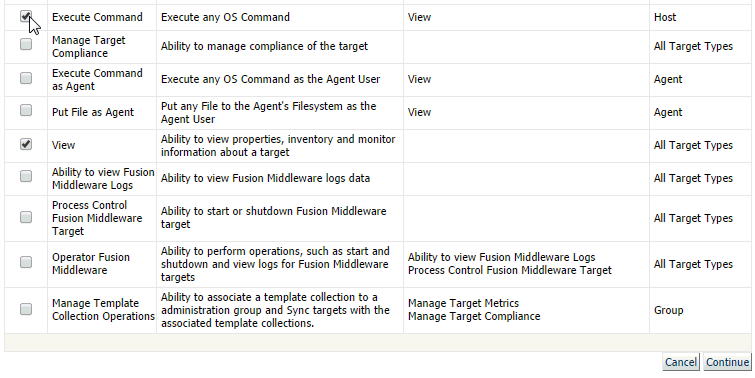
role_name: Target Privileges page refreshes. Locate the Target Privileges table.The Target Privileges table contains all of the available Enterprise Manager privileges that you can assign to a group. Enterprise Manager Cloud Control has a variety of privileges, but only two privileges are important for TimesTen operations:
-
View
This privilege is needed to view TimesTen targets.
-
Operator
This privilege is needed for TimesTen target control operations. The operator privilege includes the view privilege.
Identify the Name of the privilege(s) that you want to assign to this role.
-
-
Select the check box of the row that identifies the Name of the privilege that you want to assign to this group. If you want to add multiple privileges, select the corresponding check box of any additional privilege.
Locate the Continue button in the upper right corner of the page.
-
Click Continue.
The Create Role
role_name: EM Resource Privileges page displays. In the Target Privileges table, locate the row that contains your host group. In the TimesTen target group row, locate the pencil button in the Manage Target Privilege Grants column. -
In the host group row, click the pencil button in the Manage Target Privilege Grants column.
Figure 3-21 Manage target privilege grants
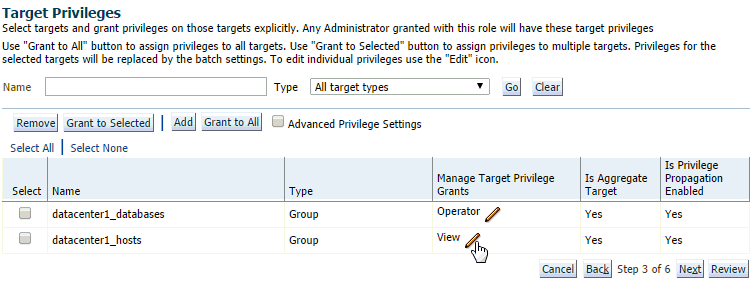
Description of "Figure 3-21 Manage target privilege grants"
The Create Role
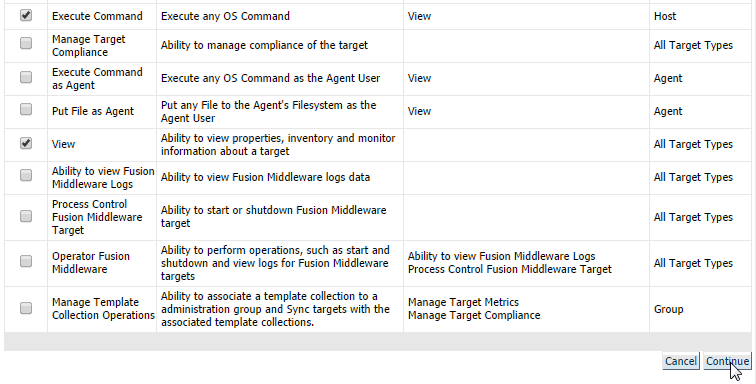
role_name: Target Privileges page refreshes. Locate the Target Privileges table.The Target Privileges table contains all of the available Enterprise Manager privileges that you can assign to a group. Enterprise Manager Cloud Control has a variety of privileges, but only two privileges are important for host operations:
-
View
This privilege is needed to view Enterprise Manager host.
-
Execute Command
This privilege is needed for TimesTen targets to execute operating system commands on a host. The Execute Command privilege is required to control the TimesTen agents, TimesTen database, and TimesTen server, and load and unload the TimesTen database from memory.
Identify the Name of the privilege(s) that you want to assign to this role.
-
-
Select the check box of the row that identifies the Name of the privilege that you want to assign to this group. If you want to add multiple privileges, select the corresponding check box of any additional privilege.
Locate the Continue button in the bottom right corner of the page.
-
Click Continue.
The Create Role
role_name: Target Privileges page displays. Locate the Next button in the upper right corner of the page. -
Click Next.
The Create Role
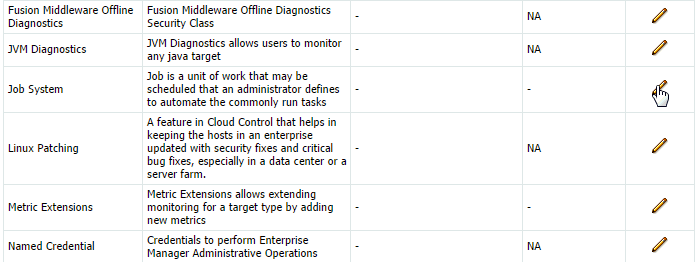
role_name: EM Resource Privileges page displays. Locate the resource type list. -
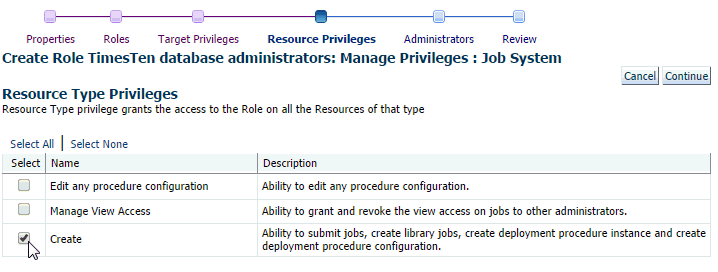
In the resource type list, locate the row that contains Job System as identified by the Resource Type Column. Click the pencil button in the Manage Privilege Grants column.
The Create Role
role_name: Manage Privileges: Job System page displays. Locate the Resource Type Privileges table. -
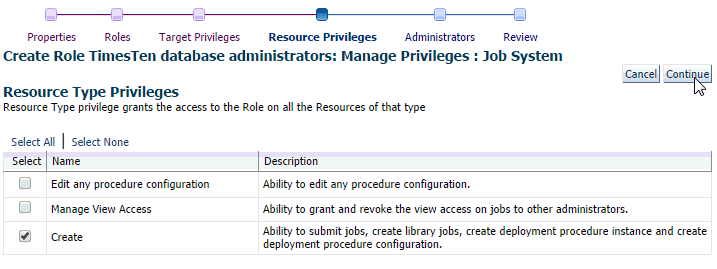
Select the check box of the row that identifies the Create privilege.
Locate the Continue button in the upper right corner of the page.
-
Click Continue.
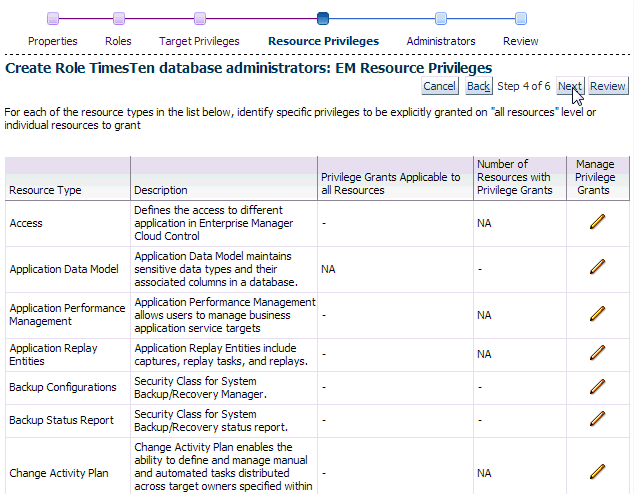
The Create Role
role_name: EM Resource Privileges page displays. Locate the Next button in the upper right corner of the page. -
Click Next.
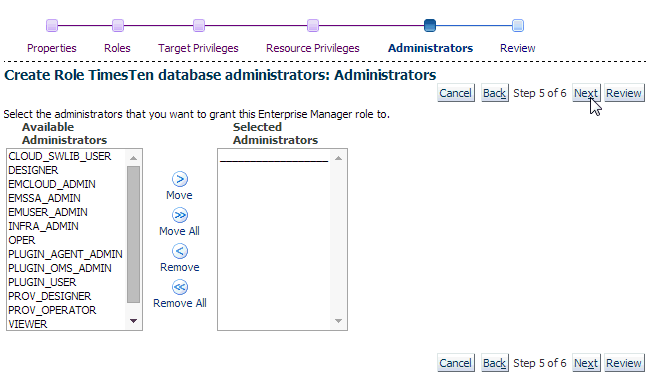
The Create Role
role_name: Administrators page displays. Locate the Next button in the upper right corner of the page. -
Click Next.
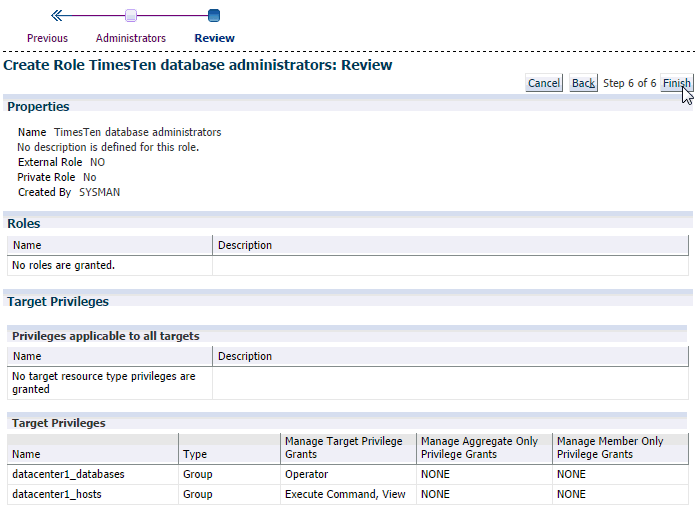
The Create Role
role_name: Review page displays. In the Properties region, verify the role name is correct. Also, verify that the correct privileges are in the Privileges applicable to all targets table. Locate the Finish button in the upper right corner of the page. -
Click Finish.
The Security Roles page displays with a confirmation message that indicates that you successfully created the Enterprise Manager role.

You are now ready to create an Enterprise Manager user.
Creating users
Create a user that can control and view your TimesTen targets.
-
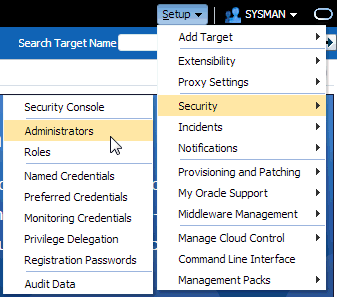
From the Setup, select Security, then select Administrators.
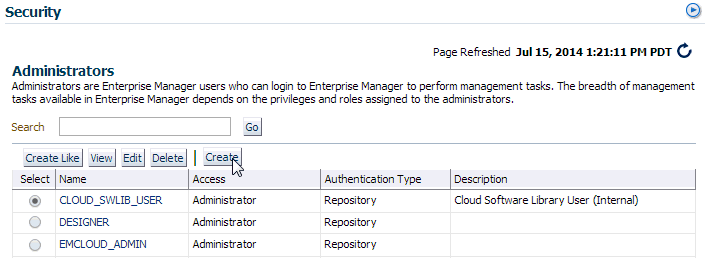
The Security Administrators page displays. Locate the Create button above the group table.
-
Click Create.
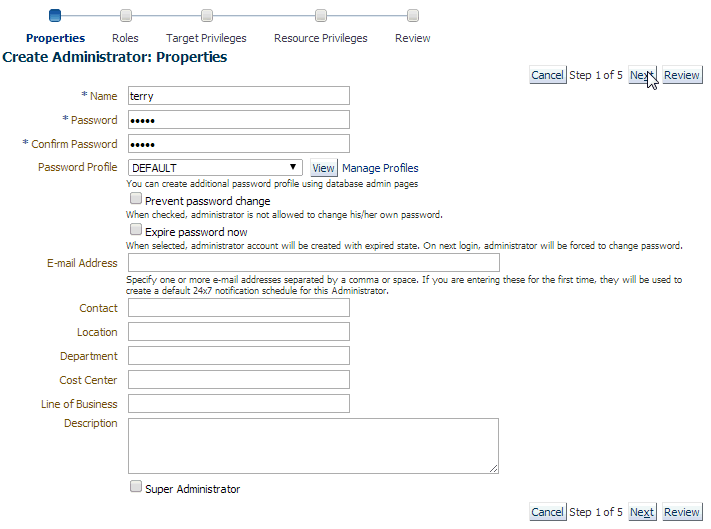
The Create Administrator: Properties page displays. You are now ready to enter the Enterprise Manager user properties. The first property is the user name.
In the *Name text field, you define the user name. Choose a name that is a meaningful identifier. (For example,
terry.) -
In the *Name text field, type the user name.
-
In the *Password text field, type the password for the user.
-
In the *Confirm Password text field, re-type the password.
Locate the Next button in the upper right corner of the page.
-
Click Next.
The Create Administrator
username: Roles page displays. You are now ready to assign a role to your user. -
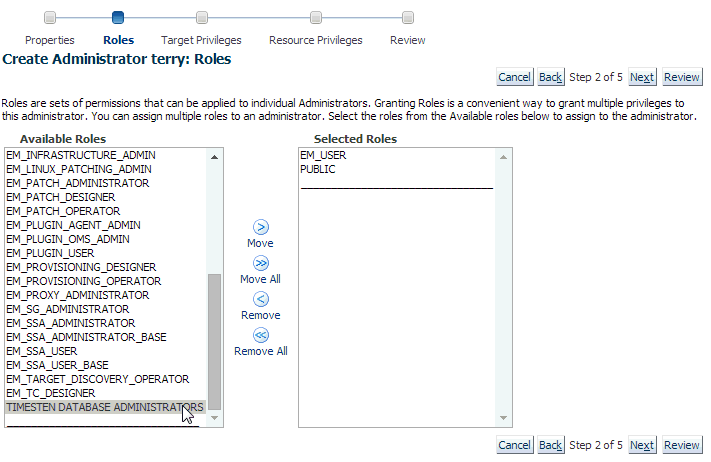
In the Available Roles list, locate the row that contains your TimesTen role. Double click the role name. If you want to assign multiple roles, double click the corresponding role name of any additional roles.
Locate the Next button in the upper right corner of the page.
-
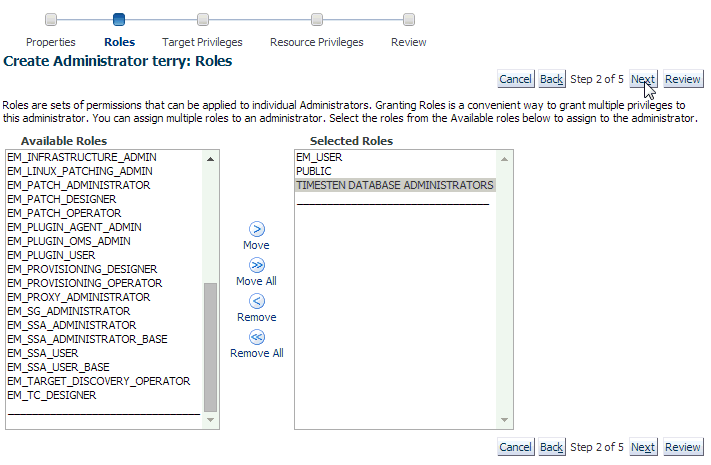
Click Next.
The Create Administrator
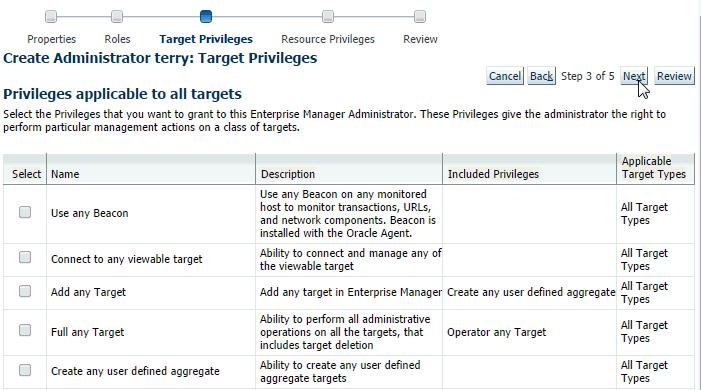
username: Target Privileges page displays. Locate the Next button in the upper right corner of the page. -
Click Next.
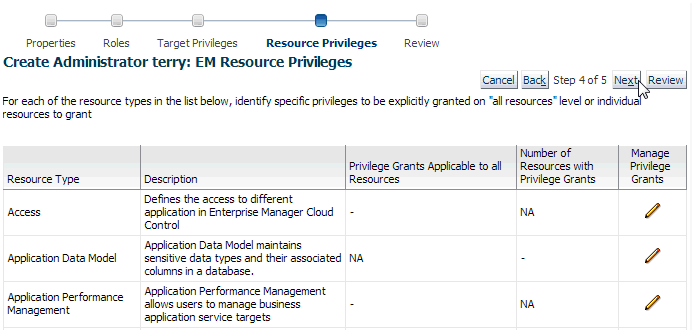
The Create Administrator
username: EM Resource Privileges page displays. Locate the Next button in the upper right corner of the page. -
Click Next.
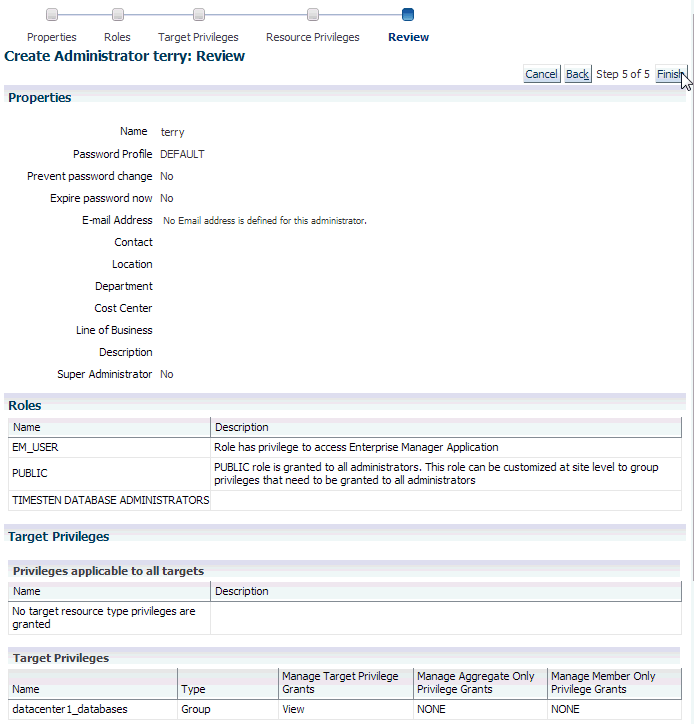
The Create Administrator
username: Review page displays. In the Properties region, verify that the user name is correct. Also, verify that the correct roles are in the Roles table. Locate the Finish button in the upper right corner of the page. -
Click Finish.
The Security Administrators page displays with a confirmation message that indicates that you successfully created the Enterprise Manager user.
You have successfully created an Enterprise Manager user that can view and control TimesTen targets.
Granting preferred credentials to users
Enterprise Manager enables you to grant a user access to preferred credentials that you created for a target with the SYSMAN user. Target preferred credentials are required to perform several operations on TimesTen targets. Ensure that you have set preferred credentials for the SYSMAN user before proceeding with this section. For more information, see "Setting preferred credentials for a target".
To grant a user access to preferred credentials, ensure that you are on the Oracle Enterprise Manager Cloud Control home page and are logged in as user SYSMAN.
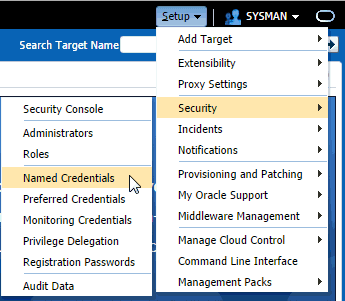
-
From the Setup menu, select Security, then select Named Credentials.
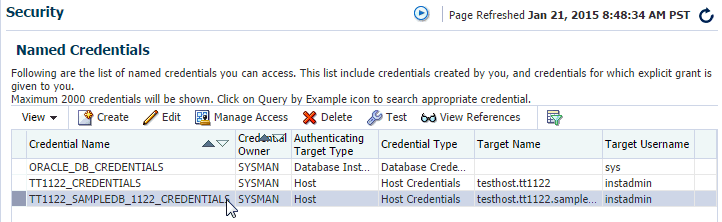
The Security Named Credentials page displays. Locate the credential name in the Credential Name column.
-
Click the credential name.
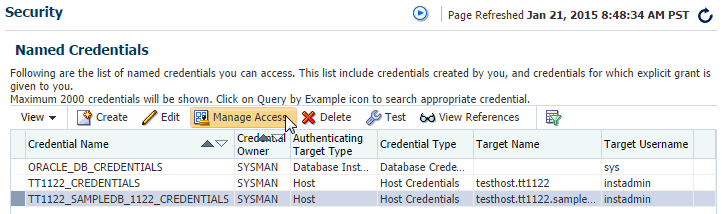
You are now ready to grant the preferred credentials to a user. Locate the Manage Access button.
-
Click Manage Access.
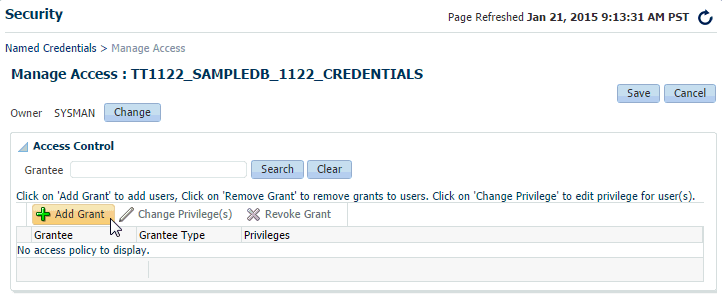
The Security Manage Access:
credential_namepage displays. Locate the Add Grant button in the Access Control region. -
Click Add Grant.
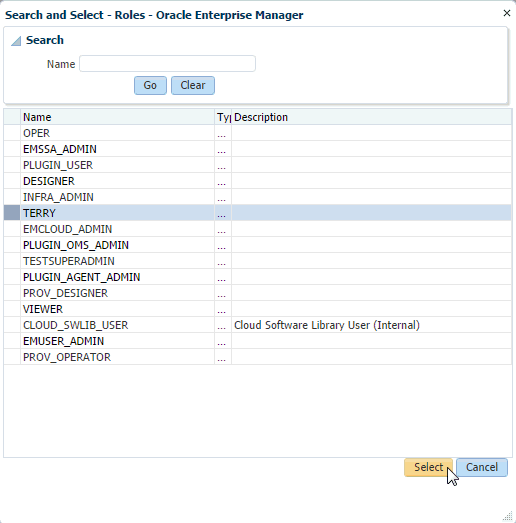
The Search and Select - Roles - Oracle Enterprise Manager dialog displays.
-
In the dialog, locate the row that contains the correct user name. Click in this row and click Select.
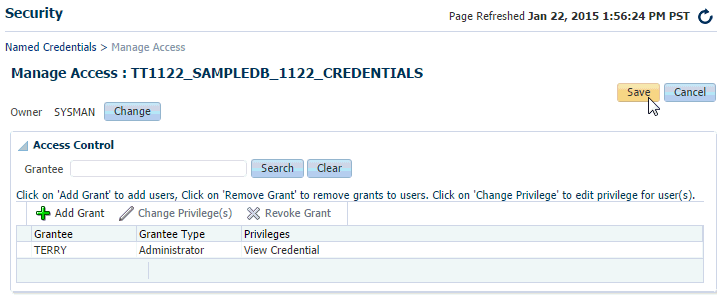
The Search and Select - Roles - Oracle Enterprise Manager dialog closes and the Security Manager Access:
credential_namepage refreshes. You should see your selected user name in the table in the Access Control region. Locate the Save button in the upper right corner of the page. -
Click Save.
The Security Named Credentials page displays. Repeat steps 1-6 to grant access to additional preferred credentials to users.
-
To enable preferred credentials on an Enterprise Manager user account, logon to Enterprise Manager using the user credentials. Then, follow the instructions in "Setting preferred credentials for a target" and assign the existing named credentials as noted in step 6.
You have successfully granted a user access to preferred credentials of a SYSMAN user target.