| Oracle® Retail Analytics Security Guide Release 14.1 E58119-01 |
|

 Previous |
 Next |
This chapter provides an overview of the security features included with Oracle Retail Analytics.
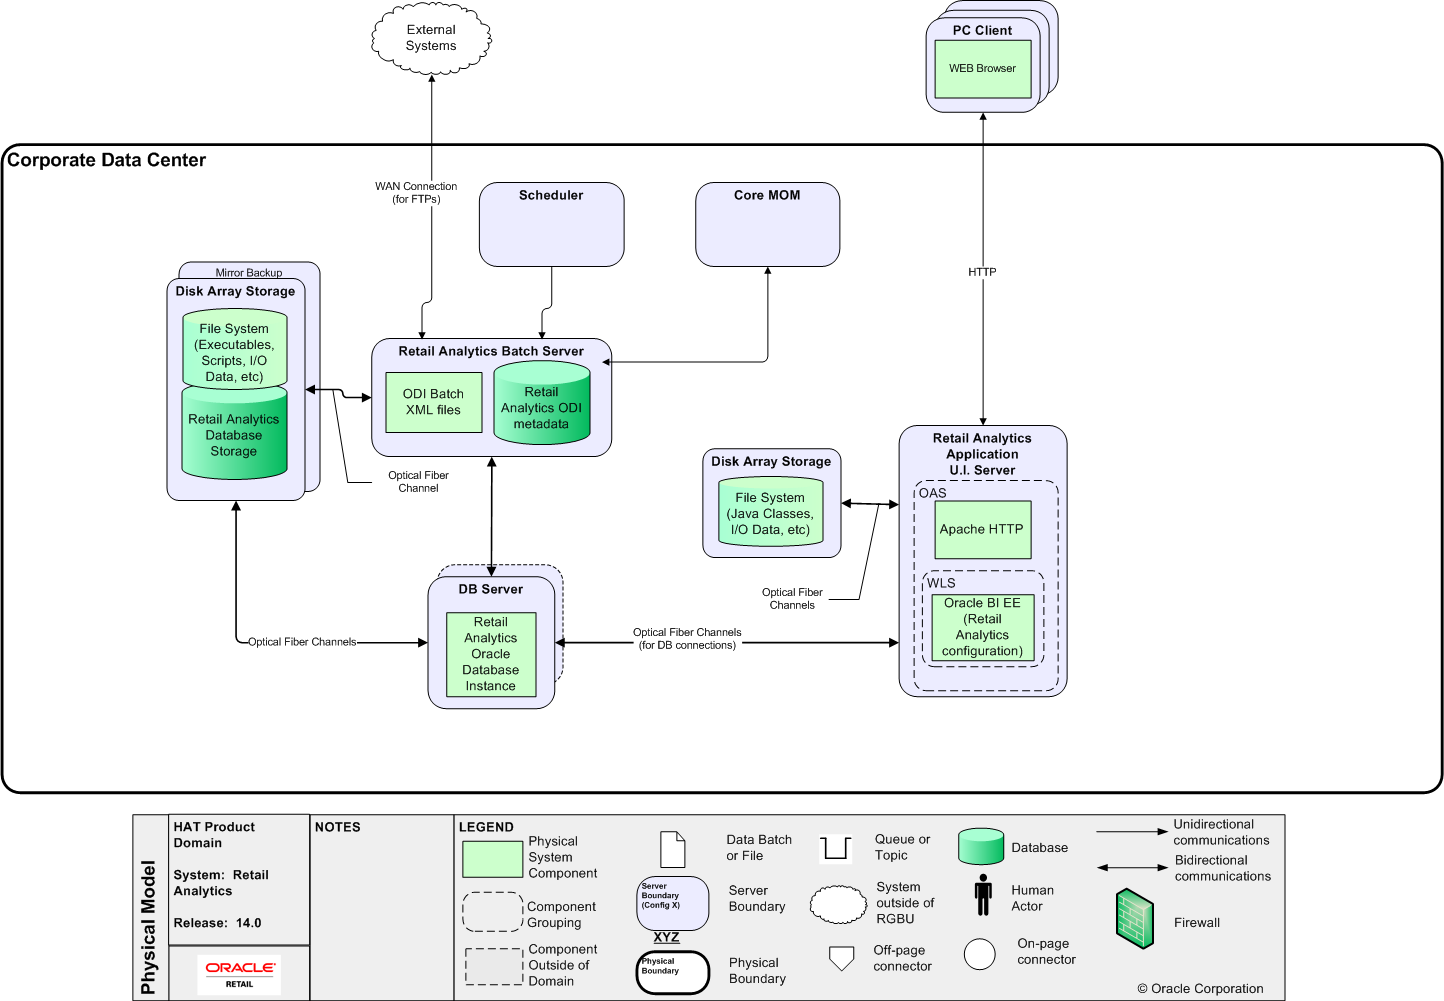
The following diagram provides a high-level overview of the physical deployment of Retail Analytics.
The PC user interface for the Oracle Retail Analytics application is web-based, normally accessed through Internet Explorer directly.
The minimal configuration of the Oracle Retail Analytics application runs on three types of servers: one for the reporting user interface via Oracle Business Intelligence Enterprise Edition (BI EE), one for the batch execution via Oracle Data Integrator (ODI), and one for the Oracle database. The batch execution and ODI metadata can be on the same server with Oracle database. Using same Oracle database server for ODI metadata and RA data mart can improve batch performance due to less network traffic. The storage of executables, scripts, configurations and data for each can reside on a central mirrored disk array cabinet unit or can be segregated by server type, with the file system configured as a shared mount point for relevant servers. All the servers and disk storage units are inter-connected by one or more high speed optical fiber channels where appropriate to insure quickest data communication relative to time critical processes occurring on each server. For connectivity to Retail Analytics data source systems and Retail Analytics hosted in the corporate data center, a LAN is sufficient. And for systems external to the data center, a WAN is usually sufficient. The connectivity needed between Retail Analytics and core Merchandising Operations Management (MOM) applications, is performed via a LAN connection.
The data aggregation logic is found on the batch server while the reporting logic for the application is customized by users and stored on the application server.
The U.I. server setup involves Oracle BI EE, which support horizontal scaling to provide some higher availability, load balancing and fail-over. To fully enable clustering requires a Web Load Balancer servicing HTTP requests from PC clients, and the cohabitation of Oracle BI EE on the multiple servers.
The database server hosts the Oracle database instance for the application. The database server can optionally be RAC enabled, using Oracle Clusterware, to provide high availability and fail-over, without which a fail-over backup server (potentially idle) would be required.
The Retail Analytics application has numerous ODI batch jobs. The scheduling can be performed by the same scheduler installed for the core MOM applications. The processing architectures of most batch jobs do not naturally lend themselves to horizontal scaling across multiple servers. However in the event of a batch server hardware failure, a backup server connected to the same file system may be needed to facilitate quicker restart of aborted jobs. Alternatively, batch jobs could be executed on the database server and/or ODI batch server if ODI is installed on the different server with Retail Analytics database server, but with a RAC setup the load balancing of multiple jobs, across multiple servers is not straightforward. In addition, jobs run on RAC database servers, will cause uneven contention for resources with the Oracle database instances that would partially defeat the load balancing efforts of RAC for Oracle database instances.
All of the batch jobs except data mining related batch jobs should run daily during a nightly batch window with no user access availability for the application. Data mining batch jobs should run weekly. The batch window for data mining process could be longer than one day; however user can still access mining reports for history mining data during mining batch window.
Oracle® Fusion Middleware Security Guide for Oracle Business Intelligence Enterprise Edition
Oracle WebLogic Server Documentation Library
Oracle® Database 2 Day + Security Guide 11g Release 2 (11.2)
Oracle® Fusion Middleware Developer's Guide for Oracle Data Integrator
Retail Analytics is deployed in Oracle Business Intelligence Enterprise Edition 11g (BI EE). The security of Oracle BI EE can be configured at different levels based on security requirements.
This document provides steps of securing the WebLogic infrastructure where Oracle BI EE has been installed.
For enhanced security at different layers of Oracle BI EE, please refer to Oracle Fusion Middleware Security Guide for Oracle Business Intelligence Enterprise Edition 11g Release 1 (11.1.1).
WebLogic Server supports SSL on a dedicated listen port. Oracle BI EE Analytics can be configured to use SSL as well. To establish an SSL connection, a Web browser connects to WebLogic Server by supplying the SSL listen port and the HTTPs protocol in the connection URL, for example, https://myserver:9704/analytics.
Retail Analytics setup is supported in WebLogic in secured mode. For enterprise deployment, it is recommended to use SSL certificates signed by certificate authorities.
|
Note: Separate signed SSL certificates needs to be obtained for each host where application is being deployed. |
Obtain an identity (private key and digital certificates) and trust (certificates of trusted certificate authorities) for WebLogic Server. Use the digital certificates, private keys, and trusted CA certificates provided by the WebLogic Server kit, the CertGen utility, Sun Microsystem's keytool utility, or a reputable vendor such as Entrust or Verisign to perform this step.
Set appropriate JAVA_HOME and PATH to java.
Example:
export JAVA_HOME=/u00/webadmin/product/jdk
export PATH=$JAVA_HOME/bin:$PATH
Create a new keystore.
keytool -genkey -keyalg RSA -keysize 2048 -keystore <keystore> -alias <alias>
Example:
keytool -genkey -keyalg RSA -keysize 2048 -keystore redevlv0126.keystore -alias redevlv0126
Generate the signing request.
keytool -certreq -keyalg RSA -file <certificate request file> -keystore <keystore> -alias <alias>
Example:
keytool -certreq -keyalg RSA -file redevlv0126.csr -keystore redevlv0126.keystore -alias redevlv0126
Submit the certificate request to Certificate authority.
Store the identity and trust. Private keys and trusted CA certificates which specify identity and trust are stored in a keystore.
In following examples, we are using same keystore to store all certificates.
Import the root certificate into the keystore.
Example:
keytool -import -trustcacerts -alias verisignclass3g3ca -file Primary.pem -keystore redevlv0126.keystore
Import the intermediary certificate (if required) into the keystore.
Example:
keytool -import -trustcacerts -alias oracleclass3g3ca -file Secondary.pem -keystore redevlv0126.keystore
Import the received signed certificate for this request into the keystore.
Example:
keytool -import -trustcacerts -alias redevlv0126 -file cert.cer -keystore
Follow the below steps to configure both the Administration server and managed server of Oracle BI EE (bi_server1). You can choose to disable the non-SSL ports (HTTP). It is highly recommended to secure the Node Manager. The steps to secure Node Manager as provided in the next section.
Configure the identity and trust keystores for WebLogic Server in the WebLogic Server Administration Console.
In the Change Center of the Administration Console, click Lock & Edit.
In the left pane of the Console, expand Environment and select Servers.
Click the name of the server for which you want to configure the identity and trust keystores. For Forms server, it would be typically WLS_FORMS.
Select Configuration > Keystores.
In the Keystores field, select the method for storing and managing private keys/digital certificate pairs and trusted CA certificates. These options are available:
Demo Identity and Demo Trust: The demonstration identity and trust keystores, located in the BEA_HOME\server\lib directory and the JDK cacerts keystore, are configured by default. Use for development only.
Custom Identity and Java Standard Trust: A keystore you create and the trusted CAs defined in the cacerts file in the JAVA_HOME\jre\lib\security directory.
Custom Identity and Custom Trust [Recommended]: Identity and trust keystores you create.
Custom Identity and Command Line Trust: An identity keystore you create and command-line arguments that specify the location of the trust keystore.
Select Custom Identity and Custom Trust.
In the Identity section, define attributes for the identity keystore.
Custom Identity Keystore: The fully qualified path to the identity keystore.
Custom Identity Keystore Type: The type of the keystore. Generally, this attribute is Java KeyStore (JKS); if left blank, it defaults to JKS.
Custom Identity Keystore Passphrase: The password you will enter when reading or writing to the keystore. This attribute is optional or required depending on the type of keystore. All keystores require the passphrase in order to write to the keystore. However, some keystores do not require the passphrase to read from the keystore. WebLogic Server only reads from the keystore so whether or not you define this property depends on the requirements of the keystore.
In the Trust section, define properties for the trust keystore.
If you chose Java Standard Trust as your keystore, specify the password defined when creating the keystore. Confirm the password.
If you chose Custom Trust [Recommended], define the following attributes:
Custom Trust Keystore: The fully qualified path to the trust keystore.
Custom Trust Keystore Type: The type of the keystore. Generally, this attribute is JKS; if left blank, it defaults to JKS.
Custom Trust Keystore Passphrase: The password you will enter when reading or writing to the keystore. This attribute is optional or required depending on the type of keystore. All keystores require the passphrase in order to write to the keystore. However, some keystores do not require the passphrase to read from the keystore. WebLogic Server only reads from the keystore so whether or not you define this property depends on the requirements of the keystore.
Click Save.
To activate these changes, in the Change Center of the Administration Console, click Activate Changes.
Not all changes take effect immediately-some require a restart.
|
Note: See "Configure Keystores" in the Administration Console Online Help for more information. |
Set SSL configuration options for the private key alias and password in the WebLogic Server Administration Console.
In the Change Center of the Administration Console, click Lock & Edit.
In the left pane of the Console, expand Environment and select Servers.
Click the name of the server for which you want to configure the identity and trust keystores.
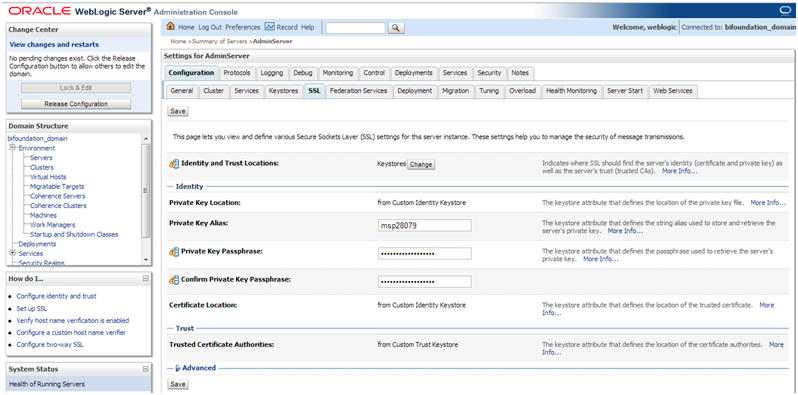
Select Configuration > SSL.
In the Identity and Trust Locations, defaults to Keystores.
In the Private Key Alias, type the string alias used to store and retrieve the server's private key.
In the Private Key Passphrase, provide the keystore attribute that defines the passphrase used to retrieve the server's private key.
Save the changes.
Click on Advanced section of SSL tab.
In the Hostname Verification, select as None. This specifies to ignore the installed implementation of the weblogic.security.SSL.HostnameVerifier interface (this interface is generally used when this server is acting as a client to another application server).
Save the changes.
|
Note: See "Configure SSL" in the Administration Console Online Help for additional information. |
All the server SSL attributes are dynamic; when modified via the Console, they cause the corresponding SSL server or channel SSL server to restart and use the new settings for new connections. Old connections will continue to run with the old configuration. To ensure that all the SSL connections exist according to the specified configuration, you must reboot WebLogic Server.
Use the Restart SSL button on the Control: Start/Stop page to restart the SSL server when changes are made to the keystore files and need to be applied for subsequent connections without rebooting WebLogic Server.
Upon restart you can see similar entries in the log.
<Mar 11, 2013 5:18:27 AM CDT> <Notice> <WebLogicServer> <BEA-000365> <Server state changed to RESUMING>
<Mar 11, 2013 5:18:27 AM CDT> <Notice> <Server> <BEA-002613> <Channel "DefaultSecure" is now listening on 10.141.15.214:57002 for protocols iiops, t3s, ldaps, https.>
<Mar 11, 2013 5:18:27 AM CDT> <Notice> <Server> <BEA-002613> <Channel "DefaultSecure[1]" is now listening on 127.0.0.1:57002 for protocols iiops, t3s, ldaps, https.>
<Mar 11, 2013 5:18:27 AM CDT> <Notice> <WebLogicServer> <BEA-000329> <Started WebLogic Admin Server "AdminServer" for domain "APPDomain" running in Production Mode>
<Mar 11, 2013 5:18:27 AM CDT> <Notice> <WebLogicServer> <BEA-000365> <Server state changed to RUNNING>
<Mar 11, 2013 5:18:27 AM CDT> <Notice> <WebLogicServer> <BEA-000360> <Server started in RUNNING mode>
WebLogic startup/shutdown scripts should be updated with secured port and protocol to start/stop services.
Backup and update following files in <DOMAIN_HOME>/bin with correct Admin server URLs.
Update the following files:
startManagedWebLogic.sh: echo "$1 managedserver1 http://msp28079.us.oracle.com:7001"
stopManagedWebLogic.sh: echo "ADMIN_URL defaults to t3://msp28079.us.oracle.com:7001 if not set as an environment variable or the second command-line parameter."
stopManagedWebLogic.sh: echo "$1 managedserver1 t3://msp28079.us.oracle.com:7001 weblogic weblogic"
stopManagedWebLogic.sh: ADMIN_URL="t3://msp28079.us.oracle.com:7001"
stopWebLogic.sh: ADMIN_URL="t3://msp28079.us.oracle.com:7001"
Change the URLs to the values below wherever applicable.
t3s://msp28079.us.oracle.com:7102
https://msp28079.us.oracle.com:7102
Retail application installer will need Java to run. In situation where Administration server is secured using signed certificate, the Java keystore through which the installer is launched must have the certificate installed.
Example:
msp28079:[10.3.6_apps] /u00/webadmin/ssl> keytool -import -trustcacerts -alias msp28079 -file /u00/webadmin/ssl/msp28079.cer -keystore /u00/webadmin/product/jdk/jre/lib/security/cacerts
Enter keystore password:
Certificate was added to keystore
msp28079:[10.3.6_apps] /u00/webadmin/ssl>
In a production environment, Oracle recommends TLS V1.1, or later, for sending and receiving messages in an SSL connection:
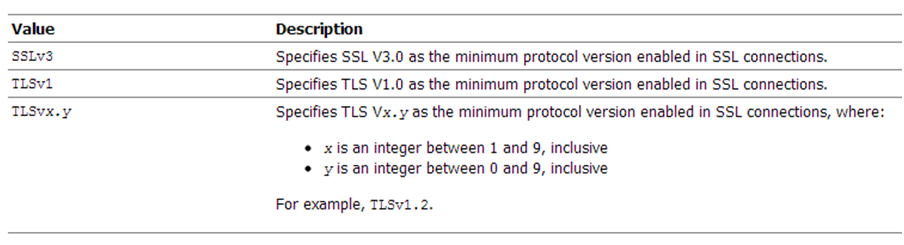
To control the minimum versions of SSL V3.0 and TLS V1 that are enabled for SSL connections, set the weblogic.security.SSL.minimumProtocolVersion=protocol system property as an option in the command line that starts WebLogic Server. This system property accepts one of the following values for protocol:
Set the following property in startup parameters in Weblogic managed server for the enabling higher protocol.
-Dweblogic.security.SSL.minimumProtocolVersion=TLSv1.1
|
Note: In case protocol is set for managed servers, the same should be set for Administration server. Ensure that all the managed servers are down when making changes to the Administration server for setting up the protocol. It is recommended to set the properties in Administration server and then the managed server. |
If you want to use the strongest Cipher suite (256 bit encryption) i.e like AES_256 (TLS_RSA_WITH_AES_256_CBC_SHA) you have to install the unlimited encryption JCE policy. It is dependent on the JDK version.
Using the following URL, download and install the Java Cryptography Extension (JCE) Unlimited Strength Jurisdiction Policy Files that correspond to the version of your JDK.
http://www.oracle.com/technetwork/java/javase/downloads/index.html
For JDK 7, download from http://www.oracle.com/technetwork/java/javase/downloads/jce-7-download-432124.html and replace the files in JDK/jre/lib/security directory.
|
Note: Once the JCE has been installed, restart entire WebLogic instance using the JDK to enable changes to take effect. |
In order to enable the specific Cipher Suite to use we need to configure the <ciphersuite> element in the <ssl> element in the <DOMAIN_HOME>\server\config\config.xml file, as follows:
<ssl>
<name>examplesServer</name>
<enabled>true</enabled>
<listen-port>17002</listen-port>
<ciphersuite>TLS_RSA_WITH_AES_256_CBC_SHA</ciphersuite>
...
</ssl>
|
Note: The above can be done using wls script. For more information please refer to http://docs.oracle.com/cd/E24329_01/web.1211/e24422/ssl.htm#BABDAJJGIt is advisable to bring down the managed server prior to making the changes. |
Navigate to <BEA_HOME>/wlserver_10.3/common/nodemanager and take a backup of nodemanager.properties.
Add similar entry to nodemanager.properties:
KeyStores=CustomIdentityAndCustomTrust
CustomIdentityKeyStoreFileName=/u00/webadmin/ssl/redevlv0126.keystore
CustomIdentityKeyStorePassPhrase=[password to keystore, this will get encrypted]
CustomIdentityAlias=redevlv0126
CustomIdentityPrivateKeyPassPhrase=[password to keystore, this will get encrypted]
CustomTrustKeyStoreFileName=/u00/webadmin/ssl/redevlv0126.keystore
SecureListener=true
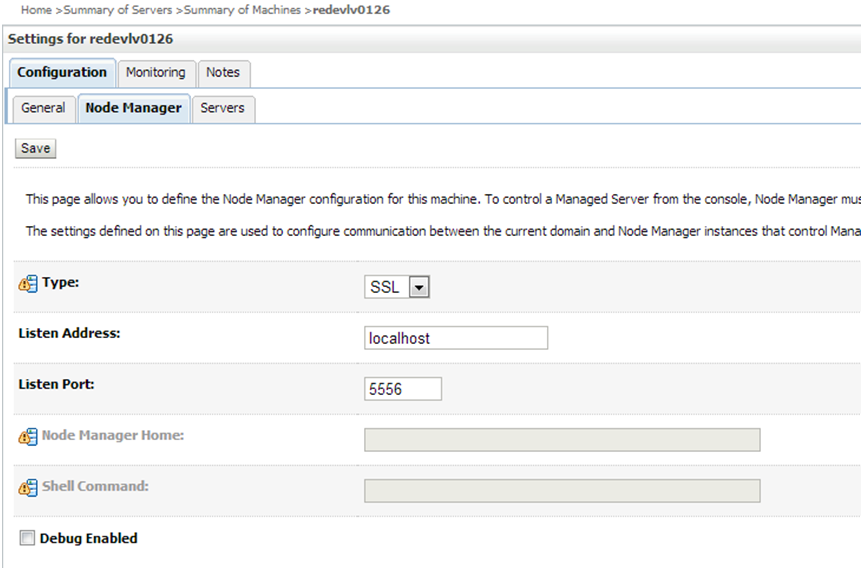
Login to WebLogic console, navigate to Environment > Machines. Select the nodemanager created already and navigate to Node Manager tab. In the Change Center, click Lock and Edit.
For Type, select SSL and save and activate.
After activating the changes, you need to bounce entire Weblogic Domain for changes to take effect. Verify the nodemanager is reachable in Monitoring tab after restart.
Depending upon your security need for your production environment, infrastructure where retail applications are deployed can be secured. Following should be secured to ensure complete protection of environment.
Securing the WebLogic Server Host
Securing Network Connections
Securing Your Database
Securing the WebLogic Security Service
Securing Applications
Please refer to Ensuring the Security of Your Production Environment section in the Securing a Production Environment for Oracle WebLogic Server. 11g Release (10.3.6) Guide for more information
Java 7 may have issues using self signed certificates. The self-signed root certificate may not be recognized by Java 1.7 and a certificate validation exception might be thrown during the SSL handshake. To fix this problem, the private key must be created with Subject Key Identifier. An option "-addext_ski" must be included when the orapki utility is used to create the private key in the root wallet.
If customers are using certificates other than provided by standard certificate authorities like custom CA implementation, then the jre used for launching the applications from local machines like laptops or desktops might error with different error messages.
The most probable cause of this issue could be unavailability of root certificates of the CA within the local jre being used. In order to import the root certificates, follow the steps similar to below.
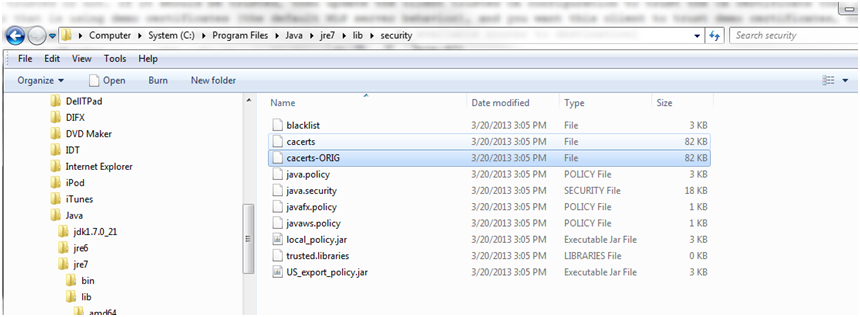
Backup cacert at <JRE_HOME>/lib/security/cacert.
Import the certificate using the keytool utility.
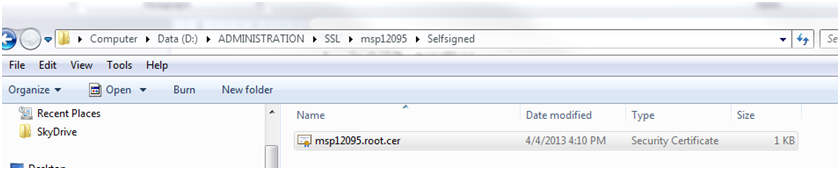
C:\Program Files\Java\jre7\lib\security>..\..\bin\keytool.exe -import -trustcacerts -file D:\ADMINISTRATION\SSL\msp12095\Selfsigned\msp12095.root.cer -alias msp12095 -keystore "C:\Program Files\Java\jre7\lib\security\cacerts"

Enter keystore password: [default is changeit]
Owner: CN=msp12095.us.oracle.com, OU=RGBU, O=Oracle Corporation, L=Minneapolis,
ST=Minnesota, C=US
Issuer: CN=msp12095.us.oracle.com, OU=RGBU, O=Oracle Corporation, L=Minneapolis,
ST=Minnesota, C=US
Serial number: 515d4bfb
Valid from: Thu Apr 04 15:16:35 IST 2013 until: Fri Apr 04 15:16:35 IST 2014
Certificate fingerprints:
MD5:  AB:FA:18:2B:BC:FF:1B:67:E7:69:07:2B:DB:E4:C6:D9
SHA1: 2E:98:D4:4B:E0:E7:B6:73:55:4E:5A:BE:C1:9F:EA:9B:71:18:60:BB
SHA256: F3:54:FB:67:80:10:BA:9C:3F:AB:48:0B:27:83:58:BB:3D:22:C5:27:7D:
F4:D1:85:C4:4E:87:57:72:2B:6F:27
Signature algorithm name: SHA1withRSA
Version: 3
Trust this certificate? [no]:  yes
Certificate was added to keystore
C:\Program Files\Java\jre7\lib\security>
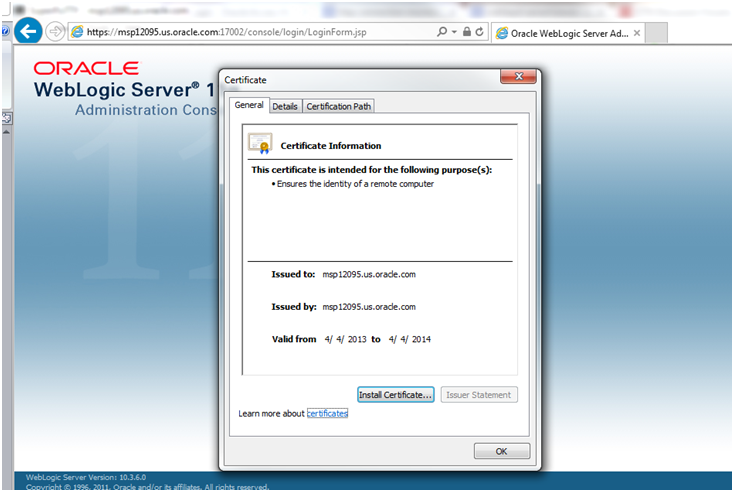
If the Root Certificate that signed WebLogic server certificate is not in that list of trusted CAs, you need to add it in the browser to avoid certificate verification error.
For Internet Explorer, that requires the following steps:
Copy the Root Certificate file to the workstation.
Rename the file to fa_root_cert.cer (this is a quick and easy way to associate the file with the Windows certificate import utility).
Double-click on the file.
Click Install Certificate and click Next.
Select Place all certificates in the following store and click Browse.
Select Trusted Root Certification Authorities and click OK.
Click Next.
Click Finish and then Yes at the Security Warning prompt.
Click OK to close the remaining open dialog boxes.
To do the same thing in Firefox, you follow a similar set of steps:
Start Firefox.
Select Tools > Options from the main menu.
Click on Advanced and then the Encryption tab.
On the Encryption tab, click View Certificates.
In Certificate Manager, click the Authorities tab and then the Import button.
In the Downloading Certificate dialog, choose Trust this CA to identify websites and click OK.
Click OK in Certificate Manager and then in Options.
Open a browser and test you URL using the SSL port.
The hostname verification ensures that the hostname in the URL to which the client connects matches the hostname in the digital certificate that the server sends back as part of the SSL connection. However, in case SSL handshake is failing due to inability to verify hostname this workaround can be used.
|
Note: Disabling hostname verification is not recommended on production environments. This is only recommended for testing purposes. Hostname verification helps to prevent man-in-the-middle attacks. |
To disable hostname verification for testing purposes, follow these steps:
Go to Environment -> Domain -> Servers -> AdminServer.
Click the SSL tab.
Click Advanced.
On Hostname Verification, select NONE.
Click Save and activate changes.
On the Node Manager startup script, look for JAVA. Add the following line:
Dweblogic.nodemanager.sslHostNameVerificationEnabled=false
After this change, the script should look like this:
JAVA_OPTIONS="-Dweblogic.nodemanager.sslHostNameVerificationEnabled=false ${JAVA_OPTIONS}"
cd "${NODEMGR_HOME}"
set -x
if [ "$LISTEN_PORT" != "" ]
 then
   if [ "$LISTEN_ADDRESS" != "" ]
Restart Node manager.
In situations where the certificate gets expired or may belong to other hosts, the certificates become unusable. To determine the details of the certificate keytool utility can be used. If the certificates are expired, they should be renewed or new certificates should be obtained from appropriate certificate authorities.
Example:
msp28079:[10.3.6_apps] /u00/webadmin/ssl> keytool -printcert -file cert.cer
Certificate[1]:
Owner: CN=msp28079.us.oracle.com, OU=FOR TESTING PURPOSES ONLY, O=Oracle Corporation, L=Redwood City, ST=California, C=US
Issuer: CN=Oracle SSL CA, OU=Class 3 MPKI Secure Server CA, OU=VeriSign Trust Network, O=Oracle Corporation, C=US
Serial number: 8878deb9f2a1a44e3cd6d92a3987296
Valid from: Thu Oct 11 20:00:00 EDT 2012 until: Sat Oct 12 19:59:59 EDT 2013
Certificate fingerprints:
         MD5:  2B:71:89:11:01:40:43:FC:6F:D7:FB:24:EB:11:A5:1C
         SHA1: DA:EF:EC:1F:85:A9:DA:0E:E1:1B:50:A6:8B:A8:8A:BA:62:69:35:C1
         SHA256: C6:6F:6B:A7:C5:2C:9C:3C:40:E3:40:9A:67:18:B9:DC:8A:97:52:DB:FD:AB:4B:E5:B2:56:47:EC:A7:16:DF:B6
         Signature algorithm name: SHA1withRSA
         Version: 3

Extensions:
Keystores are repository of the certificates. In situations when we are facing issues related to SSL Certificates, once can check the certificates which are available in the keystore. In case the certificates are not missing, they should be imported. keytool command provides the list of the certificates available.
Example:
$ keytool -v -list -keystore /u00/webadmin/product/jdk/jre/lib/security/cacerts
$ keytool -v -list -keystore /u00/webadmin/product/10.3.X_APPS/WLS/wlserver_10.3/server/lib/msp28079.keystore
Retail applications can be deployed across different hosts and even behind network behind firewalls. Ensure that firewalls are configured to allow tcps connections to enable secure communications among integrated application.
Secured applications using signed certificates need to use same secured protocols for communication. Ensure that all the communicating applications use the same protocol. Refer to Enforcing stronger encryption in WebLogic section in Pre-install steps for Secured setup of Retail Infrastructure in WebLogic chapter on steps to specify secured protocol.
Communicating applications using signed certificates may need to verify the incoming connections. Root certificates should be available in the keystores of the applications to verify the requests from different host. It is important to import all the root certificates in the keystores of all communicating applications. Refer to Import the root certificate in local client JRE section in Troubleshooting chapter for steps to import root certificates.
Authentication is required when Retail Analytics end users run Retail Analytics front-end report or Retail Analytics batch users execute Retail Analytics batch in the back-end. For front-end, the authentication, including the storage of the credential of database connection, is managed by Oracle BI EE and WebLogic. For the back-end, the authentication, including the storage of the credentials of the database connection, is managed my ODI.
During Retail Analytics installation, it is required to create different Retail Analytics database users with different permissions. Within these database users, the Retail Analytics data mart user is the user who owns data. The Retail Analytics batch user is the user who executes Retail Analytics batch. The batch user is granted with SELECT, UPDATE/INSERT, and DELETE permissions to the resources owned by the Retail Analytics data user. The Retail Analytics front-end user is the database user who will query Retail Analytics data through the front-end report. This user is granted with SELECT permission to the resources owned by the Retail Analytics data user.
The Universal Adapter is an optional ETL component which facilitates the loading of flat files generated from third party data sources into Retail Analytics database staging tables. The Universal Adapter is dependent on the Oracle RDBMS internal Java JVM v7.0. In addition, the Universal Adapter requires that the Retail Analytics batch user be granted read+write access to a folder (via grants to a database 'directory object') on the database server containing the flat files to be loaded into the system. The Retail Analytics batch user must also be granted Java execution rights.
Universal Adapter uninstallation – The Universal Adapter can be uninstalled from the Retail Analytics batch user schema by performing the following steps from any Windows/Linux workstation with an Oracle database client installed:
Drop the log4j and UniversalAdapter JAR files from the batch user schema:
|
Note: Make sure that a copy of the JAR that you are attempting to drop from the database is in your current working directory. |
dropjava -verbose -oci8 -user username/password@INSTANCE UniversalAdapter.jar
dropjava -verbose -oci8 -user username/password@INSTANCE log4j-1.2.17.jar
Drop the 'UAF_LOG' table from the batch user schema (you can do this via SQL*Plus or SQL-Developer).
Drop the 'UAF_Initialize' and 'UAF_RunETL' stored procedure stubs from the batch user schema (you can do this via SQL*Plus or SQL-Developer).
The Aggregation Framework is an optional ETL component which facilitates the loading of aggregation data into client customized aggregation tables. The Aggregation Framework is PL/SQL based programs. It requires that the Retail Analytics batch user be granted read+write access to the UTLFILE folder on the database server. The framework can be uninstalled from the batch schema by dropping procedures RA_AGGREGATION_DAILY and RA_AGGREGATION_REC.