Oracle® Retail Analytics
Installation Guide
Release 14.1.1
E63189-01
May 2015
Oracle®
Retail Analytics Installation Guide, Release 14.1.1
Author: Nathan
Young
Copyright © 2015, Oracle
and/or its affiliates. All rights reserved.
This software and related
documentation are provided under a license agreement containing restrictions on
use and disclosure and are protected by intellectual property laws. Except as
expressly permitted in your license agreement or allowed by law, you may not
use, copy, reproduce, translate, broadcast, modify, license, transmit,
distribute, exhibit, perform, publish, or display any part, in any form, or by
any means. Reverse engineering, disassembly, or decompilation of this software,
unless required by law for interoperability, is prohibited.
The information contained
herein is subject to change without notice and is not warranted to be
error-free. If you find any errors, please report them to us in writing.
If this is software or
related documentation that is delivered to the U.S. Government or anyone
licensing it on behalf of the U.S. Government, then the following notice is
applicable:
U.S. GOVERNMENT END USERS:
Oracle programs, including any operating system, integrated software, any
programs installed on the hardware, and/or documentation, delivered to U.S.
Government end users are "commercial computer software" pursuant to
the applicable Federal Acquisition Regulation and agency-specific supplemental
regulations. As such, use, duplication, disclosure, modification, and
adaptation of the programs, including any operating system, integrated
software, any programs installed on the hardware, and/or documentation, shall
be subject to license terms and license restrictions applicable to the
programs. No other rights are granted to the U.S. Government.
This software or hardware is
developed for general use in a variety of information management applications.
It is not developed or intended for use in any inherently dangerous
applications, including applications that may create a risk of personal injury.
If you use this software or hardware in dangerous applications, then you shall
be responsible to take all appropriate fail-safe, backup, redundancy, and other
measures to ensure its safe use. Oracle Corporation and its affiliates disclaim
any liability for any damages caused by use of this software or hardware in
dangerous applications.
Oracle and Java are
registered trademarks of Oracle and/or its affiliates. Other names may be
trademarks of their respective owners.
Intel and Intel Xeon are
trademarks or registered trademarks of Intel Corporation. All SPARC trademarks
are used under license and are trademarks or registered trademarks of SPARC
International, Inc. AMD, Opteron, the AMD logo, and the AMD Opteron logo are
trademarks or registered trademarks of Advanced Micro Devices. UNIX is a
registered trademark of The Open Group.
This software or hardware and
documentation may provide access to or information about content, products, and
services from third parties. Oracle Corporation and its affiliates are not
responsible for and expressly disclaim all warranties of any kind with respect
to third-party content, products, and services unless otherwise set forth in an
applicable agreement between you and Oracle. Oracle Corporation and its
affiliates will not be responsible for any loss, costs, or damages incurred due
to your access to or use of third-party content, products, or services, except
as set forth in an applicable agreement between you and Oracle.
Value-Added Reseller (VAR) Language
Oracle Retail VAR Applications
The following restrictions
and provisions only apply to the programs referred to in this section and
licensed to you. You acknowledge that the programs may contain third party
software (VAR applications) licensed to Oracle. Depending upon your product and
its version number, the VAR applications may include:
(i) the MicroStrategy Components
developed and licensed by MicroStrategy Services Corporation (MicroStrategy) of
McLean, Virginia to Oracle and imbedded in the MicroStrategy for Oracle
Retail Data Warehouse and MicroStrategy for Oracle Retail Planning &
Optimization applications.
(ii) the Wavelink
component developed and licensed by Wavelink Corporation (Wavelink) of Kirkland, Washington, to Oracle and imbedded in Oracle Retail Mobile Store Inventory
Management.
(iii) the software component
known as Access Via™ licensed by Access Via of Seattle, Washington, and
imbedded in Oracle Retail Signs and Oracle Retail Labels and Tags.
(iv) the software component
known as Adobe Flex™ licensed by Adobe Systems Incorporated of San Jose, California, and imbedded in Oracle Retail Promotion Planning & Optimization
application.
You acknowledge and confirm
that Oracle grants you use of only the object code of the VAR Applications.
Oracle will not deliver source code to the VAR Applications to you.
Notwithstanding any other term or condition of the agreement and this ordering
document, you shall not cause or permit alteration of any VAR Applications. For
purposes of this section, "alteration" refers to all alterations,
translations, patches, enhancements, customizations or modifications of all or
any portion of the VAR Applications including all reconfigurations, reassembly
or reverse assembly, re-engineering or reverse engineering and recompilations
or reverse compilations of the VAR Applications or any derivatives of the VAR
Applications. You acknowledge that it shall be a breach of the agreement to
utilize the relationship, and/or confidential information of the VAR
Applications for purposes of competitive discovery.
The VAR Applications contain
trade secrets of Oracle and Oracle's licensors and Customer shall not attempt,
cause, or permit the alteration, decompilation, reverse engineering,
disassembly or other reduction of the VAR Applications to a human perceivable
form. Oracle reserves the right to replace, with functional equivalent
software, any of the VAR Applications in future releases of the applicable
program.
Send Us Your Comments............................................... xi
Preface......................................................................... xiii
Audience.............................................................................................. xiii
Related Documents........................................................................... xiii
Customer Support............................................................................. xiii
Review Patch Documentation....................................................... xiii
Improved Process for Oracle Retail
Documentation Corrections xiv
Oracle Retail Documentation on the
Oracle Technology Network xiv
Conventions........................................................................................ xiv
1....................................................... Preinstallation
Tasks 1
Implementation Capacity Planning................................................ 1
Implementations Requiring Oracle
Retail Advanced Science Engine (ORASE) Installer 1
Check Supported Database Server
Requirements....................... 2
Check Supported ODI Requirements.............................................. 3
Check Supported Application Server
Requirements.................. 4
Verify Single Sign-On........................................................................... 4
Check Supported Web Browser and
Client Requirements....... 4
Supported Oracle Retail Products.................................................... 5
Partitioning
Prerequisites................................................................... 5
Create a UNIX User Account to
Install the Software.................. 5
Create a Staging Directory for
Retail Analytics Database Files 6
2................................... Database
Installation Tasks – Full 7
Retail Analytics 14.1.1 Full
Release................................................. 7
Create Staging Directory for Retail
Analytics Installer.............. 7
Establish
a Retail Analytics Partitioning Strategy...................... 8
Partition Strategy for Full Install...................................................... 8
Step 1: Review
RA_partitioned_tables.xls..................................... 9
Step 2: Modify
partition_attributes.cfg........................................... 9
Step 3: Creating Data Definition
Files using Retail Analytics pre-packaged programs (Optional) 10
Step 4: Create/Modify Data
Definition Files.............................. 11
Step 5: Generate DDL for Tables –
Run partition.ksh.............. 12
Create the Retail Analytics
Database............................................ 12
Create Retail Analytics Tablespaces............................................. 13
Create Retail Analytics Schema
Owners..................................... 13
Set Environment Variable................................................................. 16
Run the Retail Analytics Database
Schema Installer............... 16
Resolving Errors Encountered During
Database Schema Installation 18
3..................... Oracle
Data Integrator Configuration Tasks 21
Terminology......................................................................................... 21
ODI Home Directory.......................................................................... 21
ODI User and Password................................................................... 21
JDBC Connectivity.............................................................................. 22
Database Links.................................................................................... 22
Connecting to the Retail Analytics
ODI Repository................. 22
Importing the Master Repository Zip
Files................................. 25
Importing the Work Repository Zip
Files.................................... 28
Topology Configuration for Physical
and Logical Schemas. 32
File Configuration in Topology
Manager.................................... 44
Configure ODI Designer................................................................... 47
Retail Analytics Seed Data Setup................................................... 50
Preload Retail Analytics Business
Calendar.............................. 55
4....................... Retail
Analytics Database Schema –Patch 57
Create Staging Directory for the
Retail Analytics Installer..... 57
Run the Retail Analytics Database Schema
Installer – Patch 57
Resolving Errors Encountered During
Database Schema Installation 60
5... Retail Analytics ODI and
Oracle BI EE Content – Patch 61
Retail Analytics Patch Scope and
Support................................. 61
Before Upgrading Oracle BI EE
rpd/catalog/translations.... 61
Retail Analytics ODI Packaged
Content...................................... 61
Retail Analytics Oracle BI EE
Content Patch Instructions..... 66
Merge Steps........................................................................................... 66
Applying Customizations to the
Latest Catalog....................... 67
Customizations................................................................................... 68
6 Configuring ODI to Integrate
Retail Analytics with Merchandise Financial Planning (MFP)...................................................................................... 69
Check Oracle Data Server................................................................. 69
Install the RPAS JDBC Drivers........................................................ 71
Check RPAS JDBC Technology....................................................... 72
Start the ramfp_agent ODI Agent................................................... 73
7 Oracle BI EE Infrastructure
Installation and Configuration Tasks 75
Install Oracle BI................................................................................... 75
Installing Retail Analytics 14.1.1
Repository............................. 75
Configure the Repository (rpd)....................................................... 75
Set up the Database Connection..................................................... 76
Configure Catalog............................................................................... 78
Customizations................................................................................... 80
Localization.......................................................................................... 80
Configure Retail Analytics Roles................................................... 80
Manage Users and Security............................................................. 81
Language Selection with SSO......................................................... 82
Other Notes........................................................................................... 82
8......................................... Retail
Analytics Configuration 83
Operating System................................................................................ 83
Server OS Configuration................................................................... 83
Infrastructure/Middleware............................................................. 84
ODI.......................................................................................................... 84
Oracle BI EE.......................................................................................... 84
Database................................................................................................ 84
Application Server.............................................................................. 85
RGBU Application Configuration................................................. 85
Technology Considerations............................................................. 85
Application Specific Configurations............................................ 85
9....................................................... Patching
Procedures 99
Oracle Retail Patching Process....................................................... 99
Supported Products and Technologies........................................ 99
Patch Concepts.................................................................................. 100
Patching Utility Overview............................................................. 101
Changes with 14.1............................................................................ 101
Patching Considerations................................................................ 102
Patch Types........................................................................................ 102
Incremental Patch Structure.......................................................... 102
Version Tracking.............................................................................. 102
Apply all Patches with Installer or
ORPatch........................... 103
Environment Configuration.......................................................... 103
Retained Installation Files............................................................. 103
Reloading Content........................................................................... 103
Java Hotfixes and Cumulative
Patches...................................... 104
Backups............................................................................................... 104
Disk Space.......................................................................................... 104
Patching Operations........................................................................ 105
Running ORPatch............................................................................ 105
Merging Patches............................................................................... 115
Compiling Application Components......................................... 116
Deploying Application Components......................................... 118
Maintenance Considerations........................................................ 119
Database Password Changes....................................................... 119
WebLogic Password Changes...................................................... 120
Infrastructure Directory Changes................................................ 121
DBManifest Table............................................................................. 121
RETAIL_HOME relationship to
Database and Application Server 121
Jar Signing Configuration
Maintenance.................................... 121
Customization................................................................................... 123
Patching Considerations with
Customized Files and Objects 123
Registering Customized Files....................................................... 124
Custom Compiled Java Code........................................................ 126
Extending Oracle Retail Patch Assistant
with Custom Hooks 128
Troubleshooting Patching............................................................. 132
ORPatch Log Files............................................................................ 132
Restarting ORPatch......................................................................... 132
Manual DBManifest Updates....................................................... 132
Manual Restart State File Updates.............................................. 134
DISPLAY Settings When Compiling
Forms............................. 134
JAVA_HOME Setting...................................................................... 134
Patching Prior to First Install........................................................ 134
Providing Metadata to Oracle
Support...................................... 135
10............................................. Known
Issues/Limitations 137
Installing ODI Files for Retail
Analytics on Windows.......... 137
Temp Space Issue during ODI Batch
Execution...................... 138
Installing Oracle BI EE files for
Retail Analytics..................... 139
After Installer is run the MFP MREP
WREP seems incorrect 139
A........... Appendix: Oracle Database 12cR1 Parameter File 141
B Appendix: CreateDatabase Instance
Using an Oracle GenericTemplate – Example 143
Prerequesites...................................................................................... 143
Instance Creation Using a Generic
Template via DBCA...... 143
C........................... Appendix:
Tablespace Creation Scripts 145
D Appendix: Retail Analytics
Application Installer Screens 147
Installer Screens for Full installation:......................................... 148
Installer Screens for Patch
Installation...................................... 174
Installation Trail File....................................................................... 193
E...................................... Appendix:
Installer Silent Mode 195
F........................... Appendix:
Common Installation Errors 197
Installer Hangs on Startup............................................................ 197
Unreadable Buttons in the Installer............................................ 197
Warning: Could not create system
preferences directory..... 197
Warning: Couldn't find X Input
Context................................... 198
Message: SP2-0734: unknown command
beginning............. 198
Message: Invalid Username/Password;
Login Denied........ 198
Message: Adding credentials to the
wallet for … BUILD FAILED 199
Message: Error Connecting to
Database URL.......................... 199
Message: Cannot access NLS data
files or invalid environment specified 200
Message: User XYZ lacks CREATE
SESSION privilege; log on denied 200
Message: Some of the objects have
errors.................................. 200
WARNING: Expected * SYNONYM
objects, found X........... 201
Fatal exception: Width (0) and
height (0) cannot be <= 0 java.lang.IllegalArgumentException: Width (0) and
height (0) cannot be <= 0................................................ 201
G............................. Appendix:
Retail Analytics Code Tree 203
H.............................................................. Appendix:
Time 205
Time Calendar (4-5-4)...................................................................... 205
Time Calendar (4-5-4/Gregorian)............................................... 205
Time Calendar (13-Period)............................................................. 205
I.......................... Appendix:
Single Sign-On for WebLogic 207
What Do I Need for Single Sign-On?.......................................... 207
Can Oracle Access Manager Work with
Other SSO Implementations? 207
Oracle Single Sign-on Terms and
Definitions.......................... 208
What Single Sign-On is not........................................................... 209
How Oracle Single Sign-On Works............................................. 209
Installation Overview...................................................................... 211
User Management............................................................................ 211
J............................................ Appendix:
Installation Order 213
Enterprise Installation Order........................................................ 213
Oracle Retail Analytics, Installation Guide, Release 14.1.1
Oracle welcomes customers' comments
and suggestions on the quality and usefulness of this document.
Your feedback is important, and helps
us to best meet your needs as a user of our products. For example:
§ Are the
implementation steps correct and complete?
§ Did you understand
the context of the procedures?
§ Did you find any
errors in the information?
§ Does the structure of
the information help you with your tasks?
§ Do you need different
information or graphics? If so, where, and in what format?
§ Are the examples
correct? Do you need more examples?
If you find any errors or have any
other suggestions for improvement, then please tell us your name, the name of
the company who has licensed our products, the title and part number of the
documentation and the chapter, section, and page number (if available).
Note:
Before sending us your comments, you might like to check that you have the
latest version of the document and if any concerns are already addressed. To do
this, access the Online Documentation available on the Oracle Technology
Network Web site. It contains the most current Documentation Library plus all
documents revised or released recently.
Send your comments to us using the
electronic mail address: retail-doc_us@oracle.com
Please give your name, address,
electronic mail address, and telephone number (optional).
If you need assistance with Oracle
software, then please contact your support representative or Oracle Support
Services.
If you require training or instruction
in using Oracle software, then please contact your Oracle local office and
inquire about our Oracle University offerings. A list of Oracle offices is
available on our Web site at www.oracle.com.
Oracle Retail Installation
Guides contain the requirements and procedures that are necessary for the
retailer to install Oracle Retail products.
This Installation Guide is written for
the following audiences:
§ Database
administrators (DBA)
§ System analysts and
designers
§ Integrators and
implementation staff
For more information, see the
following documents in the Oracle Retail Analytics Release 14.1.1 documentation
set:
§ Oracle Retail Analytics
Release Notes
§ Oracle Retail Analytics
Data Model
To contact Oracle
Customer Support, access My Oracle Support at the following URL:
https://support.oracle.com
When contacting
Customer Support, please provide the following:
§ Product version and
program/module name
§ Functional and
technical description of the problem (include business impact)
§ Detailed step-by-step
instructions to re-create
§ Exact error message
received
§ Screen shots of each
step you take
When you install the application for
the first time, you install either a base release (for example, 14.1) or a
later patch release (for example, 14.1.1). If you are installing the base
release or additional patch releases, read the documentation for all releases
that have occurred since the base release before you begin installation.
Documentation for patch releases can contain critical information related to
the base release, as well as information about code changes since the base
release.
To more quickly address critical
corrections to Oracle Retail documentation content, Oracle Retail documentation
may be republished whenever a critical correction is needed. For critical
corrections, the republication of an Oracle Retail document may at times not
be attached to a numbered software release; instead, the Oracle Retail document
will simply be replaced on the Oracle Technology Network Web site, or, in the
case of Data Models, to the applicable My Oracle Support Documentation
container where they reside.
This process will prevent delays in
making critical corrections available to customers. For the customer, it means
that before you begin installation, you must verify that you have the most
recent version of the Oracle Retail documentation set. Oracle Retail
documentation is available on the Oracle Technology Network at the following
URL:
http://www.oracle.com/technetwork/documentation/oracle-retail-100266.html
An updated version of the applicable
Oracle Retail document is indicated by Oracle part number, as well as print
date (month and year). An updated version uses the same part number, with a
higher-numbered suffix. For example, part number E123456-02 is an updated version of a
document with part number E123456-01.
If a more recent version of a document
is available, that version supersedes all previous versions.
Oracle Retail product documentation is
available on the following web site:
http://www.oracle.com/technetwork/documentation/oracle-retail-100266.html
(Data Model documents are not
available through Oracle Technology Network. You can obtain them through My
Oracle Support.)
Navigate: This is a navigate statement.
It tells you how to get to the start of the procedure and ends with a screen
shot of the starting point and the statement “the Window Name window opens.”
This is a code sample
It is used to display examples of
code
1
This release of Retail Analytics
incorporates optional interfaces with these Oracle Retail products which can be
sources for the data warehouse: Oracle Retail Merchandising System (RMS),
Oracle Retail Invoice Matching (ReIM), and Oracle Retail Price Management
(RPM). Additionally, the data warehouse can also operate as a standalone
product and be fed from other legacy systems. If Oracle Retail applications are
used as the source systems, follow the requirements in the installation guides
for each of these applications. It is recommended that the source systems be
on a separate server from the data warehouse which is considered the target
server.
There is significant complexity involved
in the deployment of Oracle Retail applications, and capacity planning is site
specific. Oracle Retail strongly suggests that before installation or
implementation you engage your integrator (such as the Oracle Retail Consulting
team) and hardware vendor to request a disk sizing and capacity planning
effort.
Sizing estimates are based on a number
of factors, including the following:
§ Workload and peak
concurrent users and batch transactions
§ Hardware
configuration and parameters
§ Amount of data
§ Application features
utilized
§ Length of time
history is retained
Additional considerations during this
process include your high availability needs as well as your backup and
recovery methods.
Oracle Retail Advanced Science
Engine (ORASE) is the umbrella term for all new science leveraged by
Category Management, Oracle Retail Demand Forecasting (RDF) and Retail Analytics,
based on common infrastructure. This includes: CDT science (part of CM), DT
science (part of CM and RDF), Assortment and Space Optimization (part of CM),
Advanced Clustering (licensed as a separate Product), Market Basket Analytics
(part of Retail Analytics). All the ORASE components stated here can be
installed using the ORASE installer.
Currently, only the Oracle Retail
Customer Analytics (ORCA) module uses Clustering and Market Basket Analysis
(MBA) components of the ORASE. All these components are installed using the ORASE
Installer. If the implementation has a license for ORCA and has plans to
implement MBA, then an additional license for the Data Mining option is
required. (The Data Mining option is licensed under Oracle Advanced Analytics
on the Technology pricelist.) For additional information on implementing MBA, refer
to the Oracle Retail Advanced Science Engine Installation Guide.
This installation guide provides
details on how to configure the database connection between Retail Analytics
and ORASE schemas. See “Oracle Data
Integrator Configuration Tasks” for more information.
Please note that
<ORASEUSER> is also referenced as <ORMEUSER> or <ORASESCHEMA>
in this documentation.
Note:
Although ORASE and Retail Analytics are packaged as separate installers, the
deployment of the underlying components for both is performed on the same
database instance. Meaning, ORASE and Retail Analytics components are installed
on separate schemas on the same database. Please refer to the Oracle Retail
Advanced Science Engine Installation Guide for information on granting
permissions to the owning schemas.
IMPORTANT:
If you are implementing both Retail Analytics and ORASE, the Retail Analytics
installation MUST be executed prior to initiating the ORASE components
installation.
Check
Supported Database Server Requirements
General requirements for a database
server running Retail Analytics include:
|
Supported on
|
Versions Supported
|
|
Database Server OS
|
OS certified with Oracle
Database 12c (12.1) Enterprise Edition. Options are:
§
Oracle Linux6 for x86-64 (actual
hardware or Oracle virtual machine).
§
Red Hat Enterprise Linux 6 for x86-64
(actual hardware or Oracle virtual machine).
§
AIX 7.1 (actual hardware or
LPARs)
§ Solaris 11 Sparc (actual hardware or logical domains)
|
|
Database Server 12cR1
|
Oracle Database Enterprise
Edition 12cR1 (12.1.0.2) with the following specifications:
Components:
§
Enterprise
Edition
§
Example CD
Note: If you are implementing MBA, you
must obtain an ORCA license with the Data Mining option. The Data Mining
option is licensed under Oracle Advanced Analytics on the Technology
pricelist.
Oneoffs:
§
19623450:
MISSING JAVA CLASSES AFTER PATCH TO JDK 7
Other components:
§
Perl interpreter
5.0 or later
§ X-Windows interface
§ JDK 1.7
|
|
Oracle Data Integrator
|
ODI 11.1.1.7
|
|
Variable
|
Description
|
|
Server OS
|
Operating systems certified
include:
§
Oracle Linux 6
for x86-64 (Actual hardware or Oracle virtual machine).
§
Red Hat Enterprise Linux 6 for
x86-64 (Actual hardware or Oracle virtual
machine).
§
AIX 7.1 (actual hardware or
LPARs)
§ Solaris 11 Sparc (actual hardware or logical domains)
|
|
ODI Studio UI
|
ODI Studio (UI) is NOT
supported on Solaris and AIX Operating Systems. Please refer to the “Installing ODI Files for Retail Analytics on
Windows section” in the “Known
Issues/Limitations” chapter in case you are planning to install ODI
Studio (UI) on either of these two OS.
For Windows and Linux OS, ODI Studio (UI) is supported with 1.7 + .
|
|
Oracle Data Integrator 11g
|
Oracle Data Integrator 11g
Components:
§
Oracle Data Integrator 11.1.1.7
Options:
§ Complete
|
General requirements for an
application server capable of running the Oracle Retail Analytics application
include the following.
|
Supported on:
|
Versions Supported:
|
|
Application Server OS
|
OS certified with Oracle Fusion
Middleware 11g (11.1.1.7). Options are:
§
Oracle Linux 6
for x86-64 (Actual hardware or Oracle virtual machine).
§
Red Hat Enterprise Linux 6 for
x86-64 (Actual hardware or Oracle virtual
machine).
§
AIX 7.1 (actual hardware or
LPARs)
§ Solaris 11 Sparc (actual hardware or logical domains)
|
|
Application Server
|
Oracle Fusion Middleware 11g Release 1
(11.1.1.7.0)
Components:
§ Oracle WebLogic Server 11g (10.3.6)
|
|
Oracle Business Intelligence
Enterprise Edition (BI EE)
|
Oracle BI EE 11.1.1.7
|
If a Single Sign-On is to be used,
verify that Oracle Infrastructure Server 11g has been installed. Verify the
Oracle Business Intelligence Enterprise Edition installation hosting Oracle
Retail Analytics is registered with the Infrastructure Oracle Internet
Directory.
By default, Oracle BI EE 11g uses the
Oracle WebLogic Server embedded LDAP server as the authentication provider to
get information from users and groups. For a production environment, Oracle
recommends using another LDAP server for authentication (Oracle recommends
Oracle Identity Management version 11.1.1.7). You can configure your
installation to use Oracle Internet Directory to store credentials, roles, and
group information.
For more information on setting up
security for Retail Analytics, see the Security chapter of the Oracle Retail
Analytics Implementation Guide.
General requirements for client
running Retail Analytics include:
|
Requirement
|
Version
|
|
Browser
|
Chrome 28+
Internet Explorer 11
Firefox ESR 31
|
|
Requirement
|
Version
|
|
Oracle Retail Merchandising
System (RMS)/Oracle Retail Oracle Retail Sales Audit (ReSA)
|
14.1.1
|
|
Oracle Retail Invoice Matching
(ReIM)
|
14.1.1
|
|
Oracle Retail Price Management
(RPM)
|
14.1.1
|
|
Merchandise Financial Planning
(MFP)
|
14.1.1
|
|
Oracle Retail Advanced Science
Engine (ORASE)
|
14.1.1
|
The following are the prerequisites
for using partitions in the Retail Analytics schema:
§ Identify the tables
that need to be partitioned
§ Identify the
partitioning strategy. See the “Establish
a Retail Analytics Partitioning Strategy” section
for more details.
§ Configure
data file and configuration files, as described in the “Establish a Retail Analytics Partitioning Strategy” section.
It is possible that ODI and Oracle BI
EE have been installed on different hosts. For installing Retail Analytics
files for ODI, you must be on the same host where the ODI product has been
installed. For installing Retail Analytics files for Oracle BI EE product, you
must be on the same host where Oracle BI EE product has been installed.
In addition, find out the owner of
Oracle BI EE software. The user who installed Oracle BI EE software is the user
who will install Retail Analytics files for Oracle BI EE on this server. Any
user can install Retail Analytics files for ODI.
Note:
If ODI or Oracle BI EE is installed on Windows, you cannot use the installer to
copy ODI or Oracle BI EE-related files. You must copy files manually according
to the instruction given. You can also install MMHOME files on Windows. Please
refer to Known Issues/Limitations chapter for more details
You may install all components of
Retail Analytics on one host, or you may install components across multiple
hosts. The files to be installed are copied locally only, so you must be logged
into the target host to do the installation.
1.
Log in to the server from which you want to install one or
more components of Retail Analytics.
2.
Create a staging directory for the Retail Analytics
installation software. There should be a minimum of 800 MB disk space
available in this location.
3.
Copy the ora14application.zip file from the Retail Analytics 14.1.1
release to the staging directory. This is referred to as STAGING_DIR when
installing Retail Analytics.
4.
Change directories to STAGING_DIR and extract the zip file.
This creates an ora/installer subdirectory under STAGING_DIR
2
Database
Installation Tasks – Full
This chapter describes the tasks
required for a full database installation.
Retail Analytics 14.1.1 is a full
baseline installation. If the Retail Analytics 14.1 software is already
installed, please see “Database Installation Tasks – Patch” chapter for
information on Patching to 14.1.1.
It is assumed that Oracle Database 12cR1
(12.1.0.2), with appropriate patches, has already been installed. If not, refer
to “Check Supported Database Server
Requirements” in Chapter 1 before proceeding.
Note: Become familiar with the Retail Analytics application in a development environment before setting up
a production system. The following instructions are recommended for
development and test environments only. When implementing Retail Analytics for
a production environment, refer to capacity planning information to determine
size requirements for table spaces, tables, and indexes. The installation
scripts provided must be modified accordingly.
If a database has already been
created, it is necessary to review the contents of this section to determine if
all database components have been installed and configured properly.
Note: Review the “Patching
Procedures” chapter to understand the Retail
Patching Strategy and the ORPatch concepts before moving on to the next Topic.
To create the staging directory for Retail
Analytics installer, complete the following steps.
Note: The
same installer can be used to install multiple Retail Analytics components. If
you are installing any of the Retail Analytics components (Database, ODI, and
Oracle BI EE) on the same server, they can use the same installer and this step
does not need to be repeated.
1.

 Log into the database server as a user that can connect to the Retail
Analytics database.
Log into the database server as a user that can connect to the Retail
Analytics database.
2.
Create a staging directory for the Retail Analytics installation
software.
3.
Copy the ora14application.zip file from the RA 14.1.1 release
to the staging directory. This is referred to as STAGING_DIR when installing Retail
Analytics database software.
4.
Change directories to STAGING_DIR and extract the ora14application.zip
file. This creates an ora/installer/ subdirectory under STAGING_DIR.
Establish a Retail Analytics Partitioning Strategy
Establish a partitioning
strategy before creating the compressed data mart and historical tables in a
production environment. In doing so, consider the database size and business
requirements. For example, the amount of history to be held at various levels,
and the various functional areas that might be used should be referenced when
determining a partitioning strategy. Additionally, large non-compressed fact
tables should be partitioned for ease of rolling off history. Refer to the Oracle
Retail Analytics Operations Guide for more detailed information regarding
the partitioning strategy for both compressed and non-compressed fact tables.
Refer to Chapter 4, "Partitions, Views, and Other Schema Objects" in
Oracle® Database Concepts 12c Release for further details regarding
partitioning concepts.
Retail Analytics does not require
partitioning to function, however to achieve better performance, partitioning
is very highly recommended. If you choose not to implement partitioning, the
following paragraphs of the Establish Database Partitioning Strategy section may
be skipped. During Retail Analytics installation, when prompted, simply choose
to not setup partitioning. If you will be using partitioning, review this
section in its entirety before proceeding with the installation.
Sample Partitioning
The Retail Analytics 14.1.1 database
schema installer runs the partitioning script (partition.ksh), if the
partitioning option is chosen during install. Make sure that the pre-requisites
for partitioning are met before choosing this option. See “Preinstallation Tasks” for more details.
Retail Analytics provides a sample set
of data and configuration files. This can be used as a reference for creating
additional data files and setting up the configuration file. See the details that
follow about the data file and configuration file.
Production Partitioning
To prepare for production
partitioning, follow the steps provided below. Since partitioning strategies
are complex, the following steps should be implemented by an experienced individual
who has a thorough understanding of partitioning principles and the data to be
partitioned.
Note:
For information regarding partitioning concepts see Chapter 4,
"Partitions, Views, and Other Schema Objects" in Oracle® Database
Concepts 12c Release.
Partition Strategy for Full Install
The Partition strategy is available
for the RA 14.1.1 Full Install For Full, go to the location mentioned below to
perform the partition strategy.
The partition script directory varies
for Full and Patch.
|
Install Type
|
Partition Directory
|
|
Full
|
<STAGING_DIR>/ora/installer/ora14/ra_db/radm/Partitioning
|
Note:
For the remainder of this document, the Partition directory is referred to as
<PARTITION_DIR>. For FULL, set the PARTITION_DIR.
Use the Microsoft Excel spreadsheet to
determine an appropriate partitioning strategy (<STAGING_DIR>/ora/installer/sample/RA_partitioned_tables.xls).
The Partition Type column indicates the recommended partitioning option(s) for
each table. The Default Number of Partitions column indicates the number of
partitions to create for each table. For hash partition, this number will be
used to create DDL.
Modify <PARTITION_DIR>/partition_attributes.cfg
based on the partitioning strategy defined in ra_partitioned_tables.xls.
Changes to this file should be made only as indicated.
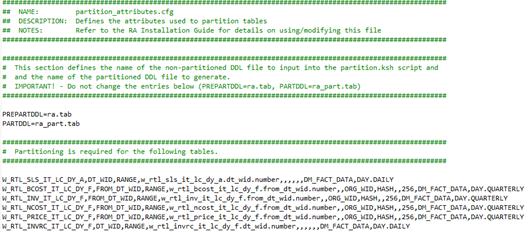
partition_attributes.cfg file: (file
is comma-delimited)
Sample Entry:
W_RTL_SLS_IT_LC_DY_A,DT_WID,RANGE,w_rtl_sls_it_lc_dy_a.dt_wid.number,,,,,,DM_FACT_DATA,DAY.DAILY
Field 1: Table Name (do not
modify)
Field 2: Partition Key (do not
modify)
Field 3: Partition Type -
Modify based on value in the Partition Type column in
ra13_partitioned_tables.xls -
Valid values are RANGE, LIST, and HASH (case sensitive).
Field 4: Partition Data
Definition Filename (do not modify)
This field is ignored if Partition Method is not RANGE or LIST. Please refer to
Step 4 on the format of the file naming convention.
Field 5: Partition Hash Count –
Modify based on value in the Default Number of Partitions column in
RA_partitioned_tables.xls. This field is ignored if Partition Method is not
HASH.
Field 6: Sub-Partition Key (do
not modify)
Field 7: Sub-Partition Method
(do not modify)
Field 8: Sub-Partition Data Definition
Filename (do not modify)
Field 9: Sub-Partition Hash
Count (do not modify)
Field 10: Tablespace Name
(optional)
Field 11: Partition Reference
file (optional)
Example:
Step 3: Creating Data Definition Files using Retail
Analytics pre-packaged programs (Optional)
If you already have Retail Analytics
time tables in another Retail Analytics 14.1.1 environment, then you can
generate the partition reference file in that environment and use it for
creating the partition files. This step is optional. This program facilitates
the creation of the partition files mentioned in the partition_attributes.cfg file
(Field 4) using the files partition reference file (Field 11).
Steps to follow:
1.
Execute <STAGING_DIR>/ ora/installer/ora14/mmhome/full/src
/SIL_RetailInitialDatadefFileLoad.ksh program in the environment where you have
Retail Analytics time tables.
2.
Copy the files DAY.DAILY, DAY.QUARTERLY, WEEK.WEEKLY and
WEEK.QUARTERLY from $ODI_HOME/file/ra/install to the installation directory “<PARTITION_DIR>/data_def”.
3.
Change directory to <PARTITION_DIR>/, then execute create_data_def.ksh.
This script reads configuration information from the partition_attributes.cfg
file and generates the partition data definition file using DAY.DAILY,
DAY.QUARTERLY, WEEK.WEEKLY and WEEK.QUARTERLY files.
If “Step
3: Creating Data Definition Files using Retail Analytics pre-packaged programs
(Optional)” is performed then verify the Data_def files generated and make
any changes as necessary.
If “Step
3: Creating Data Definition Files using Retail Analytics pre-packaged programs
(Optional)” is NOT performed then manually create files for each table that
is in partition_attributes.cfg file. An existing file can be used as a
reference template.
Tables partitioned or sub-partitioned
by RANGE or LIST have a corresponding data definition file in the <PARTITION_DIR>/data_def
directory and should not be removed or renamed. These files are used to define
the data boundaries for each partition. Values must be entered in each file
based on the Recommended Partitioning Policy column in the ra_partitioned_tables.xls:
The format of a data definition file
name is <table name>.<partition key column>.<partition key data
type>, e.g., w_rtl_sls_it_lc_dy_a.dt_wid.number. When placing data into
these files, enter one data partition value per line. If users already have
Retail Analytics time tables in some environments, DT_WID and WK_WID can be
found in Retail Analytics time calendar table W_MCAL_DAY_D or W_MCAL_WEEK_D.
When using RANGE partitioning, the
data definition files will use the value less than concept.
For example, in w_rtl_sls_it_lc_dy_a.dt_wid.number
above, the first partition contains all data less than 2001092. The second
partition contains all data greater than or equal to 2001092 and less than
2001187. A fourth MAXVALUE partition is automatically created for all data
greater than or equal to 2001281.
When using LIST partitioning, the data
definition files use the value equal to concept.
Example:
Create a file same as
w_rtl_invrc_it_dy_f.dt_wid.number
Content below

The above values should be the actual
row_wids from W_MCAL_DY/WK tables.
For all the tables that need
partitiioning please make sure to have row_wids from W_MCAL_DAY_D or W_MCAL_WEEK_D
depending on the table grain.
The installer will run the
partition.ksh script. However it can be run in standalone mode by executing the
following steps:
Change directory to
<PARTITION_DIR>, then execute
"ksh partition.ksh" at the UNIX command prompt. This script reads
configuration information from the partition_attributes.cfg file and generates
the partitioned DDL file <PARTITION_DIR>/ra_part.tab. This file is used
later during the installation process.
Sample output from partition.ksh:
Checking
partition_attributes.cfg for errors
Generating Partitioned DDL for
W_RTL_SLS_IT_LC_DY_A
partition.ksh has generated the
DDL for partitioned tables in the ra_part.tab file.
Completed successfully
Example:
<$PARTITION_DIR>./partition.ksh
Make sure that data_def exist as
folder under <$PARTITION_DIR> and the ra.tab and partition_attributes.cfg
file exist.
Note:
If you run the script stand alone and then run the installer with Partition set
to NO, you must replace ra_part.tab with ra.tab.
Note: Out of the box, no monthly range
partitioning is provided for the following tables:
o W_RTL_STCKLDGR_SC_LC_MH_F
o W_RTL_LOY_CUST_CL_LC_MH_F
o W_RTL_LOY_CUST_DP_LC_MH_F
Create the Retail Analytics Database
It is assumed that Oracle Database 12cR1,
with appropriate patches, has already been installed. If not, refer to “Check Supported Database Server Requirements”
in Chapter 1 before proceeding. Additionally, STAGING_DIR in
this section refers to the directory created in the section, “Create a Staging Directory for Retail Analytics
Database Files,” in Chapter 1.
Review the “Establish a Retail Analytics Partitioning Strategy”
section before continuing.
If a database has already been
created, it is necessary to review the contents of this section to determine if
all database components have been installed and configured properly.
If a database instance has not been
created, create one following the process in
“Appendix: Create the Database Instance Using
an Oracle Generic Template.”
Complete
the following steps.
1.
Change directories to
<STAGING_DIR>/ora/installer/create_db
2.
Log in to SQL*Plus as SYSDBA and execute:
Note:
In the create_ra_tablespaces.sql script, replace <data_file_path> with
the actual physical path before executing this script.
Note: If you receive the message,
“ORA-01543: table space table space name already exists,” the tablespace is
already in the database. You can ignore it.
SQL>@create_ra_tablespaces.sql
3.
Review create_ra_tablespaces.log for errors and correct as
needed.
Create Retail Analytics Schema Owners
Follow the instructions below to
create the required Retail Analytics Oracle schema.
Note: The
Retail Analytics schemas must be created prior to running the RA database
schema installation. The installer will validate this user before proceeding
with installation.
Up to seven users will be created. Use ra_roles_create_grant.sql
to create required roles. Use cr_radm_user.sql to create Retail Analytics data
mart schema. Use cr_rafedm_user.sql to create Retail Analytics front-end data
mart schema. Two schemas will be created by cr_odi_users.sql and they are: ODI
work repository schema and ODI master repository schema. Use
cr_ra_batch_user.sql to create the batch user. Use create_rms_user.sql to
create the rms-read only user account that resides in the same database as RMS.
After the schemas are created, use cr_db_link.sql to create a db link such that
the batch user schema can access objects in the RMS user schema. Use
External_Dir_Create.sql to create a directory object needed by RMS user schema,
if applicable.
The
following table provides information about schemas.
|
Schema
|
Schema Title (examples)
|
Schema Description
|
Created by Script
|
|
Data Mart User
|
RADM01
|
Includes the main target
tables, such as Dimensions, Facts, and Aggregates
|
cr_radm_user.sql
|
|
Batch User
|
RABE01USER
|
Includes all the temporary
tables. ODI execution is done from this user. All data mart tables have DDL
(Select) and DML (Insert, Update, Delete) grants to RABE01USER.
|
cr_ra_batch_user.sql
|
|
Front-End User
|
RAFEDM01
|
Reporting user with synonyms
and access to RADM01 schema. The OBIEE frontend should be connected to this
user. All data mart tables have DDL (Select) and DML (Insert, Update, Delete)
grants to RAFEDM01.
|
cr_rafedm_user.sql
|
|
RMS Batch User for Retail
Analytics
|
RA_RMS01USER
|
This user has access to the
source schemas where Retail Merchandising Systems tables exist for Oracle
Retail applications, such as RMS and RPM.
It is recommended to have
separate RMS Batch user exclusively for Retail Analytics product.
This schema is also referred to
as “RMS user schema” or “RMS Batch User” in other parts of this document.
|
create_rms_user.sql
|
|
ODI Master Schema
|
ODI_MREP_USER
|
This ODI Master Repository user
includes ODI job definitions and topology information.
|
cr_odi_users.sql
|
|
ODI Work Schema
|
ODI_WREP_USER
|
This ODI Work Repository user
includes ODI job status information.
|
cr_odi_users.sql
|
Complete the
following steps.
1.
Change directories to <STAGING_DIR>/ora/installer/create_db.
2.
Log in as SYSDBA to the Retail Analytics database instance
and execute RA_ROLES_CREATE_GRANT.SQL.
SQL>@ra_roles_create_grant.sql
This script creates roles
required by Retail Analytics.
3.
Review the contents of cr_radm_user.sql, cr_rafedm_user.sql cr_odi_users.sql,
cr_ra_batch_user.sql and create_rms_user.sql scripts for the names and
passwords of users that will be created. All scripts will prompt for the user
name and a password when executed. Remember the user and password provided,
because they are used later in the installation.
Note: The
Retail Analytics data mart, Retail Analytics front-end data mart, and Retail
Analytics batch user must be created on the same database instance.
4.
Log in to SQL*Plus as SYSDBA to Retail Analytics database
instance and execute the following scripts.
§ SQL>@cr_radm_user.sql
Run this once for:
–
Retail Analytics data mart schema
§ SQL>@cr_rafedm_user.sql
Run this once for:
–
Retail Analytics front-end data mart schema
§ SQL>@cr_odi_users.sql
Run this once for each of
the following schema creation:
–
ODI work repository
–
ODI master repository
§ SQL>@cr_ra_batch_user.sql
Run this
once for:
–
Oracle Retail Analytics Batch User Schema
5.
Log in as SYSDBA to RMS master schema’s database instance and
execute create_rms_user.sql.
§ SQL>@create_rms_user.sql
This script is only
applicable if you are integrating Retail Analytics with RMS.
Note:
The “RA RMS user schema” must be created on the same database instance as the
“RMS master schema”.
Note:
The “RMS user schema” is synonymous with “RA RMS schema” and “RMS Batch User”
as mentioned elsewhere in this document. It is largely a schema that has
read-only access to the “RMS master schema”
6. Log
in to the Retail Analytics batch schema and execute the following script.
SQL>@cr_db_link.sql
a.
When prompted (“Please enter a connection string you would
like to use (for example, BATCHUSER_DB) ->”) enter a descriptive database
link name.
b.
When prompted (“Please enter the name of target database”),
enter the database instance name for RA RMS User schema to which you are trying
to establish a connection.
c. When
prompted (“Please enter the username used to connect to the target DB”), enter
the RMS User schema name
d.
When prompted (“Please enter the password for the user above
(default [retail])”), enter the password for RA RMS User schema.
7. Log
in as SYSDBA to RMS master schema’s database instance and execute
External_Dir_Create.sql
SQL>@External_Dir_Create.sql
a. When
prompted (“Please enter the location of ODI Home”), enter the location of ODI
Home, for e.g.: /u00/odi/product/11.1.1.7/oracledi/agent
b. When
prompted (“Please enter the schema user to grant access to the external
directory under <ODI Home>/data”), enter the name of RA RMS user schema
you created in step #5.
Note:
This step is only applicable if you are integrating Retail Analytics with RMS.
Even if you do not need to run this script now, you must run it if you later
decide to integrate with RMS.
Retail Analytics release 14.1.1 supports
12cR1. Also, only 64-bit platforms (as noted in hardware specifications) are
supported. Therefore, only the 64-bit version of the client libraries should be
used.
Perform the following procedure to
install Retail Analytics:
Note:
The installer does not run on Windows. If ODI or Oracle BI EE is installed on
Windows, you cannot use the installer to copy ODI or Oracle BI EE files for
Retail Analytics. You must follow the manual installation process detailed in the
“Known Issues/Limitations” chapter.
1.
Change directories to <STAGING_DIR>/ora/installer.
2. Set
and export the following environment variables.
|
Variable
|
Description
|
Example
|
|
ORACLE_HOME
|
Oracle server home. Only
applicable when you are installing the database schema objects.
|
ORACLE_HOME=full_path_of_
12.1.0.2_home
export ORACLE_HOME
|
|
LD_LIBRARY_PATH
|
LD Library Path should contain
the Oracle database libraries you want to use.
|
LD_LIBRARY_PATH=$ORACLE_
HOME/lib (64-bit)
export LD_LIBRARY_PATH
|
|
JAVA_HOME
|
Java home. Ensure the version
of Java is 64-bit.
|
JAVA_HOME= /opt/app/jdk/jdk1.7
export JAVA_HOME
Refer to the ODI product
installation guide for the compatible version of JDK.
|
|
PATH
|
PATH should contain directories
for Oracle and Java executables
|
PATH=$JAVA_HOME/bin:$ORACLE_HOME/bin:$PATH
export PATH
|
|
TNS_ADMIN
|
Only applicable if tnsnames.ora
is not located under $ORACLE_HOME/network/admin. Set TNS_ADMIN to point to a
directory where tnsnames.ora is found. If tnsnames.ora is located under $ORACLE_HOME/network/admin,
(which is true in most cases), do not set this variable.
|
TNS_ADMIN=/home/user/misc
export TNS_ADMIN
|
|
NLS_LANG
|
Locale setting for Oracle
database client.
|
NLS_LANG=AMERICAN_AMERICA.
AL32UTF8
export NLS_LANG
|
|
DISPLAY
|
Address and port of X server on
desktop system of user running install. Optional for dbschema installer.
|
DISPLAY=<IP address>:0.0
export DISPLAY
|
|
ODI_HOME
|
This directory contains the ODI
installation files where ODI server is installed.
|
Provide the path of ODI_HOME where
the ODI server is installed
For example:
export
ODI_HOME=/u00/odi/product/11.1.1.7/oracledi/agent
|
3.
If you are going to run the installer in GUI mode using an X
server, you need to have the XTEST extension enabled. This setting is not
always enabled by default in your X server. See “Appendix: Common Installation Errors”
for more details.
4.
Run the install.sh script to start the installer.
Note:
The following are the usage details for install.sh. The typical usage for GUI
mode is no arguments.
ksh install.sh
[text | silent]
Note:Usually, if you have multiple instances, the RA RMS user schema would
be on one instance and all Retail Analytics schemas (RA data mart, RA front-end
data mart, RA backend) are on the other instance.
Depending on system resources,
a typical installation takes about 30 to 60 minutes.
5.
Verify that the installer reports “SUCCESS” for the Preinstall
Check. If it reports “FAILED,” check for errors in the output under the “Checking
environment for installation” section, and verify that your environment
variables are set properly.
6.
For the initial RA installation select the Full option on the
Full Install or Patch screen. If you are patching from existing 14.1 version
then ‘No’ option will be used. See the Retail Analytics Database Schema –
Patch chapter.
7.
Check the Install appropriate checkbox and continue with
installer. Depending on system resources, a typical installation can take 30
minutes to 1 hour.
8.
9.
The RA Installer provides the option of creating the ODI Repository,
copying the ODI files, scripts, and Oracle BI EE files in addition to the RA
objects.
10.
After the installer is complete, you can check its log file:
ra-install.<timestamp>.log in the path <STAGING_DIR>/ora/installer/
11.
The installer leaves behind the ant.install.properties file
for future reference and repeat installations. This file contains inputs you
provided. As a security precaution, make sure that the file has restrictive
permissions.
Example:
chmod 600
ant.install.properties
Resolving
Errors Encountered During Database Schema Installation
If the database schema installer
encounters any fatal errors, it halts execution immediately. To resolve this
issue, you can choose one of the following options.
Restart with a Clean
Set of Schemas
To restart with a
clean set of schemas, complete the following steps.
1.
Clean up all database schema objects created by the installer
for the RA RMS user schema, Retail Analytics data mart schema, Retail Analytics
front-end data mart schema, and Retail Analytics batch schema.
§ You
may even drop these schemas and recreate them by logging into SQL*Plus as
SYSDBA. Also run the External_Dir_Create.sql
to re-create the external directory with the necessary grants.
§ If
the RMS batch user schema is getting re-created with a different username
and/or password, then the database link also needs to be re-created by running cr_db_link.sql.
2.
Remove the RETAIL_HOME provided for the installation and
recreate the directory.
3.
Rerun the installer. If this message is displayed ("A
previous installation attempt was detected. Do you want to resume the previous
installation?"), enter no<ENTER>
4.
The installation runs as if run for the first time on clean
schemas.
Resume from the
Previous Point of Failure
To resume from the
previous point of failure, complete the following steps.
1.
If a SQL file failed to complete successfully, the installation
log indicates the name of the SQL file that failed and points to the directory
($RETAIL_HOME/orpatch/logs) where you can go to look at the exact errors. Additional
error information for invalid objects can be found in
$RETAIL_HOME/orpatch/logs/detail_logs/dbsql_{schema}/invalids. The {schema}
refers to radm, rarms, rafedm or rabe.
If the fatal installation error
happened while importing data using the import utility, you must resolve the
error also.
2.
Re-run the installer. If this message is displayed ("A previous
installation attempt was detected. Do you want to resume the previous
installation?"), enter yes<ENTER>.
3.
Subsequent executions of the installer skip the SQL scripts
which have already been executed in previous installer runs. This is possible
because the installer maintains entries in a table called DBMANIFEST of the
scripts that have been run. It also maintains an orpatch_restart.state file
when the install restarts.
Note:
If you are resuming the previously-failed database object installation, you
must take care to restore the database schema to the resumable state. For
example, say XYZ.sql failed to complete successfully, which ended up creating
several database objects but not all. Since you will be resuming with this
file, you must remove any objects that were created with this file by examining
the file and the database.
3
Oracle Data Integrator Configuration Tasks
This chapter is for new customers only.
An existing 14.0.1 customer can skip this chapter and go to chapter Retail
Analytics DB Schema –Patch. It is assumed that Oracle Data Integrator 11g
(11.1.1.7 version) software has already been installed. If you need more
information in addition to the following tasks, refer to ODI installation
documentation.
Please follow ODI documentation for
any ODI administration activities like setting up agents or ODI code migration
across different environments using the ODI export/import process. It is very important
to carefully assign the correct ID numbers while creating the master and work
repositories.
Note:
Please use the unique internal IDs ranging between 403 and 425 for work
repositories.
The latest environment to which code is imported should have a
higher ID number than the one from which it is exported.
For example, if the code needs to be
imported into PRODUCTION env from DEV env then the IDs could be as follows:
DEV ENV: 403 is the
internal ID of the work repository
PROD ENV: work repository
internal ID should be higher than 403.
Terminology
This section provides definitions for
applicable terminology.
This directory contains the ODI
installation files. For this section the ODI home is set under the following
path:
/u00/odi/product/11.1.1.7/oracledi/agent
Set
the path of the ODI_HOME as per your ODI installation location.
Note:
GET_ODI_HOME is an ODI global variable that holds the ODI_HOME value (Example: GET_ODI_HOME
= /u00/odi/product/11.1.1.7/oracledi/agent
The default ODI user =
SUPERVISOR
The default ODI password =
<See ODI_Post_Install.txt for password >
Note:
ODI_Post_install.txt is found under <STAGING_DIR>/ora/installer/ora14/mmhome/full/ra_odi_source_code,
where <STAGING_DIR> is the directory where you unzipped the installer.
By default, the JDBC connection
is specified as jdbc:oracle:thin@<host>:<port>:<sid>. During
configuration, customers must replace this with the actual credentials for the environment.
Note:
OCI connectivity can also be used instead of JDBC. Contact your database
administrator.
Note:
The jdbc url format varies for RAC database. Contact your database
administrator if you are using RAC database. The url format will be jdbc:oracle:thin@<host>:<port>/<service_name>
(for RAC and Multitenant database) or jdbc:oracle:thin@<host>:<port>:<SID>
Public Database
Links need to be created between RMS batch USER (example RA_RMS01USER) and
Retail Analytics Backend user (RABE01USER) and the DB-Links need to be
explicitly mentioned in the Data Servers, configured in the ODI Topology.
In ODI, Data
Server for RADM01 (used in this guide): ORACLE_BI_APPLICATIONS_RA_INSTALL
Data Server for
RABE01USER (used in this guide): ORACLE_BI_APPLICATIONS
Data Server for
RMS01/RMS01USER (used in this guide): ORACLE_RETAIL_SOURCE
Connecting to the Retail Analytics ODI
Repository
To connect to the Retail Analytics ODI
repository, create a new Retail Analytics ODI Login as follows.
Depending on the operating system you
are using to launch ODI follow the procedure for either UNIX or Windows
UNIX
The following steps apply to the UNIX
environment.
1. From
the UNIX environment navigate to the path mentioned below set up DISPLAY and execute
the following command to launch ODI Studio
Path: Cd <$ODIHOME>/..//client/
Command to Execute: ./odi.sh
2.
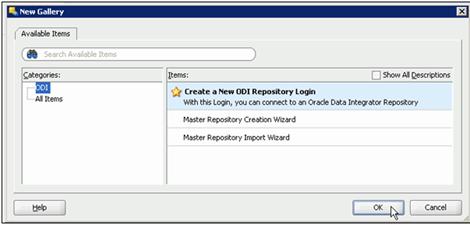
Navigate to File > New. In the New Gallery, in the
Categories tree, select ODI. From the Items list, select Create a New ODI
Repository log in.
Note:
Please refer to the Known
Issues/Limitations chapter for the compatible JDK version to be used with
ODI Studio UI before executing odi.sh
Windows
For Windows, do the following.
1.
To launch ODI Studio in Windows, do the following.
2.
From the Programs menu, select Oracle -> ODI Data Integrator.
Note:
Please refer to the Known
Issues/Limitations chapter for the compatible JDK version to be used to
launch ODI Studio.
3.
Navigate to File > New > In the New Gallery, in the
Categories tree, select ODI.
4.
From the Items list, select Create a New ODI Repository Login.
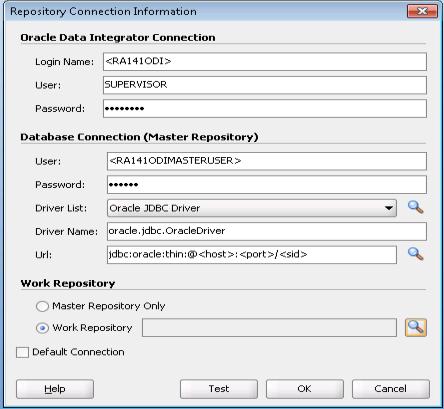
5. Configure
Repository Connections with the parameters as shown in the sample screenshot
below. To enter the JDBC URL, click the button next to JDBC URL field and
select jdbc:oracle:thin:@<host>:<port>:<sid>. Edit the URL
with the below format. jdbc:oracle:thin@<host>:<port>/<service_name>
(for RAC and Multitenant database) or
jdbc:oracle:thin@<host>:<port>:<SID>. Click the Work
Repository radio button.
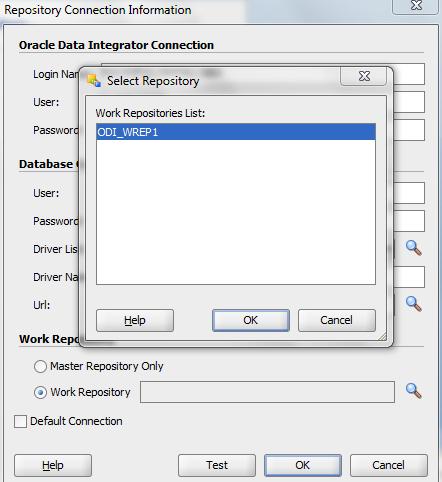
6. Select
the work repository name from the Work Repositories List and click OK.
7. Click
Test to verify a successful connection. Click OK to save the
connection.
1.
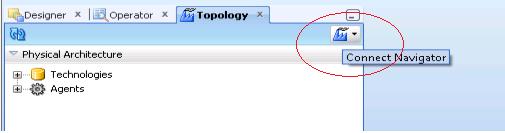
Select the Topology tab and click the Connect Navigator
icon from the upper right side as shown in the screen.
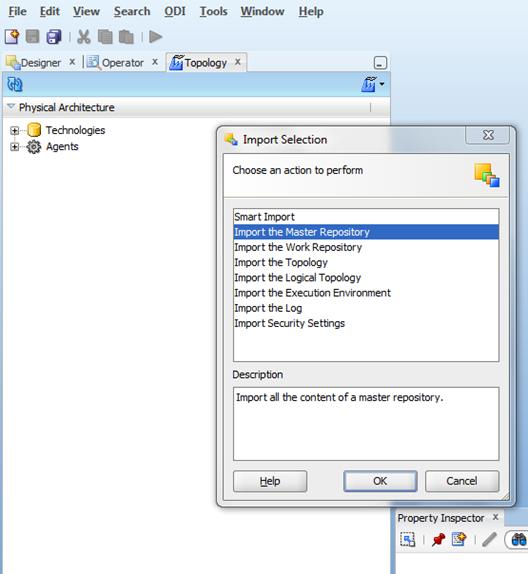
2. Select
Import from the dropdown list. The Import Selection screen is launched.
3. Select
the Import the Master Repository option and click OK.
4.
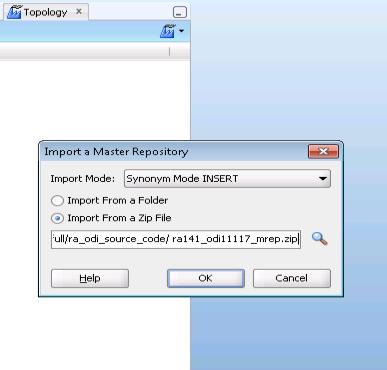
Select Synonym Mode Insert from Import Mode dropdown. .Select
the Import from a zip file radio button.
5.
Export Zip File: Browse to the location of the zip files, and
select the zip file to import from <STAGING_DIR>/ora/installer/ora14/mmhome/full/ra_odi_source_code/
ra141_odi11117_mrep.zip
6. Click
OK.
7.
The following message is displayed: The file being imported
contains objects from a repository with ID xx, this repository is not declared.
Select Yes. This will import Retail Analytics ODI code into the master
repository and verify the Import report once the master repository is imported.
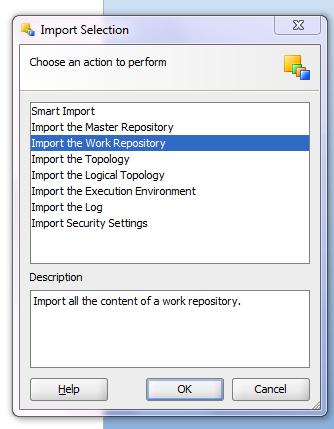
1. From
the Designer tab, click the drop down list on the upper right side of the panel
and select Import. The Import Selection screen is displayed. Select the Import
the Work Repository option and click OK.
2. In
the Import Mode field, select Synonym Mode Insert and select Import
from the zip file.
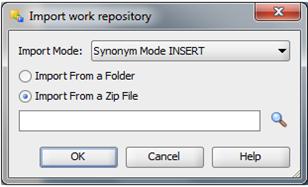
3. Browse
to the location of the zip files, select the zip file to import. Click Open.
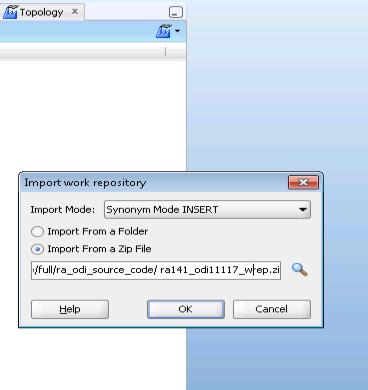
Select from location
<STAGING_DIR>/ora/installer/ora14/mmhome/full/ra_odi_source_code /ra141_odi11117_wrep.zip
4.
From the Import work repository screen, click OK.
5. Click
Yes if any warnings show up.
6. Click
Yes when the following message is displayed.
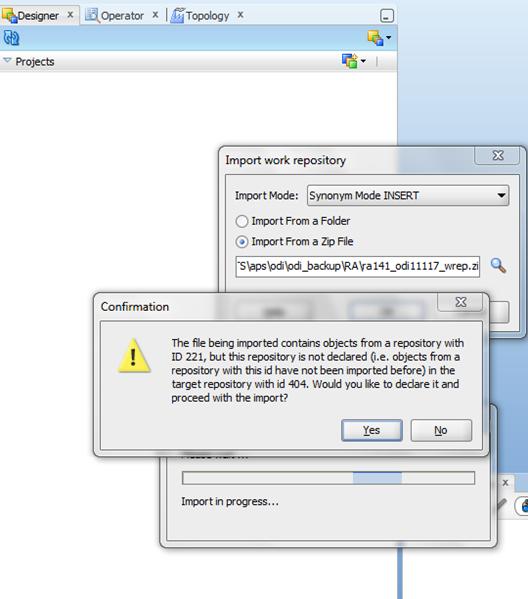
Important: Importing
the Work Repository can take as long as an hour. Do not close the Designer
window until the import is complete.
7. After
the .zip file is imported, the Projects screen appears.
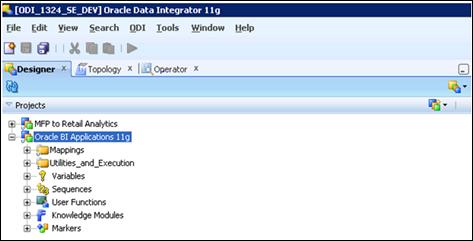
When importing is finished, you should
see the projects imported into the work repository on the left hand side of
Designer.
The following are notes regarding
creation of the ODI Agent:
1.
Configure odiparams.sh file before creating physical agent.
This file is located under $ODI_HOME\bin. These parameters are used by Agent.
UNIX: odiparams.sh
The following parameters must be
configured:
§ ODI_MASTER_DRIVER:
JDBC driver used to connect the Master Repository.
§ ODI_MASTER_URL:
JDBC URL used to connect the Master Repository.
§ ODI_MASTER_USER:
Database account used to connect the Master Repository.
§ ODI_MASTER_ENCODED_PASS:
Database account password. The password must be encoded by running the
following command
./encode.sh <password> from $ODI_HOME/bin.
§ ODI_SECU_WORK_REP:
Name of the Work Repository to connect. This Work Repository must be attached
to the master repository.
ODI_USER: OracleDI user
used to launch a scenario which is by default SUPERVISOR
§ ODI_ENCODED_PASS:
OracleDI user password. The password must be encoded by running encode.sh from
$ODI_HOME/bin. For example if the password a client wants to use is ORACLE then
do the following:
Execute .
encode.sh ORACLE
Refer to the
encode.sh file for more details.
§ ODI_INIT_HEAP=256M
ODI_MAX_HEAP=1024M
Please consider the following
two options for ODI better performance. It is recommended that you always go
through the ODI documentation for more ODI product related activities.
§ Tune
JVM heap options: ODI uses java runtime environment for most of the knowledge
modules and message-driven functionalities. The heap settings for ODI are in the
odiparams.bat script file and the default values for the ODI_INIT_HEAP and
ODI_MAX_HEAP properties are 256M and 1024M. In most of the implementations
where ODI is used, these settings are relatively low and result in an out of memory
error exception when the packages/interfaces are run. The recommended settings
are 256M for ODI_INIT_HEAP and 1024M for ODI_MAX_HEAP. Your max heap setting
should be based on how many packages and the volume of tasks performed by those
packages.
§ Optimize
the batch load size: When uploading to a RDBMS data storage, batch upload size
can be a very effective setting and improve the runtime of an interface/package
significantly. Most of the relational databases have two properties that can be
set in the Physical Schema definition of the database technology under Topology
Manager. The two settings are Array Fetch Size and Batch Upload Size. These settings
are typically quite low and should be increased to the optimal values to make
the loads faster.
To configure schemas, do the
following.
1.
From a UNIX Prompt where the installer has been run, go to
odi/bin directory.
cd
<STAGING_DIR>/ora/installer/ora14/ra_automation/conf/odi/bin
2.
Edit 03_ConfigureTopology.properties and enter the passwords
for configuration.
Note:
For security reason, installer does not populate the files with passwords.
After setting-up the topology it is advised to remove the password entry from
this file.
3.
From a UNIX Prompt from where the installer has been run, go
to lib directory.
cd
<INSTALLER>/ora14/ra_automation/lib
before running the below commands make
sure JAVA_HOME variable is setup as mentioned in chapter “Run the Retail
Analytics Database Schema Installer”
4.
Run the following command:
. ./setEnv.sh
5.
Run the following command:
. ./setEnv_odi11.1.1.7.0.sh
6.
Execute the following command.
java 03_ConfigureTopology –p ../conf/odi/bin/03_ConfigureTopology.properties
odiRepository.jar
The output for above command should be
:
May
06, 2015 1:39:33 AM org.eclipse.persistence.default
INFO:
EclipseLink, version: Eclipse Persistence Services - 2.3.1.v20111018-r10243
May
06, 2015 1:39:33 AM org.eclipse.persistence.default
INFO:
work-session login successful
May
06, 2015 1:39:33 AM org.eclipse.persistence.default
INFO:
master-session login successful
May
06, 2015 1:39:34 AM org.eclipse.persistence.default
INFO:
login successful
May
06, 2015 1:39:35 AM org.eclipse.persistence.default
INFO:
work-session logout successful
May
06, 2015 1:39:35 AM org.eclipse.persistence.default
INFO:
master-session logout successful
Note:
Please note that file “03_ConfigureTopology.properties ” has already been
populated by the installer
Once the above script runs
successfully verify the topology configurations by logging into ODI Studio as
follows.
1.
From a UNIX prompt, execute:
<$ODIHOME>/../client/odi.sh
2.
Connect to the repository and navigate to Topology.
Note: From
the Programs menu, to launch in Windows, select Oracle -> ODI Studio ->
Topology.
3.
Click the Physical Architecture tab to configure the Physical
Schemas.
4. Select Technologies à Oracle.
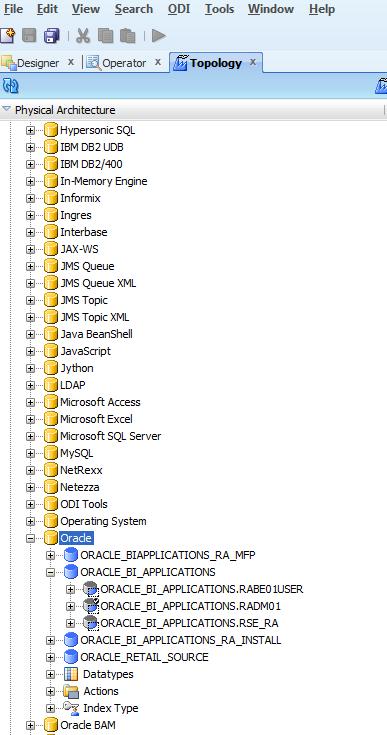
5. Select
the respective data server to review the connection details based on your database
connectivity credentials.
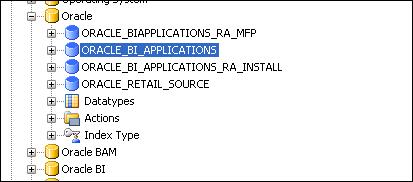
6.
The user and password default to the settings from the
03_Configure_Topology.properties file. Verify the connection setup by clicking Test
Connection.
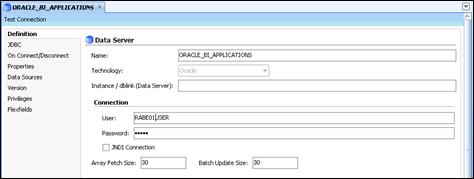
7. Select
an Agent (Local is acceptable) to test the connection and click Test.
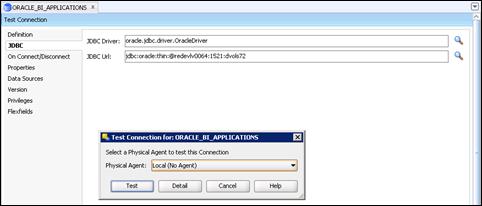
8. When
the test is complete, click OK. The Data Server is now successfully verified/modified.
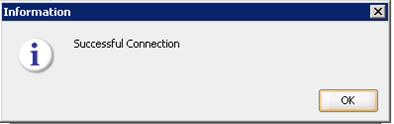
9.
Repeat the above steps and validate all other data servers by
providing the password and testing the connection.
Validate Physical Schemas
The physical schemas inside all data
servers are already modified
For example, under ORACLE_BI_APPLICATIONS
data server, verify physical schemas for Retail Analytics Batch User (for
example, RABE01USER), Retail Analytics Data Mart User (RADM01) as explained in
the following steps.
1.
Double click and select the physical Schema under the data
server.
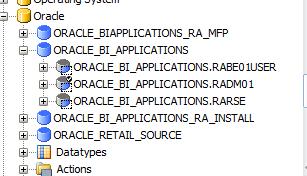
a.
Proper Schemas are already selected from the drop down list
(highlighted).
b.
Default check box is already checked.
c.
Ensure that the WORK_SCHEMA for Retail Analytics Data Mart
User (RADM01) is setup with Retail Analytics Batch User (for example,
RABE01USER).
d.
Retain the values for E$, Loading, I$, Data stores, Views, and
Triggers options as they are.
Note: The
LOADING_TAB_PREFIX is a Global variable defined in the ODI designer Module
which is used in all the Retail Analytics SDE Packages as a REFRESH VARIABLE.
The Default value of the variable is C$. This variable tracks the Session
number of the SDE Jobs.
Refer to the “ODI
Designer Configuration” section for details.
2.
Double click and select the physical schema under the data
server ORACLE_RETAIL_SOURCE.
a.
Check the default check box for RMS Batch User for retail
analytics as shown below.
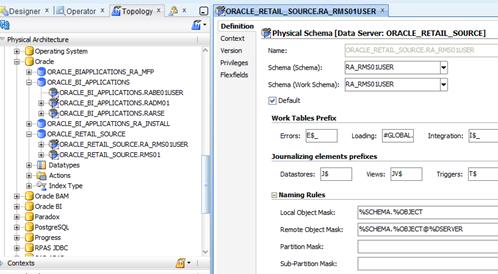
b.
Review the WORK_SCHEMA for ORACLE_RETAIL_SOURCE to verify it
is set to RMS Batch User for retail analytics as shown below.
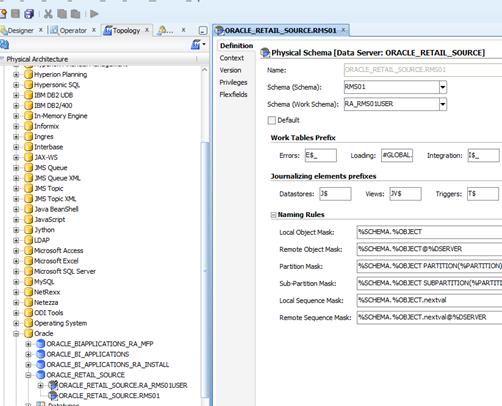

3.
Refer to Contexts, which are already created with the import
of the master rep zip file.
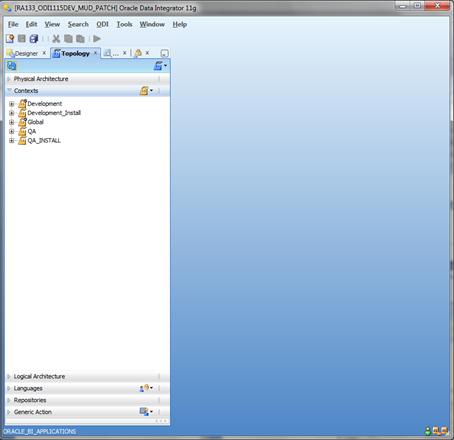
4. Verify
the Context Details.
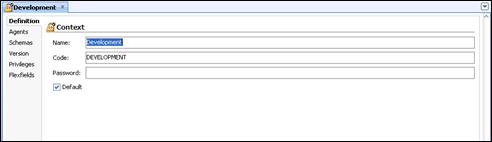
The following steps must be performed
to ensure correct mapping of the Logical schema with the Physical schemas by
means of a Context.
5.
Edit “Development” Context by going to Topology à Contexts à
double click Development.
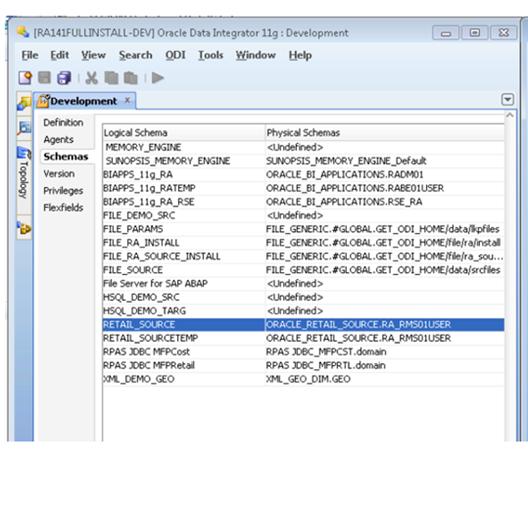
6. For
the RETAIL_SOURCE logical schema, map it to a physical schemas value of
ORACLE_RETAIL_SOURCE.RMS MASTER SCHEMA from the drop down as shown in the below
example if not done already.
7. For
the RETAIL_SOURCETEMP logical schema, map it to a physical schema value of ORACLE_RETAIL_SOURCE.RA_RMSBATCHUSER
SCHEMA if not done already.
8.
For the BIAPPS_11g_RATEMP logical schema, map it to a physical
schemas value of ORACLE_BI_APPLICATIONS.RABATCHUSER from the drop down as shown
below if not done already.
9. For
the BIAPPS_11g_RA logical schema, map it to a physical schemas value of ORACLE_BI_APPLICATIONS.RADATAMARTUSER
from the drop down as shown below if not done already.

10.
Repeat the above step for QA context and for GLOBAL context.
11.
Click Save when prompted to save your changes.
12. Edit Development_Install
context. Go to Topology à Contexts and
double click Development_Install.
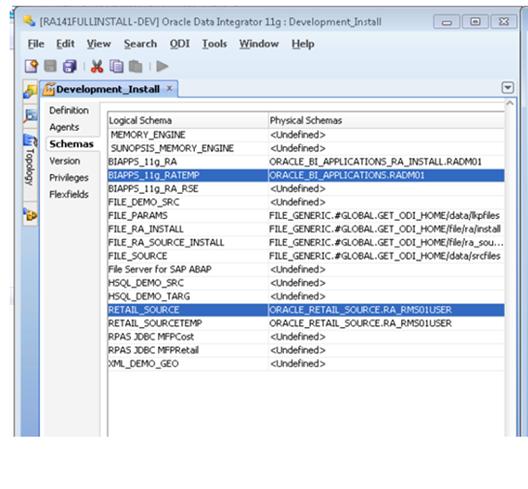
13. For the BIAPPS_11g_RATEMP
logical schema, map it to a physical schemas value of
ORACLE_BI_APPLICATIONS.RABATCHUSER from the drop down as shown below if not
done already.
14. For the BIAPPS_11g_RA
logical schema, map it to a physical schemas value of ORACLE_BI_APPLICATIONS.RADATAMARTUSER
from the drop down as shown below if not done already.
15. For the RETAIL_SOURCE
logical schema, map it to a physical schemas value of ORACLE_RETAIL_SOURCE.RMS
MASTER SCHEMA from the drop down as shown in the example below if not done
already.
16.
For RETAIL_SOURCETEMP logical schema, map it to a physical
schema value of ORACLE_RETAIL_SOURCE.RA_RMSBATCHUSER SCHEMA if not done
already.
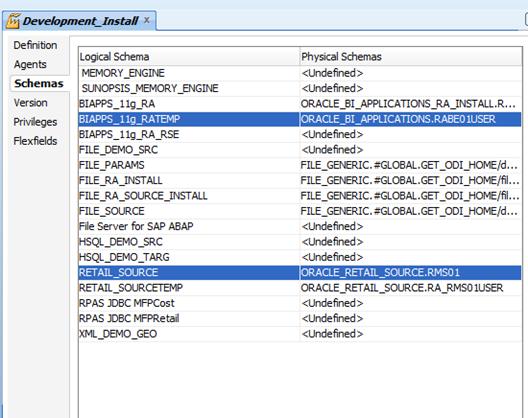
17.
Repeat the above step for the QA_Install context.
18.
Configure <ORASEUSER>
1.
The ORASE schema needs to be manually updated in the ODI
topology.
a.
From ODI topology, go to Physical Architecture and select
Oracle.
b.
Under ORACLE_BI_APPLICATIONS data server, double click
physical schema “ORACLE_BI_APPLICATIONS.<RSEUSER> and replace
<RSEUSER> with the actual ORASEUSER schema name.
2.
Select the values from the dropdowns for Schema and Work
Schema (see the below snapshot) where Schema refers to <ORMEUSER> and
Work Schema refers to <RABATCHUSER>.
3.
Please note that <ORASEUSER> is also referenced as
<ORMEUSER> or <ORASESCHEMA> in this documentation.
4.
Choose the Schema as default if you want to make it as a
Default schema.
5.
Retain the values for E$, Loading, I$, Data stores, Views,
and Triggers options as they are.
Note: The
LOADING_TAB_PREFIX is a Global variable defined in the ODI designer Module
which is used in all the Retail Analytics SDE Packages as a REFRESH VARIABLE.
The Default value of the variable is C$. This variable tracks the Session
number of the SDE Jobs.
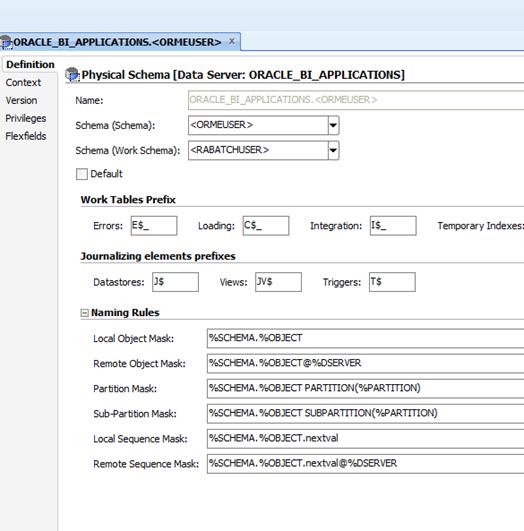
Complete the following steps.
1.
Open ODI Topology.
§ From
a UNIX prompt, execute
./ <$ODIHOME>/../client/odi.sh
Navigate to Topology
§ In
Windows, from the Programs menu, select Oracle -> ODI Studio -> Topology.
2.
From the Topology manager, select Physical Architecture and choose
Technologies=File.
3. Check
for file data server that is already imported with the import of the master rep
zip file.
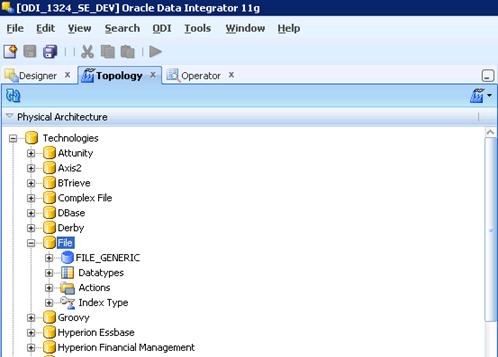
4. Validate
the Data Server details, as necessary.
Note:
For File Technology you may not need to enter the user/password.
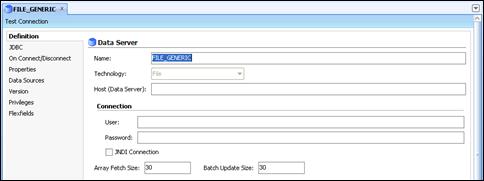
5. Validate
the JDBC information in the JDBC tab.
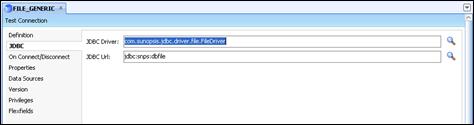
6. Select
an Agent to test the connection and click Test.
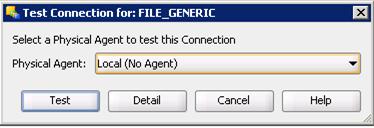
7.
When the test is complete, click OK.
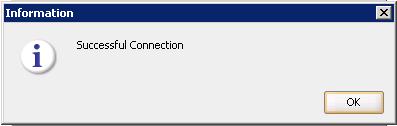
8.
Click OK to save.
9. Check
for the file
physical schema under the Data Server:
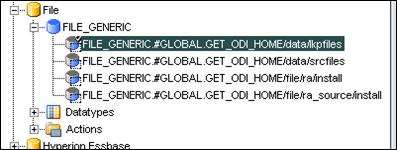
10.
Enter the details of the file physical schema if they
need to be modified or updated.
11.
Specify the directory for parent and work schemas where the
file is located. Keep the default values for E$, loading and I$ fields as
defined by ODI.
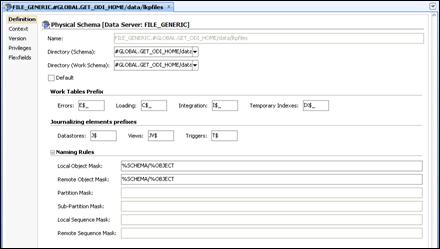
Note: File name:
FILE_GENERIC is the name of the data server.
#GLOBAL.GET_ODI_HOME is the global variable that stores the path
of ODI Home. The path /data/lkpfiles is the directory under ODI Home with the
respective source file.
12.
Close this window to complete the setup.
13. To check
the logical schemas, go to the Logical Architecture tab.
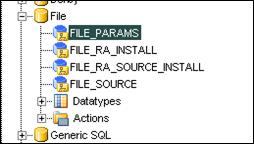
14. Validate the
logical schema details.

15.
Click OK to save.
The FILE topology configuration is now
complete.
Note:
Because the CONTEXT was already created, use the same context throughout the development/QA/production
life cycle.
Configure ODI Designer
Perform the following procedure to
configure the ODI Designer:
1. Click
the ODI Designer tab.
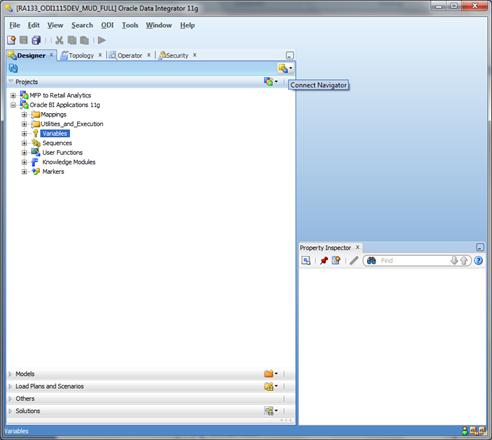
2. Select
the Global Objects and click on Global Variables.
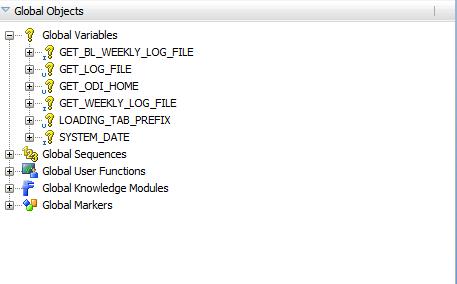
3.
Under Global Variables, select the LOADING_TAB_PREFIX variable.

4. Check
the LOADING_TAB_PREFIX variable as follows.
a. Define
the variable.
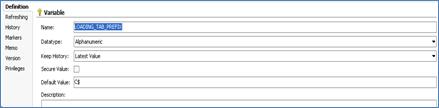
b. Go
to Refreshing Tab: Refresh logic.

5.
Change the Default Value of GET_ODI_HOME variable as shown in
the following screen by navigating to designer à
Global Objects à global variables.
GET_ODI_HOME
variable should have a value of $ODI_HOME where ODI is installed. Also change
it under refreshing tab.
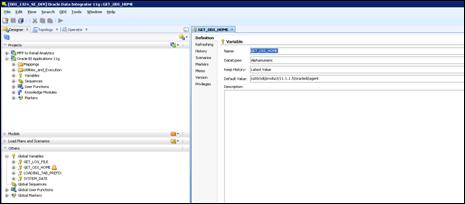
6.
Click OK.
7.
Regenerate the Scenarios as follows (please make sure the
system has lot of free memory before performing this operation):
a.
Right-click on the Projects one at a time (Oracle BI
Applications 11g and MFP to Retail Analytics) and select the option to generate
all scenarios.
b. Select
the generate mode to re-generate and check the Packages option under Objects to
Generate as show in the following screen.
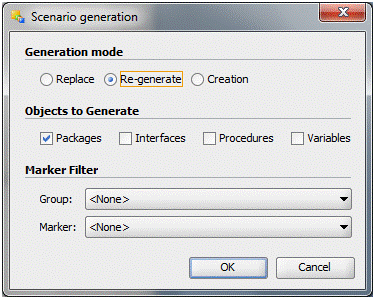
8.
Click OK for all the scenarios as they regenerate.
Retail Analytics Seed Data Setup
This section describes the steps
required for Retail Analytics seed data setup.
Note:
To configure the environment file ra.env (MMHHOME/etc/ra.env) with the correct
parameters, contact the administrator for the ODI Home and Oracle Home
parameters. ODI Home can be the same as Java Home.
Note: All
the seed and general scripts must be executed under $MMHOME/src folder in UNIX.
By default the following permissions
are given to users to access files packaged with Retail Analytics once
installation is complete.
§ All Retail Analytics
scripts should at least have 750 permission
§ All configuration
files should at least have 660 permission
§ All static data (csv
files) should at least have 640 permission
From the permission above besides
owner (the installer user), the group member can also view and execute scripts,
he can also read and modify the configuration files. The group member can also
read the static file. A user out of group cannot do anything to RA files and
explicit permission needs to be given by the Admin to users outside of group.
Seed Control Load for Source Dependent Extracts
(SDE)
Complete the following steps.
1.
Modify data for the following PARAM_NAME as necessary in <$ODIHOME>
/file/ra_source/install/C_ODI_PARAM.csv.
GLOBAL~001~SRC_BASE_HOME,<replace
with actual MMHOME>
2. Changing
ORG_ID and CALENDAR_ID values is not required; you can use the default
C_ODI_PARAM.csv.
3. Modify
PARAM_VALUE data for the following PARAM_NAME as necessary in <$ODIHOME>/
file/ra_source/install/RA_SRC_CURR_PARAM_G.csv where
§ VDATE
is the current business date
§ NEXT_VDATE
is the next date after the current business date
§ LAST_EOM_DATE
is the last date of current month
§ CURR_BOM_DATE
is the beginning date of the current month
4. Run
SDE_RetailLoadControlSeedData.ksh from UNIX to load seed data into the Retail
Analytics source table C_ODI_PARAM and RA_SRC_CURR_PARAM_G.
Seed Control Load for Source Independent Load
(SIL)
Complete the following steps.
1.
Modify C_ODI_PARAM.csv as necessary to have correct pair of
Name-Value pair. The values of the GLOBAL parameters, mentioned below should be
set with the correct values.
GLOBAL~001~BASE_HOME,<replace
with actual MMHOME>
Changing ORG_ID and CALENDAR_ID
values is not required; you can use the default C_ODI_PARAM.csv.
See the Oracle Retail Analytics Data Model for more
information about C_ODI_PARAM table.
2.
Modify <odihome>/file/ra/install/W_RTL_CURR_MCAL_G.csv,
as needed to load W_RTL_CURR_MCAL_G table to set up the values of the calendar
credentials. MCAL_NUM in this file gives the Retail Analytics current business date.
3.
Modify <odihome>/file/ra/install/file_mcal_config_g.csv
to load W_MCAL_CONFIG_G table.
4.
Modify <odihome>/file/ra/install/W_MCAL_CONTEXT_G.csv
to load the W_MCAL_CONTEXT_G table. This seed data sets up the ORG_ID and
CALENDAR_ID values for a given organization. Make sure the .csv file has Retail
Calendar~41 as the value for calendar_id.
5. Modify
<odihome>/file/ra/install/RA_TRUNCATE_TBL.csv to include OWNER,
TRUNCATE_TABLE_NAME and TYPE [Truncate (T) or Analyze (A)] to load
RA_TRUNCATE_TBL table.
Note:
By default RA_TRUNCATE_TBL.csv contains RADM01 as the DM user name, if this
user name is different please update the csv file accordingly before running
the ODI seed jobs.
6.
Modify <odihome>/file/ra/install/W_GLOBAL_CURR_G.csv to
load W_GLOBAL_CURR_G table. This seed data file sets up the data for global
currency codes, such as USD.
7.
Modify <odihome>/file/ra/install/W_RTL_PARTITION_MAP_G.csv
to load W_RTL_PARTITION_MAP_G table. This seed file sets up the table-partition
level data for partitioned tables.
8. Modify<odihome>/file/ra/install/W_RTL_PARTITION_MAP_G.csv
to load W_RTL_PARTITION_MAP_G table. This seed file sets up the table-partition
level data for partitioned tables. Refer to the section, "Setup and
Maintenance for Partitioning Retail Analytics Compressed Inventory Table,"
in the Oracle Retail Analytics Implementation Guide.
9. <odihome>/file/ra/install/W_LANGUAGES_G.csv
loads the W_LANGUAGE_G table. This seed file consists of 18 languages out of
the box. The SRC_LANGUAGE_CODE column defines the primary language for the
product. Note that Retail Analytics primary languages should be supported
within the source system.
§ File
<odihome>/file/ra/install/W_EMPLOYEE_D.csv loads one record in
W_EMPLOYEE_D table. This one record is default row with EMPLOYEE_NUM = -1 and
EMPLOYEE_NAME = No Employee.
§ File
<odihome>/file/ra/install/W_RTL_PROD_CAT_DH_DEFAULT.csv loads one record
in W_PROD_CAT_DH table. This one record is default row ROW_WID= -1 in
W_RTL_PROD_CAT_DH table.
§ File
<odihome>/file/ra/install/W_RTL_PROMO_D.csv loads one record in
W_RTL_PROMO_D table. This one record is default row ROW_WID= -1 in
W_RTL_PROMO_D table.
§ File
<odihome>/file/ra/install/W_PARTY_PER_D.csv loads one record in
W_PARTY_PER_D table. This one record is default row ROW_WID= -1 in
W_PARTY_PER_D table.
§ File
<odihome>/file/ra/install/W_RTL_CO_HEAD_D.csv loads one record in
W_RTL_CO_HEAD_D table. This one record is default row ROW_WID= -1 in
W_RTL_CO_HEAD_D table.
§ File
<odihome>/file/ra/install/W_RTL_CO_LINE_D.csv loads one record in W_RTL_CO_LINE_D
table. This one record is default row ROW_WID= -1 in W_RTL_CO_LINE_D table.
§ File
<odihome>/file/ra/install/W_RTL_PRODUCT_BRAND_D.csv loads one record in W_RTL_PRODUCT_BRAND_D
table. This one record is default row ROW_WID= -1 in W_RTL_PRODUCT_BRAND_D
table.
§ File
<odihome>/file/ra/install/W_RTL_PRODUCT_COLOR_D.csv loads one record in W_RTL_PRODUCT_COLOR_Dtable.
This one record is default row ROW_WID= -1 in W_RTL_PRODUCT_COLOR_Dtable.
§ File
<odihome>/file/ra/install/W_RTL_PRODUCT_ATTR_D.csv loads one record in W_RTL_PRODUCT_ATTR_D
table. This one record is default row ROW_WID= -1 in W_RTL_PRODUCT_ATTR_D
table.
§ File
<odihome>/file/ra/install/W_REASON_D.csv loads one record in W_REASON_D table.
This one record is default row ROW_WID= -1 in W_REASON_D table.
§ File
<odihome>/file/ra/install/W_RTL_CO_SHIP_TYPE_D.csv loads one record in W_RTL_CO_SHIP_TYPE_D
table. This one record is default row ROW_WID= -1 in W_RTL_CO_SHIP_TYPE_D
table.
§ File
<odihome>/file/ra/install/W_RTL_CO_SHIP_METHOD_D.csv loads one record in W_RTL_CO_SHIP_METHOD_D
table. This one record is default row ROW_WID= -1 in W_RTL_CO_SHIP_METHOD_D
table.
§ Modify
<odihome>/file/ra/install/W_RTL_PARTITION_MAP_G_DELTA.csv to load
W_RTL_PARTITION_MAP_G table. This seed file sets up the table-partition level
data for partitioned tables.
§ File
<odihome>/file/ra/install/W_PARTY_ORG_D.csv loads one record in W_PARTY_ORG_D
table. This one record is default row ROW_WID= -1 in W_PARTY_ORG_D table.
§ File
<odihome>/file/ra/install/W_PARTY_PER_D.csv loads one record in W_PARTY_PER_D
table. This one record is default row ROW_WID= -1 in W_PARTY_PER_D table.
§ File
<odihome>/file/ra/install/W_STATUS_D.csv loads one record in W_STATUS_D table.
This one record is default row ROW_WID= -1 in W_STATUS_D table.
10.
Run SIL_RetailLoadControlSeedData.ksh from UNIX to load seed
data into following Retail Analytics data warehouse tables:
§ C_ODI_PARAM
§ W_RTL_CURR_MCAL_G
§ W_PROD_CAT_DH
§ W_LANGUAGES_G
§ W_GLOBAL_CURR_G
§ W_RTL_PARTITION_MAP_G
§ RA_TRUNCATE_TBL
§ W_EMPLOYEE_D
§ W_RTL_PROMO_D
§ W_PARTY_PER_D
§ W_RTL_PROD_CAT_DH
§ W_RTL_CO_HEAD_D
§ W_RTL_CO_LINE_D
§ W_RTL_PRODUCT_BRAND_D
§ W_RTL_PRODUCT_COLOR_D
§ W_RTL_PRODUCT_ATTR_D
§ W_REASON_D
§ W_RTL_CO_SHIP_TYPE_D
§ W_RTL_CO_SHIP_METHOD_D
§ W_PARTY_ORG_D
§ W_STATUS_D
11.
Execute the following scripts to complete the SIL seeding
process:
§ SIL_TimeDimension_CalConfig.ksh
– loads W_MCAL_CONFIG_G
§ SIL_TimeDimension_MCalCalendar_Generated.ksh
– loads W_MCAL_CAL_D
§ SIL_RetailLoadControlSeedData.ksh
– Re-execute this Script to complete the Seeding Process which will load table W_MCAL_CONTEXT_G.
Retail Analytics Source Data Set Up
The SDE_RetailTransactionTypeDimension
program must be set up during program execution.
Before executing the seed data load
programs, ensure that the input file for transaction type is copied to its
correct location. The file domainValues_Xact_Types_RetailTranTypes_rms.csv should
be located here: <ODI_HOME>/data/lkpfiles.
Retail Analytics Data Mining Set Up
1.
Finish Seed Control Load for Source Independent Load (SIL)
2.
Modify $ODI_HOME/data/srcfiles/W_RTL_DMS_CONFIG_G.csv as
necessary to have correct pair of Name-Value pair. Not all parameters listed in
the csv file are configurable. See the Retail
Analytics Configurable Generic Parameter List section for additional
information on which parameters are configurable.
3.
Modify the following files under $ODI_HOME/data/srcfiles
folder:
§ W_RTL_DMS_ATTR_LIST_G1.csv:
Users should modify ATTR_VALUE in this file to provide a list of customer
segment number that will be used as the scope of data mining for Anchor
Customer Segment Promotion Affinities.
§ W_RTL_DMS_ATTR_LIST_G2.csv:
Users should modify ATTR_VALUE in this file to provide a list of subclass which
will be used as the scope of data mining for Anchor Subclass Top Affinities,
Since subclass is not unique by its number in RMS, the subclass provided in
this file should be in the format of DEPARTMENT NUMBER~CLASS NUMBER~SUBCLASS
NUMBER.
§ W_RTL_DMS_ATTR_LIST_G3.csv:
Users should modify ATTR_VALUE in this file to provide a list of promotion
component number that will be used as the scope of data mining for Anchor
Customer Segment Promotion Affinities.
§ W_RTL_DMS_ATTR_LIST_G4.csv:
Users should modify ATTR_VALUE in this file to provide a list of organization
number that will be used as the scope of data mining for Anchor Customer
Segment Promotion Affinities. The level of organization is defined in the
W_RTL_DMS_CONFIG_G.csv file or in the W_RTL_DMS_CONFIG_G table where the
PARAM_NAME is ‘ANC_SC_PROMO_ORG_HIER_LEVEL’.
§ W_RTL_DMS_ATTR_LIST_G5.csv:
Users should modify ATTR_VALUE in this file to provide a list of promotion
component number that will be used as the scope of data mining for Current
Top10 Promoted Subclass Affinities.
4.
Execute script systemoptionsgensil.ksh from UNIX to load mining
seed data into following Retail Analytics data warehouse tables:
§ W_RTL_DMS_ATTR_LIST_G
§ W_RTL_DMS_CONFIG_G
The following parameters need to
be passed:
§ parameter
1: C, B, A
§ parameter
2: DMS_ALL, CUST_SEG, ANC_SC_SBC_NUM,
ANC_SC_PROMO_COMP_NUM,ANC_SC_PROMO_ORG_DH_NUM, TOP10_PROMO_COMP_NUM
See the Oracle Retail Analytics Implementation
Guide for information on how to execute the systemoptionsgensil.ksh data
mining seeding program.
Note: Due
to ODI out of memory issues it is possible that there could be an error at the
create work table step of an interface. If this occurs, open the interface in
the designer, append the description content in the overview tab and save the
interface and regenerate the scenarios.
This section describes the loading of
time into Retail Analytics. The time dimension can be loaded with a 454
calendar, 13 period time calendar or a 454 with Gregorian calendar. Populate
these tables according to business requirements. If RMS is implemented, the
time dimension with 454-calendar time or 454 with Gregorian calendar the
calendar information can be extracted from this system. For information on the
tables loaded for the Time dimension refer to the Oracle Retail
Analytics Data Model documentation.
Extract the 4-5-4 or 4-5-4 with Gregorian Time
Calendar
If RMS is being used as the source of
the time calendar, run Retail Analytics time calendar SDE program mcalperiodsde.ksh
under $MMHOME/src directory. Refer to the Oracle Retail Analytics Operations
Guide on how to execute this program.
If RMS is not being used as Retail
Analytics source system, users have to manually populate Retail Analytics
business calendar staging table W_MCAL_PERIOD_DS. Refer to the Oracle Retail
Analytics Operations Guide for API of this staging table.
Extract the 13-Period Time Calendar
Since Retail Analytics source system
RMS does not support 13 period calendar, users have to prepare 13 period data
in the file ra_time_13.csv under $ODI_HOME/data/srcfiles directory Refer to the
sample file for how to create Retail Analytics 13 period source file.
Execute Retail Analytics time calendar
SIL program mcal13periodsil.ksh to load 13 period time data from ra_time_13.csv
file to Retail Analytics staging table W_MCAL_PERIOD_DS. Refer to the Oracle
Retail Analytics Operations Guide for how to execute this program.
Load the 4-5-4 or 4-5-4 with Gregorian or
13-Period Time Calendar
Under $MMHOME/src directory, execute
programs gregcaldaysil.ksh, gregcalmthsil.ksh, gregcalqtrsil.ksh, gregcalweeksil.ksh,
gregcalyearsil.ksh, mcalcfgsil.ksh, mcaldaysil.ksh, mcalperiodsil.ksh, mcalqtrsil.ksh,
mcalsil.ksh, mcalwk454sil.ksh,, mcalyrsil.ksh, timedaysil.ksh, timeminutedaysil.ksh
to populate all Retail Analytics calendar tables. Refer to the Oracle Retail
Analytics Operations Guide on how to execute these programs and the
execution order.
4
Retail Analytics Database Schema –Patch
This chapter is applicable to an
existing 14.1 customer.
The Retail Analytics 14.1.1 installer
may be used to apply the Retail Analytics patch. The installer should only be
used to apply the patch if the schema being patched does not contain
customizations or hotfixes. In this section, STAGING_DIR refers to the location
where the Retail Analytics 14.1 installer is expanded.
Before you apply the Retail Analytics 14.1.1
patch:
§ The Database should
be Oracle database 12cR1 (Check the Database Requirements section).
§ Make a backup of all
your objects and database schema.
§ Check that Retail
Analytics 14.1 is installed.
§ Make sure any
applications that connect to the RA schemas are shut down.
Before copying
over any files:
§ Note whether
customizations have been made to the module. If so, then the customizations
must be reapplied over the new version of the module (or the fix may need to be
applied to the custom version of the code).
§ Copy the original
files to a different directory before copying over them in case they need to be
referred to at a later date.
§ Verify the Partition
strategy for the Patch. Refer to the Partition
Strategy for Full / Patch Install section. Continue the below after
completing the Partition Strategy for Full /
Patch Install section.
To create a staging directory for Retail
Analytics Installer, complete the following steps.
1.
Log into the database server as a user that can connect to the RMS
database.
2.
Create a staging directory for the Retail Analytics 14.1.1 Patch.
3.
Copy the ora14application.zip file from the Retail Analytics 14.1.1
release to the staging directory. This is referred to as STAGING_DIR when
installing database software.
4.
Change directories to STAGING_DIR and extract the ora14application.zip
file. This creates an ora/installer subdirectory under STAGING_DIR.
Perform the following steps to patch the
Retail Analytics database schema:
Note:
The installer does not run on Windows. If ODI or Oracle BI EE is installed on
Windows, you cannot use the installer to copy ODI or Oracle BI EE files for
Retail Analytics. You must follow the manual installation process detailed in
the “Known Issues/Limitations”
chapter.
1.
Change directories to <STAGING_DIR>/ora/installer.
2.
Set and export the following environment variables.
|
Variable
|
Description
|
Example
|
|
ORACLE_HOME
|
Oracle server home. Only
applicable when you are installing the database schema objects.
|
ORACLE_HOME=full_path_of_
12.1.0.2_home
export ORACLE_HOME
|
|
LD_LIBRARY_PATH
|
LD Library Path should contain
the Oracle database libraries you want to use.
|
LD_LIBRARY_PATH=$ORACLE_
HOME/lib (64-bit)
export LD_LIBRARY_PATH
|
|
JAVA_HOME
|
Java home. Ensure the version
of Java is 64-bit.
|
JAVA_HOME= /opt/app/jdk/jdk1.7
export JAVA_HOME
Refer to the ODI product
installation guide for the compatible version of JDK.
|
|
PATH
|
PATH should contain directories
for Oracle and Java executables
|
PATH=$JAVA_HOME/bin:$ORACLE_HOME/bin:$PATH
export PATH
|
|
TNS_ADMIN
|
Only applicable if tnsnames.ora
is not located under $ORACLE_HOME/network/admin. Set TNS_ADMIN to point to a
directory where tnsnames.ora is found. If tnsnames.ora is located under
$ORACLE_HOME/network/admin, (which is true in most cases), do not set this variable.
|
TNS_ADMIN=/home/user/misc
export TNS_ADMIN
|
|
NLS_LANG
|
Locale setting for Oracle
database client.
|
NLS_LANG=AMERICAN_AMERICA.
AL32UTF8
export NLS_LANG
|
|
DISPLAY
|
Address and port of X server on
desktop system of user running install. Optional for dbschema installer.
|
DISPLAY=<IP address>:0.0
export DISPLAY
|
|
ODI_HOME
|
This directory contains the
ODI installation files where ODI server is installed.
|
Provide the path of ODI_HOME
where the ODI server is installed
For Example export ODI_HOME=/u00/odi/product/11.1.1.7/oracledi/agent
|
3.
If you are going to run the installer in GUI mode using an X
server, you need to have the XTEST extension enabled. This setting is not
always enabled by default in your X server. See “Appendix: Common Installation Errors”
for more details.
4.
Before proceeding with the installation ensure to take a
backup of the schema.
5.
Run the install.sh script to start the installer.
Note:
The following are the usage details for install.sh. The typical usage for GUI
mode is no arguments.
ksh install.sh
[text | silent]
Note:Usually, if you have multiple instances, the RA RMS user schema would
be on one instance and all Retail Analytics schemas (ORA data mart, ORA
front-end data mart, ORA backend) are on the other instance.
Depending on system resources,
a typical installation takes about 30 to 60 minutes.
6.
Verify that the installer reports “SUCCESS” for the Preinstall
Check. If it reports “FAILED,” check for errors in the output under the “Checking
environment for installation” section, and verify that your environment
variables are set properly.
7.
For the Retail Analytics Patch installation select the PATCH
option.
8.
Check the Install appropriate checkbox and continue with
installer. Depending on system resources, a typical installation can take 30
minutes to 1 hour.
9.
The Retail Analytics Installer provides the option of creating
the ODI Repository, copying the ODI files, scripts, and Oracle BI EE files in
addition to the Retail Analytics objects.
10.
After the installer is complete, you can check its log file:
ra-install.<timestamp>.log.
11.
The installer leaves behind the ant.install.properties file
for future reference and repeat installations. This file contains inputs you
provided. As a security precaution, make sure that the file has restrictive
permissions.
Example:
chmod 600
ant.install.properties
12. Once Installer
is successfully executed, the mmhome sub directory is created under RETAIL_HOME
which holds the scripts, ORPatch Files and other required files.
14.1 patch customers can use
this mmhome path for ODI shell script execution. In order to do that, perform
the following steps:
a.
Copy the “etc” subdirectory and all the contents under it
from the 14.1 instance of $MMHOME to retail_home/mmhome.
b.
Modify MMHOME variable in ra.env as export
MMHOME=/retail_home/mmhome and save ra.env.
c.
Copy the “error”subdirectory and all the contents under it
from the 141 instance of $MMHOME to retail_home/mmhome.
d.
Copy the “log”sub directory and all the contents under it
from the 141 instance of $MMHOME to retail_home/mmhome.
e.
Copy all the contents from the “src” subdirectory from the
141 instance of $MMHOME to retail_home/mmhome.
§ If the installer
encounters any errors, it halts execution immediately and prints to the screen
which SQL script it was running when the error occurred. Please view the log
files in $RETAIL_HOME/orpatch/logs. Additional error information for invalid
objects can be found in $ RETAIL_HOME
/orpatch/logs/detail_logs/dbsql_{schema}/invalids. The {schema} refers to radm,rabe,rarms
or rafedm.
§ See Appendix: Common Installation Errors
in this document for a list of common installation errors.
§ Subsequent executions
of the installer skip the SQL scripts which have already been executed in
previous installer runs. This is possible because the installer maintains
entries in a table called DBMANIFEST of the scripts that have been run. It also
maintains an orpatch_restart.state file when the install restarts.
5
This chapter is applicable to an
existing 141 customer and describes post installer activities.
Customers using any release of Retail Analytics
prior to 14.1 must patch their installation to Retail Analytics 14.1 before
upgrading to Retail Analytics 14.1.1
Customers using any release of Retail Analytics
prior to 141, must take a backup of RPD/catalog/translation XML files.
To complete the ODI post-process
activities after installer run in patch mode do the following.
1.
Take a backup of the Retail Analytics 14.1 MREP and the WREP
schemas.
2.
Login existing 14.1 ODI studio
3.
From the UNIX command prompt,
Export the DISPLAY
For example:
- export
DISPLAY=<IPADDRESS>:0.0
4.
Connect to 14.1 ODI designer from the UNIX command prompt
navigate to $ODI_HOME/../client and run the following command to open the
Designer.
odi.sh
5. Configure
the MREP and WREP as shown in the following screen. Test the connection.
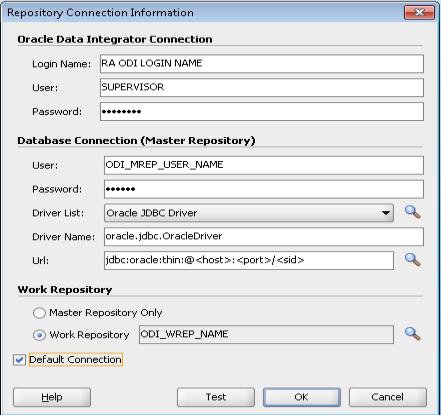
6. From the
Connection Verification dialog, click OK.
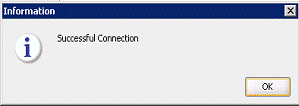
7.
As a result of 14.1.1installer execution in patch mode all the ODI
related xml files are already copied to the following location:
<STAGING_DIR>/ora/installer/ora14/mmhome/upgrade/odi-patches
8.
Import the models as follows:
a.
Go to Model →
Select any Data Store Right click →
Import Data Store.
b.
Specify the location of all the model files:
/ora/installer/ora14/mmhome/upgrade/odi-patches/TAB/
Note:
Make sure to copy the TAB files content to local directory if you are using ODI
Designer through Windows. This can also be done by invoking ODI client in Unix
OS.
c. Select
all the components from the list.
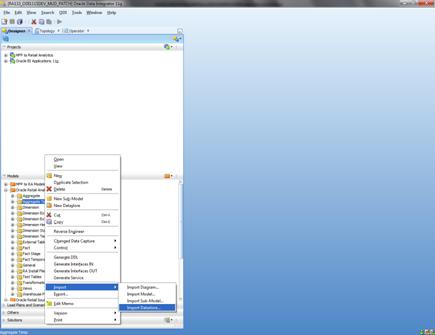
d.
Select Import Type as Synonym Mode Insert_Update and click OK.

e. Click
Yes when the following Screen appears.
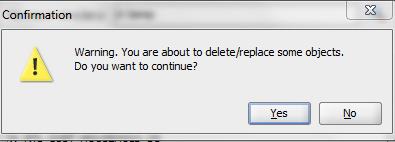
f. Click
OK when a screen similar to the following screenshot appears.
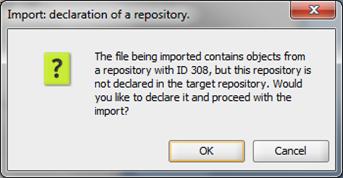
g.
The Retail Analytics 14.1.1 installer when run in patch mode,
provided the option of upgrading the ODI Repositories which imports 14.1.1 ODI
components
If you chose
to patch during installation then go to step 11 and perform scenario
regeneration, If you did not execute odi_import.ksh via the installer
please do so using the following steps.
9.
Edit the file ora/installer/ora14/mmhome/upgrade/odi-patches /odi_import.ksh
and set the variables ODI_HOME and LOGDIR.
LOGDIR variable must be set to /ora/installer/ora14/mmhome/upgrade/odi-patches
/logs
10.
Make sure odiparams.sh is configured correctly and execute
odi_import.ksh from /ora/installer/ora14/mmhome/upgrade/odi-patches
/odi_import.ksh, which will import all the ODI variables, user functions,
project folders, procedures, interfaces and packages.
For every successful import of
the components, a file named done.<filebasename> is created.
If the import is unsuccessful, a
file named err.<filebasename> is created in the $LOGDIR directory, as
mentioned in the odiparams.sh.
If odi_import.ksh fails while
processing a certain XML file, you can resolve the issue and rerun
odi_import.ksh, which will skip the already-loaded file and start with the last
XML file that failed. If you want odi-import.ksh to run from the start, delete the
done. <filebasename> file from the log directory (set through LOGDIR).
11.
Regenerate the Scenarios as follows (please make sure the
system has lot of free memory before performing this operation):
a.
Right-click on the Projects one at a time (Oracle BI
Applications 11g and MFP to Retail Analytics) and select the option to generate
all scenarios.
b. Select
the generate mode to re-generate and check the Packages option under
Objects to Generate as show in the following screen.
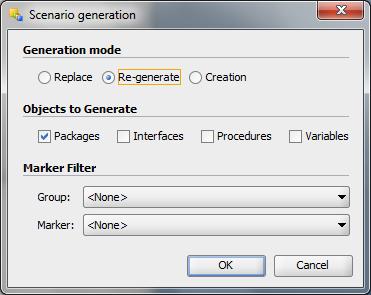
c.
Click OK for all the scenarios as they regenerate.
Seed Control Load for Source Dependent Extracts
(SDE)
Complete the following steps.
Modify data for
the following PARAM_NAME as necessary in <$ODIHOME>
/file/ra_source/install/C_ODI_PARAM_DELTA.csv.
GLOBAL~001~SRC_BASE_HOME, <replace
with actual MMHOME>
§ SDE_RetailLoadControlSeedData_Delta.ksh
C_ODI_PARAM and this will load C_ODI_PARAM table.
Seed Control Load for Source Independent Load
(SIL)
1.
Modify data for the following PARAM_NAME as necessary in <$ODIHOME>
/file/ra_source/install/C_ODI_PARAM_DELTA.csv.
GLOBAL~001~SRC_BASE_HOME, <replace
with actual MMHOME>
2.
Modify <odihome>/file/ra/install/RA_TRUNCATE_TBL.csv to
include OWNER, TRUNCATE_TABLE_NAME and TYPE [Truncate (T) or Analyze (A)] to
load RA_TRUNCATE_TBL table.
Note:
By default RA_TRUNCATE_TBL.csv contains RADM01 as the DM user name, if this
user name is different please update the csv file accordingly before running
the ODI seed jobs.
3.
File <odihome>/file/ra/install/ W_STATUS_D.csv loads
one record in W_STATUS_D table. This one record is default row ROW_WID= -1 in W_STATUS_D
table.
4.
Execute the following scripts to complete the SIL seeding
process:
§ SIL_RetailLoadControlSeedData_Delta.ksh
C_ODI_PARAM and this will load C_ODI_PARAM table.
§ SIL_RetailLoadControlSeedData_Delta.ksh
W_STATUS_D and this will load W_STATUS_D table.
§ SIL_RetailLoadControlSeedData_Delta.ksh
RA_TRUNCATE_TBL and this will load RA_TRUNCATE_TBL table.
Aggregation
Framework and Universal Adapter content are packaged with this installer. For
more details please refer to Implementation guide.
Oracle BI EE merge utility will be
used to patch the latest releases of Retail Analytics rpd (repository). The
3-way merge process is followed in order to achieve this.
What is required for the merge?
§ The latest 14.1 .1repository
of Retail Analytics which is referenced as the “current” rpd in the remainder
of this document. 14.1 rpd can be found under <STAGING_DIR><PPD
PATH> after the Retail Analytics installer execution is complete.
§ The 14.1 rpd of
Retail Analytics which is referenced as “original” rpd in the remaining of this
document.
§ Modified version of
the 14.1 Retail Analytics rpd which is referenced as “modified” rpd in the
remaining of this document. (This is the production rpd of the customer. As
recommended in the Retail
Analytics Implementation Guide, we expect the customer to make a
copy of the base and use it for any customizations.)
RPD Migration is done using Oracle BI EE
client of Oracle BI EE 11.1.1.7.
1.
Open the current rpd in offline mode using the admin tool.
2.
In the menu, go to File and select Merge.
3.
Make sure the Merge Type is set to Full repository Merge.
4.
In the Original Master Repository, select Original rpd
and provide the password as Admin123 (if the password is changed then provide
the new password).
5.
In the Modified Repository, select Modified rpd and
provide the password as Admin123 (if the password is changed then provide the
new password).
6.
The current repository will be defaulted. No change is
required.
7. Give
any appropriate name to the rpd in the Save Merged Repository as. This will be
the final patched rpd.
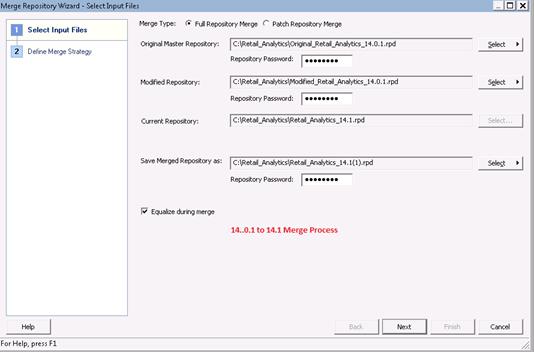
8. Select
the Equalize during merge option (this is MANDATORY) and click Next.
This step will take a few minutes and results in a final merged repository.
There can be conflicts at this stage if the 14.1 rpd has been customized. In
this case, customer has to resolve these conflicts based on requirements.
Refer to the Oracle
BI EE Infrastructure Installation and Configuration Tasks chapter for
additional details.
In case there are any customizations
to the existing catalog, here are the steps in order to bring in those changes
to the latest 14.1.1 Retail Analytics catalog.
This process will require
previous/modified catalog which will be references as “old catalog” going
forward in this document and the latest 14.1.1 catalog, which will be
referenced as “current catalog”.
1.
Open two instances of Catalog Manager from Program
Files>OBI EE> Catalog Manager.
2.
In one instance open “old catalog” and in another instance
open as “current catalog” through File>Open Catalog in offline mode. This
process will be a simple copy/paste of objects from one catalog to other.
3.
From the “old catalog”, browse to the desired folder and copy
the reports/dashboards/filters/any objects that were modified and need to be
ported to the “current catalog”.
4.
Navigate to the catalog manager instance where “new catalog”
is opened and browse to the desired folder. Paste the objects which were copied
in the previous step.
5.
Once all the objects are copied to the 14.1.1 catalog, before
re-starting BI Services make sure this catalog is configured as defined in the “Oracle BI EE Infrastructure Installation and
Configuration Tasks”).
1.
Copy all the images from the Images.zip file under
“<STAGING_DIR>/ora/installer/ora14/mmhome/full/ra_obiee_source_code/Images”
to the locations listed below if present in <OBIEE_HOME>. Create dir
“rtl” if it does not exist.
§ <OBIEE_HOME>/Oracle_BI1/bifoundation/web/app/res/s_blafp/images/rtl
§ <OBIEE_HOME>/Oracle_BI1/bifoundation/web/appv2/res/s_blafp/images/
rtl.
§ <OBIEE_HOME>/user_projects/domains/bifoundation_domain/servers/bi_server1/tmp/_WL_user/analytics_11.1.1
and under the one of the directories in analytics_11.1.1 directory find the
path to “/war/res/s_blafp/images/rtl”.
2.
Modify dvt-graph-skin.xml under below locations to remove
shadow on all the graphs. Take a backup before making any changes.
§ \Middleware_install\Oracle_BI1\bifoundation\web\msgdb\s_blafp\viewui\
chart
§ \Middleware_install\Oracle_BI1\bifoundation\web\msgdb\s_FusionFX
\viewui\chart
§ Search
the tag <Graph> in the dvt-graph-skin.xml and add the properties like
below and save it.
<Graph
visualEffects="NONE" animationDuration="0">
3.
Start the WebLogic and BI Services.
6
Configuring ODI to
Integrate Retail Analytics with Merchandise Financial Planning (MFP)
This chapter describes the
configuration of ODI for integration between Retail Analytics and MFP.
Note:
Before you begin the procedures in this chapter, MFP must be configured to
enable integration with Retail Analytics. See the Oracle Retail Merchandise
Financial Planning Operations Guide.
Note:
The owner of the odbcserver process must have read/write permissions for all
files and directories in both domains, and execute permission for all
directories in both domains. That owner/user should also have execute
permission for all files in RPAS_HOME/bin, RPAS_HOME/lib, and RPAS_HOME/applib.
Complete the following steps.
1.
Log in to the ODI Topology Manager and click Physical
Architecture.
Expand the Technologies drop down list.
2. Expand
the Oracle folder. The following Data Servers should appear.
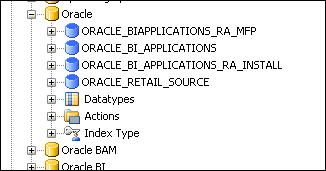
3. Check
the ORACLE_BIAPPLICATIONS_RA_MFP and update the Password values for the Retail
Analytics batch user.
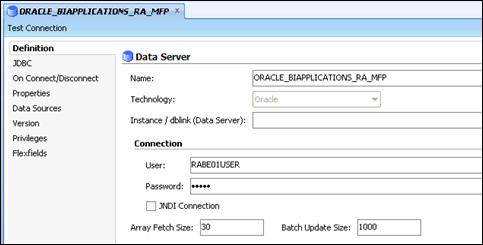
4.
Click to open the jdbc tab and update the jdbc url.
5. Expand
the entry for data server ORACLE_BIAPPLICATIONS_RA_MFP.
6. Verify
that Schema is the Retail Analytics data martuser (for example – RADM01) and
Schema (Work Schema) is Retail Analytics batchuser (for example – RABE01USER).
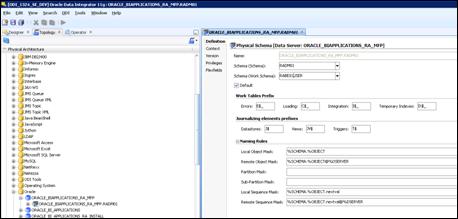
For the “RPAS JDBC MFPCost” logical
schema, map it to a physical schemas value of RPAS JDBC_MFPCST.domain from the
drop down for both “Development” and “QA” context as shown in the below example
if not done already.
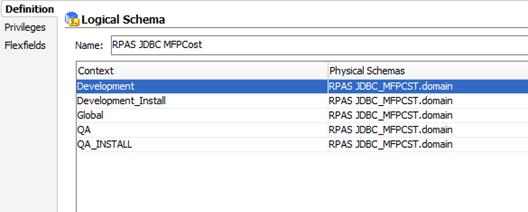
For the “RPAS JDBC MFPRetail” logical
schema, map it to a physical schemas value of “RPAS JDBC_MFPRTL.domain” from
the drop down for both “Development” and “QA” context as shown in the below
example if not done already.
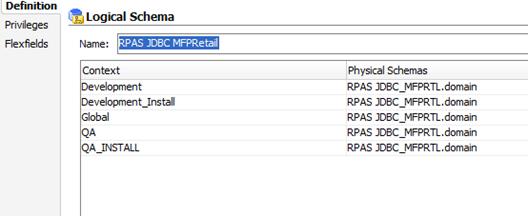
Install the RPAS JDBC drivers on the
ODI server as follows:
1.
Extract the file jdbcclient.tar.zip to create the jdbcclient
directory, as follows:
cd "$RPAS_HOME"
unzip -q jdbcclient.tar.zip
tar xf jdbcclient.tar
2.
The database administrator should copy the following files to
the ODI server under the directory $ODI_HOME/drivers:
§ jdbcclient/driver/lib/ORjc.jar
§ jdbcclient/driver/lib/ORssl14.jar
§ jdbcclient/driver/lib/iaik_jce_full.jar
§ jdbcclient/spy/lib/ORy.jar
3.
If the jdbcclient directory is on the same machine as the ODI
server, the database administrator can execute the following commands:
cd "$RPAS_HOME/jdbcclient/driver/lib"
cp -p ORjc.jar ORssl14.jar iaik_jce_full.jar "$ODI_HOME/drivers"
cp -p ../../spy/lib/ORy.jar
"$ODI_HOME/drivers"
The RPAS JDBC technology must be
present in the ODI master repository. Follow these steps to check the
connectivity:
1.
Go to ODI Topology à
Expand RPAS JDBC data server.
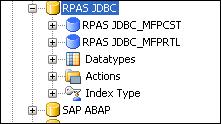
For more information about
$RPAS_HOME, see the Oracle Retail Predictive Application Server Installation
Guide.
2.
Open RPAS JDBC data server:
3.
Click the RPAS JDBC_MFPCST data server and update username
and password with MFP cost domain username and password.
4.
Click the JDBC tab and update the jdbc url.
5.
Click the RPAS JDBD MFPRTL data server and update username
and password with MFP Retail domain username and password.
6.
Click the JDBC tab and update the jdbc url.
Note:
If the agent is already running when the .jar files are copied (in the
previous step), the database administrator must stop and restart the agent.
1.
Request the application database administrator to run an
agent from <ODI_HOME>/bin.
For example:
.agentstop.sh [-NAME=<$AGENT_NAME>]
nohup agent.sh -PORT=1055
-NAME=ramfp_agent &
Please refer to ODI documentaion on how to setup standalone odi agent.ODI docs
have more details on how to have separate shell script which calls the agent.sh
command.
2.
After the agent is running, check the physical agent as
follows:
a.
Go to Topology à
Physical Architecture.
b.
Expand the Agents and open ramfp_agent.
3.
Go to Topology à Logical
Architecture.
4.
Expand the Agents and open ramfp_agent.
5. ramfp_agent
should be mapped to the Development context, as shown in the following figure.
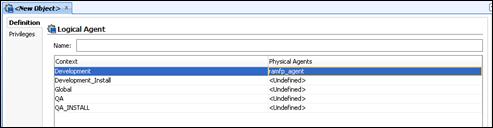
MFP related extract scripts
mfpcstsde.ksh and mfprtlsde.ksh are packaged under <$MMHOME>/ra_mfp_odi_source_code.
These scripts upon execution invoke SDE_MFPCOSTFACT and SDE_MFPRETAILFACT
scenarios.
If required these scripts can be moved
to $MMHOME/src folder
7
Oracle BI EE Infrastructure Installation and
Configuration Tasks
Refer to Oracle BI EE Enterprise
Deployment Guide and the Oracle BI EE Installation Guide for
best practices and considerations.
This chapter provides general
installation instructions and recommended configuration considerations for
Oracle Business Intelligence Enterprise Edition.
For step-by-step
instructions on how to install Oracle BI EE, see the “Installing Oracle
Business Intelligence” chapter of the Oracle BI EE Installation Guide.
Note:
You must complete all the steps described in the Retail Analytics Database
Schema Installation Tasks section of this document before performing the
following steps.
This section provides instructions for
configuring the repository, setting up the database connection, and configuring
the catalog.
Complete the following steps.
1.
Stop Oracle BI services by executing opmnctl.bat or opmnctl
stopall from <BI_INSTALL_DIRECTORY>\instances\instance1\bin.
2.
Update the configuration file located at
<BI_INSTALL_DIRECTORY>\instances\instance1\config\OracleBIServerComponent\coreapplication_obis1/NQSConfig.INI.
Add a new line under the [REPOSITORY] section. For example:
[ REPOSITORY ]
Star = Retail_Analytics.rpd,
DEFAULT;
3.
Other default repositories should be commented out in the
NQSConfig.INI. For example:
[ REPOSITORY ]
Star = Retail_Analytics.rpd,
DEFAULT;
#Star = SampleAppLite.rpd,
DEFAULT;
4.
Change the following setting from
FMW_UPDATE_ROLE_AND_USER_REF_GUIDS = NO; to FMW_UPDATE_ROLE_AND_USER_REF_GUIDS=
YES;
5.
Save and close NQSConfig.INI.
6.
Make sure that the tnsnames.ora file exists under <BI_INSTALL_DIRECTORY>\Oracle_BI1/network/admin
and the file has an entry of the database used by Retail Analytics.
7.
Proceed to set up the database connection.
Refer to the “Configuring Repositories” chapter of the Oracle
BI EE System Administrator's Guide for additional details.
Note:
The screen illustrations in the following steps are only examples. The screens
that appear depend on the setup of your system.
1.
This change requires moving the rpd to a Microsoft
Windows system which has Oracle BI EE installed. Rpd is located at
<BI_INSTALL_DIRECTORY>\instances\instance1\bifoundation\OracleBIServerComponent\coreapplication_obis1\repository.
2.
Once the Retail_Analytics.rpd is moved to a Microsoft Windows
system, open it using the Oracle BI Server Administration tool.
3.
When prompted for the password, refer to the
RPD_post_install.txt located at
<BI_INSTALL_DIRECTORY>\instances\instance1\bifoundation\OracleBIServerComponent\coreapplication_obis1\repository.
4.
At this time the password of the rpd can be changed if
desired. For more details on changing the password refer to the chapter, “Managing
Oracle BI Repository Files” of the Oracle BI EE Metadata Repository Builder's
Guide.
5.
When the rpd is opened, from the menu, go to Manage >
Variables.
6. Under
Repository Static variables, edit OLAP_USER with Front End Data Mart user (for
example, RAFEDM01) and OLAP_DSN with Data Source Name of the Data Warehouse by
double clicking on OLAP_USER and OLAP_DSN options.
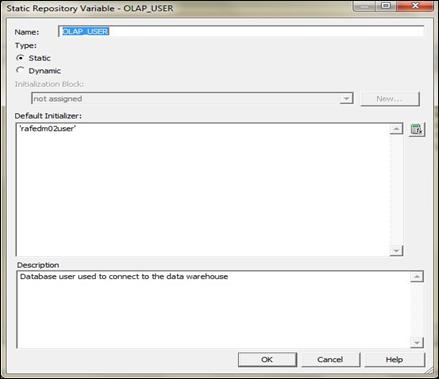

7.
In the Physical Layer, edit both the Connection Pool’s under
Oracle Data Warehouse and update the password for the Front End Data Mart User.
The following is a sample of the Oracle Data Warehouse Connection Pool screen.
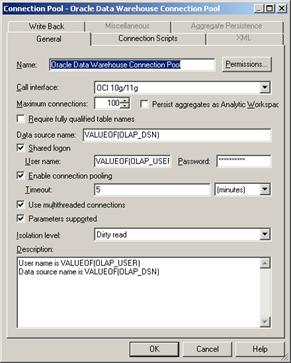
8.
Save the Retail_Analytics.rpd file.
9.
Make sure tnsnames.ora file exists under <BI_INSTALL_DIRECTORY>\Oracle_BI1/network/admin
and the file has an entry of the database which is used by Retail Analytics.
10.
Test the database connection by right-clicking on any of the
tables in the Physical Layer, and select Update Row Count. The number of rows
will be shown when that table is highlighted if the database connection is
successful.
11. FTP the rpd
back to <BI_INSTALL_DIRECTORY>\instances\instance1\bifoundation\OracleBIServerComponent\coreapplication_obis1\repository.
Make sure it is copied in binary mode.
12.
Proceed to the next section for to configure the catalog.
To configure the catalog, complete the
following steps.
1.
Update the instanceconfig.xml file to point to
Retail_Analytics catalog. instanceconfig.xml is found at
<BI_INSTALL_DIRECTORY>/instances\instance1\config\OracleBIPresentationServicesComponent\coreapplication_obips1.
Change the catalog path within the file to point to Retail_Analytics. For
example:
<CatalogPath><BI_INSTALL_DIRECTORY>\instances\instance1/bifoundation/OracleBIPresentationServicesComponent/coreapplication_obips1/catalog/</CatalogPath>
2.
Save and close instanceconfig.xml.
3.
Log in to WebLogic Enterprise Manager (EM) via web browser
with the URL as http://<hostname>:27001/em. Note that the 27001 port
number can be different for every installation. Log in with the username and
password created during Oracle BI EE installation.
4.
Go to WebLogic Domain > right click bifoundation_domain
> Security > Credentials as shown in the following screen.
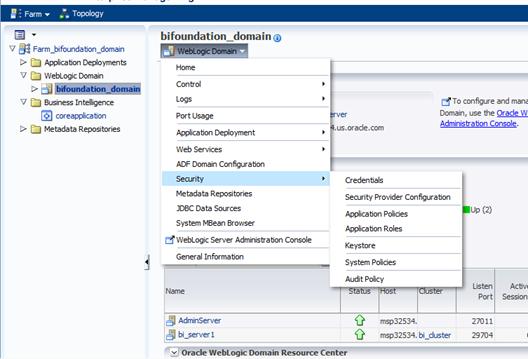
5. Click
Create Key.
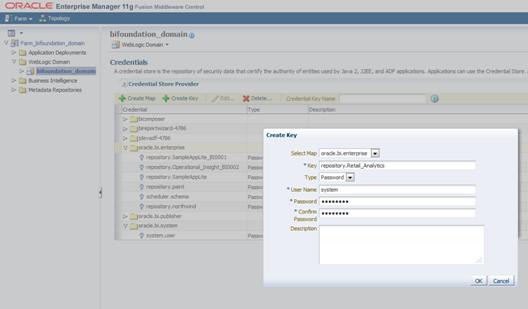
6.
For Key, enter repository.Retail_Analytics. For User Name,
enter system. Enter the password of the rpd.
7.
Click OK and log out.
8.
Start Oracle BI services by executing opmnctl.bat or opmnctl
startall from <BI_INSTALL_DIRECTORY>\instances\instance1\bin.
9.
Test Retail Analytics Installation by opening the browser
with the URL as http://<hostname>:9704/analytics with the username and
password created during Oracle BI EE installation.
Another alternative for
configuring the rpd and catalog through WebLogic, refer to the "Configuring
Repositories" chapter in the System Administrator's Guide for Oracle Business
Intelligence Enterprise Edition"
1.
Copy all the images from the Images.zip file under
“<STAGING_DIR>/ora/installer/ora141/mmhome/full/ra_obiee_source_code/Images”
to the locations listed below if present in <OBIEE_HOME>. Create dir
“rtl” if it does not exist.
§ <OBIEE_HOME>/Oracle_BI1/bifoundation/web/app/res/s_blafp/images/rtl
§ <OBIEE_HOME>/Oracle_BI1/bifoundation/web/appv2/res/s_blafp/images/
rtl.
§ <OBIEE_HOME>/user_projects/domains/bifoundation_domain/servers/bi_server1/tmp/_WL_user/analytics_11.1.1
and under the one of the directories in analytics_11.1.1 directory find the
path to “/war/res/s_blafp/images/rtl”.
2.
Modify dvt-graph-skin.xml under below locations to remove
shadow on all the graphs. Take a backup before making any changes.
§ \Middleware_install\Oracle_BI1\bifoundation\web\msgdb\s_blafp\viewui\
chart
§ \Middleware_install\Oracle_BI1\bifoundation\web\msgdb\s_FusionFX
\viewui\chart
§ Search
the tag <Graph> in the dvt-graph-skin.xml and add the properties like
below and save it.
<Graph
visualEffects="NONE" animationDuration="0">
3.
Start the WebLogic and BI Services.
During the patch process,
W_LOCALIZED_STRING_G is backed up as W_LOCALIZED_STRING_G_BKP and is truncated
so that the installer can insert all the new and updated strings and descriptions
into the table. Any customizations need to be applied after the installation
from the backup table.
To configure Retail Analytics
pre-packaged security roles:
1.
Stop all services including WebLogic.
2.
Make a backup of <BI_INSTALL_DIRECTORY>\user_projects\domains\bifoundation_domain\config\fmwconfig\system-jazn-data.xml.
3.
Copy all the RA specific AppRoles the pre-packaged
system-jazn-data.xml file located under
<STAGING_DIR>//ora/installer/ora141/mmhome/full/ra_obiee_source_code/catalog
to the existing system-jazn-data.xml file located under
<BI_INSTALL_DIRECTORY>\user_projects\domains\bifoundation_domain\config\fmwconfig.
For more information regarding Retail
Analytics application roles and associated user groups please refer to the
security section of the Oracle Retail Analytics Implementation Guide.
Below is an example on updating the
existing system-data-jazn.xml file:
Existing Jazn File:
.
.
<app-role>
<name>UserDefinedRole</name>
<display-name>Custom User Defined Role</display-name>
<class>oracle.security.jps.service.policystore.ApplicationRole</class>
<members>
<member>
<class>weblogic.security.principal.WLSGroupImpl</class>
<name>UserGroups</name>
</member>
</members>
</app-role>
</app-roles>
Now from the packaged
system-jazn-data.xml file, copy the Retail Analytics application roles into
your existing jazn file. The text in italics below is one of the application
roles packaged with Oracle Retail Analytics.
.
.
<app-role>
<name>UserDefinedRole</name>
<display-name>Custom User Defined Role</display-name>
<class>oracle.security.jps.service.policystore.ApplicationRole</class>
<members>
<member>
<class>weblogic.security.principal.WLSGroupImpl</class>
<name>UserGroups</name>
</member>
</members>
</app-role>
<app-role>
<name>RetailBuyer</name>
<display-name>Retail Buyer</display-name>
<class>oracle.security.jps.service.policystore.ApplicationRole</class>
<members>
<member>
<class>weblogic.security.principal.WLSGroupImpl</class>
<name>RetailBuyers</name>
</member>
</members>
</app-role>
</app-roles>
4.
Start all services including WebLogic.
For information regarding creating
users, user groups, security roles, permissions and privileges refer to the Oracle
BI EE Security Guide.
See the "Enabling SSO
Authentication" chapter in the Oracle BI EE Security Guide for more
information about configuration changes. For the end user, language display is
determined by the language selected in the user's browser settings.
Consider also the following:
§ Retail Analytics
supports retail 4-5-4, combined 4-5-4/Gregorian, or 13 period calendar. You can
choose which calendar to use during database installation. The default calendar
is retail 4-5-4. Even though 4-5-4 and Gregorian can be used in a single
instance of Retail Analytics, note the following points:
–
All the week level aggregate tables are rolled up based on the
4-5-4 calendar. Gregorian calendar reporting always aggregates data from the
day level tables on the fly.
–
All the transformation metrics like Last Year, Last Week etc
are based on 4-5-4 calendar.
–
All the packaged reports are created using 4-5-4 attributes. But
these reports can easily be modified or created by replacing the 4-5-4
attributes with Gregorian attributes to function with Gregorian calendar.
To implement either combined
4-5-4/Gregorian or 13 period, see ”Appendix: Time.”
§ When making any
changes to the repository, do it in the offline mode and before
saving the changes perform a global consistency check. The global consistency
check should not show any errors. Out of the box RA repository will
have some warnings when a Global Consistency Check is done. These warnings do
not affect RA functionality in any way and these are been thoroughly verified.
8
ODI
ODI admin OS user can be different
from a Retail Analytics batch OS user, however, this admin user should belong
to the same user group as Retail Analytics batch OS user. The access permission
to those files installed through ODI installation should be modified to group
read and execution. World readable files should not be allowed in product
environment. For example, the permission of odiparams.sh should be modified to
750, so it will not have world read permission or execute permission.
Seed Data Setup
See the Retail Analytics Seed Data Setup section for how
to seed Retail Analytics initial data.
Retail Analytics initial loading data
files (csv files) that are located under $ODI_HOME should be owned by Retail
Analytics batch user and installed with750 permission. No world readable files
should be allowed.
Retail Analytics shell scripts, error
files, and log files that are located under $MMHOME should be owned by Retail
Analytics batch user and installed with 750 permission. No world readable files
should be allowed.
Two files (ODI_Post_Install.txt and
RPD_post_install.txt) which contain password to protect Retail Analytics ODI
code and Oracle BI EE code should be owned by Retail Analytics batch user and
installed with 600 permission. Password in Oracle BI EE and ODI should be
changed after installation is done.
Oracle BI EE Server
Retail Analytics Oracle BI EE metadata
files (rpd, catalog, and translation) should be owned by Retail Analytics front-end
system administrator and installed with 750 permission.
Note:
In order to execute Retail Analytics Oracle BI EE report, javascript has to be
enabled in web browser.
JDBC connection
Oracle Database access through the ODI
tool can be secured by using a JDBC connection. The JDBC connection can be set up
in both the ODI client and in the ODI executable script.
In the ODI client under Topology
Oracle Technology, select JDBC jdbc driver and jdbc url for all Data Servers
used by Retail Analytics. Login credentials will also be provided here with an encrypted
password. The database and ODI credential will be stored securely through ODI.
The JDBC setup in the ODI executable
file is through the ODI file odiparams.sh which is under the $ODI_HOME/bin
directory. ODI and Oracle database login credential will be provided in this
file with encrypted password. The password encryption and login credential are
stored securely through ODI.
See the Oracle Retail Merchandising
Security Guide Release 14.1.1, section “Configuring SSL on the Oracle Data
Integrator (ODI)” for more information on configuring SSL for an ODI Agent.
See the “Oracle Data Integrator Configuration Tasks”
section for details on how to configure the ODI database connection.
JDBC connection
Oracle database access through Oracle BI
EE can be secured by using JDBC connection. The JDBC connection setup is
provided in rpd file. User needs to provide database login credential in the
rpd file. The database login credential is stored securely through Oracle BI
EE.
Retail Analytics security role
Retail Analytics provides role based security in the
current release. The access permission of Retail Analytics logical tables for
each security role has been defined in Retail Analytics rpd file. Within these
roles, Retail Analyst has the privilege to access every subject area of Retail
Analytics. It is designed for client’s testing, developing, or similar non-business
activities. Due to the extent of access associated with this role, it should be
used cautiously. See the Oracle Retail Analytics Security Guide for
additional information on the Retail Analytics security role.
Out of box, Retail Analytics does not
use any default username or password for Oracle database login. No default
account is used. All Oracle Retail Analytics database users and users
credential are created during the installation.
For details on each database user
access permission, see the “Create
Retail Analytics Schema Owners” section in chapter 2.
Ensure Restrictive Access Control
Retail Analytics provides security
roles to ensure restrictive access at object level. WebLogic application server
is used to create and maintain these application roles. The definition of roles
and the mapping of roles and user groups are stored in system-jazn-data.xml
file. Users can either replace their own system-jazn-data.xml with the one
provided by the Retail Analytics (if users have not defined their own applications
roles yet under WebLogic) or users can merge Retail Analytics roles with their
own users roles (if they already have application roles defined and do not want
to overwrite the system-jazn-data.xml file). See the Oracle Retail Analytics
Implementation Guide on how to merge Retail Analytics security roles with
users’ existing security roles.
The Retail Analytics application
requires OS, database, application server, report/analytical engine, and ETL
component. Oracle ODI is used as ETL tool to load and transform data. Oracle Database
is used as database to store Retail Analytics data. Oracle BI EE is used as
report/analytical engine, and WebLogic is used as application server. For OS,
refer to the “Preinstallation Tasks”
section. During the installation, users should use the recommended secure
configurations from these products for application deployment such as SSO and
SSL.
Retail Analytics Configurable Generic
Parameter List
The Retail Analytics Configurable Generic
Parameter List includes generic parameter list. These parameters are used by a
group of programs, but the value of each parameter can be configured
differently for different programs.
All these parameters are stored in the
C_ODI_PARAM table either in the Retail Analytics data schema or the Retail
Analytics RMS batch user schema.
|
Scenario Name
|
Param Name
|
Schema Used
|
Comment
|
|
SIL, PLP, and SDE scenarios
|
ETL_PROC_WID
|
BOTH
|
This value is the identifier
for the specific ETL process used to create or update target table. Client
can use unique number for each scenario or same number for all scenarios.
|
|
SIL and SDE base fact scenarios
|
LOC_NUM_OF_THREAD
|
BOTH
|
|
Retail Analytics Non Configurable Parameter List
The Retail Analytics Non Configurable
Parameter List includes parameters used by the Retail Analytics programs. They
are not configurable to batch users.
All these parameters are stored in the
C_ODI_PARAM table either in the Retail Analytics data schema or the Retail
Analytics RMS batch user schema.
|
Scenario Name
|
Param Name
|
Schema
|
Comment
|
|
PLP_RETAILPRODUCTDIMENSIONLKUPTEMP
|
RA_PROD_CLOSE_DT
|
RA
|
NOT Used
|
|
GLOBAL
|
ORG_ID
|
BOTH
|
This is the organization ID for
the retailer. It will be used for calendar and other dimension lookup. It is
set to ‘1’ for current release.
|
|
GLOBAL
|
CALENDAR_ID
|
BOTH
|
This is the ID of the calendar
that retailer is going to use. It is set to ‘Retail Calendar~41’ for current
release.
|
|
GLOBAL
|
RA_CATEGORY
|
RA
|
It is set to ‘RETAIL’ for the
current release.
|
|
PLP_RETAILINVPOSITIONCORPORATEORGITSCDYWKAGGREGATE
|
RA_TRUNCATE_LATEST_PARTITION
|
RA
|
This is set to ‘NO’ for the
current release. It is reserved for the future enhancement.
|
|
GLOBAL
|
RA_SRC_CATEGORY
|
RMS
|
It is set to ‘RETAIL’ for the
current release.
|
|
GLOBAL
|
RA_SRC_SUPPLIER_ACTIVE_DESC
|
RMS
|
It is set to ‘Active’ for the
current release.
|
|
GLOBAL
|
RA_SRC_SUPPLIER_INACTIVE_DESC
|
RMS
|
It is set to ‘Inactive’ for the
current release.
|
|
GLOBAL
|
RA_SRC_STORE_TYPE_FRANCHISE
|
RMS
|
It is set to ‘Franchise’ for
the current release.
|
|
GLOBAL
|
RA_SRC_STORE_TYPE_WHOLESALE
|
RMS
|
It is set to ‘Wholesale’ for
the current release.
|
|
GLOBAL
|
RA_SRC_STORE_TYPE_COMPANY
|
RMS
|
It is set to ‘Company’ for the
current release.
|
|
GLOBAL
|
RA_SRC_LOCATION_TYPE_NAME_STORE
|
RMS
|
It is set to ‘STORE’ for the
current release.
|
|
GLOBAL
|
RA_SRC_LOCATION_TYPE_NAME_WH
|
RMS
|
It is set to ‘WAREHOUSE’ for
the current release.
|
|
GLOBAL
|
RA_SRC_LOCATION_TYPE_NAME_PARTNER
|
RMS
|
It is set to ‘PARTNER’ for the
current release.
|
|
GLOBAL
|
RA_PROD_WEEKLY_RECLASS_IND
|
RA
|
This is to indicate if there is
product reclassification in the current week. It is updated by the Retail Analytics program and should not be
updated manually by a batch user.
|
|
GLOBAL
|
RA_ORG_WEEKLY_RECLASS_IND
|
RA
|
This is to indicate if there is
organization reclassification in the current week. It is updated by the Retail Analytics program and should not be
updated manually by a batch user.
|
|
SIL, PLP, and SDE scenarios
|
TARGET_TABLE_NAME
|
BOTH
|
This is to indicate the target
table that the scenario will populate. It is used by the Retail Analytics programs and should not be
modified by a batch user.
|
|
SIL and PLP scenarios
|
EXECUTION_ID
|
BOTH
|
It is set to ‘1’ and is not
used in the current release.
|
|
Weekly batch programs
|
BATCH SCHEDULE
|
RA
|
This is to indicate which
program is executed at weekly base. It is set to ‘1’ for the scenario that
will be executed once a week. It is used by the Retail
Analytics refresh program and should not be updated by a batch user.
|
|
GLOBAL
|
WHOLESALE_CUST_TYPE_CODE
|
RA
|
This is the string code for
wholesale customer type. It is set to ‘WHOLESALE’ in Retail Analytics.
|
|
GLOBAL
|
Fullfillment Status
|
RA
|
This is the string code for
customer order status for fulfillment. It is set to ‘FF’ in Retail Analytics.
|
|
GLOBAL
|
ackordered Status
|
RA
|
This is the string code for
customer order status for backorder. It is set to ‘BO’ in Retail Analytics.
|
|
GLOBAL
|
Reserved Status
|
RA
|
This is the string code for
customer order status for reserve. It is set to ‘RSV’ in Retail Analytics.
|
|
GLOBAL
|
Pick Status
|
RA
|
This is the string code for
customer order status for picking. It is set to ‘PK’ in Retail Analytics.
|
|
GLOBAL
|
STORETYPE_FRANCHISE
|
RA
|
This is the store type for
franchise store. It is set to ‘Franchise’ in Retail
Analytics.
|
|
GLOBAL
|
Cancel Status
|
RA
|
This is the string code for
customer order status for cancel. It is set to ‘CAN’ in Retail Analytics.
|
|
GLOBAL
|
SHIPMENT_OVERNIGHT_METHOD
|
RA
|
This is the string code for
customer order overnight shipment method. It is set to ‘FF03’ in Retail Analytics.
|
|
GLOBAL
|
SHIPMENT_GROUND_METHOD
|
|
This is the string code for
customer order ground shipment method. It is set to ‘RETAIL_SHIP_METHOD_CODE~22~1’
in Retail Analytics.
|
|
GLOBAL
|
REASON_CLASS
|
RA
|
This is the string code for
reason class used for RA reason code. It is set to ‘RTL_REASON’
|
|
GLOBAL
|
INVADJ_REASON_CAT_CODE
|
RA
|
This is the string code for
reason category used for RA inventory adjustment. It is set to
‘RTL_INVADJ_REASON’
|
|
GLOBAL
|
INVADJ_REASON_CAT_NAME
|
RA
|
This is the string code for
reason category name used for RA inventory adjustment. It is set to
‘Inventory Adjustment Reasons’
|
|
GLOBAL
|
RTL_STATUS_CLASS
|
RA
|
This is the string code for
status class used for RA. It is set to ‘RTL_INV_STATUS’.
|
Retail Analytics Configurable Parameter List
The Retail Analytics configurable
parameter includes a list of parameters that are used by either one program or
a group of programs if the Scenario Name is ‘GLOBAL’. The value of each
‘GLOBAL’ parameter will be the same even it can be used by different programs.
All these parameters are stored in the
C_ODI_PARAM table either in the Retail Analytics data schema or the Retail Analytics
RMS batch user schema.
|
Scenario Name
|
Param Name
|
Schema Used
|
Comment
|
|
SIL_DAYDIMENSION
|
START_DT
|
RA
|
This is the start date of the
calendar that a batch user is going to use.
|
|
SIL_DAYDIMENSION
|
END_DT
|
RA
|
This is the end date of the
calendar that a batch user is going to use.
|
|
SIL_ITEMDIMENSION
|
IS_INCREMENTAL
|
RA
|
This is to indicate if the
incremental approach or the snapshot approach is going to be used for item
dimension during daily ETL loading. The valid value is ‘Y’, ‘N’.
|
|
GLOBAL
|
BASE_HOME
|
RA
|
This is the MMHOME where SIL
and PLP ETL batch programs are located.
|
|
GLOBAL
|
RA_STORE_COMP_NUM_OF_OPEN_DAYS
|
BOTH
|
This is the number of days that
a store has to be open for to become a COMP store.
|
|
GLOBAL
|
RA_RATE_TYPE
|
RA
|
The valid value is ‘Corporate’.
|
|
SIL_TIMEOFDAYDIMENSION
|
IS_INCREMENTAL
|
RA
|
‘N’,Y’
|
|
GLOBAL
|
LANGUAGE_CODE
|
RA
|
This is the primary language
code that Retail Analytics is going to use. It is in Oracle database code and
has to be within the 18 languages that Retail Analytics supports. If RMS is
used, this code has to match the primary language code in RMS.
|
|
PLP_RETAILINVPOSITIONCORPORATEORGITSCDYWKAGGREGATE
|
PARALLEL_DEGREE_W_RTL_INV_IT_DY_TMP
|
RA
|
This is the parallel degree for
SUM SQL statement used for inventory subclass day population.
|
|
PLP_RETAILINVPOSITIONSCCLDPLCDYWKAGGREGATE
|
PARALLEL_DEGREE_W_RTL_INV_SC_LC_DY_TMP
|
RA
|
This is the parallel degree for
SUM SQL statement used for inventory subclass location day population.
|
|
GLOBAL
|
SRC_BASE_HOME
|
RMS
|
This is the MMHOME where SDE
batch programs are located.
|
|
SDE_RETAILITEMDIMENSION
|
IS_INCREMENTAL
|
RMS
|
This is to indicate if the
incremental approach or the snapshot approach is going to be used for item
dimension during daily ETL loading. The valid value is ‘Y’, ‘N’.
|
|
SDE_RETAILITEMSUPPLIERDIMENSION
|
IS_INCREMENTAL
|
RMS
|
This is to indicate if the
incremental approach or the snapshot approach is going to be used for item
supplier dimension during daily ETL loading. The valid value is ‘Y’, ‘N’.
|
|
GLOBAL
|
WHOLESALE_CHANNEL
|
BOTH
|
This is the channel value of
wholesale stores. All wholesales stores should have a same channel.
|
|
SDE_RETAILDOMAINMEMBERLKUP
|
COLOR
|
RMS
|
Before running the script
"SIL_RetailLoadControlSeedData.ksh", replace the value 'C' to match
with column value of DIFF_TYPE for COLOR from RMS DIFF_IDS table.
|
|
SDE_RETAILDOMAINMEMBERLKUP
|
FABRIC
|
RMS
|
Before running the script
"SIL_RetailLoadControlSeedData.ksh", replace the value FAB' to
match with column value of DIFF_TYPE for FABRIC from RMS DIFF_IDS table.
|
|
SDE_RETAILDOMAINMEMBERLKUP
|
SCENT
|
RMS
|
Before running the script
"SIL_RetailLoadControlSeedData.ksh", replace the value 'SC' to
match with column value of DIFF_TYPE for SCENT from RMS DIFF_IDS table.
|
|
SDE_RETAILDOMAINMEMBERLKUP
|
STYLE
|
RMS
|
Before running the script
"SIL_RetailLoadControlSeedData.ksh", replace the value 'STY' to
match with column value of DIFF_TYPE for STYLE from RMS DIFF_IDS table.
|
|
SDE_RETAILDOMAINMEMBERLKUP
|
SIZE
|
RMS
|
Before running the script
"SIL_RetailLoadControlSeedData.ksh", replace the value 'S' to match
with column value of DIFF_TYPE for SIZE from RMS DIFF_IDS table.
|
|
SDE_RETAILITEMDIFFDIMENSION
|
BRAND
|
RMS
|
Replace the
value 'B' from the above line to match with column value of BRAND
NAME from ITEM_MASTER table of RMS table
|
|
SDE_RETAILITEMDIFFDIMENSION
|
COLOR
|
RMS
|
Before running the script
"SIL_RetailLoadControlSeedData.ksh", replace the value 'C' to match
with column value of DIFF_TYPE for COLOR from RMS DIFF_IDS table.
|
|
SDE_RETAILITEMDIFFDIMENSION
|
FLAVOR
|
RMS
|
Before running the script
"SIL_RetailLoadControlSeedData.ksh", replace the value 'F' to match
with column value of DIFF_TYPE for FLAVOR from RMS DIFF_IDS table.
|
|
SDE_RETAILITEMDIFFDIMENSION
|
FABRIC
|
RMS
|
Before running the script
"SIL_RetailLoadControlSeedData.ksh", replace the value FAB' to
match with column value of DIFF_TYPE for FABRIC from RMS DIFF_IDS table.
|
|
SDE_RETAILITEMDIFFDIMENSION
|
SCENT
|
RMS
|
Before running the script
"SIL_RetailLoadControlSeedData.ksh", replace the value 'SC' to
match with column value of DIFF_TYPE for SCENT from RMS DIFF_IDS table.
|
|
SDE_RETAILITEMDIFFDIMENSION
|
STYLE
|
RMS
|
Before running the script
"SIL_RetailLoadControlSeedData.ksh", replace the value 'STY' to
match with column value of DIFF_TYPE for STYLE from RMS DIFF_IDS table.
|
|
SDE_RETAILITEMDIFFDIMENSION
|
SIZE
|
RMS
|
Before running the script
"SIL_RetailLoadControlSeedData.ksh", replace the value 'S' to match
with column value of DIFF_TYPE for SIZE from RMS DIFF_IDS table.
|
|
SDE_RETAILCOLORDIMENSION
|
COLOR
|
RMS
|
Before running the script
"SIL_RetailLoadControlSeedData.ksh", replace the value 'C' to match
with column value of DIFF_TYPE for COLOR from RMS DIFF_IDS table.
|
|
SDE_RETAILITEMATTRDIMENSION
|
FLAVOR
|
RMS
|
Before running the script
"SIL_RetailLoadControlSeedData.ksh", replace the value 'F' to match
with column value of DIFF_TYPE for FLAVOR from RMS DIFF_IDS table.
|
|
SDE_RETAILITEMATTRDIMENSION
|
FABRIC
|
RMS
|
Before running the script "SIL_RetailLoadControlSeedData.ksh",
replace the value FAB' to match with column value of DIFF_TYPE for FABRIC
from RMS DIFF_IDS table.
|
|
SDE_RETAILITEMATTRDIMENSION
|
SCENT
|
RMS
|
Before running the script
"SIL_RetailLoadControlSeedData.ksh", replace the value 'SC' to
match with column value of DIFF_TYPE for SCENT from RMS DIFF_IDS table.
|
|
SDE_RETAILITEMATTRDIMENSION
|
STYLE
|
RMS
|
Before running the script
"SIL_RetailLoadControlSeedData.ksh", replace the value 'STY' to
match with column value of DIFF_TYPE for STYLE from RMS DIFF_IDS table.
|
|
SDE_RETAILITEMATTRDIMENSION
|
SIZE
|
RMS
|
Before running the script
"SIL_RetailLoadControlSeedData.ksh", replace the value 'S' to match
with column value of DIFF_TYPE for SIZE from RMS DIFF_IDS table.
|
|
GLOBAL
|
RTVR_REASON_CAT_CODE
|
RA
|
This the reason category used
for RA return to vendor. It should match RMS CODE_HEAD.CODE_TYPE for return
to vendor reasons.
|
|
GLOBAL
|
CHANGE_ON_DT
|
RMS
|
This is to store the date of
the last extracted data from RMS ITEM_IMAGE table. During the installation, this
should be set to the business start date for the client in the format of
‘DD-MM-YY’.
|
Retail Analytics Data Mining Non Configurable
List
The Retail Analytics Data Mining Non
Configurable List includes a list of non configurable parameters which are used
by Retail Analytics data mining only. Some of these parameters will be updated
by Retail Analytics ETL programs during ETL batch cycle. None of these
parameters can be updated manually by Retail Analytics batch user.
All these parameters are stored in
table W_RTL_DMS_CONFIG_G in Retail Analytics data schema.
|
Parameter Name
|
Comment
|
|
ARM_WEEK_WID
|
This column is updated by Retail Analytics
program and should not be updated manually by batch user.
|
|
TOP10_RESTART_HIST_IND
|
Valid value in (‘Y’, ‘N’). This
column is updated by Retail Analytics program based on reclassification
information. It should not be updated manually by batch user.
|
|
TOP10_MIN_DY_WID
|
This is the first date of data
that Top 10 Product Affinities mining program is going to look. In most case,
it will be the first date of current week. This will be reset to the first
day of the week that is 26 weeks ago when there is a reclassification on
product hierarchy in the current week. This column is updated by Retail
Analytics program and should not be updated manually by batch user.
|
|
TOP10_MAX_DY_WID
|
This is the last date of data
that Top 10 Product Affinities mining program is going to look. In most case,
it will be the last date of the current week. This column is updated by
Retail Analytics program and should be updated manually by batch user.
|
|
ANC_SC_IF_HIER_LEVEL
|
This is the product hierarchy
level for IF item for the mining for Anchor Subclass Top Affinities. It is
set to ‘SBC’ for the current release.
|
|
ANC_SC_THEN_HIER_LEVEL
|
This is the product hierarchy
level for THEM item for the mining for Anchor Subclass Top Affinities. It is
set to ‘SBC’ for the current release.
|
|
ANC_SC_ATTR_LIST_SBC
|
This is an identifier of the
subclass attribute list to be processed from W_RTL_DMS_ATTR_LIST_G. It is set
to ‘ANC_SC_ATTR_LIST_SBC_NUM’ for the current release.
|
|
ANC_SC_RESTART_HIST_IND
|
Valid value in (‘Y’, ‘N’). This
column is updated by Retail Analytics program based on reclassification
information. It should not be updated manually by batch user.
|
|
ANC_SC_MIN_DY_WID
|
This is the first date of data
that Anchor Subclass Top Affinities mining program is going to look. In most
case, it will be the first date of current week. This will be reset to the
first day of the week that is 26 weeks ago when there is a reclassification
on product hierarchy in the current week. This column is updated by Retail
Analytics program and should be updated manually by batch user.
|
|
ANC_SC_MAX_DY_WID
|
This is the last date of data
that Anchor Subclass Top Affinities mining program is going to look. In most
case, it will be the last date of the current week. This column is updated by
Retail Analytics program and should be updated manually by batch user.
|
|
TOP10_PROMO_IF_HIER_LEVEL
|
This is the product hierarchy
level for IF item for the mining for Current Top 10 Promoted Subclass
Affinities. It is set to ‘SBC’ for the current release.
|
|
TOP10_PROMO_THEN_HIER_LEVEL
|
This is the product hierarchy
level for TEHN item for the mining for Current Top 10 Promoted Subclass
Affinities. It is set to ‘SBC’ for the current release.
|
|
TOP10_PROMO_ATTR_LIST_PROMO_COMP
|
This is an identifier of the
Promotion component list to be processed from W_RTL_DMS_ATTR_LIST_G. It is
set to ‘TOP10_PROMO_ATTR_LIST_PROMO_COMP_NUM’ for the current release.
|
|
TOP10_PROMO_RESTART_HIST_IND
|
Valid value in (‘Y’, ‘N’). This
column is updated by Retail Analytics program based on reclassification
information. It should not be updated manually by batch user.
|
|
TOP10_PROMO_MIN_DY_WID
|
This is the first date of data
that Current Top 10 Promoted Subclass Affinities mining program is going to
look. In most case, it will be the first date of current week. This will be
reset to the first day of the week that is 26 weeks ago when there is a
reclassification on product hierarchy in the current week. This column is
updated by Retail Analytics program and should be updated manually by batch
user.
|
|
TOP10_PROMO_MAX_DY_WID
|
This is the last date of data
that Current Top 10 Promoted Subclass Affinities mining program is going to
look. In most case, it will be the last date of the current week. This column
is updated by Retail Analytics program and should be updated manually by
batch user.
|
|
CUST_PROMO_IF_HIER_LEVEL
|
This is the product hierarchy
level for IF item for the mining for Anchor Customer Segment Promotion
Affinities. It is set to ‘SBC’ for the current release.
|
|
CUST_PROMO_THEN_HIER_LEVEL
|
This is the product hierarchy
level for TEHN item for the mining for Anchor Customer Segment Promotion
Affinities. It is set to ‘SBC’ for the current release.
|
|
CUST_PROMO_ATTR_LIST_CUST_SEG
|
This is an identifier of the
customer segment list to be processed from W_RTL_DMS_ATTR_LIST_G. It is set
to ‘CUST_PROMO_ATTR_LIST_CUST_SEG_NUM’ for the current release.
|
|
CUST_PROMO_MIN_DY_WID
|
This is the first date of data
that Anchor Customer Segment Promotion Affinities mining program is going to
look. In most case, it will be the first date of current week. This will be
reset to the first day of the week that is 26 weeks ago when there is a
reclassification on product hierarchy in the current week. This column is
updated by Retail Analytics program and should be updated manually by batch
user.
|
|
CUST_PROMO_MAX_DY_WID
|
This is the last date of data
that Anchor Customer Segment Promotion Affinities mining program is going to
look. In most case, it will be the last date of the current week. This column
is updated by Retail Analytics program and should be updated manually by
batch user.
|
|
ANC_SC_PROMO_IF_HIER_LEVEL
|
This is the product hierarchy
level for IF item for the mining for Anchor Subclass Top Affinities by
Promotions. It is set to ‘SBC’ for the current release.
|
|
ANC_SC_PROMO_THEN_HIER_LEVEL
|
This is the product hierarchy
level for THEN item for the mining for Anchor Subclass Top Affinities by
Promotions. It is set to ‘SBC’ for the current release.
|
|
ANC_SC_PROMO_ATTR_LIST_ORG_DH
|
This is an identifier of the
organization list to be processed from W_RTL_DMS_ATTR_LIST_G. It is set to
‘ANC_SC_PROMO_ATTR_LIST_ORG_DH_NUM’ for the current release.
|
|
ANC_SC_PROMO_ATTR_LIST_PROMO_COMP
|
This is an identifier of the
Promotion component list to be processed from W_RTL_DMS_ATTR_LIST_G. It is
set to ‘ANC_SC_PROMO_ATTR_LIST_PROMO_COMP_NUM’ for the current release.
|
|
ANC_SC_PROMO_RESTART_HIST_IND
|
Valid value in (‘Y’, ‘N’). This
column is updated by Retail Analytics program based on reclassification
information. It should not be updated manually by batch user.
|
|
ANC_SC_PROMO_MIN_DY_WID
|
This is the first date of data
that Anchor Subclass Top Affinities by Promotions mining program is going to
look. In most case, it will be the first date of current week. This will be
reset to the first day of the week that is 26 weeks ago when there is a
reclassification on product hierarchy in the current week. This column is
updated by Retail Analytics program and should be updated manually by batch
user.
|
|
ANC_SC_PROMO_MAX_DY_WID
|
This is the last date of data
that Anchor Subclass Top Affinities by Promotions mining program is going to
look. In most case, it will be the last date of the current week. This column
is updated by Retail Analytics program and should be updated manually by
batch user.
|
Retail Analytics Data Mining Configurable List
The Retail Analytics Data Mining
Configurable List includes a list of configurable parameters which are used by Retail
Analytics data mining and Retail Analytics Sales Baseline calculation only..
All these parameters are stored in the
W_RTL_DMS_CONFIG_G table in the Retail Analytics data schema.
|
Parameter Name
|
Comment
|
|
BL_POST_PROMO_CALC_FREQ
|
Recalculation frequency for
intermediate weeks.
|
|
BL_POST_PROMO_WEEKS
|
Override value indicating
specifically the number of post-promotion weeks to use for baseline
calculation.
|
|
BL_PRE_PROMO_WEEKS
|
Override value indicating
specifically the number of pre-promotion weeks to use for baseline
calculation.
|
|
BL_PROMO_CALC_DOP
|
Number of concurrent threads to
use while doing promotion baseline calculation.
|
|
BL_REFRESH_PRE_PWEEKS
|
Number of weeks prior to
processing week that need to be refreshed from Retail Analytics.
|
|
BL_WEEKS_TO_USE
|
Number of weeks to use for
baseline calculation.
|
|
BL_WEEK_TO_PROCESS
|
Baseline processing week WID.
This will be updated by baseline ETL refresh program.
|
|
BL_WEIGHT_AGE_BASE
|
Baseline weight age base.
|
|
BL_WK_SALES_DATA_DOP
|
Number of concurrent threads to
use while gathering weekly sales data.
|
|
ARM_HIST_NUM_OF_WEEK
|
This is the number of weeks
that Retail Analytics will hold mining result history for.
|
|
ARM_WEEKLY_DOP
|
|
|
ARM_BATCH_DOP
|
|
|
TOP10_PROD_HIER_LEVEL
|
This is the highest product
hierarchy level that the mining for Top 10 Product Affinities will be
executed at. Valid value in (‘SBC’, ‘CLS’, ‘DEPT’).
|
|
TOP10_MIN_SUPPORT_DEPT
|
|
|
TOP10_MIN_SUPPORT_CLS
|
|
|
TOP10_MIN_SUPPORT_SBC
|
This is the minimum support
filter when Top 10 Product Affinities is configured at subclass level.
|
|
TOP10_MIN_CONFIDENCE_DEPT
|
|
|
TOP10_MIN_CONFIDENCE_CLS
|
|
|
TOP10_MIN_CONFIDENCE_SBC
|
This is the minimum confidence
filter when Top 10 Product Affinities is configured at subclass level.
|
|
TOP10_MIN_REVERSE_CONFIDENCE_DEPT
|
|
|
TOP10_MIN_REVERSE_CONFIDENCE_CLS
|
|
|
TOP10_MIN_REVERSE_CONFIDENCE_SBC
|
This is the minimum reverse
confidence filter when Top 10 Product Affinities is configured at subclass
level.
|
|
TOP10_MAX_SET_SIZE
|
This is the total number of
items in the Rule for Top10 Product Affinities. Number 4 is the maximum value
that a client can use.
|
|
ANC_SC_MIN_SUPPORT
|
This is the minimum support
filter for Anchor Subclass Top Affinities.
|
|
ANC_SC_MIN_CONFIDENCE
|
This is the minimum confidence
filter for Anchor Subclass Top Affinities.
|
|
ANC_SC_MIN_REVERSE_CONFIDENCE
|
This is the minimum reverse
confidence filter for Anchor Subclass Top Affinities.
|
|
ANC_SC_MAX_SET_SIZE
|
This is the total number of
items in the Rule for Anchor Subclass Top Affinities.
|
|
TOP10_PROMO _MIN_SUPPORT
|
This is the minimum support
filter for Current Top 10 Promoted Subclass Affinities.
|
|
TOP10_PROMO _MIN_CONFIDENCE
|
This is the minimum confidence
filter for Current Top 10 Promoted Subclass Affinities.
|
|
TOP10_PROMO
_MIN_REVERSE_CONFIDENCE
|
This is the minimum reverse
confidence filter for Current Top 10 Promoted Subclass Affinities.
|
|
TOP10_PROMO _MAX_SET_SIZE
|
This is the total number of
items in the Rule for Current Top 10 Promoted Subclass Affinities.
|
|
CUST_PROMO _MIN_SUPPORT
|
This is the minimum support
filter for Anchor Customer Segment Promotion Affinities.
|
|
CUST_PROMO _MIN_CONFIDENCE
|
This is the minimum confidence
filter for Anchor Customer Segment Promotion Affinities.
|
|
CUST_PROMO
_MIN_REVERSE_CONFIDENCE
|
This is the minimum reverse
confidence filter for Anchor Customer Segment Promotion Affinities.
|
|
CUST_PROMO _MAX_SET_SIZE
|
This is the total number of
items in the Rule for Anchor Customer Segment Promotion Affinities.
|
|
CUST_PROMO_RESTART_HIST_IND
|
Valid values are ‘Y’, ‘N’.
|
|
CUST_PROMO_CUST_SEG_RECLASS_IND
|
This is to indicate if any
customer change segment during the week. It is only manually updated by end
user. Setting this to ‘Y’ will cause mining program to re-execute mining
process against the whole history of mining data.
|
|
ANC_SC_PROMO_ORG_HIER_LEVEL
|
This is to identify the
organization hierarchy level of this mining process. The valid values are in
(‘LOCATION’, ‘DISTRICT’, ‘AREA’, ‘CHAIN’, ‘REGION’).
|
|
ANC_SC_PROMO _MIN_SUPPORT
|
This is the minimum support
filter for Anchor Subclass Top Affinities by Promotions.
|
|
ANC_SC_PROMO _MIN_CONFIDENCE
|
This is the minimum confidence
filter for Anchor Subclass Top Affinities by Promotions.
|
|
ANC_SC_PROMO
_MIN_REVERSE_CONFIDENCE
|
This is the minimum reverse
confidence filter for Anchor Subclass Top Affinities by Promotions.
|
|
ANC_SC_PROMO _MAX_SET_SIZE
|
This is the total number of
items in the Rule for Anchor Subclass Top Affinities by Promotions.
|
|
ARM_WHOLESALE_INCLUDE_IND
|
This is to indicate if mining
process should include wholesale store. The valid values are ‘Y’ or ‘N’.
|
|
BL_WHOLESALE_INCLUDE_IND
|
This is to indicate if baseline
process should include wholesale store. The valid values are ‘Y’ or ‘N’.
|
9
The patching process for many Oracle
Retail products has been substantially revised from prior releases. Automated
tools are available to reduce the amount of manual steps when applying
patches. To support and complement this automation, more information about the
environment is now tracked and retained between patches. This information is
used to allow subsequent patches to identify and skip changes which have
already been made to the environment. For example, the patching process uses a
database manifest table to skip database change scripts which have already been
executed.
The enhanced product patching process
incorporates the following:
§ Utilities to automate
the application of Oracle Retail patches to environments.
§ Unified patches so
that a single patch can be applied against Database, Forms, Java applications,
Batch, etc. installations.
§ Database and
Environment manifests track versions of files at a module level.
§ Centralized
configuration distinguishes installation types (Database, Forms, Java, Batch,
etc.).
§ Patch inventory
tracks the patches applied to an environment.
These enhancements make installing and
updating Oracle Retail product installations easier and reduce opportunities
for mistakes. Some of these changes add additional considerations to patching
and maintaining Oracle Retail product environments. Additional details on
these considerations are found in later sections.
With version 14.1.1, several
additional products and technologies are supported by the enhanced patching
process. The utilities, processes and procedures described here are supported
with the following products and listed technologies:
|
Product
|
Supported Technology
|
|
Oracle Retail Merchandising System
(RMS)
|
§ Database
scripts
§ Batch
scripts
§ RETL
scripts
§ Data
Conversion Scripts
§ Forms
§ BI
Publisher Reports
|
|
Oracle Retail Warehouse
Management System (RWMS)
|
§ Database
scripts
§ Batch
scripts
§ Forms
§ BI
Publisher Reports
|
|
Oracle Retail Price Management
(RPM)
|
§ Database
scripts (included with RMS)
§ Java
Application
§ Batch
scripts
|
|
Oracle Retail Invoice Matching
(ReIM)
|
§ Database
scripts (included with RMS)
§ Java
Application
§ Batch
scripts
|
|
Oracle Retail Allocation
|
§ Database
scripts (included with RMS)
§ Java
Application
§ Batch
scripts
|
|
Oracle Retail Sales Audit
(ReSA)
|
§ Database
scripts (included with RMS)
§ Java
Application
|
|
Oracle Retail Analytics (RA)
|
§ Database
scripts
|
|
Oracle Retail Advanced Science
Engine (ORASE)
|
§ Database
scripts
§ Batch
scripts
|
|
Oracle Retail Application
Security Role Manager (RASRM)
|
§ Java
Application
|
During the lifecycle of an Oracle
Retail environment, patches are applied to maintain your system. This
maintenance may be necessary to resolve a specific issue, add new
functionality, update to the latest patch level, add support for new
technologies, or other reasons.
A patch refers to a collection of
files to apply to an environment. Patches could be cumulative, such as the
14.1.0 or 14.1.1 release, or incremental, such as a hot fix for just a few
modules. Patches may contain updates for some or all components of a product
installation including database, application code, forms, and batch. In a
distributed architecture the same patch may need to be applied to multiple
systems in order to patch all of the components. For example, if a patch contains
both database and application changes, the patch would need to be applied to
both the database server and the application server.
The top-level directory for the
installation of an Oracle Retail product is referred to as the RETAIL_HOME.
Underneath RETAIL_HOME are all of the files related to that product
installation, as well as configuration and metadata necessary for the Oracle
Retail Patch Assistant to maintain those files. In some cases the runtime
application files also exist under RETAIL_HOME. For example, the compiled RMS
forms, compiled RMS batch files, or Java Application batch scripts.
Patches are applied and tracked using
utilities that are specifically designed for this purpose. The primary utility
is described briefly below and additional information is available in later
sections.
ORPatch is the utility used to apply
patches to an Oracle Retail product installation. It is used in the background
by the installer when creating a new installation or applying a cumulative
patch. It is used directly to apply an incremental patch to an environment.
ORMerge is a utility to allow multiple
patches to be combined into a single patch. Applying patches individually may
require some steps to be repeated. Merging multiple patches together allows
these steps to be run only once. For example, applying several incremental
patches to database packages will recompile invalid objects with each patch.
Merging the patches into a single patch before applying them will allow invalid
objects to be recompiled only once.
ORCompile is a utility to compile
components of Oracle Retail products outside of a patch. It allows RMS Forms,
RMS Batch, and RWMS Forms to be fully recompiled even if no patch has been
applied. It also contains functionality to recompile invalid database objects
in product schemas.
Oracle Retail Deploy Patch (ORDeploy)
ORDeploy is a utility to deploy components
of Oracle Retail Java products outside of a patch. It allows RPM, ReIM,
Allocation and ReSA java applications to be redeployed to WebLogic even if a
patch has not been applied. It contains functionality to optionally include or
not include Java customizations when redeploying.
Many products and technologies are
supported by the enhanced patching process for the first time in 14.1. In
those cases all of the content in this chapter is new with 14.1.
MMHOME changed to
RETAIL_HOME
For RMS and RWMS, which were
previously supported in 14.0, there is a change when using ORPatch and related
tools. Previously the MMHOME environment variable was used to refer to the RMS
and RWMS installation area. Starting with 14.1, RETAIL_HOME is now used to
refer to the installation area. So where previously it was necessary to set
MMHOME before executing ORPatch, you must now set RETAIL_HOME.
Note: RMS
Batch continues to use MMHOME to refer to the area where batch is installed,
and requires it to be set when executing batches. The change to using
RETAIL_HOME relates only to ORPatch and related utilities.
Java batch script
location
For Java products with batch scripts,
starting with 14.1 the location of batch scripts has been changed to
$RETAIL_HOME/<app>-batch. Previously batch scripts were stored within
the WebLogic domain in the retail directory. Credential store files continue
to be stored within the WebLogic domain.
Oracle Retail produces two types of
patches for their products: cumulative and incremental.
Cumulative
Patches
A cumulative patch includes all of the
files necessary to patch an environment to a specific level or build a new
environment at that level. Examples of cumulative patches would be 14.1.1,
14.1.2, and so on. Cumulative patches come with a standard Oracle Retail
installer and so can be applied to an environment with the installer rather
than with ORPatch or other utilities.
Incremental
Patches
An incremental patch includes only
selected files necessary to address a specific issue or add a feature.
Examples of incremental patches would be a hot fix for a specific defect.
Incremental patches do not include an installer and must be applied with
ORPatch.
An Oracle Retail incremental patch
generally contains several files and one or more subdirectories. The
subdirectories contain the contents of the patch, while the individual files
contain information about the patch and metadata necessary for patching
utilities to correctly apply the patch. The most important files in the
top-level directory are the README.txt, the manifest files.
The README.txt file contains
information about the incremental patch and how to apply it. This may include
manual steps that are necessary before, after or while applying the patch. It
will also contain instructions on applying the patch with ORPatch.
Each patch contains manifest files
which contain metadata about the contents of a patch and are used by ORPatch to
determine the actions necessary to apply a patch. Patches should generally be
run against all installations a product in an environment, and ORPatch will
only apply the changes from the patch that are relevant to that installation.
Note:
Cumulative patches use a different patch structure because they include a full
installer which will run ORPatch automatically.
The patching infrastructure for 14.1
tracks version information for all files involved with a product installation.
The RETAIL_HOME now contains files which track the revision of all files within
the RETAIL_HOME including batch, forms, database, Java archives and other
files. In addition, records of database scripts that have been applied to the
product database objects are kept within each database schema.
In order to ensure that environment
metadata is accurate all patches must be applied to the Oracle Retail product
installation using patching utilities. For cumulative patches this is done
automatically by the installer. For incremental patches ORPatch must be used
directly. This is especially important if database changes are being applied,
in order to ensure that the database-related metadata is kept up-to-date.
A configuration file in
$RETAIL_HOME/orpatch/config/env_info.cfg is used to define the details of a
specific Oracle Retail environment. This file defines:
§ The location of
critical infrastructure components such as the ORACLE_HOME on a database or
middleware server.
§ The location of
Oracle Wallets to support connecting to the database users.
§ The type of file
processing which is relevant to a particular host. For example, if this is a
host where database work should be done, or a host where batch compilation
should be done, a host where Java applications should be deployed, etc. This
allows a single database, forms and batch patch to be run against all types of
hosts, applying only the relevant pieces on each server.
§ Other configuration
necessary to determine proper behavior in an environment.
Retained Installation Files
The RETAIL_HOME location of an Oracle
Retail product installation contains all of the files associated with that
installation. This can include database scripts, Java files, Forms, Batch,
RETL and Data Conversion files as with previous versions and also includes all
database scripts. This allows objects to be reloaded during patching,
including any necessary dependencies.
In order to ensure that database
contents and generated files exactly match patched versions, when applying
cumulative patches some content is regenerated even if it does not appear to
have changed.
On a cumulative patch this includes:
§ All re-runnable
database content will be reloaded
–
Packages and Procedures
–
Database Types (excluding RIB objects)
–
Control scripts
–
Triggers
–
WebService jars and packages
–
Form Elements
§ All RMS and RWMS
forms files will be recompiled
§ All RMS batch files
will be recompiled
When applying incremental patches,
only changed files will be reloaded. However this does not apply to RMS batch,
which is fully recompiled with any change.
When applying cumulative patches to
Java applications components with ORPatch, all hotfixes related to base product
ear files included with the patch will be rolled back. This increases the
likelihood of a successful deployment because hotfixes may not be compatible
with updated product ear files, or may already be included with the ear.
Before applying a cumulative patch to Java applications, check the patch
documentation to determine which hotfixes are not included in the ear. Then
work with Oracle Support to obtain compatible versions of the fixes for the
updated ear version. In some cases this may be the same hotfix, in which case
it can be re-applied to the environment. In other cases a new hotfix may be
required.
Before applying a patch to an
environment, it is extremely important to take a full backup of both the
RETAIL_HOME file system and the Oracle Retail database. Although ORPatch makes
backups of files modified during patching, any database changes cannot be
reversed. If a patch fails which contains database changes, and cannot be
completed, the environment must be restored from backup.
When patches are applied to an
environment, the old version of files which are updated or deleted are backed
up to $RETAIL_HOME/backups/backup-<timestamp>. When applying large
patches, ensure there is sufficient disk space on the system where you unzip
the patch or the patching process may fail. Up to twice as much disk space as
the unzipped patch may be required during patching.
In addition to backups of source
files, the existing compiled RMS or RWMS Forms and RMS Batch files are saved
before recompilation. These backups may be created during patches:
§ Batch ‘lib’ directory
in $RETAIL_HOME/oracle/lib/bin-<timestamp>
§ Batch ‘proc’
directory in $RETAIL_HOME/oracle/proc/bin-<timestamp>
§ Forms ‘toolset’
directory in $RETAIL_HOME/base/toolset/bin-<timestamp>
§ Forms ‘forms’
directory in $RETAIL_HOME/base/forms/bin-<timestamp>
Periodically both
types of backup files can be removed to preserve disk space.
ORPatch is used to apply patches to an
Oracle Retail product installation. When applying a patch which includes an
installer, ORPatch does not need to be executed manually as the installer will
run it automatically as part of the installation process. When applying a
patch that does not include an installer, ORPatch is run directly.
ORPatch performs the tasks necessary
to apply the patch:
§ Inspects the patch
metadata to determine the patch contents and patch type.
§ Reads the environment
configuration file to determine which product components exist in this
installation.
§ Assembles a list of
patch actions which will be run on this host to process the patch.
§ Executes pre-checks
to validate that all patch actions have the necessary configuration to proceed.
§ Compares version
numbers of files from the patch against the files in the environment.
§ Backs up files which
will be updated.
§ Copies updated files
into the installation.
§ Loads updated files
into database schemas, if applicable.
§ Recompiles RMS batch,
if applicable.
§ Recompiles RMS forms,
if applicable.
§ Constructs updated Java
archives and deploys them to WebLogic, if applicable
§ Updates Java batch
files and libraries, if applicable
§ Records the patch in
the patch inventory.
If a patch does not contain updated
files for the database or system, no action may be taken. If a previously
failed ORPatch session is discovered, it will be restarted.
Before applying a patch to your
system, it is important to properly prepare the environment.
Single Patching Session
It is extremely important that only a
single ORPatch session is active against a product installation at a time. If
multiple patches need to be applied, you can optionally merge them into a
single patch and apply one patch to the environment. Never apply multiple
patches at the same time.
Shutdown Applications
If a patch updates database objects,
it is important that all applications are shutdown to ensure no database
objects are locked or in use. This is especially important when applying
changes to Oracle Retail Integration Bus (RIB) objects as types in use will not
be correctly replaced, leading to “ORA-21700: object does not exist or marked
for delete” errors when restarting the RIB.
Backup Environment
Before applying a patch to an
environment, it is important to take a full backup of both the RETAIL_HOME file
system and the retail database. Although ORPatch makes backups of files
modified during patching, any database changes cannot be reversed. If a patch
which contains database changes fails and cannot be completed, the environment
must be restored from backup.
Log Files
When applying a patch, ORPatch will
create a number of log files which contain important information about the
actions taken during a patch and may contain more information in the event of
problems. Log files are created in the $RETAIL_HOME/orpatch/logs directory.
Logs should always be reviewed after a patch is applied.
After a patch session the log
directory will contain at a minimum an ORPatch log file and may also contain
other logs depending on the actions taken. The following table describes logs
that may exist.
|
Log File
|
Used For
|
|
orpatch-<date>-<time>.log
|
Primary ORPatch log file
|
|
detail_logs/dbsql_<component>/invalids/*
|
Details on the errors causing a
database object to be invalid
|
|
detail_logs/analyze/details
|
Detail logs of files that will
be created/updated/removed when a patch is applied
|
|
detail_logs/compare/details
|
Detail logs of the differences
between two sets of environment metadata
|
|
orpatch_forms_<pid>_child_<num>.log
|
Temporary logs from a child
process spawned to compile forms in parallel. After the child process
completes, the contents are append to the primary orpatch log file
|
|
detail_logs/forms/rms_frm_toolset/*
|
Detail logs of the compilation
of each RMS Toolset file
|
|
detail_logs/forms/rms_frm_forms/*
|
Detail logs of the compilation
of each RMS Forms file
|
|
detail_logs/rmsbatch/lib/*
|
Detail logs of the compilation
of RMS Batch libraries
|
|
detail_logs/rmsbatch/proc/*
|
Detail logs of the compilation
of RMS Batch programs
|
|
detail_logs/dbsql_rms/rms_db_ws_consumer_jars/*
|
Detail logs of the loadjava
command to install RMS WebService Consumer objects
|
|
detail_logs/dbsql_rms/rms_db_ws_consumer_libs/*
|
Detail logs of the loadjava
command to install RMS WebService Consumer libraries
|
|
detail_logs/forms/rwms_frm_forms/*
|
Detail logs of the compilation
of each RWMS Forms file
|
|
detail_logs/dbsql_rwms/rwms_db_sp
_jars/*
|
Detail logs of the loadjava
command to install RWMS SP jars
|
|
detail_logs/javaapp_<product>/deploy/*
|
Detail logs of the deploy of a
Java product
|
Unzip Patch Files
Before executing ORPatch, the patch
files must be unzipped into a directory. This directory will be passed to
ORPatch as the “-s <source directory>” argument on the command-line when
applying or analyzing a patch.
Location of ORPatch
The ORPatch script will be located in
$RETAIL_HOME/orpatch/bin.
Command Line Arguments
ORPatch behavior is controlled by
several command-line arguments. These arguments may be actions or options.
Command and option names can be specified in upper or lower case, and will be
converted to upper-case automatically. Arguments to options, for example the
source directory patch, will not be modified.
ORPatch command-line actions:
|
Action
|
Description
|
|
apply
|
Tells ORPatch to apply a patch,
requires the –s option
Example: orpatch apply -s
$RETAIL_HOME/stage/patch123456
|
|
analyze
|
Tells ORPatch to analyze a
patch, requires the –s option
Example: orpatch analyze -s
$RETAIL_HOME/stage/patch123456
|
|
lsinventory
|
Tells ORPatch to list the
inventory of patches that have been applied to this installation
|
|
exportmetadata
|
Tells ORPatch to extract all
metadata information from the environment and create a $RETAIL_HOME/support
directory to contain it. Requires the –expname option.
|
|
diffmetadata
|
Tells ORPatch to compare all
metadata from the current environment with metadata exported from some other
environment. Requires the –expname and –srcname options.
|
|
revert
|
Tells ORPatch to revert the
files related to a patch, requires the –s option
Example: orpatch revert –s $RETAIL_HOME/backups/backup-09302013-153010
|
Note: An
action is required and only one action can be specified at a time.
ORPatch
command-line arguments:
|
Argument
|
Valid For Actions
|
Description
|
|
-s <source dir>
|
apply
analyze
|
Specifies where to find the top-level
directory of the patch to apply or analyze. The source directory should
contain the manifest.csv and patch_info.cfg files.
|
|
-new
|
apply
|
Forces ORPatch to not attempt
to restart a failed ORPatch session
|
|
-expname
|
exportmetadata
diffmetadata
lsinventory
|
Defines the top-level name to
be used for the export or comparison of environment metadata. When used with
lsinventory, it allows an exported inventory to be printed.
|
|
-srcname
|
diffmetadata
|
Defines the ‘name’ to use when
referring to the current environment during metadata comparisons.
|
|
-dbmodules
|
diffmetadata
|
When comparing metadata at a
module-level, compare the dbmanifest information rather than the environment
manifest. This method of comparing metadata is less accurate as it does not include
non-database files.
|
|
-jarmodules
|
analyze
diffmetadata
|
When used with analyze,
requests a full comparison of the metadata of Java archives included in the
patch versus the metadata of the Java archives in the environment. This
behavior is automatically enabled when Java customizations are detected in
the environment. Analyzing the contents of Java archives allows for detailed
investigation of the potential impacts of installing a new Java ear to an
environment with customizations.
When used with diffmetadata,
causes metadata to be compared using jarmanifest information rather than the
environment manifest. This provides more detailed information on the exact
differences of the content of Java archives, but does not include non-Java
files.
|
|
-selfonly
|
apply
analyze
|
Only apply or analyze changes
in a patch that relate to orpatch itself. This is useful for applying
updates to orpatch without applying the entire patch to an environment.
|
|
-s <backup dir>
|
revert
|
Specifies the backup from a
patch that should be reverted to the environment. This restores only the
files modified during the patch, the database must be restored separately or
the environment will be out-of-sync and likely unusable.
|
In some cases, it may be desirable to
see a list of the files that will be updated by a patch, particularly if files
in the environment have been customized. ORPatch has an ‘analyze’ mode that
will evaluate all files in the patch against the environment and report on the
files that will be updated based on the patch.
To run ORPatch in analyze mode,
include ‘analyze’ on the command line. It performs the following actions:
§ Identifies files in
the environment which the patch would remove.
§ Compares version
numbers of files in the patch to version numbers of files in the environment.
§ Prints a summary of
the number of files which would be created, updated or removed.
§ Prints an additional
list of any files that would be updated which are registered as being
customized.
§ Prints an additional
list of any files which are in the environment and newer than the files
included in the patch. These files are considered possible conflicts as the
modules in the patch may not be compatible with the newer versions already
installed. If you choose to apply the patch the newer versions of modules in
the environment will NOT be overwritten.
§ If a Java custom file
tree is detected, prints a detailed analysis of the modules within Java ear
files that differ from the current ear file on the system.
§ Saves details of the
files that will be impacted in
$RETAIL_HOME/orpatch/logs/detail_logs/analyze/details.
This list of files can then be used to
assess the impact of a patch on your environment.
To analyze a patch, perform the
following steps:
1.
Log in as the UNIX user that owns the product installation.
2.
Set the RETAIL_HOME environment variable to the top-level
directory of your product installation.
export RETAIL_HOME=/u00/oretail/14.1/tst
3.
Set the PATH environment variable to include the orpatch/bin
directory
export
PATH=$RETAIL_HOME/orpatch/bin:$PATH
4.
Set the JAVA_HOME environment variable if the patch contains
Java application files.
export JAVA_HOME=/u00/oretail/java_jdk
Note:
If the JAVA_HOME environment variable is not specified, the value from
RETAIL_HOME/orpatch/config/env_info.cfg will be used.
5.
Create a staging directory to contain the patch, if it does
not already exist.
mkdir –p $RETAIL_HOME/stage
6.
Download the patch to the staging directory and unzip it.
7.
Execute orpatch to analyze the patch.
orpatch analyze -s $RETAIL_HOME/stage/patch123456
8.
Repeat the patch analysis on all servers with installations
for this product environment.
9.
Evaluate the list(s) of impacted files.
For more information on registering
and analyzing customizations, please see the Customization section later in
this document.
Once the system is prepared for
patching, ORPatch can be executed to apply the patch to the environment. The
patch may need to be applied to multiple systems if it updates components that
are installed on distributed servers.
To apply a patch, perform the
following steps:
1.
Log in as the UNIX user that owns the product installation.
2.
Set the RETAIL_HOME environment variable to the top-level
directory of your product installation.
export RETAIL_HOME=/u00/oretail/14.1/tst
3.
Set the PATH environment variable to include the orpatch/bin
directory
export
PATH=$RETAIL_HOME/orpatch/bin:$PATH
4.
Set the DISPLAY environment variable if the patch contains
Forms.
export DISPLAY=localhost:10.0
Note:
If the DISPLAY environment variable is not specified, the value from
RETAIL_HOME/orpatch/config/env_info.cfg will be used.
5.
Set the JAVA_HOME environment variable if the patch contains
Java application files.
export JAVA_HOME=/u00/oretail/java_jdk
Note:
If the JAVA_HOME environment variable is not specified, the value from
RETAIL_HOME/orpatch/config/env_info.cfg will be used.
6.
Create a staging directory to contain the patch, if it does
not already exist.
mkdir –p $RETAIL_HOME/stage
7.
Download the patch to the staging directory and unzip it.
8.
Review the README.txt included with the patch. If manual
steps are specified in the patch, execute those steps at the appropriate time.
9.
Shutdown applications.
10.
Execute ORPatch to apply the patch.
orpatch apply -s $RETAIL_HOME/stage/patch123456
11.
After ORPatch completes, review the log files in
$RETAIL_HOME/orpatch/logs.
12.
Repeat the patch application on all servers with
installations for this product environment.
13.
Restart applications.
Restarting ORPatch
If ORPatch is interrupted while
applying a patch, or exits with an error, it saves a record of completed work
in a restart state file in $RETAIL_HOME/orpatch/logs. Investigate and resolve
the problem that caused the failure, then restart ORPatch.
By default when ORPatch is started
again, it will restart the patch process close to where it left off. If the
patch process should not be restarted, add ‘-new’ to the command-line of
ORPatch.
Please note that starting a new patch
session without completing the prior patch may have serious impacts that result
in a patch not being applied correctly. For example, if a patch contains
database updates and batch file changes and ORPatch is aborted during the load
of database objects, abandoning the patch session will leave batch without the
latest changes compiled in the installation.
After a patch is successfully applied
by ORPatch the patch inventory in $RETAIL_HOME/orpatch/inventory is updated
with a record that the patch was applied. This inventory contains a record of
the patches applied, the dates they were applied, the patch type and products
impacted.
To list the patch inventory, perform
the following steps:
1.
Log in as the UNIX user that owns the product installation.
2.
Set the RETAIL_HOME environment variable to the top-level
directory of your product installation.
export RETAIL_HOME=/u00/oretail/14.1/tst
3.
Set the PATH environment variable to include the orpatch/bin
directory
export PATH=$RETAIL_HOME/orpatch/bin:$PATH
4.
Execute orpatch to list the inventory.
orpatch lsinventory
ORPatch functionality is driven based
on additional metadata that is stored in the environment to define what version
of files are applied to the environment, and which database scripts have been
applied to database schemas. This environment metadata is used to analyze the
impact of patches to environments and controls what actions are taken during a
patch. The metadata is stored in several locations depending on the type of
information it tracks and in some cases it may be desirable to extract the
metadata for analysis outside of ORPatch. For example, Oracle Support could
ask for the metadata to be uploaded to assist them in triaging an application
problem.
ORPatch provides a capability to
export all of the metadata in an environment into a single directory and to
automatically create a zip file of that content for upload or transfer to
another system. The exact metadata collected from the environment depends on
the products installed in the RETAIL_HOME.
ORPatch metadata exported:
|
Installed Product Component
|
Exported Metadata
|
Description
|
|
Any
|
orpatch/config/env_info.cfg
orpatch/config/custom_hooks.cfg
ORPatch inventory files
|
ORPatch configuration and
settings
|
|
Any
|
All env_manifest.csv and
deleted_env_manifest.csv files
|
Environment manifest files
detailing product files installed, versions, customized flags and which patch
provided the file
|
|
Database Schemas
|
DBMANIFEST table contents
|
Database manifest information
detailing which database scripts were run, what version and when they were
executed
|
|
Java Applications
|
All files from
javaapp_<product>/config except jar files
|
Environment-specific product
configuration files generated during installation
|
|
Java Applications
|
Combined export of all
META-INF/env_manifest.csv files from all product ear files
|
Jar manifest information
detailing files, versions, customized flags and which patch provided the file
|
|
Java Applications
|
orpatch/config/javaapp_<product>/ant.deploy.properties
|
Environment properties file
created during product installation and used during application deployment
|
|
Java Applications
|
<weblogic_home>/server/lib/weblogic.policy
|
WebLogic server java security
manager policy file
|
|
Java Applications
|
<weblogic_home>/common/nodemanager/nodemanager.properties
|
Weblogic nodemanager
configuration file
|
|
Java Applications
|
<domain_home>/config/fmwconfig/jps-config.xml
|
JPS configuration file for the
Weblogic application domain.
|
|
RMS Batch
|
orpatch/config/rmsbatch_profile
|
Batch compilation shell profile
|
|
RMS Forms
|
orpatch/config/rmsforms_profile
|
Forms compilation shell profile
|
|
RWMS Forms
|
orpatch/cofngi/rwsmforms_profile
|
Forms compilation shell profile
|
Exports of environment metadata are
always done to the $RETAIL_HOME/support directory. When exporting metadata,
you must specify the –expname argument and define the name that should be given
to the export. The name is used for the directory within $RETAIL_HOME/support
and for the name of the zip file.
To extract an environment’s metadata,
perform the following steps:
1.
Log in as the UNIX user that owns the product installation.
2.
Set the RETAIL_HOME environment variable to the top-level
directory of your product installation.
export RETAIL_HOME=/u00/oretail/14.1/tst
3.
Set the PATH environment variable to include the orpatch/bin
directory
export
PATH=$RETAIL_HOME/orpatch/bin:$PATH
4.
Execute orpatch to export the metadata.
orpatch exportmetadata –expname
test_env
This example would export all metadata
from the environment to the $RETAIL_HOME/support/test_env directory. A zip
file of the metadata would be created in $RETAIL_HOME/support/test_env.zip.
Note: The
$RETAIL_HOME/support/<name> directory should be empty or not exist prior
to running exportmetadata in order to ensure accurate results.
Once metadata has been exported from
an environment, it can be used to compare the environment manifest metadata of
two environments. ORPatch provides a capability to compare metadata of the
current environment with the exported metadata of another environment. Note
that even though there are many types of metadata exported by ORPatch, only
environment manifest metadata is evaluated during comparisons. Metadata
comparison happens in four phases: product comparison, patch comparison,
ORPatch action comparison, and module-level comparison.
Product comparison compares the
products installed in one environment with the products installed in another
environment. Patch comparison compares the patches applied in one environment
with the patches applied in another environment, for common products. This
provides the most summarized view of how environments differ. Patches which
only apply to products on one environment are not included in the comparison.
Since each patch may impact many
files, the comparison then moves on to more detailed analysis. The third phase
of comparison is to compare the enabled ORPatch actions between environments.
These actions roughly correspond to the installed ‘components’ of a product.
For example, one environment may have database and forms components installed
while another has only forms. Action comparison identifies components that are
different between environments. The final phase of comparison is at the module
level for actions that are common between environments. Modules which exist
only on one environment, or exist on both environments with different
revisions, or which are flagged as customized are reported during the
comparison.
Differences between environment
metadata are reported in a summarized fashion during the ORPatch execution.
Details of the comparison results are saved in
$RETAIL_HOME/orpatch/logs/detail_logs/compare/details. One CSV file is created
for each phase of comparison: product_details.csv, patch_details.csv, action_details.csv
and module_details.csv.
In order to be compared by ORPatch,
exported metadata must be placed in the $RETAIL_HOME/support directory. The
metadata should exist in the same structure that it was originally exported
in. For example, if the metadata was exported to $RETAIL_HOME/support/test_env
on another system, it should be placed in $RETAIL_HOME/support/test_env on this
system.
When reporting differences between two
environments, ORPatch uses names to refer to the environments. These names are
defined as part of the diffmetadata command. The
–expname parameter, which defines the directory containing the metadata, is
also used as the name when referring to the exported metadata. The –srcname
parameter defines the name to use when referring to the current environment.
As an example, if you had exported the ‘test’ environment’s metadata and copied
it to the ‘dev’ environment’s $RETAIL_HOME/support/test_env directory, you
could run “orpatch diffmetadata -expname test_env -srcname dev_env”. The
detail and summary output would then refer to things that exist on dev but not
test, revisions in the test environment versus revisions in the dev
environment, etc.
ORPatch will automatically export the
environment’s current metadata to $RETAIL_HOME/support/compare prior to
starting the metadata comparison.
To compare two environment’s metadata,
perform the following steps:
1.
Export the metadata from another environment using orpatch
exportmetadata.
2.
Transfer the metadata zip from the other system to $RETAIL_HOME/support.
3.
Log in as the UNIX user that owns the product installation.
4.
Set the RETAIL_HOME environment variable to the top-level
directory of your product installation.
export RETAIL_HOME=/u00/oretail/14.1/dev
5.
Set the PATH environment variable to include the orpatch/bin
directory
export
PATH=$RETAIL_HOME/orpatch/bin:$PATH
6.
Unzip the metadata zip file.
unzip test_env.zip
7.
Execute orpatch to compare the metadata
orpatch diffmetadata –expname test_env
–srcname dev_env
This example would compare the current
environment against the metadata extracted in $RETAIL_HOME/support/test_env
directory.
Note:
The $RETAIL_HOME/support/compare directory will be automatically removed before
environment metadata is exported at the start of the comparison.
Reverting a Patch
In general it is best to either
completely apply a patch, or restore the entire environment from the backup
taken before starting the patch. It is important to test patches in test or
staging environments before applying to production. In the event of problems,
Oracle Retail recommends restoring the environment from backup if a patch is
not successful.
Note:
Reverting patches in an integrated environment can be extremely complex and
there is no fully automated way to revert all changes made by a patch.
Restoring the environment from a backup is the recommended method to remove
patches.
It is, however, possible to revert
small patches using the backups taken by ORPatch during a patch. This will
restore only the files modified, and it is still necessary to restore the
database if any changes were made to it.
Note:
Reverting a patch reverts only the files modified by the patch, and does not
modify the database, or recompile forms or batch files after the change.
When multiple patches have been
applied to an environment, reverting any patches other than the most recently
applied patch is strongly discouraged as this will lead to incompatible or
inconsistent versions of modules applied to the environment. If multiple
patches are going to be applied sequentially it is recommended to first merge
the patches into a single patch that can be applied or reverted in a single
operation.
To revert a patch, perform the
following steps:
1.
Log in as the UNIX user that owns the product installation.
2.
Set the RETAIL_HOME environment variable to the top-level
directory of your product installation.
export RETAIL_HOME=/u00/oretail/14.1/tst
3.
Set the PATH environment variable to include the orpatch/bin
directory
export
PATH=$RETAIL_HOME/orpatch/bin:$PATH
4.
Identify the backup directory in $RETAIL_HOME/backups that
contains the backup from the patch you want to restore.
§ The
backup directory will contain a patch_info.cfg file which contains the name of
the patch the backup is from.
§ It
is possible to have two directories for the same patch, if ORPatch was updated
during the patch. It is not possible to revert the updates to ORPatch. Select
the backup directory that does not contain orpatch files.
§ If
it is not clear which backup directory to use, restore the environment from
backup
5.
Execute orpatch to revert the environment using the contents
of the backup directory
orpatch revert –s
$RETAIL_HOME/backups/backup-11232013-152059
6.
Restore the database from backup if the patch made database
changes
7.
Use the orcompile script to recompile forms if the patch
included RMS or RWMS forms files
orcompile –a RMS –t FORMS
orcompile –a RWMS –t FORMS
8.
Use the orcompile script to recompile batch if the patch
included RMS batch files
orcompile –a RMS –t BATCH
9.
Use the ordeploy script to redeploy the appropriate Java
applications if the patch included Java files
ordeploy –a RPM –t JAVA
ordeploy –a REIM –t JAVA
ordeploy –a ALLOC –t JAVA
ordeploy –a RESA –t JAVA
When patches are applied individually
some ORPatch tasks such as compiling forms and batch files or deploying Java
archives are performed separately for each patch. This can be time-consuming.
An alternative is to use the ORMerge utility to combine several patches into a
single patch, reducing application downtime by eliminating tasks that would
otherwise be performed multiple times. Patches merged with ORMerge are applied
with ORPatch after the merge patch is created.
ORMerge uses source and destination
areas in order to merge patch files. The source area is a single directory
that contains the extracted patches to merge. The destination area is the
location where the merged patch will be created. If a file exists in one or
more source patches, only the highest revision will be copied to the merged
patch.
The source and destination directories
should exist under the same parent directory. That is, both the source and
destination directories should be subdirectories of a single top-level
directory.
The source directory must have all
patches to be merged as immediate child directories. For example if three
patches need to be merged the directory structure would look like this:
Source and Destination
Directory Example
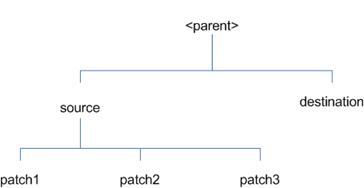
In the example above, the manifest.csv
and patch_info.cfg files for each patch to be merged must exist in
source/patch1, source/patch2, and source/patch3.
ORMerge Command-line Arguments
|
Argument
|
Required
|
Description
|
|
-s
|
Yes
|
Path to source directory
containing patches to merge
|
|
-d
|
Yes
|
Path to destination directory
that will contain merged patch
|
|
-name
|
No
|
The name to give the merged
patch. If not specified, a name will be generated. When the merged patch is
applied to a system, this name will appear in the Oracle Retail patch inventory.
|
|
-inplace
|
No
|
Used only when applying a patch
to installation files prior to the first installation. See “Patching prior
to the first install” in the Troubleshooting section later, for more
information.
|
To merge patches, perform the
following steps:
1.
Log in as the UNIX user that owns the product installation.
2.
Set the RETAIL_HOME environment variable to the top-level
directory of your product installation.
export RETAIL_HOME=/u00/oretail/14.1/tst
3.
Set the PATH environment variable to include the orpatch/bin
directory
export
PATH=$RETAIL_HOME/orpatch/bin:$PATH
4.
Create a staging directory to contain the patches.
mkdir –p $RETAIL_HOME/stage/merge/src
5.
Download the patches to the staging directory and unzip them
so that each patch is in a separate subdirectory.
6.
Review the README.txt included with each patch to identify
additional manual steps that may be required. If manual steps are specified in
any patch, execute them at the appropriate time when applying the merged patch.
7.
Create a destination directory to contain the merged patches.
mkdir -p
$RETAIL_HOME/stage/merge/dest
8.
Execute ORMerge to merge the patches.
ormerge -s $RETAIL_HOME/stage/merge/src
–d $RETAIL_HOME/stage/merge/dest –name merged_patch
The merged patch can now be applied as
a single patch to the product installation using ORPatch.
In some cases it may be desirable to
recompile RMS Forms, RWMS Forms or RMS Batch outside of a product patch. The
ORCompile utility is designed to make this easy and remove the need to manually
execute ‘make’ or ‘frmcmp’ commands which can be error-prone. ORCompile
leverages ORPatch functions to ensure that it compiles forms and batch exactly
the same way as ORPatch. In addition ORCompile offers an option to compile
invalid database objects using ORPatch logic.
ORCompile takes two required command
line arguments each of which take an option. Arguments and options can be
specified in upper or lower case.
ORCompile Command Line Arguments
|
Argument
|
Description
|
|
-a <app>
|
The application to compile.
|
|
-t <type>
|
The type of application objects
to compile
|
ORCompile Argument Options
|
Application
|
Type
|
Description
|
|
RMS
|
BATCH
|
Compile RMS Batch programs
|
|
RMS
|
FORMS
|
Compile RMS Forms
|
|
RWMS
|
FORMS
|
Compile RWMS Forms
|
|
RMS
|
DB
|
Compile invalid database
objects in the primary RMS schema
|
|
RMS
|
DB-ASYNC
|
Compile invalid database
objects in the RMS_ASYNC_USER schema
|
|
ALLOC
|
DB-ALC
|
Compile invalid database
objects in the Allocations user schema
|
|
ALLOC
|
DB-RMS
|
Compile invalid database
objects in the RMS schema
|
|
REIM
|
DB
|
Compile invalid database
objects in the RMS schema
|
|
RME
|
DB
|
Compile invalid database
objects in the RME schema
|
|
ASO
|
DB
|
Compile invalid database
objects in the ASO schema
|
|
RA
|
DB-DM
|
Compile invalid database
objects in the RA DM schema
|
|
RA
|
DB-RABATCH
|
Compile invalid database
objects in the RA batch schema
|
|
RA
|
DB-RMSBATCH
|
Compile invalid database
objects in the RA RMS batch schema
|
|
RA
|
DB-FEDM
|
Compile invalid database
objects in the RA front-end schema
|
Note:
Compiling RMS type DB, ReIM type DB, and Allocation type DB-RMS, are all
identical as they attempt to compile all invalid objects residing in the RMS
schema.
To compile files, perform the
following steps:
1.
Log in as the UNIX user that owns the product installation.
2.
Set the RETAIL_HOME environment variable to the top-level
directory of your product installation.
export RETAIL_HOME=/u00/oretail/14.1/tst
3.
Set the PATH environment variable to include the orpatch/bin
directory
export
PATH=$RETAIL_HOME/orpatch/bin:$PATH
4.
Execute orcompile to compile the desired type of files.
orcompile –a <app> -t
<type>
Compile RMS Batch.
orcompile -a RMS -t BATCH
Compile RWMS Forms.
orcompile -a RWMS -t FORMS
Compile invalid objects in the RA DM
schema.
orcompile -a RA -t DB-DM
Compile invalid objects in the RMS
owning schema.
orcompile -a RMS -t DB
In some cases it may be desirable to
redeploy Java applications outside of a product patch. For example, when
troubleshooting a problem, or verifying the operation of the application with
different WebLogic settings. Another situation might include wanting to deploy
the application using the same settings, but without customizations to isolate
behavior that could be related to customized functionality.
The ordeploy utility is designed to
make this easy and remove the need to re-execute the entire product installer
when no configuration needs to change. ORDeploy leverages Oracle Retail Patch
Assistant functions to ensure that it deploys applications exactly the same way
as ORPatch. In addition ORDeploy offers an option to include or not include
custom Java files, to ease troubleshooting.
ORDeploy takes two required command
line arguments each of which take an option. Arguments and options can be
specified in upper or lower case.
ORDeploy Command Line Arguments
|
Argument
|
Description
|
|
-a <app>
|
The application to deploy.
|
|
-t <type>
|
The type of application objects
to deploy
|
ORDeploy
Argument Options
|
Application
|
Type
|
Description
|
|
ALLOC
|
JAVA
|
Deploy the Allocations Java
application and Java batch files, including any custom Java files.
|
|
ALLOC
|
JAVANOCUSTOM
|
Deploy the Allocations Java
application and Java batch files, NOT including any custom Java files.
|
|
REIM
|
JAVA
|
Deploy the REIM Java
application and Java batch files, including any custom Java files.
|
|
REIM
|
JAVANOCUSTOM
|
Deploy the REIM Java
application and Java batch files, NOT including any custom Java files.
|
|
RESA
|
JAVA
|
Deploy the RESA Java
application, including any custom Java files.
|
|
RESA
|
JAVANOCUSTOM
|
Deploy the RESA Java
application, NOT including any custom Java files.
|
|
RPM
|
JAVA
|
Deploy the RPM Java application
and Java batch files, including any custom Java files.
|
|
RPM
|
JAVANOCUSTOM
|
Deploy the RPM Java application
and Java batch files, NOT including any custom Java files.
|
Running the ORDeploy utility
To deploy Java applications, perform
the following steps:
1.
Log in as the UNIX user that owns the product installation.
2.
Set the RETAIL_HOME environment variable to the top-level
directory of your product installation.
export RETAIL_HOME=/u00/oretail/14.1/tst
3.
Set the PATH environment variable to include the orpatch/bin
directory
export
PATH=$RETAIL_HOME/orpatch/bin:$PATH
4.
Execute ORDeploy to deploy the desired Java application.
ordeploy –a <app> -t
<type>
ORDeploy Examples
Deploy RPM.
ordeploy -a RPM -t JAVA
Deploy ReIM without including Java
customizations.
ordeploy -a REIM -t JAVANOCUSTOM
The additional information stored
within the RETAIL_HOME and within database schemas adds some considerations
when performing maintenance on your environment.
Oracle wallets are used to protect the
password credentials for connecting to database schemas. This includes all database
schemas used during an install. If the password for any of these users is
changed the wallet’s entry must be updated.
The wallet location is configurable
but by default is in the following locations:
|
Location
|
Installation Type
|
|
$RETAIL_HOME/orpatch/rms_wallet
|
RMS Database
RMS Batch
|
|
$RETAIL_HOME/orpatch/rms_wallet_app
|
RMS Forms
|
|
$RETAIL_HOME/orpatch/rwms_wallet
|
RWMS Database
|
|
$RETAIL_HOME/orpatch/rwms_wallet_app
|
RWMS Forms
|
|
$RETAIL_HOME/orpatch/oraso_wallet
|
ASO Database
|
|
$RETAIL_HOME/orpatch/orme_wallet
|
RME Database
|
|
$RETAIL_HOME/orpatch/ra_wallet
|
RA Database
|
The wallet alias for each schema will
be <username>_<dbname>. Standard mkstore commands can be used to
update the password.
For example:
mkstore -wrl $RETAIL_HOME/orpatch/rms_wallet
–modifyCredential rms_rmsdb rms01 rmspassword
This command will update the password
for the RMS01 user to ‘rmspassword’ in the alias ‘rms_rmsdb’.
The Oracle wallets are required to be
present when executing ORPatch. Removing them will prevent you from being able
to run ORPatch successfully. In addition the Oracle wallet location is
referenced in the RMS batch.profile, and in the default RMS and RWMS Forms URL
configuration, so removing them will require reconfiguration of batch and forms.
If batch and forms were reconfigured after installation to use other wallet
files, it is possible to backup and remove the wallets, then restore them when
running ORPatch.
Java wallets are used to protect the
password credentials used when deploying Java products. This includes the
WebLogic administrator credentials, LDAP connection credentials, batch user
credentials and any other credentials used during an install. If the password
for any of these users is changed the wallet’s entry must be updated, or the
Java product installation can be run again.
The wallet location is in the
following locations:
|
Location
|
Installation Type
|
|
$RETAIL_HOME/orpatch/config/javapp_rpm
|
RPM Java
|
|
$RETAIL_HOME/orpatch/config/javapp_reim
|
ReIM Java
|
|
$RETAIL_HOME/orpatch/config/javapp_alloc
|
Allocation Java
|
|
$RETAIL_HOME/orpatch/config/javapp_resa
|
RESA Java
|
|
$RETAIL_HOME/orpatch/config/javaapp_rasrm
|
RASRM Java
|
The wallet aliases will be stored in
the retail_installer partition. The names of the aliases will vary depending
on what was entered during initial product installation.
The dump_credentials.sh script can be
used to list the aliases in the wallet.
For example:
cd
$RETAIL_HOME/orpatch/deploy/retail-public-security-api/bin
./dump_credentials.sh
$RETAIL_HOME/orpatch/config/javapp_alloc
Apapplication level key
partition name:retail_installer
User Name Alias:dsallocAlias
User Name:rms01app
User Name Alias:BATCH-ALIAS
User Name:SYSTEM_ADMINISTRATOR
User Name Alias:wlsAlias User
Name:weblogic
The easiest way to update the
credential information is to re-run the Java product installer. If you need to
manually update the password for a credential, the save_credential.sh script
can be used.
For example:
cd $RETAIL_HOME/orpatch/deploy/retail-public-security-api/bin
./save_credential.sh –l
$RETAIL_HOME/orpatch/config/javapp_alloc –p retail_installer –a wlsAlias –u
weblogic
This command will prompt for the new
password twice and update the aslias wlsAlias, username weblogic with the new
password.
The
RETAIL_HOME/orpatch/config/env_info.cfg file contains the path to the database
ORACLE_HOME on database or RMS Batch installations, to the WebLogic Forms and
Reports ORACLE_HOME and ORACLE_INSTANCE on RMS or RWMS Forms installations, and
to the WEBLOGIC_DOMAIN_HOME, WL_HOME and MW_HOME on Java product installations.
If these paths change, the related configuration variables in the env_info.cfg
file must be updated.
The table dbmanifest within Oracle
Retail database schemas is used to track the database scripts which have been
applied to the schema. It is critical not to drop or truncate this table.
Without it, ORPatch will attempt to re-run scripts against the database which
have already been applied which can destroy a working environment. Similarly,
if copying a schema from one database to another database, ensure that the
dbmanifest table is preserved during the copy.
The RETAIL_HOME associated with an
Oracle Retail product installation is critical due to the additional metadata
and historical information contained within it. If a database or application
installation is moved or copied, the RETAIL_HOME related to it should be copied
or moved at the same time.
The RPM product installation includes
an option to configure a code signing certificate so that jar files modified
during installation or patching are automatically re-signed. This configuration
is optional, but recommended. If it is configured, the code signing keystore
is copied during installation to
$RETAIL_HOME/orpatch/config/jarsign/orpkeystore.jks. The keystore password and
private key password are stored in a Java wallet in the
$RETAIL_HOME/orpatch/config/jarsign directory. The credentials are stored in a
wallet partition called orpatch:
|
Alias
|
Username
|
Description
|
|
storepass
|
discard
|
Password for the keystore
|
|
keypass
|
discard
|
Password for the private key
|
The keystore file and passwords can be
updated using the product installer. This is the recommended way to update the
signing configuration.
If only the credentials need to be
updated, the sign_jar.sh script can be used.
5.
Log in as the UNIX user that owns the product installation.
6.
Set the RETAIL_HOME environment variable to the top-level
directory of your installation.
export RETAIL_HOME=/u00/oretail/14.1/tst
7.
Change directories to the location of sign_jar.sh
cd
$RETAIL_HOME/orpatch/deploy/bin
8.
Execute sign_jar.sh
sign_jar.sh changepwd
9.
When prompted, enter the new keystore password
10.
When prompted, enter the new private key password
In general, the additional
capabilities provided by the ORPatch should make it easier to evaluate the
potential impacts of patches to your customizations of Oracle Retail products.
However, the additional metadata maintained by the Oracle Retail patching
utilities does add some considerations when making customizations.
It is always preferred to customize
applications by extension rather than by direct modification. For example,
adding new database objects and forms rather than modifying existing Oracle
Retail objects and forms. You can also leverage built-in extension points such
as User Defined Attributes, the Custom Flexible Attribute Solution, or seeded
customization points in ADF Applications.
It is strongly discouraged to directly
modify Oracle Retail database objects, especially tables, as your changes may
be lost during patching or may conflict with future updates. When adding or
modifying database objects, Oracle Retail recommends that all objects be added
with scripts to ensure that they can be rebuilt if necessary after a patch.
When you create new database objects,
Oracle Retail recommends placing them in an Oracle database schema specifically
for your customizations. You must use synonyms and grants to allow the Oracle
Retail product schema owner and other users to access your objects, and use
synonyms and grants to allow your customizations to access Oracle Retail
objects. A separate schema will ensure that your customizations are segregated
from base Oracle Retail code.
ORPatch expects that there will be no
invalid objects in the database schemas it manages after a patch is applied.
For this reason adding extra objects to the product schema could result in
failures to apply patches as changes to base objects may cause custom objects
to go invalid until they are updated. In this situation, manually update the
custom objects so that they compile, and restart the patch.
When creating new custom forms, Oracle
Retail recommends placing them in a separate directory specifically for your
customizations. This directory should be added to the FORMS_PATH of your RMS
or RWMS Forms URL configuration to allow the forms to be found by the Forms
Server. This will ensure that your customizations are segregated from base
Oracle Retail code. If you choose to place customizations in the Forms bin
directory, then your custom forms will need to be recopied each time Forms are
fully recompiled.
ADF Application Customization
Oracle Retail ADF-based applications
such as Allocation and ReSA can be customized using a process called ‘seeded
customization’. The customization process involves using JDeveloper in
Customizer mode to create changes to product configurations, and then building
a MAR archive containing the changes. The generated MAR is deployed to the MDS
repository used by the application and applied to the application at runtime.
These types of customizations are handled outside of ORPatch and are not
reported during patch analysis or tracked by the custom file registration
utility. More information can be found in the respective product customization
guides.
Custom Compiled Java Code
When customizing Oracle Retail
Java-based products such as RPM and ReIM via product source code, ORPatch
supports automatically adding compiled customizations into the application ear
file prior to deployment. This allows customizations to be applied to the
application without directly modifying the base product ear, enabling
customizations and defect hotfixes to co-exist when they do not change the same
file or a dependent file. See the later “Custom Compiled Java Code” section
for additional information and considerations.
Whenever you have customized a product
by directly modifying Oracle Retail files or database objects, it is important
to ensure you analyze each the files that will be updated by a patch before
applying the patch. This will allow you to identify any customized files which
may be overwritten by the patch and either merge your customization with the
new version of the file, or re-apply the customization after applying the
patch.
If you choose to customize Oracle
Retail files directly, it is extremely important not to update the
revision number contained in the env_manifest.csv. This could cause future
updates to the file to be skipped, invalidating later patch applications as
only a partial patch would be applied. The customized revision number for
modified files will need to be tracked separately.
The ORPatch contains utilities and
functionality to allow tracking of files that have been customized through
direct modification. This process is referred to as ‘registering’ a customized
file. Registration only works for files which are shipped by Oracle Retail. It
is not possible to register new files created in the environment as part of
extensions or customizations.
When patches are analyzed with
ORPatch, special reporting is provided if any registered files would be updated
or deleted by the patch. Customized files impacted by the patch are listed at
the end of the analysis report from ORPatch. The detail files generated during
the analyze will contain a column called ‘customized’ which will have a Y for
any files which were registered as customized. This allows easier
identification of customizations which will be overwritten by a patch.
All files delivered by Oracle Retail
are considered ‘base’ and so when they are applied to an environment any
registrations of those files as customized will revert back to un-customized. Each
time a patch overwrites customized files, you must re-register the files as
customized once you have applied customizations.
To register customized files, use the
$RETAIL_HOME/orpatch/bin/orcustomreg script.
The orcustomerg script operates in one
of two modes: registration and list.
§ Registration mode
registers or unregisters one or more files as customized.
§ List mode lists all
files in the environment that are registered as customized.
|
Argument
|
Description
|
|
-f <file>
|
Adds <file> to the list
of files that will be registered. Can be specified more than once.
|
|
-bulk <file>
|
Specifies a file to read,
containing one filename per line. All filenames listed inside <file>
will be registered.
|
|
-register
|
Files specified with -f or
-bulk will be registered as ‘customized’
|
|
-unregister
|
Files specified with -f or
-bulk will be registered as ‘base’
|
§
At least one of -f or -bulk is required.
§
If neither -register nor -unregister is specified, the default is
‘-register’.
§
File names specified with -f must either be fully-qualified or be
relative to RETAIL_HOME. The same is true for filenames specified within a
-bulk file.
|
Argument
|
Description
|
|
-list
|
List all files in the
environment registered as customized
|
Perform the following procedure to run
the orcustomreg script:
1.
Log in as the UNIX user that owns the product installation.
2.
Set the RETAIL_HOME environment variable to the top-level
directory of your product installation.
export RETAIL_HOME=/u00/oretail/14.1/tst
3.
Set the PATH environment variable to include the orpatch/bin
directory
export
PATH=$RETAIL_HOME/orpatch/bin:$PATH
4.
Execute orcustomreg script to register the desired file(s).
orcustomreg –register –f <file>
Register
$RETAIL_HOME/dbsql_rms/Cross_Pillar/control_scripts/source/oga.sql as
customized.
orcustomreg -f
dbsql_rms/Cross_Pillar/control_scripts/source/oga.sql
Unregister customizations for
$RETAIL_HOME/dbsql_rwms/Triggers/Source/TR_WAVE.trg
orcustomreg –unregister –f
$RETAIL_HOME/dbsql_rwms/Triggers/Source/TR_WAVE.trg
Bulk register several files as
customized.
echo
“$RETAIL_HOME/oracle/proc/src/mrt.pc” > custom.txt
echo
“$RETAIL_HOME/oracle/proc/src/saldly.pc” >> custom.txt
echo
“$RETAIL_HOME/oracle/proc/src/ccprg.pc” >> custom.txt
orcustomreg –bulk custom.txt
List all files
registered as customized.
orcustomreg –list
When customizing Oracle Retail
Java-based products such as RPM and ReIM via product source code, ORPatch
supports automatically adding compiled customizations into the application ear
file prior to deployment. This allows customizations to be applied to the
application without directly modifying the base product ear, enabling
customizations and defect hotfixes to co-exist when they do not change the same
file or a dependent file
This functionality is enabled by
creating a directory called $RETAIL_HOME/javaapp_<app>/custom, where
<app> is the application the customizations apply to. Files stored
within this directory will be combined with the base product ear files before
the application is deployed to WebLogic. ORPatch will attempt to consider
customizations stored within the ‘custom’ directory during patch analysis by
triggering more detailed ear file change analysis to assist with identifying
which customizations might be impacted by changes in the patches.
Note:
It is not possible, nor necessary, to register compiled Java customizations
with the orcustomreg tool.
As with other customization techniques
for other technologies, Oracle Retail recommends making Java customizations in
new files as much as possible, versus overwriting base product or configuration
files. In the past it was necessary to build complete replacement product ear
files, but this method of customization is no longer required nor recommended.
Replacement ear and jar files will not contain the META-INF/env_manifest.csv
files which are required in order to be able to apply incremental patches.
Instead, compile the specific Java classes being customized and place them
along with any custom configuration files in
$RETAIL_HOME/javaapp_<app>/custom.
Building Deployable ear files
When constructing the product ear file
to deploy to WebLogic, ORPatch applies changes to the ear file in a specific
order, with files from later steps overwriting files in earlier steps. The
resulting ear is stored in $RETAIL_HOME/javaapp_<app>/deploy, and then
deployed to WebLogic.
Sequence for ORPatch Java Product
ear file updates
|
Order
|
File Type
|
Location
|
|
1
|
Base product ear
|
$RETAIL_HOME/javaapp_<app>/base
|
|
2
|
Updated configuration files
|
$RETAIL_HOME/javaapp_<app>/config
|
|
3
|
Oracle Retail-supplied hotfixes
|
$RETAIL_HOME/javaapp_<app>/internal
|
|
4
|
Compiled customizations
|
$RETAIL_HOME/javaapp_<app>/custom
|
Merging Custom Files
When merging files from the custom
directory with the product ear, ORPatch uses the directory path of the files
within custom to calculate where the file should be stored within the ear.
This allows arbitrary nesting of files, even when placing files within jars
stored in jars, stored within the ear. The following examples below use RPM,
but apply to adding compiled customizations to any Java-based product.
Custom
directory location and product ear location Examples
|
File path within
javaapp_<app>/custom/
|
Final Ear File Location
|
|
rpm14.ear/company/ui/MyCustom.class
|
In rpm14.ear:
/company/ui/MyCustom.class
|
|
rpm14.ear/rpm14.jar/company/bc/MyCustom2.class
|
In rpm14.ear:
In rpm14.jar:
/company/bc/MyCustom2.class
|
|
rpm14.ear/lib/ourcustomlibs.jar
|
In rpm14.ear
/lib/ourcustomlibs.jar
|
|
rpm14.ear/WebLaunchServlet.war/lib/
rpm14.jar/company/bc/MyCustom2.class
|
In rpm14.ear:
In WebLaunchServlet.war:
In lib/rpm14.jar:
/company/bc/MyCustom2.class
|
Analyzing patches when customizations are
present
When analyzing a patch which contains
a base product ear and the custom directory contains files, ORPatch will
automatically trigger a more detailed analysis of the changes coming in a
patch. This includes calculating what files inside the product ear have been
added, removed or updated and which files appear to be customized based on the
contents of the ‘custom’ directory. The detailed results of the ear file
comparison during patch analysis will be saved in
javaapp_<app>_archive_compare_details.csv. Any custom files which appeared
to be impacted by the patch are saved in
javapp_<app>_archive_custom_impacts.csv. Both files will be in the
$RETAIL_HOME/orpatch/logs/detail_logs/analyze/details directory.
Note:
This detailed analysis is not available when analyzing individual hotfixes,
so special care must be taken when applying hotfixes to a customized product
installation, to ensure there are no conflicts between customizations and
hotfix changes.
Customizations and cumulative patches
By default, when applying a cumulative
patch, ORPatch will not include customizations in the deployed product ear,
even if they are present in the appropriate directory. This allows
verification that the application is functioning properly using base code,
before applying customizations. After verifying the initial deployment, use
ORDeploy with the “-t JAVA” option to construct and deploy the product ear
including customizations.
If customizations need to be removed
outside of a patch, use ORDeploy with the “-t JAVANOCUSTOM” option to create
and deploy an ear containing only Oracle Retail code. To force ORPatch to
include customizations in the deployed ear even when applying a cumulative
patch, set JAVAAPP_<app>_INCLUDE_CUSTOM=Y in the
$RETAIL_HOME/orpatch/config/env_info.cfg file.
Changing configuration
files
It is possible to directly change
product configuration files in $RETAIL_HOME/javaapp_<app>/config. These
updates can be deployed to the environment using the ORDeploy utility.
However, the ‘config’ directory is completely recreated each time the product
installer is used. This means that modifications will be lost and must be
manually reapplied after each installer run. It is recommended to make
configuration changes via the installer where possible, and retain the
ant.install.properties file for use in later installer sessions.
The default ORPatch actions and
processing logic is sufficient to install and patch the base Oracle Retail
product code. However there may be situations where custom processing is
desired during patching activities such as executing a shell script prior to
the start of patching, or running a SQL script at the end of the patch.
ORPatch supports extensions in the
form of custom hooks. These hooks allow external scripts to be run at specific
points during ORPatch processing.
Action
ORPatch supports a variety of
‘actions’ which define the steps necessary to apply updates to a particular
area of the Oracle Retail application. Each action is generally specific to
updates to a single technology or logical component of the environment. For
example, one action might handle making updates to the RMS database schema,
while a separate action is responsible for compiling RWMS forms, and a different
action deploys the RPM Java application. These actions are enabled and
disabled within the environment configuration file, allowing ORPatch to
determine what types of changes to apply to each product installation.
ORPatch Actions
|
Order
|
Action Name
|
Description
|
|
1
|
DBSQL_RMS
|
Loads RMS and RPM database
objects into the primary RMS schema
|
|
2
|
DBSQL_RMSASYNC
|
Loads database objects into the
RMS_ASYNC_USER schema
|
|
3
|
DBSQL_REIM
|
Loads ReIM database objects
into the RMS schema
|
|
4
|
DBSQL_RAF
|
Loads Retail Application
Framework database objects into the RMS schema
|
|
5
|
DBSQL_ALCRMS
|
Loads Allocation database
objects into the RMS schema
|
|
6
|
DBSQL_ALLOC
|
Loads Allocation database
objects into the Allocation user schema
|
|
7
|
DBSQL_RMSDEMO
|
Used to create demo data in the
RMS schema if demo data was selected during initial installation
|
|
8
|
DBSQL_RMSDAS
|
Loads database objects into the
RMS Data Access Schema
|
|
9
|
RMSBATCH
|
Compiles RMS Batch
|
|
10
|
ORAFORMS_RMS
|
Compiles RMS Forms, copies RMS
reports to $RETAIL_HOME
|
|
11
|
RMSRETLSCRIPTS
|
Copies Oracle Retail Extract
and Load scripts for RMS
|
|
12
|
RMSDCSCRIPTS
|
Copies Oracle Retail
Merchandising System data conversion scripts
|
|
13
|
DBSQL_RWMS
|
Loads database objects into the
primary RWMS schema
|
|
14
|
DBSQL_RWMSADF
|
Loads database objects into the
RWMS ADF user schema
|
|
15
|
DBSQL_RWMSUSER
|
Loads database objects into the
RWMS user schema
|
|
16
|
ORAFORMS_RWMS
|
Compiles RWMS Forms, copies
RWMS batch scripts and reports to $RETAIL_HOME
|
|
17
|
JAVAAPP_RPM
|
Deploys the RPM Java
application and batch scripts
|
|
18
|
JAVAAPP_REIM
|
Deploys the REIM Java
application and batch scripts
|
|
19
|
JAVAAPP_ALLOC
|
Deploys the Allocation Java
application and batch scripts
|
|
20
|
JAVAAPP_RESA
|
Deploys the ReSA Java
application
|
|
21
|
JAVAAPP_RASRM
|
Deploys the RASRM Java application
|
|
22
|
DBSQL_RARMSBATCH
|
Loads database objects into the
RMS Batch schema for RA
|
|
23
|
DBSQL_RADM
|
Loads database objects into the
RA Data Mart schema
|
|
24
|
DBSQL_RAFEDM
|
Loads database objects into the
RA Front-end schema
|
|
25
|
DBSQL_RABATCH
|
Loads database objects into the
RA Batch schema
|
|
26
|
DBSQL_RASECORE
|
Loads core database objects
into the ORASE schema
|
|
27
|
DBSQL_RASEASO
|
Loads ASO database objects into
the ORASE schema
|
|
28
|
DBSQL_RASECDT
|
Loads CDT database objects into
the ORASE schema
|
|
29
|
DBSQL_RASECIS
|
Loads CIS database objects into
the ORASE schema
|
|
30
|
DBSQL_RASEDT
|
Loads DT database objects into
the ORASE schema
|
|
31
|
DBSQL_RASEMBA
|
Loads MBA database objects into
the ORASE schema
|
|
32
|
RASECOREBATCH
|
Copies ORASE core batch scripts
and libraries
|
|
33
|
RASEASOBATCH
|
Copies ORASE ASO batch scripts
and libraries
|
|
34
|
RASECDTBATCH
|
Copies ORASE CDT batch scripts
and libraries
|
|
35
|
RASECISBATCH
|
Copies ORASE CIS batch scripts
and libraries
|
|
36
|
RASEDTBATCH
|
Copies ORASE DT batch scripts
and libraries
|
|
37
|
RASEMBABATCH
|
Copies ORASE MBA batch scripts
and libraries
|
Phase
ORPatch processes patches in phases.
Each action relevant to a patch and host is provided an opportunity to process
the patch for each phase. The standard phases which allow hooks are:
|
Restart Phase Number
|
Phase Name
|
Description
|
|
N/A
|
PRECHECK
|
Actions verify that their
configuration appears complete and correct. This phase and the associated
hooks will be run every time orpatch is executed, even if processing will be
restarted in a later phase.
|
|
10
|
PREACTION
|
Actions do processing prior to
when files are copied to the environment. Files are deleted during this
phase.
|
|
20
|
COPYPATCH
|
Actions copy files included in
a patch into the destination environment and the environment manifest is updated.
|
|
30
|
PATCHACTION
|
Actions take the more detailed
steps necessary to apply the new files to the environment. For database
actions in particular, this is the phase when new and updated sql files are
loaded into the database.
|
|
40
|
POSTACTION
|
Actions do processing after
files have been copied and PatchActions are completed. The Forms actions,
for example, use this phase to compile the forms files as this must happen
after database packages are loaded.
|
|
50
|
CLEANUP
|
Actions do any additional
processing. Currently no actions implement activities in this phase.
|
Custom hooks are configured in a
configuration file RETAIL_HOME/orpatch/config/custom_hooks.cfg. The
configuration file is a simple text file where blank lines and lines starting
with # are ignored and all other lines should define a custom hook.
To define a custom hook, a line is
added to the file in the form:
<hook name>=<fully qualified
script>
The hook name must be in upper case
and is in the form:
<action name>_<phase name>_<sequence>
The action name is any action name
understood by ORPatch. The phase name is one of the five phase names from the
table above. The sequence is either ‘START’ or ‘END’. Hooks defined with a
sequence of ‘START’ are run before the action’s phase is invoked. Hooks
defined with a sequence of ‘END’ are run after the action’s phase is invoked.
Multiple scripts can be associated
with a single hook by separating the script names with a comma. If a hook name
appears in the configuration file multiple times only the last entry will be
used.
The script defined as a custom hook
must be an executable shell script that does not take any arguments or inputs.
The only environment variable that is guaranteed to be passed to the custom
hook is RETAIL_HOME. The script must return 0 on success and non-zero on
failure.
If an action is a DBSQL action (i.e.
has a name like DBSQL_), the custom hook can optionally be a .sql file. In
this case the SQL script will be run against the database schema that the DBSQL
action normally executes against. The SQL script must not generate any ORA- or
SP2- errors on success. In order to be treated as a database script, the
extension of the file defined as the custom hook must be .sql in lower-case.
Any other extension will be treated as if it is a shell script. If you have
database scripts with different extensions, they must be renamed or wrapped in
a .sql script.
When using the PRECHECK phase and
START sequence, please note that the custom hook will be executed prior to any
verification of the configuration. Invalid configuration, such as invalid
database username/password or a non-existent ORACLE_HOME, may cause the custom
hook to fail depending on the actions it tries to take. However in these
cases, the normal orpatch PRECHECK activities would likely have failed as
well. All that is lost is the additional context that orpatch would have
provided about what was incorrect about the configuration.
If a custom hook fails, for example a
shell script hook returns non-zero or a sql script generates an ORA- error in
its output, the custom hook will be treated as failing. A failing custom hook
causes ORPatch to immediately stop the patching session.
When ORPatch is restarted it always
restarts with the same phase and action, including any START sequence custom
hooks. If the START sequence custom hook fails, the action’s phase is never
executed. With an END sequence custom hook, the action’s phase is re-executed
when ORPatch is restarted and then the custom hook is re-executed. When an
action’s phase is costly, for example the DBSQL_RMS action which does a lot of
work, this can mean a lot of duplicate processing.
For this reason it is preferred to use
START sequence custom hooks whenever possible. If necessary, use a START
sequence hook on a later phase or a later action, rather than an END sequence
custom hook.
In addition to action-specific hooks,
there are two patch-level hook points available. These hooks allow scripts to
be run before any patching activities start and after all patching activities
are completed. The hooks are defined in the same configuration file, with a
special hook name.
To run a script before patching,
define:
ORPATCH_PATCH_START=<fully qualified
script>
To run a script after patching,
define:
ORPATCH_PATCH_END=<fully qualified
script>
These hooks only support executing
shell scripts, database scripts must be wrapped in a shell script. It is also
important to note that these hooks are run on every execution of ORPatch to
apply a patch, even when restarting a patch application. If the START sequence
patch-level hook returns a failure, patching is aborted. If the END sequence
patch-level hook returns a failure, it is logged but ignored as all patching
activities have already completed.
Please note that the
ORPATCH_PATCH_START hook is executed prior to any verification of the
configuration. Invalid configuration may cause the custom hook to fail
depending on the actions it tries to take. However in these cases, the normal
ORPatchactivities would likely fail as well.
Example Custom Hook Definitions
A shell script that is executed prior
to the Pre-Action phase of RMS Batch:
RMSBATCH_PREACTION_START=/u00/oretail/prepare_custom_header.sh
A shell script that is executed after
RETL script files are copied into the RETAIL_HOME:
RETLSCRIPTS_COPYPATCH_END=/u00/oretail/copy_custom_files.sh
A SQL script that is executed against
the RWMS owning schema at the start of the Clean-up Phase:
DBSQL_RWMS_CLEANUP_START=/dba/sql/recompile_synonyms.sql
There is not a general method for
determining the cause of a patching failure. It is important to ensure that
patches are thoroughly tested in a test or staging system several times prior
to attempting to apply the patch to a production system, particularly if the
patch is a large cumulative patch. After the test application is successful,
apply the patch to the production system.
ORPatch records extensive information
about the activities during a patch to the log files in
RETAIL_HOME/orpatch/logs. This includes a summary of the actions that are
planned for a patch, information about all files that were updated by the
patch, and detailed information about subsequent processing of those files.
The ORPatch log files also contain timestamps to assist in correlating log
entries with other logs.
Even more detailed logs are available
in RETAIL_HOME/orpatch/logs/detail_logs for some activities such as forms
compilation, invalid database object errors, and output from custom hooks. If
the standard ORPatch log information is not sufficient, it might be helpful to
check the detailed log if it exists.
The restart mechanism in ORPatch is
designed to be safe in nearly any situation. In some cases to ensure this, a
portion of work may be redone. If the failure was caused by an intermittent
issue that has been resolved, restarting ORPatch may be sufficient to allow the
patch to proceed.
A possible cause for database change
script failures is that a database change was already made manually to the
database. In this event, you may need to update the dbmanifest table to record
that a specific script does not need to be run. Before doing this, it is
extremely important to ensure that all statements contained in the script have
been completed.
Use the
$RETAIL_HOME/orpatch/bin/ordbmreg script to register database scripts in the
dbmanifest table.
Command Line Arguments for ordbmreg
|
Argument
|
Description
|
|
-f <file>
|
Adds <file> to the list
of files that will be registered. Can be specified more than once.
|
|
-bulk <file>
|
Specifies a file to read,
containing one filename per line. All filenames listed inside <file>
will be registered.
|
|
-register
|
Files specified with -f or
-bulk will be registered in the dbmanifest table
|
|
-unregister
|
Files specified with -f or
-bulk will be removed from the dbmanifest table
|
§
At least one of -f or -bulk is required.
§
If neither -register nor -unregister is specified, the default is
‘-register’.
§
File names specified with -f must either be fully-qualified or be
relative to RETAIL_HOME. The same is true for filenames specified within a
-bulk file.
§
Registering a file in the dbmanifest table will cause it to be
completely skipped. Before doing so, ensure that all commands contained in it
have been completed.
§
Removing a file from the dbmanifest table will cause it to be run
again. This will fail if the commands in the script cannot be re-run. For
example if they create a table that already exists.
Running the ordbmreg Script
Perform the following procedure to run
the ordbmreg script:
1.
Log in as the UNIX user that owns the product installation.
2.
Set the RETAIL_HOME environment variable to the top-level
directory of your product installation.
export RETAIL_HOME=/u00/oretail/14.1/tst
3.
Set the PATH environment variable to include the orpatch/bin
directory
export
PATH=$RETAIL_HOME/orpatch/bin:$PATH
4.
Execute ordbmreg script to register the desired file(s).
ordbmreg –register –f <file>
Examples of using the ordbmreg Script
Register
$RETAIL_HOME/dbsql_rms/Cross_Pillar/db_change_scripts/source/000593_system_options.sql
with the dbmanifest table.
ordbmreg -f
dbsql_rms/Cross_Pillar/db_change_scripts/source/000593_system_options.sql
Remove the dbmanifest row for
$RETAIL_HOME/dbsql_radm/ra_db/radm/database_change_scripts/000035_s12733240_w_party_per_d.sql.
ordbmreg –unregister –f $RETAIL_HOME/dbsql_radm/ra_db/radm/database_change_scripts/000035_s12733240_w_party_per_d.sql
Bulk register several files in the
dbmanifest table.
echo
“$RETAIL_HOME/dbsql_rwms/DBCs/Source/000294_container.sql” > dbcs.txt
echo
“$RETAIL_HOME/dbsql_rwms/DBCs/Source/000457_drop_object.sql” >> dbcs.txt
ordbmreg –bulk dbcs.txt
Restarting after registration
Once the row has been added to the
dbmanifest table, restart ORPatch and the script will be skipped. If the file
is not skipped there are several possibilities:
§ The script registered
is not the failing script.
§ The file type is not
a type that is filtered by the dbmanifest. The only file types that skip files
listed in the dbmanifest are:
–
Initial install DDL Files
–
Installation scripts that cannot be rerun
–
Database Change Scripts
Oracle Retail strongly discourages
manually updating the ORPatch restart state files. Updating the file
improperly could cause necessary steps in the patching process to be skipped or
patches to be incorrectly recorded as applied.
When compiling RMS or RWMS forms, it
is necessary to have a valid X-Windows Display. ORPatch allows this setting to
come from one of two places:
§ DISPLAY environment
variable set before executing ORPatch
or
§ DISPLAY setting in
RETAIL_HOME/orpatch/config/env_info.cfg
The DISPLAY variable in the
environment overrides the env_info.cfg, if both are set. The destination
X-Windows display must be accessible to the user running ORPatch, and for best
compilation performance it should be on the network ‘close’ to the server where
RMS Forms are installed and compiled. Using a local display or VNC display is
preferred. Compiling forms across a Wide-Area Network will greatly increase
the time required to apply patches to environments.
When working with Java application
jar, ear or war files, it is necessary to have a valid JAVA_HOME setting.
ORPatch allows this setting to come from one of two places:
§ JAVA_HOME environment
variable set before executing ORPatch
or
§ JAVA_HOME setting in
RETAIL_HOME/orpatch/config/env_info.cfg
The JAVA_HOME variable in the
environment overrides the env_info.cfg, if both are set. The specified Java
home location must be accessible to the user running ORPatch and be a full Java
Development Kit (JDK) installation. The JAVA_HOME must contain the jar utility
and if automatic Jar file signing is configured, must also contain the keytool
and jarsigner utilities.
In some situations, it may be
necessary to apply a patch to product installation files before the initial
install. For example, if there is a defect with a script that would be run
during the install and prevent proper installation. In this rare situation, it
may be necessary to apply a patch to the installation files prior to starting
installation.
Note: These
steps should only be undertaken at the direction of Oracle Support.
Perform the following steps to patch
installation files prior to starting an installation. The steps assume an RMS
installation, but apply to any product supported by ORPatch:
1.
Unzip the installation files to a staging area.
Note:
The following steps assume the files are in /media/oretail14.1
2.
Locate the patch_info.cfg within the product media. The
directory it resides in will be used for later steps.
find /media/oretail14.1/rms/installer
–name patch_info.cfg
Output Example:
/media/oretail14.1/rms/installer/mom14/patch_info.cfg
3.
Get the PATCH_NAME for the standard product installation.
The patch name to use in subsequent steps will be the portion following the “=”
sign.
grep “PATCH_NAME=”
/media/oretail14.1/rms/installer/mom14/patch_info.cfg
Output Example:
PATCH_NAME=MOM_14_1_0_0
4.
Create a directory that will contain the patch that must be
applied, next to the directory with the product installation files.
Note:
The following steps assume this directory is in /media/patch.
5.
Unzip the patch into the directory created in step 2.
Note:
This should place the patch contents in /media/patch/<patch num>.
6.
Export RETAIL_HOME to point within the installation staging
area.
export
RETAIL_HOME=/media/oretail14.1/rms/installer/mom14/Build
7.
Create a logs directory within the installation staging area
mkdir $RETAIL_HOME/orpatch/logs
8.
Ensure the ORMerge shell script is executable.
chmod u+x $RETAIL_HOME/orpatch/bin/ormerge
9.
Run ORMerge to apply the patch to the installation media,
using a –name argument that is the same as what was found in step 3.
$RETAIL_HOME/orpatch/bin/ormerge -s /media/patch
-d /media/oretail14.1/rms/installer/mom14 –name MOM_14_1_0_0 –inplace
Note: The
–inplace argument is critical to ensure that the patching replaces files in the
mom14 directory.
10.
Unset the RETAIL_HOME environment variable.
unset RETAIL_HOME
At this point, the installation files
will have been updated with the newer versions of files contained within the
patch. Log files for the merge will be in
/media/oretail14.1/rms/installer/mom14/Build/orpatch/logs.
In some situations, it may be
necessary to provide details of the metadata from an environment to Oracle support
in order to assist with investigating a patching or application problem.
ORPatch provides built-in functionality through the ‘exportmetadata’ action to
extract and consolidate metadata information for uploading to Oracle Support or
for external analysis. For more information, see the ORPatch ‘Exporting
Environment Metadata’ section.
10
ODI 11.1.1.7 studio UI (client) is NOT
supported on the following OS when using JDK1.7 or above. Please refer to OS
supported for Retail Analytics in the “Check
Supported ODI Requirements“ section of this guide.
§ Red Hat EL 4 (UL7+)
§ Red Hat EL 5 (UL3+)
§ Oracle Enterprise
Linux 4 (UL7+)
§ Oracle Enterprise
Linux 5 (UL3+)
§ SLES 10 (SP1+)
§ SLES 11
§ Windows
§ Mac OS
Please refer to ODI certification
matrix available on My Oracle Support for more details.
JDK 7 certification is only for ODI server
components. ODI 11.1.1.7.0 Studio UI does not support JDK 7. ODI Studio is
supported with a minimum java version of 1.6.0_04 and a maximum version less
than 1.7
Example: Before launching ODI Studio
in Windows OS, please make sure odi.conf file @<ODI_HOME>/../client/odi/bin/
has the above java version.
The Retail Analytics
14.1.1 installer is not supported on a Windows platform.
Installing ODI Files
for Retail Analytics on Windows
Following steps for ODI install on
Windows can be chosen when running the installer on either AIX or Solaris OS
(note that ODI Studio is not supported on these OS for ODI 11.1.1.7) to perform
install steps as mentioned in the ODI install section “Oracle Data Integrator
Configuration Tasks“
Complete
the following steps.
1.
On the windows machine, determine your <ODI Home>. This
directory does not necessarily have to be where ODI product is installed.
2.
Copy all files under <STAGING_DIR>.
3.
Copy all files under <STAGING_DIR>
In case if
customer experience the following error while executing the scenario “PLP_RETAILCOSTATUSITLCCHDYWKAGGREGATE”
during the ODI batch run please consider the following recommendation and check
with your DBA on the table space availability.
Caused By: java.sql.SQLException:
ORA-01652: unable to extend temp segment by 128 in tablespace TEMP1
SQL> exec
dbms_stats.gather_table_stats('RABE01USER', 'W_INT_ORG_D_RTL_TMP', cascade
=> true);
PL/SQL procedure successfully
completed.
SQL> exec
dbms_stats.gather_table_stats('RABE01USER', 'W_INT_ORG_DH_RTL_TMP', cascade
=> true);
PL/SQL procedure successfully
completed.
SQL> exec
dbms_stats.gather_table_stats('RABE01USER', 'W_PRODUCT_D_RTL_TMP', cascade
=> true);
PL/SQL procedure successfully
completed.
After Analyzing the query using
dbms_stats (Stats=Gathered), the plan is:
//Good Plan avoiding TEMP issue//
-----------------------------------------------------------------------------------------------------------------
| Id |
Operation
|
Name
| Rows | Bytes | Cost (%CPU)| Time |
-----------------------------------------------------------------------------------------------------------------
| 0 | SELECT
STATEMENT
|
| 3 | 1032 | 32
(7)| 00:00:01 |
|* 1 | HASH
JOIN
|
| 3 | 1032 | 32
(7)| 00:00:01 |
|* 2 | HASH
JOIN
|
| 3 | 807 |
12 (9)| 00:00:01 |
|* 3 | HASH
JOIN
|
|
3 | 795 | 9 (12)| 00:00:01 |
| 4
| TABLE ACCESS BY INDEX ROWID|
W_RTL_CO_STATUS_IT_LC_CH_DY_A | 3 |
600 | 5 (0)| 00:00:01 |
|* 5
| INDEX SKIP
SCAN |
PK_W_RTL_CO_STATUS_IT_LC_CH_DY | 3 |
| 1
(0)| 00:00:01 |
|* 6 |
TABLE ACCESS FULL |
W_INT_ORG_DH_RTL_TMP
| 406 | 26390 | 3 (0)| 00:00:01
|
| 7 |
TABLE ACCESS FULL |
W_INT_ORG_D_RTL_TMP
| 485 | 1940 | 3 (0)|
00:00:01 |
|* 8 | TABLE ACCESS
FULL |
W_PRODUCT_D_RTL_TMP
| 4852 | 355K| 19 (0)| 00:00:01
|
Retail Analytics supports Oracle BI EE
code deployment on UNIX environments (please refer Oracle BI EE certification (Check
Supported Application Server Requirements ) for complete list) and the
following steps provide details of installing Retail Analytics Oracle BI EE
code on Windows OS.
Complete the following steps.
1.
On the Oracle BI EE host, locate <OBIEE_Home>
directory. This must be a middleware home for Oracle BIEE installation, where
“instances” subdirectory exists. Example: C:\10.3.6_OBIEE\WLS
2.
Copy all files under <STAGING_DIR>/
3.
Copy all files under <STAGING_DIR>/ora/installer/ora14/mmhome/full/ra_obiee_source_code/catalog
to
<OBIEE_Home>/instances/instance1/bifoundation/OracleBIPresentationServicesComponent/coreapplication_obips1/catalog
4.
Unzip the content of <STAGING_DIR>/ora/installer/ora14/mmhome/full/ra_obiee_source_code/translations/translations.zip
to <OBIEE_Home>/instances/instance1/bifoundation/OracleBIPresentationServicesComponent/coreapplication_obips1/msgdb.
Once the installer execution is
successfully completed, the following subdirectories will appear under
ora/installer/ora14/mmhome/ra_mfp_odi_source_code/aps/odi/repository:
§ mfptora142_odi10g_wrep
§ mfptora142_odi10g_mrep
These subdirectories are redundant and
can be ignored since the MFP ODI code is packaged with Retail Analytics ODI
code.
A
##############################################################################
# Copyright (c) 2014 by Oracle
Corporation
# Oracle 12.1.0.x Parameter file
# NOTES: Before using this script:
# 1. Change
<datafile_path>, <admin_path>, <utl_file_path>,
<diag_path> and <hostname>
# values as appropriate.
# 2. Replace the word SID with
the database name.
# 3. Size parameters as
necessary for development, test, and production environments.
#
------------------------------------------------------------------------
*.audit_file_dest=full_path_of_audit_dir
*.audit_trail='db'
*.compatible='12.1.0.0.0'
*.control_files='full_path_of_controlfile_1','full_path_of_controlfile_2'
###########################################
#
Memory Settings:
# xxxM
= Some reasonable starting value for your environment.
###########################################
*.db_block_size=xxxM
*.db_cache_size=xxxM
*.java_pool_size=xxxM
*.memory_target=xxxM
*.pga_aggregate_target=xxxM
*.shared_pool_size=xxxM
*.streams_pool_size=xxxM
###########################################
*.db_block_size=8192
*.db_domain=''
*.db_name='dbName'
*.diagnostic_dest='full_path_of_diag_dir'
*.enable_pluggable_database=true|false
*.fast_start_mttr_target=900
*.nls_calendar='GREGORIAN'
*.nls_date_format='DD-MON-RR'
*.nls_language='AMERICAN'
*.nls_numeric_characters='.,'
*.nls_sort=BINARY
*.open_cursors=900
*.os_authent_prefix=''
*.plsql_optimize_level=2
*.processes=2000
*.query_rewrite_enabled='true'
*.remote_dependencies_mode='SIGNATURE'
*.remote_login_passwordfile='EXCLUSIVE'
*.remote_os_authent=true
*.sec_case_sensitive_logon=false
*.undo_tablespace='UNDOTBS1'
B
Appendix:
CreateDatabase Instance Using an Oracle GenericTemplate – Example
The 12.1.0.2 binary must have already
been installed. Refer to “Check Supported
Database Server Requirements” for all the required oneoff patches.
Prerequisites:
·
12.1.0.2
binary must have already been installed.. Refer to the Database Server
Preinstallation section for all the required oneoff patches.
Background
As of 14.1, Oracle Retail no longer delivers
customed database template files. Instead, databases can be created using the
generic Oracle delivered template in the directory: $ORACLE_HOME/assistant/dbca/template.
$ORACLE_HOME/assistantsdbca/templates>
--> ls -l General_Purpose.dbc
-rw-r--r-- 1 oracle rgbudba 4908 May 24 2013
General_Purpose.dbc
Instance Creation Using the Generic Template
via DBCA
1.
Ensure ORACLE_HOME and ORACLE_BASE is in the path:
export ORACLE_HOME=/u00/oracle/product/12.1.0.2
export ORACLE_BASE=/u00/oracle
export PATH=$ORACLE_HOME/bin:$PATH
.cd into /u00/oracle/product/12.1.0.2/assistants/dbca/templates
2.
Execute the following command to create an instance:
$ORACLE_HOME/bin/dbca -silent
-createDatabase -templateName General_Purpose.dbc -gdbName DB_NAME -sid DB_SID
-createAsContainerDatabase true -SysPassword oracle1 -SystemPassword oracle1
-emConfiguration NONE -datafileDestination /u02/oradata -characterSet AL32UTF8
-nationalCharacterSet AL16UTF16 -redoLogFileSize 100 -initParams
nls_date_format=DD-MON-RR,nls_language=AMERICAN,nls_calendar=GREGORIAN,fast_start_mttr_target=900
The above will create a
container database using all the default parameters set by dbca. Replace the
pfile by taking a copy from Appendix A but customize the values according to
the need of your environment.
If you wish to create a non-container
database, replace [-createAsContainerDatabase true] with
[-createAsContainerDatabase false].
3.
Execute the following commands to create a pluggable database
if this is a container environment.
CREATE PLUGGABLE DATABASE PDB_NAME
ADMIN USER PDBADMIN
IDENTIFIED BY pdbadmin_pwd ROLES=(CONNECT)
file_name_convert=('/u02/oradata/cdb_name/pdbseed','/u02/oradata/pdb_name');
alter pluggable database pdb_name
open;
alter system register;
4.
Post Database Creation Setup
The above commands create a
database with all files in one directory, ie, /u02. Multiplex the redo logs
and the control files following the OFA architecture.
5.
Configure the listener and the tnsnames entry.
6.
Log into the pluggable database to create the required
tablespaces accordingly. For non-container databases, log into the database as
normal and create the tablespaces.
C
Appendix:
Tablespace Creation Scripts
-------------------------------------------------------------------------------------
--- Script:
create_ra_tablespaces.sql
--- Execute as: sysdba
--- Note: Before running this
script:
--- Modify
<datafile_path> values.
--- Modify datafile
storage parameters and sizes based on partitioning strategy.
----------------------------------------------------------------------------------
spool create_ra_tablespaces.log
set
echo on
CREATE
TABLESPACE DM_DIM_DATA
DATAFILE '<datafile_path>/dm_dim_data01.dbf' SIZE 300M AUTOEXTEND ON
NEXT 100M MAXSIZE 2000M
EXTENT MANAGEMENT LOCAL
SEGMENT SPACE MANAGEMENT AUTO
;
CREATE
TABLESPACE DM_DIM_INDEX
DATAFILE
'<datafile_path>/dm_dim_index01.dbf' SIZE 300M AUTOEXTEND ON NEXT 100M
MAXSIZE 2000M
EXTENT MANAGEMENT LOCAL
SEGMENT SPACE MANAGEMENT AUTO
;
CREATE
TABLESPACE DM_FACT_DATA
DATAFILE '<datafile_path>/ dm_fact_data01.dbf' SIZE 300M
AUTOEXTEND ON NEXT 100M MAXSIZE 2000M
EXTENT MANAGEMENT LOCAL
SEGMENT SPACE MANAGEMENT AUTO
;
CREATE
TABLESPACE DM_FACT_INDEX
DATAFILE '<datafile_path>/dm_fact_index01.dbf' SIZE 300M
AUTOEXTEND ON NEXT 100M MAXSIZE 2000M
EXTENT MANAGEMENT LOCAL
SEGMENT SPACE MANAGEMENT AUTO
;
CREATE
TABLESPACE RETAIL_INDEX
DATAFILE '<datafile_path>/retail_index01.dbf' SIZE 100M
AUTOEXTEND ON NEXT 100M MAXSIZE 2000M
EXTENT MANAGEMENT LOCAL
SEGMENT SPACE MANAGEMENT AUTO
;
CREATE
TABLESPACE RETAIL_DATA
DATAFILE '<datafile_path>/retail_data01.dbf' SIZE 100M
AUTOEXTEND ON NEXT 100M MAXSIZE 2000M
EXTENT MANAGEMENT LOCAL
SEGMENT SPACE MANAGEMENT AUTO
;
CREATE TABLESPACE USERS
DATAFILE '<datafile_path>/users01.dbf' SIZE
100M
AUTOEXTEND ON NEXT 100M MAXSIZE 1000M
EXTENT
MANAGEMENT LOCAL
SEGMENT SPACE MANAGEMENT AUTO
;
spool
off
D
Appendix:
Retail Analytics Application Installer Screens
Understanding of the following details
about your environment is required to ensure the installer successfully deploys
the Retail Analytics application. Depending on the options you select, you may
not see some screens or fields.
Note:
The values shown in the text fields in the screenshots and in examples are
sample values. Enter appropriate values for your organization for all text
fields as you go through the UI screens.
Note:
When running in text mode, and when you are presented with questions having to
do with making choices, you are expected to fully spell out the selected item.
For example, a checkbox control in graphical user interface will appear as
(yes/no) question in text mode. You must enter Yes or No. Entering anything
other than Yes in this case will result in No.
A separate section is provided below
for full and patch installations. Please refer to the appropriate sections for
installation.
Screen: Oracle Retail Analytics 14.1.1
This screen displays the requirements
for installing Retail Analytics 14.1.1
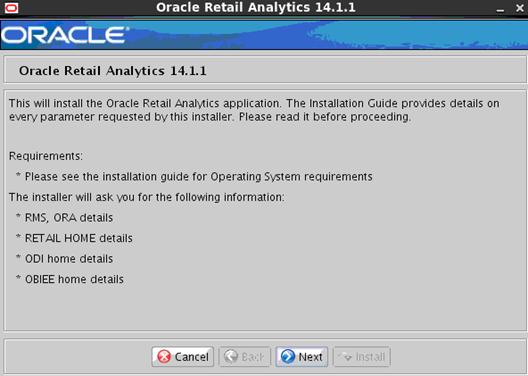
Screen: RA Application RETAIL_HOME
This screen will ask
for RETAIL_HOME
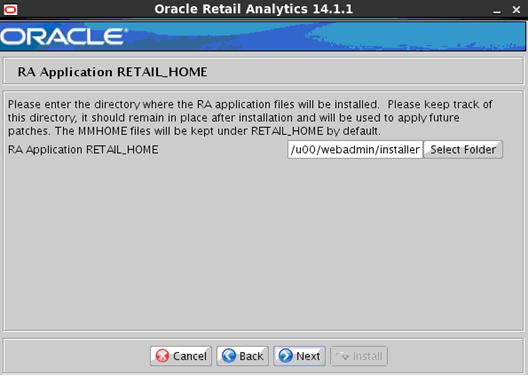
|
Field Title
|
RA Application RETAIL_HOME
|
|
Field Description
|
Retail home path
|
|
Notes
|
Retail Home is used to keep
Orpatch related files and the mmhome files by default. Please keep track of
this directory, it should remain in place after installation and will be used
to apply future patches.
The mmhome stores all shell and
DDL scripts.
|
|
Example
|
/u00/webadmin/installer-testing/retail_home
|
Screen: RA COMPONENT SELECTION

|
Field
Title
|
Full
Install of RA 14.1.1
|
|
Field
Description
|
Check “yes”
box if you want to install Full RA 14.1.1
Check “no”
this box for Patch install of RA 14.1.1 from Ra 14.1
|
|
Notes
|
|
|
Field Title
|
MMHOME files
|
|
Field Description
|
Check this box if you want to
install MMHOME files
Do not check this box if you do
not want to install MMHOME files
|
|
Notes
|
|
|
Field Title
|
OBIEE files
|
|
Field Description
|
Check this box if you want to
install Oracle BI EE files
Do not check this box if you do
not want to install Oracle BI EE files
|
|
Notes
|
Oracle BI EE files contain
Oracle BI EE source seed files (report files, catalog, translated string).
If you select this component,
the installer will be copying files into Oracle BI EE home directory so you
must run this installer on the same machine where Oracle BI EE is installed,
and as the same user that owns Oracle BI EE product. Otherwise, the installer
will fail.
Also, the installer files must
be owned by this user, as the installer must be run by the user that has
ownership of the installer files. This means you should unzip the installer
package as this user.
|
|
Field Title
|
Install RMS objects for Oracle
Retail Analytics
|
|
Field Description
|
Check this box if you want to
Install RMS database objects for Oracle Retail Analytics
|
|
Notes
|
When selected, this option creates
database objects for RMS for Oracle Retail Analytics.
|
|
Field Title
|
Install Oracle Retail
Analytics
|
|
Field Description
|
Check this box if you want to Install
database objects for Oracle Retail Analytics
|
|
Notes
|
When selected, this option creates
database objects for Oracle Retail Analytics.
|
Note:
MMHOME, ODI, and Oracle BI EE files for Retail Analytics are installed
locally. If these components are to be installed on different hosts, you must
run the installer from each target host and select the correct components for
that host.
Screen: OBIEE Scripts Home Details
This screen is displayed only if you had
checked off the OBIEE files box from the Component Selection screen.
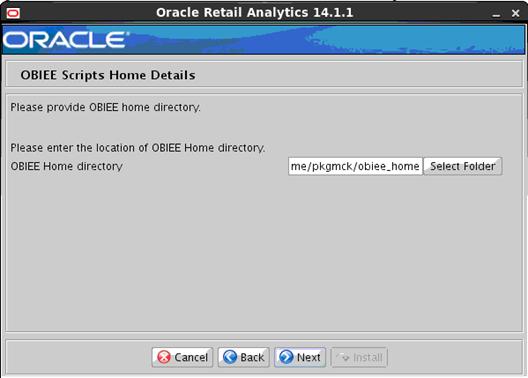
|
Field Title
|
OBIEE Home directory
|
|
Description
|
Oracle BI EE Home directory,
where “instances” subdirectory exists.
|
|
Example
|
/home/pkgmck/obiee_home
|
|
Notes
|
§ You
must enter a middleware home for Oracle BI EE installation, where “instances”
subdirectory exists.
§
Example: /u00/webadmin/product/10.3.x_OBIEE/WLS
§ Be
sure to run the installer as the same OS user who owns Oracle BI EE, because
the installer will be copying files into the multiple Oracle BI EE
directories. Also, due to the installer characteristics, the installer files
must be owned by this user for installing Oracle BI EE files.
§ Unlike
files installed for MMHOME and ODI components, Oracle BI EE scripts will not
be backed up if you have specified the pre-existing Oracle BI EE home. You
must back up repository/catalog/translation files yourself as necessary.
§ Pre-existing
files will be over-written
|
Screen: Select to Patch ODI Files

|
Field Title
|
Patch Existing ODI repositories
|
|
Field Description
|
Check this box if you want to patch
ODI Files.
|
Screen: RA BACK UP ODI FILES
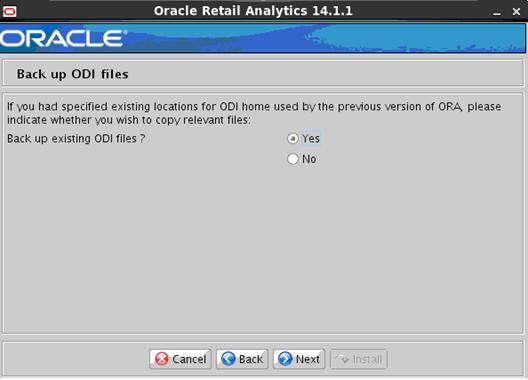
|
Field Title
|
Back up Existing ODI files
|
|
Field Description
|
Check this box if you want to
back up ODI Files.
|
Screen: RA ODI BACK UP DIRECTORIES
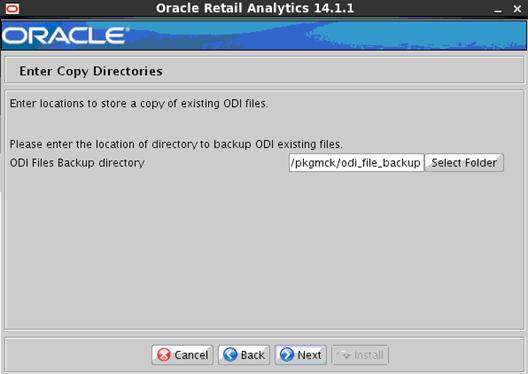
|
Field Title
|
ODI files Backup directory
|
|
Field Description
|
Enter the directory path for
with backup file name.
|
Screen: ODI Home Directory
This screen is displayed only if you
had checked off the Install ODI files box from the Component Selection
screen.
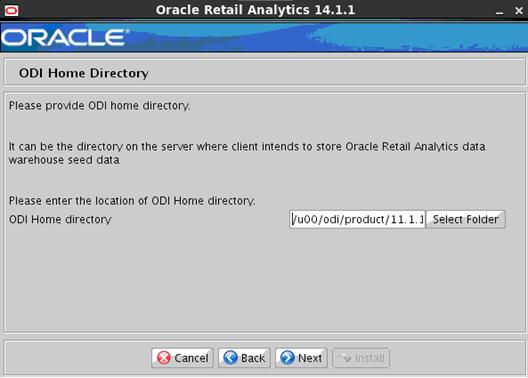
|
Field Title
|
ODI Home directory
|
|
Field Description
|
ODI Home directory
|
|
Example
|
/u00/odi/product/11.1.1.x/oracledi/agent
|
|
Notes
|
§ ODI
seed data files will be copied into one or more directories under the
directory you specify.
§ This
directory must be the ODI Home where ODI is installed
§ You
must run the installer as the same OS user that installed ODI. Due to the
installer characteristics, the installer files must be owned by this same
user also.
|
Screen: System, ODI Supervisor, Host DB Details
This screen is displayed only if you
had checked the Create RA ODI Master and Work Repositories on Select to
Install ODI Files and Create Repository screen.
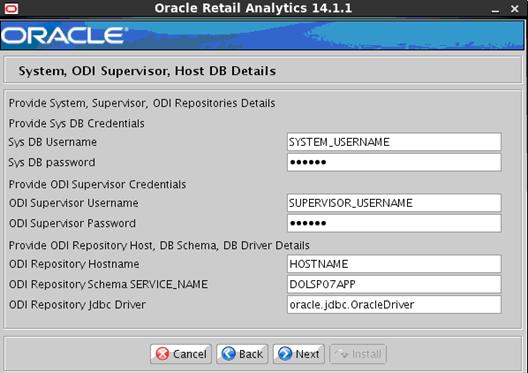
|
Field Title
|
Sys DB Username
|
|
Field Description
|
This is the SYS DB super user
as this is required by ODI to complete the RA-ODI installation.
|
|
Example
|
Sys as sysdba
|
|
Field Title
|
Sys DB Password
|
|
Field Description
|
Sys Password
|
|
Field Title
|
ODI Supervisor Username
|
|
Field Description
|
This is the ODI supervisor user
which is used to connect to ODI GUI.
|
|
Example
|
SUPERVISOR
|
|
Field Title
|
ODI Supervisor
Password
|
|
Field Description
|
ODI Supervisor Password
|
|
Field Title
|
ODI Repository Hostname
|
|
Field Description
|
This is the DB Hostname where
ODI master and work schemas (users) are created.
|
|
Example
|
HOSTNAME
|
|
Field Title
|
ODI Repository Schema SID
|
|
Field Description
|
Provide the ODI Repository
Schema SERVICE NAME.
|
|
Example
|
DOLSP07APP
|
|
Field Title
|
ODI Repository Jdbc Driver
|
|
Field Description
|
The ODI repository jdbc driver
is defaulted to oracle.jdbc.OracleDriver.
|
|
Example
|
oracle.jdbc.OracleDriver
|
Screen: Master and Work Repository Details
This screen is displayed only if you
had checked the Create RA ODI Master and Work Repositories on Select to
Install ODI Files and Create Repository screen.
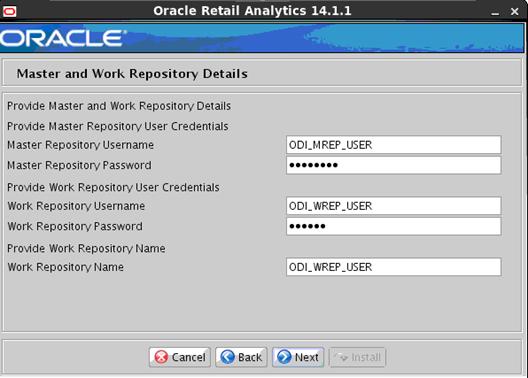
|
Field Title
|
Master Repository Password
|
|
Field Description
|
ODI master repository user for
Retail Analytics.
|
|
Example
|
ODI_MREP_USER
|
|
Field Title
|
Master Repository Password
|
|
Field Description
|
Provide the master repository
password.
|
|
Field Title
|
Work Repository Username
|
|
Field Description
|
The ODI work repository user
for Retail Analytics.
|
|
Example
|
ODI_WREP_USER
|
|
Field Title
|
Work Repository Username
|
|
Field Description
|
Provide the work repository
password.
|
|
Field Title
|
Work Repository Name
|
|
Field Description
|
ODI work repository name label that
will be provided in ODI GUI. Please use the same name as ODI work repository
user name.
|
|
Example
|
ODI_WREP_USER
|
Screen: Master and Work Repository ID Details
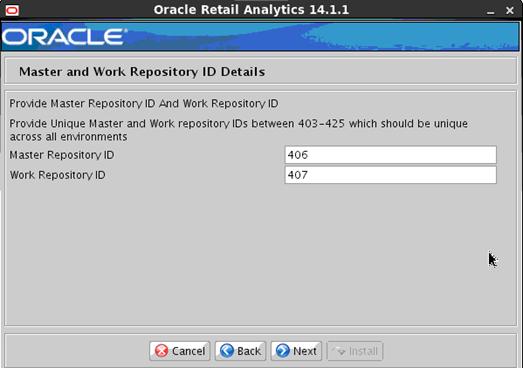
|
Field Title
|
Master Repository ID and Work
Repository ID
|
|
Field Description
|
To ensure object uniqueness
across several work repositories, ODI uses a specific mechanism to generate
unique IDs for objects (such as technologies, data servers, Models, Projects,
Integration Interfaces, KMs, etc.). Every object in Oracle Data Integrator is
identified by an internal ID. The internal ID appears on the Version tab of
each object.
|
|
Example
|
Unique values between 403-425.
|
Screen: RMS Oracle Retail Analytics Host and
Schema Details
This screen is displayed only if you
had checked off the Install RMS objects for Oracle Retail Analytics box
from the Component Selection screen.
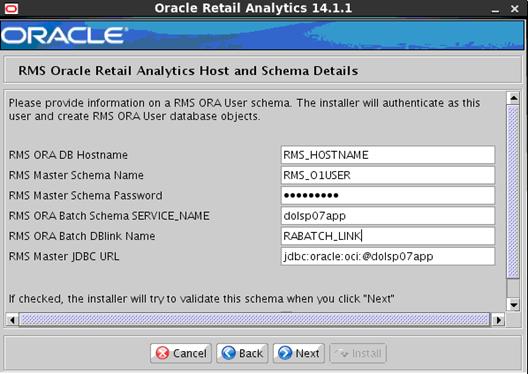
|
Field Title
|
RMS ORA DB Hostname
|
|
Field Description
|
Provide hostname where RMS ORA
DB is installed.
|
|
Example
|
HOSTNAME
|
|
Field Title
|
RMS Master Schema Name
|
|
Field Description
|
Provide RMS Master Schema Name.
|
|
Example
|
RMS01
|
|
Field Title
|
RMS Master Schema Password
|
|
Field Description
|
Provide RMS Master Schema password.
|
|
Field Title
|
RMS ORA Batch Password
|
|
Field Description
|
RMS User schema password.
|
|
Field Title
|
RMS ORA Batch Schema SERVICE_NAME
|
|
Field Description
|
RMS ORA User
schema SERVICE_NAME
|
|
Example
|
Dolsp07app
|
|
Field Title
|
RMS ORA Batch DBlink Name
|
|
Field Description
|
Provide RMS ORA Batch DBlink
name
|
|
Field Title
|
RMS Master JDBC URL
|
|
Field Description
|
Provide JDBC URL
|
|
Field Title
|
Test Data Source?
|
|
Field Description
|
Check the box if you want the
installer to test the connection to the schema upon clicking Next.
Clear the box if you want to
bypass the validation.
|
Screen: RA RMS Oracle Retail Analytics Host and
Schema Details
This screen is displayed only if you
had checked off the Install RMS objects for Oracle Retail Analytics box
from the Component Selection screen
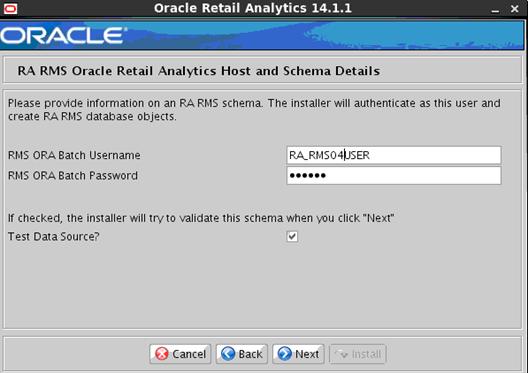
|
Field Title
|
RMS ORA Batch Username
|
|
Field Description
|
RMS Batch User schema name that
will integrate with the master RMS schema from RMS product.
|
|
Example
|
RA_RMS04USER
|
|
Field Title
|
RMS ORA Batch Password
|
|
Field Description
|
RMS Batch User password that
will integrate with the master RMS schema from RMS product.
|
Screen: Oracle Retail Analytics Datamart Schema
Details
This screen is displayed only if you
had checked the Install Oracle Retail Analytics box from the Component
Selection screen.
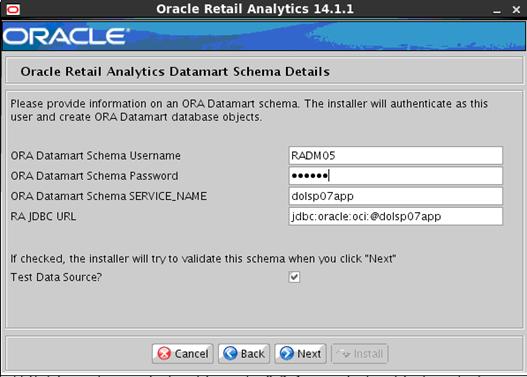
|
Field Title
|
ORA Datamart Schema Username
|
|
Field Description
|
Oracle Retail Analytics
Datamart schema name
|
|
Example
|
RADM05
|
|
Field Title
|
ORA Datamart Schema Password
|
|
Field Description
|
Oracle Retail Analytics
Datamart schema password
|
|
Field Title
|
ORA Datamart Schema SERVICE_NAME
|
|
Field Description
|
Oracle Retail Analytics
Datamart schema SERVICE_NAME
|
|
Example
|
Dolsp07app
|
|
Field Title
|
RA Master JDBC URL
|
|
Field Description
|
Provide JDBC URL
|
|
Field Title
|
Test Data Source?
|
|
Field Description
|
Check the box if you want the
installer to test the connection to the schema upon clicking Next.
Clear the box to bypass the
validation.
|
Screen: Oracle Retail Analytics Front End
Datamart Schema Details
This screen is displayed only if you
had checked the Install Oracle Retail Analytics box from the Component
Selection screen.
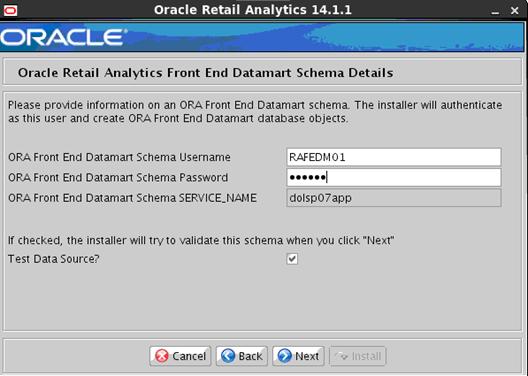
|
Field Title
|
ORA Front End Datamart Schema
Username
|
|
Field Description
|
Oracle Retail Analytics
Datamart Schema name
|
|
Example
|
RAFEDM01
|
|
Field Title
|
ORA Front End Datamart Schema
Password
|
|
Field Description
|
Oracle Retail Analytics Front
End Datamart schema password
|
|
Field Title
|
ORA Front End Datamart Schema
SERVICE_NAME
|
|
Field Description
|
Oracle Retail Analytics
Datamart schema SERVICE_NAME
|
|
Example
|
Dolsp07app
|
|
Field Title
|
Test Data Source?
|
|
Field Description
|
Check the box if you want the
installer to test the connection to the schema upon clicking Next.
Clear the box to bypass the
validation.
|
Screen: Oracle Retail Analytics Batch Schema
Details
This screen is displayed only if you
had checked the Install Oracle Retail Analytics box from the Component
Selection screen.
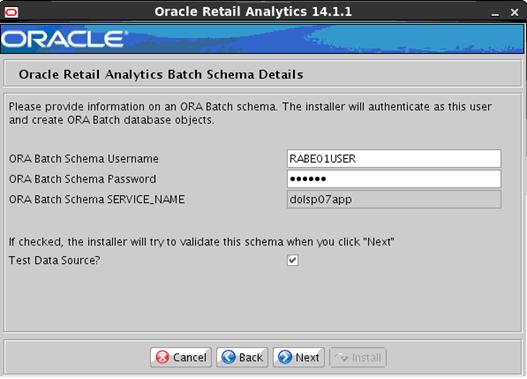
|
Field Title
|
ORA Batch schema Username
|
|
Field Description
|
Oracle Retail Analytics Batch
schema name
|
|
Example
|
RABE01USER
|
|
Field Title
|
ORA Batch Schema password
|
|
Field Description
|
Oracle Retail Analytics Batch
schema password
|
|
Field Title
|
ORA Batch Schema SERVICE_NAME
|
|
Field Description
|
Oracle Retail Analytics Batch
schema SERVICE_NAME
|
|
Example
|
Dolsp07app
|
|
Notes
|
This field is informational
only and is disabled. Its value is taken from the Oracle Retail Analytics
Datamart schema SID because the Oracle Retail Analytics Batch schema must be
on the same database instance as the Oracle Retail Analytics Datamart schema
resides.
|
|
Field Title
|
Test Data Source?
|
|
Field Description
|
Check the box if you want the
installer to test the connection to the schema upon clicking Next.
Clear the box to bypass the
validation.
|
Screen:
Oracle Retail Analytics Partitioning
This screen
is displayed only if you had checked off the Install Oracle Retail Analytics
box from the Component Selection screen
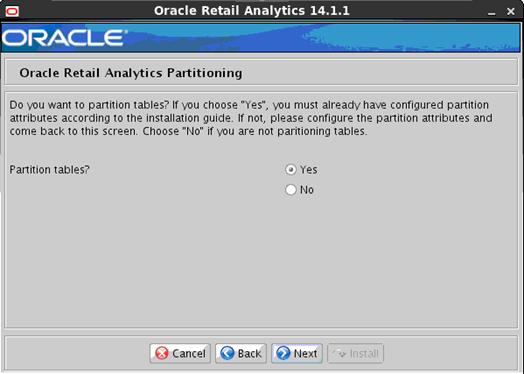
|
Field Title
|
Partition Tables
|
|
Field Description
|
Select Yes if you have
configured a partition strategy and want to create tables with this strategy.
Select No if you want to
create tables without partitioning.
|
|
Notes
|
Refer to the Establish a Retail Analytics Partitioning Strategy section
for details about how to configure a partition strategy.
|
Screen: Oracle Wallet
An oracle wallet is an encrypted
container used to store and retrieve sensitive information, such as user
credentials. This screen will ask you for a new password for wallet if you have
opted to install db components.
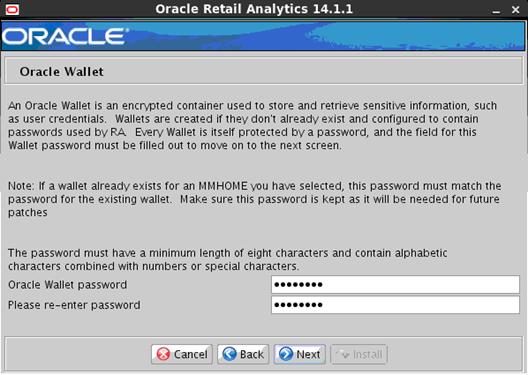
|
Field Title
|
Oracle Wallet password
|
|
Field Description
|
The wallet password
|
|
Notes
|
The password for wallet to
store the credentials of db components.
The password must have a
minimum length of eight characters and contain alphabetic character combined
with numbers or special characters.
Note: If a wallet already
exists for an MMHOME you have selected, this password must match the password
for the existing wallet. Make sure this password is kept as it will be
needed for future patches.
|
Screen: Installation Summary
This screen shows the selections you
have made so far. Not all fields will be displayed. For example, DB schema user
passwords are not displayed regardless of whether you selected to do DB schema
installation.
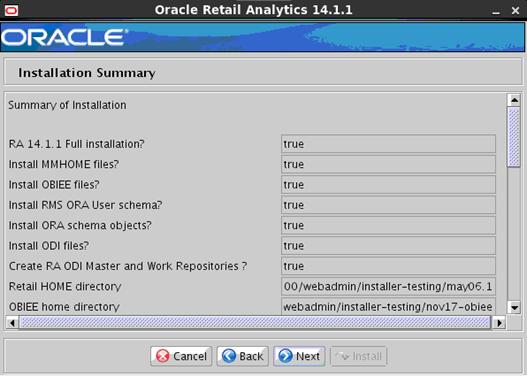
Screen: Oracle Retail Analytics 14.1.1
This screen displays the requirements
for patching to Retail Analytics 14.1.1 from RA 14.1
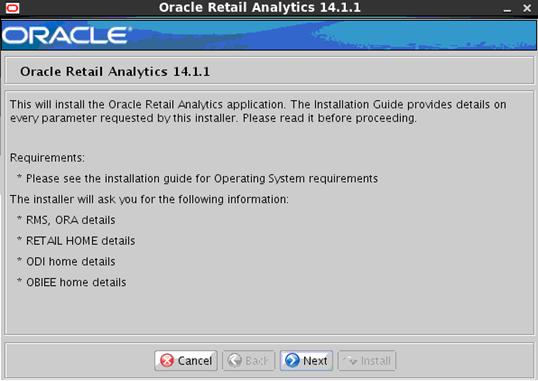
Screen: RA Application RETAIL_HOME
This screen will ask for RETAIL_HOME

|
Field
Title
|
RA
Application RETAIL_HOME
|
|
Field
Description
|
Retail home
path
|
|
Notes
|
Retail Home
is used to keep Orpatch related files and the mmhome files by default. Please
keep track of this directory, it should remain in place after installation
and will be used to apply future patches.
The mmhome stores
all shell and DDL scripts
|
|
Example
|
/u00/pkgmck/retail_home
|
Screen: Component Selection
You can make selections for the
product component you want to install. These choices allow you to install
certain components on one host and others on another host per your requirement.
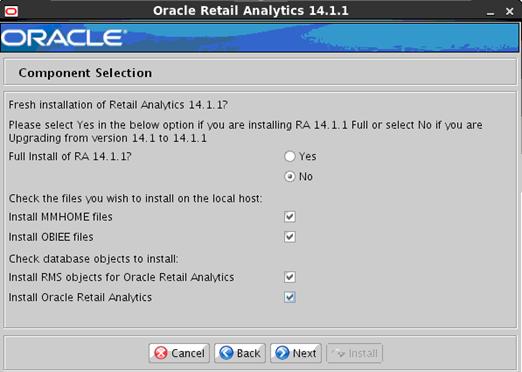
|
Field
Title
|
Full
Install of RA 14.1.1
|
|
Field
Description
|
Check “no” on
the radio box for Patch install of RA 14.1.1 from Ra 14.1
|
|
Notes
|
|
|
Field
Title
|
MMHOME
files
|
|
Field
Description
|
Check this
box if you want to install MMHOME files
Do not check
this box if you do not want to install MMHOME files
|
|
Notes
|
|
|
Field
Title
|
OBIEE files
|
|
Field
Description
|
Check this
box if you want to install Oracle BI EE files
Do not check
this box if you do not want to install Oracle BI EE files
|
|
Notes
|
Oracle BI EE
files contain Oracle BI EE source seed files (report files, catalog,
translated string).
If you
select this component, the installer will be copying files into Oracle BI EE home
directory which you will be entering in the subsequent installer screen.
Also, the
installer files must be owned by this user, as the installer must be run by
the user that has ownership of the installer files. This means you should
unzip the installer package as this user.
|
|
Field
Title
|
Install RMS
objects for Oracle Retail Analytics
|
|
Field
Description
|
Check this
box if you want to Install RMS database objects for Oracle Retail Analytics
|
|
Notes
|
When
selected, this option creates database objects for RMS for Oracle Retail
Analytics.
|
|
Field
Title
|
Install Oracle
Retail Analytics
|
|
Field
Description
|
Check this
box if you want to Install database objects for Oracle Retail Analytics
|
|
Notes
|
When
selected, this option creates database objects for Oracle Retail Analytics.
|
Note: MMHOME, ODI, and Oracle BI EE
files for Retail Analytics are installed locally. If these components are to be
installed on different hosts, you must run the installer from each target host
and select the correct components for that host.
Screen: OBIEE Scripts Home Details
This screen is displayed only if you
had checked off the OBIEE files box from the Component Selection screen.
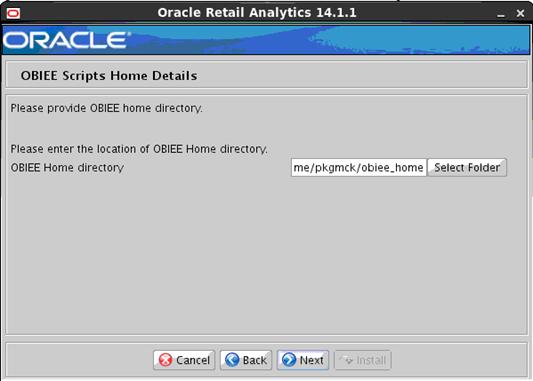
|
Field
Title
|
OBIEE Home
directory
|
|
Description
|
Oracle BI EE
Home directory, where “instances” subdirectory exists.
|
|
Example
|
/u00/product/OBIEE
|
|
Notes
|
§
You must enter a middleware home for Oracle BI EE installation,
where “instances” subdirectory exists.
§
Example: /u00/webadmin/product/10.3.x_OBIEE/WLS
§
Be sure to run the installer as the same OS user who owns
Oracle BI EE, because the installer will be copying files into the multiple
Oracle BI EE directories. Also, due to the installer characteristics, the
installer files must be owned by this user for installing Oracle BI EE files.
§
Unlike files installed for MMHOME and ODI components, Oracle BI
EE scripts will not be backed up if you have specified the pre-existing
Oracle BI EE home. You must back up repository/catalog/translation files
yourself as necessary.
§
Pre-existing files will be over-written
|
Screen: Select to Install ODI Files and Create
Repository
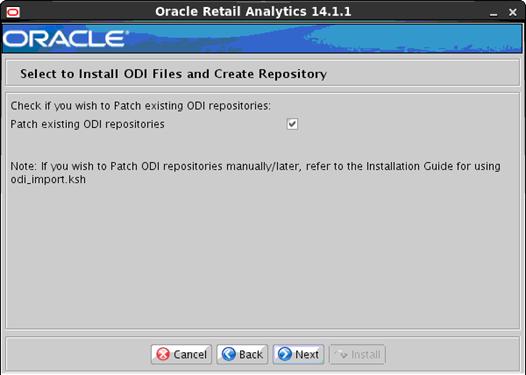
|
Field Title
|
Patch Existing ODI Repositories
|
|
Field Description
|
Select “Yes” if you are
patching the existing Retail Analytics 14.1 ODI repositories to 14.1.1 and
want the installer to do so.
Select
“No” if you are not patching ODI repositories, or you want to patch existing
RA ODI repositories manually by directly invoking odi_import.ksh to
bring it to 14.1.1 level.
|
|
Notes
|
§ Whether
you are using the installer or direct invocation of odi_import.ksh to patch ODI
repositories, you must ensure that $ODI_HOME/bin/odiparams.sh is property
configured before upgrading the ODI repositories
§ If
“log” subdirectory already exists at <ODI HOME>/../log (which is right
under “oracledi”, e.g. /u00/odi/product/11.1.1.x/oracledi/log), then ensure
that your OS user has write access to this log directory, as odi_import.ksh
will invoke ODI utilities which write logs to this directory.
§ See
a separate section on how to invoke odi_import.
|
Screen: Back up ODI files
This screen is displayed only if you
had checked the Upgrading existing ODI repositories box from the Select to
Install ODI Files and Create Repository screen.
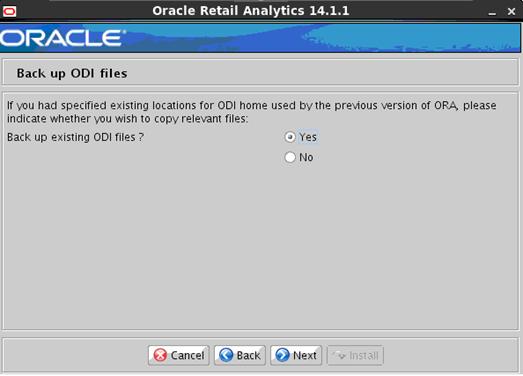
|
Field Title
|
Back up existing ODI files?
|
|
Field Description
|
Select Yes if you had entered
RETAIL_HOME or ODI Home where previously installed files exist, and you wish
to move them to another place so that they are backed up.
Select No if you had entered
new locations for RETAIL_HOME or ODI Home, or if you do not wish to back up
previously installed files.
|
|
Notes
|
You can still select No if you
entered a new ODI Home with no pre-existing ODI seed data and scripts,
regardless of MMHOME location you entered.
|
Screen: Enter Copy Directories
This screen is displayed only if you
had checked the Patching existing ODI repositories box from the Back up ODI
files screen.

|
Field Title
|
ODI Files Backup directory
|
|
Field Description
|
Enter the location where you
wish to move pre-existing ODI files to.
|
|
Notes
|
Ensure that your OS user can
copy the pre-existing ODI files. In other words, you must be able to copy
existing ODI files to the target directory.
|
Screen: ODI Home Directory
This screen is displayed only if you
had checked the Upgrading existing ODI repositories box from the Select to
Install ODI Files and Create Repository screen.
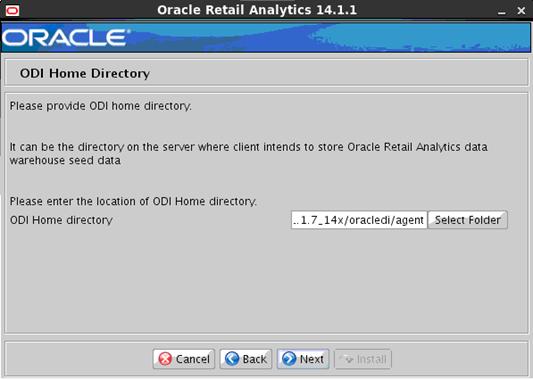
|
Field
Title
|
ODI Home
directory
|
|
Field
Description
|
ODI Home
directory
|
|
Example
|
/u00/odi/product/11.1.1.x/oracledi/agent
|
|
Notes
|
§
ODI seed data files will be copied into one or more directories
under the directory you specify.
§
This directory must be the ODI Home where ODI is installed
§
You must run the installer as the same OS user that installed
ODI. Due to the installer characteristics, the installer files must be owned
by this same user also.
|
Screen: RMS Oracle Retail Analytics Host and
Schema Details
This screen is displayed only if you
had checked off the Install RMS objects for Oracle Retail Analytics box
from the Component Selection screen.
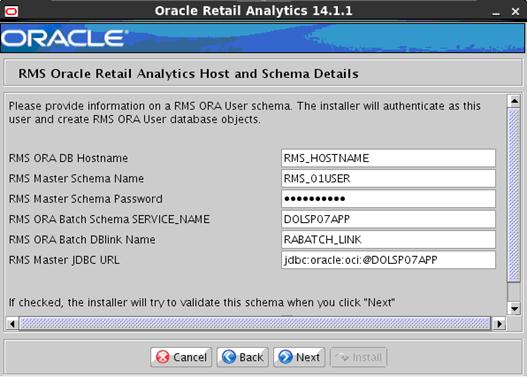
|
Field
Title
|
RMS ORA DB
Hostname
|
|
Field
Description
|
Provide
hostname where RMS ORA DB is installed
|
|
Example
|
HOSTNAME
|
|
Field
Title
|
RMS Master
Schema Name
|
|
Field
Description
|
Provide RMS
Master Schema Name
|
|
Example
|
RMS01
|
|
Field
Title
|
RMS Master
Schema Password
|
|
Field
Description
|
Provide RMS
Master Schema password
|
|
Field
Title
|
RMS ORA
Batch Password
|
|
Field
Description
|
RMS User
schema password.
|
|
Field
Title
|
RMS ORA
Batch Schema SERVICE_NAME
|
|
Field
Description
|
RMS ORA User schema SERVICE_NAME
|
|
Example
|
Dolsp07app
|
|
Field
Title
|
RMS ORA
Batch DBlink Name
|
|
Field
Description
|
Provide RMS
ORA Batch DBlink name
|
|
Field Title
|
RMS ORA Batch DBlink Name
|
|
Field Description
|
Provide RMS ORA Batch DBlink
name
|
|
Field
Title
|
Test Data
Source?
|
|
Field
Description
|
Check the
box if you want the installer to test the connection to the schema upon
clicking Next.
Clear the
box if you want to bypass the validation.
|
Screen: RA RMS Oracle Retail
Analytics Host and Schema Details
This screen is
displayed only if you had checked off the Install RMS objects for Oracle
Retail Analytics box from the Component Selection screen
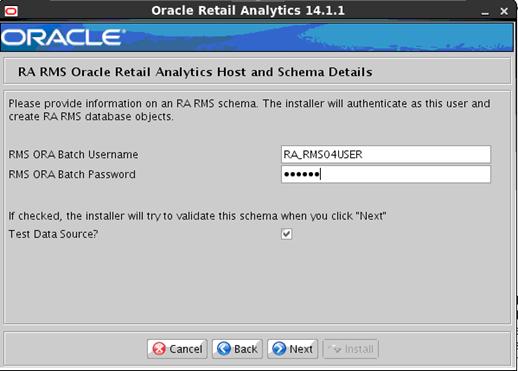
|
Field
Title
|
RMS ORA
Batch Username
|
|
Field
Description
|
RMS Batch User
schema name that will integrate with the master RMS schema from RMS product.
|
|
Example
|
RA_RMS04USER
|
|
Field Title
|
RMS ORA Batch Password
|
|
Field Description
|
RMS Batch User password that
will integrate with the master RMS schema from RMS product.
|
Screen: Oracle Retail Analytics Datamart Schema
Details
This screen
is displayed only if you had checked off the Install Oracle Retail Analytics
box from the Component Selection screen.

|
Field
Title
|
ORA
Datamart Schema Username
|
|
Field
Description
|
Oracle
Retail Analytics Datamart schema name
|
|
Example
|
RADM05
|
|
Field
Title
|
ORA
Datamart Schema Password
|
|
Field
Description
|
Oracle
Retail Analytics Datamart schema password
|
|
Field
Title
|
ORA
Datamart Schema SERVICE_NAME
|
|
Field
Description
|
Oracle
Retail Analytics Datamart schema SERVICE_NAME
|
|
Example
|
Dolsp07app
|
|
Field Title
|
RA Master JDBC URL
|
|
Field Description
|
Provide JDBC URL
|
|
Field
Title
|
Test Data
Source?
|
|
Field
Description
|
Check the
box if you want the installer to test the connection to the schema upon
clicking Next.
Clear the
box to bypass the validation.
|
Screen: Oracle Retail
Analytics Front End Datamart Schema Details
This screen is
displayed only if you had checked the Install Oracle Retail Analytics box
from the Component Selection screen.

|
Field
Title
|
ORA Front
End Datamart Schema Username
|
|
Field
Description
|
Oracle
Retail Analytics Datamart Schema name
|
|
Example
|
RAFEDM01
|
|
Field
Title
|
ORA Front
End Datamart Schema Password
|
|
Field
Description
|
Oracle
Retail Analytics Front End Datamart schema password
|
|
Field
Title
|
ORA Front
End Datamart Schema SERVICE_NAME
|
|
Field
Description
|
Oracle
Retail Analytics Datamart schema SERVICE_NAME
|
|
Example
|
Dolsp07app
|
|
Field
Title
|
Test Data
Source?
|
|
Field
Description
|
Check the
box if you want the installer to test the connection to the schema upon
clicking Next.
Clear the
box to bypass the validation.
|
Screen: Oracle Retail
Analytics Batch Schema Details
This screen is
displayed only if you had checked the Install Oracle Retail Analytics
box from the Component Selection screen.

|
Field
Title
|
ORA Batch
schema Username
|
|
Field
Description
|
Oracle
Retail Analytics Batch schema name
|
|
Example
|
RABE01USER
|
|
Field
Title
|
ORA Batch Schema
password
|
|
Field
Description
|
Oracle
Retail Analytics Batch schema password
|
|
Field
Title
|
ORA Batch Schema
SERVICE_NAME
|
|
Field
Description
|
Oracle
Retail Analytics Batch schema SERVICE_NAME
|
|
Example
|
Dolsp07app
|
|
Notes
|
This field
is informational only and is disabled. Its value is taken from the Oracle
Retail Analytics Datamart schema SID because the Oracle Retail Analytics
Batch schema must be on the same database instance as the Oracle Retail
Analytics Datamart schema resides.
|
|
Field
Title
|
Test Data
Source?
|
|
Field
Description
|
Check the
box if you want the installer to test the connection to the schema upon
clicking Next.
Clear the
box to bypass the validation.
|
Screen: Oracle Wallet
An oracle wallet is an encrypted
container used to store and retrieve sensitive information, such as user
credentials. This screen will ask you for a new password for wallet if you have
opted to install db components.
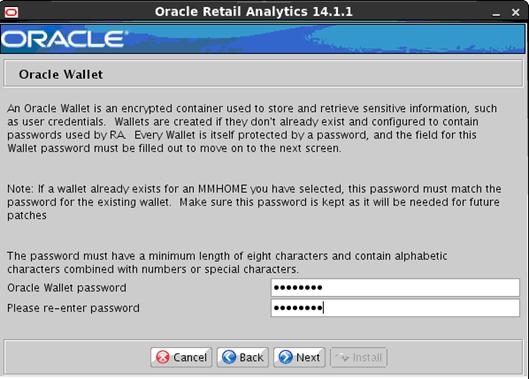
|
Field
Title
|
Oracle
Wallet password
|
|
Field
Description
|
The wallet
password
|
|
Notes
|
The password
for wallet to store the credentials of db components.
The password must have a
minimum length of eight characters and contain alphabetic character combined
with numbers or special characters.
Note:
If a wallet already exists for an MMHOME you have selected, this password
must match the password for the existing wallet. Make sure this password is
kept as it will be needed for future patches.
|
Screen: Installation Summary
This screen shows the selections you
have made so far. Not all fields will be displayed. For example, DB schema user
passwords are not displayed regardless of whether you selected to do DB schema
installation.
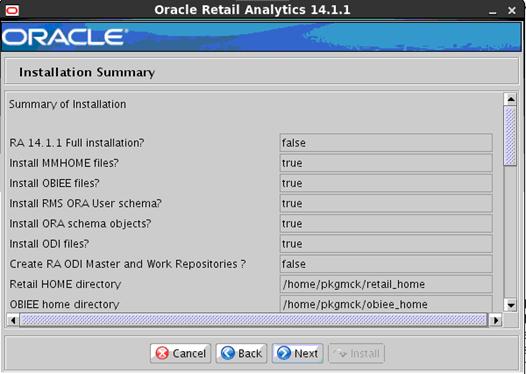
Installation
Trail File
When the installer exits (at the end
of successful/failed installation), it produces a trail file called
ra.<version>install.trail.properties in <STAGING_DIR>/ora/installer,
(for example,. ra.14.1.0.0.install.trail.properties). The file content reflects
the choices you made and the statuses of the various components you have or have
not chosen (MMHOME listed in the file is actually RETAIL_HOME/mmhome). For
example:
#Fri, 08 May 2015 04:40:06 -0500
Installation_Attempted_At=201505080331
Installation_Status=Success
RA_version=14.1.1.0
MMHOME_Installed_or_Upgraded=Yes
ODI_Files_Installed_or_Upgraded=Unknown
ODI_Home=
ODI_Repositories_Installation_Status=Unknown
OBIEE_Files_Installed_or_Upgraded=Yes
OBIEE_Home=/home/pkgmck/obiee_home
RA_RMS_User_Database_Installation_Status=Installed
v14.1.1.0
RA_User_Database_Installation_Status=Installed
v14.1.1.0
If this file already exists when you
run the installer (for example, running the installer for the second time), the
installer will read in the existing file's settings as a basis to work with.
This means, for example, if you had already installed ODI components the first
time, and you are installing Retail Analytics database objects now, then the
file will continue to reflect the status of ODI component and will update
Retail Analytics database installation status.
Since this file is produced in
<STAGING_DIR>/ora/installer for your installer, it reflects only the
activities you carried out using your installer. If another person had another
copy of the installer somewhere and already finished installing certain
components, your trail file will not reflect that and it is easy for it to be
out of sync with reality. Therefore, keep this in mind and use the file as a
loose guide only. You may want to manually update your trail file from time to
time to keep it accurate.
E
In addition to the GUI and text
interfaces of the Retail Analytics installer, there is a silent mode that can
be run. This mode is useful if you want to run a repeat installation without
retyping the most settings you provided in the previous installation. It is
also useful if you encounter errors in the middle of an installation and want
to continue.
The installer runs in two distinct
phases. The first phase involves gathering settings from the user. At the end
of the first phase, a properties file named ant.install.properties is created
with the settings that were provided. Then the second phase begins, where this
properties file is used to provide your settings for the installation.
Note:
Sensitive credential information such as schema passwords are deleted from
ant.install.properties, so you will need to provide them again before running
the installer in silent mode
To skip the first phase and re-use the
ant.install.properties file from a previous run, follow these instructions:
1.
Edit the ant.install.properties file and correct any invalid
settings that may have caused the installer to fail in its previous run.
2.
Look for duplicate properties in the ant.install.properties
file. Some properties are set on multiple pages to ensure default values when a
page is only displayed under certain conditions. For example, if there are two
instances of input.property.name, remove all but the last one.
3.
Run the installer again with the silent argument.
F
Appendix:
Common Installation Errors
This section provides some common
errors encountered during installation of Retail Analytics.
Symptom:
When the database schema installer is
run, the following is written to the console and the installer hangs
indefinitely:
Running pre-install checks
Running tnsping to get listener port
Solution:
The installer startup script is
waiting for control to return from the tnsping command, but tnsping is
hanging. Type Control+C to cancel the installer, and investigate and solve the
problem that is causing the tnsping <sid> command to hang. This
can be caused by duplicate database listeners running.
If you are unable to read the
text within the installer buttons, it probably means that your JAVA_HOME is
pointed to a pre-1.7 JRE or JDK.
Set JAVA_HOME with the appropriate JDK
(the same JDK that has been used by WebLogic Server).
Symptom:
The following text appears in the
installer Errors tab:
May 22, 2006 11:16:39 AM
java.util.prefs.FileSystemPreferences$3 run
WARNING: Could not create system
preferences directory. System preferences are unusable.
May 22, 2006 11:17:09 AM
java.util.prefs.FileSystemPreferences checkLockFile0ErrorCode
WARNING: Could not lock System prefs.
Unix error code -264946424.
Solution:
This is related to
Java bug 4838770. The /etc/.java/.systemPrefs directory may not have been
created on your system. See http://bugs.sun.com
for details.
This is an issue
with your installation of Java and does not affect the Oracle Retail product
installation.
Symptom:
The following text
appears in the console window during execution of the installer in GUI mode:
Couldn't find X Input Context
Solution:
This message is harmless and can be
ignored.
Message: SP2-0734:
unknown command beginning
Symptom:
Installation outputs the message that
looks like:
SP2-0734: unknown command beginning "old 5:
..." - rest of line ignored.
or
SP2-0734: unknown command beginning "new 4:
..." - rest of line ignored. Solution:
You can ignore this error. This warning is generated from invalids.sql if no objects need to be
validated.
Symptom:
Installation outputs the message:
Error: java.sql.SQLException: ORA-01017: invalid
username/password; logon denied
Solution:
The installer
cannot log into the database as one of the users you have supplied it. Verify
that they have been created with SQL files in <STAGING_DIR>/ora/installer/create_db
per “Create Retail Analytics Schema Owners” in Chapter 2 and verify that you
can manually log into the database with them.
Symptom:
Installer starts to add DB credentials
to the wallet and then give out an error like this:
[echo] Adding credentials to
wallet for ...
BUILD FAILED
/view_storage/mohammz_ra/rgbura/dist/ora/installer/build.xml:474:
The following error occurred while executing this line:
/view_storage/mohammz_ra/rgbura/dist/ora/installer/common-ora-install.xml:213:
exec returned: 1
Solution:
It is likely that you have run the
installer in silent mode and ant.install.properites file did not have the
password set for the DB schemas.
If you did fill out the passwords in a
previous run, the installer had cleared the password fields for all schemas
(e.g. input.rms.db.password, input.rdm.db.password, etc) when the installer
starts to run. This is done for security So next time, you need to re-populate
these fields before re-running the installation.
Another possible cause is if you
entered an invalid character for schema username, password or SID. For example,
if you mistakenly entered “<host>:<port>:<sid>” instead of
“<sid>” for schema SID, then it will cause mkstore utility to crash,
resulting in the error in discussion.
Symptom:
After entering database credentials in
the installer screens and hitting next, a message pops up with an error like
this:
Error
connecting to database URL <url> as user <user>
details...
The message
prevents you from moving on to the next screen to continue the installation.
Solution:
This error occurs when the installer
fails to validate the user credentials you have entered on the screen. Make
sure that you have entered the credentials properly.
You may receive a message similar to
this:
Error
connecting to database URL <url> as user <user>
java.lang.Exception:
UnsatisfiedLinkError encountered when using the Oracle driver.
Please
check that the library path is set up properly or switch to the JDBC thin
client.
This message
means that bit-width for your Java and Oracle client libraries are not
compatible with each other. Make sure that you are using only the 64-bit version
of Java and Oracle client libraries.
Symptom:
After entering database credentials in
the installer screens and hitting next, a message pops up with an error like
this:
Error connecting to database URL
jdbc:oracle:oci:@pkols07 as user XYZ
java.sql.SQLException: ORA-12705:
Cannot access NLS data files or invalid environment
Solution:
This error occurs if the NLS_LANG
environment variable has not been set and exported with a valid value expected
by the Oracle database server. See the section, Run
the Retail Analytics Database Schema Installer, in Chapter 2.
Symptom:
After entering database credentials in
the installer screens and hitting next, a message pops up with an error like
this:
Error connecting to database URL
jdbc:oracle:oci:@pkols07 as user rarms1
java.sql.SQLException: ORA-01045: user
RARMS1 lacks CREATE SESSION privilege; logon denied
Solution:
This error occurs if the schema user
in question has not been created properly. Make sure there was no error when
you ran one of the schema user creation scripts in <STAGING_DIR>/ora/installer/create_db
per “Create Retail Analytics Schema Owners” in Chapter 2. You may find it
easier to drop the schema user and re-create it as opposed to manually granting
the missing privilege(s).
Symptom:
During DB schema object creations step
for a given schema, after all objects have been successfully created, it gives
“Some of the objects have errors” when it tries to compile any invalid objects.
[exec] Execution of INV_OBJ_COMP
script
[exec] Some of the objects have
errors. Open a sql session and run the command below to find out the invalid
objects
[exec]
*******************************************************
[exec] * select * from
user_objects where status != 'VALID'
[exec] *******************************************************
Solution:
As the error message suggests, find
out the invalid objects and resolve accordingly. This error can manifest itself
for a variety of reasons but here are some possible causes:
§ You created temporary
invalid objects in the schema and forgot to drop them when the installer was
run.
§ If this happened in
the RMS user schema, it is possible that the invalid objects reported came from
the master RMS schema.
–
Someone might have created invalid objects in the master RMS schema
that may not have anything to do with Retail Analytics, and may be outside of
your control as the master RMS schema. If you want to resolve these invalid
objects, consult someone responsible for maintaining the master RMS schema to
resolve the invalid objects, and rerun the installation.
Alternatively, you may want to
ignore this error message and continue with the rest of the schema objects
installations. You can do this if, after reviewing the list of invalid objects
that failed to compile, according to the log indicated by the installer, you
determine they do not need to be recompiled during the installation. In this
case you can rerun the installation by choosing to resume from the previous
point of failure and clearing the "RMS User Schema Install Option"
check box. In silent mode, you should set input.do.install.rms.db to “false” in
the installer properties file, ant.install.properties, in order to not install
RMS user schema objects. This will cause the RMS user schema object installation
to be skipped, and the installation will continue with the next schema. For
details on how to resume database schema object installations from the previous
point of failure, see “Resuming from the Previous Point of Failure” in the
section, Resolving Errors Encountered
During Database Schema Installation.
Symptom:
Toward the end of the
installation involving database schema objects, the installer will issue:
"WARNING: Expected * SYNONYM objects, found 9026" for RMS user
schema.
Solution:
This warning can be ignored.
The installer does not validate the number of SYNONYM objects for RMS user
schema.
Symptom:
When running the installer in
GUI mode, the screens fail to open and the installer ends, returning to the
console without any error message. The ant.install.log file contains this
error. This is an error encountered when the installer is used in GUI mode with
certain X Servers.
Solution:
Until this is fixed
permanently, employ the workaround solution below should you encounter this
issue:
1.
Copy ant.install.properties.sample to ant.install.properties
2.
Re-run the installer
G
The following table describes the
contents of each of the Retail Analytics code tree directories created during
the Retail Analytics installation.
|
Path
|
Directory
|
Description
|
|
<base_directory>
|
dbasql
|
This directory contains all SQL
scripts necessary to maintain the permissions for the database users.
|
|
<base_directory>
|
batch
|
Empty directory used for
development and testing purposes only.
|
|
<base_directory>
|
data
|
This directory contains the
text files that serve as the input to Retail Analytics ODI SDE modules. (For
Example RDWT.txt file).
|
|
<base_directory>/data
|
lkpfiles
|
This directory consists of all
the csv files required for ODI jobs to run Example Transaction Types file.
|
|
<base_directory>/data
|
srcfiles
|
This directory consists of all
the csv files required for ODi jobs to execute Time Dimension.
|
|
<base_directory>
|
error
|
This directory holds all
program error files, and status files. Directory is empty on installation.
|
|
<base_directory>/error
|
out
|
Out subdirectory consists of
files which are as a result of ODI job execution.
|
|
<base_directory>
|
log
|
This directory holds log files
of program execution. Directory is empty on installation.
|
|
<base_directory>
|
etc
|
This directory contains files
that hold variables used by Retail Analytics batch modules. The
configuration file ra.env is found in this directory.
Modify the parameters in this
ra.env as per your installation of ODI, ORACLE DB.
Set ODI_JAVA_HOME variable
value same as ODI_HOME.
|
|
|
|
|
|
<base_directory>
|
ra_obiee_source_code
|
This directory consists of Oracle
BI EE source code (catalog, translated string).
|
|
<base_directory>
|
ra_odi_source_code
|
This directory consists of ODI
Information.
|
|
<base_directory>
|
src
|
This directory contains of
shell scripts which invoke Retail Analytics ODI modules upon execution.
|
|
<base_directory>
|
ra_mfp_odi_source_
code
|
This directory contains RA-MFP
integration code, which consists of the following:
§ ODI
topology information about how to access the MFP source (RPAS DOMAINS)
system.
§ RA-MFP
integration code content (packages, interfaces and scenarios, and shell
script), which enables the loading of Planning content to Retail Analytics.
|
H
This appendix provides time definitions.
Retail Analytics provides support for
the retail 4-5-4 calendar. The fiscal 4-5-4 calendar is the calendar supported
by RMS and other Oracle Retail applications and is populated in Retail
Analytics via an extract from RMS. The 4-5-4 calendar is the default calendar
used when viewing the time dimension through the Oracle BI middle tier layer of
Retail Analytics.
Note:
Even if 4-5-4 is the default calendar for Retail Analytics, you can still see
the Gregorian Time attributes and transformations from within Oracle BI.
However, you can only utilize these objects if you have opted for Gregorian
calendar during database installation.
Retail Analytics provides support for
the combined 4-5-4 calendar/Gregorian calendar. If a user chooses to use the
combined 4-5-4/Gregorian calendar, the user must execute the batch program that
generates the text files needed to populate the Gregorian time dimension.
The 13-Period calendar can also be
used, but RMS does not support it. If a user chooses to use the 13-Period
calendar, the user can either provide a flat file with its 13-period time, or
utilize a sample 13-period time flat file, and then ETL scripts populate the
time dimension with this file during Retail Analytics installation. Within the
middle-tier application, all references to Month must be manually updated to
Period, to comply with the 13-Period nomenclature.
To update Retail Analytics to report
in 13-Period time, follow these steps:
1.
Update the time dimension tables. (For instructions, see “Database Installation Tasks – Full.”)
2.
Within the repository, delete the attribute Half Year, and
re-name the objects referencing month.
§
Highlighting the object in the Business Layer and pressing the
delete key deletes the attribute Half Year. All relationships and hierarchies
are automatically updated. The table TIME_HALF_DM and its Aliases can also be
deleted the same way in the Physical layer. Global Consistency check is recommended
after the change.
§ Each
repository object referencing Month can be re-named by selecting the object and
pressing F2. After all the changes, Global Consistency check is recommended
before saving the repository.
I
Single Sign-On (SSO) is a term for the
ability to sign onto multiple Web applications via a single user ID/Password. There
are many implementations of SSO. Oracle provides an implementation with Oracle
Access Manager.
Most, if not all, SSO technologies use
a session cookie to hold encrypted data passed to each application. The SSO
infrastructure has the responsibility to validate these cookies and, possibly,
update this information. The user is directed to log on only if the cookie is
not present or has become invalid. These session cookies are restricted to a
single browser session and are never written to a file.
Another facet of SSO is how these
technologies redirect a user’s Web browser to various servlets. The SSO
implementation determines when and where these redirects occur and what the
final screen shown to the user is.
Most SSO implementations are performed
in an application’s infrastructure and not in the application logic itself.
Applications that leverage infrastructure managed authentication (such as
deployment specifying Basic or Form authentication) typically have little or no
code changes when adapted to work in an SSO environment.
A Single Sign-On system involves the
integration of several components, including Oracle Identity Management and
Oracle Access Management. This includes the following components:
§ An Oracle Internet
Directory (OID) LDAP server, used to store user, role, security, and other
information. OID uses an Oracle database as the back-end storage of this
information.
§ An Oracle Access
Manager (OAM) 11g Release 2 server and administrative console for implementing
and configuring policies for single sign-on.
§ A Policy Enforcement
Agent such as Oracle Access Manager 11g Agent (WebGate), used to authenticate
the user and create the Single Sign-On cookies.
§ Oracle Directory
Services Manager (ODSM) application in OIM11g, used to administer users and
group information. This information may also be loaded or modified via standard
LDAP Data Interchange Format (LDIF) scripts.
§ Additional
administrative scripts for configuring the OAM system and registering HTTP
servers.
Additional WebLogic managed servers
will be needed to deploy the business applications leveraging the Single
Sign-On technology.
Yes, Oracle Access Manager has the
ability to interoperate with many other SSO implementations, but some
restrictions exist.
The following terms apply to single
sign-on.
Authentication
Authentication is the process of
establishing a user’s identity. There are many types of authentication. The
most common authentication process involves a user ID and password.
Dynamically Protected URLs
A Dynamically Protected URL is a URL
whose implementing application is aware of the Oracle Access Manager
environment. The application may allow a user limited access when the user has
not been authenticated. Applications that implement dynamic protection
typically display a Login link to provide user authentication and gain greater
access to the application’s resources.
Oracle Identity Management (OIM) and Oracle
Access Manager (OAM) for 11g
Oracle Identity Management (OIM) 11g
includes Oracle Internet Directory and ODSM. Oracle Access Manager (OAM) 11g R2
should be used for SSO using WebGate. Oracle Forms 11g contains Oracle HTTP
server and other Retail Applications will use Oracle WebTier11g for HTTP Server.
MOD_WEBLOGIC
mod_WebLogic operates as a module
within the HTTP server that allows requests to be proxied from the OracleHTTP
server to the Oracle WebLogic server.
Oracle Access Manager 11g Agent (WebGate)
Oracle WebGates are policy enforcement
agents which reside with relying parties and delegate authentication and
authorization tasks to OAM servers.
Oracle Internet Directory
Oracle Internet Directory (OID) is an
LDAP-compliant directory service. It contains user ids, passwords, group
membership, privileges, and other attributes for users who are authenticated
using Oracle Access Manager.
Partner Application
A partner application is an
application that delegates authentication to the Oracle Identity Management
Infrastructure. One such partner application is the Oracle HTTP Server (OHS)
supplied with Oracle Forms Server or WebTier11g Server if using other Retail
Applications other than Oracle Forms Applications.
All partner applications must be
registered with Oracle Access Manager (OAM) 11g. An output product of this
registration is a configuration file the partner application uses to verify a
user has been previously authenticated.
Statically Protected URLs
A URL is considered to be Statically
Protected when an Oracle HTTP server is configured to limit access to this URL
to only SSO authenticated users. Any unauthenticated attempt to access a
Statically Protected URL results in the display of a login page or an error
page to the user.
Servlets, static HTML pages, and JSP
pages may be statically protected.
Single Sign-On is NOT a user
ID/password mapping technology.
However, some applications can store
and retrieve user IDs and passwords for non-SSO applications within an OID LDAP
server. An example of this is the Oracle Forms Web Application framework, which
maps Single Sign-On user IDs to a database logins on a per-application basis.
Oracle Access Manager involves several
different components. These are:
§ The Oracle Access
Manager (OAM) server, which is responsible for the back-end authentication of
the user.
§ The Oracle Internet
Directory LDAP server, which stores user IDs, passwords, and group (role)
membership.
§ The Oracle Access
Manager Agent associated with the Web application, which verifies and controls
browser redirection to the Oracle Access Manager server.
§ If the Web
application implements dynamic protection, then the Web application itself is
involved with the OAM system.
About SSO Login Processing with OAM Agents
1.
The user requests a resource.
2.
Webgate forwards the request to OAM for policy evaluation
3.
OAM:
a.
Checks for the existence of an SSO cookie.
b.
Checks policies to determine if the resource is protected and
if so, how?
4.
OAM Server logs and returns the decision
5.
Webgate responds as follows:
§ Unprotected
Resource: Resource is served to the user
§ Protected
Resource:
Resource is redirected to the credential collector.
The login form is served based on the authentication policy.
Authentication processing begins
6.
User sends credentials
7.
OAM verifies credentials
8.
OAM starts the session and creates the following host-based
cookies:
§ One
per partner: OAMAuthnCookie set by 11g WebGates using authentication token received
from the OAM Server after successful authentication.
Note: A valid cookie is required for a session.
§ One
for OAM Server: OAM_ID
9.
OAM logs Success of Failure.
10.
Credential collector redirects to WebGate and authorization
processing begins.
11.
WebGate prompts OAM to look up policies,
compare them to the user's identity, and determine the user's level of authorization.
12.
OAM logs policy decision and checks the session cookie.
13.
OAM Server evaluates authorization policies and cache the
result.
14.
OAM Server logs and returns decisions
15.
WebGate responds as follows:
§ If
the authorization policy allows access, the desired content or applications are
served to the user.
§ If
the authorization policy denies access, the user is redirected to another URL
determined by the administrator.
SSO Login Processing with OAM Agents
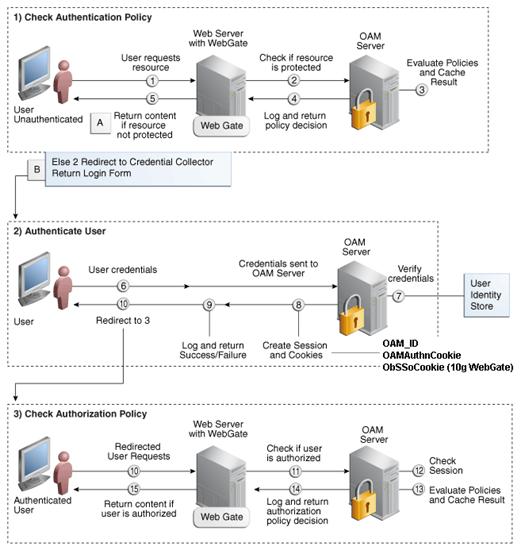
Installing an Oracle Retail supported
Single Sign-On installation using OAM11g requires installation of the
following:
1.
Oracle Internet Directory (OID) LDAP server and the Oracle
Directory Services Manager. They are typically installed using the Installer of
Oracle Identity Management . The ODSM application can be
used for user and realm management within OID.
2.
Oracle Access Manager 11gR2 has to be installed and
configured.
3.
Additional midtier instances (such as Oracle Forms 11gr2) for
Oracle Retail applications based on Oracle Forms technologies (such as RMS).
These instances must be registered with the OAM installed in step 2.
4.
Additional application servers to deploy other Oracle Retail
applications and performing application specific initialization and deployment
activities must be registered with OAM installed in step 2.
Infrastructure Installation and Configuration
The Infrastructure installation for
Oracle Access Manager (OAM) is dependent on the environment and requirements
for its use. Deploying Oracle Access Manager (OAM) to be used in a test
environment does not have the same availability requirements as for a
production environment. Similarly, the Oracle Internet Directory (OID) LDAP
server can be deployed in a variety of different configurations. See the Oracle Identity Management Installation Guide11g.
OID User Data
Oracle Internet Directory is an
LDAP
v3 compliant directory
server. It provides standards-based user definitions out of the box.
Customers with existing corporate LDAP
implementations may need to synchronize user information between their existing
LDAP directory servers and OID. OID supports standard LDIF file formats and
provides a JNDI compliant set of Java classes as well. Moreover, OID provides
additional synchronization and replication facilities to integrate with other
corporate LDAP implementations.
Each user ID stored in OID has a
specific record containing user specific information. For role-based access,
groups of users can be defined and managed within OID. Applications can thus
grant access based on group (role) membership saving administration time and
providing a more secure implementation.
User Management consists of
displaying, creating, updating or removing user information. There are many
methods of managing an LDAP directory including LDIF scripts or Oracle
Directory Services Manager (ODSM) available for OID11g.
ODSM
Oracle Directory Services Manager
(ODSM) is a Web-based application used in OID11g is designed for both
administrators and users which enables you to configure the structure of the
directory, define objects in the directory, add and configure users, groups,
and other entries. ODSM is the interface you use to manage entries, schema,
security, adapters, extensions, and other directory features.
LDIF Scripts
Script based user management can be
used to synchronize data between multiple LDAP servers. The standard format for
these scripts is the LDAP Data Interchange Format (LDIF). OID supports LDIF
script for importing and exporting user information. LDIF scripts may also be
used for bulk user load operations.
User Data Synchronization
The user store for Oracle Access
Manager resides within the Oracle Internet Directory (OID) LDAP server. Oracle
Retail applications may require additional information attached to a user name
for application-specific purposes and may be stored in an application-specific
database. Currently, there are no Oracle Retail tools for synchronizing changes
in OID stored information with application-specific user stores. Implementers
should plan appropriate time and resources for this process. Oracle Retail
strongly suggests that you configure any Oracle Retail application using an
LDAP for its user store to point to the same OID server used with Oracle Access
Manager.
J
This
section provides a guideline as to the order in which the Oracle Retail
applications should be installed. If a retailer has chosen to use some, but
not all, of the applications the order is still valid less the applications not
being installed.
Note:
The installation order is not meant to imply integration between products.
Enterprise Installation Order
1.
Oracle Retail Merchandising System (RMS), Oracle Retail Trade
Management (RTM)
2.
Oracle Retail Sales Audit (ReSA)
3.
Oracle Retail Extract, Transform, Load (RETL)
4.
Oracle Retail Active Retail Intelligence (ARI)
5.
Oracle Retail Warehouse Management System (RWMS)
6.
Oracle Retail Invoice Matching (ReIM)
7.
Oracle Retail Price Management (RPM)
8.
Oracle Retail Allocation
9.
Oracle Retail Central Office (ORCO)
10.
Oracle Retail Returns Management (ORRM)
11.
Oracle Retail Back Office (ORBO)
12.
Oracle Retail Store Inventory Management (SIM)
13.
Oracle Retail Predictive Application Server (RPAS)
14.
Oracle Retail Demand Forecasting (RDF)
15.
Oracle Retail Category Management (RCM)
16.
Oracle Retail Replenishment Optimization (RO)
17.
Oracle Retail Analytic Parameter Calculator Replenishment
Optimization (APC RO)
18.
Oracle Retail Regular Price Optimization (RPO)
19.
Oracle Retail Merchandise Financial Planning (MFP)
20.
Oracle Retail Size Profile Optimization (SPO)
21. Oracle
Retail Assortment Planning (AP)
22.
Oracle Retail Item Planning (IP)
23.
Oracle Retail Item Planning Configured for COE (IP COE)
24.
Oracle Retail Advanced Inventory Planning (AIP)
25.
Oracle Retail Analytics
26.
Oracle Retail Advanced Science Engine (ORASE)
27.
Oracle Retail Integration Bus (RIB)
28.
Oracle Retail Service Backbone (RSB)
29.
Oracle Retail Financial Integration (ORFI)
30.
Oracle Retail Point-of-Service (ORPOS)
§ Oracle
Retail Mobile Point-of-Service (ORMPOS) (requires ORPOS)
31.
Oracle Retail Markdown Optimization (MDO)
32.
Oracle Retail Clearance Optimization Engine (COE)
33.
Oracle Retail Analytic Parameter Calculator for Markdown
Optimization
(APC-MDO)
34.
Oracle Retail Analytic Parameter Calculator for Regular Price
Optimization
(APC-RPO)
35.
Oracle Retail Macro Space Planning (MSP)
The Oracle Retail Enterprise
suite includes Macro Space Planning. This can be installed independently of and
does not affect the installation order of the other applications in the suite.
If Macro Space Planning is installed, the installation order for its component
parts is:
§ Oracle
Retail Macro Space Management (MSM)
§ Oracle
Retail In-Store Space Collaboration (ISSC) (requires MSM)
§ Oracle
Retail Mobile In-Store Space Collaboration (requires MSM and ISSC)