3 Managing Oracle Database Appliance Virtualized Platform
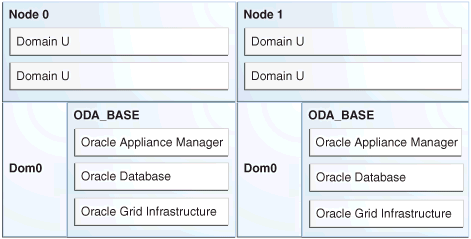
After you deploy Oracle Database Appliance Virtualized Platform, your system will have two domains on each server node, Dom0 and ODA_BASE (also known as Dom1). You can use the CPU cores not assigned to Oracle Database (ODA_BASE) for virtual machines, each of which is referred to as user domain or a Domain (Dom) U. The following figure shows the virtualized structure as a block diagram.
Figure 3-1 Oracle Database Appliance Virtualized Platform
Description of "Figure 3-1 Oracle Database Appliance Virtualized Platform"
Oracle recommends that you use shared repositories with Oracle Database Appliance Virtualized Platform for high availability. The virtual machine files can be stored on shared disks, providing shared storage for the database as well as the application virtual machines. Additionally, CPU pools and a resizeable Oracle Database domain (ODA_BASE) ensure that the virtual machines do not consume cycles from each other or from your assigned database CPU cores. Find details about the uses and configuration of these features, as well as information about resizing your Oracle Database domain (ODA_BASE), in the following sections of this chapter:
-
About Shared Repositories and Virtual Machines on Oracle Database Appliance Virtualized Platform
-
Managing Shared Repositories and Virtual Disks on Oracle Database Appliance Virtualized Platform
-
About Virtual Machine Templates and Assemblies on Oracle Database Appliance Virtualized Platform
-
Managing Virtual Machine Templates and Assemblies on Oracle Database Appliance Virtualized Platform
-
About Virtual Machines on Oracle Database Appliance Virtualized Platform
-
Managing Virtual Machines High Availability on Oracle Database Appliance Virtualized Platform
-
Managing Virtual Machines on Oracle Database Appliance Virtualized Platform
-
About CPU Pools on Oracle Database Appliance Virtualized Platform
-
Managing CPU Pools on Oracle Database Appliance Virtualized Platform
Many of the sections that cover management of a feature include a set of related examples.
Overview of Guest Virtual Machine Deployments
The main steps to deploy a guest virtual machine are as follows:
-
Create a new repository if necessary.
-
Import the required template or assembly.
-
Configure the template or assembly.
-
Clone the template or assembly.
-
Update the virtual machine as required.
-
Start the virtual machine.
-
Access the virtual machine using the virtual machine console.
For additional details and options available to complete each of the preceding steps, see the remaining sections in this chapter.
About Shared Repositories and Virtual Machines on Oracle Database Appliance Virtualized Platform
Oracle Database Appliance Virtualized Platform enables you to create one or more shared repositories for the storage of virtual machine (VM) files. A VM shared repository provides high availability support. A VM can be configured to fail over from one node to another node in case of node failure, and a VM can auto-restart on the failover node if the preferred node is not available.
Additionally, you can create virtual disks in shared repositories. Virtual disks provide additional storage options for virtual machines, by allowing you to attach additional block storage to your VMs. Similarly, you can detach the storage if you no longer need the additional space. You can use virtual disks to expand existing file system storage inside the VM by extending the storage volume onto a virtual disk or creating a new file system on a virtual disk. Your virtual disks can also be shared by multiple VMs running on same shared repository.
The following figure shows a typical architecture of Oracle Database Appliance Virtualized Platform with a shared storage system.
Figure 3-2 Architecture Overview of Oracle Database Appliance Virtualized Platform Shared Repositories

Description of "Figure 3-2 Architecture Overview of Oracle Database Appliance Virtualized Platform Shared Repositories"
The preceding figure shows the shared disks on Oracle Database Appliance Virtualized Platform connected directly to ODA_BASE. ODA_BASE contains three shared repositories named fs1, fs2, and fs3. Each shared repository is an Oracle Automatic Storage Management Cluster File System (Oracle ACFS) in ODA_BASE created on top of the ASM disk group (DATA or RECO) chosen for the repository. The process that creates a repository also performs an NFS export of the repository to the respective Dom0 via the private network. The export enables shared storage for the virtual machine files.With the configuration shown in the figure, you can create multiple repositories. Mount these repositories either on the nodes where the virtual machine needs to run (such as fs1 and fs3 in the figure), or on both the nodes (such as fs2 in the illustration). Create one or more virtual machines or virtual machine templates on these shared repositories.
Create and manage shared repositories, virtual disks, and their virtual machines, including all of the underlying architecture shown in the figure, with Oracle Appliance Manager commands.
Managing Shared Repositories and Virtual Disks on Oracle Database Appliance Virtualized Platform
To create a shared repository, use the oakcli create repo command to identify the repository name, the disk group to use for its storage (DATA or RECO), and its size (in Gigabytes). Once you have created a shared repository, start the repository with the oakcli start repo command to make the storage available before assigning a virtual machine to the repository. Note that this command will also start any virtual machines assigned to the repository that are defined to be automatically started. The oakcli start repo command has a required parameter for shared repositories to identify the node where the repository needs to be started.
Other Oracle Appliance Manager shared repository commands, including commands to show and to stop (dismount) existing repositories, are similar to to those used for non-shared repositories, but require a parameter to identify the node. Unlike the default repositories, which are permanent, you may delete a shared repository that has no active (mounted) virtual machines.
Note:
Do not issue an oakcli stop repo command while virtual machines are still active in the repository for the selected node.The following commands have additional options for managing virtual machines on shared repositories:
-
Include a
-prefnodeclause, to identify the node where you want the virtual machine to run by default, and a-failoverclause, to indicate if you want the virtual machine to use the other node when the preferred node is not available (either at startup or while already active).Note:
If your virtual machine is assigned to a specific CPU pool and is allowed to failover, then the virtual machine will try to use the same CPU pool on the secondary node. If the CPU pool exists but is a different size, then the performance of your virtual machine might be impacted when running on the secondary node. If the assigned CPU pool does not exist on the secondary node, then the virtual machine will not fail over. -
Use the name of the shared repository in the
-repoclause and include a-nodeclause to identify the node on which you want to perform the cloning process. -
Use the name of the shared repository in the
repoclause and include the-incsizeparameter to increase the size of the repository. The number you provide in the -incsize clause defaults to gigabytes but you can changed the unit to megabytes by appendingMto the size. -
Use the name of the shared repository in the
-repoclause and include a-nodeclause to identify the node where you want to import a template or an assembly.
To create a virtual disk within a shared repository, use an oakcli create vdisk command to define the size of the virtual disk, the shared repository in which it will reside, a unique name within that shared repository, and whether or not the virtual disk can be shared by multiple virtual machines.
After you create one or more virtual disks, you can see information about them all using an oakcli show vdisk command. To see details about an individual virtual disk, use the same command but include the virtual disk name and a -repo clause to name the shared repository where you created the virtual disk. You may also clone virtual disks using an oakcli clone vdisk clone_vdisk -repo repo_name -src src_vdisk command, where clone_vdisk is the name to assign to the cloned virtual disk, repo_name is the repository where the original virtual disk resides, and src_vdisk is the name of the virtual disk that you are cloning.
You can also delete a virtual disk with an oakcli delete vdisk command that includes the virtual disk name and a -repo clause to name shared repository.
The section "Examples of Oracle Appliance Manager Commands for Shared Repositories, Virtual Disks, and Virtual Machines" contains examples of commands used to manage shared repositories and virtual disks.
Examples of Oracle Appliance Manager Commands for Shared Repositories, Virtual Disks, and Virtual Machines
- Example 1 Create a Shared Repository
-
This command creates a shared repository named
repo1in the ASM DATA disk group with 30 gigabytes of available storage:oakcli create repo repo1 -dg data -size 30
- Example 2 Show the Status of All Shared Repositories
-
This command displays information about all existing repositories, which includes the default, local repositories as well as the shared repositories:
oakcli show repo

      NAME                      TYPE          NODENUM  FREE SPACE     STATE

      odarepo1                  local          0              N/A     N/A
      odarepo2                  local          1              N/A     N/A
      repo1                     shared         0           68.25%     ONLINE
      repo1                     shared         1           68.25%     ONLINE
      repo2                     shared         0              N/A     OFFLINE
      repo2                     shared         1           89.83%     ONLINE
- Example 3 Start a Shared Repository
-
This command starts the shared repository named repo1 on Node 1:
oakcli start repo repo1 -node 1
- Example 4 Stop a Shared Repository
-
This command stops the shared repository named repo1 on Node 0:
oakcli stop repo repo1 -node 0
- Example 5 Show the Status of Named Shared Repository
-
This command displays information from Node 1 about the shared repository named repo1:
oakcli show repo repo1 -node 1

Resource: repo1_1
        AutoStart       :       restore
        DG              :       DATA
        Device          :       /dev/asm/repo1-286
        ExpectedState   :       Online
        FreeSpace       :       87.703125M
        MountPoint      :       /u01/app/repo1
        Name            :       repo1_0
        Node            :       all
        RepoType        :       shared
        Size            :       30720
        State           :       Online
        Version         :       2
- Example 6 Delete a Shared Repository
-
This command deletes the shared repository named repo1 if the repository is offline (stopped) on both nodes:
oakcli delete repo repo1
- Example 7 Import Virtual Machine Templates from an External Repository Assembly into a Shared Repository
-
This command imports virtual machine templates contained in an external repository template assembly file. Note the single quotation marks that enclose the URL. Assuming that the assembly contains three different templates, they are assigned the names
myol6u_15gb1,myol6u_15gb2, andmyol6u_15gb3, and they are imported into the shared repository, repo2, on Node 1.oakcli import vmtemplate myol6u_15gb -assembly 'http://example.com/assemblies/OEL6/OVM_OL6U1_x86_PVHVM_15GB.ova' -repo repo2 -node 1
- Example 8 Create a Virtual Machine from a Template in a Shared Repository
-
This command creates a virtual machine named
myol6u_testfrom the virtual machine template named myol6u_15gb1, which is stored in shared repository named repo2 on Node 0.oakcli clone vm myol6u_test -vmtemplate myol6u_15gb1 -repo repo2 -node 0
Note:
The-nodeclause identifies the node where the cloning activity is to be run. Also, the node value does not assign the default startup node for the virtual machine, this assignment is set by theoakcli configure vmcommand. - Example 9 Configure a Virtual Machine for Use on a Shared Repository
-
This command sets values for specific resources in the virtual machine named myol16u_test:
-
number of CPUs assigned to the virtual machine when started (vcpu)
-
CPU access priority (cpuprio)
-
maximum percentage of a CPU's capacity that will be assigned to the virtual machine (cpucap)
-
amount of memory assigned when the virtual machine starts up (memory)
-
the node where the virtual machine would normally start automatically when the shared repository is started or when the virtual machine is started manually (prefnode)
-
enable automatic failover if the default node (prefnode) is not available (failover)
These values will override values assigned to these same parameters in the virtual template from which this virtual machine was derived. The virtual machine will use default values for parameters that are not defined in either the parent template or in a configuration command.
oakcli configure vm myol16u_test
-vcpu 2 -cpuprio 150 -cpucap 20 -memory 1G
-prefnode 0 -failover true
-
- Example 10 Create a Virtual Disk for Use in a Shared Repository
-
This command creates a virtual disk named sdisk1 in the repo2 shared repository with a size of 1 gigabyte and the ability to be shared by virtual machines:
oakcli create vdisk sdisk1 -repo repo2 -size 1G -type shared
- Example 11 Attach a Virtual Disk to a Virtual Machine
-
This command attaches the virtual disk named sdisk1, as created in Example 11, to the virtual machine named
myol6u_testin the repo2 shared repository, as created in Example 8:oakcli modify vm myo16u_test -attachvdisk sdisk1
About Virtual Machine Templates and Assemblies on Oracle Database Appliance Virtualized Platform
Import and configure virtual machine templates as the source for the virtual machines deployed on Oracle Database Appliance Virtualized Platform. If you have created shared repositories, then import templates into the desired repository, otherwise import templates into the local repository on the desired node.
You might also import assemblies that contain one or more templates. When you import a template or assembly into a shared repository, identify the node that will perform the operation. Avoid overworking a busy node by selecting the node carefully. The repository will be available to both nodes no matter which node performs the import.
Templates imported into local nodes use the repository name supplied in the import command to identify the node that will complete the import and provide the storage. On Node 0, the local repository is named odarepo1 and on Node 1, the local repository is named odarepo2..If you want to import a template to both local repositories, then you must provide a different template name when you import the template into the second node.
Note:
You cannot create or clone templates directly on Oracle Database Appliance Virtualized Platform. Find virtual machine templates athttp://edelivery.oracle.com/linux.If you import an assembly that contains more than one template, then the command automatically modifies the template name that you provide so that all template names remain unique. The first template will have the number "1" appended to the name, the second template will have the number "2" appended, and so on.
Once you have imported a virtual machine template, you can customize the template with Oracle Appliance Manager commands. For details about all the commands to manage virtual machines, see the section "Managing Virtual Machine Templates and Assemblies on Oracle Database Appliance Virtualized Platform".
Managing Virtual Machine Templates and Assemblies on Oracle Database Appliance Virtualized Platform
Use Oracle Appliance Manager import commands to store and name virtual machine templates for Oracle Database Appliance Virtualized Platform. Customize and manage the templates with additional Oracle Appliance Manager commands.
Examples of the commands described in this section are available in "Examples of Oracle Appliance Manager Virtual Machine Templates and Assembly Management Commands".
Importing Virtual Machine Templates
Use the Oracle Appliance Manager oakcli import vmtemplate command to import virtual machine templates and assemblies. You can import virtual machine templates and assemblies directly from a remote repository using a URL to identify the source of the files. Optionally, use a remote copy command to copy files from the remote repository into your Dom0 /OVS directory and then import the files using the path and names to identify the downloaded files.
Note:
When importing templates or assemblies to a local repository, do not use the-node clause. The target node is implicit in the name of the repository.Displaying and Modify Virtual Machine Template Configurations
Once you have imported a virtual machine template to a storage repository, examine the template configuration parameters with the Oracle Appliance Manager oakcli show vmtemplate command. If you need to reconfigure the template for specific requirements, then use the Oracle Appliance Manager oakcli configure vmtemplate command. This is useful if you plan to deploy multiple virtual machines with the same characteristics from a single template. If you will be deploying only one virtual machine or many virtual machines but with different characteristics, then set required values in the virtual machines with the oakcli configure vm command after you deployed the template.
Listing Stored Virtual Machine Templates
To find all your stored virtual machine templates, use the Oracle Appliance Manager oakcli show vmtemplate command with no parameters. If you no longer need a template that you previously stored, then remove the template from the repository with the Oracle Appliance Manager oakcli delete vmtemplate command.
Examples of Oracle Appliance Manager Virtual Machine Templates and Assembly Management Commands
- Example 1 Import a Virtual Machine Template from Dom0
-
This command imports a virtual machine template that is defined in the file named
OVM_OL5U5_X86_64_PVM_10GB.tgz. This file was previously copied from an external template repository into the/OVSfile system on Dom0. The template is assigned the namemyol5u1and is imported into the repository on Node 0.oakcli import vmtemplate myol5u -files /OVS/OVM_OL5U5_X86_64_PVM_10GB.tgz -repo odarepo1
- Example 2 Import a Virtual Machine Template Using an External Repository URL
-
This command imports a virtual machine template file named
OVM_OL5U7_X86_64_PVM_10GB.tgzfrom an external template repository. Note the single quotation marks that enclose the URL. The templates is assigned the namemyol5u7_10gband is imported into the repository on Node 1.oakcli import vmtemplate myol5u7_10gb -files 'http://example.com/vmtmplt/OEL5/OVM_OL5U7_X86_64_PVM_10GB.tgz' -repo odarepo2
- Example 3 Import Virtual Machine Templates from an External Repository Assembly
-
This command imports virtual machine templates contained in an external template repository assembly file. Note the single quotation marks that enclose the URL. Assuming that the assembly contains three different templates, they are assigned the names
myol6u_15gb1,myol6u_15gb2, andmyol6u_15gb3, and they are imported into the repository on Node 1.oakcli import vmtemplate myol6u_15gb -assembly 'http://example.com/assemblies/OEL6/OVM_OL6U1_x86_PVHVM_15GB.ova' -repo odarepo2
- Example 4 Configure a Virtual Machine Template
-
This command sets values for specific resources in the virtual machine template named myol5u7_10gb:
-
Number of CPUs assigned when the virtual machine starts up (vcpu)
-
Maximum number of CPUs that can be assigned to the virtual machine (maxvcpu)
-
Maximum percentage of a CPU's capacity that will be assigned to the virtual machine (cpucap)
-
Amount of memory assigned when the virtual machine starts up (memory)
-
Maximum amount of memory that can be assigned to the virtual machine (maxmemory)
-
Operating system used by the virtual machine (os)
These values will become the default values for any virtual machine cloned from this template, although you can change any or all them later with the Oracle Appliance Manager
oakcli configure vmcommand.oakcli configure vmtemplate myol5u7_10gb -vcpu 2 -maxvcpu 4 -cpucap 40 -memory 1536M -maxmemory 2G -os OTHER_LINUX
-
- Example 5 Configure Network Information in a Virtual Machine Template
-
This command sets net1 as the network used to access a virtual machine cloned from the myol5u7_10gb virtual machine template.
oakcli modify vmtemplate myol5u7_10gb -addnetwork net1
- Example 6 List the Existing Virtual Machine Templates
-
This command displays the name and repository for each virtual machine template as well as the default number of CPUs and default amount of memory that Oracle Database Appliance Virtualized Platform would assign to a virtual machine created from the template.
oakcli show vmtemplate
- Example 7 Show Configured Values for a Virtual Machine Template
-
This command displays the values for the configurable options in the virtual machine template named myol5u7_10gb.
oakcli show vmtemplate myol5u7_10gb
- Example 8 Remove a Virtual Machine Template
-
This command removes the virtual machine template named myol6u_15gb3 from Oracle Database Appliance Virtualized Platform.
oakcli delete vmtemplate my0l6u_15gb3
About Virtual Machines on Oracle Database Appliance Virtualized Platform
Deploy virtual machines on Oracle Database Appliance Virtualized Platform to run applications and other software on CPUs that are independent of Oracle Database software running in ODA_BASE. Use Oracle Appliance Manager to create and manage virtual machines, including starting and stopping them, and opening consoles for GUI access.
Note:
You can use a VNC session to open a GUI console for a virtual machine.You create ("clone") virtual machines from imported templates (or assemblies) or else from an existing virtual machine. In the former case, your virtual machine can be a complete clone of the contents of the template or assembly, or it can be a snap clone, which contains only the metadata of the virtual machine definition. In the latter case, all copies of existing virtual machines must be snap clones, either of a complete virtual machine or a snap clone.
You can clone virtual machines that have attached virtual disks. In such cases, a clone of a virtual machine will contain the contents of virtual disks attached locally but not of virtual disks attached in shared mode. If needed, clone the virtual disks required by a cloned virtual machine in a separate step.
Note:
Creating snap clones is a very fast operation compared to cloning the entire template or assembly. However, if you update the contents of a snap clone, your system will acquire additional storage for the clone to retain the original content as well as the changed content, unless the changes are on shared virtual disks.Unless you are using local repositories, you could set high-availability options for your virtual machines. These include identifying the node where the virtual should be started by default and whether the virtual machine should be failed over to the other node. Failover can occur if the node where the virtual is already running should fail or if the preferred node is not available when the virtual attempts to start.
Although it is possible to reconfigure an active virtual machine, your changes would not take effect until you stopped and restarted the virtual machine. You can also display high level information about all of your virtual machines or detailed information about the configuration of single virtual machines. When you no longer have use for a particular virtual machine, then delete the virtual machine to regain storage.
For details about the commands you use to manage virtual machines, see "Managing Virtual Machines on Oracle Database Appliance Virtualized Platform".
See Also:
Oracle Database Appliance Release Notes for the version of Oracle VM supported by each release of Oracle Database Appliance. Oracle Database Appliance Virtualized Platformsupports all guest operating systems provided by the supported version of Oracle VM. Find the supported guest operating systems in the related Oracle VM Release Notes.Managing Virtual Machines High Availability on Oracle Database Appliance Virtualized Platform
A system that is highly available is designed to provide uninterrupted computing services during essential time periods, during most hours of the day, and most days of the week throughout the year. Reliability, recoverability, timely error detection, and continuous operations are primary characteristics of a highly available solution. Two essential parts of high availability are automatic restart and failover.
A virtual machine automatically restarts after a hardware or software failure or whenever your database host computer restarts. Using the oakcli configure vm command, you can start a virtual machine on a preferred node by setting the -prefnode parameter.
Failover lets the virtual machine be restarted on the other node with no manual intervention in the event of an unplanned node failure. The -failover parameter, used with the oakcli configure vm command, enables a virtual machine to fail over from one node to another.
Managing Virtual Machines on Oracle Database Appliance Virtualized Platform
Create and manage user domain virtual machines on Oracle Database Appliance Virtualized Platform using Oracle Appliance Manager commands. Access your active virtual machines using the command line (after configuring the virtual machine with commands similar to those in Example 7 later in this section) or GUI VM consoles opened with Oracle Appliance Manager.
Use Oracle Appliance Manager commands for the following tasks:
-
Creating an image for a new virtual machine
Use the
oakcli clone vmcommand to create an image for a new virtual machine on Oracle Database Appliance. By default, the image inherits the content and configuration information from the template or from the virtual machine that you are cloning and resides in the same repository as the source. To create a snap clone, which will only contain the configuration metadata, include the-snapclause in theoakcli clonecommand.Unless you are using local repositories for your virtual machines, include the
-nodeclause in theoakcli clonecommand to identify the node that should run the cloning process. To create a snap clone, include the-snapclause in theoakcli clonecommand. -
Displaying and Modifying virtual machine configurations
To see the current configuration of a virtual machine image, use the Oracle Appliance Manager
oakcli show vmcommand. If you need to make changes to the configuration, such as setting high-availability options, then run the Oracle Appliance Manageroakcli configure vmcommand.Note:
CPU capacity is controlled either by the CPU pool assigned to a virtual machine (by the-cpupoolparameter), or by the default_unpinned_pool if the virtual machine is configured without a-cpupoolparameter.Note:
If you reconfigure a virtual machine that is currently running, then your changes will not be effective until you stop and restart the virtual machine. -
Starting and stopping virtual machines
When you are ready to start a virtual machine on Oracle Database Appliance Virtualized Platform, run the Oracle Appliance Manager
oakcli start vmcommand Similarly, to stop a virtual machine, run theoakcli stop vmcommand. -
Sending messages to active virtual machines
New Oracle Virtual Machine Templates include a utility, Oracle VM Guest Additions (ovmd) that provides a messaging interface for first-boot installation configuration. To send such messages to a virtual machine on Oracle Database Appliance Virtualized Platform, use the
oakcli modify vmcommand with the-sparameter, where the argument for the parameter is list of parameters enclosed in single or double quotation marks. The elements in the list are key and value pairs with a colon delimiter to separate the pair of values and a semi-colon to separate value pairs from each other. The following example has two value pairs.oakcli modify vm vmo16u3 -s 'com.oracle.linux.network.device.0:eth0;com.oracle.linux.network.ipaddr.0:192.1.2.18'
See Also:
The section Using the Oracle VM Guest Additions in Oracle VM Utilities Guide for x86 for more information about ovmd, and the Oracle VM Guest Additions. -
Accessing an active virtual machine
To open a GUI virtual machine console for an active virtual machine, run the Oracle Appliance Manager
oakcli show vmconsolecommand. If the console does not display correctly, then close the console, set the DISPLAY environment variable to an appropriate value for your monitor, and then rerun theoakcli show vmconsolecommand.You can also configure your virtual machine (using
oakcli modify vmcommands with the-sparameter) to allow access from the Oracle Database Appliance command line instead of a virtual machine console. -
Listing the virtual machines in your repositories
Display a list your existing virtual machines, including some basic information about each one, with the Oracle Appliance Manager
oakcli show vmcommand. -
Adding a virtual disk to or removing a virtual disk from a virtual machine
Use an
oakcli modify vmvirtual_machine_namecommand with an-attachvdiskor a-detachvdiskclause that names the virtual disk to add or remove the virtual disk. -
Removing a virtual machine from a repository
Remove an unwanted virtual machine with the Oracle Appliance Manager
oakcli delete vmcommand.
For examples of the commands to manage virtual machines described in this section, see "Examples of Oracle Appliance Manager Virtual Machine Commands".
Examples of Oracle Appliance Manager Virtual Machine Commands
- Example 1 Create a Virtual Machine Image from a Template
-
This command creates a complete virtual machine image named
myol15u_testfrom the virtual machine template namedmyol15uwhich is stored in the shared repositoryshrepoon Node 0.oakcli clone vm myol15u_test -vmtemplate myol5u -repo shrepo -node 1
- Example 2 Create a Snap Clone from a Template
-
This command creates a snap clone named
myol15u_snapfrom the virtual machine template namedmyol15u.oakcli clone vm myol15u_snap -vmtemplate myol5u -snap
- Example 3 Create a Snap Clone of an Existing Virtual Machine
-
This command creates a snap clone named
myol15u_test1from a virtual machine namedmyol15u_test.oakcli clone vm myol15u_test1 -vm myol5u_test1 -snap
- Example 4 Configure a Virtual Machine
-
This command sets values for specific resources in the virtual machine named myol5u_test:
-
Number of CPUs assigned to the virtual machine when started (vcpu)
-
CPU access priority (cpuprio)
-
Maximum percentage of a CPU's capacity that will be assigned to the virtual machine (cpucap)
-
Amount of memory assigned when the virtual machine starts up (memory)
-
CPU pool to be assigned to the virtual machine (cpupool)
-
Definition of the keyboard type to be used for virtual machine access (keyboard)
-
Definition of the mouse type to be used for virtual machine access (mouse)
These values will override values assigned to these same parameters in the virtual template from which this virtual machine was derived. The virtual machine will use default values for parameters that are not defined in either the parent template or in a configuration command.
oakcli configure vm myol5u_test
-vcpu 2 -cpuprio 150 -cpucap 20 -memory 1G
-cpupool linpool -keyboard en-us -mouse USB_MOUSE
Note:
CPU capacity is controlled by the CPU pool assigned to a virtual machine by either the-cpupoolparameter or by the default_unpinned_pool (if the virtual machine is not configured with a-cpupoolparameter). Values for-vcpuand-maxcpuparameters that are larger than the number of CPUs in the assigned CPU pool are ignored. -
- Example 5 List the Existing Virtual Machine Images
-
This command displays the name, the repository, and the current state (online or offline) for each virtual machine. The output also contains the default number of CPUs and default amount of memory that Oracle Database Appliance Virtualized Platform will assign to each virtual machine.
oakcli show vm
- Example 6 Show Configured Values for a Virtual Machine
-
This command displays the definition of a virtual machine named myol5u_test. The output contains the current values for all of the configurable parameters along with additional information such as the virtual machine autostart setting.
oakcli show vmtemplate myol5u_test
- Example 7 Start a Virtual Machine
-
This command starts the virtual machine named myol5u_test.
oakcli start vm myol5u_test
- Example 8 Open a VM Console for a Virtual Machine
-
This command opens a GUI VM console window to an active virtual machine named myol5u_test.
oakcli show vmconsole myol5u_test
Note:
Theoakcli show vmconsolecommand requires a valid definition for the DISPLAY environment variable to work correctly. - Example 9 Set Up a Virtual Machine for Access from eth0 Using an IP Address
-
The following set of commands configures the virtual machine vmol6u3 (which has ovmd) with the IP address 192.168.16.51 for the eth0 interface and sets the
rootpassword topassword123a.oakcli clone vm vmol6u3 -vmtemplate ol6u3 -repo shrepo -node 0 oakcli modify vm vmol6u3 -addnetwork priv1 oakcli start vm vmol6u3 oakcli modify vm vmol6u3 -s 'com.oracle.linux.network.device.0:eth0' oakcli modify vm vmol6u3 -s 'com.oracle.linux.network.onboot.0:yes' oakcli modify vm vmol6u3 -s 'com.oracle.linux.network.bootproto.0:static' oakcli modify vm vmol6u3 -s 'com.oracle.linux.network.ipaddr.0:192.168.16.51' oakcli modify vm vmol6u3 -s 'com.oracle.linux.network.netmask.0:255.255.255.0' oakcli modify vm vmol6u3 -s 'com.oracle.linux.root-password:password123'
- Example 10 Add a Virtual Disk to a Virtual Machine
-
This command adds a virtual disk named sdisk1 to the virtual machine named myol5u_test.
oakcli modify vm myol5u_test -attachvdisk sdisk1
- Example 11 Stop a Virtual Machine
-
This command stops the virtual machine named myol5u_test.
oakcli stop vm myol5u_test
- Example 12 Remove a Virtual Machine
-
This command removes the virtual machine named myol5u_test from Oracle Database Appliance Virtualized Platform.
oakcli delete vm my0l5u_test
About CPU Pools on Oracle Database Appliance Virtualized Platform
Isolate workloads by creating CPU pools and assigning (pinning) virtual machines to a specific CPU pool. When you pin a virtual machine to a CPU pool, you ensure that the virtual machine will use CPUs in that pool only.
When Oracle Database Appliance Virtualized Platform is configured, a default-unpinned-pool is created on each node. The size of this pool depends on the hardware model as follows:
-
On Oracle Database Appliance X5-2 Virtualized Platform, the default-unpinned-pool contains 72 CPUs
-
On Oracle Database Appliance X4-2 Virtualized Platform, the default-unpinned-pool contains 48 CPUs
-
On Oracle Database Appliance X3-2 Virtualized Platform, the default-unpinned-pool contains 32 CPUs
-
On Oracle Database Appliance Version 1 Virtualized Platform, the default-unpinned-pool contains 24 CPUs.
When you create the ODA_BASE domain, a new CPU pool, named odaBaseCpuPool, is created on both nodes and the required CPUs are removed from the default-unpinned-pool. ODA_BASE is the only domain allowed to use the CPUS in the odaBaseCpuPool. When you start other virtual machines they run on CPUs that were left in the default-unpinned-pool, effectively ODA_BASE from the work being done by other virtual machines.
You might also cage groups of virtual machines by creating additional CPU pools. These additional pools enable you to pin a virtual machine, or a set of machines, to its own CPU pool. Virtual machines running in a specific CPU pool do not share CPU cycles with virtual machines running in other CPU pools. Define as many CPU pools as you want, up to the number of available CPUs on your system.
If your application requirements change over time, resize, add, or drop CPU pools as needed. Resize ODA_BASE if necessary, although this requires a special command that also updates your Oracle Database Appliance Virtualized Platform license. See the section "Resizing ODA_BASE" for details.
A CPU pool can have a different size on each node (except for the odaBaseCpuPool), as shown by the following oakcli show cpupool commands, one for each node:
oakcli show cpupool -node 0
                 Pool                         Cpu List
default-unpinned-pool   [14, 15, 16, 17, 18, 19, 20, 2
                                            1, 22, 23]
               twocpu                         [12, 13]
       odaBaseCpuPool   [0, 1, 2, 3, 4, 5, 6, 7, 8, 9,
                                               10, 11]
oakcli show cpupool -node 1
                 Pool                         Cpu List
default-unpinned-pool   [12, 13, 14, 15, 16, 17, 18, 1
                                    9, 20, 21, 22, 23]
       odaBaseCpuPool   [0, 1, 2, 3, 4, 5, 6, 7, 8, 9,
                                                10,11]
For commands to manage CPU pools, other than odaBaseCpuPool, see "Managing CPU Pools on Oracle Database Appliance Virtualized Platform".
A CPU can belong to one and only one CPU pool, although you can assign multiple virtual machines to a CPU pool. A CPU pool becomes over-subscribed when the virtual machines that are active in the pool require more CPUs than you configured for the pool. For example, if a CPU pool has four CPUs, then you might start two virtual machines that have been defined to use four CPUs each. In this case, the CPU pool is over-subscribed because each of the four CPUs is supporting two virtual machines. Similarly, if you stop one of those virtual machines but start another one that requires two CPUs, then the CPU pool is still over-subscribed because two of the CPUs are supporting both virtual machines. When over-subscribing a CPU pool, you need to assess the performance of the virtual machines in that pool. You should be prepared to re-assign one or more virtual machines to a different CPU pool if sharing an over-subscribed pool degrades performance to unacceptable levels.
Managing CPU Pools on Oracle Database Appliance Virtualized Platform
Use Oracle Appliance Manager commands to manage CPU pools on each node of Oracle Database Appliance Virtualized Platform.
The actions you could perform on CPU pools include:
-
Creating additional CPU pools with the Oracle Appliance Manager
oakcli create cpupoolcommand. -
Changing the number of CPUs allocated to a CPU pool with the Oracle Appliance Manager
oakcli configure cpupoolcommand. -
Examining your existing CPU pools with the Oracle Appliance Manager
oakcli show cpupoolcommand. -
Pinning a virtual machine to a specific CPU pool with the
-cpupooloption of the Oracle Appliance Manageroakcli configure vmcommand. You can pin multiple virtual machines to the same CPU pool.
See examples of the commands discussed in this section in "Examples of Oracle Appliance Manager CPU Pool Management Commands".
Examples of Oracle Appliance Manager CPU Pool Management Commands
- Example 1 Create a New CPU Pool on Oracle Database Appliance Virtualized Platform
-
This command creates CPU pool named winpool with 4 CPUs on Node 0.
oakcli create cpupool winpool -numcpu 4 -node 0
- Example 2 Change the Number of CPUs Assigned to a CPU Pool on Oracle Database Appliance Virtualized Platform
-
This command changes the number CPUs assigned to the CPU pool named linpool on Node 1. The new number of CPUs will be six after the command runs.
oakcli configure cpupool linpool -numcpu 6 -node 1
- Example 3 Show the CPU Pools Configured on Oracle Database Appliance Virtualized Platform Nodes
-
This command displays the CPUs assigned to each defined CPU pool on Node 0. The command also lists the virtual machines, if any, assigned to each CPU pool.
oakcli show cpupool -node 0
- Example 4 Assign a Virtual Machine to a CPU Pool on Oracle Database Appliance Virtualized Platform
-
This command pins the virtual machine named wintest to the CPU pool named winpool.
oakcli configure vm wintest -cpupool winpool
Note:
You do not manage odaBaseCpuPool withoakcli cpupool commands. Instead, you have to use commands that configure ODA_BASE, as discussed in "Resizing ODA_BASE".About Network Infrastructure and Virtual Local Area Networks on Oracle Database Appliance Virtualized Platform
To specify which network should access a virtual machine, you employ network infrastructure components of Oracle Database Appliance Virtualized Platform. This section describes these infrastructure components.
Oracle Database Appliance Virtualized Platform manages all the high level network infrastructure components for you by precreating the bonds and bridges for all networks. The front end point for accessing a virtual machine will be one of the bridges defined for Dom0.
The following tables show the default network interfaces and are categorized by hardware as listed here:
-
Table 3-1 and Table 3-2 list the default network interfaces for Oracle Database Appliance Virtualized Platform on systems with a storage shelf.
-
Table 3-3 lists the default network interfaces for Oracle Database Appliance Virtualized Platform on systems without a storage shelf.
In all cases, connections to user domains are through the selected interfaces.
Table 3-1 Oracle Database Appliance Virtualized Platform Dual Port 10-GbE Network Interfaces
| Interfaces at Dom0 | Bond Devices at Dom0 | Bridge in Dom0 | Interfaces in ODA_BASE Domain |
|---|---|---|---|
|
icbond0 |
priv1 |
eth0 |
Table 3-2 Oracle Database Appliance Virtualized Platform On Board Quad Port 10-GbE Network Interfaces
| Interfaces at Dom0 | Bond Devices at Dom0 | Bridge in Dom0 | Interfaces in ODA_BASE Domain |
|---|---|---|---|
|
bond0 |
net1 |
eth1 |
|
bond1 |
net2 |
eth2 |
Note:
If you define a fiber public network connection, then bond0 is configured on PCIe boards.Table 3-3 Oracle Database Appliance Version 1 Virtualized Platform Network Interfaces
| Type | Interfaces at Dom0 | Bond Devices at Dom0 | Bridge in Dom0 | Interfaces in ODA_BASE Domain |
|---|---|---|---|---|
|
Private |
eth0 eth1 |
bond0 |
priv1 |
eth0 |
|
On Board Public |
eth2 eth3 |
bond1 |
net1 |
eth1 |
|
1st Pair Quad Port |
eth4 eth5 |
bond2 |
net2 |
eth2 |
|
2nd Pair Quad Port |
eth6 eth7 |
bond3 |
net3 |
eth3 |
|
eth8 eth9 |
xbond0 |
net4 |
eth4 |
Note:
If you define a fiber public network connection, then bond0 is configured on PCIe boards.When you configure a virtual machine, you define which network the virtual machine should use by identifying the related bridge. For example, to connect a virtual machine named myvm1 to the net1 network, you would use the following command:
oakcli modify vm myvm1 -addnetwork net1
Figure 3-3 Basic Virtual Machine Local Area Network
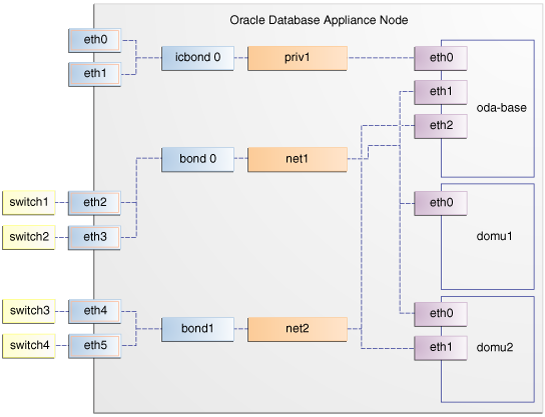
Description of "Figure 3-3 Basic Virtual Machine Local Area Network"
Figure 3-3 shows a typical Oracle Database Appliance configuration based on the preceding information.
During the installation and configuration of Oracle software on Oracle Database Appliance Virtualized Platform, you had an opportunity to assign default Virtual Local Area Networks (VLANs) to ODA_BASE. Figure 3-4, "Oracle Database Appliance Virtualized Platform with Virtual Local Area Networks" shows a typical Oracle Database Appliance configuration using VLANs. The figure shows the same configuration as Figure 3-3 but with three tagged VLANs added for backups (backup), for applications (application), and for management (mgnt).
Figure 3-4 Oracle Database Appliance Virtualized Platform with Virtual Local Area Networks
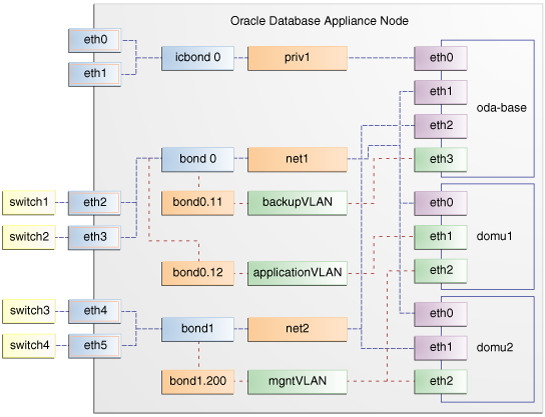
Description of "Figure 3-4 Oracle Database Appliance Virtualized Platform with Virtual Local Area Networks"
The following section, "Managing Virtual Local Area Networks on User Domains and on ODA_BASE", describe how to create new or remove existing VLANs in ODA_BASE and in your user domains respectively.
Managing Virtual Local Area Networks on User Domains and on ODA_BASE
Manage VLANs with Oracle Appliance Manager commands that are fully documented in Chapter 5, "Oracle Appliance Manager Command-Line Interface." To manage VLANs for user domains, log into ODA_BASE, and to manage VLANs for ODA_BASE, log into Dom0. The examples in this section use a VLAN named sample10.
Note:
You can create VLANs from Dom0 only before your deployment of Oracle Database Appliance or Oracle Database Appliance Virtualized Platform.Creating a Virtual Local Area Network
To create a VLAN, use the oakcli create vlan command. You need to provide the following information to create a VLAN:
-
VLAN name that is unique on the node where the VLAN is created (but which can be the same as a VLAN name on the other node of Oracle Database Appliance Virtualized Platform)
-
VLAN tag number between 2 to 4096 inclusive that is unique on the node where the VLAN is created (but which can be the same as a VLAN tag number on the other node of Oracle Database Appliance Virtualized Platform)
-
Name of the interface on which the VLAN is to be created. Find the available interfaces for your hardware listed in the Bond Devices at Dom0 column in either Table 3-2 or Table 3-3.
-
Node on which to create the VLAN
Note:
Create the same VLAN on both nodes, if needed, by issuing theoakcli create vlan command twice, once for node 0 and once for node 1.The following example shows one option for creating the sample10 VLAN on node 0:
oakcli create vlan sample10 -vlanid 10 -if bond0 -node 0
WARNING:
If you are planning to use a VLAN with a virtual machine created in a shared repository, then you should create that VLAN on both nodes. A virtual machine fails if an assigned network is not available on the node where the virtual machine is trying to run by default or following a failover.
Assigning and Removing a Virtual Local Area Network for a User Domain
Use the oakcli modify vm command with an -addnetwork clause to assign an existing VLAN to a virtual machine and with a -deletenetwork clause to remove a VLAN from a virtual machine. The clauses must also contain the name of the VLAN.
The following example shows how to assign the sample10 VLAN to the myol5u_test virtual machine:
oakcli modify vm myol5u_test -addnetwork sample10
Assigning and Removing a Virtual Local Area Network for ODA_BASE
Use the oakcli configure oda_base command to add an existing VLAN to ODA_BASE or to remove a VLAN from ODA_BASE. Note that this command will also let you resize ODA_BASE and domain memory size. If you only want to manage VLANs, enter the number that corresponds to the number of your current CPU cores and current number for your memory.
In the following partial example, the CPU core count and default memory values are left unchanged, while the test01 VLAN is assigned to ODA_BASE. Note that the current CPU core count, 6, corresponds to selection number 3 in Core Licensing Options list of values.
# oakcli configure oda_base
Core Licensing Options:
        1. 2 CPU Cores
        2. 4 CPU Cores
        3. 6 CPU Cores
        4. 8 CPU Cores
        5. 10 CPU Cores
        6. 12 CPU Cores
        Current CPU Cores       :6
        Selection[1 : 6](default 12 CPU Cores) : 3
        ODA base domain memory in GB(min 8, max 88)(Current Memory 48G)[default 64]     : 48
INFO: Using default memory size i.e. 64 GB
Additional vlan networks to be assigned to oda_base? (y/n) [n]: y
Select the network to assign (test00,test01,test02,test03): test01
Additional vlan networks to be assigned to oda_base? (y/n) [n]:
Vlan network to be removed from oda_base (y/n) [n]:
INFO: . . .
Viewing and Deleting Virtual Local Area Networks
To see what VLANs currently exist in ODA_BASE, run the oakcli show vlan command. In the following example, we show a number of VLANs in addition to the sample10 VLAN used in previous examples:
oakcli show vlan

NAME                  ID    INTERFACE   NODENUM

net1                  1     bond0       0
net1                  1     bond0       1
net2                  1     bond1       0
net2                  1     bond1       1
net3                  2     bond1       0
net3                  4     bond0       1
net10                 20    bond1       0
net10                 20    bond1       1
To remove an unwanted VLAN from a node, use an oakcli delete vlan command, providing the VLAN name and the node number. The following command would remove the sample10 VLAN from node 0 (where the VLAN was assigned in the earlier oakcli create vlan example):
oakcli delete vlan sample10 -node 0
Resizing ODA_BASE
Increase the number of CPU cores assigned to the ODA_BASE domain on Oracle Database Appliance Virtualized Platform if you need more computing power or memory for your installed Oracle databases. Alternatively, decrease the CPU cores if you need more CPUs assigned to your virtual machine domains. You must increase or decrease the assigned CPU core count on each node by two or multiples of two.
Oracle recommends that you use templates to size the databases that you deploy in ODA_BASE, following the guidelines in Appendix A of Oracle Database Appliance Getting Started Guide. Sum the number of CPUs that these databases require, using the tables in that Appendix, and divide the value by two determine the number of CPU cores you will need for ODA_BASE.
Plan to change your ODA_BASE core count when there is no critical activity running on your Oracle databases. This is because the ODA_BASE domain shuts down during the resizing process. When you are ready to proceed, complete these steps:
-
Log onto Dom0 and run the
oakcli configure oda_basecommand as shown in this example, which changes the CPU core count from six to eight in ODA_BASE:# oakcli configure oda_base Core Licensing Options: 1. 2 CPU Cores 2. 4 CPU Cores 3. 6 CPU Cores 4. 8 CPU Cores 5. 10 CPU Cores 6. 12 CPU Cores Current CPU Cores :6 Selection[1 : 6](default 12 CPU Cores) : 10 ODA base domain memory in GB(min 8, max 88)(Current Memory 64G)[default 32] : INFO: Using default memory size i.e. 32 GB Additional vlan networks to be assigned to oda_base? (y/n) [n]: Vlan network to be removed from oda_base (y/n) [n] INFO: Node 0:Configured oda base pool INFO: Node 1:Configured oda base pool INFO: Node 0:ODA Base configured with new memory INFO: Node 0:ODA Base configured with new vcpus INFO: Changes will be incorporated after the domain is restarted on Node 0 INFO: Node 1:ODA Base configured with new memory INFO: Node 1:ODA Base configured with new vcpus INFO: Changes will be incorporated after the domain is restarted on Node 1 -
Perform any actions listed in the output from the command. Not all versions of the software, such as the one shown in the preceding example, require any additional actions before restarting ODA_BASE.
-
Restart the domain to implement the changed configuration for ODA_BASE by running the following restart command on Dom0 of both nodes:
oakcli restart oda_base