| Oracle® Communications Service Broker Online Mediation Controller Implementation Guide Release 6.0 Part Number E23527-02 |
|
|
View PDF |
| Oracle® Communications Service Broker Online Mediation Controller Implementation Guide Release 6.0 Part Number E23527-02 |
|
|
View PDF |
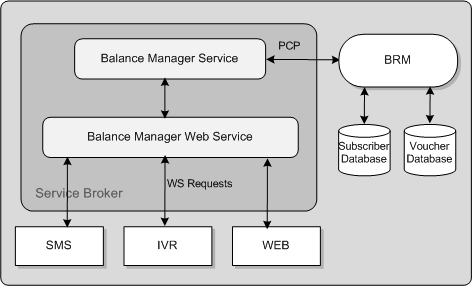
The Oracle Communications Service Broker Balance Manager provides a way to enable prepaid subscribers to check their account balances and replenish ("top up") their accounts either from stored payment account information or by redeeming a voucher.
This chapter describes the Balance Manager feature and the Balance Manager API.
The Balance Manager feature is implemented in Service Broker by a Balance Manager Service.
The Balance Manager Service integrates with Oracle Billing and Revenue Management (BRM) to access the subscriber billing accounts. Communication between the Balance Manager Service and BRM is over Portal Communications Protocol (PCP).
BRM authenticates the subscribers and maintains the subscriber billing accounts. All subscriber payment information, such as credit card and debit account numbers, is stored on BRM.
To check their balances, top up their account balances from their credit or debit accounts, and redeem vouchers, subscribers can interact with the Balance Manager applications using Interactive Voice Response (IVR), Short Message Service (SMS), or a Web interface. This chapter describes the procedures for implementing IVR and SMS support. It does not describe implementation of a Web interface, but such an interface would use the same Balance Manager Web Service APIs as the IVR and SMS interfaces.
The Balance Manager Web Service mediates between the IVR, SMS, or Web front ends and the Balance Manager Service. The Balance Manager Service translates the WS messages to PCP and communicates with BRM over PCP to perform the requested action in the prepaid accounts on BRM.
Figure 8-1 shows a high level overview of the Balance Manager in context with components that are external to Service Broker.
The Balance Manager applications perform four activities, encapsulated in the four methods in the Balance Manager API:
authenticate: Authenticates subscribers who want to check their balances or add funds to their accounts using payment resources stored on BRM.
check balance: Checks the balance in a subscriber account.
top up: Adds funds to ("tops up") an account using the subscriber's payment resources stored on BRM.
voucher top up: Adds funds to an account by redeeming a voucher.
See "Using the Balance Manager Web Services API" for more information about these methods.
If a subscriber approaches the credit limit configured for his account in BRM while on a call, the Balance Manager can request that the IRV service play a warning announcement or tone. If the subscriber's payment information is registered on BRM, the subscriber can top up his account immediately.
The Balance Manager feature supports using vouchers to add funds to a subscriber account. The subscriber redeems the voucher by sending the voucher information (for example, a scratch card number and PIN) to a short-code address supplied by the operator. The vouchers must have been previously registered with BRM.
Use of the Balance Manager assumes that the subscriber accounts in BRM are configured to use one or more payment methods (credit card, direct debit). You can set up subscriber payment methods in the BRM Customer Center.
Use of the voucher top-up feature also assumes that, if vouchers are to be accepted as payment, BRM has been configured for voucher payments and that the vouchers have been loaded into the BRM database. See the discussion of the Voucher Manager and the Voucher Administration Center in the Service Integration Components guide in the BRM documentation set for information about how to set up vouchers in BRM.
In addition to setting up BRM with subscriber payment information and vouchers, you must configure BRM for subscriber authentication.
Also, there are configuration tasks to perform in Service Broker to enable communication among the various components.
These generic configuration tasks are required for all interfaces to the Balance Manager (IVR, SMS, and Web) and for all the Balance Manager SMS applications: (Balance Manager SMS, Top up App. and Voucher Top-Up).
The generic configuration tasks are as follows:
In BRM, create an authentication service. See "Creating an Authentication Service" for details. This step is optional, because you can use an existing authentication service, if one exists, instead of creating a new one.
In BRM, create an authentication plan that incorporates the authentication service from step 1. This step is required. See "Creating an Authentication Plan" for details.
In BRM, for every subscriber, add the authentication plan to the subscribers' accounts. This step is required. See "Adding the Authentication Plan to Subscriber Accounts" for details.
In the Service Broker Administration Console, configure the authentication service for the application. This step is required. See "Configuring the Authentication Service for the Balance Manager Applications" for details.
In the Service Broker Administration Console, configure the Portal Communications Protocol Signaling Server Unit (PCP SSU) to enable communication between Service Broker and BRM. This step is required. See "Configuring the PCP SSU".
In the Service Broker Administration Console, configure the Web Services SSU HTTP incoming rule for the Balance Manager. This configuration directs Service Broker how to route Web Service messages to the Balance Manager. This step is required. See "Configuring the HTTP Incoming Rule for the Web Services SSU" for details.
In the Service Broker Administration Console, configure the credentials to enable clients of the Balance Manager SOAP Web Services to access Balance Manager API. See "Configuring Web Service Client Credentials" for details.
In the Service Broker Administration Console, configure the Balance Manager Web Service. See "Configuring the Balance Manager Web Service" for details.
In addition, there are several required configuration tasks required only for the Balance Manager application, which provides the SMS interface to the Balance Manager. See "SMS Configuration Tasks" for information about these configuration tasks.
BRM must be configured with an authentication service for the Balance Manager to use to authenticate subscribers. You can use an existing BRM authentication service, or you can create a new one.
To create a new authentication service in BRM:
Connect to the BRM Developer Center.
In the class browser, navigate to service/authentication.
Create a new storable class with no new fields under service/authentication.
It is not necessary to create any new fields because all the information that the Balance Manager needs are the LOGIN and PASSWORD fields, which already exist in the parent service class. The phone number parameter passed by the Balance Manager request maps to the LOGIN field in the BRM service and the PIN maps to the PASSWD field.
Click OK.
For more information about creating a new storable class, see the Online Help in the Storable Class Editor in the BRM Developer Center and the discussion of creating custom storable classes in the BRM documentation.
In BRM, create an authentication plan that incorporates the authentication service.
To create an authentication plan:
Connect to the BRM Pricing Center.
In the Pricing Center application, create a new plan.
In the Plan Attributes tab, click Actions - New Service.
The Service Deal dialog box appears.
In the Service Deal dialog box, select /service/authentication as the service type and <No deal> for the deal.
Click OK.
Click OK in the Plan Attributes tab to save the authentication plan.
For more information, see the discussion of creating plans in the BRM documentation about setting up rating and pricing.
Each subscriber account must be associated with the authentication plan.
To associate a subscriber with the authentication plan:
Connect to the BRM Customer Center.
Select the subscriber in the left panel.
In the Purchase Options list, select Add Plan.
Select the authentication plan to use for the Balance Manager from the list of plans.
Click through the Next buttons to Finish.
For more information about adding a new plan, see the discussion of adding a product with a new service in the BRM Customer Center Help.
To configure the authentication service for the Balance Manager feature:
In the Service Broker Administration Console, expand the OCSB node.
Expand the Processing Tier node.
Expand the Applications node.
Click the Lock and Edit icon.
Expand the Balance Manager node.
Click the BRM Authentication item.
In the Authentication Service field, enter the name of the BRM authentication service that the Balance Manager applications use to authenticate subscribers.
This is either a pre-existing authentication service in BRM or the one that you created for the Balance Manager. See "Creating an Authentication Service".
Click Apply.
The PCP SSU must be configured to enable communication between Service Broker and BRM.
To configure the PCP SSU, follow the instructions in the discussion of configuring PCP Signaling Server Units in the Oracle Communications Service Broker Signaling Domain Configuration Guide.
To set the HTTP incoming rule for the WS SSU:
In the Service Broker Administration Console, expand the OCSB node.
Expand the Signaling Tier node.
Click the Lock and Edit icon.
Expand the SSU Web Services node.
Click the General item.
Click the SSU WS tab.
Click the Incoming Routing Rules subtab.
Click New.
In the dialog box, set the incoming routing rules as follows:
Set the Name field to an incoming rule name of your choice.
Set the Service Name field to BalanceManagerService.
Set the Alias field to ssu:topup@ocsb/topup.
Click OK.
For more information, see the discussion of configuring routing rules for incoming Web Service messages in Oracle Communications Service Broker Signaling Domain Configuration Guide.
You can set up credentials to authenticate external Web Services clients for access to the Balance Manager Web Service.
To configure credentials for the Web Service:
In the Service Broker Administration Console, expand the OCSB node.
Expand the Signaling Tier node.
Click the Lock and Edit icon.
Expand the SSU Web Services node.
Click the General item.
Click the SOAP tab.
Click the Credential Store subtab.
Enter credentials for the Web Service client. See the discussion of authenticating SOAP requests with WSSE UsernameToken credentials in Oracle Communications Service Broker Signaling Domain Configuration Guide for detailed instructions on configuring credentials.
Credential checking is optional and disabled by default. To enable it, set the Authentication Method field in the Balance Manager endpoint to USERNAME_TOKEN, as described in the "Configuring the Balance Manager Web Service" section.
To configure the Balance Manager SOAP Web Service:
In the Service Broker Administration Console, expand the OCSB node.
Expand the Signaling Tier node.
Click the Lock and Edit icon.
Expand the SSU Web Services node.
Click the Balance Manager item.
Click the Balance Manager tab.
Click the End Point subtab.
Click New.
In the dialog box, set the Balance Manager endpoint as follows:
Set the URI field to /BalanceManagerService.
Set the Authentication Method field to either NONE or USERNAME_TOKEN.
The USER_NAME token is for WSSE Username Token security. As an alternative, you can authenticate credentials using HTTP Basic Auth. See the discussion of HTTP server security contexts in Oracle Communications Service Broker Signaling Domain Configuration Guide for information about using Basic Auth.
If the Authentication Method field is USERNAME_TOKEN, set the Username field to the user name of the service. This value is ignored if the Authentication Method is NONE.
If the Authentication Method field is USERNAME_TOKEN, set the Credential Key field to the key that you configured for the service in the Credential Store. This value is ignored if the Authentication Method is NONE.
Click OK.
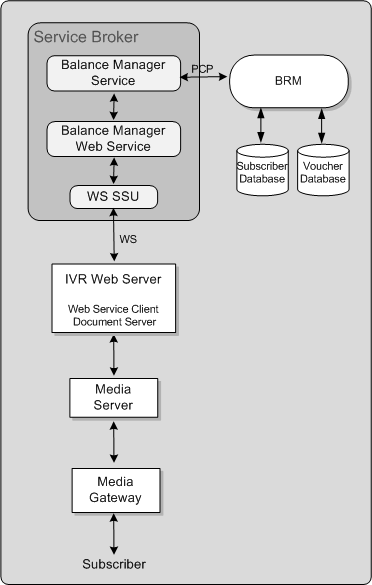
Subscribers can check their balances and top up their accounts from their phone keypads using dual-tone multifrequency (DTMF) technology. They can add value using the credit or debit information associated with their accounts, or they can redeem a voucher to add value to their own or any other prepaid account.
The IVR implementation uses voice xml (vxml) scripts to play prompts and to gather DTMF input from the subscriber. Examples of these prompts are "Please enter the 10 digit telephone number.", "Please enter the amount you want add.", "You have entered an invalid telephone number pin combination.", and so on.
The following components, external to Service Broker, are required to interact with the Balance Manager Web Service to support IVR interaction:
IVR Web Server
The IVR Web Server acts as a document server for the vxml scripts and as a Web Service client to the Balance Manager Web Service.
The vxml scripts are hosted in a servlet or JSP container to enable communication with the Top Up Web service.
Media Server
The media server plays the vxml scripts. Operators can use the media server of their choice.
Media Gateway
The Media Gateway processes the incoming IVR communication from the caller and generates the SIP call with the initial vxml script.
The WS SSU in Service Broker receives the Web Service requests and routes them to the Balance Manager Web Service for processing.
The IVR Web Service client initiates IVR interaction by sending a SIP INVITE to the media server. This INVITE contains the URI of the first vxml script to invoke.
The Web Service client implements the logic to control the flow of vxml scripts to the media server. Based on interactions with the subscriber and responses from the Balance Manager Web Service, the Web Service client sends the next logical vxml script for the media server to play.
You implement the IVR Web Service client to work with the media server of your choice. Configure the media server to invoke the initial vmxl script for an incoming Balance Manager request; for example:
http://webserver_ host:port/BalanceManager/welcome.vxml
Service Broker includes a sample IVR Web Service client implementation as source code that you can compile and run. The sample is built on WebLogic server using the Voxeo Prophecy media server to play the scripts.
The sample source code and supporting files are found in the following file:
Oracle_Home/samples/topup.ivr.sample.source.zip
To use the sample, unzip the sample archive and follow the instructions in the README file included in the archive.
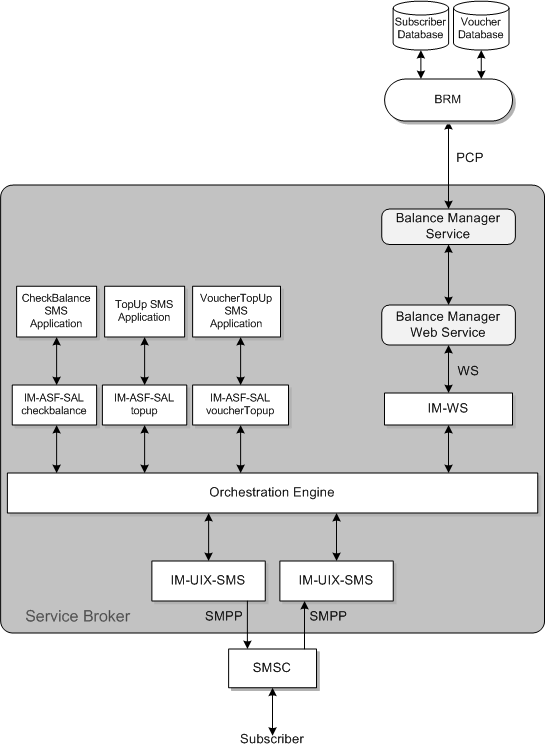
Subscribers can check their balances, top up their accounts, and redeem vouchers by sending SMS messages to and receiving them from the following Balance Manager SMS applications:
Balance Manager SMS
Top up App
Voucher Top-Up
These applications reside within Service Broker and interact with various Service Broker components.
The workflow for sending an SMS request to the Balance Manager SMS applications is as follows:
The subscriber sends an SMS message requesting one of the Balance Manager services: check balance, top up, or redeem voucher.
The SMSC receives the SMS message from the subscriber and sends it to the IM-UIX-SMS module inside Service Broker.
The IM-UIX-SMS receives the request from the SMSC and forwards it to the Orchestration Engine.
The Orchestration Engine routes the request to the appropriate IM-ASF-SAL module.
The IM-ASF-SAL module sends the request to the appropriate Balance Manager SMS application.
The application processes the request to create the appropriate calls to the Balance Manager Web Service API. It sends the request back up through the IM-ASF_SAL through the Orchestration Engine, where it is routed to the IM-WS.
The IM-WS sends the request to the Balance Manager Web Service.
The Balance Manager Web Service sends the request to the Balance Manager Service, which handles the fulfillment of the request on BRM.
After the request is processed, the Balance Manager Web Service sends the result to the appropriate IM-ASF-SAL.
In the case of check balance, the result is the current balance. For topup and voucher top up, it is the success or failure to increment the subscriber's credit balance.
The IM-ASF-SAL sends the results by SMS message to the SMSC through the Orchestration Engine and the IM-UIX-SMS module.
The SMS interface to the Balance Manager requires additional configuration of several Service Broker components in addition to the tasks described in the "Generic Set Up for the Balance Manager" section.
The following configuration tasks are required if you are using the Balance Manager SMS application. These tasks are all performed in the Service Broker Administration Console.
Add and configure two IM-UIX-SMS SMPP instances to process requests to and from the SMSC. See "Setting Up the IM-UIX-SMS Module" for details.
Configure the SMPP SSUs to set up routing of submit_sm and deliver_sm requests to the addresses of the three SMS applications. See "Configuring the SMPP Signaling Server Unit (SMPP SSU)" for details.
Create three IM-ASF-SAL instances, one for each application, to enable the applications to interact with the other Service Broker modules. See "Creating and Configuring the IM-ASF-SALs" for details.
Create an IM-WS instance for the Balance Manager. This enables the Balance Manager to receive messages from and send messages to Web Services using SOAP and REST interfaces. See "Creating and Configuring an IM-WS" for details.
Create an outgoing rule to define how the Web Services SSU routes outgoing Balance Manager messages. "Creating an Outgoing Routing Rule for the Web Services Signaling Service Unit (SSU)" for details.
Set up the orchestration logic, which tells the Orchestration Engine the order in which to invoke the applications. See "Setting Up the Orchestration Logic for Balance Manager" for details.
Configure the text of outgoing messages in the Balance Manager SMS application. See "Configuring the Balance Manager SMS Application Messages" for details.
The SMS interface to the Balance Manager SMS applications requires two IM-UIXSMS-SMPP instances: one to receive requests from the SMSC and another to send responses to the SMSC. If these modules do not exist, you must create them.
To create an IM-UIX-SMSSMPP instance to handle SMS requests:
Expand the OCSB node.
Click the Lock and Edit icon.
Expand the Processing Tier node.
Expand the Interworking Modules node.
Click the IM Management item.
Click New.
From the Type menu, select IMUIXSMSSMPP34.
From the Version menu, select 2.0.0.0.
In the Name field, enter a name for the instance; for example: imsmpp_in.
Click OK.
Click the Commit icon to commit your changes.
Repeat this procedure to create another instance to handle responses; for example imsmpp_out.
Then configure both IM-UIX-SMSSMPP instances.
To configure an IM-UIX-SMSSMPP instance:
Expand the OCSB node.
Click the Lock and Edit icon.
Expand the Processing Tier node.
Expand the Interworking Modules node.
Select the instance that you want to configure.
See the discussion of configuring IM-UIX-SMS in Oracle Communications Service Broker Processing Domain Configuration Guide for detailed instructions for configuring the IM-UIX-SMSSMPP instances.
Click Apply.
The SMPP SSU provides Service Broker with access to the SMSC over SMPP.
In this module, configure:
three incoming routing rules, one for each application
an SMPP network entity
a connection to the SMSC
The incoming routing rule defines the IM-UIX-SMS instance to which the SMPP SSU routes deliver_sm messages from the SMSC.
To create the incoming routing rules:
Expand the OCSB node.
Click the Lock and Edit icon.
Expand the Signaling Tier node.
Click the SSU SMPP item.
Click the SSU SMPP tab.
Click the Incoming Routing Rules subtab.
For each of the three Balance Manager SMS applications, do the following:
Click New.
In the dialog box, provide a name for the incoming rule in the Name field; for example: CheckBalance, TopUp, VoucherTopUp.
In the SMPP Destination Address field, enter the IP address of the SMSC that you configured in the IFC as the incoming SMSC for the Balance Manager. This is the destination address to be used in deliver_sm messages to the application. The Balance Manager SMS applications have different IP addresses.
In the Service Type field, enter SMS.
In the Alias field, enter the value that you configured for the Default SMSC Alias field of the incoming IM-UIXSMSSMPP instance.
Click OK.
See the discussion of configuring incoming routing rules in the configuring SMPP sign in Oracle Communications Service Broker Signaling Domain Configuration Guide for more information.
The SMPP network entity defines the SMSC to which the SMPP SSU routes submit_sm messages generated by the IM-UIX-SMS.
To create the network entity:
Expand the OCSB node.
Click the Lock and Edit icon.
Expand the Signaling Tier node.
Click the SSU SMPP item.
Click the SSU SMPP tab.
Click the SMPP Network Entities subtab.
Click New.
See the discussion of configuring SMPP network entities in Oracle Communications Service Broker Signaling Domain Configuration Guide for instructions on configuring the network entity.
Click OK.
The connection to the SMSC specifies the IP address and port to connect to, as well as other connection parameters.
To configure a connection to the SMSC:
Expand the OCSB node.
Click the Lock and Edit icon.
Expand the Signaling Tier node.
Click the SSU SMPP item.
Click the SMPP tab.
See the discussion of setting up SMSC connections in Oracle Communications Service Broker Signaling Domain Configuration Guide for detailed instructions on setting up SMSC connections.
An IM-ASF-SAL enables the Balance Manager to interface with the other Service Broker components. Create three IM-ASF-SALs, one for each Balance Manager SMS application.
To create the IM-ASF-SALs:
Expand the OCSB node.
Click the Lock and Edit icon.
Expand the Processing Tier node.
Expand the Interworking Modules node.
Click IM Management.
For each of the three Balance Manager SMS applications, do the following:
Click New.
From the Type menu, select IMASFSAL.
From the Version menu, select 2.0.0.0.
In the Name field, enter a name for the instance; for example: imCheckBalance, imTopUp, imVoucherTopup.
Click OK.
To configure the Balance Manager IM-ASF-SALs:
Expand the OCSB node.
Expand the Processing Tier node.
Expand the Interworking Modules node.
For each of the three Balance Manager SMS applications, do the following:
In the left panel of the console, select one of the IMASFSAL instances created for the Balance Manager SMS applications.
The configuration form for that IM-ASF-SAL appears in the right panel.
Click the Application Server tab.
In the SAL Application Address field, enter the appropriate SIP URI of the Service Broker application to which to connect this IM-ASF -SAL. The choices are: sip:checkbalance@oracle.com, sip:topup@oracle.com, or sip:voucherTopup@oracle.com.
From the SAL Mode field, select INLINE.
Configure the fields in the Session Keep Alive and SAL tabs as appropriate for your installation.
For information on the fields in the Session Keep Alive and SAL tabs, see the discussion of configuring IM-ASF-SAL in Oracle Communications Service Broker Processing Domain Configuration Guide
Click Apply.
After you have configured all three Balance Manager SMS applications, commit your changes to save the configuration and deploy it to the managed servers.
The IM-WS enables the Balance Manager to receive messages from and send messages to Web Services using Simple Object Access Protocol (SOAP).
To create the IM-WS:
Expand the OCSB node.
Click the Lock and Edit icon.
Expand the Processing Tier node.
Expand the Interworking Modules node.
Click IM Management.
Click New.
In the dialog box, select IMWS from the Type menu.
Select 2.0.0.0 for the version.
Assign a name to the instance; for example: imwsbalmgr.
Click OK.
Click the Commit icon to commit your changes.
To configure the IM-WS:
Expand the OCSB node.
Expand the Processing Tier node.
Expand the Interworking Modules node.
In the left panel, select the IMWS instance created for the Balance Manager.
The configuration form for that IMWS appears in the right panel.
Click the WebService tab.
In the Web Service Alias field, enter topup.
From the Web Service type menu, select SOAP.
In the Web Service Body Type field, enter topuprequest.
Click Apply.
The outgoing routing rule for the Web Services SSU defines how messages are routed from the Balance Manager Service.
This task assumes that the network access point on which the Web Services SSU listens for HTTP traffic has been previously configured. See the discussion of configuring HTTP server network access settings in Oracle Communications Service Broker Signaling Domain Configuration Guide for more information.
To create an outgoing routing rule for the Web Services SSU:
Expand the OCSB node.
Click the Lock and Edit icon.
Expand the Signaling Tier node.
Expand the SSU Web Services node.
Click the General item.
Click the SSU WS tab.
Click the Outgoing Routing Rules subtab.
Click New.
In the Name field, assign a name to the rule.
In the Alias field, enter topup.
In the Web Service URI field, enter the URI of your Balance Manager Web Service in the form:
http://BalanceManagerWebServiceIPAddress:port/soap/BalanceManagerService
See the discussion of configuring routing rules for outgoing Web Services in Service Broker Signaling Domain Configuration Guide for information on configuring the remaining fields.
Click OK.
You need to inform the Orchestration Engine of the order in which to invoke the Balance Manager components. The order is:
The message is sent from the IM-UIX-SMSSMPP module that receives incoming SMS messages from the SMSC to the appropriate IM-ASF-SAL module.
Normally, the message is sent from the IM-ASF-SAL module to the Balance Manager Web Service. However, if there is a problem with the request, no message is sent to the Balance Manager Web service.
The message is sent from the IM-ASF-SAL module to the IM-UIX-SMSSMPP module that sends results MSM messages to the SMSC.
First, edit the orchestration logic in the Orchestration Engine and then update the subscribers' orchestration logic with the new flow.
You can add the orchestration logic for the Balance Manager using Orchestration Studio user interface or you can define the Initial Filter Criteria directly in an ifc.xml file that you edit directly with a text editor. See Oracle Communications Service Broker Orchestration Studio User's Guide for information on setting up orchestration logic using either method.
The criteria in the ifc.xml file are based on the TO header and the MESSAGE method. To access the Balance Manager Web Service, use one or more of the following: getBalance, voucherTopup, topup.
The orchestration logic associated with a subscriber is stored as part of the subscriber profile. After you have updated ifc.xml for the Balance Manager components, incorporate it into the <ifcProfileData> element in the subscriber profile using the updateSubscriber operation. See the Subscriber Store API Reference in Oracle Communications Service Broker Subscriber Store User's Guide for information about this operation.
The IP addresses for the three applications in the ifc.xml file should be set to the same values as the IP addresses that you configured for the incoming routing rules in the SMPP SSU.
This step configures the outgoing messages that will be displayed to the end user in response to requests to check a balance, top up an account from a credit card or bank account, or redeem a voucher.
To configure the Top up App application messages:
Expand the OCSB node.
Click the Lock and Edit icon.
Expand the Processing Tier node.
Expand the Applications node.
Click the Top up App item.
The Top up App configuration form appears in the right panel.
Click the Top up configuration tab.
In the Success Message field, enter the text for the message that the user will receive if the request succeeds.
The only information available to the application is whether the operation succeeded or failed.
In the Error Message field, enter the text for the message that the user will receive if the request fails.
In the Content parse field enter the regular expression to use to parse the incoming message.
The regular expression describes how the content is divided between the amount and the PIN. For top up, it should describe two groups of digits, one for the amount and one for the PIN. For example, (\d+\.?\d):(\d+) describes two groups, separated by a colon. The first group, representing the amount, contains any number of digits followed by an optional dot followed by any number of digits. The second group, representing the PIN describes any number of digits
Click Apply.
To configure the Voucher Top-up application messages:
Expand the OCSB node.
Click the Lock and Edit icon.
Expand the Processing Tier node.
Expand the Applications node.
Click the Voucher Top-Up item.
The Voucher Top-Up configuration form appears in the right panel.
Click the Voucher Top up configuration tab.
In the Success Message field, enter the text for the message that the user will receive if the request succeeds.
The only information available to the application is whether the operation succeeded or failed.
In the Error Message field, enter the text for the message that the user will receive if the request fails.
In the Content parse field enter the regular expression to use to parse the incoming message.
The regular expression describes how the content is divided between the voucher number and the voucher PIN. For voucher redemption, it should describe two groups of digits, one for the voucher and one for the voucher PIN. For example, (\d+):(\d+) describes two groups of any number of consecutive digits separated by a colon.
Click Apply.
To configure the Balance Manager SMS application messages:
Expand the OCSB node.
Click the Lock and Edit icon.
Expand the Processing Tier node.
Expand the Applications node.
Expand the Balance Manager item.
Expand the SMS node.
Click the Check Balance item.
In the Success Message field, enter the text for the message that the user will receive if the request succeeds. You can use %s as the placeholder for the amount, which the Balance Manager will supply; for example, "Your new balance is %s".
In the Error Message field, enter the text for the message that the user will receive if the request fails.
In the Request SMS Format field, enter the regular expression to use to parse the incoming message.
The regular expression describes the part of the content that is the PIN. For example, \d+ describes any number of consecutive digits.
Click Apply.
The following Balance Manager Web Service APIs support the basic Balance Manager functionality through SOAP Web Services:
The Balance Manager SOAP Web Service Definition Language (WSDL) file is by default located in:
http://host:port/soap/BalanceManagerService?wsdl
Verifies that the subscriber phone number and PIN are valid.
If the phone number and pin combination is not valid, throws an AuthenticationException. To ensure security, the AuthenticationException has no attributes that explain why the authentication failed.
The request body parameters are:
phonenumber: (String) Required. Phone number of the subscriber account to authenticate. Corresponds to the LOGIN value in the subscriber's account on BRM.
PIN: (String) Required. PIN to authenticate. Corresponds to the PASSWORD value in the subscriber's account on BRM.
None
The error responses are:
AuthenticationFault: Authentication failed. For security no information about why authentication failed is provided.
<element name="AuthenticationFault" type="tns:AuthenticationFault" />
<complexType name="AuthenticationFault">
    <sequence />
</complexType>
ServiceException: Failed for reasons other than invalid phonenumber and pin combination.
<element name="ServiceException" type="tns:ServiceException" />
<complexType name="ServiceException">
    <sequence>
        <xsd:element name="messageId" type="xsd:string" />
        <xsd:element name="text" type="xsd:string" />
        <xsd:element name="variables" type="xsd:string"
            minOccurs="0" maxOccurs="unbounded" />
    </sequence>
 </complexType>
Example 8-1 authenticate request
<soapenv:Envelope xmlns:soapenv="http://schemas.xmlsoap.org/soap/envelope/" xmlns:rcc="http://oracle/ocsb/app/rcc">
   <soapenv:Header/>
   <soapenv:Body>
      <rcc:authenticate>
         <rcc:phonenumber>16505067000</rcc:phonenumber>
         <rcc:PIN>O3r5a7c</rcc:PIN>
      </rcc:authenticate>
   </soapenv:Body>
</soapenv:Envelope>
Gets the current balance for the specified account.
Performs authentication using the authenticate operation before accessing the account information.
The request body parameters are:
phonenumber: (String) Required. Phone number associated with the account. Corresponds to the LOGIN value in the subscriber's account on BRM.
PIN: (String) Required. PIN associated with the account. Corresponds to the PASSWORD value in the subscriber's account on BRM.
showCurrencyInfo: (Boolean) Required. If true, currency details associated with the account are included in the returned BalanceType object. If false, currency details are not included.
The response body parameter is:
balanceType: (balanceType) Object showing the balance in the subscriber's account.
The balanceType object encapsulates credit balance information associated with a subscriber account:
<complexType name="balanceType">
    <sequence>
        <!-value of the account balance-->
        <element name="amount" type="xsd:double" />
        <!-BRM resourceId corresponding to this balanceType-->
        <element name="type" type="xsd:int" />
        <!-object describing the currency of the balance-->
        <element name="details" type="tns:currencyDetails" minOccurs="0" />    </sequence></complexType>
The currencyDetails object describes the currency associated with the account.
<complexType name="currencyDetails">
    <sequence>
        <!-name of the currency-->
        <element name="name" type="xsd:string" />
        <!-ISO 3166 currency code-->
        <element name="code" type="xsd:string" />
        <!-symbol representing the currency such as $ or €-->
        <element name="symbol" type="xsd:string" />
    </sequence>
</complexType>
The error responses are:
AuthenticationFault: Authentication failed. For security no information about why authentication failed is provided.
<element name="AuthenticationFault" type="tns:AuthenticationFault" />
<complexType name="AuthenticationFault">
    <sequence />
</complexType>
ServiceException: Failed for reasons other than invalid phonenumber and pin combination.
<element name="ServiceException" type="tns:ServiceException" />
<complexType name="ServiceException">
    <sequence>
        <xsd:element name="messageId" type="xsd:string" />
        <xsd:element name="text" type="xsd:string" />
        <xsd:element name="variables" type="xsd:string"
            minOccurs="0" maxOccurs="unbounded" />
    </sequence>
</complexType>
Example 8-2 getBalance request
<soapenv:Envelope xmlns:soapenv="http://schemas.xmlsoap.org/soap/envelope/" xmlns:rcc="http://oracle/ocsb/app/rcc">
   <soapenv:Header/>
   <soapenv:Body>
      <rcc:getBalance>
         <rcc:phonenumber>16505067000</rcc:phonenumber>
         <rcc:PIN>O3r5a7c</rcc:PIN>
         <rcc:showCurrencyInfo>true</rcc:showCurrencyInfo>
      </rcc:getBalance>
   </soapenv:Body>
</soapenv:Envelope>
Example 8-3 getBalanceResponse
<soapenv:Envelope xmlns:soapenv="http://schemas.xmlsoap.org/soap/envelope/" xmlns:rcc="http://oracle/ocsb/app/rcc">
   <soapenv:Header/>
   <soapenv:Body>
      <rcc:getBalanceResponse>
         <rcc:balance>
            <rcc:amount>346.20</rcc:amount>
            <rcc:type>100001</rcc:type>
            <rcc:details>
               <rcc:name>United States dollar</rcc:name>
               <rcc:code>USD</rcc:code>
               <rcc:symbol>$</rcc:symbol>
            </rcc:details>
         </rcc:balance>
      </rcc:getBalanceResponse>
   </soapenv:Body>
</soapenv:Envelope>
Adds the specified amount to the specified subscriber account.
The funds are supplied by the subscriber's predefined payment arrangement in BRM. No credit card or debit account information is transmitted by this method.
Performs authentication using the authenticate operation before adding funds to the account.
The request body parameters are:
phonenumber: (String) Required. Phone number associated with the account. Corresponds to the LOGIN value in the subscriber's account on BRM.
PIN: (String) Required. PIN associated with the account. Corresponds to the PASSWORD value in the subscriber's account on BRM.
amount: (double) Required. Amount to add to the account.
None.
The error responses are:
AuthenticationFault: Authentication failed. For security no information about why authentication failed is provided.
<element name="AuthenticationFault" type="tns:AuthenticationFault" />
<complexType name="AuthenticationFault">
    <sequence />
</complexType>
ServiceException: Failed for reasons other than invalid phone number and pin combination.
<element name="ServiceException" type="tns:ServiceException" />
<complexType name="ServiceException">
    <sequence>
        <xsd:element name="messageId" type="xsd:string" />
        <xsd:element name="text" type="xsd:string" />
        <xsd:element name="variables" type="xsd:string"
            minOccurs="0" maxOccurs="unbounded" />
    </sequence>
</complexType>
<soapenv:Envelope xmlns:soapenv="http://schemas.xmlsoap.org/soap/envelope/" xmlns:rcc="http://oracle/ocsb/app/rcc">
   <soapenv:Header/>
   <soapenv:Body>
      <rcc:topup>
         <rcc:phonenumber>16505067000</rcc:phonenumber>
         <rcc:PIN>O3r5a7c</rcc:PIN>
         <rcc:amount>100</rcc:amount>
      </rcc:topup>
   </soapenv:Body>
</soapenv:Envelope>
Redeems a voucher to add the voucher value to the specified subscriber account.
This operation does not perform authentication. Users can redeem a voucher to add funds to accounts that are not their own.
The request body parameters are:
phonenumber: (String) Required. Phone number associated with the account to which the voucher amount is added. Corresponds to the LOGIN value in the subscriber's account on BRM.
voucherNumber: (String) Required. Number of the voucher.
voucherPin: (double) Required. PIN for the voucher.
None.
The error response is:
ServiceException: Generic exception
<element name="ServiceException" type="tns:ServiceException" />
<complexType name="ServiceException">
    <sequence>
        <xsd:element name="messageId" type="xsd:string" />
        <xsd:element name="text" type="xsd:string" />
        <xsd:element name="variables" type="xsd:string"
            minOccurs="0" maxOccurs="unbounded" />
    </sequence>
</complexType>
Example 8-5 voucherTopup request
<soapenv:Envelope xmlns:soapenv="http://schemas.xmlsoap.org/soap/envelope/" xmlns:rcc="http://oracle/ocsb/app/rcc">
   <soapenv:Header/>
   <soapenv:Body>
      <rcc:voucherTopup>
         <rcc:phonenumber>16505067000</rcc:phonenumber>
         <rcc:vouchernumber>0020031003</rcc:vouchernumber>
         <rcc:voucherpin>6T3#e</rcc:voucherpin>
      </rcc:voucherTopup>
   </soapenv:Body>
</soapenv:Envelope>
|
Copyright © 2010, 2012, Oracle and/or its affiliates. All rights reserved. Legal Notices |
|