| Oracle® Communications Service Broker Online Mediation Controller Implementation Guide Release 6.0 Part Number E23527-02 |
|
|
View PDF |
| Oracle® Communications Service Broker Online Mediation Controller Implementation Guide Release 6.0 Part Number E23527-02 |
|
|
View PDF |
This chapter describes how you set up and configure online charging mediation in passthrough mode, when integrating with Oracle Communications Billing and Revenue Management (BRM).
When integrating with Oracle Communications BRM, you can implement passthrough mediation mode. In passthrough mode, Service Broker bypasses the OE and Interworking Modules, performing direct mediation between Diameter Ro and PCP. If you do not need to combine online charging with other applications, such as mid-call announcements, then you should use the passthrough mode as an alternative to the online charging mediation described in "Setting Up Orchestrated Charging Mediation".
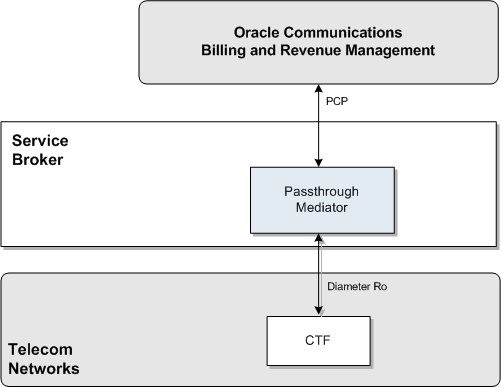
Figure 4-1 shows the Service Broker components that you need to configure to apply BRM online charging services in passthrough mode.
To configure passthrough mode:
Configure Service Broker as a Diameter node. See "Configuring Service Broker as a Diameter Node".
Create BRM connection pools. See "Creating BRM Connection Pools".
Secure the BRM connection pools that you created in step 2. See "Securing BRM Connection Pools".
Configure destination BRM applications. See "Configuring Destination BRM Applications".
Configure the passthrough mediator. See "Configuring the Passthrough Mediator".
This section describes how to configure Service Broker as a Diameter node and define how other Diameter entities access it. For details, see the information on creating a Diameter node in "Configuring Diameter Signaling Server Units" in Oracle Communications Service Broker Processing Domain Configuration Guide.
In the Administration Console:
In the navigation tree, expand the OCSB node, and then the Signaling Tier node.
Select the SSU Diameter node.
In the DIAMETER tab, select the Diameter Configuration tab.
You can either use the default node or create a new node by clicking the Plus (+) icon below the Node tree. The General tab appears.
In the Name field, enter a unique name for the Diameter node.
In the Realm field, enter the realm name that other Diameter entities use to access Service Broker.
In the Port field, enter the port number that signaling servers use to listen to Diameter traffic.
Leave the Address, Host and Target fields blank to apply the configuration to all signaling servers in the Signaling Domain and have them all provide a Diameter network channel on the same port.
Note:
If you run multiple signaling servers on the same physical machine, you have to define each signaling server as a different Diameter node which listens on a different port. Otherwise, if the Diameter SSU running on all signaling servers will use the same port, then the ports will collide.Create BRM connection pools in the PCP SSU. For more information, see PCP connection pool information in "Configuring the PCP Signaling Server Unit" in Oracle Communications Service Broker Signaling Domain Configuration Guide.
See also "About Connection Pooling" in Oracle Communications Billing and Revenue Management System Administrator's Guide.
The passthrough mediator will later route outgoing PCP requests to BRM applications through the connection pools that you defined. See "Routing Outgoing PCP Requests to BRM Applications".
Secure the BRM connection pools, as described in "Securing Connection Pools" in the chapter "Configuring the PCP Signaling Server Unit" in Oracle Communications Service Broker Signaling Domain Configuration Guide.
In the Administration Console:
In the navigation tree, expand the OCSB node, and then the Signaling Tier node.
Select the SSU PCP node.
In the PCP tab, select the Credential Store tab.
In the Password area, enter the ID of the connection pool that you want to secure, in the Key field. This should be the Pool ID that you assigned to the connection pool when you created the connection pool.
In the Password area, enter the password of the BRM client application account used by the connection pool to access the BRM, in the Password field. This should be the password of the account that you configured in the BRM CM Login ID field when you initially defined the connection pool.
In the Password area, uncheck the one-way checkbox.
Repeat steps 4 through 7 for each connection pool that you want to secure.
Define destination BRM applications. For more information, see PCP network entities information, in "Configuring the PCP Signaling Server Unit" in Oracle Communications Service Broker Signaling Domain Configuration Guide.
This section describes how to configure the passthrough mediator using the Service Broker Administration Console.
To access the passthrough mediator configuration screen:
In the domain navigation pane, expand OCSB.
Expand Processing Tier.
Expand Passthrough Mediation.
In the passthrough mediation:
Route incoming Diameter request through the passthrough mediator. See "Routing Incoming Diameter Requests Through the Passthrough Mediator".
Configure general Ro to PCP mediation parameters. See "Configuring General Ro to PCP Mediation Parameters".
Route outgoing PCP requests to BRM applications. See "Routing Outgoing PCP Requests to BRM Applications".
Configure service types. See "Configuring Service Type Parameters".
Incoming Diameter requests will be routed through the passthrough mediator if their Origin-Realm AVP contains a specific value that you configure.
To specify the value of the Origin-Realm AVP:
In the navigation pane, select the Routing node.
In the Origin Realm field, enter the value required in the Origin-Realm AVP to have requests routed to the passthrough mediator.
Click the Apply button.
To configure general Ro to PCP mediation parameters:
In the navigation pane, select the Ro PCP Mediation node.
Select the General tab.
Configure the parameters described in Table 4-1
Table 4-1 Ro to PCP Mediation General Parameters
| Name | Type | Description |
|---|---|---|
|
Client Program Name |
String |
The name representing the passthrough mediator as a BRM client application when accessing BRM. Default value: Matrix |
|
Object Type |
String |
Always set this value to gsm. |
|
Default Opcode Timeout |
Integer |
The time to allow for a charging requests to execute before it is considered to have timed out. Given in seconds. |
|
Reservation Expiration Time |
Integer |
The time BRM applications keeps reservation objects before they release them. Given in milliseconds. Default value: 86400000 (24 hours) See "About Creating Reservations" in the chapter "Reserving Resources for Concurrent Network Sessions" in Oracle Communications Billing and Revenue Management Configuring and Collecting Payments. |
The passthrough mediator routes outgoing PCP requests through connection pools that you create. See "Creating BRM Connection Pools".
By default, the passthrough mediator routes requests through all connection pools in a round-robin fashion. However, you can also enable a resolution mechanism that routes requests based on the value of an AVP inside the request. In this case, the value of the AVP is resolved into a connection pool; the value of the AVP needs to match the alias of a destination BRM application, that is the alias of a PCP network entity configured in the PCP SSU.
To configure how the passthrough mediator routes PCP requests through connection pools:
In the navigation pane, select the Ro PCP Mediation node.
Select the SSU PCP Alias Resolver tab.
Configure the parameters described in Table 4-2
Table 4-2 SSU PCP Alias Resolver Parameters
| Name | Type | Description |
|---|---|---|
|
Enable SSU PCP Alias Resolution |
Boolean |
Specifies whether to enable the connection pool resolution mechanism or not. Possible values:
Default value: false |
|
AVP Code |
Integer |
The code of the AVP based on which value the connection pool resolution is done. Default value: 283 (Destination-Realm AVP) |
|
AVP Vendor ID |
Integer |
The vendor ID of the AVP you entered in AVP Code. Default value: 0 |
To set up mapping between Diameter Ro Service-Identifier AVP and BRM service types:
In the navigation pane, select the Ro PCP Mediation node.
Select the Service Types tab.
Click the New button.
Configure the parameters described in Table 4-3
Table 4-3 Ro to PCP Mediation Service Types Parameters
| Name | Type | Description |
|---|---|---|
|
Service Identifier |
Integer |
The Diameter Ro service identifier to be mapped to BRM service type |
|
Service Type |
String |
The BRM service type to use for the corresponding Diameter Ro service id. For example, service/telco/gsm/sms |
|
Default Service Type |
Boolean |
Set to:
|
For information on setting up passthrough mediation in Degraded Mode, see the discussion about the passthrough mode in "Using Degraded Mode".
The passthrough mediator maps Ro requests to BRM Portal Communications Module (PCM) operations.
By default, the passthrough mediator supports the Ro to BRM PCM operation mapping described in Table 4-4.
Table 4-4 Supported Ro to PCP Mapping
| Op. | Diameter Criteria | BRM Request | BRM Operation Code |
|---|---|---|---|
|
CCR |
CC-Request-Type=EVENT_REQUEST Requested-Action=CHECK_BALANCE |
Balance Check |
PCM_OP_TCF_AAA_QUERY_BALANCE |
|
CCR |
CC-Request-Type=EVENT_REQUEST Requested-Action=PRICE_ENQUIRY |
Service Price Enquiry |
PCM_OP_TCF_AAA_SERVICE_PRICE_ENQUIRY |
|
CCR |
CC-Request-Type=EVENT_REQUEST Requested-Action=DIRECT_DEBIT |
Direct Debit |
PCM_OP_TCF_AAA_STOP_ACCOUNTING |
|
CCR |
CC-Request-Type=EVENT_REQUEST Requested-Action=REFUND_ACCOUNT |
Refund Account |
PCM_OP_TCF_AAA_STOP_ACCOUNTING |
|
CCR |
CC-Request-Type=INITIAL |
Session Initial |
PCM_OP_TCF_AAA_AUTHORIZE |
|
CCR |
CC-Request-Type=UPDATE |
Session Update |
PCM_OP_TCF_AAA_UPDATE_AND_REAUTHORIZE |
|
CCR |
CC-Request-Type=TERMINATION |
Session Termination |
PCM_OP_TCF_AAA_STOP_ACCOUNTING |
The passthrough mediator uses processor classes to map incoming Diameter requests to BRM PCM operation codes. It implements different processor classes for different Diameter operations.
To extend the Ro to PCP mediation:
Contact Oracle consulting for implementing processor classes and deploy them in your system.
Configure the passthrough mediator to use the newly deployed processor classes and the related mapping between Diameter requests to BRM PCM operation codes. See "Mapping Diameter Requests to BRM Portal Communications Module Operation Codes"
To map new Diameter Ro requests to BRM PCM operation codes:
In the navigation pane, expand the OCSB node.
Expand the Processing Tier node.
Expand the Passthrough Mediation node.
Select the Ro PCP Mediation node.
In the Ro PCP Mediation tab, select the Opcode Mapping subtab.
A configuration tree appears that resembles the AVP hierarchy in the Ro request.
In the navigation tree, select the type of Diameter request that you want to add mapping for.
Click the Plus (+) button at the bottom of the navigation tree area. A new AVP node is added.
In the AVP tab in the right hand pane, enter the following fields for the AVP that you want to map:
AVP Code
AVP Vendor ID
AVP Value
Click the Add Opcode Mapping button. The Mapping tab appears.
In the Mapping tab, set the following fields as described:
In the Processor Class field, enter name of the name of the processor class implementing the mapping that you are currently configuring.
In the Opcode ID and Opcode Flag fields, enter the BRM operation code and operation flag.
In the Opcode Timeout field, enter the time to allow for the BRM operation to execute before it is considered to have timed out. Given in milliseconds.
|
Copyright © 2010, 2012, Oracle and/or its affiliates. All rights reserved. Legal Notices |
|