| Oracle® Communications Service Broker Policy Controller Implementation Guide Release 6.0 Part Number E23528-02 |
|
|
View PDF |
| Oracle® Communications Service Broker Policy Controller Implementation Guide Release 6.0 Part Number E23528-02 |
|
|
View PDF |
This chapter explains how to create Policy Profiles that specify Quality of Service (QoS) limits for services and associate those limits with charging information from your charging engine.
This chapter assumes that you know the details for any predefined PCC rules that you will reference, including the Charging-Rule-Name AVPs to use.
Policy Profiles are the Policy Controller implementations of PCC rules as defined in the 3GPP TS 23.203 v9.9.0 specification. You can use Policy Profiles to specify QoS and charging details to apply to subscribers. Each Policy Profile contains a Quality of Service Profile that specifies the actual bandwidth limits, QoS Class Identifier (QCI), and gate status, and a Charging Profile that associates those limits with charging information in your charging engine. Neither QoS Profiles nor Charging Profiles are required in Policy Profiles. If you are going to use them however, you must create Charging Profiles and/or QoS Profiles first. You create these profiles using the Policy Designer Profile Editor tab and its subtabs.
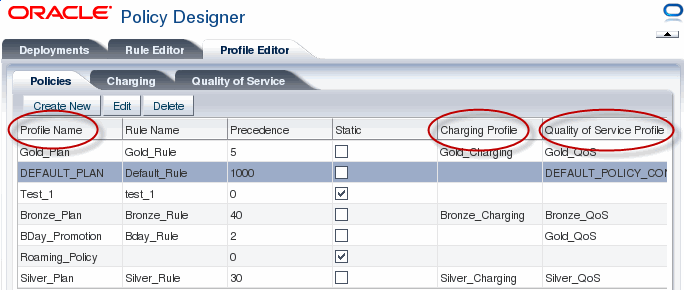
You can use the Policy Designer interface's Policies subtab to create and manage Policy Profiles. Figure 3-1 shows the Policy Designer with the Profile Editor tab and Policies subtab selected. The Profile Editor tab shows the Policy Profiles listed by name in the column on the left, and columns on the right list the Charging Profiles and Quality of Service Profiles that each Policy Profile is associated with. The Profile Name, Charging Profile and Quality of Service Profile column headings are circled in red.
Policy Designer requires that you always have a default profile policy called DEFAULT_PLAN to charge subscribers if no other profiles apply. You need to define Charging Profiles and Quality of Service Profiles for it to actually charge subscribers. This policy profile has a precedence level of 1000 to ensure that it always has the lowest priority of all policies. You cannot delete this default profile.
Remember that you may also use pre-defined PCC rules from your PCEF with the Policy Designer. To use a predefined PCC Rule in Policy Designer, simply create a new Policy Profile using predefined PCC rule's name as it appears in the PCEF and check the Static box. A Static check box marks Policy Profiles as predefined PCC rules on the main Policies pane.
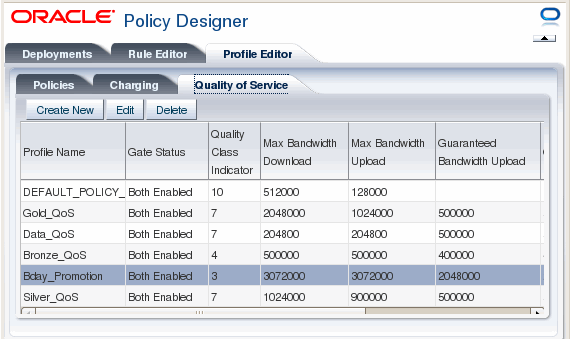
Figure 3-2 shows the Profile Editor tab and Quality of Service Profile subtab with the Quality of Service Profiles listed one per row. Quality of Service Profiles specify details for the actual bandwidth limits for subscriber accounts, and the settings that determine which services have priority when competing for available resources.
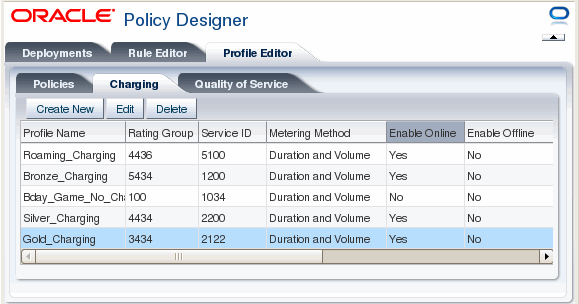
Figure 3-3 shows the Profile Editor tab and the Charging Profiles subtab. Charging Profiles do not contain specific currency amounts. Instead they reference billing and charging details specified in your charging engine and your other policy implementation entities.
The procedures below assume that you already know the details of the policies you will create. To create policies you should already know details about your policy implementation such as:
The bandwidth limits to set.
How your policies relate to each other.
Precedence level determines the order in which Policy Profiles are evaluated. These values are positive integers with lower integers having higher priority. The default profile has a precedence level of 1000. It should always be evaluated with the lowest priority (have the highest precedence level), so be sure to use lower integers for your other Profiles or if needed, raise the default profile priority.
Profiles with the same priority are evaluated in a random order so be sure profiles with the same priority have non-overlapping criteria.
Charging details such as:
The rating groups and service IDs of the services you will charge for.
The IP addresses and ports of the entities you will accept billing service data flow from.
The configuration details of the charging engine that you use.
Follow these steps to create a new Quality of Service Profile:
Start the Policy Designer.
Navigate to Profile, then Quality of Service.
Click Create New.
The Quality of Service screen appears.
Specify parameters for the new Charging Control Profile:
Profile Name - A descriptive name for the profile.
Gate Status - Specifies the PCEF action (gate open or closed) when service data flow traffic arrives from Policy Controller. Can be one of the following:
Uplink Enabled - Allows data uploading.
Downlink Enabled - Allows data downloading.
Both Enabled - Allows both data uploading and downloading.
Both Disabled - Disallows both data uploading and downloading.
Removed - Reserved for Oracle use.
Quality Class Indicator - QoS Class Identifier type as defined in the 3GPP TS 23.203 v9.90 (2011-06) standard. See the standard for details:
http://www.3gpp.org/ftp/Specs/html-info/23203.htm
Can be one of the QCI values listed in Table 3-1. Note that multiple QCI values can be useful for the same services.
Table 3-1 Supported QCI Values
| QCI Value | Priority | Guaranteed Bit Rate? | Typical Service |
|---|---|---|---|
|
1 |
2 |
Yes |
Conversational voice. |
|
2 |
4 |
Yes |
Live video streaming. |
|
3 |
3 |
Yes |
Real time gaming. |
|
4 |
5 |
Yes |
Buffered video streaming. |
|
5 |
1 |
No |
IMS Signalling. |
|
6 |
6 |
No |
Buffered video streaming, TCP-based services (for example, email, chat, FTP, p2p file sharing, progressive video). |
|
7 |
7 |
No |
Voice, live video streaming, interactive gaming. |
|
8 |
8 |
No |
Buffered video streaming, TCP-based services (for example, email, chat, FTP, p2p file sharing, progressive video). |
|
9 |
9 |
No |
Buffered video streaming, TCP-based services (for example, email, chat, FTP, p2p file sharing, progressive video). |
Max Download Bandwidth (Bit/s) - The maximum allowed bandwidth rate.
Max Upload Bandwidth (Bit/s) - The maximum allowed data upload rate.
Guaranteed Download Bandwidth (bit/s) - The minimum data download rate to use.
Guaranteed Upload Bandwidth (Bit/s) - The minimum data upload rate to use.
Click Save.
The new Quality of Service profile appears in the Quality of Service subtab.
Follow these steps to create a new Charging Profile:
Start the Policy Designer.
Navigate to Profile Editor, then Charging.
Click Create New.
The Charging screen appears
Fill in the parameters for a new charging profile:
Profile Name - A descriptive name for the new Charging Profile.
Rating Group - The name of the rating group to use. See your charging engine documentation for details.
Service ID - The Service ID to use. See your charging engine documentation for details.
Metering Method - Can be one of the following
Duration - Charges based on the amount of connect time (session-based).
Volume - Charges based on the amount of data transferred.
Duration and Volume - Charges for both the connect time and amount of data transferred.
Enable Online - Yes specifies service data flow using on-line charging; No ignores service data flow using online charging.
Enable Offline - Yes specifies service data flow using offline charging; No ignores service data flow using offline charging.
Select Save.
The new Charging Profile appears in the Charging subtab.
This section explains how to create the Policy Profiles that are called by your rules to specify quality of service levels and charging information. Policy Profiles typically include a Quality of Service Profile and a Charging Profile, but they are not required.
There are two types of Policy Profiles that you can create as explained in the sections that follow:
Policy Profiles that use QoS Profiles and Charging Profiles to set bandwidth levels and limits, and charging information.
Static Policy Profiles that obtain bandwidth levels and limits and charging information from either individual or base level predefined PCC rules.
This section explains how to create a Policy Profile using the bandwidth settings and charging information contained in QoS and Charging Profiles. This section assumes that you have:
Created the Charging Profiles and Quality of Service Profiles to use in each Policy Profile. For more information, see "Creating a Charging Profile" and "Creating a Quality of Service Profile".
Obtained the Charging-Rule-Name AVP name(s) to use with the new Policy Profile.
To create a Policy Profile to be stored in Policy Controller:
Start the Policy Designer.
Navigate to Profile Editor, then Policies.
Click Create New.
The Policies screen appears.
Fill in a Profile Name (mandatory). This is an informal unique name for the new profile.
Fill in a Rule Name (mandatory). This is the Diameter Gx Charging-Rule-Name AVP as defined in the 3GPP TS 29.212 v9.7.0 (2011-06) specification.
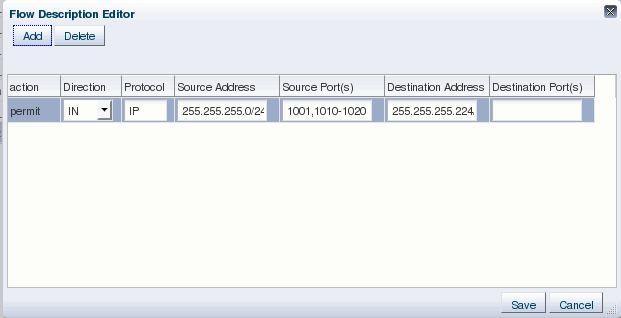
Click Edit Flow Description to bring up the Flow Description Editor shown in Figure 3-5. These fields filter service data flow by using the Rx Flow-Description AVP parameters listed below. For details, see the 3GPP TX 29.214 v9.x specification.
Fill in any parameters required to filter service data flow for the profile to affect:
Direction - IN or OUT. Applies the profile to service data flow coming in to, or being sent out from Policy Controller.
Protocol - (Required) Filters the service data flow by protocol. Applies the profile to service data flow matching the protocols you specify.
Source Address - (Required) IP/mask number. Applies the profile to service data flow matching entities specified by a IP address/subnet mask.
Source Port(s) - A comma-separated list integers that specify ports on the Source Address. Applies the profile to service data flow from the ports specified from the Source address. Dash-separated ranges are also allowed. For example:
2000,2002,4010-4020
Destination Address - (Required) IP/mask number. Applies the profile to service data flow destined for entities specified by an IP address/ubnet mask.
Destination Port(s) - A comma-separated list integers specify ports on the Accentuation Address. Applies the profile to service data flow destined for the ports you list at the Destination Address. Dash-separated ranges are also allowed.
Click Save.
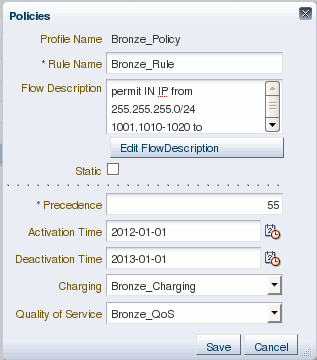
The Policies screen reappears with the flow information added. Figure 3-4 shows an example.
Fill in the remaining Policy Profile fields:
Precedence - (Mandatory) Specifies the Policy Profile evaluation order. See "Planning Your Profiles" for details on the precedence levels.
Activation Time - Sets the date and time that the new Policy Profile becomes active. Select the calendar icon and enter a month, year, day, and time for the policy to become active. The default values make the Policy Profile active from the current date and time. Select OK to confirm your choices.
Deactivation Time - Sets the date and time that the new Policy Profile expires. Select the calendar icon and enter a month, year, day, and time for the policy to stop being active. When you bring up the calendar pane, it applies the current date and time as the default values for deactivating the Policy Profile, so be sure to change them. Select OK to confirm your choices.
Charging - Select a Charging Profile from the drop-down list.
Quality of Service - Select a Quality of Service Profile from the drop-down list.
Click Save.
The new Policy Profile appears in the Profile Name column.
This section explains how to create a Policy Profile that uses bandwidth metrics and charging information from predefined PCC rules already stored on your PCEF.
This section assumes that you have:
Created the Charging Profiles and Quality of Service Profiles to use in each Policy Profile. For more information, see "Creating a Charging Profile" and "Creating a Quality of Service Profile".
Obtained the names and Charging-Rule-Name AVP name(s) of any predefined PCC rules that you are using.
To create a Policy Profile using Policy Controller:
Start the Policy Designer.
Navigate to Profile Editor, then Policies.
Click Create New.
The Policies screen appears.
Check the Static box.
The unneeded fields disappear and the Rule Name is Rule Base Name check box appears.
If the PCC rule is a base rule, check the Rule Name is Rule Base Name check box. This installs all of the PCC rules in the base rule.
Note:
Because these are “grouped” rules there is no single rule name to display in the Rule Name column of the Policies tab. This field is left blank.Fill in a Profile Name (mandatory). This is an informal name for the Policy Profile that is displayed in the Profiles tab.
Fill in a Rule Name (mandatory). This is the name of a predefined PCC rule or base rule.
Click Edit Flow Description to bring up the Flow Description Editor shown in Figure 3-5. These fields filter service data flow by using the Rx Flow-Description AVP parameters listed below. For details, see the 3GPP TX 29.214 v9.x specification.
Figure 3-5 Example Flow Description Editor Screen
Fill in any parameters required to filter service data flow for the profile to affect:
Direction - IN or OUT. Applies the profile to service data flow coming in to, or being sent out from Policy Controller.
Protocol - (Required) Filters the service data flow by protocol. Applies the profile to service data flow matching the protocols you specify.
Source Address - (Required) IP/mask number. Applies the profile to service data flow matching entities specified by a IP address/subnet mask.
Source Port(s) - A comma-separated list integers that specify ports on the Source Address. Applies the profile to service data flow from the ports specified from the Source address. Dash-separated ranges are also allowed. For example:
2000,2002,4010-4020
Destination Address - (Required) IP/mask number. Applies the profile to service data flow destined for entities specified by an IP address/ubnet mask.
Destination Port(s) - A comma-separated list integers specify ports on the Accentuation Address. Applies the profile to service data flow destined for the ports you list at the Destination Address. Dash-separated ranges are also allowed.
Click Save.
The Policies screen reappears with the flow information added.
Click Save.
The new Policy Profile appears in the Profile Name column.
|
Copyright © 2011, 2012, Oracle and/or its affiliates. All rights reserved. Legal Notices |
|