| Oracle® Communications Service Broker SVC Implementation Guide Release 6.0 Part Number E24885-02 |
|
|
View PDF |
| Oracle® Communications Service Broker SVC Implementation Guide Release 6.0 Part Number E24885-02 |
|
|
View PDF |
This chapter explains how to set up Oracle Communications Social Voice Communicator (SVC) to work with Oracle Communications Service Broker.
Configuring the SVC Social Voice, SVC Social Circle, and SVC Social Voicemail services to work with Service Broker requires these general steps:
Configure Service Broker features to work with SVC services. See "Configuring Service Broker for SVC Services" for more information.
Configuring the SVC services themselves. These configuration tasks are covered in "About Configuring SVC Services" and "Configuring SVC Services".
Configuration tasks that vary by SVC service. Table 2-1 lists the SVC services that require these additional configuration tasks:
Creating a user portal that your subscribers will use to self-administer their accounts. For more information see "Configuring the Social Circle Click-to-Dial Service".
(Optional) Configure charging. For more information see "Configuring Charging for Social Voice Communicator Services"
Table 2-1 lists the configuration tasks required by each SVC service. The following sections explain the configuration tasks.
This section explains how to configure Service Broker to use SVC services. The configuration tasks include:
The following sections describe these tasks.
To install the SVC software, you select it as an included component of the SVC Service Broker installation in the Oracle Universal Installer.
In Graphical Installation Mode, you include the SVC option by selecting it in the Available Product Components page of the installation sequence.
When using the silent installer script, include the SVC software in the installation by setting the INSTALL_TYPE_FM value to:
1 to include both the VPN and SVC software.
3 to include just the SVC software.
After installing the SVC software, you can remove it by starting the Oracle Universal Installer and clicking the Deinistall Product button. In the product list, choose the Service Broker Admin Console as the component to remove under the Service Broker product item.
For more information on installing Service Broker software, see the Oracle Communications Service Broker Installation Guide.
The Service Broker SVC services operate as components of the Service Broker Processing Domain, so create a Processing Domain or Combined Domain before configuring and using SVC services. This section describes considerations applicable to creating Service Broker domains for implementing SVC services.
SVC exposes a RESTful API that administrators use to configure and provision SVC services. In test and evaluation implementations, it may not be necessary to secure the connection to the RESTful facade. The API connection must be secured for production implementations.
The security features available for securing the API connection include Secure HTTP (HTTPS) and SSL-based client certification authentication.
Note:
to SSL-based client certificate authentication, SVC authenticates client requests based on user name and password values passed in HTTP headers of API requests. See "Authentication and Authorization" for more information.API connection security is governed by the common security settings for the Service Broker domain. Therefore, to secure the connections to the SVC RESTful API, follow the instructions for applying security to Service Broker as described in Oracle Communications Service Broker System Administrator's Guide.
By default, the security settings in a new installation of the Service Broker software are enabled.
The following Service Broker properties control the connectivity between the RESTful API clients and the SVC API facade:
org.eclipse.equinox.http.jetty.https.enabled: Set to true to use HTTPS for the REST API connection.
org.eclipse.equinox.http.jetty.https.ports: Specify a port number to use for the secured HTTP connection.
Set these properties in the properties files located in Oracle_home/ocsb60/admin_console/properties:
For a web domain, edit the web.properties file
For a hosted domain edit the hosting.properties file:
To enable client certificate authentication by the Managed Server, set the axia.http.client_auth property to true in the common.properties file located in Oracle_home/ocsb60/admin_console/properties.
Import the client certificate of each SVC API client into each Managed Server's trusted certificate keystore. To allow the client to verify the identify of the Managed Server when negotiating the HTTPS connection, import the Managed Server's SSL certificate into the client's trusted keystore.
For more information on creating and managing certificates see Oracle Communications Service Broker System Administrator's Guide.
When creating a secured domain, you must use https as the protocol in the Domain URL value passed to the domain creation script.
See the Oracle Communications Service Broker Administration Guide for complete information on securing the Service Broker installation.
To create a domain for Service Broker VPN, you use the common domain creation script:
Oracle_home/ocsb60/admin_console/create_domain.sh
When prompted for a domain type to install, select either Social-Voice-Communicator or Co-Deployed-Virtual-Private-Network-and-Social-Voice-Communicator. You choose the domain type by entering the index number that corresponds to your selection, as indicated in the script output.
For more information about creating Service Broker domains, see the Oracle Communications Service Broker Installation Guide.
Before using the SVC API to configure SVC services, set up the database that SVC uses to store its application data. The application data includes subscriber information, Social and SVC Social Voice contacts, and statistical data generated by the operations of the SVC services.
SVC works with these Oracle Database versions:
Oracle Database 10g Release 2
Oracle Database 11g Release 1 or Release 2
Note that SVC services do not support Oracle Coherence in-memory storage or Oracle Berkeley DB file-based storage. Use an Oracle Database for persistence.
To configure data persistence, you first set up the database. You then configure the connection to the database in the Service Broker configuration, as described in the following sections.
SVC includes a database configuration script that sets up the tables and schema required for SVC services. The script invokes other SQL scripts, which perform the actual configuration of the database.
A SQL script is available for each type of SVC service: SVC Social Voice, SVC Social Circle, and SVC Social Voicemail, a SQL script exists for creating the statistical data tables and schema that are common to all services.
Only run the SQLscripts that are applicable to your implementation. For example, if using SVC services only, you only need to run the SVC SQL script and statistical data script.
Before configuring data persistence, make sure the database is available by network to the Service Broker. Oracle recommends that you create a user account on the database specifically for the Service Broker's use, and another for SVC.
To set up the database:
Open the following properties file for editing:
Oracle_home/ocsb60/admin_console/create_db_table.properties
Configure the profile database settings, as follows:
profile.db.server - The IP address of the database server.
profile.db.port - The port on which the database listens for TCP client connections.
profile.db.dbname - The name of a database to store data. This is the database in which the script creates and formats tables for the service and statistical data.
profile.db.user - The name of a database user with privileges to access this database.
For example:
profile.db.server=10.10.1.125
profile.db.port=1521
profile.db.dbname=orcl
profile.db.user=ocsb
Save and close create_db_tables.properties.
Move any SQL scripts not relevant to your implementation from the SQL script directory to a backup location. The directory where the scripts are located is:
Oracle_home/ocsb60/admin_console/scripts/database
The database configuration script invokes any SQL script it finds in this directory.
The scripts are:
er_ons.sql: Configures tables in the database for the SVC Social Circle service.
er_voicemail.sql: Configures tables in the database for the SVC Social Voicemail service.
er_vpn.sql: Configures tables in the database for the VPN service.
er_stats.sql: Configures tables in the database for statistical information generated by activities of the services.
Run the database configuration script:
Oracle_home/ocsb60/admin_console/create_db_table.sh
The script connects to the database using the setting you specified in create_db_table.properties.
At the following prompt, enter the password associated with the database user you identified in the create_db_table.properties file.
Please input password of profile database user
The database configuration script prints status or error messages to the screen. If successful, you can now use the SVC API and batch operation tools.
See "Understanding the SVC Data Model" for more information on the data objects.
After preparing the database, create the connection to the database in the Service Broker domain.
You can configure the database connection by using the Administration Console user interface or MBeans.
You need to know at least the following values for your database:
CredentialKey: Use KEY, the default credential key name assigned to the profile database user by the database configuration script.
name: Use oracle_driver for the connection name, unless you have modified the default driver reference attribute for the SVC application.
connectionFactory: In most cases, this should be the built-in driver, oracle.jdbc.pool.OracleDataSource.
For complete information on configuring the database connection, see the discussion on post installation tasks in Oracle Communications Service Broker Installation Guide.
If your SVC implementation includes storing user credentials, such as passwords for voice-mail accounts, configure the Service Broker Credential Store to store those credentials. For more information see the discussion on securing credentials with Credential Store in Oracle Communications Service Broker System Administrator's Guide.
To make the SVC API accessible to clients, create an HTTP access point in the Service Broker Signaling Tier as follows:.
Open the Administration Console.
Click OCSB, then Signaling Tier, then SSU Web Services, then General.
The General page appears
Click the HTTP tab, then Server, then Network Access.
Click the Edit icon.
Click New.
The New HTTP window appears.
Fill in details for the new HTTP access point:
For more information about the Credential Store settings see the discussion on securing credentials with Credential Store in Oracle Communications service Broker System Administrator's Guide.
Server Address - The hostname or IP address of the server to bind to. Leave blank if using a local host.
Server Port - A server port number to use.
Protocol - Most production implementations use HTTPS.
SSL Client Auth (if using HTTPS) - Boolean. Whether to enable SSL client authentication for this port.
Keystore Id (if using HTTPS) - The Credential Store Keystore ID.
Truststore Id - The Credential Store Truststore ID.
Target - The target server. If blank, applies to all servers.
Click OK.
Select the Security Context subtab.
Click the Edit icon.
Select the Keyid 0 and Context URI / line.
Click Update.
The Update window appears.
Change the value for Auth Method to NONE.
Click OK.
Click Confirm.
This section explains how to set up the SVC services to work with Service Broker, and your networks. All SVC services require these configuration tasks.
This section assumes that you have followed the instruction in the Configuring Service Broker for SVC Services section and installed and connected Service Broker for SVC services.
This section lists the configuration tasks required by all SVC services. The configuration tasks in this section are required by all SVC services. Table 2-1 lists the additional configuration tasks that each SVC service requires.
Configuring SVC service include the following tasks described in this section:
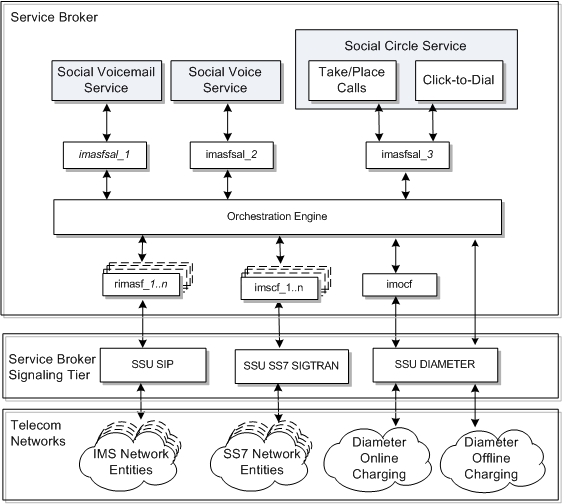
Figure 2-1 shows an overview of the various Service Broker components of a working SVC implementation and the various components required.
All SVC services require application-facing IM-ASF-SAL IMs to connect to the Orchestration Engine, and network-facing IMs to connect them to your telecom network. Follow these steps for each SVC service your implementation requires within a domain:
Open the Administration Console and click Edit.
In the OCSB navigation tree, expand Processing Tier, then Interworking Modules, then IM Management.
Click New.
Create a new IM-ASF-SAL to route SIP messages from the SIP SSU to the Orchestration Engine. Each IM-ASF-SAL requires a unique name. For more information, see the discussion on managing Interworking Modules in Oracle Communications Service Broker Processing Domain Configuration Guide.
Configure the new IM-ASF-SAL for the SVC Service.
Select the new IM-ASF-SAL from the MBean navigation tree. Select OCSB, then Processing Tier, then Interworking Modules, then IM-ASF-SAL_name.
The Configuration pane appears.
Click Application Server.
Enter the SVC service address in the SAL Application Address box using this syntax:
sip:SVC_application_name@oracle.com
Where:
SVC_application_name - Is the name of your SVC application to connect to. You get this name from the appropriate MBean. For example, SVC Social Circles application name, sip:socialcircles@oracle.com, is available from the applicationName attribute of the personalsvc configuration MBean:
oracle:type=oracle.axia.cm.ConfigurationMBean,name=oracle.axia.apps.svc.personalsvc.configuration,version=1.1.0.0,name0=personalsvcConfig,name1=general,name2=applicatonName
Set the SAL Mode to External.
Click Apply.
For more information on the remaining configuration settings see the discussion on configuring IM-ASF-SAL in Oracle Communications Service Broker Processing Domain Configuration Guide.
Commit the new IM-ASF SAL.
The services provided by SVC work over both SS7-based and IMS-based networks. To expose SVC services to those networks, connect SVC to the network-facing IMs which in turn, connect to external networks as described in the following sections. Figure 2-1 shows an overview of the required components; the sections below provide instructions for creating and configuring them.
You use R-IM-ASF, SSU SIP, and Orchestration Engine routing rules connect SVC services to a SIP-based telecom network.
Each network node requires SSU SIP and R-IM-ASF.
Configure SVC services with a SIP network:
For each network node in your implementation, create, activate, and configure an R-IM-ASF to route SIP traffic between the Orchestration Engine and the SIP SSU.
For more information, see the discussion on managing Interworking Modules, and configuring R-IM-ASF in Oracle Communications Service Broker Processing Domain Configuration Guide.
Add iFC routing rules to the Orchestration Engine to route traffic to and from the SIP network nodes.
For more information on creating the iFC, see "Sample iFC Routing Rules" and Oracle Communications Service Broker Orchestration Studio User's Guide.
Configure the SIP SSU to accept calls from your SIP network nodes and route them to the R-IM-ASF IMs that you created. Route all traffic from your network notes through the default SIP SSU.
For more information, see the discussion on configuring SIP Signaling Units in Oracle Communications Service Broker Signaling Domain Configuration Guide.
In addition, you must also change the default SessionIDOverride setting from false to true. You can set this attribute using the Service Broker JConsole or any JMX client, or even run scripts on the MBeans directly.
Set the SessionIDOverride attribute of the following MBean to true.
MBean: com.convergin:Type=SipSsu,Version=2.0.0.0,Location=AdminServer,Name=ssusip.ssusip
This section explains how to set up Oracle Communications Service Broker to make SVC services available to SS7 telecom networks.
Your SVC services require network-facing IMs and Orchestration Engine routing rules to connect your SVC service to a SS7-based telecom network.
Both the Oracle-supplied SVC services and other services that you connect them with, require connections from your SS7 network nodes to the Service Broker Orchestration Engine. You create these connections by configuring the SSU SS7 SIGTRAN and creating IM-SCF and R-IM-ASF IMs. You configure IM-SCF to route traffic from SIP network entities to the SSU SS7 SIGTRAN and then to the Orchestration Engine. To route traffic the from the Orchestration Engine to the SIP network notes, configure an R-IM-ASF. Figure 2-1 shows these relationships.
Each network node requires an individual IM-SCF, R-IM-SCF, or both.
To connect SVC services to a SIP network:
For each network node in your implementation, create, activate, and configure an IM-SCF to route SIP traffic from SS7 network nodes to the Orchestration Engine. At a minimum, specify these Configuration settings:
General: Alias
Call Handling: Body Encoding Format
Media Resources: Add the media resources that your implementation requires.
For more information on the configuration settings, see the discussion on configuring IM-SCF in Oracle Communications Service Broker Processing Domain Configuration Guide.
For each network node in your implementation, create, activate, and configure an R-IM-SCF to route SS7 traffic from the Orchestration Engine to the SSU SS7 SIGTRAN.
For more information, see the discussion on managing Interworking Modules and configuring R-IM-SCF in Oracle Communications Service Broker Processing Domain Configuration Guide.
Configure the SSU SS7 SIGTRAN to accept traffic from your SS7 network nodes and route it to the R-IM-SCF IMs that you created. The SSU SS7 SIGTRAN settings are configured on the Administration Console by opening OCSB, then Signaling Tier, then SSU Web Services, then SSU SS7 SIGTRAN. These configuration settings are the minimum required for an SVC Service; your implementation may require others:
SSU SS7 SIGTRAN: General: Configure the SSU to connect to your SS7 stack.
M3UA: Local Point Code
M3UA: Connectivity: Add at least one Local System entry and one Remote System entry.
M3UA: Connectivity: Network Mapping
M3UA: Connectivity: Network Routing: Configure the routes to your network entities.
SCCP: Local SSNs
SCCP: Remote PC and SSN Addresses
Routing: Incoming Routing Rules: Add a rule that accepts traffic from the IM-SCF.
Routing: Incoming Routing Criteria: Add a rule that routes calls by the Alias entry you created in the IM-SCF.
For more information on the configuration settings, see the discussion on configuring SS7 Signaling Server Units for SIGTRAM in Oracle Communications Service Broker Signaling Domain Configuration Guide.
Add routing rules to the Orchestration Engine to route traffic to and from SIP network nodes. For each SVC Service, enter the IM-ASF-SCF that you created in the Default Routing Targets box.
For more information see the discussion on configuring SS7 Signaling Server Units for SIGTRAN Oracle Communications Service Broker Signaling Domain Configuration Guide.
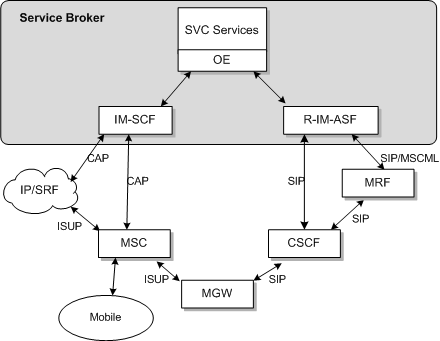
Your media server configuration will depend entirely on your individual implementation. Figure 2-2 shows a possible SVC deployment that illustrates the flexibility you have in working with media services over telecom networks. This SVC implementation works on both IMS and SS7 networks. This implementation assumes that all subscribers share the same MRF.
Note:
Netann media servers are not supported.Figure 2-2 Example Media Server Configuration
To configure a media server to work with your SVC implementation:
If not running, start the Administration Console.
Using a JMX MBean browser, such as the Java Monitoring and Management console (JConsole) tool, connect to the Administration Console process.
See the Service Broker System Administrators's Guide for information on connecting to the Administration Console process to access configuration MBeans.
In the MBean browser, navigate to the voicemail configuration
MBean: oracle:type=oracle.axia.cm.ConfigurationMBean,name=oracle.axia.apps.svc.common.configuration,version=1.1.0.0,name0=svcConfig,name1=callControl,name2=mediaServer
Specify an email address to receive voice-mail and email notifications in the mediaServer:type parameter.
This section describes the MBean attribute that you use to enable SVC services to take telephone calls. Table 2-1 lists the SVC services that require this configuration task.
You can set this attribute using the Service Broker JConsole or any JMX client, or even run scripts on the MBeans directly.
In the hostedDomain attribute of the following MBean, add the SVC service domain home you created.
MBean: oracle:type=oracle.axia.cm.ConfigurationMBean,name=oracle.axia.apps.svc.common.configuration,version=1.1.0.0.SNAPSHOT,name0=svcConfig,name1=callControl,name2=hostedDomain[0]
This section describes the MBean attributes that enable SVC services to place telephone calls and access voice-mail features. Table 2-1 lists the SVC services that require this configuration task.
This sections assumes that you have acquired a media server to use and know the media server's listening port and IP address.
You can set these attributes using the Service Broker JConsole or any JMX client, or even run scripts on the MBeans directly.
To configure SVC services to process calls and use voice-mail services:
In the hostedDomain attribute of the following MBean, add the SVC service domain home you created.
MBean: oracle:type=oracle.axia.cm.ConfigurationMBean,name=oracle.axia.apps.svc.common.configuration,version=1.1.0.0.SNAPSHOT,name0=svcConfig,name1=callControl,name2=hostedDomain[0]
In the mrfAlias attribute of the following MBean, change mrfAlias to the Media Resource Function alias, usually with this syntax mrf_identifier@ocsb.com.
MBean: oracle:type=oracle.axia.cm.ConfigurationMBean,name=oracle.axia.apps.svc.common.configuration,version=1.1.0.0.SNAPSHOT,name0=svcConfig,name1=callControl,name2=mrfAlias
In the ip attribute of the following MBean, specify the IP address of your media server
MBean: oracle:type=oracle.axia.cm.ConfigurationMBean,name=oracle.axia.apps.svc.common.configuration,version=1.1.0.0.SNAPSHOT,name0=svcConfig,name1=callControl,name2=mediaServer,name3=ip
In the port attribute of the following MBean, specify the port number to use on the media server:
MBean: oracle:type=oracle.axia.cm.ConfigurationMBean,name=oracle.axia.apps.svc.common.configuration,version=1.1.0.0.SNAPSHOT,name0=svcConfig,name1=callControl,name2=mediaServer,name3=port
In the type attribute of the following MBean, specify the Media Server Type.
MBean: oracle:type=oracle.axia.cm.ConfigurationMBean,name=oracle.axia.apps.svc.common.configuration,version=1.1.0.0.SNAPSHOT,name0=svcConfig,name1=callControl,name2=mediaServer,name3=type
In the filePath attribute of the following MBean, specify the root path to the media files. The syntax is: file://file_path
MBean: oracle:type=oracle.axia.cm.ConfigurationMBean,name=oracle.axia.apps.svc.common.configuration,version=1.1.0.0.SNAPSHOT,name0=svcConfig,name1=callControl,name2=mediaServer,name3=filePath
This section explains how to configure voice-mail for SVC services. Table 2-1 lists the SVC services that require this configuration task.
Before you configure voice-mail for SVC services, you must complete the following tasks:
Acquire a media server and know the media server's listening port and IP address.
Acquire an email server.
Follow the steps in "Connecting SVC Services to SIP Networks" and "Connecting SVC Services to SS7 Networks".
This section assumes that you will use a separate server for storing voice-mail messages, and know that server's IP address and message file location. To set up a server to store voice-mail messages:
On your SVC services server, select a local NFS location to mount audio files.
On your SVC services server open a command shell.
Mount the remote voice file location to a local location by using the following command syntax:
mount -t nfs -o rw Audio_File_IP_Adress:/Audio_File_Path Local_Location
Where:
Audio_File_IP_Address is the audio file server identifier.
Audio_File_Path is the location of the audio files on the audio file server.
Local_Location is the SVC server location to mount the audio files.
For example:
mount -t nfs -o rw 198.18.0.0:/opt/data/voicedata /opt/oracle/svc/voicedata
Mount the media server to the same location with this syntax:
mount -t nfs -o rw SVC_Server_IP_Address:/Audio_File_Location Media_Server_location
Where:
Audio_File_IP_Address is the audio file server location.
Audio_File_Location is the path to the audio files on the audio file server.
Media_Server_Location is the location to mount the media server.
This section assumes that you have followed the instructions in "Configuring a Media Server for SVC Services" and added a media server to store voice-mail messages.
To configure voice-mail capability for an SVC service:
Set the SVC Server umask to 002.
This ensures that your SVC Server has permission to write files to the voice-mail directory.
On a command line as superuser, add the media server user to the root group with this command:
#useradd root User_Name
Where:
User_Name is the name of the media server user.
Add DNS server names and IP addresses to the /etc/resolve.conf file using this syntax:
nameserver DNS_Server_IP_Address
nameserver ISP_Server_IP_Address
Where:
DNS_Server_IP_Address is the location of an DNS server to use.
ISP_Server_IP_Address is the location of an ISP server to use.
For example:
nameserver 208.67.222.222
nameserver 208.67.222.220
Open the Administration Console and select OCSB, then Processing Tier, then Interworking Modules, then IM Management.
If you have not created a new IM-ASF-SAL to route traffic from the Orchestration Engine to the SVC Social Voicemail server, do so now. For more information, see "Connecting SVC Services to Service Broker".
For more information see the discussion on configuring R-IM-ASF in Oracle Communications Service Broker Processing Domain Configuration Guide.
Select the new IM-ASF-SAL in the IM Management list.
Select Configuration then Application Server.
Enter the application alias of the SVC voicemail server in the SAL Application Address box using this syntax:
sip:Voicemail_Sever_Name@Domain_Name.com
Where:
Voicemail_Server_Name is the name of the voicemail server you are adding.
Domain_Name is the of the domain where the server can be found.
Click Commit.
In the navigation pane select OCSB, then Signaling Tier, and then the SSU for your protocol.
Configure an incoming routing rule to the IM-ASF that you created. For more information see Oracle Communications Service Broker Processing Domain Configuration Guide.
Navigate to OCSB then Processing Tier then Orchestration Engine.
Click Configuration then Static Route OLP.
Enter the URI of the SVC Social Voicemail service using this syntax:
sip:IMASFSAL_Name.IMASFSAL@ocsb
Where:
IMASFSAL_Name is the name of the IM-ASF-SAL you created for voice-mail.
Click Commit.
Configure these parameters using the Service Broker JConsole, or any JMX client or create scripts to run on the MBeans directly:
Set the SessionIDOverrdie attribute to true in this MBean:
com.convergin:Type=SipSsu,Version=2.0.0.0,Location=AdminServer,Name=ssusip.ssusip
Set a location to store voice-mail files using the localVoiceRootPath parameter in this MBean. The syntax is /parent_directory/child_directory/..:
localVoiceRootPath MBean in oracle:type=oracle.axia.cm.ConfigurationMBean,name=oracle.axia.apps.svc.voicemailsvc,version=1.1.0.0,name0=voicemailsvcConfig,name1=general,name2=localVoiceRootPath
Specify a root location on the media server to store voice-mail messages using the mediaServerVoiceRootPath attribute of this MBean. Use this syntax: filename:///parent_directory/child_directory/...
oracle:type=oracle.axia.cm.ConfigurationMBean,name=oracle.axia.apps.svc.voicemailsvc,version=1.1.0.0,name0=voicemailsvcConfig,name1=general,name2=localVoiceRootPath.
Specify an email server login account name to use with the accountName attribute of this MBean:
accountName MBean in oracle:type=oracle.axia.cm.ConfigurationMBean,name=oracle.axia.apps.svc.voicemailsvc,version=1.1.0.0,name0=voicemailsvcConfig,name1=emailNotification,name2=accountName.
Specify the email server login account password using the setpassword operation of this MBean. Set the key and password attributes to the key and password that the account uses, and set one-way to False:
Specify a password in the oracle:type=oracle.axia.cm.ConfigurationMBean,name=oracle.axia.apps.svc.voicemailsvc,version=1.1.0.0,name0=CredentialStore.
Specify an email address to receive voice-mail and email notifications from the email server using the emailAddress attribute of this MBean:
emailAddress MBean in oracle:type=oracle.axia.cm.ConfigurationMBean,name=oracle.axia.apps.svc.voicemailsvc,version=1.1.0.0.name0=voicemailsvcConfig,name1=emailNotification,name2=emailAddress.
Specify the IP address of the email server using the mailServerHost attribute of this MBean:
oracle:type=oracle.axia.cm.ConfigurationMBean,name=oracle.axia.apps.svc.voicemailsvc,version=1.1.0.0,name0=voicemailsvcConfig,name1=emailNotification,name2=mailServerHost.
Specify the port to listen for email messages from the email server using the mailServerPort attribute of this MBean:
oracle:type=oracle.axia.cm.ConfigurationMBean,name=oracle.axia.apps.svc.voicemailsvc,version=1.1.0.0,name0=voicemailsvcConfig,name1=emailNotification,name2=mailServerPort.
By default, the SVC Social Voicemail service is configured to automatically send voice-mail messages that arrive in their voice-mail account to subscribers' email accounts in .wav format. To enable this capability, configure the security settings on both the email server and email clients, and set several Service Broker configurations.
You use the keytool program for this to generate and import keystore and server certificates; this program is available as part of the JDK that you installed with Service Broker.
For more information on keytool and keytool parameters, see the discussions setting up the public key infrastructure between Administration clients and Processing Servers, and Signaling Servers, and about Keytool and X.500 distinguished names in Oracle Communications Service Broker System Administrator's Guide.
Perform these steps to configure email notification for SVC Social Voicemail service:
Generate and export HTTPS certificates and keystores using the keytool program as follows:
Generate a public or private key for the server. This is an example command:
keytool -genkeypair -dname "cn=Servername, ou=Organizational_Unit, o=Organization, c=US" -alias server -keypass Password -keystore Server_Keystore -storepass
Export the public key using a self-signed certificate. This is an example command:
keytool -exportcert -alias Server_Name -keystore Server_Keystore -storepass Password -rfc -file Server_Key_Filename.cer
Import the server certificate into the client truststore. This is an example command:
keytool -importcert -file Server_Key_Filename.cer -keystore Client_Truststore -storepass Password -noprompt
Generate the public or private key for the client. This is an example command:
keytool -genkeypair -dname "cn=Axia Client_Name, ou=Organizational_Unit, o=Organization, c=US" -alias Client -keypass Password -keystore Client_Keystore -storepass
Export the public key to the client using a self-signed certificate. This is an example command:
keytool -exportcert -alias Client_Name -keystore Client_Keystore -storepass Password -rfc -file Client_Certificat_Name.cer
Import the client certificate into the server truststore. This is an example command:
keytool -importcert -file Client_Certificat_Name.cer -keystore Server_Truststore -storepass Password -noprompt
Copy the keystore files (Public_Key_Filename.cer and Client_Certificate_Name.cer) to these Service Broker locations:
Oracle_home/install/admin_console
Oracle_home/install/managed_server
Set axia.ssl=true in your Oracle_home/ocsb60/admin_console/properties/common.properties file.
Confirm that your Oracle_home/ocsb60/managed_server/service.properties file includes these entries:
javax.net.ssl.keystore=servsrkeystore
javax.net.ssl.trustStore=servertruststore
Copy the server certificate file (Server_Key_Filename.cer) from the email server to the Service Broker keystore.
Import the server certificate file to the client truststore and server truststore with these commands:
keytool -importcert -alias mail -file Server_Key_Filename.cer -keystore Server_Truststore -storepass Password -noprompt
keytool -importcert -alias mail -file Server_Key_Filename.cer -keystore Client_Truststore -storepass Password -noprompt
In the JConsole, expand oracle.axia.api.management.ds.DomainServiceMBean then setDomainProperty.
Enter these name-value pairs:
Name: axia.ssl; Value: true
Name: systemprop.axia.netio.ssl; Value: true
Name: systemprop.axia.netio.client_auth; Value: false
Your SVC Social Voicemail service now automatically sends voice-mail messages as WAV files in emails to subscribers.
This section lists the configuration tasks necessary to configure the SVC Social Circle Click-to-Dial service. The SVC Social Circle Click-to-Dial service is the only SVC service that requires these configuration tasks.
The Social Circle Click-to-Dial service is unique among the SVC services in that it is a session-initiating application. Traffic originates from it and travels through Service Broker to the telecom network. You route traffic from the click-to-dial application using IM-ASF-SAL and from this IM to the Orchestration Engine, and then to network nodes.
Complete these tasks to configure the Social Circle Click-to-Dial service:
Select and configure an IP Multimedia Subsystem (IMS) to store WAV files for the click-to-dial messages.
Select and configure a SIP server to accept click-to-dial calls.
Create and activate an application-facing IM-ASF SAL.
For more information on creating IMs, see the discussion on managing Interworking Modules in Oracle Communications Service Broker Processing Domain Configuration Guide.
Create and activate an R-IM-ASF to connect the SIP server to the Orchestration Engine. Set the Network Entity Email Address field to:
sip:cscf@IP_address:Port_number
Where:
IP_Address - The IP address of your SIP server.
Port_number - The SIP server port to use. 5060 is the default.
For more information on creating IMs, see the discussion on managing Interworking Modules in Oracle Communications Service Broker Processing Domain Configuration Guide
Configure the SIP SSU.
For more information on configuring the SIP SSU see the discussion on configuring SIP Signaling Server Units in Oracle Communications Service Broker Signaling Domain Configuration Guide. Be sure to add your SIP server IP address to the GloballyRoutable User agent URI: box.
Configure the Orchestration Engine.
Navigate to OCSB, Processing Tier, Orchestration Engine, General. In the Subscriber Profile Receiver field, select OlpLSSInfoReceiver to route traffic to the IM-ASF that you created.
For more information on configuring the Orchestration Engine, see the discussion on configuring the Orchestration Engine in Oracle Communications Service Broker Processing Domain Configuration Guide.
Configure the Service Broker orchestration Profiles:
In the Administration Console navigate to OCSB, Processing Tier, Supplementary Modules, SM-LSS.
Click the Configuration, Orchestration Profiles.
Select the default orchestration profile and click Update to update.
The Update dialog box appears. It contains the local initial filter criteria (iFC) logic that controls the application chain applied by Service Broker. The OLP Data field contains the actual iFC text that specifies the orchestration logic
Fill in the iFC criteria to use. This example clicktodial.ifc file will help guide you through the process. Also see "Sample iFC Routing Rules" for an iFC example that includes the other SVC services.
<?xml version="1.0" encoding="UTF-8"?>
<Sh-Data>
<Sh-IMS-Data>
  <IFCs>
     <InitialFilterCriteria>
      <Priority>0</Priority>
      <TriggerPoint>
       <ConditionTypeCNF>0</ConditionTypeCNF>
       <SPT>
        <ConditionNegated>0</ConditionNegated>
        <Group>0</Group>
        <Method>INVITE</Method>
       </SPT>
       <SPT>
        <ConditionNegated>0</ConditionNegated>
        <Group>0</Group>
        <RequestURI>sip:User_Nmae@IP_Address:Port_Number</RequestURI>
       </SPT>
       </TriggerPoint>
      <ApplicationServer>
       <ServerName>sip:imasf_Name.IMASF@ocsb</ServerName>
       <DefaultHandling>0</DefaultHandling>
      </ApplicationServer>
     </InitialFilterCriteria>
     <InitialFilterCriteria>
      <Priority>1</Priority>
      <TriggerPoint>
       <ConditionTypeCNF>0</ConditionTypeCNF>
       <SPT>
        <ConditionNegated>0</ConditionNegated>
        <Group>0</Group>
        <Method>INVITE</Method>
       </SPT>
       <SPT>
        <ConditionNegated>0</ConditionNegated>
        <Group>0</Group>
        <RequestURI>sip:User_Nmae@IP_Address:Port_Number</RequestURI>
       </SPT>
       </TriggerPoint>
      <ApplicationServer>
       <ServerName>sip:imasf_Name.IMASF@ocsb</ServerName>
       <DefaultHandling>0</DefaultHandling>
      </ApplicationServer>
     </InitialFilterCriteria>
  </IFCs>
</Sh-IMS-Data>
</Sh-Data>
Configure these parameters using the Service Broker JConsole, or any JMX client or create scripts to run on the MBeans directly:
Set the application-facing module name in this MBean: oracle:type=oracle.axia.cm.ConfigurationMBean,name=oracle.axia.apps.svc.personalsvc.configuration,version=1.1.0.0,name0=personalsvcConfig,name1=click2dial,name2=applicationFacingModuleName.
Use this syntax: sip:imrasfsal_name.IMRASFSAL@domain_name.com.
(Optional) Replace the default click_2_dial.wav announcement files in these MBeans. These files are played to a subscriber when they initiate a click-to-dial call. Replace these default files with versions that meets your implementation's needs. oracle:type=oracle.axia.cm.ConfigurationMBean,name=oracle.axia.apps.svc.personalsvc.configuration,version=1.1.0.0.name0=personalsvcConfig,name1=click2dial,name2=click2DialVoiceIMS
And
oracle:type=oracle.axia.cm.ConfigurationMBean,name=oracle.axia.apps.svc.personalsvc.configuration,version=1.1.1.0.0,name0=personalsvcConfig,name1=click2dial,name2=click2DialVoiceIN
Set the default network type in this MBean: oracle:type=oracle.axia.cm.ConfigurationMBean,name=oracle.axia.apps.svc.personalsvc.configuration,version=1.1.0.0,name0=personalsvcConfig,name1=click2dial,name2=defaultNetworkType.
The default value is IMS. Change this to IN to for SS7 networks.
For more information on configuring the SM-LSS see the discussion on configuring SM-LSS in Oracle Communications Service Broker Processing Domain Configuration Guide.
This section shows a sample set of iFC routing rules used to test traffic for SVC services. Example data has been filled in.
<?xml version="1.0" encoding="UTF-8"?>
<Sh-Data>
<Sh-IMS-Data>
  <IFCs>

     <!-- Social Voicemail service -->
     <InitialFilterCriteria>
      <Priority>0</Priority>
      <TriggerPoint>
       <ConditionTypeCNF>0</ConditionTypeCNF>
       <SPT>
        <ConditionNegated>0</ConditionNegated>
        <Group>0</Group>
        <Method>INVITE</Method>
       </SPT>
       <SPT>
        <ConditionNegated>0</ConditionNegated>
        <Group>0</Group>
        <RequestURI>sip:29009@open-ims.test</RequestURI>
       </SPT>
       </TriggerPoint>
      <ApplicationServer>
       <ServerName>sip:imasfsal_vm.IMASFSAL@ocsb</ServerName>
       <DefaultHandling>1</DefaultHandling>
      </ApplicationServer>
     </InitialFilterCriteria>

     <!-- Social Circle one number service-->
     <InitialFilterCriteria>
      <Priority>1</Priority>
      <TriggerPoint>
       <ConditionTypeCNF>0</ConditionTypeCNF>
       <SPT>
        <ConditionNegated>0</ConditionNegated>
        <Group>0</Group>
        <Method>INVITE</Method>
       </SPT>
       <SPT>
        <ConditionNegated>0</ConditionNegated>
        <Group>0</Group>
        <SIPHeader>
          <Header>To</Header>
          <Content>.*sip:456.*@open-ims.test.*</Content>
        </SIPHeader>
       </SPT>
       </TriggerPoint>
      <ApplicationServer>
       <ServerName>sip:imasfsal_gons.IMASFSAL@ocsb</ServerName>
       <DefaultHandling>1</DefaultHandling>
      </ApplicationServer>
     </InitialFilterCriteria>

     <!-- Social Voice one number service-->
     <InitialFilterCriteria>
      <Priority>2</Priority>
      <TriggerPoint>
       <ConditionTypeCNF>0</ConditionTypeCNF>
       <SPT>
        <ConditionNegated>0</ConditionNegated>
        <Group>0</Group>
        <Method>INVITE</Method>
       </SPT>
       <SPT>
        <ConditionNegated>0</ConditionNegated>
        <Group>0</Group>
        <SIPHeader>
          <Header>To</Header>
          <Content>.*sip:123.*@open-ims.test.*</Content>
        </SIPHeader>
       </SPT>
       </TriggerPoint>
      <ApplicationServer>
       <ServerName>sip:imasfsal_1.IMASFSAL@ocsb</ServerName>
       <DefaultHandling>1</DefaultHandling>
      </ApplicationServer>
     </InitialFilterCriteria>

     <InitialFilterCriteria>
      <Priority>3</Priority>
      <TriggerPoint>
       <ConditionTypeCNF>0</ConditionTypeCNF>
       <SPT>
        <ConditionNegated>0</ConditionNegated>
        <Group>0</Group>
        <Method>INVITE</Method>
       </SPT>
       </TriggerPoint>
      <ApplicationServer>
       <ServerName>sip:imasf_cscf.IMASF@ocsb</ServerName>
       <DefaultHandling>1</DefaultHandling>
      </ApplicationServer>
     </InitialFilterCriteria>

  </IFCs>
</Sh-IMS-Data>
</Sh-Data>
The first step in providing SVC services to your subscribers is to create a web-based user portal that your subscribers use to access those services. SVC includes an API that you use for this purpose. You can design the user portal in any way that meets your requirements. For more information on the SVC API see "About the SVC API Operations" and "Social Voice Communicator API Reference".
|
Copyright © 2011, 2012, Oracle and/or its affiliates. All rights reserved. Legal Notices |
|