| Oracle® Fusion Middleware Security Guide for Oracle Business Intelligence Enterprise Edition 11g Release 1 (11.1.1) E10543-02 |
|
 Previous |
 Next |
| Oracle® Fusion Middleware Security Guide for Oracle Business Intelligence Enterprise Edition 11g Release 1 (11.1.1) E10543-02 |
|
 Previous |
 Next |
This chapter explains how Oracle Business Intelligence can be configured to use commercial directory servers for authentication. It covers configuring Oracle Business Intelligence to use OID for authentication, and configuring Oracle Business Intelligence to use OID as a policy store and credential store.
|
Note: For a detailed list of security setup steps, see Section 1.8, "Detailed List of Steps for Setting Up Security In Oracle Business Intelligence". |
This chapter contains the following sections:
Section 3.1, "Common Tasks for Deploying Security With Oracle Internet Directory"
Section 3.2, "Configuring an Alternative Authentication Provider"
Section 3.3, "Configuring an Alternative Policy Store and Credentials Store"
Table 3-1 contains common authorization configuration tasks and provides links for more information.
Table 3-1 Task Map: Configuring Authorization for Oracle Business Intelligence
| Task | Description | Information |
|---|---|---|
|
Re-configure Oracle BI to use an LDAP based Authentication Provider. |
Re-configure Oracle BI to use an LDAP based Authentication Provider, such as Oracle Internet Directory. |
Section 3.3, "Configuring an Alternative Policy Store and Credentials Store" |
|
Re-configure Oracle BI to use an LDAP based Credential Store and Policy Store Provider. |
Re-configure Oracle BI to use an LDAP based Credential Store and Policy Store Provider, such as Oracle Internet Directory. |
Section 3.3, "Configuring an Alternative Policy Store and Credentials Store" |
When you use OID as the Authentication Provider, you use OID Console to set up your Users and Groups. You can then map these Users and Groups to the preconfigured Application Roles (for example, BIConsumer, BIAuthors, and BIAdministrator), and any additional Application Roles that you create. For more information about mapping Users and Groups to Application Roles, see Section 2.5, "Managing Application Roles and Application Policies Using Fusion Middleware Control".
You continue to use the other Oracle Business Intelligence tools (i.e. BI Administration Tool, Enterprise Manager Fusion Middleware Control, and Administration Page in Oracle BI Presentation Catalog) to manage the other areas of the security model.
For a current list of supported authentication providers and directory servers to use with Oracle Business Intelligence, see the system requirements and certification documentation. For more information, see System Requirements and Certification.
If a directory server other than the default the Embedded WebLogic LDAP Server is being used, you can view the users and groups from that directory server in Oracle WebLogic Server Administration Console. However, you must continue to manage the users and groups in the interface for the directory server being used. For example, if you are using OID, you must use OID Console to create and edit Users and Groups.
To configure OID as an Authentication Store Provider, do the following:
Prerequisite: Shut down all servers except Admin Server.
Configure Oracle Internet Directory as an authentication provider as described in Section 3.2.1.1, "How to Configure Oracle Business Intelligence to use Oracle Internet Directory as an Authentication Provider".
Configure the User Name Attribute in the Identity Store to match the User Name Attribute in the Authentication Provider as described in Section 3.2.1.2, "How to Configure the User Name Attribute in the Identity Store".
Use the myrealm\Users and Groups tab to verify that the Users and Group from OID are displayed correctly. If the Users and Groups are displayed correctly, then proceed to Step 4. Otherwise, re-set your configuration settings and re-try.
Configure a new BISystemUser account for a user in Oracle Internet Directory to match the account for DefaultAuthenticator as described in Section 3.2.1.3, "Configure a New Trusted User (BISystemUser)".
Update the user GUIDs to be the values in Oracle Internet Directory as described in Section 3.2.1.4, "Refresh the User GUIDs".
Notes
After a new authentication provider is configured, Application Roles must be mapped again to the correct Groups (enterprise roles) in the new identity store.
For more information, see Section 2.5.4.2, "Modifying Membership of an Application Role".
You perform this task to reconfigure your installation to use OID instead of the default Oracle WebLogic Administration Server.
To configure the OID authentication provider:
Note: MyOIDDirectory is used to represent the Oracle Internet Directory in the following procedure.
In Oracle WebLogic Server Administration Console, click Lock & Edit in the Change Center.
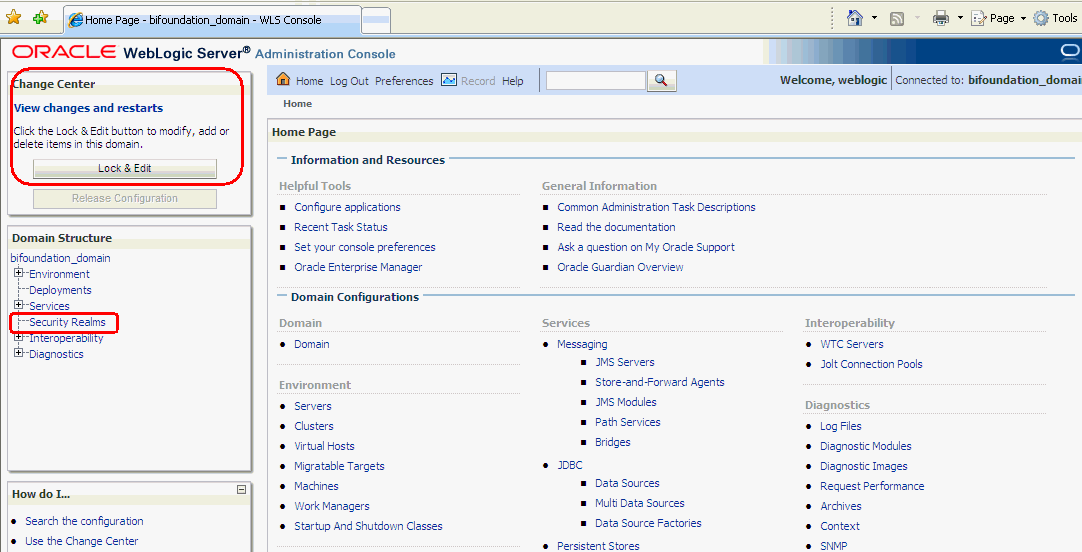
Select Security Realms from the left pane and click myrealm.
The default Security Realm is named myrealm.
Display the Providers tab, then display the Authentication sub-tab.
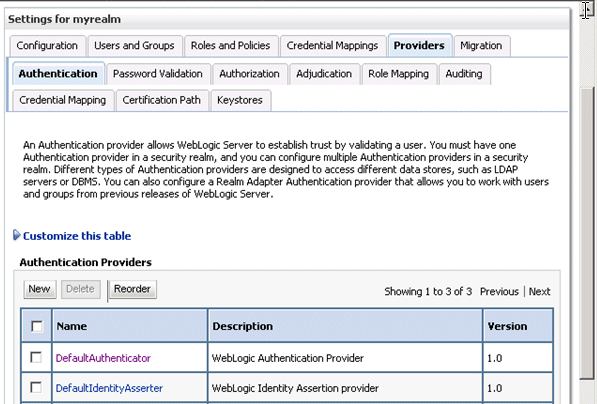
Click New to launch the Create a New Authentication Provider page.
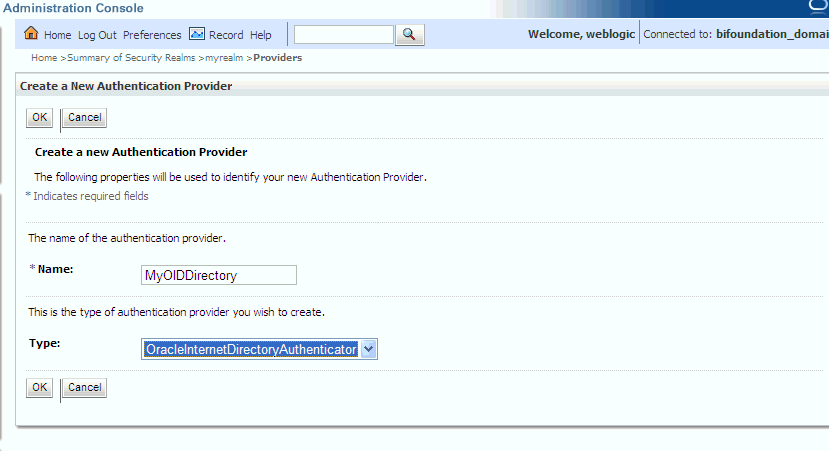
Enter values in the Create a New Authentication Provider page as follows:
Name: Enter a name for the authentication provider. For example, MyOIDDirectory.
Type: Select OracleInternetDirectoryAuthenticator from the list.
Click OK to save the changes and display the Authentication Providers list updated with the new Authentication Provider.
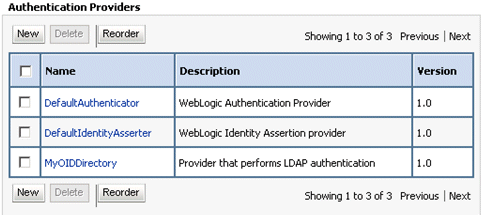
Click the new Authenticator Provider in the Name column to display the Settings for <Authentication Provider Name> page.
For example, click MyOIDDirectory.
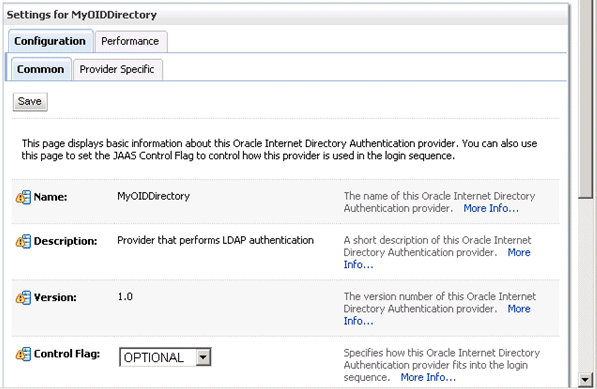
Display the Configuration\Common tab, and use the Control Flag drop down list to select 'SUFFICIENT', then click Save.
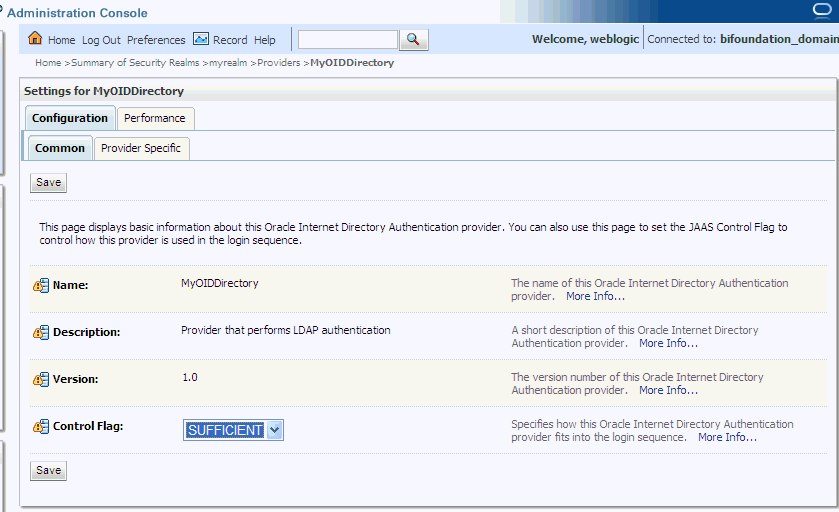
Display the Provider Specific tab.
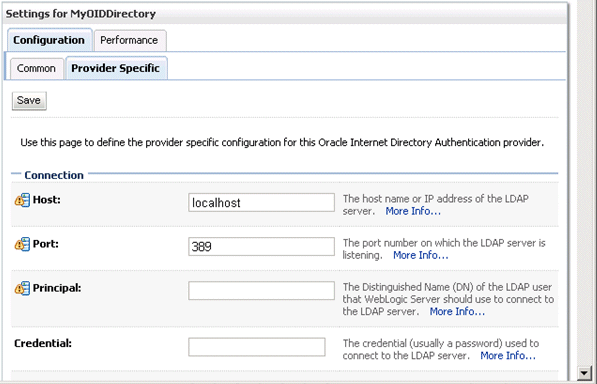
Use the Provider Specific tab to specify the details listed in the table below.
| Section Name | Field Name | Description |
|---|---|---|
| Connection | Host | The host name of the Oracle Internet Directory server. |
| Port | The port number on which the Oracle Internet Directory server is listening. | |
| Principal | The distinquished name (DN) of the Oracle Internet Directory user to be used to connect to the Oracle Internet Directory server. For example: cn=OIDUser,cn=users,dc=us,dc=mycompany,dc=com. | |
| Credential | Password for the Oracle Internet Directory user entered as the Principal. | |
| Groups | Group Base DN | The base distinguished name (DN) of the Oracle Internet Directory server tree that contains groups. |
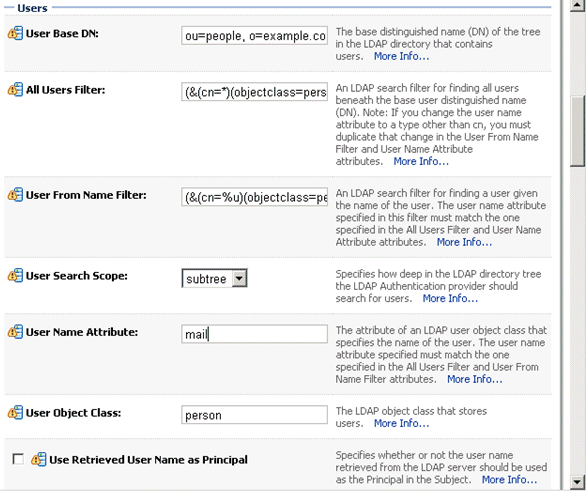
| Users | User Base DN | The base distinguished name (DN) of the Oracle Internet Directory server tree that contains users. |
| All Users Filter | LDAP search filter. Click More Info... for details. | |
| User From Name Filter | LDAP search filter. Click More Info... for details. | |
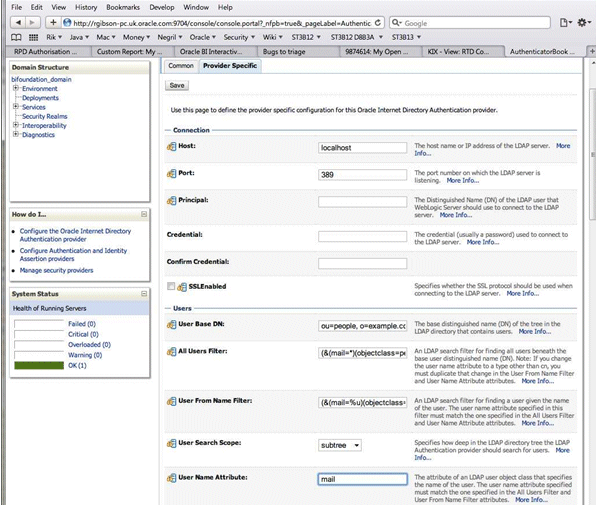
| User Name Attribute | The attribute that you want to use to authenticate (for example, cn, uid, or mail). For example, to authenticate using a User's email address you set this value to 'mail'.
Note: The value that you specify here must match the User Name Attribute that you are using in the Authentication Provider, as described in the next task Section 3.2.1.2, "How to Configure the User Name Attribute in the Identity Store". |
The screenshot below shows the Users area of the Provider Specific tab.
Click Save.
At the main Settings for myrealm page, display the Providers tab, then display the Authentication sub-tab.

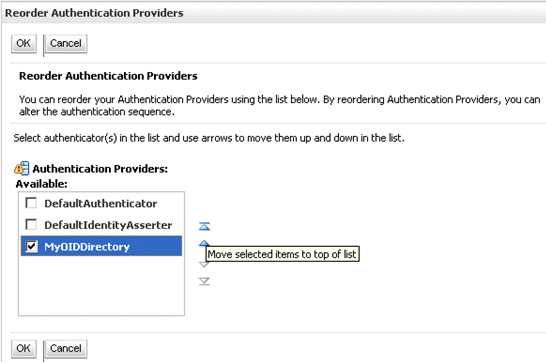
Click Reorder. to display the Reorder Authentication Providers page.
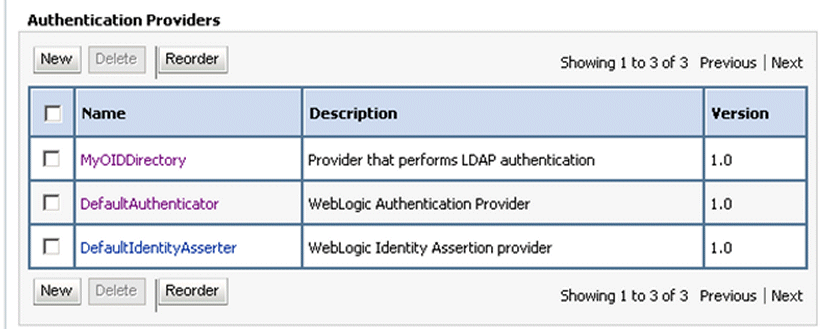
Select the name of the Oracle Internet Directory authentication provider (for example, MyOIDDirectory) and use the arrow buttons to move it into the first position in the list, then click OK.
The screenshot below shows the re-ordered list of Authentication Providers.
Click DefaultAuthenticator in the Name column to display the Settings for DefaultAuthenticator page.
Display the Configuration\Common tab, and use the Control Flag drop down list to select 'SUFFICIENT', then click Save.
If you configure a different Authentication Provider such as OID, then you must ensure that the User Name Attribute that you use in the Identity Store matches the User Name Attribute that you use in the Authentication Provider.
For example, to authenticate using a User's email address you might set the User Name Attribute to 'mail' in both the Identity Store and the Authentication Provider.
The screenshot below shows an example where the User Name Attribute in OID Authenticator has been set to 'mail'.
To configure the User Name Attribute:
In Oracle Enterprise Manager - Fusion Middleware Control, navigate to \Weblogic domain\bifoundation_domain in the navigation pane.
Right-click bifoundation_domain and select Security, then Security Provider Configuration to display the Security Provider Configuration page.
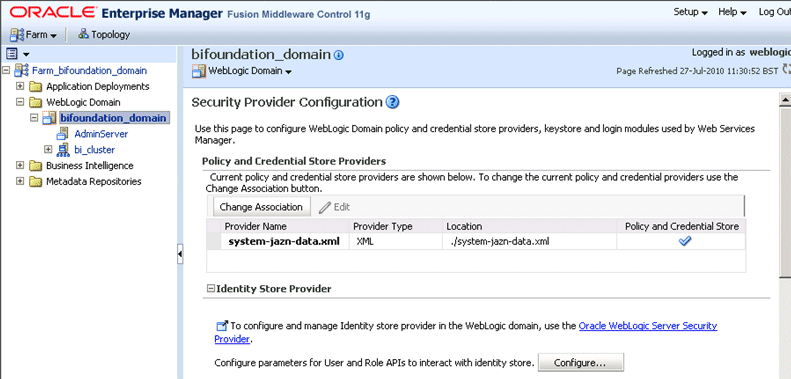
In the Identity Store Provider area, click Configure to display the Identity Store Configuration page.
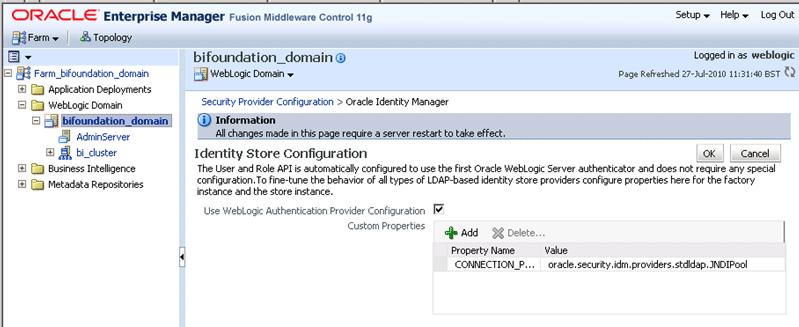
In the Custom Properties area, use the Add option to add the following two Custom Properties:
Table 3-2 Custom Properties
| Property Name | Value |
|---|---|
|
user.login.attr |
Specify the User Name Attribute that is set in the Authentication Provider. For example, if the User Name Attribute is set to 'mail' in the Authentication Provider, then set this value to 'mail'. |
|
username.attr |
Specify the User Name Attribute that is set in the Authentication Provider. For example, if the User Name Attribute is set to 'mail' in the Authentication Provider, then set this value to 'mail'. |
The screenshot below shows an example set of Custom Properties with the User Name Attribute set to 'mail'.
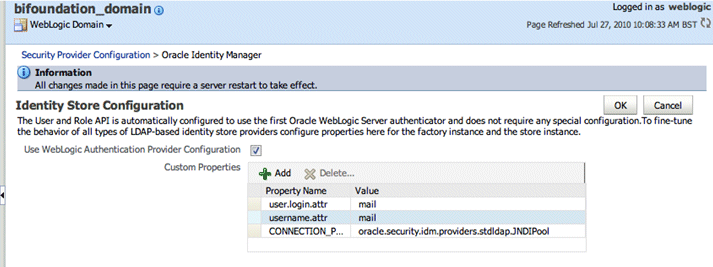
Click OK to save the changes.
Restart the Admin Server.
Note: Ensure that the Users and Groups in OID are displayed in WebLogic Console, as described in step 3 in Section 3.2.1, "How to Configure Oracle Internet Directory as an Authentication Store Provider".
Oracle Business Intelligence uses a specific user for the configured authentication provider for internal communication. If you configure Oracle BI to use an OID authentication provider, then you must select a user from OID to use for this purpose and give that user the required permissions. You can create a new user in OID for this purpose or use a pre-existing user. You give the chosen user the permission they need by making them a member of the pre-existing BISystem Application Role.
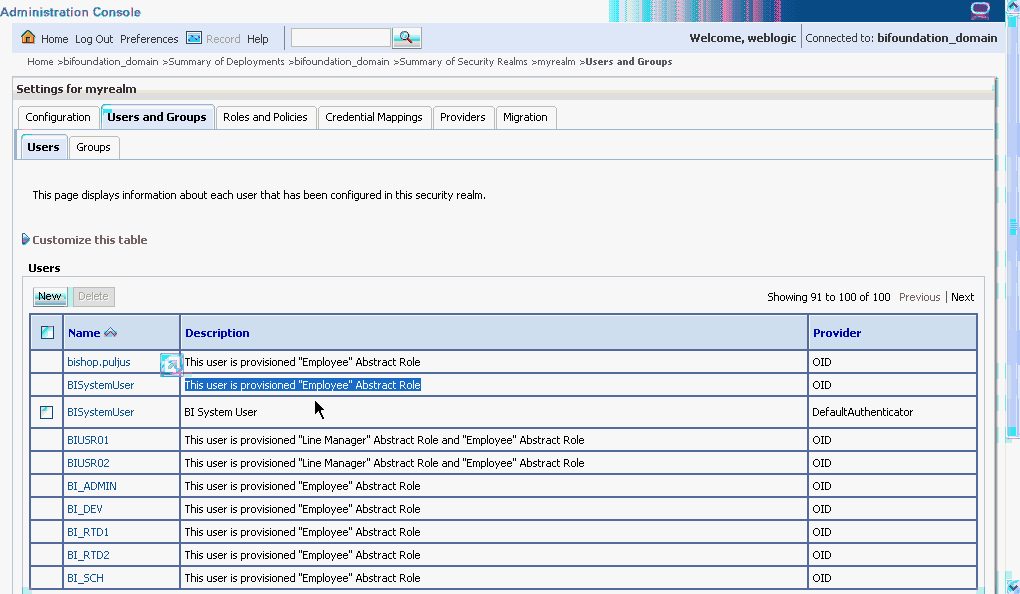
Pre-requisite: Delete the default 'BISystemUser' from the realm myrealm. Display the Settings for myrealm page, display the Users and Groups tab, then the Users sub-tab, and delete the user named BISystemUser with DefaultAuthenticator in the Provider column of the table (see example screenshot below).

To create a new trusted user account with a user in OID:
In Oracle Internet Directory, create a user for the trusted user.
Best practice is to name this trusted user BISystemUser to clarify its purpose, but you might choose any name you want.
When you are finished, the Users table in Oracle WebLogic Server Administration Console should resemble the screenshot below.
Next you must make the new trusted user a member of the BISystem Application Role.
In Fusion Middleware Control target navigation pane, go to the Oracle WebLogic Server domain in which Oracle Business Intelligence is installed. For example, bifoundation_domain.
Go to the Application Roles page in Fusion Middleware Control.
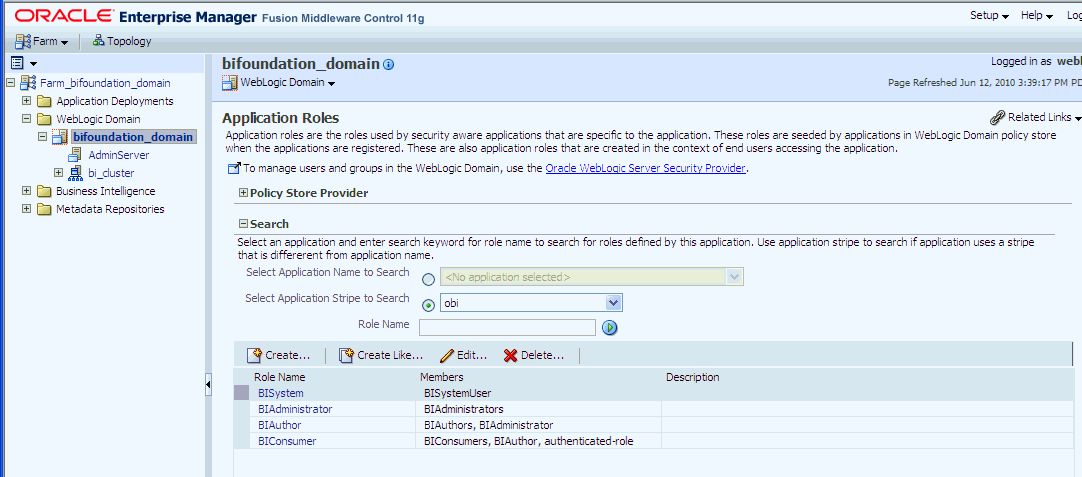
In the Select Application Stripe to Search list, select obi from the list. Click the search arrow to the right of the Role Name field.
The Oracle Business Intelligence Application Roles are displayed and should resemble the screenshot below.
Select the BISystem Application Role and click Edit.
In the Edit Application Role page, click Add User.
In the Add User dialog, search for the trusted user created in Oracle Internet Directory. Use the shuttle controls to move the trusted user name (BISystemUser) from the Available Users list to the Selected Users list.
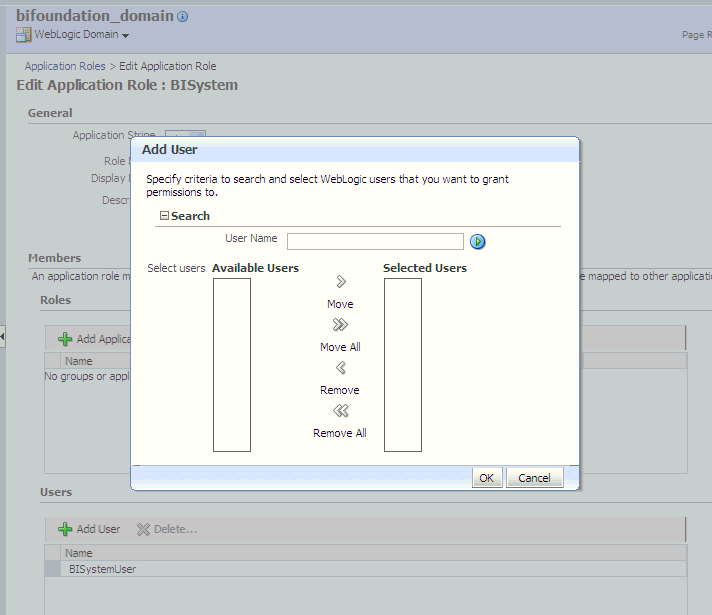
Click OK.
The trusted user (BISystemUser) contained in Oracle Internet Directory is now a member of the BISystem Application Role.
Next add the trusted user's credentials to the oracle.bi.system credential map.
From Fusion Middleware Control target navigation pane, expand the farm, then expand WebLogic Domain, and select bifoundation_domain.
From the WebLogic Domain menu, select Security, then Credentials.
Open the oracle.bi.system credential map, select system.user and click Edit.

In the Edit Key dialog, enter BISystemUser (or name you selected) in the User Name field. In the Password field, enter the trusted user's password that is contained in Oracle Internet Directory.
Click OK.
In WebLogic Console, click myrealm to display the Settings for <Realm> page, display the Roles and Policies tab, and add the new System user to the Global 'Admin Role'.
Start the Managed Servers.
The new trusted user from Oracle Internet Directory is configured for Oracle Business Intelligence
If you change the directory server used as the identity store for the authentication provider, then you must refresh the user GUIDs as described below. If you do not refresh the GUIDs and the same user name exists in both directory servers (original and new), then the original user GUID might conflict with the user GUID contained in new directory server, resulting in authentication errors.
To refresh the user GUIDs:
This task requires that you manually edit the configuration files to instruct Oracle BI Server and Oracle BI Presentation Server to refresh the GUIDs on restart. Once completed, you edit these files to remove the modification. For information about where to locate Oracle Business Intelligence configuration files, see "Where Configuration Files are Located" in Oracle Fusion Middleware System Administrator's Guide for Oracle Business Intelligence Enterprise Edition.
Update the FMW_UPDATE_ROLE_AND_USER_REF_GUIDS parameter in NQSConfig.INI:
Open NQSConfig.INI for editing at:
ORACLE_INSTANCE/config/OracleBIServerComponent/coreapplication_obisn
Locate the FMW_UPDATE_ROLE_AND_USER_REF_GUIDS parameter and set it to YES, as follows:
FMW_UPDATE_ROLE_AND_USER_REF_GUIDS = YES;
Save and close the file.
Update the ps:Catalog element in instanceconfig.xml:
Open instanceconfig.xml for editing at:
ORACLE_INSTANCE/config/OracleBIPresentationServicesComponent/
coreapplication_obipsn
Locate the ps:Catalog element and update it as follows:
<ps:Catalog xmlns:ps="oracle.bi.presentation.services/config/v1.1">
<ps:UpgradeAndExit>false</ps:UpgradeAndExit>
<ps:UpdateAccountGUIDs>UpdateAndExit</ps:UpdateAccountGUIDs>
</ps:Catalog>
Save and close the file.
Start the Oracle Business Intelligence system components using opmnctl:
cd ORACLE_BASE/admin/instancen/bin
./opmnctl startall
Set the FMW_UPDATE_ROLE_AND_USER_REF_GUIDS parameter in NQSConfig.INI back to NO.
Important: You must perform this step to ensure that your system is secure.
Update the ps:Catalog element in instanceconfig.xml to remove the <ps:UpdateAccount GUIDs> entry.
Restart the Oracle Business Intelligence system components using opmnctl:
cd ORACLE_BASE/admin/instancen/bin
./opmnctl stopall
./opmnctl startall
To re-configure Oracle Business Intelligence to use OID as a Credential Store and Policy Store Provider, follow the steps in Section 8.2 Reassociating the Domain Policy Store in Oracle Fusion Middleware Security Guide.
Notes
The only LDAP server supported in this release is Oracle Internet Directory. The pre-requisites for using an LDAP-based credential store are the same as for using an LDAP-based policy store. For more information, see "Configuring a Domain to Use an LDAP-Based Policy Store" in Oracle Fusion Middleware Security Guide.