| Oracle® WebLogic Communication Services Developer's Guide 11g Release 1 (11.1.1) E13807-02 |
|
 Previous |
 Next |
| Oracle® WebLogic Communication Services Developer's Guide 11g Release 1 (11.1.1) E13807-02 |
|
 Previous |
 Next |
This chapter describes the Parlay X Multimedia Messaging Web Service that is available with Oracle User Messaging Service and how to use the Parlay X Web Services Multimedia Messaging API to send and receive messages through Oracle User Messaging Service.
|
Note: To learn about the architecture and components of Oracle User Messaging Service, see Oracle Fusion Middleware Getting Started with Oracle SOA Suite. |
This chapter contains the following sections:
|
Note: Oracle User Messaging Service also ships with a Java client library that implements the Parlay X API. |
The following sections describe the semantics of each of the supported operations along with implementation-specific details for the Parlay X Gateway. The following tables, describing input/output message parameters for each operation, are taken directly from the Parlay X specification.
Oracle User Messaging Service implements a subset of the Parlay X 2.1 Multimedia Messaging specification. Specifically Oracle User Messaging Service supports the SendMessage and ReceiveMessage interfaces. The MessageNotification and MessageNotificationManager interfaces are not supported.
The SendMessage interface allows you to send a message to one or more recipient addresses by using the sendMessage operation, or get the delivery status for a previously sent message by using the getMessageDeliveryStatus operation. The following requirements apply:
A recipient address must conform to the address format requirements of Oracle User Messaging Service (in addition to being a valid URI). The general format is <delivery_type>:<protocol_specific_address>, such as "email:user@domain", "sms:5551212", or im:user@jabberdomain".
Certain characters are not allowed in URIs; if it is necessary to include them in an address they can be encoded or escaped. Refer to the Oracle Fusion Middleware User Messaging Service API Reference for java.net.URI for details on how to create a properly encoded URI.
While the WSDL specifies that sender addresses can be any string, Oracle User Messaging Service requires that they be valid Messaging addresses.
Oracle User Messaging Service requires that you specify sender addresses on a per-delivery type basis. So for a sender address to apply to a recipient of a given delivery type, say EMAIL, the sender address must also have delivery type of EMAIL. Since this operation allows multiple recipient addresses but only one sender address, the sender address only applies to the recipients with the same delivery type.
Oracle User Messaging Service does not support the MessageNotification interface, and therefore does not produce delivery receipts, even if a receiptRequest is specified. In other words, the receiptRequest parameter is ignored.
Table 18-1 describes message descriptions for the sendMessageRequest input in the sendMessage operation.
Table 18-1 sendMessage Input Message Descriptions
| Part Name | Part Type | Optional | Description |
|---|---|---|---|
|
addresses |
xsd:anyURI[0..unbounded] |
No |
Destination address for this Message. |
|
senderAddress |
xsd:string |
Yes |
Message sender address. This parameter is not allowed for all 3rd party providers. The Parlay X server needs to handle this according to a SLA for the specific application and its use can therefore result in a PolicyException. |
|
subject |
xsd:string |
Yes |
Message subject. If mapped to SMS this parameter is used as the senderAddress, even if a separate senderAddress is provided. |
|
priority |
MessagePriority |
Yes |
Priority of the message. If not present, the network assigns a priority based on the operator policy.Charging to apply to this message. |
|
charging |
common: ChargingInformation |
Yes |
Charging to apply to this message. |
|
receiptRequest |
common:SimpleReference |
Yes |
Defines the application endpoint, interfaceName and correlator that is used to notify the application when the message has been delivered to a terminal or if delivery is impossible. |
Table 18-2 describes sendMessageResponse output messages for the sendMessage operation.
The getMessageDeliveryStatus operation gets the delivery status for a previously sent message. The input "requestIdentifier" is the "result" value from a sendMessage operation. This is the same identifier that is referred to as a Message ID in other Messaging documentation.
Table 18-3 describes the getMessageDeliveryStatusRequest input messages for the getMessageDeliveryStatus operation.
Table 18-3 getMessageDeliveryStatusRequest Input Message Descriptions
| Part Name | Part Type | Optional | Description |
|---|---|---|---|
|
registrationIdentifier |
xsd:string |
No |
Identifier related to the delivery status request. |
Table 18-4 describes the getMessageDeliveryStatusResponse output messages for the getMessageDeliveryStatus operation.
Table 18-4 getMessageDeliveryStatusResponse Output Message Descriptions
| Part Name | Part Type | Optional | Description |
|---|---|---|---|
|
result |
DeliveryInformation [0..unbounded] |
Yes |
An array of status of the messages that were previously sent. Each array element represents a sent message, its destination address and its delivery status. |
The ReceiveMessage interface has three operations. The getReceivedMessages operation polls the server for any messages received since the last invocation of getReceivedMessages. Note that getReceivedMessages does not necessarily return any message content; it generally only returns message metadata.
The other two operations, getMessage and getMessageURIs, are used to retrieve message content.
This operation polls the server for any received messages. Note the following requirements:
The registration ID parameter is a string that identifies the endpoint address for which the application wants to receive messages. See the discussion of the ReceiveMessageManager interface for more details.
The Parlay X specification says that if the registration ID is not specified, all messages for this application must be returned. However, the WSDL says that the registration ID parameter is mandatory. Therefore our implementation treats the empty string ("") as the "not-specified" value. If you call getReceivedMessages with the empty string as your registration ID, you get all messages for this application. Therefore the empty string is not an allowed value of registration ID when calling startReceiveMessages.
According to the Parlay X specification, if the received message content is "pure ASCII text", then the message content is returned inline within the MessageReference object, and the messageIdentifier (Message ID) element is null. Our implementation treats any content with Content-Type "text/plain", and with encoding "us-ascii" as "pure ASCII text" for the purposes of this operation. As per the MIME specification, if no encoding is specified, "us-ascii" is assumed, and if no Content-Type is specified, "text/plain" is assumed.
The priority parameter is currently ignored.
Table 18-5 describes the getReceivedMessagesRequest input messages for the getReceivedMessages operation.
Table 18-5 getReceivedMessagesRequest Input Message Descriptions
| Part Name | Part Type | Optional | Description |
|---|---|---|---|
|
registrationIdentifier |
xsd:string |
No |
Identifies the off-line provisioning step that enables the application to receive notification of Message reception according to the specified criteria. |
|
priority |
MessagePriority |
Yes |
The priority of the messages to poll from the Parlay X gateway. ALl messages of the specified priority and higher get retrieved. If not specified, all messages shall be returned, that is, the same as specifying "Low." |
Table 18-6 describes the getReceivedMessagesResponse output messages for the getReceivedMessages operation.
Table 18-6 getReceivedMessagesResponse Output Message Descriptions
| Part Name | Part Type | Optional | Description |
|---|---|---|---|
|
registrationIdentifier |
xsd:string |
No |
Identifies the off-line provisioning step that enables the application to receive notification of Message reception according to the specified criteria. |
|
priority |
MessagePriority |
Yes |
The priority of the messages to poll from the Parlay X gateway. ALl messages of the specified priority and higher get retrieved. If not specified, all messages shall be returned. This is the same as specifying Low. |
The getMessage operation retrieves message content, using a message ID from a previous invocation of getReceivedMessages. There is no SOAP body in the response message; the content is returned as a single SOAP attachment.
Table 18-7 describes the getMessageRequest input messages for the getMessage operation.
Table 18-7 getMessageRequest Input Message Descriptions
| Part Name | Part Type | Optional | Description |
|---|---|---|---|
|
messageRefIdentifier |
xsd:string |
No |
The identity of the message. |
There are no getMessageResponse output messages for the getMessage operation.
The getMessageURIs retrieves message content as a list of URIs. Note the following requirements:
These URIs are HTTP URLs which can be dereferenced to retrieve the content.
If the inbound message has a Content-Type of "multipart", then multiple URIs are returned, one per sub-part. If the Content-Type is not "multipart", then a single URI is returned.
Per the Parlay X specification, if the inbound messages a body text part, defined as "the message body if it is encoded as ASCII text", it is returned inline within the MessageURI object. For the purposes of our implementation, we define this behavior as follows:
If the message's Content-Type is "text/*" (any text type), and if the charset parameter is "us-ascii", then the content is returned inline in the MessageURI object. There is no URI returned since there is no content other than what is returned inline.
If the message's Content-Type is "multipart/" (any multipart type), and if the first body part's Content-Type is "text/" with charset "us-ascii", then that part is returned inline in the MessageURI object, and there is no URI returned corresponding to that part.
Per the MIME specification, if the charset parameter is omitted, the default value of "us-ascii" is assumed. If the Content-Type header is not specified for the message, then a Content-Type of "text/plain" is assumed.
Table 18-8 describes the getMessageURIsRequest input messages for the getMessageURIs operation.
Table 18-8 getMessageURIsRequest Input Message Descriptions
| Part Name | Part Type | Optional | Description |
|---|---|---|---|
|
messageRefIdentifier |
xsd:string |
No |
The identity of the message to retrieve. |
Table 18-9 describes the getMessageURIsResponse output messages for the getMessageURIs operation.
The Parlay X Messaging specification leaves certain parts of the messaging flow undefined. The main area that is left undefined is the process for binding a client to an address for synchronous receiving (through the ReceiveMessage interface).
Oracle User Messaging Service includes an extension interface to Parlay X to support this process. The extension is implemented as a separate WSDL in an Oracle XML namespace to indicate that it is not an official part of Parlay X. Clients can choose to not use this additional interface or use it in some modular way such that their core messaging logic remains fully compliant with the Parlay X specification.
ReceiveMessageManager is the Oracle-specific interface for managing client registrations for receiving messages. Clients use this interface to start and stop receiving messages at a particular address. (This is analogous to the concept of registering/unregistering access points in the Messaging API).
Invoking this operation allows a client to bind itself to a given endpoint for the purpose of receiving messages. Note the following requirements:
An endpoint consists of an address and an optional "criteria", defined by the Parlay X specification as the first white space-delimited token of the message subject or content.
In addition to the endpoint information, the client also specifies a "registration ID" when invoking this operation; this ID is just a unique string which can be used later to refer to this particular binding in the stopReceiveMessage and getReceivedMessages operations.
If an endpoint is already registered by another client application, or the registration ID is already being used, a Policy Error results.
Certain characters are not allowed in URIs; if it is necessary to include them in an address they can be encoded/escaped. See the Oracle Fusion Middleware User Messaging Service API Reference for java.net.URI for details on how to create a properly encoded URI. For example, when registering to receive XMPP messages you must specify an address such as "IM:jabber|user@example.com", however the pipe "|" character is not allowed in URIs, and must be escaped before submitting to the server.
There is no guarantee that the server can actually receive messages at a given endpoint address. That depends on the overall configuration of Oracle User Messaging Service, particularly the Messaging drivers that are deployed in the system. No error is indicated if a client binds to an address where the server cannot receive messages.
The startReceiveMessage operation has the following inputs and outputs:
Table 18-10 describes the startReceiveMessageRequest input messages for the startReceiveMessage operation.
Table 18-10 startReceiveMessageRequest Input Message Descriptions
| Part Name | Part Type | Optional | Description |
|---|---|---|---|
|
registrationIdentifier |
xsd:string |
No |
A registration identifier. |
|
messageService ActivationNumber |
xsd:anyURI |
No |
Message Service Activation Number. |
|
criteria |
xsd:string |
Yes |
Descriptive string. |
There are no startReceiveMessageResponse output messages for the startReceiveMessage operation.
Invoking this operation removes the previously-established binding between a client and a receiving endpoint. The client specifies the same registration ID that was supplied when startReceiveMessage was called in order to identify the endpoint binding that is being broken. If there is no corresponding registration ID binding known to the server for this application, a Policy Error results.
Table 18-11 describes the stopReceiveMessageRequest input messages for the stopReceiveMessage operation.
Table 18-11 stopReceiveMessageRequest Input Message Descriptions
| Part Name | Part Type | Optional | Description |
|---|---|---|---|
|
registrationIdentifier |
xsd:string |
No |
A registration identifier. |
There are no stopReceiveMessageResponse output messages for the stopReceiveMessage operation.
While it is possible to assemble a Parlay X Messaging Client using only the Parlay X WSDL files and a Web Service assembly tool, we also provide pre-built Web Service stubs and interfaces for the supported Parlay X Messaging interfaces. Due to difficulty in assembling a Web Service with SOAP attachments in the style mandated by Parlay X, we recommend the use of the provided API rather than starting from WSDL.
For a complete listing of the classes available in the Parlay X Messaging API, see the Oracle Fusion Middleware User Messaging Service API Reference. The main entry points for the API are through the following client classes:
oracle.sdp.parlayx.multimedia_messaging.send.SendMessageClient
oracle.sdp.parlayx.multimedia_messaging.receive.ReceiveMessageClient
oracle.sdp.parlayx.multimedia_messaging.extension.receive_manager. ReceiveMessageManager
Each client class allows a client application to invoke the operations in the corresponding interface. Additional Web Service parameters such as the remote gateway URL and any required security credentials, are provided when an instance of the client class is constructed. See the Oracle Fusion Middleware User Messaging Service API Reference for more details. The security credentials are propagated to the server using standard WS-Security headers, as mandated by the Parlay X specification.
The general process for a client application is to create one of the client classes above, set the necessary configuration items (endpoint, username, password), then invoke one of the business methods (for example SendMessageClient.sendMessage(), etc). For examples of how to use this API, see the Messaging samples on Oracle Technology Network (OTN), and specifically usermessagingsample-parlayx-src.zip.
This chapter describes how to create, deploy and run the sample chat application with Parlay X APIs provided with Oracle User Messaging Service on OTN.
|
Note: To learn about the architecture and components of Oracle User Messaging Service, see Oracle Fusion Middleware Getting Started with Oracle SOA Suite. |
This chapter contains the following sections:
This sample demonstrates how to create a Web-based chat application to send and receive messages through e-mail, SMS, or IM. The sample uses standards-based Parlay X Web Service APIs to interact with a User Messaging server. The sample application includes web service proxy code for each of three Web service interfaces: the SendMessage and ReceiveMessage services defined by Parlay X, and the ReceiveMessageManager service which is an Oracle extension to Parlay X. You must define an Application Server connection in JDeveloper, and deploy and run the application.The application is provided as a pre-built Oracle JDeveloper project that includes a simple web chat interface.
Perform the following steps to run and deploy the pre-built sample application:
Open the usermessagingsample-parlayx.jws (contained in the .zip file) in Oracle JDeveloper.
In the Oracle JDeveloper main window the project appears.
Figure 18-1 Oracle JDeveloper Main Window
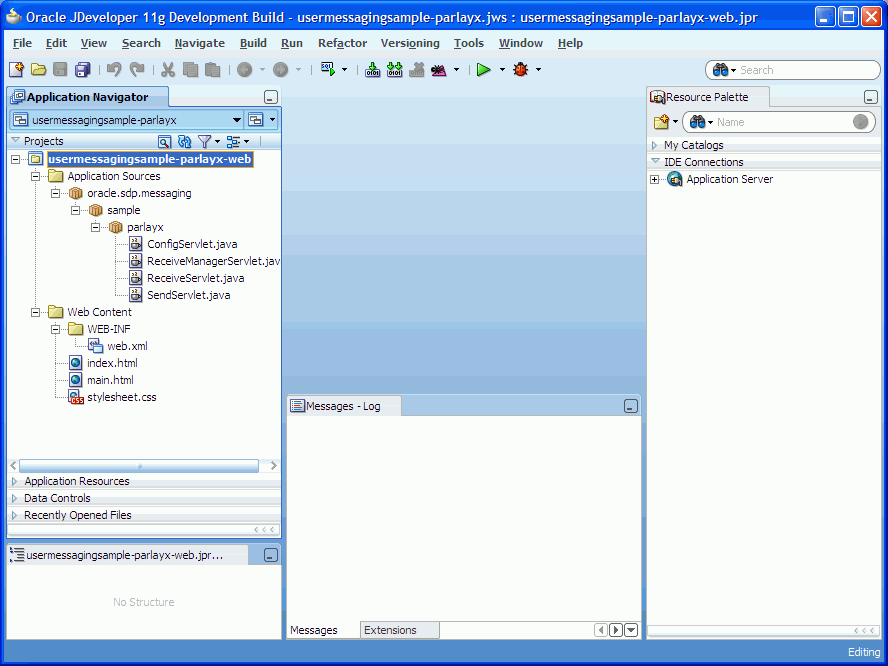
In Oracle JDeveloper, select File > Open..., then navigate to the directory above and open workspace file "usermessagingsample-parlayx.jws".
This opens the precreated JDeveloper application for the Parlay X sample application. The application contains one Web module. All of the source code for the application is in place. You must configure the parameters that are specific to your installation.
Satisfy the build dependencies for the sample application by adding a library to the Web module.
In the Application Navigator, right click on web module usermessagingsample-parlayx-war, and select Project Properties.
In the left pane, select Libraries and Classpath.
Click Add Library.
Click New to define a new library.
For Library Name, enter "oracle.sdp.client".
With "Class Path" selected, select Add Entry.
Navigate to <JDeveloper_Base_Directory>/communications/modules/oracle.sdp.client_11.1.1, and select jar file "sdpclient.jar".
Click OK/Accept in all popups to create the library and add it as a dependency to the sample Web module.
Create an Application Server Connection by right-clicking the project in the navigation pane and selecting New. Follow the instructions in Section 18.6.4, "Creating a New Application Server Connection".
Deploy the project by selecting the usermessasgingsample-parlayx project, Deploy, usermessasgingsample-parlayx, to, and SOA_server (Figure 18-6).
Verify that the message "Build Successful" appears in the log.
Enter the default revision and click OK.
Verify that the message "Deployment Finished" appears in the deployment log.
You have successfully deployed the application.
Before you can run the sample you must configure any additional drivers in Oracle User Messaging Service and configure a default device for the user receiving the message in User Messaging Preferences, as described in the following sections.
|
Note: Refer to "Configuring Notifications" in the Oracle Fusion Middleware SOA Developer's Guide for more information. |
Perform the following steps to run and test the sample:
Open a Web browser.
Navigate to the URL of the application as follows, and log in:
http://<host>:<port>/usermessagingsample-parlayx/
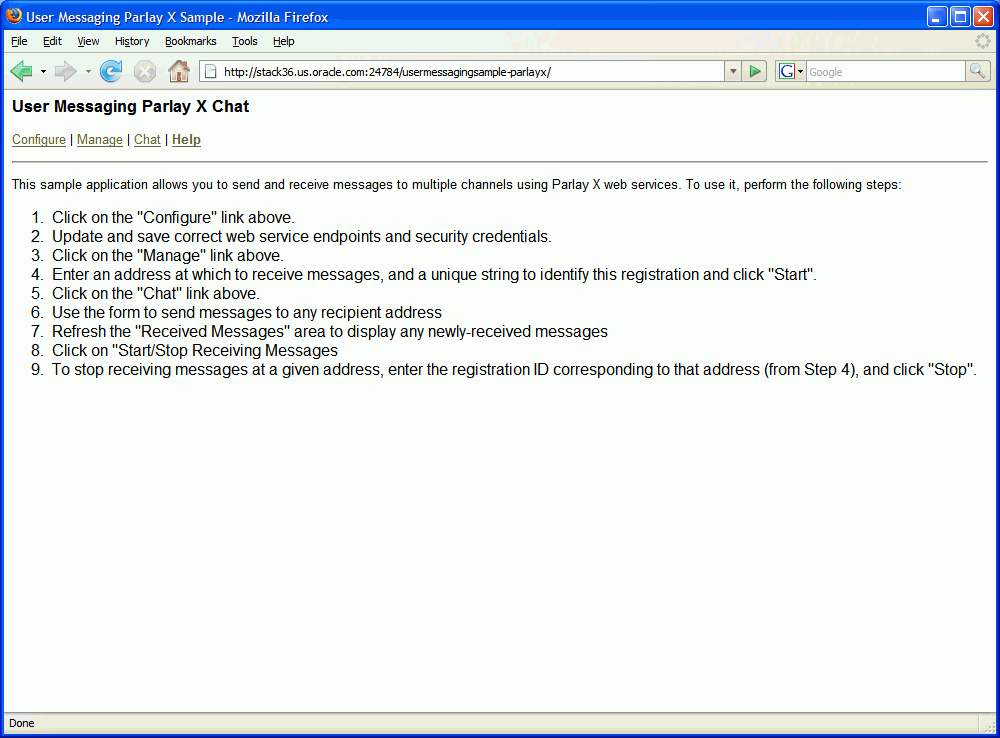
The 'Messaging Parlay X Sample' Web page appears (Figure 18-7). This page contains navigation tabs and instructions for the application.
Figure 18-7 Messaging Parlay X Sample Web Page
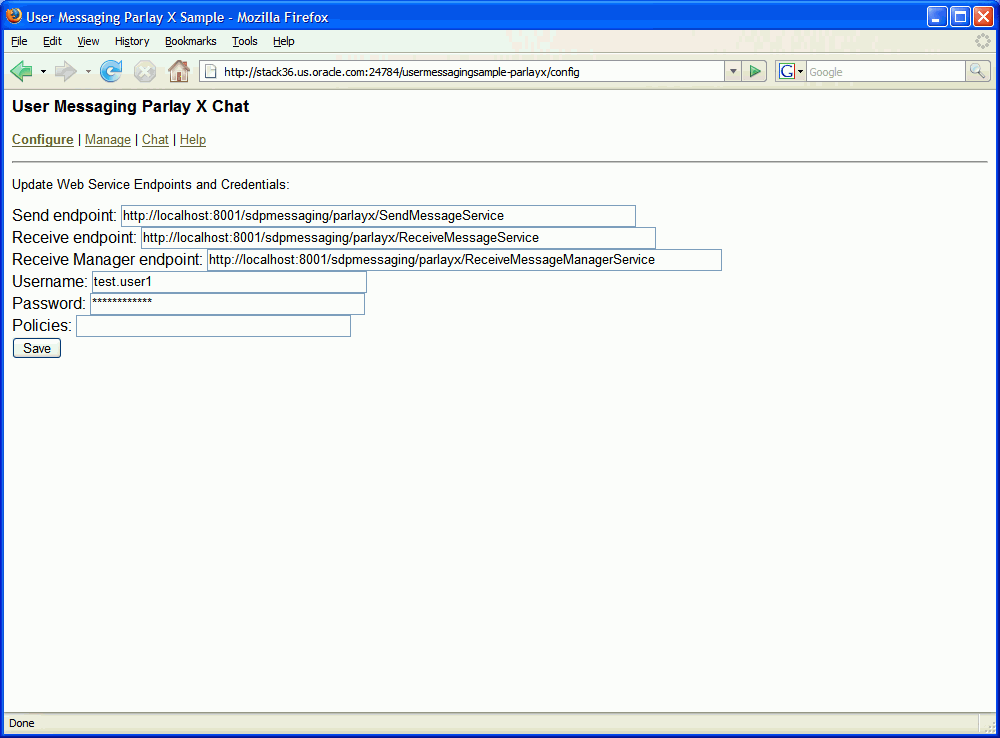
Click Configure and enter the following values (Figure 18-8):
Specify the Send endpoint. For example, http://localhost:port/sdpmessaging/parlayx/SendMessageService
Specify the Receive endpoint. For example, http://localhost:port/sdpmessaging/parlayx/ReceiveMessageService
Specify the Receive Manager endpoint. For example, http://localhost:port/sdpmessaging/parlayx/ReceiveMessageMessageService
Specify the Username and Password.
Specify a Policy (required if the User Messaging Service instance has WS security enabled).
Figure 18-8 Configuring the Web Service Endpoints and Credentials
Click Save.
Click Manage.
Enter a Registration ID to specify the registration and address at which to receive messages (Figure 18-9). You can also use this page to stop receiving messages at an address.
Click Start.
Verify that the message "Registration operation succeeded" appears.
Click Chat (Figure 18-10).
Enter recipients in the To: field in the format illustrated in Figure 18-10.
Enter a message.
Click Send.
Verify that the message is received.
Perform the following steps to create a new Application Server Connection.
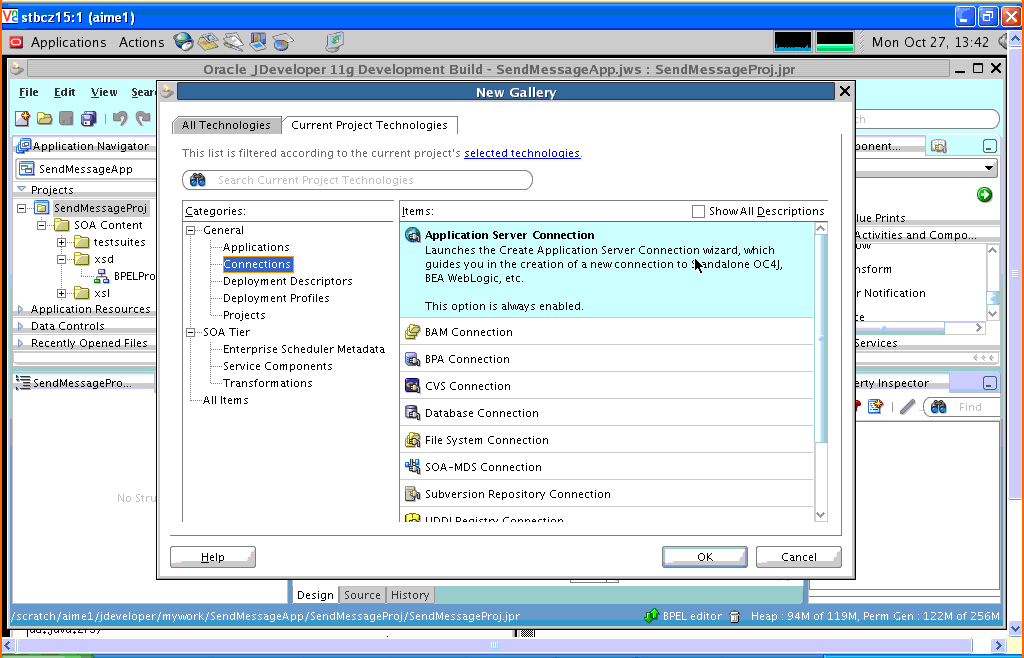
Create a new Application Server Connection by right-clicking the project and selecting New, Connections, and Application Server Connection (Figure 18-11).
Figure 18-11 New Application Server Connection
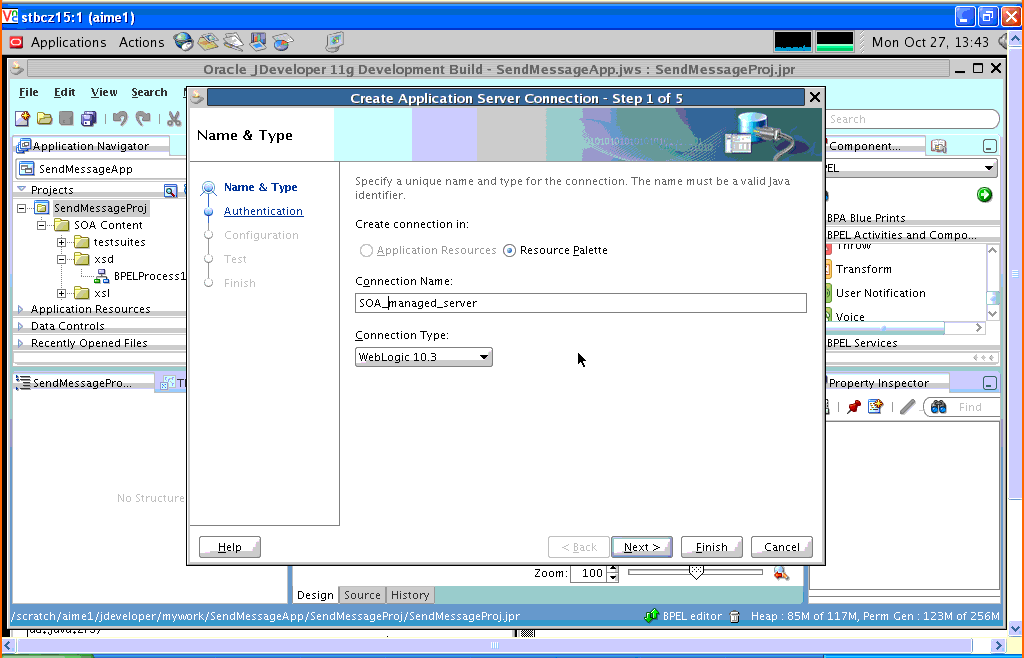
Name the connection “SOA_server” and click Next (Figure 18-12).
Select "WebLogic 10.3" as the Connection Type.
Figure 18-12 New Application Server Connection
Enter the authentication information. The typical values are:
Username: weblogicPassword: weblogic
On the Connection screen, enter the hostname, port and SSL port for the SOA admin server, and enter the name of the domain for WLS Domain.
Click Next.
On the Test screen click Test Connection.
Verify that the message “Success!” appears.
The Application Server Connection has been created.