| Oracle® Fusion Middleware Application Adapter for J.D. Edwards OneWorld User's Guide for Oracle WebLogic Server 11g Release 1 (11.1.1.4.0) E17058-04 |
|
 Previous |
 Next |
| Oracle® Fusion Middleware Application Adapter for J.D. Edwards OneWorld User's Guide for Oracle WebLogic Server 11g Release 1 (11.1.1.4.0) E17058-04 |
|
 Previous |
 Next |
J.D. Edwards OneWorld enables you to specify inbound functionality for Master Business Functions (MBF). This chapter describe how to enable outbound and inbound transaction processing in J.D. Edwards OneWorld and how to modify the jde.ini file for XML support. It contains the following topics:
This section describes the settings that are required in the JDE.INI file for the XML call object kernel (outbound and inbound processing).
Open the JDE.INI file and modify the [JDENET_KERNEL_DEF6] and [JDENET_KERNEL_DEF15] sections as follows:
[JDENET_KERNEL_DEF6]krnlName=CALL OBJECT KERNELdispatchDLLName=XMLCallObj.dlldispatchDLLFunction=_XMLTransactionDispatch@28maxNumberOfProcesses=1numberOfAutoStartProcesses=1
[JDENET_KERNEL_DEF15]krnlName=XML TRANSACTION KERNELdispatchDLLName=XMLTransactions.dlldispatchDLLFunction=_XMLTransactionDispatch@28maxNumberOfProcesses=1numberOfAutoStartProcesses=1
The parameters containing an underscore (_) and @28 are for Windows NT operating systems only. For other operating systems, replace the parameters with the values in the following table:
| Operating System | Call Object dispatch DLLName | XML Trans dispatch DLLName |
|---|---|---|
| AS400 | XMLCALLOBJ | XMLTRANS |
| HP9000B | libxmlcallojb.sl | libxmltransactions.lo |
| Sun or RS6000 | libxmlcallojb.so | Libxmltransactions.so |
|
Note: The J.D. Edwards installation for version B7333(XE) does not include [JDENET_KERNEL_DEF15]. As a result, if you are using version B7333(XE), you must manually add it to the jde.ini file. For all other J.D. Edwards versions, [JDENET_KERNEL_DEF15] is included with the installation. |
This section describes how to use the GenJava development tool, which is used to create Java wrappers for accessing the J.D. Edwards business functions. The Oracle Application Adapter for J.D. Edwards OneWorld uses these wrappers to call the J.D. Edwards business functions.
J.D. Edwards provides a Java Generation tool called GenJava that you can use to expose J.D. Edwards business functions externally as Java class files. A J.D. Edwards system administrator usually runs the GenJava tool.
During GenJava operation, you must specify a library of business functions, for example CALLBSFN. GenJava creates the associated Java class files for the business functions and related data structures. GenJava also compiles the business functions, generates Java documents, and packages them into two .JAR files. One .JAR file contains Java classes and the second .JAR file contains Java documents.
For example, if the business function library you specified in GenJava is CALLBSFN, the following files are found in the <install>\system\classes directory or any user-specified directory redirected by GenJava:
JDEJAVA_CALLBSFN.xml
JDEJAVA_CALLBSFNInterop.jar
JDEJAVA_CALLBSFNInteropDoc.jar
Once they are generated, these library files must be added to the CLASSPATH.
GenJava also provides access to J.D. Edwards business functions by generating pure Java interfaces for these business functions. GenJava can be generated from a thick client or a deployment server.
Running GenJava
GenJava is located in the <install>\system\bin32 directory. You run GenJava from the command line. There are two GenJava command options that can be used to generate the wrappers.
GenJava Command Option 1
The following command generates Java wrappers for Category 1 (Master Business Functions), Category 2 (Major Business Functions), Category 3 (Minor Business Functions), and Category - (Uncategorized Business Functions) in the CALLBSFN library:
GenJava /Cat 1 /Cat 2 /Cat 3 /Cat - CALLBSFN
GenJava Command Option 2
The GenJava command can also be run with a JDEScript file and prompts a J.D. Edwards log on window, where you must enter a valid user ID, password, and environment.
Using an editor, create a new file called AddressBook.cmd and enter the following commands:
define library CALLBSFNloginlibrary CALLBSFNinterface AddressBookimport B0100031import B0100019import B0100032import B0100002import B0100033buildlogout
Run the following GenJava command:
GenJava /cmd .\AddressBook.cmd
GenJava generates the wrappers (CALLBSFNInterop.jar, CALLBSFNInteropDoc.jar, and CALLBSFN.xml) in Java for all business functions that are mentioned in the script file.
The flow of inbound data to third parties is controlled through the Data Export Controls application. For each transaction type and order type, one or more records can be defined with different function names and libraries.
Type P0047 in the Fast Path field and press Enter as shown in, Figure A-1 .
The Work With Data Export Controls window is displayed, as shown in Figure A-2 .
Figure A-2 Work With Data Export Controls Window
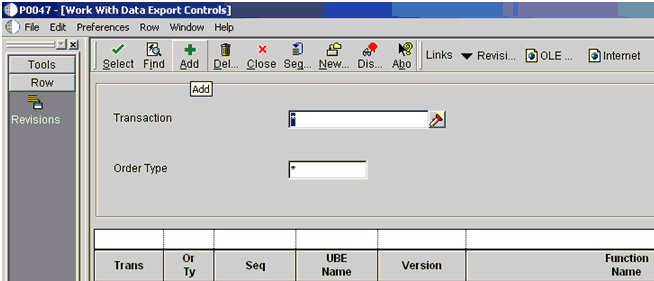
Click Add.
The Data Export Control Revisions window is displayed. Notice that the sequence (Seq) number automatically increments for each new line, as shown in Figure A-3.
Figure A-3 Data Export Control Revisions Window
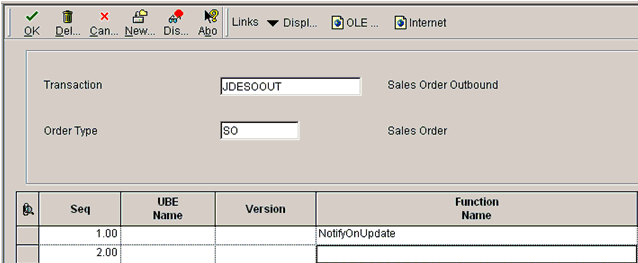
Perform the following steps:
Type JDESOOUT in the Transaction field.
Type SO in the Order Type field.
Type NotifyOnUpdate in the first row of the Function Name column.
Type the absolute path to the location of the iwoevent.dll file in the first row of the Function Library column, for example:
D:\JDEdwards\E812\DDP\Outbound\iwoevent.dll
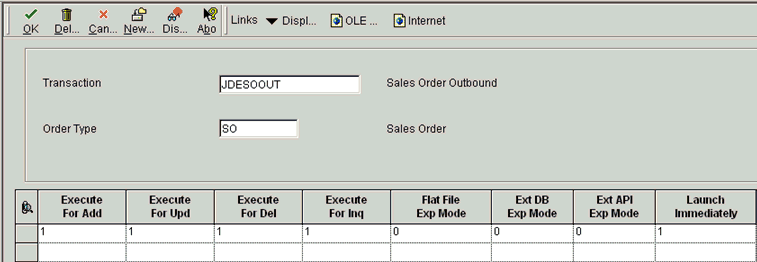
Type 1 in the first row of the Execute for Add column if you want the notifications for add/insert.
Make the same decision for update, delete, and inquiry and type 1 in the appropriate column.
Type 1 in the Launch Immediately column to launch the Outbound Subsystem batch process (R00460).
Click OK, as shown in Figure A-4.
Figure A-4 Data Export Control Revisions Window
Starting the Outbound Scheduler Subsystem Process (R00460)
Once you have finished defining one or more records for each transaction type and order type, you must manually start the outbound scheduler subsystem process.
Type BV in the Fast Path field and press Enter, as shown in Figure A-5.
The Work With Batch Versions - Available Versions window is displayed, as shown in Figure A-6.
Figure A-6 Work With Batch Versions - Available Versions Window

Type R00460 in the Batch Application field and click Find, as shown in Figure A-7.
Select Interoperability Generic Outbound Subsystem UBE (XJDE0001) and click Select.
The Version Prompting window is displayed, as shown in Figure A-8.
Click Submit, as shown in Figure A-9.
Navigate to the last screen and click OK.
Verifying the Subsystem Process
This section describes how to verify the outbound scheduler subsystem processs.
Type WSJ in the Fast Path field and press Enter, as shown in Figure A-10.
The Work With Server (Subm Jobs) window is displayed, as shown in Figure A-11.
Figure A-11 Work With Server (Subm Jobs) window
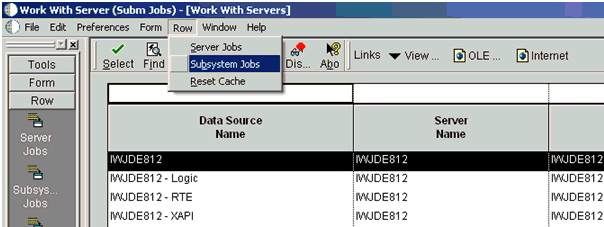
Select a corresponding server from the table.
Click Row from the menu bar and select Subsystem Jobs, as shown in Figure A-12.
Click Find, as shown in Figure A-13.
Verify that R is listed in the Job Status column.
Configuring P4210 (Sales Order) to Trigger an Event
This section describes how to configure a P4210 (Sales Order) to trigger an event.
Type IV in the Fast Path field and press Enter, as shown in Figure A-14.
The Interactive Versions window is displayed, as shown in Figure A-15.
Type P4210 in the Interactive Application field and click Find, as shown in Figure A-16.
Figure A-16 Interactive Application Field
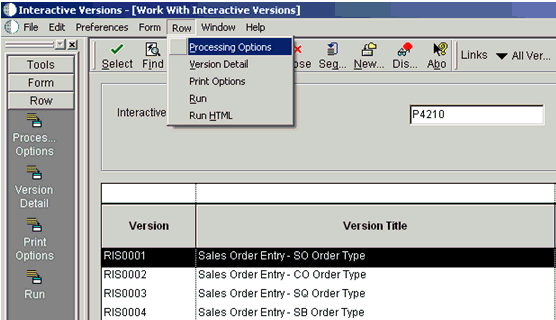
Select a document version from the table, for example, RIS0001 - Sales Order Entry - SO Order Type.
Click Row from the menu bar and select Processing Options.
The Processing Options dialog is displayed, as shown in Figure A-17.
Click the Interop tab.
Type JDESOOUT in the Transaction Type field.
Add Sales Order.
Verifying the Configuration Steps
This section describes how to verify the configuration steps by updating F0046.
Type P0046 in the Fast Path field and press Enter, as shown in Figure A-18.
The P0046 - Work With Processing Log window is displayed, as shown in Figure A-19.
Figure A-19 Work With Processing Log Window
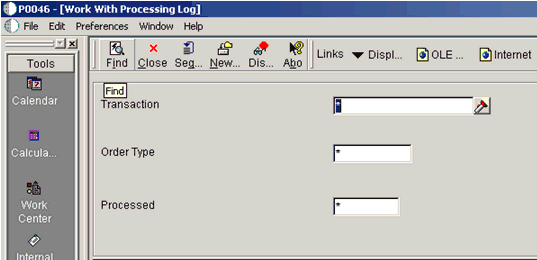
Click Find.
The following data is displayed, as shown in Figure A-20.
Search for the corresponding transaction.
The iwoevnt.log file is created in the following directory:
\\iwJDE812\JDEdwards\E812\DDP\system\bin32
The iwoevent.log file is created in the outbound folder where the iwoevent.dll and iwoevent.cfg files are located. The following is an example of the event log file:
Event call begin...Server time : Tue May 27 07:23:55 2008userId : JDE batchNumber : 15205 transactionNumber: 103494 lineNumber : 1.000000transactionType : JDESOOUTsequenceNumber : 1.000000Request xml:========================<? xml version="1.0" encoding="UTF-8"?><jde><request><connection><dsn /><user /><password /><sp><proc>JDESOOUT</proc><data><ediUserId>JDE </ediUserId><ediBatchNumber>15205 </ediBatchNumber><ediTransactionNumber>103494 </ediTransactionNumber></data></sp></connection></request></jde>========================