| Oracle® Fusion Middleware Developer's Guide for Oracle WebCenter 11g Release 1 (11.1.1.4.0) E10148-12 |
|
 Previous |
 Next |
| Oracle® Fusion Middleware Developer's Guide for Oracle WebCenter 11g Release 1 (11.1.1.4.0) E10148-12 |
|
 Previous |
 Next |
Oracle WebCenter provides several ways to integrate content into a WebCenter Portal application. For more information, see Chapter 25, "Introduction to Integrating and Publishing Content."
JCR APIs enable independent access to content, regardless of the underlying repository or the type of the content; for example, documents, relational content, and so on. The JCR 1.0 API, as defined in JSR 170, provides a set of basic capabilities for reading, writing, browsing, and searching content. The JCR data controls also enable you to connect to and read from other JCR 1.0 repositories. To add content available in Oracle Content Server, Oracle Portal, and file systems to JSF pages, you first create connections to the repositories, then use the connections to create data controls based on the repositories.
This chapter includes the following sections:
Section 27.2, "Configuring Content Data Controls for JCR Adapters"
Section 27.5, "Integrating Content Using Content Data Controls"
A content data control is a container for all the data objects, collections, methods, and operations used to create user interface (UI) components within your WebCenter Portal application. The data controls provide you with easy-to-use methods that you can drag and drop onto JSF pages to publish content as ADF components, such as URLs, files, and folders. While methods, parameters, and default attributes to publish content are similar across all JCR data controls, the content integration module gives you the flexibility to customize attributes based on your requirements.
Each type of content data control contains methods and parameters to publish content as links, tables, files, and folders, and to add search and advanced search capabilities for your content. Parameters include two types of attributes: default and custom. The default attributes are common across data controls based on File System, Oracle Portal, Oracle Content Server, and Oracle WebCenter adapter for Microsoft SharePoint. The custom attributes are repository-specific and can be added while creating content data controls.
The following sections describe the methods, parameters, and default attributes that are common across data controls based on File System, Oracle Portal, Oracle Content Server, and Oracle WebCenter adapter for Microsoft SharePoint:
The getItems method returns the files and folders stored starting at a particular location in the repository. This method enables you to publish content in forms, tables, and hierarchical trees. Using this method, you can also create navigation lists and buttons.
Table 27-1 describes the parameters of the getItems method.
Table 27-1 Parameters of the getItems Method
| Parameter | Description |
|---|---|
|
|
Defines the starting point for |
|
|
Specifies what should be returned: only files, only folders, or any object. |
The getItems method returns the attributes described in Table 27-2.
Table 27-2 Return Attributes of the getItems Method
| Parameter | Description |
|---|---|
|
|
Provides a URI to the icon that the Documents service uses for an item. |
|
|
Provides a URI to the icon that the Documents service uses for an item. |
|
|
Parameter to the Documents service task flows that require an ID. |
|
|
Describes the last modified date of an item. |
|
|
Describes the name of the returned file or folder. |
|
|
Describes the location of the returned file or folder within the content repository. |
|
|
The direct access URL of a file or folder. |
|
|
Describes whether the returned object is a file or folder or some other type. |
The search method enables you to create a simple search by name pattern or keyword.
Table 27-3 describes the parameters of the search method.
Table 27-3 Parameters of the search Method
| Parameter | Description |
|---|---|
|
|
Starting path of the search. |
|
|
Specifies whether only the specified folder ( The default value is |
|
|
Search keyword for full text search. |
|
|
Pattern search on name. Use the |
The search method returns the attributes described in Table 27-4.
Table 27-4 Return Attributes of the search Method
| Parameter | Description |
|---|---|
|
|
Provides a URI to the icon that the Documents service uses for an item. |
|
|
Provides a URI to the icon that the Documents service uses for an item. |
|
|
Parameter to the Documents service task flows that require an ID. |
|
|
Describes the last modified date of an item. |
|
|
Describes the name of the returned file or folder. |
|
|
Describes the location of the returned file or folder within the content repository. |
|
|
The direct access URL of a file or folder. |
|
|
Describes whether the returned object is a file or folder or some other type. |
The advancedSearch method enables you to perform an advanced search by creating a set of search criteria out of any available attribute.
Table 27-5 describes the parameters of the advancedSearch method.
Table 27-5 Parameters of the advancedSearch Method
| Parameter | Description |
|---|---|
|
|
Starting path of the search. |
|
|
Specifies whether only the specified folder ( The default value is |
|
|
Search keyword for full text search. |
|
|
Pattern search on name. Use the |
|
|
Specifies whether all predicates ( |
|
|
A collection of |
|
|
Specifies what should be returned: only files, only folders, or any object. |
The advancedSearch method returns the attributes described in Table 27-6.
Table 27-6 Return Attributes of the advancedSearch Method
| Parameter | Description |
|---|---|
|
|
Provides a URI to the icon that the Documents service uses for an item. |
|
|
Provides a URI to the icon that the Documents service uses for an item. |
|
|
Parameter to the Documents service task flows that require an ID. |
|
|
Describes the last modified date of an item. |
|
|
Describes the name of the returned file or folder. |
|
|
Describes the location of the returned file or folder within the content repository. |
|
|
The direct access URL of a file or folder. |
|
|
Describes whether the returned object is a file or folder or some other type. |
The getURI method returns the URI attribute, which is the direct access URL of the file or folder. Its path parameter describes the path to the object. You can use this method to create links to content and to inline content in your page. The getURI method returns the URI attribute.
The getAttributes method returns the list of attributes and their values for a given file or folder. Its path parameter describes the path to the object.
Table 27-7 describes the attributes that the getAttributes method returns.
This section describes how to create a content data control based on a content repository connection:
Section 27.2.1, "How to Configure a Content Repository Data Control"
Section 27.2.2, "What Happens When You Configure a Content Repository Data Control"
The procedure to create content repository data controls is the same irrespective of the types of the connections that you use to create data controls. If you have not created a connection to your content repository, then see Section 26.2, "Configuring Content Repository Connections". In this section, a content data control is created using an Oracle Content Server-based connection.
To create a content data control using an existing content repository connection:
In the Application Navigator, select the Portal project, in which the project entries for the new data control should be created.
You must do this to ensure that the data control definition is separate from the data control usage. When you select the Portal project, data control definition files are created in its sub folder, Application Sources and not in the ViewController project in which the user interface is created.
In the Application Resources panel, expand the Connections folder in which you created the repository connection.
Drag the repository connection that you intend to use for the new data control and drop it into the Data Controls panel.
Alternatively, from the File menu, choose New. In the New Gallery, expand Business Tier, select Content Repository and then Content Repository Data Control, and click OK.
The Create Content Repository Data Control dialog displays with the name of the connection selected in the Connection Name list.
|
Note: If you created your repository connection under the Resource Palette, then right-click the connection under the Resource Palette and choose Create Data Control. From the Resource Palette, you can also drag and drop the required connection onto the Data Controls panel.To add a new connection, click the Create new content repository connection icon to display the Create Content Repository Connection dialog. For more information, see Section 26.2, "Configuring Content Repository Connections". |
In the Data Control Name field, enter a name for your data control, for example MyDataControl.
To add custom attributes, click Add. Then, enter a name for the attribute as it should appear in the Data Controls panel, select its type, and enter the JCR path.
In Oracle Content Server, a metadata attribute named dPropertyName is mapped in the adapter as shown here:
jcr:content/idc:metadata/idc:dPropertyName
For example, if the property name is dWorkflowState, then it is mapped as jcr:content/idc:metadata/idc:dWorkflowState.
In Oracle Portal, a metadata attribute is mapped in the adapter as shown here:
portal:name of the attribute in Oracle Portal
|
Note: To retrieve the JCR paths of item attributes, run thegetAttributes method on the required items. Then reenter the wizard to include those paths by right-clicking the respective data control in the Data Controls panel and choosing Edit Definition. |
Click OK.
|
Note: The data controls include the predefined node types of JCR. These basic node types represent folders (nt:folder) and files (nt:file). These are derived from nt:hierarchyNode, which is a child of the nt:base supertype. Additional node types can be derived from the basic types to customize the experience to a particular repository. |
When the data control is successfully configured, it shows under the Data Controls panel. Expand it in the Data Controls panel to see the hierarchical list of methods, parameters, and operations for the new data control, as shown in Figure 27-1. For detailed information on using the Data Control panel, see Chapter titled "Using Oracle ADF Model in A Fusion Web Application" of Oracle Fusion Middleware Fusion Developer's Guide for Oracle Application Development Framework.
Figure 27-1 Data Controls Panel - Oracle Content Server
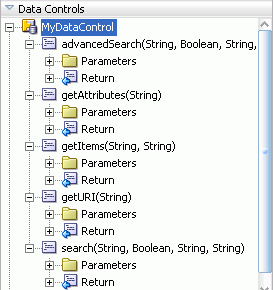
Table 27-8 describes the icons and object hierarchy of a data control.
Table 27-8 The Data Controls Panel Icons and Object Hierarchy
| Icon | Name | Description | Used to Create... |
|---|---|---|---|
|
|
Data Control |
Represents a data control. You cannot use the data control itself to create UI components, but you can use any of the child objects listed under it. Depending on how your business services were defined, there may be multiple data controls. |
Serves as a container for the other objects, and is not used to create anything |
|
|
Method |
Represents an operation in the data control or one of its exposed structures that may accept parameters, perform some business logic and optionally return single value, a structure or a collection of those |
Command components For methods that accept parameters: command components and parameterized forms |
|
|
Method Return |
Represents an object that is returned by a custom method. The returned object can be a single value or a collection. A method return appears as a child under the method that returns it. The objects that appear as children under a method return can be attributes of the collection, other methods that perform actions related to the parent collection, and operations that can be performed on the parent collection. |
For single values: text fields and selection lists For collections: forms, tables, trees, and range navigation components When a single-value method return is dropped, the method is not invoked automatically by the framework. A user either has to also create an invoke action as an executable, or drop the corresponding method as a button to invoke the method. |
|
|
Attribute |
Represents a discrete data element in an object (for example, an attribute in a row). Attributes appear as children under the collections or method returns to which they belong. Only the attributes that were included in the view object are shown under a collection. If a view object joins one or more entity objects, that view object's collection will contain selected attributes from all of the underlying entity objects. |
Label, text field, date and selection list components |
|
|
Operation |
Represents a built-in data control operation that performs actions on the parent object. Data control operations are located in an Operations folder under collections or method returns, and also under the root data control node. The operations that are children of a particular collection or method return operate on those objects only, while operations under the data control node operate on all the objects in the data control. If an operation requires one or more parameters, they are listed in a Parameters folder under the operation. |
UI components such as buttons or links |
|
|
Parameter |
Represents a parameter value that is declared by the method or operation under which it appears. Parameters appear in the Parameters folder under a method or operation. |
Label, text, and selection list components |
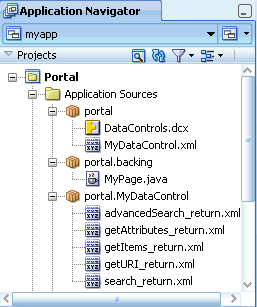
The following files (Figure 27-2) are created under the Portal project:
DataControls.dcx: Oracle JDeveloper creates this file the first time a data control is created. This file lists all the Oracle ADF data controls created under the current project. This file is required to initialize the data control.
datacontrolname.xml: This file includes attributes, accessors, and operations of a data control.
advancedSearch_return.xml: This file includes the return type definition for the advancedSearch method.
getAttributes_return.xml: This file includes the return type definition for the getAttributes method.
getItems_return.xml: This file includes the return type definition for the getItems method.
getURI_return.xml: This file includes the return type definition for the getURI method.
search_return.xml: This file includes the return type definition for the search method.
Return.xml: This file defines the standard operations on collections.
Figure 27-2 Projects Panel - Portal Project
This section describes a generic procedure to edit content data controls that you configured as described in Section 27.2, "Configuring Content Data Controls for JCR Adapters".
To edit a content data control:
In Oracle JDeveloper, go to the application that contains your content data control.
Under Data Controls panel, right-click the data control you intend to edit, and choose Edit Definition, as shown in Figure 27-3. The Edit Content Repository Data Control dialog displays, as shown in Figure 27-4.
Figure 27-4 Edit Content Repository Data Control Dialog
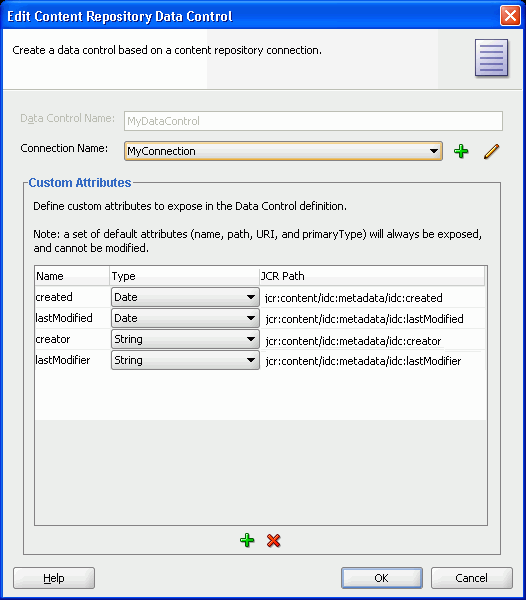
To select a different connection, use the Connection Name list.
To add a connection, click the Create new content repository connection icon to display the Create Content Repository Connection dialog. Depending on the type of connection that you intend to create, see relevant sections in Section 26.2, "Configuring Content Repository Connections" for information about its configuration parameters.
To edit an existing connection, click the Edit selected content repository connection icon to display the Edit Content Repository Connection dialog. Depending on the type of connection that you intend to modify, see relevant sections in Section 26.2, "Configuring Content Repository Connections" for information about its configuration parameters.
To add or remove custom attributes, use the Add new attribute icon and the Remove selected attribute icon respectively in the Custom Attributes box.
Click OK to apply the changes.
You can enable security for your content repository connections. For information, see Chapter 63, "Securing Your WebCenter Portal Application".
In this section, you will use getURI, getItems, search, and advancedSearch methods of your data control. The basic procedure to use any data control method is to drag and drop it onto a page. When a method is dropped, its ADF Faces tag is added to the source of the page, and the tag is displayed in the Structure window. For example, dropping the URI attribute of getURI as a Go Link adds an af:goLink to the page. The destination of the af:goLink is set to the EL expression #{bindings.URI.inputValue}. This EL expression ties the destination value of the af:goLink to the binding container's URI value.
In the page definition file, methodIterator is added to the executables element, and methodAction is added to the bindings element. The methodIterator and methodAction elements define which data control and method is to be used. The NamedData attribute of the methodAction defines what input parameter values should be provided to this method call. The path and type parameters are common across all data control methods. However, NamedData for search and advancedSearch includes additional parameters that are unique to those methods. For example, in the advancedSearch method, the NamedData can also be used to define the search predicates, whether the search is recursive, and so on.
The page definition includes the AttrNames element, which defines the attributes of the items available in the bindings container to ADF. These items are based on default attributes and custom attributes that were defined when creating the data control.
For detailed information on using the Data Control panel and working with page definition files, see the chapter "Using Oracle ADF Model in A Fusion Web Application" of Oracle Fusion Middleware Fusion Developer's Guide for Oracle Application Development Framework.
The examples in this section use the following data control methods:
getURI to add textual and clickable image links to the repository folder.
getItems to publish the repository content in an ADF table and tree.
search and advancedSearch to display those items of the repository that match the search criteria.
This section includes the following subsections:
Section 27.5.7, "How to Add Search Capabilities to Content Repositories"
Section 27.5.9, "What You May Need to Know When Using Search Capabilities"
This section describes how to create hyperlinks to files stored in a file system and convert them into textual and image links. You use the ADF Go Link and the getURI method to create textual links and the Image of ADF Faces to create image links.
This section includes the following procedures:
Before you begin:
Configure a repository connection as described in Section 26.2, "Configuring Content Repository Connections".
Configure a data control as described in Section 27.2, "Configuring Content Data Controls for JCR Adapters".
Create a page as described in Section 5.2.2, "Adding Pages to the Portal."
In this section, you will use the Oracle ADF Go Link option of the getURI method to publish your content as a textual link. You will also create a link to show a specific item of a repository.
To publish content as a textual link:
In the Application Navigator, double-click a page, for example myPage.jspx, to open it in the visual editor.
In the Data Controls panel, under the repository connection, expand the getURI (String) method and expand Return. You should see the URI attribute, as shown in Figure 27-5.
Figure 27-5 The URI Attribute of the getURI Method

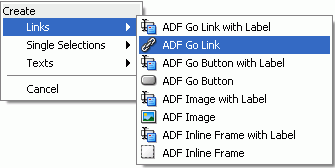
To create a textual link, select the URI attribute and drop it on to the page, or in the Structure window under af:form. From the Create menu, choose Links and then ADF Go Link, as shown in Figure 27-6.
If this is the first time you have dropped a node onto the page, then the Edit Action Binding dialog displays.
Figure 27-6 Oracle JDeveloper Context Menu for the getURI method
In the Value field of the path parameter, enter the path of the file for which you intend to create the link, as shown in Figure 27-7. You must enter a leading slash (/), for example /PlasmaNews.html. To modify or delete this path later, click the arrow icon next to the node in design mode and choose Go to Binding from the context menu.
|
Note: To grant edit, personalize, customize, and view permissions at the attribute level, see Section 27.4, "Securing a Content Repository Data Control". |
Click OK.
Right-click the page and select Run. In your browser, you should see the URL for the file path entered in the Edit Action Binding dialog without any formatting.
By default, the link displays the text goLink1. In the Structure window, select af:goLink - goLink1 and view the properties in the Property Inspector.
In the Text field, enter a name for the link, for example, Plasma News, as shown in Figure 27-8.
Right-click your page and choose Run. The page appears in your browser window with the new link, as shown in Figure 27-9.
Click the link to check that the correct file is displayed.
In Section 27.5.1.2, "Creating a Clickable Image to Link to a Document", you will extend this textual link into an image link.
To add a link to another item, in the same JSF page:
In the Application Navigator, right-click the page in which you created the ADF Go Link, and choose Go to Page Definition. The Page Data Binding Definition displays in the design view, as shown in Figure 27-10.
Figure 27-10 Page Data Binding Definition
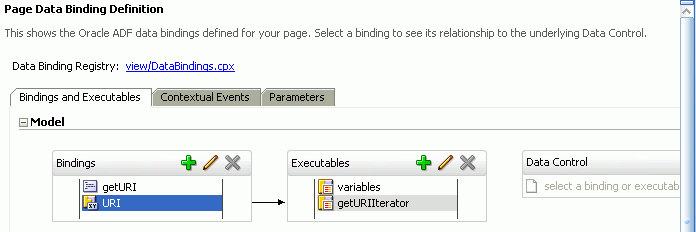
Go to the source view of the page definition.
In the executables element, add another methodIterator and change the methodIterator id and value of Binds, as shown in Bold in the following example:
<executables>
  <variableIterator id="variables"/>
  <methodIterator Binds="getURI.result" DataControl="MyDataControl"
     RangeSize="25" BeanClass="portal.MyDataControl.getURI_return"
     id="getURIIterator"/>
  <methodIterator Binds="getURI1.result" DataControl="MyDataControl"
    RangeSize="25" BeanClass="portal.MyDataControl.getURI_return"
    id="getURIIterator1"/>
  </executables>
In the Bindings element, add another methodAction and change the methodAction id, ReturnName, and NDValue, as shown in Bold in the following example:
<methodAction id="getURI"
  RequiresUpdateModel=true Action="invokeMethod" MethodName="getURI"
  IsViewObjectMethod="false" DataControl="MyDataControl"
  InstanceName="MyDataControl"
  ReturnName="MyDataControl.methodResults.getURI_MyDataControl_getURI_result">
  <NamedData NDName="path" NDValue="/PlasmaNews.html"
    NDType="java.lang.String"/>
</methodAction>
<methodAction id="getURI1"
  RequiresUpdateModel="true" Action="invokeMethod" MethodName="getURI"
  IsViewObjectMethod="false" DataControl="MyDataControl"
  InstanceName="MyDataControl"
  ReturnName="MyDataControl.methodResults.getURI_MyDataControl_getURI1_result">
  <NamedData NDName="path" NDValue="/FusionOrderDemoLogo.jpg"
    NDType="java.lang.String"/>
</methodAction>
In the Bindings element, add another attributeValues tag to specify the new Id, as shown in bold in the following example:
<attributeValues
      IterBinding="getURIIterator"
      id="URI">
   <AttrNames>
      <Item Value="URI"/>
   </AttrNames>
</attributeValues>
<attributeValues
        IterBinding="getURIIterator1"
        id="URI1">
  <AttrNames>
        <Item Value="URI"/>
  </AttrNames>
</attributeValues>
In the Data Controls panel, under the repository connection, expand the getURI (String) method and expand Return. You should see the URI attribute.
To create a textual link, select the URI attribute and drop it on to the page, or in the Structure window under af:form. From the Create menu, choose Links and then ADF Go Link, as shown in Figure 27-11.
Figure 27-11 Oracle JDeveloper Context Menu for the getURI method

In the Structure window, double-click the new goLink; for example, af:goLink2 to display the Go Link Properties window.
In the Text field, enter a display name for your new link; for example, FOD Logo.
In the Destination field, click the down arrow to display the Expression Builder dialog. Then, expand ADF Bindings, bindings, and URI1.
Double-click inputValue variable to create the #{bindings.URI1.inputValue} expression, and click OK. This expression is based on new elements that you added in executables and bindings.
Run your page. The new link should display content from the new path (NDValue) that you specified in step 4. Figure 27-12 shows the new link, FOD Logo, in addition to the Plasma News link that was added in the first part of Section 27.5.1.1, "Publishing Content As a Textual Link".
You can add as many links as required by following these steps.
In this section, you will use the Image option of ADF Faces to publish a document as a clickable image, that is, clicking the image object will display your document.
To publish content as a clickable image object:
In the Application Navigator, open the page, in which you created the ADF Go Link, by double-clicking it.
To convert the textual link that you created in the first part of Section 27.5.1.1, "Publishing Content As a Textual Link", in the Structure window, right-click af:goLink - goLink1 and choose Browse. The Insert Item dialog displays.
From the Select the item to be created list, select Image, as shown in Figure 27-13.
Click OK. The Insert Image dialog displays.
Browse to the image file you intend to display as the image link; for example, plasma.jpg.
Click Finish.
Right-click your page and choose Run. Figure 27-14 shows a sample output.
Figure 27-14 ADF Object Image Link in a Browser
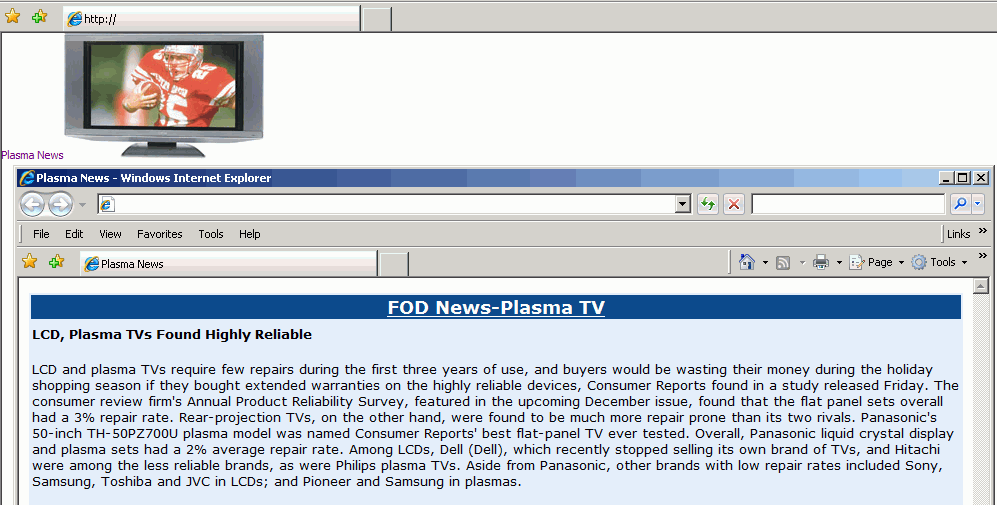
In the preceding examples, you created hyperlinks to files that are stored in a file system using ADF Go Link and converted them into textual and image links using the getURI method and the Image component of ADF Faces.
At runtime, the ADF framework uses the information from the page definition file to invoke the data control methods required by the page. For information about the page lifecycle, see the chapter "Understanding the Fusion Page Lifecycle" of Oracle Fusion Middleware Fusion Developer's Guide for Oracle Application Development Framework.
At runtime, the getURI data control method is invoked to convert the given path into a valid HTTP URI for the content repository for which the data control is configured. The returned URL is syntactically correct for the target repository, but is not guaranteed to find a resource, that is, the getURI method does not validate that the path corresponds to an existing JCR node. When the page is rendered and the clickable image or link is clicked, the application's get handler converts the HTTP URL into a JCR path and attempts to retrieve the content for the JCR path. The get handler also supplies mimeType information in the response Content-Type header, if such information is available from the repository. This is because in JCR, jcr:mimeType is an optional property of the nt:resource node type.
In this section, the getItems data control method is used to publish file and folder information in a table. This section describes the following procedures:
Section 27.5.3.1, "Displaying Files and Folders in Read-Only Format"
Section 27.5.3.2, "Displaying the Name Attribute As a Go Link"
Before you begin:
Configure a repository connection as described in Section 26.2, "Configuring Content Repository Connections".
Configure a data control as described in Section 27.2, "Configuring Content Data Controls for JCR Adapters".
Create a page as described in Section 5.2.2, "Adding Pages to the Portal."
Here you will create a read-only ADF table using the getItems method.
To display folder content in a read-only table:
To open the page in the visual editor, double-click it in the Application Navigator.
In the Data Controls panel, under your data control, expand the getItems method and the Return node, as shown in Figure 27-15.
Figure 27-15 The Return node of the getItems method
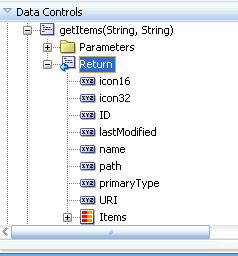
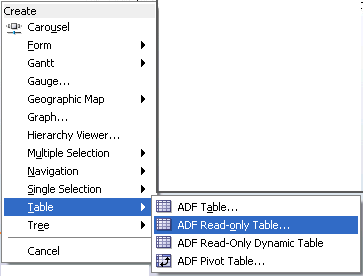
To create a table that lists every file and folder available through this data control, drop the Return node on to the page or under af:form in the Structure window. From the Create menu, choose Table and then ADF Read-only Table , as shown in Figure 27-16.
Figure 27-16 The Create Context Menu for getItems Method
In the Edit Table Columns dialog, as shown in Figure 27-17, Select the row for the getItems.name Value Binding and enter an appropriate value for the Display Label; for example, Name.
Repeat this step for the path, URI, primaryType, and lastModified attributes. Enter new display labels such as name, Location, URL, and so on, then click OK.
If this is the first time you have dropped a node onto the page, the Edit Action Binding dialog displays.
In the Edit Action Binding dialog, enter the path of the content directory as the path parameter, as shown in Figure 27-18. You must enter a leading slash (/). To modify or delete this path later, click the arrow icon next to the node in design mode and choose Go to Binding from the context menu.
Leave the type parameter blank. This implies that the table displays both files and folders.
Click OK. You should now see a table on the page that looks like Figure 27-19.
Figure 27-19 Read-Only Table for Publishing Folder Content

|
Note: You can turn the page caching on or off. To do so, open the page definition and expand executables, and select getItemsIterator in the Structure window. Then, in the Property Inspector, set CacheResults to true or false, as required. |
Run the page. You should see a list of all files and folders available in your content directory. Figure 27-20 shows a read-only table displaying both files and folders at runtime.
Figure 27-20 Files and Folders Displayed in a Read-Only Table
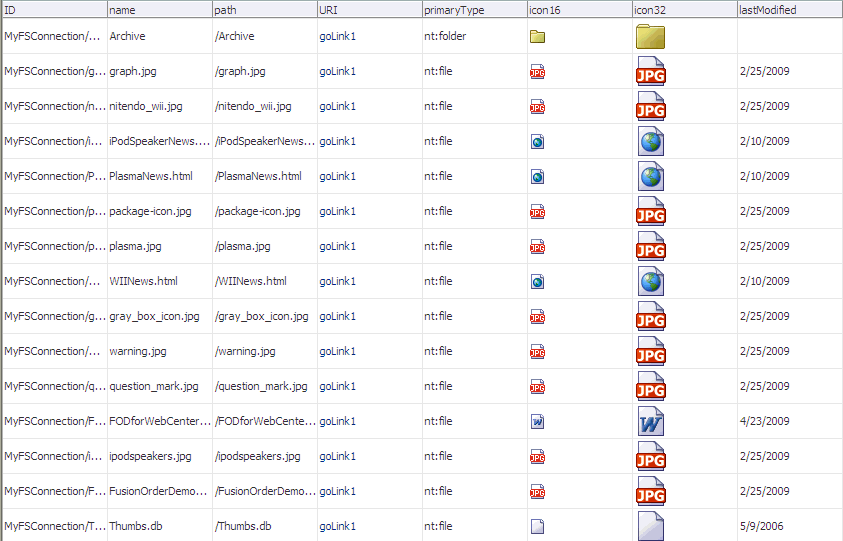
By default, the table displays file or folder attributes as read-only text (af:outputText). The next section describes how to display the Name attribute (name) as a Go Link (af:goLink).
In this section, you will convert the Name attribute of the table that you created in Section 27.5.3.1, "Displaying Files and Folders in Read-Only Format" into a link using an ADF Go Link component. You will also configure the table to show only the Name column.
To display the Name attribute as a Go Link:
In the Structure window (Figure 27-21), expand the first column of the table (af:column - Name) to show the default display format af:outputText - #{row.name}.
Figure 27-21 Default Formatting for the Name Column
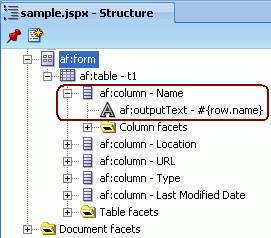
In the source view for the page, change the name column to use a go link. The link displays the name but links to the URI of the entry:
Replace the af:outputText in bold
<af:column sortProperty="name" sortable="false"
      headerText="#{bindings.Return.hints.name.label}" id="c2">
   <af:outputText value="#{row.name}" id="ot1"/>
</af:column>
with an af:goLink as shown in bold:
af:column sortProperty="name" sortable="false"
     headerText="#{bindings.Return.hints.name.label}"
     id="c2">
  <af:goLink text="#{row.name}" id="goLink2"
     destination="#{row.bindings.URI.inputValue}"/>
</af:column>
In the Structure window, right-click af:column - URL and select Delete.
Right-click the page in the Application Navigator and choose Run. You should see a list of hyperlinked file and folder names like the one shown in Figure 27-22. This figure shows the name attribute as a link. Clicking a link in the URI column opens the respective file or folder and shows its contents.
Figure 27-22 Folder Content Displayed as Hyperlinks
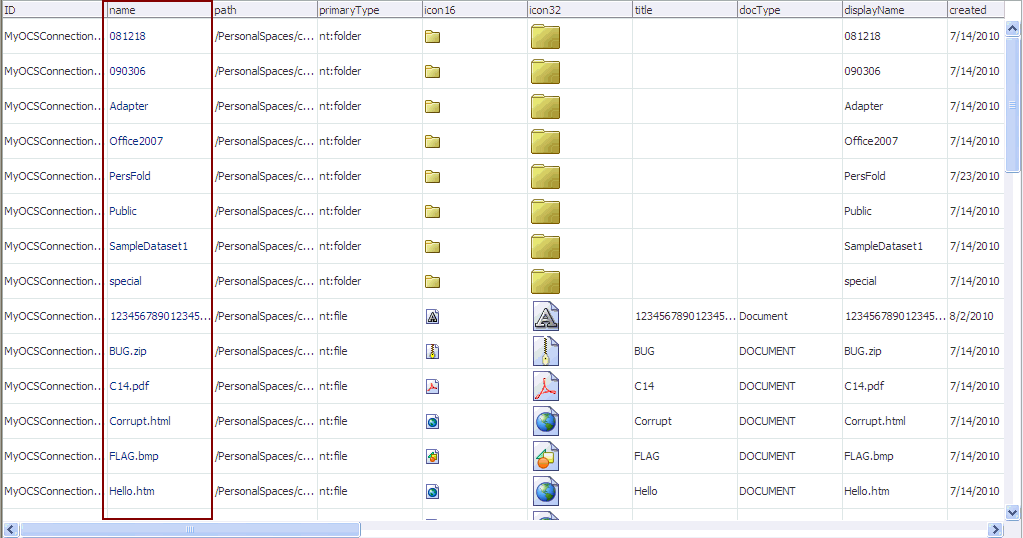
Click a file name. The file you pick should appear in a browser window.
Click the name of a folder, the contents of the folder display, as shown in Figure 27-23.
To configure the table to show only the Name column:
In the Structure window, under the af:table - t1 node, delete all but the Name column.
Double-click the af:table - t1 node to display the Property Inspector.
Under the Common tab, in the Id field, enter a name, for example myFiles, as shown in Figure 27-24.
Figure 27-24 Table Properties - Common Tab
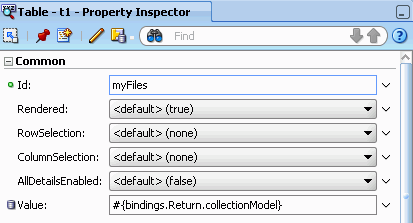
Run the page to view the output. Figure 27-25 shows only one column of the table since other rows were removed from the Structure window at design time. This table shows both files and folders, because you left the type parameter blank when creating the table.
Figure 27-25 Files and Folders Displayed in a Single-Column Table

In the next section, the Name column will be configured to show only files.
The type attribute is used to configure a table to show only files and not folders.
To configure the table to show files:
Right-click your page and choose Go to Page Definition.
|
Note: TheRangeSize binding setting, which is used to control the number of items displayed on a page, is set to 10 by default in the page definition file. You can change it, as required, in the Property Inspector. |
In the Overview tab, double-click getItems under Bindings. The Edit Action Binding dialog displays.
The type options are nt:file and nt:folder. To specify the display of only files, enter nt:file under the Value column, as shown in Figure 27-26, and click OK.
Now run the page. Figure 27-27 shows only files in the single-column table because the column type is nt:file.
Figure 27-27 Files Displayed in a Single-Column Table

The getItems method of the JCR data control retrieves the child items of a JCR folder (type nt:folder). This method is called with a path to a folder and optionally a type to which the returned child nodes are restricted.
The path parameter must be the path of a folder. An exception to this rule is that the root of the repository does not have to be a folder. Hence, the getItems method can retrieve the child items for a path that corresponds to a folder, or that is the root of the repository. Otherwise the getItems method does not attempt to retrieve the child items and therefore the result set is never populated.
At runtime, the JCR data control calls the Session.getItem method. This method returns a JCR node. The data control then calls the node.getNodes to retrieve child nodes. The child nodes are filtered according to the specified type; for example, the nt:file type. The data control passes on these child nodes to ADF. The data control ensures that the JCR node object is adapted to ADF so that JCR properties are available as data control item attributes that can be consumed through the bindings container.
In the example, each row in the collection returned by the data control is stored as a row in the af:table table. However, a column is only displayed for each af:column defined in the af:table, and not for every possible ADF item attributes returned by the data control. In the first part of the example, the drag and drop action creates an af:column for every ADF attribute available for each ADF item returned by the data control.
If the af:table is modified to include only the af:column for the name, then at runtime it only requests the name of the ADF item. That is, the data control runs a method to fetch the name of the JCR node. At design time, when the name column is converted to an af:goLink, the destination of Go Link destination is set to the URI value of the item, as shown in the following syntax:
<af:goLink text="#{row.name}" destination="#{row.URI}"/>
At runtime, for each ADF item in the table, the data control runs methods to return both the JCR name of the item and its HTTP URL.
In this section, you will use the getItems method to publish content in a hierarchal tree format. This section describes the following procedures:
Before you begin:
Configure a repository connection as described in Section 26.2, "Configuring Content Repository Connections".
Configure a data control as described in Section 27.2, "Configuring Content Data Controls for JCR Adapters".
Create a page as described in Section 5.2.2, "Adding Pages to the Portal."
In this section, you will display your content in the tree format.
To display your content in the tree format:
In the Application Navigator, double-click your page to open it in the design view.
In the Data Controls panel, under your data control, expand the getItems method as shown in Figure 27-28.
Figure 27-28 Parameters of the getItems Method

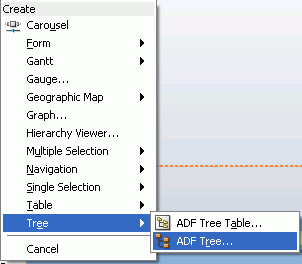
To display your content as an ADF Tree, select the Return node and drag it onto the page. From the Create menu, choose Tree and then ADF Tree, as shown in Figure 27-29.
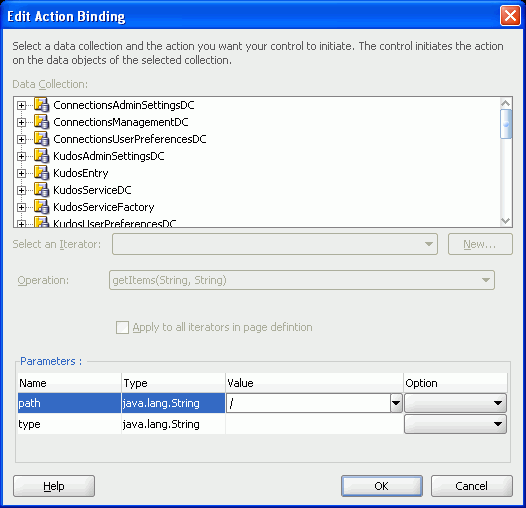
If this is the first time you have dropped a node onto the page, the Edit Action Binding dialog displays.
Figure 27-29 Oracle JDeveloper Create Menu for getItems
To create a tree that displays everything under the base path, enter the slash (/) for the path parameter, as shown in Figure 27-30. To modify or delete this path later, click the arrow icon next to the node in the design mode and choose Go to Binding from the context menu.
Leave the type parameter blank to show both files and folders.
Figure 27-30 The Edit Action Binding Dialog
Click OK. The Edit Tree Binding dialog displays.
To show item names, paths, and types at runtime, under Available Attributes, select the desired attributes and move them to the Display Attributes list.
In the Tree Level Rules box, click the Add Rule icon and select Items to create a rule, as shown in Figure 27-31, which enables the tree to find its child items.
Click OK. A tree displays in the page that looks like Figure 27-32.
Figure 27-32 Tree for Navigating Folder Content

Run your page to display the results.
When the page appears in your browser window, you should see a list of files and folders available through your data control. Figure 27-33 displays a tree of files and folders in the read-only format based on ADF tree dropped on the JSF page. Expand a branch to see the content in this subdirectory.
|
Note: By default, the range size is10. To change the number of items displayed in the tree, edit the RangeSize property for the data control in the page definition file (namePageDef.xml). |
Figure 27-33 Folder Content Displayed in a Tree
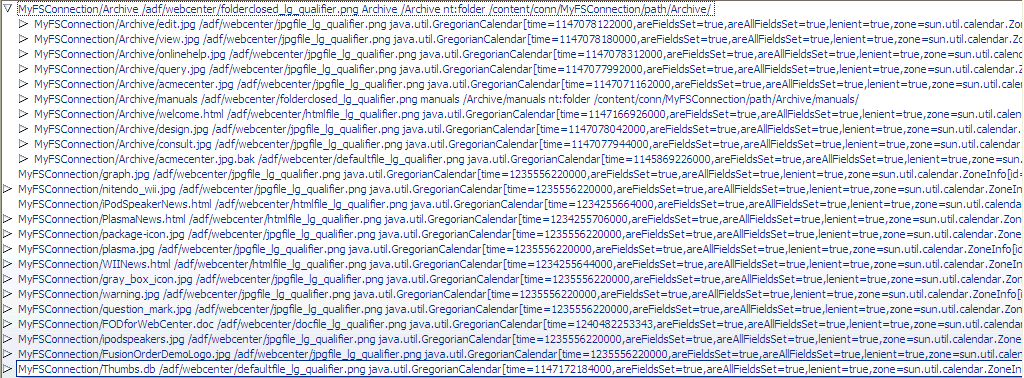
By default, the tree displays file and folder names as read-only text. The next section describes how to create hyperlinks to file names. In the following section, folder names will remain read-only text because they are required for navigation through the tree.
To create hyperlinks to file names and to keep folder names read-only, you need the af:switcher component with two facets: one for folders and one for files.
To use the Switcher component for folders and files:
In the Structure window, navigate to f:facet - nodeStamp and delete af:outputText-#{node}.
Right-click nodeStamp and choose Insert inside f:facet - nodeStamp and then Browse.
In the Insert Item dialog, from the dropdown list for selecting the category, select ADF Faces.
From the Select the item to be created list, select Switcher, and click OK.
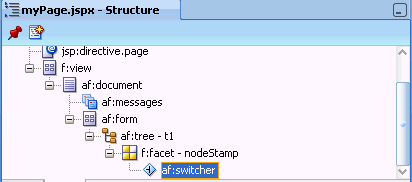
A Switcher is added under f:facet - nodeStamp in the Structure window, as shown in Figure 27-34.
Figure 27-34 Output Text Converted to a Switcher Component
Double-click af:switcher to display the Property Inspector, if it is not displayed.
Under the Common tab, in the FacetName field, enter the expression #{node.primaryType}.
In the Structure window, insert two facets for the switcher. Right-click af:switcher, choose Insert Inside af:switcher and then Facet. The Insert Facet dialog displays.
Name the first facet nt:folder and click OK. Folder names require no additional formatting, so you can display the node names as plain text. Name the second facet nt:file. The facets look like Figure 27-35.
Figure 27-35 Switcher Component with Two Facets
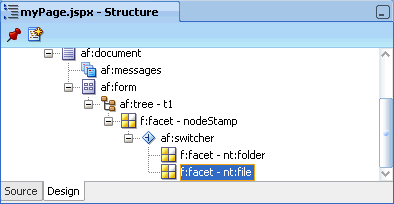
Right-click f:facet - nt:folder, choose Insert Inside f:facet - nt:folder and then Browse.
In the Insert Item dialog, choose ADF Faces from the dropdown list.
From the Select the item to be created list select Output Text and click OK.
Double-click af:outputText - outputText1 to display the Property Inspector, if it is not displayed already. Under the Common tab, in the Value field, enter the expression #{node.name}.
Right-click f:facet - nt:file, choose Insert Inside f:facet - nt:folder and then Browse.
In the Insert Item dialog, choose ADF Faces from the dropdown list.
From the Select the item to be created list select Go Link and click OK.
In the Structure window, double-click af:goLink - goLink to display the Property Inspector, if it is not already displayed.
Under the Common tab, in the Text field, enter the #{node.name} expression.
In the Destination field, enter the expression #{node.URI}.
From the TargetFrame list, select _blank.
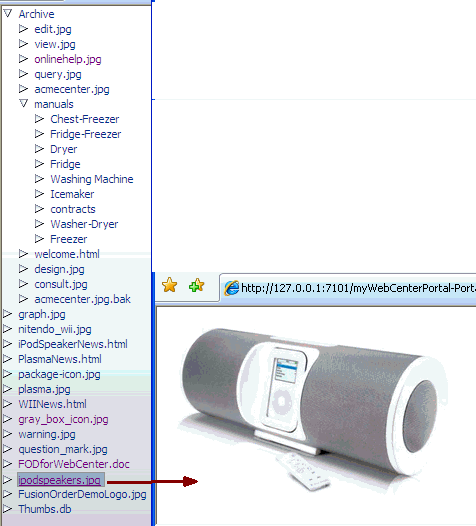
Run the page. Figure 27-36 displays files names as hyperlinks, because the nt:file facet of the switcher under af:tree was converted to a link (node.URI). Clicking a link displays the respective item.
Figure 27-36 Tree with File Names as Hyperlinks
The JCR data control getItems method is designed to retrieve the child items of a JCR folder (type nt:folder). The method is invoked with a path to a folder and optionally a type to which the returned child nodes are restricted. The path parameter must be the path of a folder for the getItems method to retrieve the child items. An exception to this rule is that the root of the repository does not have to be a folder. Hence, the getItems method can retrieve the child items for a path that corresponds to a folder, or that is the root of the repository. Otherwise the getItems method does not attempt to retrieve the child items and therefore the result set is never populated. If the path is valid, then the data control invokes JCR Session.getItem() on this path which returns a JCR node, and then it invokes node.getNodes() to retrieve all child nodes. The child nodes are filtered according to the type supplied; for example, to return only the nt:file type child node. This is the result that is provided by the data control to ADF. The data control ensures that the JCR node object is adapted to ADF such that JCR properties are available as data control item attributes that can be consumed by way of the bindings container.
The af:tree renders each node in the collection returned by the data control as a node in its tree. In the first part of the example, it displays the name, type, and URI for each node. Each of these values is retrieved through the data control. When the switcher is added to the af:tree the node's primaryType value is used to differentiate how a node is rendered. If the node is of primary type nt:folder, then only its name is shown in the tree node. However if the node is of type nt:file, then the node renders go:Link, the destination of which is the node's URI. The data control getItems method is invoked again to retrieve the child nodes of any folder node in the tree.
With the help of two examples, this section describes how to add simple and advanced search capabilities for the integrated content. The simple search enables users to search for the content based on name or content fragments in specific locations. The advanced search enables users to search by attribute values of the content.
This section contains the following:
Before you begin:
Configure a repository connection as described in Section 26.2, "Configuring Content Repository Connections".
Configure a data control as described in Section 27.2, "Configuring Content Data Controls for JCR Adapters".
Create a page as described in Section 5.2.2, "Adding Pages to the Portal."
In this section, you will enable simple search capabilities in your page. This will let you perform wildcard (%) search.
To enable the search function:
In the Application Navigator, double-click your page to open it.
In the Data Controls panel, select the search node.
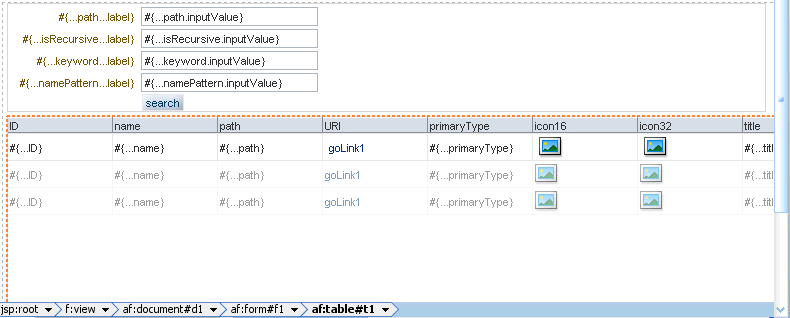
To enable users to perform a search by clicking a button, drag and drop the search node on your page. From the Create menu, choose Parameters and then ADF Parameter Form. The Edit Form Fields dialog displays.
Click OK. The ADF parameter form is added to the page, as shown in Figure 27-37
Figure 27-37 ADF Parameter Form in the Design View

To enable the display of search results in a read-only table, drag and drop the Return node onto the page. From the Create menu, choose Table and then ADF Read-Only Table. The Edit Table Columns dialog displays.
Click OK. A table similar to Figure 27-38 displays.
Figure 27-38 Table with Four Columns - search
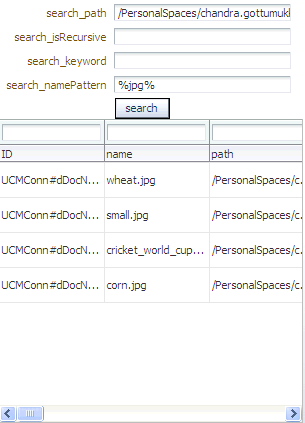
Run this page and specify / for search_path and %jpg% for namePattern. All .jpg files stored in the root of your repository display, as shown in Figure 27-39.
Figure 27-39 Search Results for .jpg Files
In this section, you will add advanced search capabilities to your page that will enable you to perform search based on the last modified dates of items located in your file system repository.
To enable the advanced search function:
In the Application Navigator, open your page in which you intend to create the advanced search function. The page must be automatically exposed in new managed bean, where name=advancedSearch, class=AdvancedSearch, package=view. (In the Create JSF Page dialog > Page Implementation > Automatically Expose UI Components in a New Managed Bean)
In this example the page is called advancedSearch.jspx.
Double-click the page to open it.
In the Component Palette, select ADF Faces.
From the list of ADF Faces - Layout components, drag Panel Form Layout onto the page.
From the Component Palette, drag Input Date into the Panel Form Layout.
In the Property Inspector, under the Common tab, set the Label to Modified after.
In the Application Navigator, under portal.backing, double-click AdvancedSearch.java to open it.
Add the following import declarations. These declarations are required for the getPredicates method, which will be added in the next step.
import java.util.ArrayList;
import java.util.Calendar;
import java.util.Date;
import java.util.List;
import oracle.vcr.datacontrol.search.Predicate;
import oracle.vcr.datacontrol.search.Operator;
Add the following method to enable the advanced search based on last modified dates of the items stored in the repository:
public List<Predicate> getPredicates() {
        ArrayList<Predicate> predicates = new ArrayList<Predicate>();
        if (id1.getValue() != null && !id1.getValue().equals(""))
{
            Calendar cal = Calendar.getInstance();
            cal.setTime((Date)id1.getValue());
            predicates.add(new Predicate("jcr:content/jcr:lastModified"
                                         , Operator.GREATER_THAN
                                         , cal));
        }
        // ... other predicates
        if (predicates.size()>0)
            return predicates;
        return null;
    }
From the Data Controls panel, drag the advancedSearch node onto the page. From the Create menu, choose Methods and then ADF Button. The Edit Action Binding dialog displays.
For Path, specify the path to the directory in which the search will be performed; for example, /. For isRecursive specify true, and matchAny specify false.
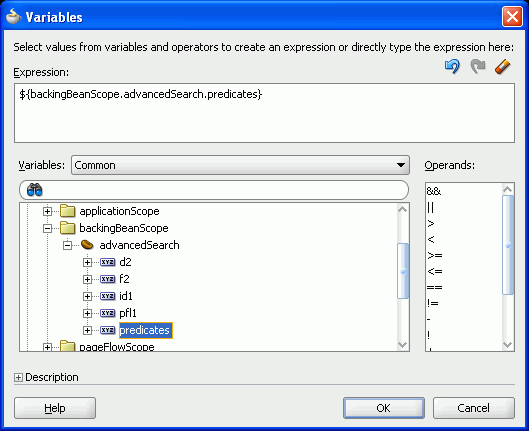
For predicates, select the arrow next to the Value field and then select Show El Expression Builder. The Variables dialog displays.
Expand ADF Managed Beans, backingBeanScope, advancedSearch and select predicates. This adds the expression ${backingBeanScope.advancedSearch.predicates}, as shown in Figure 27-40, and click OK.
Figure 27-40 Variables Dialog - predicates
Click OK in the Edit Action Binding dialog.
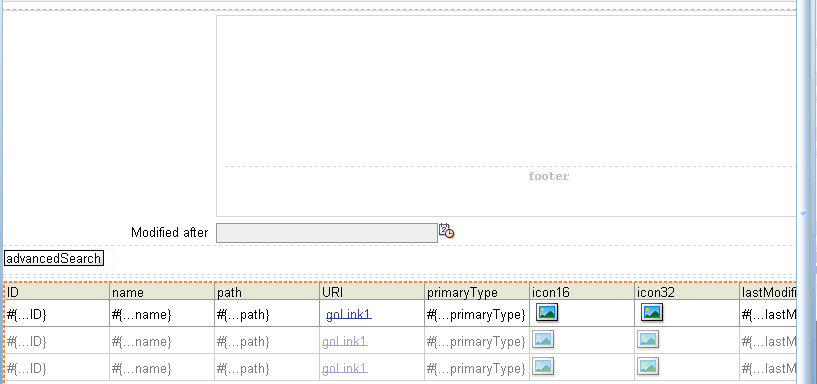
In the Data Controls panel, expand the advancedSearch node. Then drag Return and drop it onto the page, after the advancedSearch ADF button. From the Create menu, choose Table and then ADF Read-only Table.
In the Edit Table Columns dialog, edit labels of the columns, if needed. Then click OK. The Design view looks like Figure 27-41.
Figure 27-41 Advanced Search - Design View
In the Property Inspector, under the Behavior tab, set the ContentDelivery property to immediate.
To view the page in a browser, under the Application Navigator, right-click the page and choose Run. The advancedSearch page displays in the browser.
Enter a last modified date and click the advancedSearch button. The files modified after that date are displayed, as shown in Figure 27-42.
Clicking the search button at runtime invokes the search method and the values provided through the UI are used as the parameters for the search. At runtime, you can perform the wild (%) card search. For example, to search for files that have .jpg extension, enter / in the search_path field, enter %jpg in the namePattern field and then click Search. All files with the .jpg extension will display in the read-only table.
At runtime the JCR data control uses the given parameters to construct an XPath query for the given parameters. For the simple search example, the query is:
Non-recursive:
XPath query /jcr:root/element(*, nt:file)[jcr:like(ojcr:local-name(), '%jpg%')]

Recursive:
XPath query /jcr:root//element(*, nt:file)[jcr:like(ojcr:local-name(), '%jpg%')]
In the advanced search example, first a backing bean is added to the page, because the backing bean is required to construct the predicate parameter value of the advancedSearch method. Then the Panel Form Layout UI component is dropped onto the page. In this component, the InputDate component is dropped, which is used at runtime to supply the date-based search criterion. The advancedSearch method predicates parameter allows for a combination of predicates to be supplied to the search method. Each can specify the value of an item's properties that must apply for the search. In this example, only a modification date is tested in the predicates, but potentially multiple tests could be included, for example a modification date and a mimeType.
The backing bean's getPredicates method is hardcoded to construct the predicates method from the date provided by the page at runtime. At design time, the return value of the predicates method is bound into the predicates advancedSearch method parameter. At runtime this invokes the getPredicates method before invoking the advancedSearch method to construct the correct predicate value.
At runtime the JCR data control uses the given parameters to construct an XPath query for the given parameters. For this example the query is:
/jcr:root//element(*, nt:hierarchyNode)[jcr:content/@jcr:lastModified >
xs:dateTime('2009-02-15T00:00:00.000+05:30')]
Consider the following points while adding search capabilities:
How certain operations work depends on the implementation of the adapter and the underlying repository. While read and query operations are similar, full text search works differently. Another example is, the file system and Oracle Portal adapters do not support search based on the primaryType attribute. The only supported way to search based on type is through the element (*, type) construct.
If you use the Oracle Portal adapter, then the behavior of search functionality varies depending on whether Oracle Text is enabled or not. If Oracle Text is disabled, then the search is performed in the Oracle Portal content metadata. With Oracle Text turned on, all indexed content is searched, which includes the contents of files. This also applies to Oracle Content Server. That is, Oracle Content Server-based adapter performs full text index operation on its documents using Oracle Text.
The Oracle Portal adapter does not support translations and only returns content in the base language of a page group. Searching across multiple page groups with different base languages is not supported.