| Oracle® Fusion Middleware Developer's Guide for Oracle WebCenter 11g Release 1 (11.1.1.4.0) E10148-12 |
|
 Previous |
 Next |
| Oracle® Fusion Middleware Developer's Guide for Oracle WebCenter 11g Release 1 (11.1.1.4.0) E10148-12 |
|
 Previous |
 Next |
This chapter describes how to use the Page service to create and manage pages at runtime. It includes the following sections:
Section 18.1, "Introduction to Page Creation and Management"
Section 18.3, "Defining Values for the Page - Create New Task Flow Parameters"
The Page service enables you to create new pages and task flows in your application at runtime. You can base your pages on default or custom styles and templates. You can create them with either the Page - Create New task flow or the Page service APIs.
After you create pages or task flows, users can view and manage them with either the Page service data control or the Page service APIs. The APIs provide a means of defining a work area within the application, called a scope. Scopes are useful for categorizing custom pages that are of interest to a specific team or community (similar to a Group Space in WebCenter Spaces).
Table 18-1 describes the developer tools included with the Page service.
Table 18-1 Page Service Developer Tools
| Tool | Description |
|---|---|
|
Page - Create New task flow |
A task flow for creating pages or task flows at runtime. |
|
PageServiceDC data control |
A data control for viewing or deleting information about listed pages and task flows at runtime. PageServiceDC is available in design time after you add the Page service libraries to your application. By default, the Page service libraries are added to the application when you use the WebCenter template or when you add the Page - Create New task flow. |
|
Page service APIs |
APIs for creating and managing pages and task flows at runtime. |
The Page service is integrated with many Oracle WebCenter Services, such as the Links, Search, and Tags services. You can track the most recent changes in pages with the Recent Activities service. Because it is preconfigured to work with the Recent Activities service, the Page service automatically produces the information that the Recent Activities service uses to display the most recent additions, changes, or deletions in pages.
For more information about the services at runtime, see Oracle Fusion Middleware User's Guide for Oracle WebCenter Spaces.
You can create pages and task flows at runtime with either the Page - Create New task flow or the Page service APIs.
|
Note: The Page - Create New task flow provides a means of creating pages and task flows and editing task flow parameters. To execute operations, such as copy, rename, create scope, and so on, you must use the Page service APIs along with the Page - Create New task flow. The Page service APIs provide the flexibility of customization within the Page service. |
The Page - Create New task flow enables you to invoke the Create Page dialog at runtime. The Create Page dialog in turn enables users to create pages based on predefined styles, schemes, and templates.
Page styles, schemes, and templates provide both a default page structure that describes the areas where you can place content (that is, the page layout) and a background color and image that contribute to a page look and feel. You can select the page style, scheme, scheme background color, and template when you create a page. You can additionally enhance the usefulness and presentability of a page using page layout components. These include an in-place HTML text editor, images, layout boxes, hyperlinks, and so on.
Figure 18-1 shows the Create Page dialog at runtime.
Figure 18-1 Create Page Dialog with Default Styles
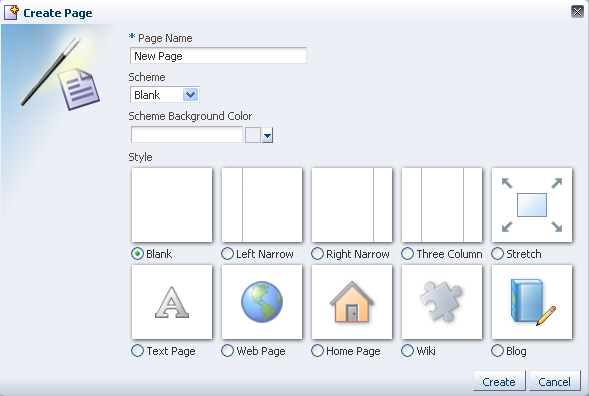
Some page styles include properties that suggest a particular use for the page. For example, the Web Page style includes a configurable property for specifying a URL. Among its many uses, the Web Page style provides a means of embedding wiki or blog pages and exposing external Web content within your application.In many cases, you can switch the page scheme, scheme background color, and layout when you revise a page. You can also start with a blank page and create layout, look, and feel from the start.
At runtime, you can view a list of pages created through the Page - Create New task flow and create, copy, update or delete those pages.
For more information, see the section "Working with Page Layouts, Styles, and Schemes" in the Oracle Fusion Middleware User's Guide for Oracle WebCenter Spaces.
This section describes how to add the Page - Create New task flow to your application to enable the creation of pages at runtime. It contains the following subsections:
To add the Page - Create New task flow to your WebCenter application:
Follow the steps described in Section 5.2.2, "Adding Pages to the Portal."
Open the customizable page on which you want to add the service.
In the Resource Palette, expand My Catalogs, WebCenter Services Catalog, and Task Flows.
Drag and drop the Page - Create New task flow onto your page.
When prompted, select Region as the way to create the task flow.
Click OK.
Save your page.
Run your application to see that Create Page is now on the page.
Click Create Page.
The Create Page dialog opens (see Figure 18-1).
Enter a page name, then select the scheme, the scheme background color, and the template.
Click Create.
A page is created based on the selected information. For more details on where the page is created, see Section 18.2.1.4, "Structure of Pages Created at Runtime."
|
Note: After you add the task flow, you can edit task flow parameters. For information about Page - Create New task flow parameters, see Section 18.3, "Defining Values for the Page - Create New Task Flow Parameters."For detailed information about pages, such as how to delete pages created at runtime, see Section 18.5, "Managing Pages." |
The Page service does not require its own, specific configuration of ADF security. It follows the security set up for the application. In a non-secured application, all pages created in the Create Page dialog appear in the data control, viewable by everyone. In a secured application, users see only the pages they create or the pages to which they are granted privileges.
To secure your application and the Page - Create New task flow:
Follow the steps in Section 7.2.1.1, "Implementing Security for Services."
After you add the Page - Create New task flow to an application page, double-click the jazn-data.xml file in Application Resources to open the ADF Security Policies Editor.
If necessary, click the Task Flow tab to bring it forward.
In the Task Flow column, select page-create-new task flow (Figure 18-2).
Figure 18-2 Adding Privileges to the Page - Create New Task Flow
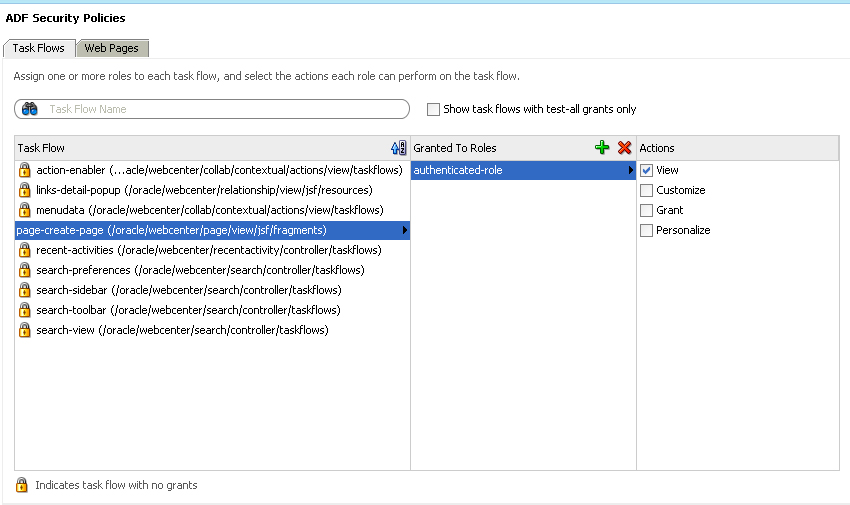
Under Granted to Roles, click the Add icon to add a user role on which to grant task flow access privileges.
After you have added user roles, select a role in the ADF Security Policies dialog and then, under Actions, select the privileges to apply to the selected role.
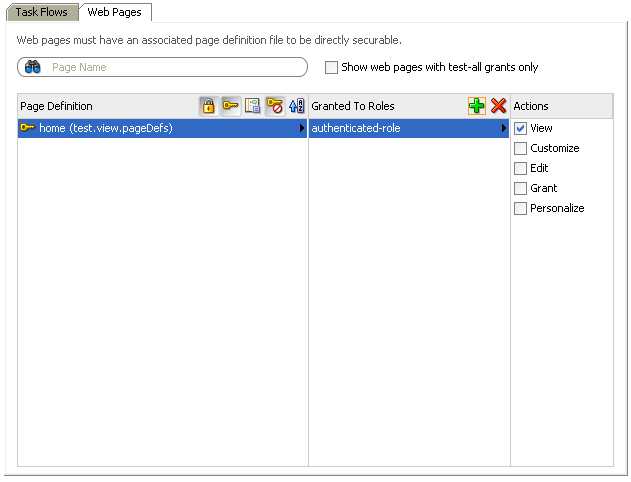
Click the Web Pages tab to apply security to the page on which you added the Page - Create New task flow (Figure 18-3).
Follow the same procedure outlined in steps 3 through 6: select a page, add roles, apply privileges.
Figure 18-3 Adding Privileges to Page with the Page - Create New Task Flow
|
Note: The PageServiceDC data control does not require any security setting for a secure or non-secure application. |
For detailed information, see the chapter "Introducing the Page Service and Oracle Composer" in Oracle Fusion Middleware User's Guide for Oracle WebCenter Spaces.
The pages you create at runtime using the Page - Create New task flow or the Page service APIs are stored in the mds folder, located under your application root. Table 18-2 provides examples of the default formats used for page and task flow file names.
Table 18-2 Default File Name Formats
| File Type | Format |
|---|---|
|
Page |
For example: |
|
Page Definition |
|
|
Task Flow View pages |
|
|
Task Flow View Page Definitions |
|
|
Task Flow Definitions |
|
When you use the Page service APIs to create pages, you can provide a custom value for the file name format. For example: myPage<N>.jspx (value of N starts from 1)
The following examples show the structure of a page (Page1.jspx) and its associated page definition (Page1PageDef.xml) created at runtime by the user user1.
Example 18-1 Page Created Under a Default Scope
mds\oracle\webcenter\page\scopedMD\s8bba98ff_4cbb_40b8_beee_296c916a23ed\user\user1\Page1.jspx
Example 18-2 Page Definition Created Under a Default Scope
mds\pageDefs\oracle\webcenter\page\scopedMD\s8bba98ff_4cbb_40b8_beee_296c916a23ed\user\user1\Page1PageDef.xml
Example 18-3 Page Created Under a Custom Scope
mds\oracle\webcenter\page\scopedMD\<scopeGUID>\Page1.jspx
Example 18-4 Page Definition Created Under a Custom Scope
mds\pageDefs\oracle\webcenter\page\scopedMD\<scopeGUID>\Page1PageDef.xml
In Example 18-4, the scopeGUID is a unique ID assigned to a specific scope by the Page service.
Example 18-5 Task Flow View Page Created Under a Default Scope
mds\oracle\webcenter\page\scopedMD\s8bba98ff_4cbb_40b8_beee_296c916a23ed\user\user1\Page1.jspx
Example 18-6 Task Flow Definition Created Under a Default Scope
mds\oracle\webcenter\page\scopedMD\s8bba98ff_4cbb_40b8_beee_296c916a23ed\user\user1\Page1.xml
Example 18-7 Task Flow View Page Definition Created Under a Default Scope
mds\pageDefs\oracle\webcenter\page\scopedMD\s8bba98ff_4cbb_40b8_beee_296c916a23ed\user\user1\Page1PageDef.xml
Example 18-8 Task Flow View Page Created Under a Custom Scope
mds\oracle\webcenter\page\scopedMD\<scopeGUID>\Page1.jspx
Example 18-9 Task Flow Definition Created Under a Custom Scope
mds\oracle\webcenter\page\scopedMD\<scopeGUID>\Page1.xml
Example 18-10 Task Flow Page Definition Created Under a Custom Scope
mds\pageDefs\oracle\webcenter\page\scopedMD\<scopeGUID>\Page1PageDef.xml
In Example 18-10, the scopeGUID is a unique ID assigned to a specific scope by the Page service.
To access pages with a default scope, enter the following URL:
http://<server>:<port>/<app name>/faces/oracle/webcenter/page/scopedMD/s8bba98ff_4cbb_40b8_beee_296c916a23ed/user/<user guid>/Page1.jspx
To access pages with a custom scope, enter the following URL:
http://<server>:<port>/<app name>/faces/oracle/webcenter/page/scopedMD/<scope guid>/Page1.jspx
This section describes how to access and define values for Page - Create New task flow parameters. It contains the following subsections:
Section 18.3.1, "How to Access Page - Create New Task Flow Parameters"
Section 18.3.2, "Setting Scope in a Page - Create New Task Flow"
To access Page - Create New task flow parameters:
Go to the Application Navigator and right-click the .jspx page with the Page - Create New task flow.
Select Go to Page Definition, and scroll to select the Create Page task flow.
Click the Edit (pencil) icon to edit any of the parameters.
The Page Data Binding Definition in the design view is shown in Figure 18-4.
The Edit Task Flow Binding dialog opens, as shown in Figure 18-5.
Figure 18-5 Edit Task Flow Binding for the Page - Create New Task Flow
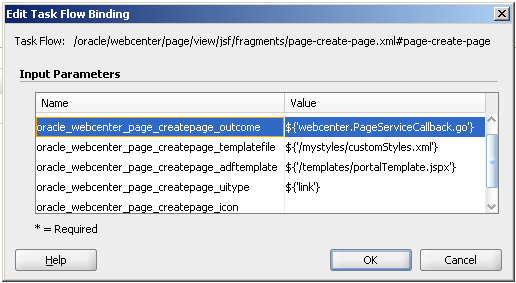
The following optional Page - Create New parameters are available:
For information, see Section 18.3.2, "Setting Scope in a Page - Create New Task Flow."
For information, see Section 18.3.3, "Setting an Outcome Parameter."
For information, see Section 18.3.4, "Specifying Styles."
For information, see Section 18.3.5, "Specify an ADF Template."
For information, see Section 18.3.6, "Showing a Command Link."
For information, see Section 18.3.7, "Displaying an Image."
For information, see Section 18.3.8, "Customizing the Label."
By default, the pages and task flows you create using the Page - Create New task flow are stored in the default scope. To assign a specific scope to the Page - Create New task flow, the scope name must be assigned to the oracle_webcenter_page_createpage_scopename parameter, as shown in Figure 18-6.
Figure 18-6 oracle_webcenter_page_createpage_scopename Parameter
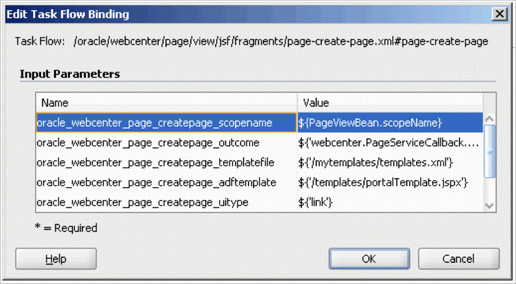
In Figure 18-6, PageViewBean is a custom managed bean that is invoking the getScopeName() method to fetch the value of scopeName. It uses the Page service API. By doing this, the Page - Create New task flow creates all pages and task flows under the specified scope, rather than default scope.
The following example code highlights only the creation of scope. If a scope already exists, then users can get the scope name from the Scope object.
Example 18-11 Creating a Scope for Application Pages
import oracle.webcenter.framework.service.Scope;
import oracle.webcenter.framework.service.ScopeAlreadyExistsException;
import oracle.webcenter.framework.service.ServiceContext;

public class PageViewBean {
    private String scopeName;

    public String getScopeName() {
        String scopeName = "MyScope";
        ServiceContext sContext = ServiceContext.getContext();
        try {
            Scope scope =
                sContext.createScope(scopeName); // Creates a new scope
            this.scopeName = scope.getName(); // Returns the scope name
            sContext.setScope(scope); // Setting the Scope. This step is important.
        } catch (ScopeAlreadyExistsException scopeExistsException) {
            System.out.println("Scope Already Exists...");
        }
        return this.scopeName;
    }


    public void setScopeName(String scopeName) {
        this.scopeName = scopeName;
    }

}
The outcome parameter defines a Java method that is called after the page is created. In this method, you can add dynamic content to the page, refresh the user interface that calls up the dialog to confirm creation of a new page, or initiate browser navigation to the newly created page. To specify a Java method to invoke after page creation (that is, it is called after users click the Create button in the Create Page dialog), enter the following in the Edit Task Flow Binding dialog:
oracle_webcenter_page_createpage_outcome = ${'view.MyTestClass.go'}
You can define the method either with a String parameter or with no parameter. The String parameter value is the new page's name with full path. If the method is defined both ways, then the one with a parameter is invoked.
In the following example, the method go(String newPagePath) is invoked. This method redirects users to the newly created page with the Java class MyTestClass.java. The value of newPagepath is passed by the Page service.
package view;

import javax.faces.context.ExternalContext;
import javax.faces.context.FacesContext;
import javax.faces.event.ActionEvent;

public class MyTestClass {
    public MyTestClass() {
    }

    /*
       This method is executed only when there is no other go(String newPagePath) method with a String argument .
    */
    public void go() {
        System.out.println("go() method without parameters executed.");
    }

    /*
       This method is prioritized and executed even when there are other go() methods without arguments.
    */
    public void go(String newPagePath) {
        System.out.println("go(String newPagePath) method with parameter executed.");
        try {
            FacesContext context = FacesContext.getCurrentInstance();
            String viewID = context.getViewRoot().getViewId();
            System.out.println("ViewID=" + viewID);

            ExternalContext extCtx = context.getExternalContext();
            String targetURI =
                extCtx.getRequestContextPath() + "/faces" + viewID;
            System.out.println("Navigate to: " + targetURI);
            extCtx.redirect(targetURI);
            context.responseComplete();
        } catch (Exception ee) {
            System.out.println("Error: " + ee.toString());
        }

    }
}
The Page service provides out-of-the-box styles that are packaged within the Page service libraries. You can use these styles or create your own custom styles.
This section describes how to apply out-of-the-box styles and custom styles. It contains the following subsections:
|
Note: For more information about styles, see Section 18.6, "Introduction to Custom Styles and Templates." |
The following out-of-the-box-styles are provided (see Figure 18-1):
Blank
Left Narrow
Right Narrow
Three Column
Stretch
Text Page
Web Page
To associate out-of-the-box styles with the Page - Create New task flow, use the optional parameter oracle_webcenter_page_createpage_templatefile. Use the parameter value to specify the location of the file that contains the list of out-of-the-box styles.
To associate out-of-the-box styles with the Page - Create New task flow:
Create a folder named mystyles under your application's public_html folder.
Within mystyles, create a file named default_pageservice_styles.xml.
Add entries for all the out-of-the-box styles using the templateDef element.
The templateDef element takes the following attributes:
name: This attribute specifies the path to the .jspx page that defines a page style. When you use the default styles, you must specify the path to the page that defines the style you intend to use. The default page style page files are located within the Page service libraries. For example:
name="/oracle/webcenter/page/pstemplates/TemplateThreeColumn.jspx"
TemplateThreeColumn.jspx is the page within the Page service library that defines the Three Column Template style.
title: The value you enter for title is used as the able for the style in the Create Page dialog. You can modify the title of an out-of-the-box style to any name. For example: title="Three Column Layout" or title="Sales Standard".
icon: This attribute specifies an image icon for a style.
For out-of-the-box styles, if you do not specify an icon for a style, then the Page service automatically uses the default icons assigned to each out-of-the-box style.
Example 18-12 shows the content of a sample default_pageservice_styles.xml file that lists the other out-of-the-box styles:
Example 18-12 Sample default_pageservice_styles.xml File
<?xml version="1.0" encoding="UTF-8" ?>
 <templatesDef xmlns="http://xmlns.oracle.com/webcenter/page">
  <templateDef name="/oracle/webcenter/page/pstemplates/TemplateThreeColumn.jspx" title="Three Column Layout" />
  <templateDef name="/oracle/webcenter/page/pstemplates/TemplateText.jspx" title="Text Page" />
  <templateDef name="/oracle/webcenter/page/pstemplates/TemplateStretch.jspx" title="Stretch" />
  <templateDef name="/oracle/webcenter/page/pstemplates/TemplateWeb.jspx" title="Web Page" />
  <templateDef name="/oracle/webcenter/page/pstemplates/TemplateBlank.jspx" title="Blank" />
  <templateDef name="/oracle/webcenter/page/pstemplates/TemplateNarrowLeft.jspx" title="Left Narrow Column Layout" />
  <templateDef name="/oracle/webcenter/page/pstemplates/TemplateNarrowRight.jspx" title="Right Narrow Column Layout" />
 </templatesDef>
Open the Edit Task Flow Binding dialog as described in Section 18.3.1, "How to Access Page - Create New Task Flow Parameters."
Set the oracle_webcenter_page_createpage_templatefile parameter value to ${'/mystyles/default_pageservice_style.xml'}.
For example:
oracle_webcenter_page_createpage_templatefile = ${'/mystyles/default_pageservice_style.xml'}
Click OK.
In this example, you associate a custom style, labeled News, with the Page - Create New task flow.
To associate a custom style with the Page - Create New task flow:
Define your custom style in a .jspx file (for example, NewsTemplate.jspx).
|
Note: For information about how to create ADF templates, see Section 18.6, "Introduction to Custom Styles and Templates." |
Add an entry for the custom style in an XML file (for example, custom_pageservice_style.xml).
For example:
<?xml version="1.0" encoding="UTF-8" ?>
  <templatesDef xmlns="http://xmlns.oracle.com/webcenter/page">
    <templateDef name="NewsTemplate.jspx" title="News" icon="/images/news.png" />
  </templatesDef>
|
Note: For more information about the syntax to use fortemplateDef element and the style-related .xml file, see Section 18.3.4.1, "Out-of-the-Box Styles." |
Save the custom_pageservice_style.xml under a folder in your application's public_html folder.
For example:
…/public_html/mystyles/custom_pageservice_style.xml
The following files must be placed in the same folder as custom_pageservice_style.xml:
The file that defines the custom style, for example, NewsTemplate.jspx.
The page definition file of the custom style file, for example, NewTemplatePageDef.xml.
The ADF Template (for example, defaultTemplate.jspx) on which the custom style file is based. This step is applicable only if you are using ADF templates.
|
Note: If you specify the location of an ADF template using theoracle_webcenter_page_createpage_adftemplate as described in following section, then you do not need to put this file (defaultTemplate.jspx) under the mystyles folder. You can specify a different location for the file by following Section 18.3.5, "Specify an ADF Template." |
Open the Edit Task Flow Binding dialog as described in Section 18.3.1, "How to Access Page - Create New Task Flow Parameters."
Set the oracle_webcenter_page_createpage_templatefile parameter to ${'/mystyles/custom_pageservice_style.xml'}, where mystyles is a folder under the public_html folder of your application.
For example:
oracle_webcenter_page_createpage_templatefile = ${'/mystyles/custom_pageservice_style.xml'}
When you want to use the same template for both design time and runtime pages, you can use an ADF template. All that is required is to point the Page - Create New task flow to the template location.
To associate an ADF template with the Page - Create New task flow:
Open the Edit Task Flow Binding dialog as described in Section 18.3.1, "How to Access Page - Create New Task Flow Parameters."
In the Value column next to the oracle_webcenter_page_creatpage_adftemplate parameter, enter the path to the ADF template.
For example:
${'templates/portalTemplate.jspx'}
In Figure 18-7, an ADF template called portalTemplate.jspx is used.
Figure 18-7 oracle_webcenter_page_createpage_adftemplate Parameter
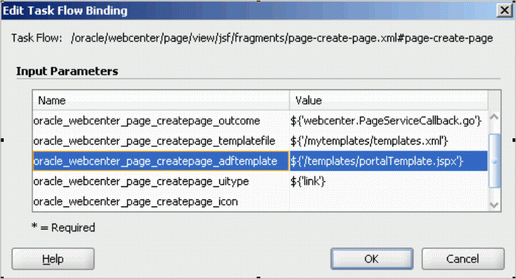
ADF templates can be in your application's public_html folder. In this case, the path of portalTemplate.jspx is ../public_html/templates/portalTemplate.jspx.
Click OK.
By default, the Page - Create New task flow is rendered as a command button. You can instead specify that it is rendered as a command link (Figure 18-8).
To render the Page - Create New task flow as a command link:
Open the Edit Task Flow Binding dialog as described in Section 18.3.1, "How to Access Page - Create New Task Flow Parameters."
Revise the oracle_webcenter_page_createpage_uitype parameter to the following value: ${'link'}.
For example:
oracle_webcenter_page_createpage_uitype = ${'link'}
Click OK.
You can associate an icon with the Page - Create New task flow button or link. For example, Figure 18-9 shows the task flow rendered as a command link with a page icon.
Figure 18-9 Command Link with a Page Icon
Figure 18-10 shows the task flow rendered as a command button with a page icon.
Figure 18-10 Command Button with a Page Icon
To specify an icon for the Page - Create New task flow button or link:
Open the Edit Task Flow Binding dialog as described in Section 18.3.1, "How to Access Page - Create New Task Flow Parameters."
Revise the oracle_webcenter_page_createpage_icon parameter to the following value: {'/images/page.jpg'}.
For example:
oracle_webcenter_page_createpage_icon = ${'/images/page.jpg'}
Click OK.
By default, the label for the Page - Create New task flow command button or link is Create Page. You can provide your own value using the oracle_webcenter_page_createpage_label parameter value.
Figure 18-11 shows the task flow rendered as a command button with a custom label.
To change the command button or link label:
Open the Edit Task Flow Binding dialog as described in Section 18.3.1, "How to Access Page - Create New Task Flow Parameters."
Revise the oracle_webcenter_page_createpage_label parameter to your preferred string value.
For example:
oracle_webcenter_page_createpage_label = ${'Create New Page'}
Click OK.
The following types of objects are required for the creation of a task flow view page:
Task flow view page (JSFF file)
Page definition of view page
Task flow definition XML file, which defines the task flow
To enable the creation of task flow view pages through the Page - Create New task flow:
At design time, add a Page - Create New task flow to your page (home.jspx).
Open the Edit Task Flow Binding dialog as described in Section 18.3.1, "How to Access Page - Create New Task Flow Parameters."
Change the label on the Create Page button or link by revising the value specified for the oracle_webcenter_page_createpage_label parameter.
For example:
oracle_webcenter_page_createpage_label = ${'Create Task Flow'}
Click OK.
Create an XML file (for example, custom_taskflow_styles.xml) to contain entries for all the task flow styles.
For example:
<?xml version='1.0' encoding="UTF-8"?>
<templatesDef xmlns="http://xmlns.oracle.com/webcenter/page">
  <templateDef name="mytaskflow_view.jsff" title="News"   icon="/images/news.png" type="taskflow"/>
</templatesDef>
The element templateDef in the XML file contains the following attributes:
name: to specify the name of the task flow view page
title: to specify the label to associate with the task flow view page style in the Create Page dialog.
icon: to specify the image icon for the task flow
Under your application's public_html folder, create a folder (for example, mystyles) and add the custom_taskflow_styles.xml file to it.
Make sure that the following files are also under the mystyles folder:
mytaskflow_view.jsff (task flow view page)
mytaskflow_viewPageDef.xml (task flow view page definition)
mytaskflow_view.xml (task flow definition)
Open the Edit Task Flow Binding dialog again, and provide the path to the XML file you created in step 5 to the oracle_webcenter_page_createpage_templatefile parameter.
For example:
oracle_webcenter_page_createpage_templatefile=${'/mystyles/custom_taskflow_styles.xml' }
In this example, mystyles is a folder under the public_html folder of your application.
Run the home.jspx page, and then click the Create Task Flow button.
Enter the title of the task flow, select the News style (see Section 18.3.4.2, "Custom Styles"), and then click Create.
The new task flow view page is rendered.
For information on where the task flows are created, see section Section 18.2.1.4, "Structure of Pages Created at Runtime."
You can manage pages using either the Page service data control or the Page service APIs. This section contains the following subsections:
Section 18.5.1, "Using the Page Service Data Control to Manage Pages"
Section 18.5.2, "Using the Page Service APIs to Manage Pages and Task Flows"
You can customize Page service views with the Page service data control. The data control enables you to view information about existing pages at runtime and delete any of the listed pages. The Page service data control, PageServiceDC, is included in the Page service libraries and is available at design time after you add the libraries to the application.
For more information about the Page service data control, see Section 18.8.2, "Using the Page Service Data Control."
The Page service provides APIs to manage pages and task flows. These include APIs to delete pages and task flows, change the hidden status, change the page scheme (name, background color, background image), and copy pages.
For more information about Page service APIs, see Section 18.8.1, "Using the Page Service Java APIs."
At runtime, when users click the Create Page option, the Create Page dialog displays a set of predefined styles for creating the page (see Figure 18-1). Users select one of these page styles to create a page based on the associated style template. The style provides a special look and feel to your pages. The template provides the page layout. Templates are the ADF pages on which runtime pages are based. Pages can be based on default or custom styles and templates.
To provide custom selections for the Create Page dialog, you must define them, for example, in /mytemplates/templates.xml. Place the directory /mytemplates under the web content root.
If you choose not to use the default options available with the Create Page dialog, then you can use the following types of custom templates in your application:
Page and page fragment templates for use with runtime pages
ADF templates for use as the base for page and page fragment templates
Templates to be used by the Create Page dialog itself
This section explains how to customize the Page - Create New task flow to use different templates for the Create Page dialog and for the new pages that you create at runtime. It contains the following subsections:
Section 18.6.1, "How to Create Templates for Pages Created at Runtime"
Section 18.6.3, "Creating Styles for the Create Page Dialog"
You can create custom page templates according to your design requirements and associate page styles with these templates. If you want to restrict the style options in the Create Page dialog or provide a different set of styles, then you must perform the following high-level tasks:
Create pages or page fragments to be used as templates for the different page styles.
Edit the Create Page dialog parameter to specify new page styles.
This section steps you through both procedures. It contains the following subsections:
To create a page or page fragment style:
In Oracle JDeveloper, create a JSF template with all necessary information, such as header, welcome message, login/logout links, and so on.
When creating pages, create a page (JSPX) based on that template.
When creating task flows, create a page fragment (JSFF) based on that template.
When creating a page based on a template, the Page service actually copies the template and creates a new page based on it.
Put all the necessary content in the JSPX or JSFF file.
For example, if there is a facet where you would like to display content, you can drop a Page Customizable component from Oracle Composer around it to make the page editable at runtime. Make sure you set the correct values for the document title, styleClass, and inlineStyle attributes.
|
Note: If this page or page fragment will be used as a template for pages that can be customized at runtime, then you must ensure that theID attribute on all components on this page or fragment is set to a unique value. |
Example 18-13 shows the sample code of a page fragment style, pstemplateview.jsff.
Example 18-13 Sample Code of a New Page Style
<?xml version='1.0' encoding='utf-8'?>
<!-- Copyright (c) 2006, 2008, Oracle and/or its affiliates.
All rights reserved. -->
<jsp:root xmlns:jsp="http://java.sun.com/JSP/Page" version="2.1"
          xmlns:pe="http://xmlns.oracle.com/adf/pageeditor"
          xmlns:cust="http://xmlns.oracle.com/adf/faces/customizable"
          xmlns:f="http://java.sun.com/jsf/core"
          xmlns:af="http://xmlns.oracle.com/adf/faces/rich">
     <jsp:directive.page contentType="text/html;charset=utf-8"/>
     <f:loadBundle basename="oracle.webcenter.page.view.resource.PGUIBundle"
                   var="res"/>
     <f:view>
       <af:document title="#{pageDocBean.title}" id="docrt">
         <af:form usesUpload="true" id="f1">
           <af:pageTemplate viewId="/oracle/webcenter/page/pstemplates/defaultTemplate.jspx" id="T">
             <f:facet name="content">
               <pe:pageCustomizable id="pcl1">
                 <af:panelStretchLayout id="psl2"
                                        styleClass="replace_with_scheme_name"
                                        inlineStyle="replace_with_inline_style">
                   <f:facet name="center">
                     <af:panelGroupLayout id="pgl1"
                                          layout="scroll">
                       <pe:layoutCustomizable id="lc1"
                                 showLayoutChanger="#{pageServiceBean.isEditMode}"
                                 text="Change Layout"
                                 showIcon="false"
                                 type="threeColumnNarrow"
                                 shortDesc="Layout Changer">
                         <cust:panelCustomizable id="mainC"/>
                         <f:facet name="contentA">
                           <cust:panelCustomizable id="cnta"/>
                         </f:facet>
                         <f:facet name="contentB">
                           <cust:panelCustomizable id="cntb"/>
                         </f:facet>
                       </pe:layoutCustomizable>
                     </af:panelGroupLayout>
                   </f:facet>
                 </af:panelStretchLayout>
                 <f:facet name="editor">
                   <pe:pageEditorPanel id="pep1"/>
                 </f:facet>
               </pe:pageCustomizable>
             </f:facet>
           </af:pageTemplate>
         </af:form>
       </af:document>
|
Note: The page definition file of the JSPX page, which defines the style, must contain the following syntax for theid and Package attributes. The Page service replaces these values with the relevant values when creating a page based on a custom style:
<?xml version="1.0" encoding="UTF-8" ?>
<pageDefinition xmlns="http://xmlns.oracle.com/adfm/uimodel"
                version="11.1.1.41.30"
                id="ps_pagedefusage"
                Package="ps_package">
|
Alternatively, the JSPX or JSFF template file that you are creating can be based on an ADF template.
Example 18-14 shows the sample code of an ADF template.
|
Note: If you choose to design your own ADF templates and want to set page style, then you must have aPanel Group Layout or Panel Stretch Layout component as a direct child of the Page Customizable. Additionally, you must set the placeholder for styleClass and inlineStyle, as shown in bold below. The page style values replace the placeholder text. |
Example 18-14 Sample Code of a Page Style that uses an ADF Template
<?xml version='1.0' encoding='utf-8'?>
<!-- Copyright (c) 2006, 2008, Oracle and/or its affiliates.
All rights reserved. -->
<jsp:root xmlns:jsp="http://java.sun.com/JSP/Page" version="2.1"
          xmlns:pe="http://xmlns.oracle.com/adf/pageeditor"
          xmlns:cust="http://xmlns.oracle.com/adf/faces/customizable"
          xmlns:f="http://java.sun.com/jsf/core"
          xmlns:af="http://xmlns.oracle.com/adf/faces/rich">
  <jsp:directive.page deferredSyntaxAllowedAsLiteral="true"/>
  <jsp:directive.page contentType="text/html;charset=utf-8"/>
  <f:view>
    <af:document title="#{pageDocBean.title}" id="docrt">
      <af:form usesUpload="true" id="f1">
        <af:pageTemplate
 viewId="/oracle/webcenter/webcenterapp/view/templates/WebCenterAppShellTemplate.jspx"
                value="#{bindings.shellTemplateBinding}" id="T">
          <f:facet name="content">
            <pe:pageCustomizable id="pcl1">
              <af:panelStretchLayout id="psl2"
                                     styleClass="replace_with_scheme_name"
                                     inlineStyle="replace_with_inline_style">
                <f:facet name="center">
                  <af:panelGroupLayout id="pgl1"
                                       layout="scroll">
                    <pe:layoutCustomizable id="lc1"
                                           showLayoutChanger="#{pageServiceBean.isEditMode}"
                                           text="#{uib_o_w_w_r_WebCenter.LABEL_CHANGE_LAYOUT}"
                                           showIcon="false" type="oneColumn"
                                           shortDesc="#{uib_o_w_w_r_WebCenter.LABEL_CHANGE_LAYOUT}">
                      <cust:panelCustomizable id="mainC"/>
                      <f:facet name="contentA">
                        <cust:panelCustomizable id="cnta"/>
                      </f:facet>
                      <f:facet name="contentB">
                        <cust:panelCustomizable id="cntb"/>
                      </f:facet>
                    </pe:layoutCustomizable>
                  </af:panelGroupLayout>
                </f:facet>
              </af:panelStretchLayout>
              <f:facet name="editor">
                <pe:pageEditorPanel id="pep1"/>
              </f:facet>
            </pe:pageCustomizable>
          </f:facet>
        </af:pageTemplate>
      </af:form>
    </af:document>
  </f:view>
</jsp:root>
Example 18-15 shows the sample code of a page style, NewsTemplate.jspx, that is based on an ADF template, portalTemplate.jspx. The viewId attribute of the af:pageTemplate tag provides the name of the ADF template used.
For information about using ADF templates, see the Oracle Fusion Middleware Web User Interface Developer's Guide for Oracle Application Development Framework.
Example 18-15 Sample Code of a Page Style on an ADF Template
<?xml version='1.0' encoding='utf-8'?>
<!-- Copyright (c) 2006, 2008, Oracle and/or its affiliates.
All rights reserved. -->
<jsp:root xmlns:jsp="http://java.sun.com/JSP/Page" version="2.1"
          xmlns:pe="http://xmlns.oracle.com/adf/pageeditor"
          xmlns:cust="http://xmlns.oracle.com/adf/faces/customizable"
          xmlns:f="http://java.sun.com/jsf/core"
          xmlns:af="http://xmlns.oracle.com/adf/faces/rich">
  <jsp:directive.page contentType="text/html;charset=utf-8"/>
  <f:loadBundle basename="oracle.webcenter.page.view.resource.PGUIBundle"
                var="res"/>
  <f:view>
    <af:document title="#{pageDocBean.title}">
      <af:form usesUpload="true">
          <af:pageTemplate viewId="/mytemplates/portalTemplate.jspx"
 value="#{bindings.pageTemplateBinding}">
      <f:facet name="pageContent">
            <pe:pageCustomizable id="pgc1">
              <af:panelStretchLayout id="psl1"
                                     styleClass="#{pageDocBean.CSSStyle}"
                                     inlineStyle="#{pageDocBean.inlineStyle}">
                <f:facet name="center">
                  <af:panelGroupLayout id="pgl1" layout="scroll">
                    <pe:layoutCustomizable id="lc1"
                        showLayoutChanger="#{pageServiceBean.isEditMode}"
                                           text="#{res['TEMPLATE.CHANGE_LAYOUT']}"
                                           showIcon="false" type="oneColumn"
                                           shortDesc="#{res['TEMPLATE.CHANGE_LAYOUT']}">
                      <cust:panelCustomizable id="mainC">
                        <cust:showDetailFrame id="sdf2"
                                              showMinimizeAction="none"
                                              showMoveAction="none"
                                              showRemoveAction="none"
                                              displayHeader="false"
                                              displayShadow="false"
                                              stretchContent="false"
                                              shortDesc="#{null}"
                                              background="light"
                                              showResizer="never"
                                              text="Text">
                          <af:richTextEditor id="rtepc" clientComponent="true"
                                             simple="true" label="#{null}"
                                             rows="20" readOnly="false"
                                             contentStyle="width:100%;"/>
                        </cust:showDetailFrame>
                      </cust:panelCustomizable>
                      <f:facet name="contentA">
                        <cust:panelCustomizable id="cnta"/>
                      </f:facet>
                      <f:facet name="contentB">
                        <cust:panelCustomizable id="cntb"/>
                      </f:facet>
                    </pe:layoutCustomizable>
                  </af:panelGroupLayout>
                </f:facet>
              </af:panelStretchLayout>
              <f:facet name="editor">
                <pe:pageEditorPanel/>
              </f:facet>
            </pe:pageCustomizable>
          </f:facet>
        </af:pageTemplate>
      </af:form>
    </af:document>
  </f:view>
</jsp:root>
To display a different style, or use a different template for a style, you must define it, for example, in /mytemplates/templates.xml. Place the directory /mytemplates under the web content root. For more information about the templates.xml file, see Section 18.3.4, "Specifying Styles."
Example 18-16 shows a sample templates.xml file.
Example 18-16 templates.xml File
<?xml version='1.0' encoding="UTF-8"?>
<templatesDef xmlns="http://xmlns.oracle.com/webcenter/page">
  <templateDef name="TemplateBlank.jspx"
               title="Blank"/>
  <templateDef name="TemplateNarrowLeft.jspx"
               title="Left Narrow Column Layout"/>
  <templateDef name="TemplateNarrowRight.jspx"
               title="Right Narrow Column Layout"/>
  <templateDef name="TemplateThreeColumn.jspx"
               title="Three Column Layout"/>
  <templateDef name="TemplateStretch.jspx"
               title="Stretch"/>
  <templateDef name="TemplateText.jspx"
               title="Text"/>
  <templateDef name="TemplateWeb.jspx"
               title="Web"/>
  <templateDef name="NewsTemplate.jspx"
               title="News"/>
</templatesDef>
To edit the styles for the Create Page dialog and add a reference to the new page style:
Create the /mytemplates/templates.xml file, commenting out templateDef entries for any default page styles that you do not want to display.
In the templateDef entry for the style that you want to associate with a different template, edit the name and type attributes, as shown in the following example:
<templateDef name="pstemplateview.jsff"
             title="News"
             icon="/images/news.png"
             type="taskflow"/>
where
name is the name of the page style that you want to use.
title is the label displayed for the style in the Create Page dialog.
type is the type of page style. It can take the value page or task flow. The default value page, creates a page based on the style's associated template. The value task flow creates a task flow view of a page based on the style's associated template.
If you want to add a new style to the Create Page dialog, add a templateDef entry, as shown in the following example:
<templateDef name="pstemplateview3.jsff"
             title="Rich Text"
             type="taskflow"
             forGroupSpace="false"/>
Save the XML file.
At runtime, the Create Page dialog displays the styles you specified. The pages and task flow page views users create using those styles are based on the JSPX or JSFF templates you defined.
If your page template is based on an ADF template, you can configure the page creation task flow to use a different ADF template depending on different criteria, such as user or scope.
You can specify the ADF template to use for runtime page creation in either of the following ways:
By using the oracle_webcenter_page_createpage_adftemplate parameter in the page creation task flow (see Section 18.3.4, "Specifying Styles").
By using the ADFTemplateViewID parameter in the createPage() and createTaskflow() APIs.
Any JSPX page template that is based on an ADF template contains an af:pageTemplate tag with the viewId attribute. The viewId attribute contains the name of the ADF template. Example 18-15 shows a page template that is based on the ADF template portalTemplate.jspx.
When you specify an ADF template name for use during page creation, the Page service searches for the af:pageTemplate tag in the page template and updates the viewId attribute with the value you provided.
This section describes how to specify which ADF template to use under a given circumstance. It contains the following subsections:
Section 18.6.2.1, "How to Specify the ADF Template Name Using the Task Flow Parameter"
Section 18.6.2.2, "How to Specify the ADF Template Name Using API Parameters"
To specify the ADF template name using the task flow parameter:
Open the JSPX file containing the Page - Create New task flow.
Right-click the page name and select Go to Page Definition.
In the page definition file, under Executables, select the Create Page task flow, and click the Edit icon on the header.
The Edit Task Flow Binding dialog opens with the list of input parameters supported by the task flow.
Set the oracle_webcenter_page_createpage_adftemplate parameter.
If you define a constant value, for example ${'/mytemplates/defaultTemplate2.jspx'}, then this ADF template is used for all pages created using the create page task flow.
However, by providing an EL value for the parameter, you can ensure that a different ADF template is used based on different criteria, such as user or scope.
For example, assume you have two users, user1 and user2, and want to use a different ADF template for pages created by each user. You must enter the value ${MyClass.ADFTemplate} for the oracle_webcenter_page_createpage_adftemplate parameter and define the method MyClass.getADFTemplate() so that it returns different ADF templates based on which user has logged in.
Click OK.
To specify the ADF template name using API parameters:
Create a page or a task flow, and specify the ID of the ADF template view activity.
The page or task flow is subsequently created based on that ADF template.
To create a page:
PageService.createPage(
     String pageType, String nameFormat, String title,
     String pageTemplate, String pageTemplatePath,
     String ADFTemplateViewID,
     String cssStyle, String schemeBGImage, String schemeBGColor)
where ADFTemplateViewID is the ID of the ADF template view activity.
To create a task flow:
PageService.createTaskflow(
     String nameFormat, String title,
     String pageTemplate, String pageTemplatePath,
     String ADFTemplateViewID,
     String cssStyle, String schemeBGImage, String schemeBGColor)
where ADFTemplateViewID is the ID of the ADF page template view activity.
To use your own page styles, define them in /mytemplates.templates.xml file. If you want to maintain a separate XML file with a different set of page styles, you can create an XML file and reference that from the Page - Create New task flow. For example, to display two different options to two users with different privileges, then you must create two XML files and define different styles in each XML file. You can then ensure that the Create Page dialog displays the respective options to each user.
This section describes how to create and reference a new style for the runtime Create Page dialog. It contains the following subsections:
Section 18.6.3.1, "How to Create a Style for the Create Page Dialog"
Section 18.6.3.2, "How to Reference a New Style from the Page - Create New Task Flow"
To create a style for the Create Page dialog:
In the /mytemplates directory, create an XML file, for example templates2.xml.
Add a templatesDef element, and within that add a templateDef entry for each style that you want to include in the Create Page dialog.
Example 18-17 shows the code entered into sample XML file templates2.xml that references the pstemplateview.jsff fragment you created in the previous section.
Example 18-17 Sample Code for the Create Page Dialog Style
<?xml version="1.0" encoding="UTF-8" ?>
- <templatesDef xmlns="http://xmlns.oracle.com/webcenter/page">
<templateDef name="pstemplateview.jsff" title="News" icon="/images/news.png"
             type="taskflow" />
  </templatesDef>
where
name is the name of the page or page fragment to use as a template.
title is the label for the style in the Create Page dialog.
type is the type of template. It can take that value page or taskflow. The default value page creates a page based on the style's associated template. The value taskflow creates a task flow view of a page based on the style's associated template.
Save the XML file.
To reference the new XML file from the Page - Create New task flow:
Open the JSPX page that contains the Page - Create New task flow.
Right-click the JSPX page, and select Go to Page Definition.
In the page definition file, under Executables, select the Create Page task flow, and click the Edit icon on the header.
The Edit Task Flow Binding dialog opens with the list of input parameters supported by the task flow.
Provide the template file name for the oracle_webcenter_page_createpage_templatefile parameter.
If you define a constant value, for example ${'/mytemplates/templates2.xml'}, then this template is used for the Create Page dialog always.
However, by providing an EL value for the parameter, you can ensure that a different template is used for the dialog based on different criteria, such as user or scope.
For example, assume you have two users, user1 and user2, and want to display a different page style to each user. In this case, you must have two templates for the Create page dialog. Let us say you have created a new template, templates2.xml, and updated the default template, templates.xml. You can then specify ${TemplateBean.template} for the oracle_webcenter_page_createpage_templatefile parameter.
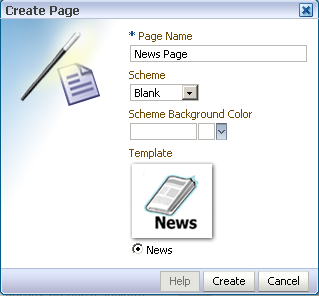
To use this value, you must first create the managed bean, TemplateBean.java, with method getTemplate(), which returns templates.xml for user1 and templates2.xml for user2. At runtime, user1 and user2 are each shown different options in the Create Page dialog, as shown in Figure 18-12 and Figure 18-13.
Figure 18-12 Create Page Dialog using the templates.xml Style
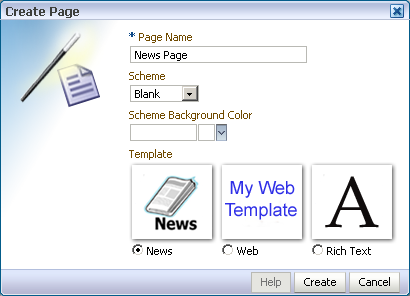
Figure 18-13 Create Page Dialog using the templates2.xml Style
Click OK.
Click Save All to save your work.
This section describes various ways to customize Page service views. It contains the following subsections:
You can use ADF Faces components to render runtime pages. For example, you can use ADF Faces components to render pages as tabs, links, and image links—or thumbnail views of pages. This section provides some examples of the types of pages you can create using ADF Faces components. It contains the following subsections:
Section 18.7.1.1, "Rendering Pages as Tabs Using ADF Faces Components"
Section 18.7.1.2, "Rendering Pages as Links Using ADF Faces Components"
Section 18.7.1.3, "Rendering Pages as Image Links Using ADF Faces Components"
When you design your application to render pages as tabs, you can use a range of ADF Faces components to accomplish this. This section provides information about the ADF Faces components that support rendering pages as tabs. It contains the following subsections:
Section 18.7.1.1.1, "Rendering Pages as Tabs Using af:navigationPane"
Section 18.7.1.1.2, "Rendering Pages as Tabs Using af:panelTabbed"
Example 18-18 illustrates how pages can be rendered as tabs using navigationPane components.
Here a method called pages from a custom bean (MyPageServiceBean) is used to get the list of pages. For more information about getting the list of pages with the Page service API, see the getPages() method in Page service API section.
Example 18-18 Rendering Pages as Tabs Using af:navigationPane
      <af:navigationPane id="tabs">
        <af:forEach var="tab" items="#{MyPageServiceBean.pages}">
          <af:commandNavigationItem text="#{tab.title}"  id="cni1"/>
          </af:forEach>
        </af:navigationPane>
The output of the code depicted in Figure 18-13 renders as a series of tabs (Figure 18-14).
Example 18-19 illustrates how pages can be rendered as tabs using navigationPane components.
Here a method called pages from a custom bean (MyPageServiceBean) is used to get the list of pages. For more information about getting list of pages using Page service API, see the getPages() method in Page service API section.
Example 18-19 Rendering Pages as Tabs Using af:panelTabbed
<af:panelTabbed id="pt1" >
    <af:forEach var="tab" items="#{ MyPageServiceBean.pages}">
        <af:showDetailItem text="#{tab.title}" id="sdi1"/>
     </af:forEach>
   </af:panelTabbed>
The output of the code in Example 18-19 renders as a series of tabs (Figure 18-15).
Figure 18-15 Render Pages as af:panelTabbed Component

This section provides examples of using ADF Faces Components to render pages as different types of links. It includes the following subsections:
Section 18.7.1.2.1, "Rendering Pages as Links Using af:commandLink"
Section 18.7.1.2.2, "Rendering Pages as Links Using af:goLink"
Example 18-20 illustrates how pages can be rendered as links using af:commandLink.
Example 18-20 Rendering Pages as Links Using af:commandLink
<af:panelGroupLayout id="pgl1" layout="vertical">
  <af:forEach var="tab" items="#{MyPageServiceBean.pages}">
     <af:commandLink text="#{tab.title}" id="cl1"/>
   </af:forEach>
</af:panelGroupLayout>
The output of the code depicted in Example 18-20 renders as a list of links (Figure 18-16).
Example 18-21 illustrates how pages can be rendered as links using af:goLink.
Example 18-21 Rendering Pages as Links Using af:goLink
<af:panelGroupLayout id="pgl2" layout="vertical">
     <af:activeOutputText value="List Of Pages" id="aot2"
                             inlineStyle="font-weight:bold; font-size:small;"/>
      <af:forEach var="tab" items="#{pageServiceBean.pages}">
         <af:goLink text="#{tab.title}" id="gl1"/>
      </af:forEach>
    </af:panelGroupLayout>
The output of the code depicted in Example 18-21 renders as a list of links (Figure 18-16).
Image links are linked thumbnail views of a page that users click to access the full page view. Example 18-22 illustrates how pages can be rendered as image links.
Example 18-22 Rendering Thumbnail Views of Pages
  <af:panelGroupLayout id="pg1_11" layout="scroll">
          <af:panelGroupLayout id="pg11" layout="horizontal" halign="center"
                               valign="middle">
            <h:panelGrid id="ds" columns="4" cellpadding="10" cellspacing="5"
                         style="text-align: center;" rowClasses="bottomAlign">
              <af:forEach varStatus="stat" begin="0" end="#{MyPageServiceBean.pageCount}">
                <af:panelGroupLayout id="sdsd" layout="vertical"
                                     halign="center">
                  <af:commandImageLink text="" id="cil1"
                                       icon="/<image_name>}"/>
                  <af:activeOutputText value="Page Title" id="aot3"/>
                </af:panelGroupLayout>
              </af:forEach>
            </h:panelGrid>
          </af:panelGroupLayout>
        </af:panelGroupLayout>
In Example 18-22, pageCount is a method from a custom bean (MyPageServiceBean) that gets the number of pages in the current scope. Users must write this method on their own using the other methods from Page service APIs.
In Example 18-22, <image_name> is the name of the image with which you associate your page.
The output of the code in Example 18-22 is rendered as a linked series of thumbnail views of a page (Figure 18-17).
You can manage access to pages and task flows either through the Security Panel, which is a part of Composer, or through Page service APIs.
For more information about runtime security, see the "Setting Page Access" section in the Oracle Fusion Middleware User's Guide for Oracle WebCenter Spaces.
For more information about setting page access with the Page service APIs, see Oracle Fusion Middleware Java API Reference for Oracle WebCenter.
This section describes the APIs and data controls available for the Page service. It includes the following sections:
This section provides information about Page service Java APIs. It includes information about the location of these APIs, how to make your application ready to use them, and how to use them to create pages. It contains the following subsections:
Section 18.8.1.1, "Configuration Settings Required for Using Page Service APIs"
Section 18.8.1.3, "How to Set up Your Application to Use the Page Service APIs"
To use the Page service APIs, you must perform the following steps:
Confirm that you have the following entries in your adf-config.xml file:
<namespace path="/oracle/webcenter/page/scopedMD"
metadata-store-usage="WebCenterFileMetadataStore"/>
<namespace path="/pageDefs"
metadata-store-usage="WebCenterFileMetadataStore"/>
<namespace path="/mytemplates"
metadata-store-usage="WebCenterFileMetadataStore"/>
If these entries do not exist in adf-config.xml, add them using a text editor.
Configure the .cpx file to use dynamic page mapping:
<Application xmlns="http://xmlns.oracle.com/adfm/application"
             version="11.1.1.51.35" id="DataBindings" SeparateXMLFiles="false"
             Package="view" ClientType="Generic"
             PageMapClass="oracle.jbo.uicli.mom.DynamicPageMapImpl"
             BasePageDefPackageName="pageDefs">
  <definitionFactories>
    <factory nameSpace="http://xmlns.oracle.com/adf/controller/binding"
             className="oracle.adf.controller.internal.binding.TaskFlowBindingDefFactoryImpl"/>
    <dtfactory className="oracle.adf.controller.internal.dtrt.binding.BindingDTObjectFactory"/>
  </definitionFactories>
  <pageMap/>
    <page path="/page1.jspx" usageId="view_page1PageDef"/>
  </pageMap>
  <pageDefinitionUsages/>
    <page id="view_page1PageDef" path="view.pageDefs.page1PageDef"/>
  </pageDefinitionUsages>
  <dataControlUsages>
    <dc id="PageServiceDC"
        path="oracle.webcenter.page.internal.model.PageServiceDC"/>
  </dataControlUsages>
</Application>
If these entries do not exist in your .cpx file, add them using a text editor.
The Page service APIs are located in the oracle.webcenter.page.model.PageService class.
The Page service provides the following APIs:
createPage
deletePage
createTaskflow
deleteTaskflow
createScope
deleteScope
copyPage
getPageList
changePageTitle
changeHiddenStatus
changePageScheme
setPageAccess
For more information about the Page service APIs, see Oracle Fusion Middleware Java API Reference for Oracle WebCenter.
Example 18-23 Using Page Service APIs to Create a Task Flow View Page
PageDef createTaskflow(String nameFormat, String title, String pageTemplate,
  String pageTemplatePath, String cssStyle, String schemeBGImage, String schemeBGColor)
  throws DuplicateNameException, InvalidNameException, LockUnavailableException;
where
nameFormat is the name format of the task flow; it can contain a subpath, such as users/UserA/taskflow{0}.jspx.
title is the title of the task flow.
pageTemplate is the template used for the task flow.
pageTemplatePath is the path for the task flow template.
cssStyle is the cascading style sheet file for this task flow.
schemeBGImage is the background image for the custom scheme.
schemeBGColor is the background color for the custom scheme.
It returns the PageDef of the newly created task flow and throws the following:
InvalidNameException if the name supplied cannot be used for update.
DuplicateNameException if the page with the same name already exists.
LockUnavailableException if another page or task flow operation is in progress.
To use the Page service APIs, the WebCenter extension must be present in your JDeveloper application. In JDeveloper, go to the Help - About menu, and click the Extensions tab. Look for the WebCenter Page Service, as shown in Figure 18-18.
|
Note: For information about adding the WebCenter extension, see Chapter 3, "Preparing Your Development Environment." |
After confirming that the Page service is included with the WebCenter extension, you must add the Page service libraries to the project.
To add Page service libraries to your project:
Right-click your ViewController project and select Project Properties and then Libraries and Classpath.
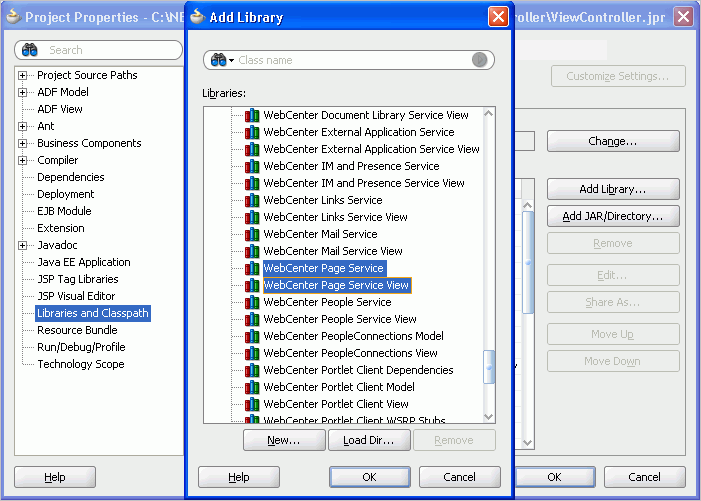
Click Add Library and select the WebCenter Page Service and WebCenter Page Service View libraries, as shown in Figure 18-19.
Figure 18-19 Adding Page Service Libraries
Click OK.
If you do not want to use JDeveloper as the code editor, then you can set the CLASSPATH to the following jar files:
Jdev_Home/jdeveloper/webcenter/jlib/pagem.jar
Jdev_Home/jdeveloper/webcenter/jlib/pages.jar
Jdev_Home/jdeveloper/webcenter/jlib/page-service-view.jar
Jdev_Home/jdeveloper/webcenter/jlib/page-service-skin.jar
This section provides an example of how to create a page using the Page service APIs. Your requirements may call for different methods. Use the way the createPage method is invoked in this sample code as a model for invoking the methods you require on the PageService object.
Typically, pages created using Page service APIs are based on templates. Before you start creating pages using the APIs, you must ensure that each template file, for example MyPageTemplate1.jspx, has a page definition file, in this case MyPageTemplate1PageDef.xml, in the same directory as the JSPX page.
Example 18-24 shows how to use the createPage() API to create a scope named MyScope, create an MDS session instance, instantiate the Page service class with this new scope, and then create a page within this scope. The new page is created based on the MyPageTemplate1.jspx template.
Example 18-24 Sample Showing How to Create a Page
...

public void createMyPage
{
    try
    {
      MDSSession mdsSess = (MDSSession)ADFContext.getCurrent().getMDSSessionAsObject();
      PageServiceConfig config = new PageServiceConfig(mdsSess, "defaultScope");
      mPageService = PageServiceFactory.createInstance(config);

      String pageNameFormat ="Page{0}.jspx";
      String pageTitle ="New Page";

      //
      // The template used to create the new page is /mytemplates/MyPageTemplate1.jspx
      // path "/mytemplates" should be defined as a MDS namespace.
      // Also MyPageTemplate1.jspx should have a pageDef called "MyPageTemplate1PageDef.xml and
      // it has the same path as the jspx file.

      PageDef newPage = mPageService.createPage(
        "personaluserpage", pageNameFormat, pageTitle,
        "MyPageTemplate1.jspx",
        "/mytemplates/",
        null, null, null);

    }
    catch(Exception e)
    {
      // Handle exception
    }
}

...
|
Note: Pages and task flows created using Page service APIs do not have permissions granted by default. You must explicitly define permissions on the page. |
For more information about the Page service APIs, see Oracle Fusion Middleware Java API Reference for Oracle WebCenter.
The Page service data control enables you to view information about existing pages at runtime and delete any of the listed pages.
This section describes how to add a Page service data control to a project and how to use it to view, edit, and delete pages. It contains the following subsections:
Section 18.8.2.1, "How to Add the Page Service Data Control"
Section 18.8.2.2, "How to View, Edit, and Delete Pages at Runtime"
This section provides an example of adding the Page service data control at design time.
To add a Page service data control to your project:
Ensure that you can see the PageServiceDC in the Application Navigator.
The PageServiceDC appears in the Application Navigator after you have performed either of the following actions:
Added the Page - Create New task flow to your project (see Section 18.2.1.1, "How to Add the Page - Create New Task Flow").
Added the Page Data Control as described in Section 7.1.3, "Using WebCenter Data Controls.".
In the Data Controls panel of the Application Navigator, expand PageServiceDC, as shown in Figure 18-20.
Under getPageTree(), drag PageTreeNode and drop it on the page.
From the Create menu, select Table, and then select ADF Read-only Table.
In the dialog, enter the scopeName parameter to view all the pages listed under the specified scope.
If you do not enter any value, then the data control takes the default scope. In Figure 18-21, the scope value is fetched from a custom managed bean.
Add a new column to the table you created at step 4.
To add a column for deleting pages at runtime, drag the deletePage(string) method and drop it in the new column.
From the Create menu, select Methods, and then select ADF Link.
In the Parameters section of the Edit Action Binding dialog, shown in Figure 18-22, specify the following value for the pageName parameter:
#{bindings.PageTreeNode.treeModel.rowData.pagePath}
Click OK.
From the Data Controls panel, expand PageServiceDC, getPageTree(), PageTreeNode, and then Operations.
Drag Execute and drop it on the page as an ADF Button.
In the Source view, set the button's Text attribute to Refresh.
This provides a refresh feature on the list of pages to enable users to refresh the list after they have added a page or deleted one from the list.
Optionally, to display pages as links that invoke page Edit mode, view the page source and replace the outputText element in the table's page path column with a goLink as follows:
Replace
<af:outputText value="#{row.pagePath}"/>
with
<af:goLink destination="/faces#{row.pagePath}" text="#{row.title}" targetFrame="_top"/>
Save your page, and run it to your browser.
The created data control table should look something like Figure 18-23.
To view a page, follow the link generated from step 14 in the previous section. If the application has been secured properly, then an edit link should render on the page at runtime.To delete a page, click the deletePage button in the row of the relevant page. This button was generated from in step 7 in the previous section. Click the Refresh button for the table to remove the deleted page row from the table.
For detailed information about how to view, edit and delete pages at runtime, see the chapter "Creating, Editing, and Deleting Pages" in Oracle Fusion Middleware User's Guide for Oracle WebCenter Spaces.
The Custom Portal Demo sample illustrates some Page service functionality, including the following:
How to add the Page - Create New task flow
How to configure task flow parameters
How to use an ADF template
How to use custom styles
How to manage pages
The Custom Portal Demo sample is posted on the Oracle WebCenter Suite 11g Demonstrations and Samples page on the Oracle Technology Network (OTN) at: http://www.oracle.com/technetwork/middleware/webcenter/overview/index.html