2 Creating Oracle Audit Vault Policies and Alerts
This chapter contains:
-
General Steps for Creating Oracle Audit Vault Policies and Alerts
-
Retrieving Audit Policy Settings from the Source Oracle Database
-
Creating Oracle Audit Vault Policies for Fine-Grained Auditing
-
Provisioning Audit Vault Policies to the Source Oracle Database
-
Copying Oracle Audit Vault Policies to Other Oracle Databases
2.1 About Oracle Audit Vault Policies and Alerts
In the Audit Vault Console, you can create the following types of audit policies for Oracle databases:
-
SQL statements
-
Schema objects
-
Privileges
-
Fine-grained auditing
-
Capture rules (for redo log file activities)
For all database types, you can create alerts. See Section 2.12 for more information.
2.2 General Steps for Creating Oracle Audit Vault Policies and Alerts
In general, to create Oracle Audit Vault policies and alerts, you follow these steps:
-
Retrieve the current policy settings from the source Oracle database.
See Section 2.3 for more information.
-
Create audit policies.
See the following sections:
-
Section 2.4 to create SQL statement policies
-
Section 2.5 to create schema object policies
-
Section 2.6 to create privilege policies
-
Section 2.7 to create fine-grained auditing policies
-
Section 2.8 to create capture rules for redo log file auditing
-
Section 2.9 to verify the Oracle Audit Vault policies
-
-
Save the Oracle Audit Vault policy settings to a .
sqlfile or manually provision them to the source database.See the following sections:
-
Section 2.10 to export the policies to the source Oracle database
-
Section 2.11 to copy the policy settings to other Oracle databases
-
-
Optionally, create alerts.
See Section 2.12 for more information.
-
Optionally, set a retention period for the audit data from all source databases.
See Section 2.14 for more information.
2.3 Retrieving Audit Policy Settings from the Source Oracle Database
Before you create policies in the Audit Vault Console, you must retrieve the current audit settings that have been created in the source Oracle database. This way, you have a snapshot of the audit settings in the source database from that point in time, before you begin to create policies and alerts.
Follow these steps:
2.3.1 Step 1: Retrieve the Audit Settings from the Source Oracle Database
To retrieve audit settings from the source Oracle Database:
-
Log in to the Audit Vault Console as a user who has been granted the
AV_AUDITORrole.Section 1.4 explains how to start the Audit Vault Console. The Dashboard page appears.
-
In the Audit Vault Console, select the Audit Policy tab.
By default, the Audit Settings page appears.
-
From the Audit Source listing, select the check boxes for the source databases you want.
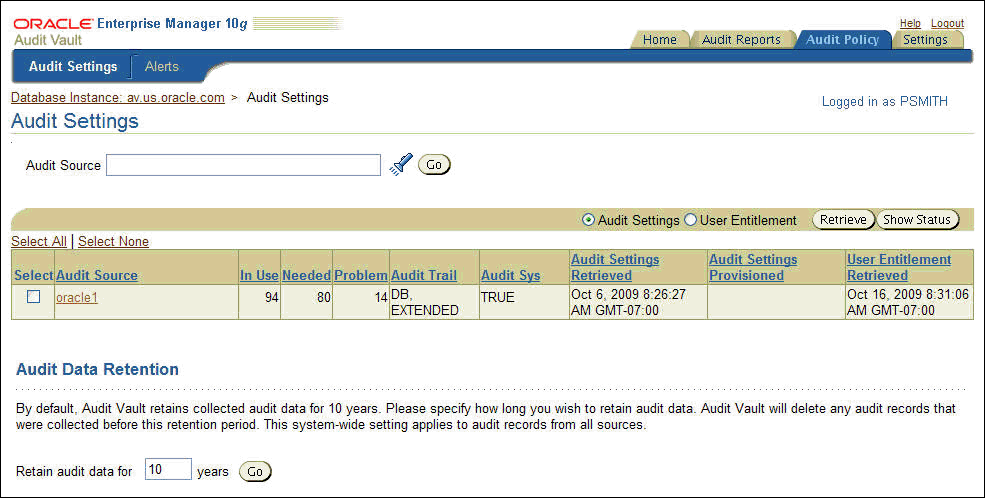
Description of the illustration audit_settings.gif
To filter the list of audit sources, enter text in the Audit Source text field or click the flashlight icon to display the Search And Select: Audit Source page. If you make selections on the Search And Select: Audit Source page, when you return, the Audit Source column will be populated with your selections.
-
Click the Audit Settings option.
-
Click the Retrieve button.
Oracle Audit Vault displays a message letting you know that the audit policy data is being retrieved. To check the status of the retrieval, click the Show Status button.
The Audit Vault Console displays a summary of audit settings for the available source databases.
At this stage, you are ready to view the audit settings. Table 2-1 shows the fields used in the audit settings list in the Audit Settings page, which indicate the state of the source database. If the Problem field contains a value higher than 0, then most likely you must activate (that is, update for use in Oracle Audit Vault) the audit settings. If the Problem field is set to 0, then all the existing audit settings already have been activated.
Table 2-1 Fields Under Apply Audit Settings in the Audit Settings Page
| Field | Description |
|---|---|
|
Select |
Select the audit source to retrieve |
|
Audit Source |
Displays the name of the audit source database |
|
In Use |
Number of active settings in the source database |
|
Needed |
Number of required audit settings you (the auditor) have specified |
|
Problem |
Number of audit settings that require attention by the auditor |
|
Audit Trail |
The location to which database audit records are directed, based on the If the setting is |
|
Audit Sys |
Indicates that the |
|
Audit Setting Retrieved |
The time that the audit information for the selected audit source was last retrieved |
|
Audit Setting Provisioned |
The time that the audit settings were provisioned to the source database |
|
User Entitlement Retrieved |
The time that the user entitlement information was retrieved. See Section 3.8 for more information. |
2.3.2 Step 2: Activate (Update) the Fetched Audit Settings State
After you retrieve the source database audit settings, you can view and modify them as needed. Remember that you are capturing a snapshot of the audit settings from a particular point in time: if these settings change in the source database, then you must retrieve the audit settings again.
-
In the Audit Settings page, select the name of the source database listed in the Audit Source field.
The Apply Audit Settings section appears. In the following example, the Problem field shows that there are three SQL statement audit settings that may need to be activated or removed from the source database. None of the other audit settings types must be activated.
A nonzero value in the Problem field can indicate that an audit policy that was created in the source database has not yet been updated in Oracle Audit Vault. If you do not need the audit policy, then do not activate it. In that case, when you provision the Audit Vault settings back to the source database, this audit policy will be deleted in the source database.
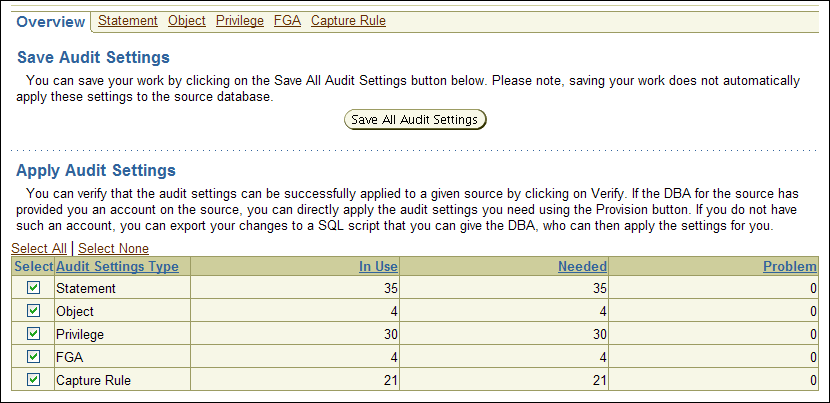
Description of the illustration apply_audits.gif
-
To update the statement audit settings, select the Statement tab.
The Statement page appears. The settings that must be updated are indicated with an X in the Needed column. As the Audit Vault auditor, you can indicate that the audit policies are required.
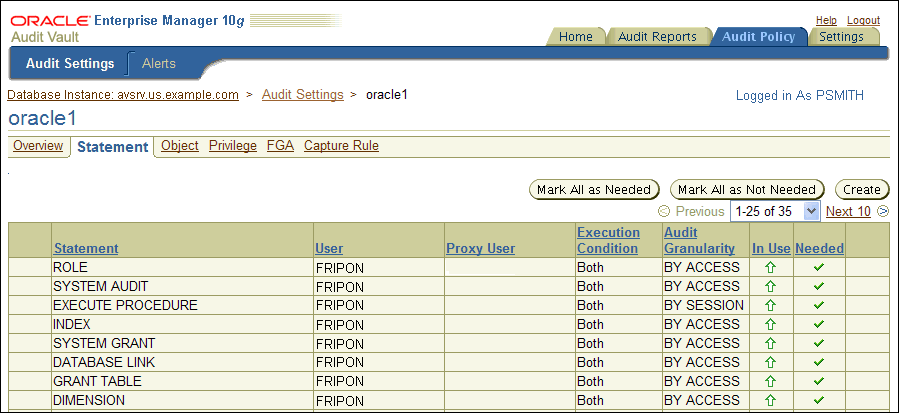
Description of the illustration fetch_settings.gif
-
Select each X in the Needed column to update the audit settings for SQL statements. Alternatively, click the Mark All as Needed button select all the audit settings. To deselect all of the selected settings, click Mark All as Not Needed.
A check mark indicates that the Oracle Audit Vault auditor has determined that the audit setting is needed. A green up arrow in the In Use column indicates that both Oracle Audit Vault and the source database are currently storing consistent definitions of the audit policies. A red X in the Needed column indicates that these policy definitions are inconsistent, with Oracle Audit Vault having the outdated version of the policy.
-
After completing the Needed column updates, click the Save All Audit Settings button.
At this stage, the audit settings between the source database and Oracle Audit Vault should be the same, except for any settings that you have omitted in Step 3, or if changes in the audit settings are made independently in the source database.
2.4 Creating Oracle Vault Audit Policies for SQL Statements
2.4.1 About SQL Statement Auditing
Statement auditing audits SQL statements by type of statement, not by the specific schema objects on which the statement operates. Statement auditing can be broad or focused (for example, by auditing the activities of all database users or only a select list of users). Typically broad statement auditing audits the use of several types of related actions for each option. These statements are in the following categories:
-
Data definition statements (DDL). For example,
AUDIT TABLEaudits allCREATE TABLEandDROP TABLEstatements.AUDIT TABLEtracks several DDL statements regardless of the table on which they are issued. You can also set statement auditing to audit selected users or every user in the database. -
Data manipulation statements (DML). For example,
AUDIT SELECT TABLEaudits allSELECT ... FROM TABLEorSELECT ... FROM VIEWstatements, regardless of the table or view.
2.4.2 Defining a SQL Statement Audit Policy
To define a SQL statement audit policy:
-
If necessary, retrieve and activate the current statement audit policies.
See Section 2.3 for more information.
-
In the Audit Settings page, select the Statement tab to display the Statement page.
Table 2-2 describes the fields used in the Statement page.
-
Click the Create button and in the Create Statement Audit page, define the audit policy.
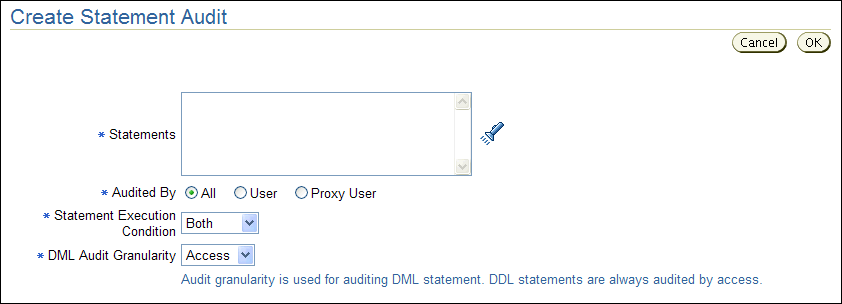
Description of the illustration create_statement.gif
Table 2-3 describes the Create Statement Audit fields.
-
Click OK.
The statement audit policy is created. To ensure that the statement audit policy is semantically correct, see Section 2.9.
-
In the Dashboard page, select Save All Audit Settings.
To display the Dashboard page, click the Audit Settings link, and then in the Audit Settings page, select the name of the source database.
Table 2-2 lists the fields used in the Statement page.
Table 2-2 Fields in the Statement Page
| Field | Description |
|---|---|
|
(Leftmost column) |
An exclamation mark icon indicates one of the following conditions:
|
|
Statement |
The statement that is audited |
|
User |
The user to which this setting applies, if any |
|
Proxy User |
The proxy user for the database, if any |
|
Execution Condition |
The execution condition audited: |
|
Audit granularity |
The granularity of auditing: |
|
In Use |
The arrow points upward if the setting is active in the source database and downward if it has not been provisioned or is not active. |
|
Needed |
A check mark indicates that the policy is needed. An X indicates that the policy is not needed. If a policy that is not in use is set to needed, the In Use arrow points up after provisioning. If a policy that is in use is set to not needed, the audit policy is no longer displayed after provisioning. To select all policies as needed, click the Mark All as Needed button. To reverse this action, click Mark All as Not Needed. |
|
(Rightmost column) |
Click the trash can icon to remove the policy. You can use the trash can icon to remove the policy only if you had just created it and decided it was not required in the source database, or if it is not active in the source database. |
Table 2-3 lists the fields used in the Create Statement Audit page.
Table 2-3 Fields in the Create Statement Audit Page
| Field | Description |
|---|---|
|
Statements |
Select the SQL statements to audit. To display the list of SQL statements for selection, click the flashlight icon. Examples are:
|
|
Audited By |
Choose the category of users to audit:
|
|
Statement Execution Condition |
Choose the execution condition:
|
|
DML Audit Granularity |
Choose the level of granularity:
|
2.5 Creating Oracle Audit Vault Policies for Schema Objects
2.5.1 About Schema Object Auditing
Schema object auditing is the auditing of specific statements on a particular schema object, such as AUDIT SELECT ON HR.EMPLOYEES. Schema object auditing is very focused, auditing only a specific statement on a specific schema object for all users of the database.
For example, object auditing can audit all SELECT and DML statements permitted by object privileges, such as SELECT or DELETE statements on a given table. The GRANT and REVOKE statements that control those privileges are also audited.
Object auditing lets you audit the use of powerful database commands that enable users to view or delete very sensitive and private data. You can audit statements that reference tables, views, sequences, standalone stored procedures or functions, and packages.
Oracle Database and Oracle Audit Vault always set schema object audit options for all users of the database. You cannot set these options for a specific list of users.
2.5.2 Defining a Schema Object Audit Policy
To define a schema object audit policy:
-
If necessary, retrieve and activate the current object audit policies.
See Section 2.3 for more information.
-
In the Audit Settings page, select the Object tab to display the Object page.
Table 2-4 describes the fields used in the Object page.
-
Click the Create button and in the Create Object Audit page, define the audit policy.
Table 2-5 describes the Create Object Audit fields.
-
Click OK.
The object audit policy is created. To ensure that the object audit policy is semantically correct, see Section 2.9.
-
In the Dashboard page, select Save All Audit Settings.
To display the Dashboard page, click the Audit Settings link, and then in the Audit Settings page, select the name of the source database.
Table 2-4 lists the fields used in the Object page.
Table 2-4 Fields in the Object Page
| Field | Description |
|---|---|
|
(Leftmost column) |
An exclamation mark icon indicates one of the following conditions:
|
|
Statement |
The statement that is audited |
|
Schema |
The database schema to which this setting applies |
|
Object |
The object (such as a database table) to which this setting applies |
|
Execution Condition |
The execution condition audited: |
|
Audit granularity |
The granularity of auditing: |
|
In Use |
The arrow points upward if the setting is active in the source database and downward if it has not been provisioned or is not active. |
|
Needed |
A check mark indicates that the policy is needed. An X indicates that the policy is not needed. If a policy that is not in use is set to needed, the In Use arrow points up after provisioning. If a policy that is in use is set to not needed, the audit policy is no longer displayed after provisioning. To select all policies as needed, click the Mark All as Needed button. To reverse this action, click Mark All as Not Needed. |
|
(Rightmost column) |
Click the trash can icon to remove the policy. You can use the trash can icon to remove the policy only if you had just created it and decided it was not required in the source database, or if it is not active in the source database. |
Table 2-5 lists the fields used in the Create Object Audit page.
Table 2-5 Fields in the Create Object Audit Page
| Field | Description |
|---|---|
|
Statements |
Select the SQL statements to audit. To display a list of SQL statements for selection, click the flashlight icon. Examples are:
|
|
Object Type |
Select the type of object to audit, such as table. To display a list of object types and their audit sources for selection, click the flashlight icon. Examples are:
|
|
Object |
Optional. Select the object to audit. To display a list of objects and their source databases for selection, and to filter the list by audit source and object owner, click the flashlight icon. For example, if you entered |
|
Statement Execution Condition |
Choose the execution condition:
|
|
DML Audit Granularity |
Choose the level of granularity:
|
2.6 Creating Oracle Audit Vault Policies for Privileges
2.6.1 About Privilege Auditing
Privilege auditing is the auditing of SQL statements that use a system privilege. You can audit the use of any system privilege. Like statement auditing, privilege auditing can audit the activities of all database users or only a specified list of users.
For example, if you enable AUDIT SELECT ANY TABLE, Oracle Database audits all SELECT tablename statements issued by users who have the SELECT ANY TABLE privilege. This type of auditing is very important for the Sarbanes-Oxley (SOX) Act compliance requirements. Sarbanes-Oxley and other compliance regulations require the privileged user be audited for inappropriate data changes or fraudulent changes to records.
Privilege auditing audits the use of powerful system privileges enabling corresponding actions, such as AUDIT CREATE TABLE. If you set both similar statement and privilege audit options, then only a single audit record is generated. For example, if the statement clause TABLE and the system privilege CREATE TABLE are both audited, then only a single audit record is generated each time a table is created. The statement auditing clause, TABLE, audits CREATE TABLE, ALTER TABLE, and DROP TABLE statements. However, the privilege auditing option, CREATE TABLE, audits only CREATE TABLE statements, because only the CREATE TABLE statement requires the CREATE TABLE privilege.
Privilege auditing does not occur if the action is already permitted by the existing owner and schema object privileges. Privilege auditing is triggered only if these privileges are insufficient, that is, only if what makes the action possible is a system privilege.
Privilege auditing is more focused than statement auditing for the following reasons:
-
It audits only a specific type of SQL statement, not a related list of statements.
-
It audits only the use of the target privilege.
2.6.2 Defining a Privilege Audit Policy
To define a privilege audit policy:
-
If necessary, retrieve and activate the current privilege audit policies.
See Section 2.3 for more information.
-
In the Audit Settings page, select the Privilege tab to display the Privilege page.
Table 2-6 describes the fields used in the Privilege page.
-
Click the Create button and in the Create Privilege Audit page, define the privilege audit policy.
Table 2-7 describes the Create Privilege Audit fields.
-
Click OK.
The privilege audit policy is created. To ensure that the privilege audit policy is semantically correct, see Section 2.9.
-
In the Dashboard page, select Save All Audit Settings.
To display the Dashboard page, click the Audit Settings link, and then in the Audit Settings page, select the name of the source database.
Table 2-6 lists the fields used in the Privilege page.
Table 2-6 Fields in the Privilege Page
| Field | Description |
|---|---|
|
(Leftmost column) |
An exclamation mark icon indicates one of the following conditions:
|
|
Privilege |
The privilege that is audited |
|
User |
The user to which this setting applies |
|
Proxy User |
The proxy user for the database, if any |
|
Execution Condition |
The execution condition audited: |
|
Audit granularity |
The granularity of auditing: |
|
In Use |
The arrow points upward if the setting is active in the source database and downward if it has not been provisioned or is not active. |
|
Needed |
A check mark indicates that the policy is needed. An X indicates that the policy is not needed. If a policy that is not in use is set to needed, the In Use arrow points up after provisioning. If a policy that is in use is set to not needed, the audit policy is no longer displayed after provisioning. To select all policies as needed, click the Mark All as Needed button. To reverse this action, click Mark All as Not Needed. |
|
(Rightmost column) |
Click the trash can icon to remove the policy. You can use the trash can icon to remove the policy only if you had just created it and decided it was not required in the source database, or if it is not active in the source database. |
Table 2-7 lists the fields used in the Create Privilege Audit page.
Table 2-7 Fields in the Create Privilege Audit Page
| Field | Description |
|---|---|
|
Privilege |
Select the privilege to audit. To display a list of privileges for selection, click the flashlight icon. Examples are:
|
|
Audited By |
Choose the category of users to audit:
|
|
Statement Execution Condition |
Choose the execution condition:
|
|
DML Audit Granularity |
Choose the level of granularity:
|
2.7 Creating Oracle Audit Vault Policies for Fine-Grained Auditing
This section contains:
2.7.1 About Fine-Grained Auditing
Fine-grained auditing (FGA) enables you to create a policy that defines specific conditions that must exist for the audit to occur. For example, fine-grained auditing lets you audit the following types of activities:
-
Accessing a table between 9 p.m. and 6 a.m. or on Saturday and Sunday
-
Using an IP address from outside the corporate network
-
Selecting or updating a table column
-
Modifying a value in a table column
A fine-grained audit policy provides granular auditing of select, insert, update, and delete operations. Furthermore, you reduce the amount of audit information generated by restricting auditing to only the conditions that you want to audit. This creates a more meaningful audit trail that supports compliance requirements. For example, a central tax authority can use fine-grained auditing to track access to tax returns to guard against employee snooping, with enough detail to determine what data was accessed. It is not enough to know that a specific user used the SELECT privilege on a particular table. Fine-grained auditing provides a deeper audit, such as when the user queried the table or the computer IP address of the user who performed the action.
2.7.1.1 Auditing Specific Columns and Rows
When you define the fine-grained audit policy, you can target one or more specific columns, called a relevant column, to be audited if a condition is met. This feature enables you to focus on particularly important, sensitive, or privacy-related data to audit, such as the data in columns that hold credit card numbers, patient diagnoses, U.S. Social Security numbers, and so on. A relevant-column audit helps reduce the instances of false or unnecessary audit records, because the audit is triggered only when a particular column is referenced in the query.
You further can fine-tune the audit to specific columns and rows by adding a condition to the audit policy. For example, suppose you enter the following fields in the Create Fine Grained Audit page:
-
Condition:
department_id = 50 -
Columns:
salary, commission_pct
This setting audits anyone who tries to select data from the salary and commission_pct columns of employees in Department 50.
If you do not specify a relevant column, then Oracle Database applies the audit to all the columns in the table; that is, auditing occurs whenever any specified statement type affects any column, whether or not any rows are returned.
2.7.1.2 Using Event Handlers in Fine-Grained Auditing
In a fine-grained audit policy, you can specify an event handler to process an audit event. The event handler provides flexibility in determining how to handle a triggering audit event. For example, it could write the audit event to a special audit table for further analysis, or it could send a pager or an email alert to a security administrator. This feature enables you to fine-tune audit responses to appropriate levels of escalation.
For additional flexibility in implementation, you can employ a user-defined function to determine the policy condition, and identify a relevant column for auditing (audit column). For example, the function could allow unaudited access to any salary as long as the user is accessing data within the company, but specify audited access to executive-level salaries when they are accessed from outside the company.
2.7.2 Defining a Fine-Grained Auditing Policy
To define a fine-grained auditing policy:
-
If necessary, retrieve and activate the current fine-grained auditing policies.
See Section 2.3 for more information.
-
In the Audit Settings page, select the FGA tab to display the FGA (fine-grained auditing) page.
The FGA page appears similar to the following:

Description of the illustration fga_page.gif
Table 2-8 describes the fields used in the FGA page.
-
Click the Create button and in the Create Fine Grained Audit page, define the audit policy.
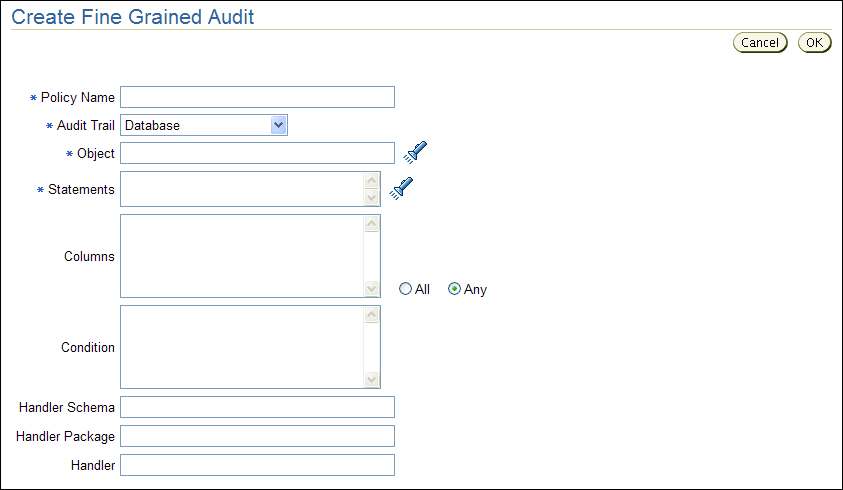
Description of the illustration create_fga.gif
Table 2-9 describes the Create Fine Grained Audit fields.
-
Click OK.
The fine-grained audit policy is created. To ensure that the fine-grained audit policy is semantically correct, see Section 2.9.
-
In the Dashboard page, select Save All Audit Settings.
To display the Dashboard page, click the Audit Settings link, and then in the Audit Settings page, select the name of the source database.
Table 2-8 lists the fields used in the Fine-Grained Audit page.
Table 2-8 Fields in the Fine-Grained Audit Page
| Field | Description |
|---|---|
|
(Leftmost column) |
An exclamation mark icon indicates one of the following conditions:
|
|
Policy Name |
The name of this fine-grained audit policy |
|
Schema |
The schema to which this policy applies |
|
Object |
The object to which this policy applies |
|
Statement |
The SQL statement to which this policy applies. Values are:
|
|
Columns |
The database columns being audited, also referred to as the relevant columns. If this field is empty, all columns are audited. |
|
In Use |
The arrow points upward if the setting is active in the source database and downward if it has not been provisioned or is not active. |
|
Needed |
A check mark indicates that the policy is needed. An X indicates that the policy is not needed. If a policy that is not in use is set to needed, the In Use arrow points up after provisioning. If a policy that is in use is set to not needed, the audit policy is no longer displayed after provisioning. To select all policies as needed, click the Mark All as Needed button. To reverse this action, click Mark All as Not Needed. |
|
(Rightmost column) |
Click the trash can icon to remove the policy. You only can use the trash can icon to remove the policy if you had just created it and decided it was not required in the source database, or if it is not active in the source database. |
Table 2-9 lists the fields in the Create Fine Grained Audit page.
Table 2-9 Fields in the Create Fine Grained Audit Page
| Field | Description |
|---|---|
|
Policy Name |
Enter a name for this fine-grained audit policy. |
|
Audit Trail |
Select from one of the following audit trail types:
|
|
Object |
Select an object to audit (for example |
|
Statements |
Select one or more SQL statements to audit. To display a list of statements for selection, click the flashlight icon. Select from the following SQL statements:
|
|
Columns |
Optional. Enter the names of the database columns (relevant columns) to audit. Separate each column name with a comma. If you enter more than one column, select All or Any as the condition that triggers this policy. For example, if you selected the CUSTOMER_ID, CREDIT_LIMIT, DATE_OF_BIRTH See Section 2.7.1.1 for more information about relevant columns. |
|
Condition |
Optional. Enter a Boolean condition to filter row data. For example: department_id = 50 If this field is blank or null, auditing occurs regardless of condition. |
|
Handler Schema |
Mandatory if you specify an event handler. Enter the name of the schema account in which the event handler was created. For example: SEC_MGR See Section 2.7.1.2 for more information about event handlers. |
|
Handler Package |
Mandatory if you specify an event handler. Enter the name of the package in which the event handler was created. For example: OE_FGA_POLICIES |
|
Handler |
Optional. Enter the name of the event handler. For example: CHECK_OE_VIOLATIONS If you specify an event handler, then you must specify its schema and package as well. |
2.8 Creating Capture Rules for Redo Log File Auditing
2.8.1 About Capture Rules Redo Log File Auditing
You can create a capture rule to track before and after value changes in the database redo log files. The capture rule specifies DML and DDL changes that should be checked when Oracle Database scans the database redo log. You can apply the capture rule to an individual table, a schema, or globally to the entire database. Unlike statement, object, privilege, and fine-grained audit policies, you do not retrieve and activate capture rule settings from a source database, because you cannot create them there. You only can create the capture rule in the Audit Vault Console.
In the source database, ensure that the table that you plan to use for the redo log file audit is not listed in the DBA_STREAMS_UNSUPPORTED data dictionary view. This is because the REDO collector uses Oracle Streams and Oracle LogMiner to read the redo logs. If there is a column type that is unsupported, then Oracle Audit Vault cannot extract the before and after values from the table.
2.8.2 Defining a Capture Rule for Redo Log File Auditing
-
In the Audit Settings page, select the Capture Rule tab to display the Capture Rule page.
Table 2-10 describes the fields used in the Capture Rule page.
-
Click the Create button and in the Create Capture rule page, define the capture rule.

Description of the illustration create_capture_rule.gif
Table 2-11 describes the Create Capture Rule page fields.
-
Click OK.
The capture rule is created. To ensure that the capture rule is semantically correct, see Section 2.9.
-
In the Dashboard page, select Save All Audit Settings.
To display the Dashboard page, click the Audit Settings link, and then in the Audit Settings page, select the name of the source database.
Table 2-10 lists the fields used in the Capture Rule page.
Table 2-10 Fields in the Capture Rule Page
| Field | Description |
|---|---|
|
(Leftmost column) |
An exclamation mark icon indicates one of the following conditions:
|
|
Rule Type |
The types of capture rules are as follows:
|
|
Schema |
Indicates the schema to which this rule applies |
|
Table |
For table capture rules, this fields indicates the table to which this rule applies. |
|
DDL |
|
|
DML |
|
|
In Use |
The arrow points upward if the setting is active in the source database and downward if it has not been provisioned or is not active. |
|
Needed |
A check mark indicates that the policy is needed. An X indicates that the policy is not needed. If a policy that is not in use is set to needed, the In Use arrow points up after provisioning. If a policy that is in use is set to not needed, the audit policy is no longer displayed after provisioning. To select all policies as needed, click the Mark All as Needed button. To reverse this action, click Mark All as Not Needed. |
|
(Rightmost column) |
Click the trash can icon to remove the policy. You can use the trash can icon to remove the policy only if you had just created it and decided it was not required in the source database, or if it is not active in the source database. |
Table 2-11 lists the fields used in the Create Capture Rule page.
Table 2-11 Fields in the Create Capture Rule Page
| Field | Description |
|---|---|
|
Capture Rule |
Select from the following capture rule types:
|
|
Capture |
Select from the following:
|
2.9 Verifying Oracle Audit Vault Policy Settings
After you have created an audit policy or capture rule, you can verify its semantic correctness.
-
From within the Audit Vault Console, select the Audit Policy tab.
-
Under Audit Source, select the name of the source database.
The Apply Audit Settings section appears.
-
Select the audit settings types that you want to verify: Statement, Object, Privilege, FGA, or Capture Rule.
By default, all audit types are selected.
-
Under Apply Audit Settings, click the Verify button.
The Audit Vault Console displays a message letting you know that the settings have been verified.
2.10 Provisioning Audit Vault Policies to the Source Oracle Database
After you have created, verified, and saved the audit policies, you can provision the audit policy changes to the source database. To verify that the audit policy changes have taken affect, you can retrieve a snapshot from the source database, as described in Section 2.3.1.
You can provision the audit policy settings in the following ways:
-
Saving the Audit Policy Settings to a SQL Script for a Database Administrator
-
Manually Provisioning the Audit Policy Settings to the Source Database
Caution:
Any audit policy that is not indicated as Needed in Audit Vault will be turned off on the source database. Section 2.3.1 describes how to retrieve audit policies from a source Oracle database.2.10.1 Saving the Audit Policy Settings to a SQL Script for a Database Administrator
To save the audit settings to a SQL script:
-
From within the Audit Vault Console, click the Database Instance link to display the Dashboard page.
-
Select the name of the source database.
The Apply Audit Settings section appears.
-
Select from the audit settings types the audit settings that you want to export: Statement, Object, Privilege, FGA, or Capture Rule.
By default, all the audit settings types are selected.
-
Click Export as SQL to save the settings to a SQL script. In the Browse dialog field, select a location for the SQL file.
-
Give this script to your database administrator, who can apply the policies to the source database.
2.10.2 Manually Provisioning the Audit Policy Settings to the Source Database
To manually provision the audit settings to the source database.
-
From within the Audit Vault Console, click the Database Instance link to display the Dashboard page.
-
Select the name of the source database.
The Apply Audit Settings section appears.
-
Select from the audit settings types the audit settings that you want to export: Statement, Object, Privilege, FGA, or Capture Rule.
By default, all the audit settings types are selected.
-
In the Audit Source User Name field, enter the user name of a user who has been granted the
EXECUTEprivilege for theAUDITSQL statement, theNOAUDITSQL statement, and theDBMS_FGAPL/SQL package.If the source database is protected with Oracle Database Vault, ensure that the user has been granted the
AUDIT SYSTEMandAUDIT ANYprivileges. If there is an audit command rule in place, ensure the command is enabled and the user whose name you enter is able to execute the command. -
In the Audit Source Password field, enter the password of this user.
-
Click the Provision button.
After you provision the audit settings to the source database, a database administrator can modify or delete audit policies. For this reason, you should periodically retrieve the settings to ensure that you have the latest audit settings. Section 2.3 describes how to fetch audit settings.
2.11 Copying Oracle Audit Vault Policies to Other Oracle Databases
You can copy audit policies from one Oracle database to another Oracle database that has been added to Oracle Audit Vault. You can copy policies that are already in use in the database or copy policies that you have created in Oracle Audit Vault but not yet applied to that database.
-
From within the Audit Vault Console, click the Database Instance link to display the Dashboard page.
-
Select the name of the source database.
The Apply Audit Settings section appears.
-
Select audit settings for types that you want to copy: Statement, Object, Privilege, FGA, and Capture Rule.
By default, all the audit settings types are selected.
-
In the From field under Copy Audit Settings from Another Source, enter the name of a source database that is different from the current source database, or use the flashlight icon to select it from a list.
-
After Copy, select either of the following options:
-
Actual (In Use): Copies the settings listed in the In Use field under Apply Audit Settings.
-
Needed (Not Yet In Use): Copies the settings listed in the Needed field under Apply Audit Settings.
-
-
In the From field, enter the full name of the source database from which you want to copy, or use the flashlight icon to select its name from a list.
You can filter the source databases by source name, host name, and host IP address.
-
Click the Load button.
-
Click the Save All Audit Settings button.
-
Export the settings to a SQL file or provision the settings to the source database, using the procedure described in Section 2.10.
2.12 Creating and Configuring Alerts
2.12.1 About Alerts
You can create and configure alerts for Oracle Database, Microsoft SQL Server, Sybase ASE, and IBM DB2 source databases. The alert is raised when the incoming audit data violates specific audit policies. You can specify an alert level and associate the alert with the events described in Appendix A through Appendix D.
When an incoming audit record meets the specified condition, an alert is raised and placed in the alert store, where you can review and respond to it as necessary. For example, you may want to send an email to a security officer or file a trouble ticket within the appropriate tracking system. You can configure templates to be used for this type of alert notification. Section 2.13 describes how to respond to an alert.
Remember that alerts are raised when the audit data reaches the Oracle Audit Vault database, not when the actual action occurs. The time lag between when the action occurs and when the alert is raised depends on several factors, including how frequently the audit data collectors collect the audit records. An Oracle Audit Vault administrator can configure this frequency.
Alerts are independent of audit policies. That is, you do not need to perform the tasks described under Section 2.3 before you create an alert.
Note:
An Oracle Audit Vault administrator can disable alerts. If the alerts are not firing, then check with your administrator.2.12.2 Creating Templates to be Used for Alerts
This section contains:
2.12.2.1 About Notification Alert Templates
You can configure Oracle Audit Vault alerts to trigger an email in response to an Audit Vault alert being raised or a report being generated. For example, suppose you create an alert that is triggered every time a connection is made by a application shared schema account outside of the application (for example, APPS or SYSADM). When the user tries to log in, Oracle Audit Vault sends an email to an administrator warning him or her of misuse of the application account. To accomplish this, you must create an email notification profile that defines who will receive the email, and then create an email template that contains a message.
You also can create a trouble ticket that can be used log trouble tickets in response to an alert. Before you can do so, you must create a trouble ticket template.
2.12.2.2 Creating an Email Notification Profile
The email notification profile is a way of creating an email group for a specific notification purpose, that is, a distribution list. For example, if you need to send email to all auditors in your group, you can create an email notification profile. When you create an alert, you can use this profile to specify an email list of recipients.
To create a notification profile:
-
Log in to the Audit Vault Console as a user who has been granted the
AV_AUDITORrole.Section 1.4 explains how to start the Audit Vault Console.
-
From the Dashboard page, select the Settings tab.
-
Select the Notification Profiles tab.
The Notification Profiles page is displayed by default. It displays a list of existing notification profiles, which you can modify or delete.
-
Click the Create button, and in the Add Notification Profile page, define the notification profile.
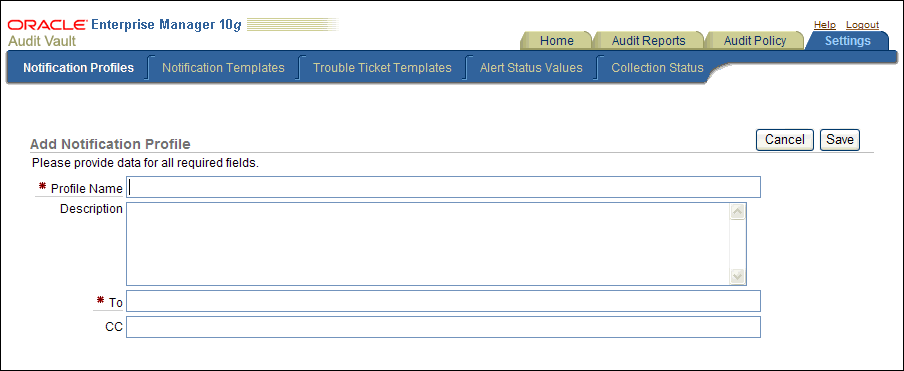
Description of the illustration create_not_profile.gif
Table 2-12 describes the Add Notification Profile fields.
-
Click the Save button.
After you create the profile, it is listed in the Profile List section of the Notification Profile. From there, you can modify or delete profiles as necessary.
Table 2-12 lists the fields used in the Add/Edit Notification Profile Page.
Table 2-12 Fields in the Add Notification Profile Page
| Field | Description |
|---|---|
|
Profile Name |
Enter a name of the notification profile. For example: All Auditors |
|
Description |
Optionally, enter a description of the notification profile. For example: Profile used for notifications that are sent to all auditors |
|
To |
Enter a list of user or group email addresses, each separated by a comma. For example: auditors_ca@example.com, sec_admin@example.com |
|
CC |
Optionally, include additional email addresses if you want. For example: ida.neau@example.com, kari.uksa@example.com, nessa.sarie@example.com, ima.kuksa@example.com |
2.12.2.3 Creating an Email Notification Template
An email notification template enables you to specify the content of the email when you send it to other users, including the email recipients specified in an email notification template, when an Oracle Audit Vault alert is raised or an Audit Vault report is generated.
To create a notification template:
-
Log in to the Audit Vault Console as a user who has been granted the
AV_AUDITORrole.Section 1.4 explains how to start the Audit Vault Console.
-
From the Dashboard page, select the Settings tab.
-
Select the Notification Templates tab.
The Notification Templates page displays a list of existing notification templates, which you can modify or delete. Some of these templates are predefined.
-
Click the Create button and in the Add Notification Template page, define a notification template.
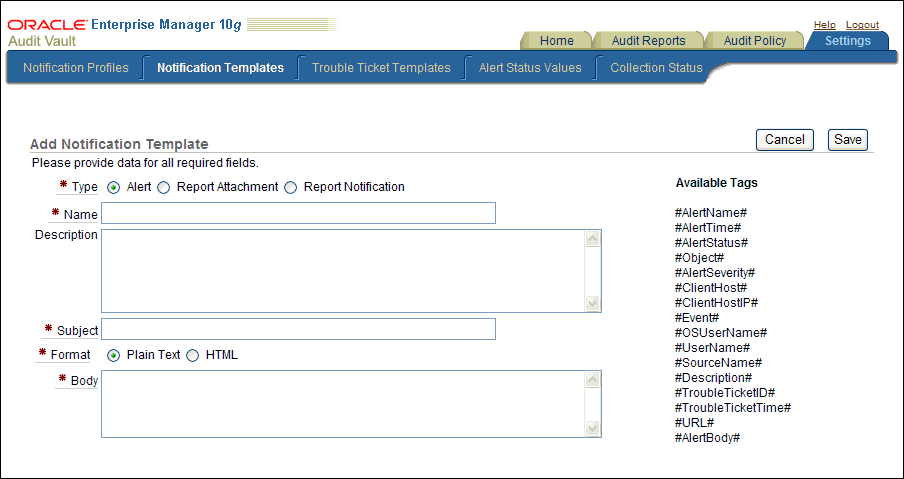
Description of the illustration create_notification_temp.gif
Table 2-13 describes the Add Notification Template page.
-
Click Save.
After you create the template, it is listed in the Notification Templates page. From there, you can modify or delete templates as necessary.
Table 2-13 lists the fields used in the Add Notification Template page.
Table 2-13 Fields in the Add Notification Template Page
| Field | Description |
|---|---|
|
Type |
Specify the type of notification. Select from the following options:
|
|
Name |
Enter a name for the template. For example: Critical Alert Email for non-os User Access Attempts |
|
Description |
Enter a brief description of what the template will be used for. For example: Alerts admins if non-OS users try to log into the database |
|
Subject |
Enter a subject header for the alert. You can use the supplied tags to provide dynamic text based on the content of the alert or report. For example: #AlertSeverity# Alert: Non-OS User Trying to Access the employee_db Database #Date_created# |
|
Format |
Select either Plain Text or HTML. |
|
Body |
Enter the body text for the notification. You can use the tags listed under Available Tags to associate existing alerts with the notification. Table 2-14 and Table 2-15 describe these tags in detail. For example, suppose you create the following body text for an alert notification: The "#Report_name#", generated on #Date_created#, is ready for your review. You can review the report at the following location: #URL# Please do not reply to this email. This is an automatically generated message. The generated message could, depending on the circumstances and alert generated, say something similar to the following: The System Privileges Report, generated on Sept 26, 2009, 3:15:06 PM, is ready for your review. You can review the report at the following location: https://mau.example.com:1158/av/console/f?p=7700:4:3525486105242281::NO::P4_REPORT_ID:36 Please do not reply to this email. This is an automatically generated message. |
Table 2-14 lists the available tags for alert notifications.
Table 2-14 Notification Template Alert Tags
| Alert Tag Name | Description |
|---|---|
|
|
Name of the alert |
|
|
Time the event causing the alert was created |
|
|
Status of the Alert (for example, New, Open, or Closed) |
|
|
Schema name and object name from the event that caused the alert |
|
|
Severity of the alert (Critical or Warning) |
|
|
Host name of the client |
|
|
IP address of the client |
|
|
Audit event (for example, |
|
|
The operating system user name associated with the event |
|
|
The user name associated with the event (a database event because Oracle Audit Vault currently collects only database events) |
|
|
Source database in which the alert was raised. |
|
|
Description of the alert |
|
|
The trouble ticket ID that has been created for this alert |
|
|
The time the trouble ticker has been created |
|
|
URL of the alert |
|
|
A special tag that is a shortcut to include the following fields in the email: |
Table 2-15 lists the available tags for report notifications.
Table 2-15 Notification Template Report Tags
| Report Tag Name | Description |
|---|---|
|
|
Name of the report |
|
|
Date and time the alert was generated |
|
|
Event category for the report (for example, data access event). See the following appendixes for more information about audit event categories: |
|
|
URL to the report that was generated |
2.12.2.4 Creating a Trouble Ticket Template
A trouble ticket template is a form that defines a trouble ticket action that must be logged in response to an alert.
To create a trouble ticket template:
-
Log in to the Audit Vault Console as a user who has been granted the
AV_AUDITORrole.Section 1.4 explains how to start the Audit Vault Console.
-
From the Dashboard page, select the Settings tab.
-
Select the Trouble Ticket Templates tab.
The Trouble Ticket Templates page displays a list of existing trouble ticket templates, which you can modify or delete.
-
Click the Create button and in the Add Trouble Ticket Template page, define the template.
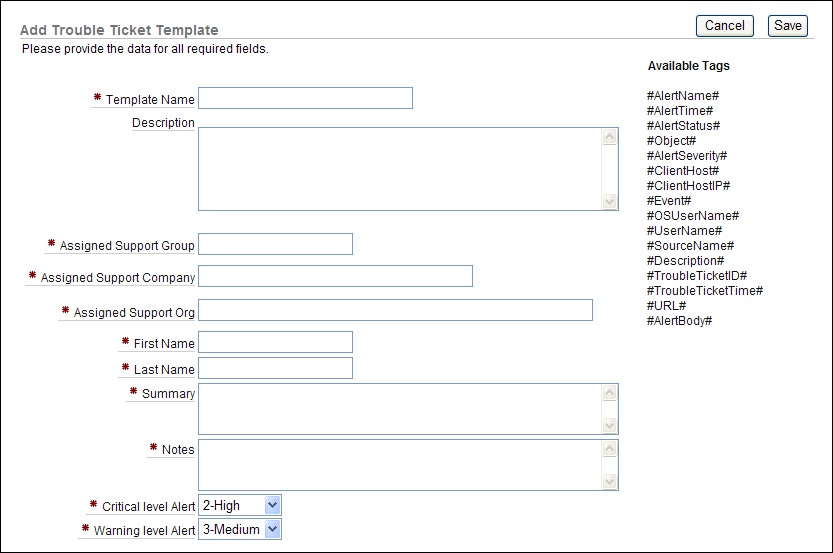
Table 2-16 lists the fields used in the Trouble Ticket Template page.
-
Click Save.
After you create the template, it is listed in the Trouble Ticket Templates page. From there, you can modify or delete templates as necessary.
Table 2-16 lists the fields used in the Trouble Ticket Template page.
Table 2-16 Fields Used in the Add Trouble Ticket Template Page
| Field | Description |
|---|---|
|
Template Name |
Enter a name for the trouble ticket template. For example: hr_data_tmpl |
|
Description |
Optionally, enter a description for the trouble ticket template. For example: Template to be used for any HR data violations |
|
Assigned Support Group |
Enter the name of the support group that is assigned the trouble ticket. Check with your Remedy administrator for the value to be used. For example: sec_support |
|
Assigned Support Company |
Enter the name of the company that is assigned the trouble ticket. Check with your Remedy administrator for the value to be used. For example: Example, Inc. |
|
Assigned Support Org |
Enter the name of the support organization that is assigned to the trouble ticket. Check with your Remedy administrator for the value to be used. For example: sec_support_org |
|
First Name |
Enter the first name of the customer for whom you are creating the trouble ticket. Check with your Remedy administrator for the value to be used. For example: Ima |
|
Last Name |
Enter the last name of the customer. Check with your Remedy administrator for the value to be used. For example: Noyd |
|
Summary |
Enter a detailed summary of the trouble ticket incident. You can use the tags listed under Available Tags to associate existing alerts with the trouble ticket template. Table 2-15 describes these tags in detail. For example, suppose you enter the following text: #ReportName# was generated on #DateCreated#. Please see the following URL: #URL# In the trouble ticket, depending on the circumstances, it could appear as follows: The Data Access Report was generated on Sept 30, 2009, 3:15:06 PM. Please see the following URL: https://mau.example.com:1158/av/console/f?p=7700:4:3525486105242281::NO::P4_REPORT_ID:58 |
|
Notes |
Enter notes for this ticket. For example: I think someone has been tampering with HR files again. |
|
Critical level Alert |
Select from the following levels:
These levels categorize the alert only. |
|
Warning level Alert |
Select from the following levels:
These levels categorize the alert only. |
2.12.3 Creating Alert Status Values
You can create alert status values to assign to an alert during the lifetime of the alert. Oracle Audit Vault provides two status values: NEW and CLOSED. You can create additional ones to suit your needs, such as PENDING.
To create an alert status value:
-
Log in to the Audit Vault Console as a user who has been granted the
AV_AUDITORrole.Section 1.4 explains how to start the Audit Vault Console.
-
In the Audit Vault Console, select the Settings tab, and then select the Alert Status Values secondary tab.
The Alert Status Values page appears.
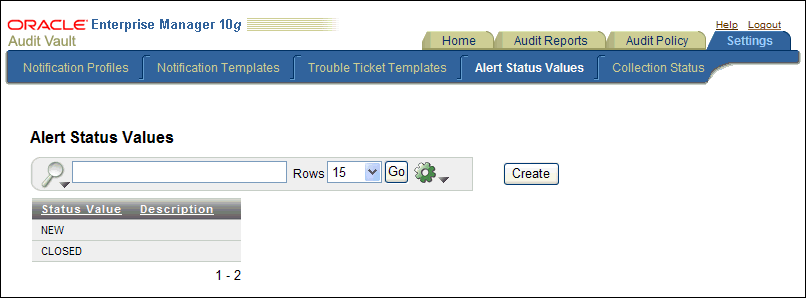
Description of the illustration alert_status_values.gif
-
To create a new alert status, click the Create button.
The Add Alert Status Value page appears.
-
Enter the following settings:
-
Status Value: Enter a name for the status value (for example,
PENDING). -
Description: Optionally, enter a description for the status value. For example:
Use this value to assign to alerts that are in process of being resolved and have not yet been closed.
-
-
Click the Save button.
The new alert status appears in the Alert Status Values page. From there, you can edit the alert status. To delete it, click the trash icon.
2.12.4 Creating a Basic Alert
A basic alert specifies a user, table, audit event, success criteria, and notification settings. For example, you could create a basic alert to be raised each time User X tries to modify Table Y.
To create a basic alert:
-
Log in to the Audit Vault Console as a user who has been granted the
AV_AUDITORrole.Section 1.4 explains how to start the Audit Vault Console.
-
In the Audit Vault Console, select the Audit Policy tab, and then select the Alerts secondary tab.
The Audit Alerts page appears, which lists the existing alerts. You can use the Audit Source Type, Audit Source, and Audit Event Category fields or their flashlight icons to filter the list of existing alerts. To view the definition for an existing alert, select its name in the Alert Name field.

Description of the illustration alerts.gif
-
Click Create.
The Create Alert Rule page appears.
-
In the Alert field, enter the alert name and then in the Description field, enter a brief description of the alert.
-
Specify the following information:
-
Alert Severity: Select Warning or Critical.
-
Audit Source Type: Select one of the following audit source types:
-
SYBDB (for Sybase Adaptive Server Enterprise)
-
MSSQLDB (for Microsoft SQL Server)
-
ORCLDB (for Oracle Database)
-
DB2DB (for IBM DB2)
-
-
Audit Source: Select from the list of source databases based on the audit source type that you selected.
-
Audit Event Category: Select from the list of available categories based on the audit source type that you selected. For detailed information about the audit events for these categories, see the following appendixes:
-
-
After Specify additional alert conditions in, select Basic.
The following area appears on the Alerts page:
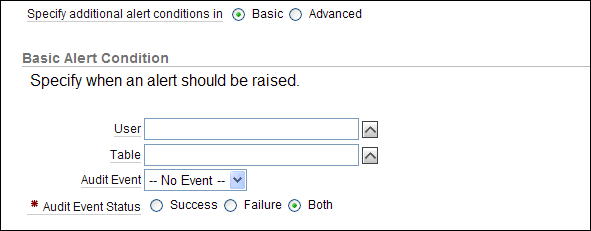
Description of the illustration create_basic_alert.gif
-
Specify the following information:
-
User: Specify the name of one or more users or click the flashlight icon to search for and select user names.
Oracle Audit Vault only lists the tables from the Oracle databases that have been configured for Audit Vault and since the last retrieve of the audit policy settings. To retrieve the latest audit policy settings, see Section 2.3.
-
Table: Specify the name of one or more tables or click the flashlight icon to search for and select table names.
Oracle Audit Vault only lists the tables from the Oracle databases that have been configured for Audit Vault and since the last retrieve of the audit policy settings.
-
Audit Event: Select the name of an audit event from the list. The audit events that appear are based on the audit event category that you selected. See the following appendixes for more information about audit events:
-
Audit Event Status: Select an option to represent whether the event has a status of Success, Failure, or Both.
-
-
Under Notification Action, optionally specify the following information:

Description of the illustration create_alert_action.gif
-
Template: From the list, select a notification template.
-
Profile: From the list, select a profile template.
-
To: Enter one or more email addresses, each separated by a comma.
-
Cc: Enter one or more email addresses, each separated by a comma.
-
Add to List: Click the Add to List button to record the email recipients that you entered in the To and Cc fields.
-
-
Under Trouble Ticket Action, from the list, optionally select a trouble ticket template.
-
Click OK.
After you create the basic alert, you can modify all the fields of the alert except for the following fields:
-
Alert Severity
-
Audit Source Type
-
Audit Source
-
Audit Event Category
In addition, you can monitor the alert activity from the Dashboard page. See Section 2.12.6 for more information.
2.12.5 Creating an Advanced Alert
This section contains:
2.12.5.1 About Advanced Alerts
In the Advanced Alert Condition section of the Create Alert Rule page, you can construct a Boolean condition that evaluates audit event behavior. When the Boolean condition evaluates to TRUE, then Oracle Audit Vault raises the alert, and either notifies other users or creates a trouble ticket. The alert condition can be simple or complex. As a general guideline, try to keep your alert conditions simple. Overly complex conditions can slow the Audit Vault Server database performance.
The syntax for the alert condition is as follows:
audit_field operator expression
When you insert the audit event fields for the expression, Oracle Audit Vault encloses them in # (pound) symbols. For example:
-
#USERNAME# -
#HOST_IP# -
#EVENT_STATUS#
See the event attributes tables in Appendix A through Appendix D for a full listing of the event attributes for the Oracle Database, SQL Server, Sybase ASE, and IBM DB2 source databases.
You can use any legal SQL function. For example:
-
upper() -
lower() -
to_char()
You can use any legal SQL operator. For example:
-
not -
like -
< -
> -
in -
and -
null
When using operators, follow these guidelines:
-
Remember that Oracle Audit Vault evaluates an alert condition for each incoming audit record.
-
You cannot use nested queries (for example,
not in SELECT...) in the condition.
Wildcards are as follows:
-
%(to match zero or more characters) -
_(to match exactly one character)
You can group components within the condition by using parentheses. For example:
(((A > B) and (B > C)) or C > D)
You can create a user-defined function that retrieves data from a table for the alert evaluation. Section 2.12.5.3.
2.12.5.2 Creating an Advanced Alert That Uses a Condition
-
Follow Step 1 through Step 5 in Section 2.12.4.
-
After Specify additional alert conditions in, select Advanced.
The following area appears on the Alerts page:

Description of the illustration create_adv_alert.gif
-
From the Select an event to insert in the condition list, select an event.
The event appears in the Condition field with its associated source event. For example, suppose you wanted to monitor application shared schema accounts that are being used outside the database. An example of this scenario is when the database user is
APPSand the client identifier is set toNULL. From the Audit Event Category list, you would select USER SESSION. Then from the Select an event to insert it in the condition list, you select LOGON. Oracle Audit Vault then adds the following event code for logons to the Condition field:#SOURCE_EVENTID# = '100'
(Appendix A through Appendix D describe the event codes in detail.)
-
From the Select an attribute to insert in the condition list, select an attribute.
For this example, you select USERNAME, which Oracle Audit Vault adds to the Condition field. At this stage, the Condition field appears as follows:
#SOURCE_EVENTID# = '100' #USERNAME#
Do not remove the
#symbols that enclose the event code or the attribute. -
Modify the condition to build the expression.
For example:
#SOURCE_EVENTID# ='100'and lower (#USERNAME#) = 'apps' and #CLIENT_ID" = null
This alert says, "Raise an error if any ex-employee tries to log in to the database."
-
Under Notification Action, optionally specify the following information:
-
Template: From the list, select a notification template.
-
Profile: From the list, select a profile template.
-
To: Enter one or more email addresses, each separated by a comma.
-
Cc: Enter one or more email addresses, each separated by a comma.
-
Add to List: Click Add to List to create a listing of existing notification recipients, which will be listed
-
-
Under Trouble Ticket Action, from the list, optionally select a trouble ticket template.
-
Click OK.
2.12.5.3 Creating an Advanced Alert Condition That Uses a Function
You can create a function (or a package containing a set of functions) to use with the alert condition. For example, if the alert condition must test for a specific host name, then you can create a function that checks the host names listed in a table. This function can be used for any of the supported source database types.
Follow these guidelines when you create a table and function to use with an alert condition:
-
Create the function and table on the Audit Vault Server database. The function and table should reside in the schema of the user who creates them.
-
The user who creates the function and table must have the following privileges:
-
CREATE TABLE -
CREATE PROCEDURE
In addition, ensure that this user has enough space to create the table and procedure in his or her tablespace, which by default is
USERS. For example:SQL> ALTER USER HOSTCHECKER QUOTA 10M ON USERS;
-
-
The return type for the function can be any legal type, such as
CHAR,VARCHAR2, orNUMBER. However, you cannot have a Boolean return type. -
You must grant the
EXECUTEprivilege for the function to theAVREPORTUSERaccount. This is a default user account that is designed to manage the Audit Vault reports. -
If the function is modified in the future or the function privileges changed, then the alert becomes invalid and does not work. Furthermore, the other alerts that were created for the alert category and source database (for example, all alerts created for the Account Management category for Oracle source databases) may not work as well. If this problem occurs, then check and correct the alert functions and privileges. Then drop and recreate the alert to use the corrected function. Afterward, all alerts created for the affected alert category and source database should work. Work with your Oracle Audit Vault administrator to troubleshoot alert issues.
To accomplish this, follow these general steps:
-
Log in to SQL*Plus in the Audit Vault Server database as the user responsible for creating the alert table and function.
For example:
$ sqlplus hostChecker Enter password: password Connected. -
Create a table that contains the data that the function will retrieve.
For example:
SQL> CREATE TABLE hostlist (hostname VARCHAR2(100));
-
Create the function.
For example, to create a function that retrieves the host names populated in the
hostlisttable:CREATE OR REPLACE FUNCTION checkhost (host IN VARCHAR2) RETURN CHAR AS hostcount NUMBER; BEGIN SELECT COUNT(*) INTO hostcount FROM hostchecker.hostlist WHERE LOWER(host) = hostname; IF (hostcount > 0) THEN RETURN 'Y'; ELSE RETURN 'N'; END IF; END checkhost; /
-
Grant the
EXECUTEprivilege to theAVREPORTUSERuser account.For example:
SQL> GRANT EXECUTE ON CHECKHOST TO AVREPORTUSER;

Grant succeeded.
-
Create the advanced alert as described in Section 2.12.5.2.
For example, the alert condition can be as follows:
hostChecker.checkHost(#HOST_NAME#) = 'N'
If you have not created the function properly, then Oracle Audit Vault prevents you from creating an alert to use the function. If this happens, check the structure of the alert and ensure that you have granted the
AVREPORTUSERaccount theEXECUTEprivilege for the function.
2.12.6 Monitoring Alerts
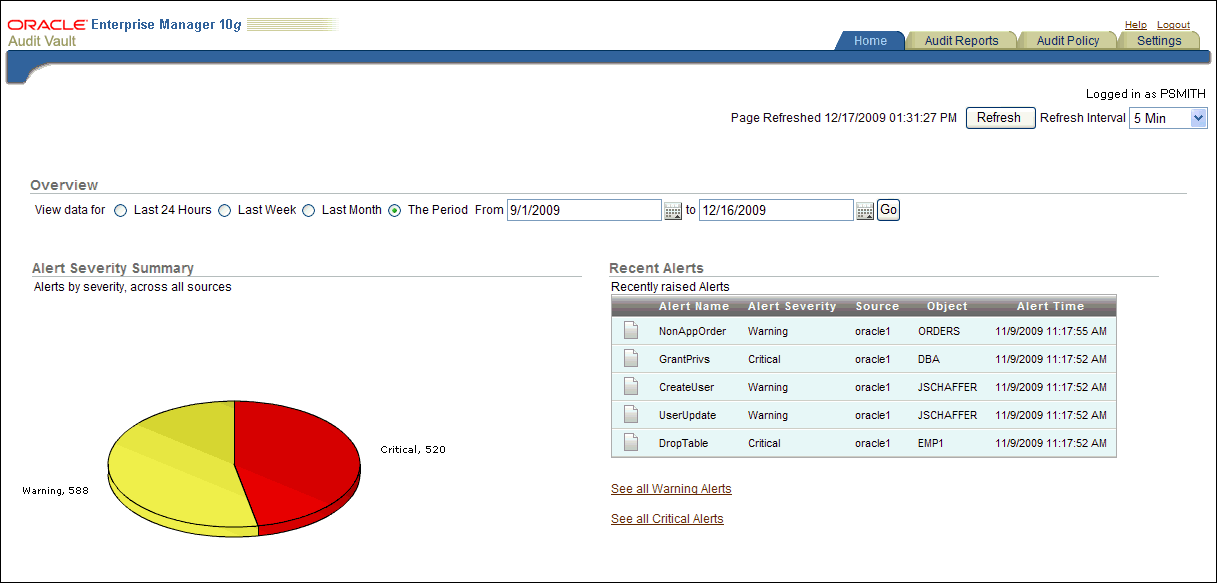
The Overview page is where auditors can view alert summaries, drill down to reports, and view agent and collector status. To display the Dashboard page, select the Home tab.
When an audit record is generated, Oracle Audit Vault classifies it in the event category that you specified when you created the alert. Audit event activity is monitored by the event category to which the audit record belongs. For example, a Logon event belongs to the User Session event category.
Oracle Audit Vault raises an alert when data in a single audit record matches an alert rule condition. Alerts are grouped by the sources with which they are associated, by the event category to which the event belongs, and by the severity level of the alert (warning or critical).
Figure 2-1 shows the a partial view of the Dashboard page.
From the Dashboard page, you can:
-
Select an event start time and end time for viewing Audit Vault event data. You can specify a time period by month, week, or day time span or the period between a specified begin and end date.
-
View five types of graphical summaries (pie charts and bar graphs) of alert activity and event activity over the specified time period. These graphical summaries include:
-
Alert Severity Summary (pie chart)
Click a section in this pie chart to drill down to a more detailed critical or warning alert report to see what sources are showing a particular severity level. See Section 3.5 for more information about critical and warning alert reports.
-
Summary of Alert Activity (pie chart)
Click a section in this pie chart to find critical and warning alerts to see the affected sources for all alert activity.
-
Top Five Audit Sources by Number of Alerts (bar graph)
Click a bar in this bar graph to find more detailed critical and warning alert information that shows a severity level for a particular source.
-
Alerts by Audit Event Category frequency (number of alerts) (bar graph)
Click an event category link in this bar graph to drill down to see more detailed critical and warning alert information that shows all alerts for that event category.
-
Activity by Audit Event Category frequency (number of events) (bar graph)
Click an event category link in this bar graph to find events for that event category. You can generate default reports for these event categories. See Chapter 3, "Using Oracle Audit Vault Reports" for more information.
-
-
Click a pie section or bar chart y-axis event category label to drill down to a more detailed report level.
2.13 Responding to an Alert
After you have created alerts and when they are generated, you or other auditors can respond to them. You can change the alert status (for example, closing it), notify other users of the alert, or log a trouble ticket for the alert.
To respond to an alert:
-
Log in to the Audit Vault Console as a user who has been granted the
AV_AUDITORrole.Section 1.4 explains how to start the Audit Vault Console. The Dashboard page appears.
-
Access the alert by using one of the following methods:
-
From the Dashboard page, select the alert from the Recent Alerts list.
-
From the Dashboard page, select the See All Warning Alerts link to access warning alerts.
-
From the Dashboard page, select the See All Critical Alerts link to access critical alerts.
-
Select the Audit Report tab, then the Default Reports secondary tab. Under Alert Reports, select either All Alerts, Critical Alerts, or Warning Alerts. Click Go to filter the report display.
The All Alerts page appears similar to following:
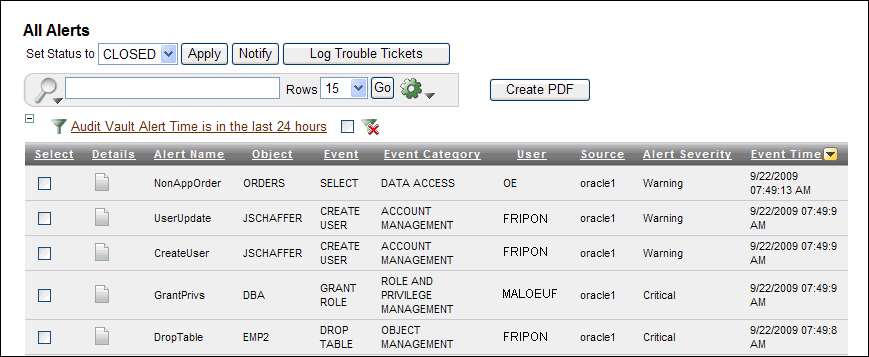
Description of the illustration alert_response.gif
-
-
In the All Alerts page, select the check boxes for the reports to which you want to respond.
-
Perform any of the following actions:
-
Notify another auditor of the alert. Click the Notify button. In the Manual Alert Notification page, select the notification template and profile that you want to use, and optionally enter email addresses in the To and Cc fields. Separate multiple email addresses with a comma. Click the Add to List button to compile the listing, and then click the Notify button to send the notification.
-
Log a trouble ticket. Click the Log Trouble Tickets button. In the Manual Trouble Ticketing page, select the trouble ticket template that you want from the Template list. Then click OK. The Alerts page appears, with a message describing the status (for example,
Successfully queued the trouble ticket logging request). -
Details. Select the page icon under the Details column for the report, and under the Notes area, select either Current Note or Previous Notes to update the status of the alert, or log or update a Remedy ticket.
This method also enables you to file notification and trouble ticket information.
-
Set the alert status. From the Set Status to list, select either NEW or CLOSED, and then click the Apply button. When an alert is first generated, it is set to OPEN. The Alerts page displays a message describing the status (for example,
Successfully updated the alert statuses).
-
2.14 Setting a Retention Period for Audit Data
You can set a period of 1 to 99 years for Oracle Audit Vault to retain audit data. By default, Oracle Audit Vault retains collected audit data for 10 years. When you set this retention period, it applies to audit records from all source databases, not just the currently selected source database. Oracle Audit Vault deletes the data based on the time that it was collected by Oracle Audit Vault, not when the audit event actually occurred. For example, suppose you load audit data that is more than 10 years old and then you set the retention period to 7 years. Oracle Audit Vault will delete this audit data 7 years from now.
To set the audit data retention period:
-
Log in to the Audit Vault Console as a user who has been granted the
AV_AUDITORrole.Section 1.4 explains how to start the Audit Vault Console. The Dashboard page appears.
-
In the Audit Vault Console, select the Audit Policy tab.
By default, the Audit Settings page appears.
-
Under Audit Data Retention, enter a value (1–99) in the Retain audit data field.
-
Click Go.
