Oracle® Insurance Policy Administration 9.4.1.0 E23637_01
Each person associated with a policy must be entered in OIPA as a client. Once the client is added, a role can then be assigned to that client. The role assigned to each client in OIPA defines that client's specific relationship to the policy. Roles are also used to define security levels for CSRs using the system. The Roles right-click menu provides a way to quickly edit a client's existing role.
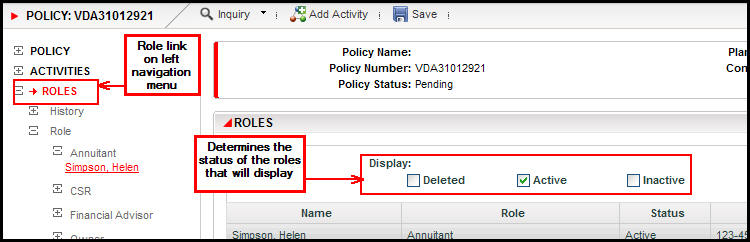
The Roles link from the Left Navigation menu opens the Roles screen where the user can attach clients to a policy and assign specific roles.
The Roles link may be used to add, delete and maintain the attached roles on a policy. In some situations, the Roles link may become disabled after a policy moves to active status. In that case, activities can be used to add roles to a policy when processed. If these activities were configured to support business needs, they will appear in the Activity Drop Down list when the Add Activity link is selected.
Select Roles from the Left Navigation menu. Active roles will display by default. Deleted or inactive roles will only be visible if the box next to them is clicked in the Display section at the top of the Roles screen.
Roles Link and Role Screen with Role Status
Click the Find Client tab at the bottom of the Role screen. The available client roles will display on the screen.
Check the roles that apply to the client.
Select the Client type from the drop down box and enter any information that will narrow the search. Use the % (percent) sign as a wild card if you do not remember the exact name.
Click Find.
Select the client from the search result list and click Add.
Click Save from the Secondary menu.
Repeat this process for each role that is needed on the policy.
Note: If a client has not been added to the system, add the new client then follow the steps above.
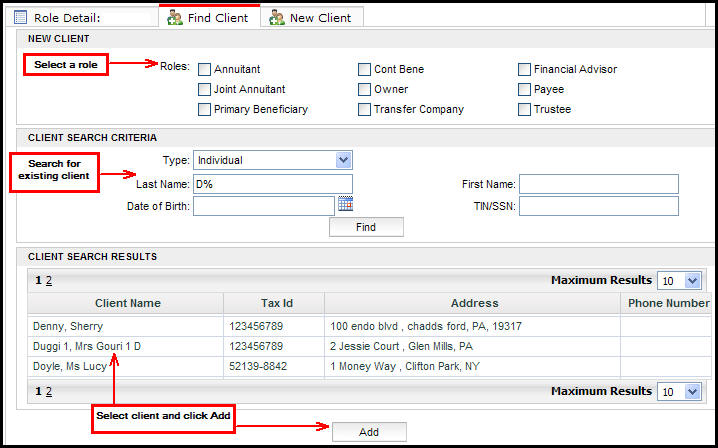
Find Client Tab on Roles Screen
If a client's role needs to be updated, quickly make the change using the Roles screen right-click menu. After the Roles link is selected from the Left Navigation menu, all the roles will be listed on the screen that are associated with the policy. Update the role information by right-clicking on the client name. The following options are available:
Edit Role Details: The Role Detail tab at the bottom of the screen will open and display all of the information that is associated with the role.
Delete Role: Remove the role from the policy.
Also As: Add another role to the client.
Equal Percent: Select multiple clients with the same role and this option will automatically apply equal percents to the role.
Edit Client Details: The Client screen will open displaying the information that was entered when the client was first added to the system.
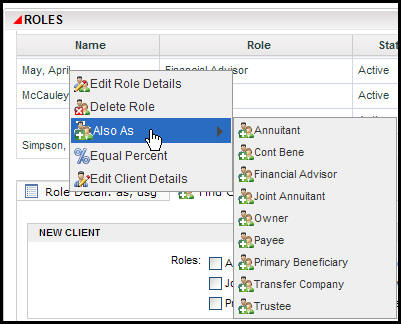
Role Right-Click Options
Copyright © 2009, 2011, Oracle and/or its affiliates. All rights reserved. Legal Notices