| Skip Navigation Links | |
| Exit Print View | |

|
Trusted Extensions Configuration and Administration Oracle Solaris 11 Information Library |
| Skip Navigation Links | |
| Exit Print View | |

|
Trusted Extensions Configuration and Administration Oracle Solaris 11 Information Library |
Part I Initial Configuration of Trusted Extensions
1. Security Planning for Trusted Extensions
2. Configuration Roadmap for Trusted Extensions
3. Adding the Trusted Extensions Feature to Oracle Solaris (Tasks)
4. Configuring Trusted Extensions (Tasks)
5. Configuring LDAP for Trusted Extensions (Tasks)
Part II Administration of Trusted Extensions
6. Trusted Extensions Administration Concepts
7. Trusted Extensions Administration Tools
8. Security Requirements on a Trusted Extensions System (Overview)
9. Performing Common Tasks in Trusted Extensions (Tasks)
10. Users, Rights, and Roles in Trusted Extensions (Overview)
11. Managing Users, Rights, and Roles in Trusted Extensions (Tasks)
12. Remote Administration in Trusted Extensions (Tasks)
13. Managing Zones in Trusted Extensions (Tasks)
14. Managing and Mounting Files in Trusted Extensions (Tasks)
15. Trusted Networking (Overview)
16. Managing Networks in Trusted Extensions (Tasks)
17. Trusted Extensions and LDAP (Overview)
18. Multilevel Mail in Trusted Extensions (Overview)
19. Managing Labeled Printing (Tasks)
20. Devices in Trusted Extensions (Overview)
21. Managing Devices for Trusted Extensions (Tasks)
Handling Devices in Trusted Extensions (Task Map)
Using Devices in Trusted Extensions (Task Map)
Managing Devices in Trusted Extensions (Task Map)
How to Configure a Device in Trusted Extensions
How to Revoke or Reclaim a Device in Trusted Extensions
Customizing Device Authorizations in Trusted Extensions (Task Map)
How to Create New Device Authorizations
How to Add Site-Specific Authorizations to a Device in Trusted Extensions
How to Assign Device Authorizations
22. Trusted Extensions Auditing (Overview)
23. Software Management in Trusted Extensions (Reference)
Creating and Managing a Security Policy
Site Security Policy and Trusted Extensions
Computer Security Recommendations
Physical Security Recommendations
Personnel Security Recommendations
Additional Security References
B. Configuration Checklist for Trusted Extensions
Checklist for Configuring Trusted Extensions
C. Quick Reference to Trusted Extensions Administration
Administrative Interfaces in Trusted Extensions
Oracle Solaris Interfaces Extended by Trusted Extensions
Tighter Security Defaults in Trusted Extensions
Limited Options in Trusted Extensions
D. List of Trusted Extensions Man Pages
Trusted Extensions Man Pages in Alphabetical Order
Oracle Solaris Man Pages That Are Modified by Trusted Extensions
The following task map describes procedures to protect devices at your site.
|
By default, an allocatable device has a label range from ADMIN_LOW to ADMIN_HIGH and must be allocated for use. Also, users must be authorized to allocate the device. These defaults can be changed.
The following devices can be allocated for use:
audion – Indicates a microphone and speaker
cdromn – Indicates a CD-ROM drive
floppyn – Indicates a diskette drive
mag_tapen – Indicates a tape drive (streaming)
rmdiskn – Indicates a removable disk, such as a JAZ or ZIP drive, or USB hot-pluggable media
Before You Begin
You must be in the Security Administrator role in the global zone.
The Device Manager appears.

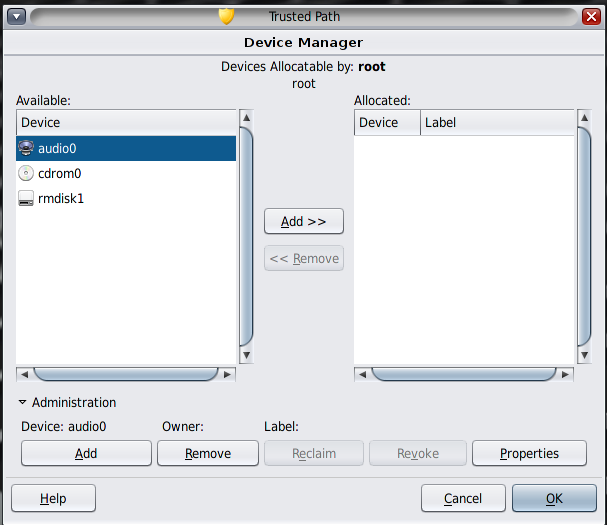
Click Administration, then highlight the device. The following figure shows an audio device that is being viewed by the root role.

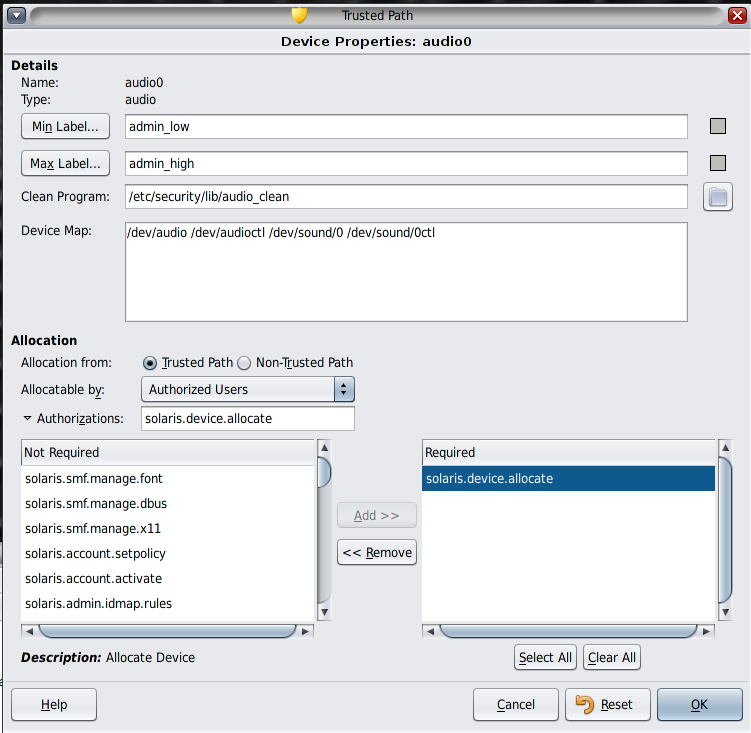
Click the Min Label button. Choose a minimum label from the label builder. For information about the label builder, see Label Builder in Trusted Extensions.
Click the Max Label... button. Choose a maximum label from the label builder.
In the Device Configuration dialog box, under For Allocations From Trusted Path, select an option from the Allocatable By list. By default, the Authorized Users option is checked. Therefore, the device is allocatable and users must be authorized.
When configuring a printer, frame buffer, or other device that must not be allocatable, select No Users.
In the For Allocations From Non-Trusted Path section, select an option from the Allocatable By list. By default, the Same As Trusted Path option is checked.
The following dialog box shows the solaris.device.allocate authorization is required to allocate the cdrom0 device.

To create and use site-specific device authorizations, see Customizing Device Authorizations in Trusted Extensions (Task Map).
If a device is not listed in the Device Manager, it might already be allocated or it might be in an allocate error state. The system administrator can recover the device for use.
Before You Begin
You must be in the System Administrator role in the global zone. This role includes the solaris.device.revoke authorization.
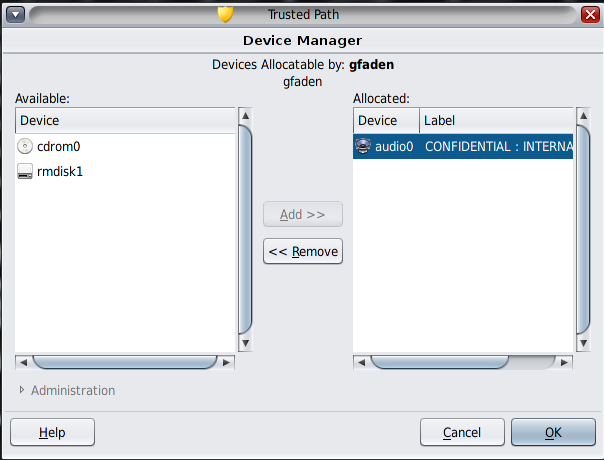
In the following figure, the audio device is already allocated to a user.

Select the device name and check the State field.
The No Users option in the Allocatable By section of the Device Configuration dialog box is used most often for the frame buffer and printer, which do not have to be allocated to be used.
Before You Begin
You must be in the Security Administrator role in the global zone.
Click the Min Label... button. Choose a minimum label from the label builder. For information about the label builder, see Label Builder in Trusted Extensions.
Click the Max Label... button. Choose a maximum label from the label builder.
Example 21-1 Preventing Remote Allocation of the Audio Device
The No Users option in the Allocatable By section prevents remote users from hearing conversations around a remote system.
The security administrator configures the audio device in the Device Manager as follows:
Device Name: audio
For Allocations From: Trusted Path
Allocatable By: Authorized Users
Authorizations: solaris.device.allocate
Device Name: audio
For Allocations From: Non-Trusted Pathh
Allocatable By: No Users
If no device_clean script is specified at the time a device is created, the default script, /bin/true, is used.
Before You Begin
Have ready a script that purges all usable data from the physical device and that returns 0 for success. For devices with removable media, the script attempts to eject the media if the user does not do so. The script puts the device into the allocate error state if the medium is not ejected. For details about the requirements, see the device_clean(5) man page.
You must be in the root role in the global zone.