3 Developing Applications
This chapter describes how to use Identity Governance Framework ArisID Extension to Oracle JDeveloper to develop applications.
See Also:
Oracle Fusion Middleware Installation Guide for Oracle JDeveloperThis chapter contains the following topics:
Using the Identity Governance Framework ArisID API
When developing an application with the ArisID API you will typically perform the following tasks:
-
Create an ArisID project in Oracle JDeveloper.
-
Create and configure a CARML file.
-
Generate the ArisID beans.
-
(Optional) Edit the mapping file.
The Identity Governance Framework ArisID extension for JDeveloper is organized into several different packages. The packages are separated primarily by functionality. At the top level, the packages are for the CARML Overview Editor, the Relationship Editor, the Mapping Editor, Bean Generation, and Project Creation. Project creation contains all the classes required for creating a project structure, managing project properties, and creating CARML files. Common elements shared between many of these packages are kept in .common. This is primarily abstract classes for common Swing components and Parsing/Modeling XML structures.
Creating the Project
The first step in using Identity Governance Framework ArisID is to create a project in Oracle JDeveloper. After the Identity Governance Framework ArisID extension is installed, ArisID/IGF Project is added to the project gallery in JDevelolper. The corresponding project wizard adds the ArisID required libraries, creates a directory structure, and adds the option to test the ArisID configuration. The follow figure shows an example ArisID project and the directory structure as it appears in JDeveloper:
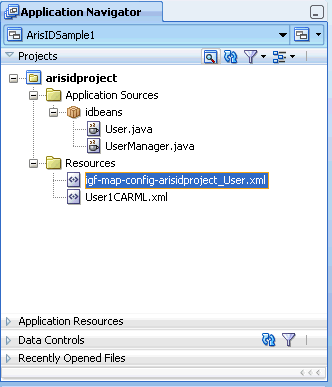
Description of the illustration igfdg_jdev_project.gif
To create a project:
-
Choose File then New to open the New Gallery.
-
In the Categories tree, expand General and select Projects.
-
Choose IGF/ArisID Project and click OK.
-
Specify a Project Name and Directory for your project on the Project Name page.
-
Optionally, move additional technologies from the Available list to the Selected list.
-
Specify a Default Package, Java Source Path, and Output Directory for your project in the Project Java Settings page.
-
Specify J2SE or J2EE in the Configure IGF/CARML Setting page.
-
Click Finish.
Creating and Editing the CARML File
You declare the application requirements in terms of attributes and interactions. These are specified using a Client Attribute Requirements Markup Language (CARML) file. The CARML editor is an XML editor that lets you edit the various fields of a CARML file. The following figure shows an example CARML XML file displayed in the CARML Editor with the Data Definitions section:
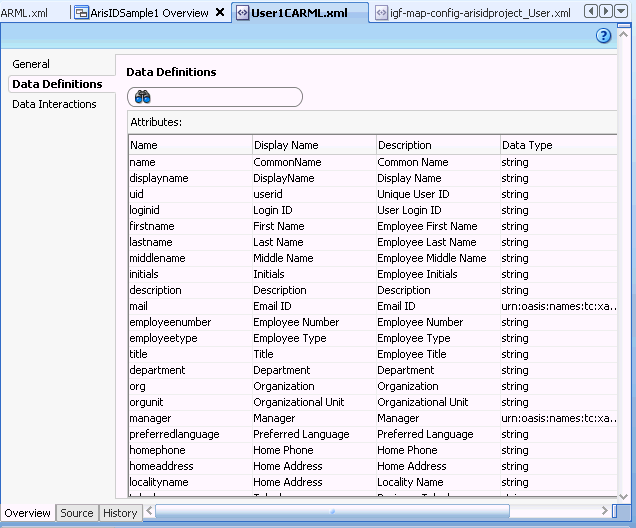
Description of the illustration igfdg_carml_editor.gif
To create a new CARML file:
-
Choose File then choose New to open the New Gallery.
-
In the Categories tree, expand Business Tier and choose Security.
-
In the Items list, double click Client Attributes Requirements (CARML) to open the dialog.
-
In the Create CARML File dialog, specify the name of the file that you would like to create and click OK.
You can use any of the templates provided. The associated description provides the details about each of the template files.
The General page of the CARML file editor appears.
-
Specify the values for the two fields on the General page: CARML Unique Indicator and CARML description.
-
Specify your application attribute requirements in the Data Definitions page. Add entities and specify data interactions for entities.
-
Specify the application based interaction requirements in the Data interactions page. During the data interactions step, specify filters for interaction types.
To edit an existing CARML file, double-click the appropriate file in the Projects panel to open it in the overview editor for CARML files.
Generating ArisID Beans
When you have finished editing your CARML file, you can generate the ArisID Beans to use in your application. If you have created a relation file according to the schema definitions bundled with the ArisID API, you can use it when generating the beans.
After you have specified your attribute and interaction declarations in the CARML file, you can generate the corresponding bean classes to use in your application. If you have multiple entities defined in the file, and would like to specify the relationship between the entities, you can do so using the relationship file.
To generate the beans:
-
In the Projects pane, highlight the CARML file you want to use to generate the beans.
-
Right click to display the Application Navigator context menu for a CARML file.
-
Choose Generate ArisIDBeans.
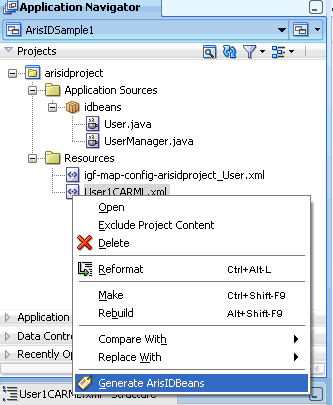
Description of the illustration igfdg_generate_beans.gif
-
In the Generate ArisIDBeans dialog, specify the Package.
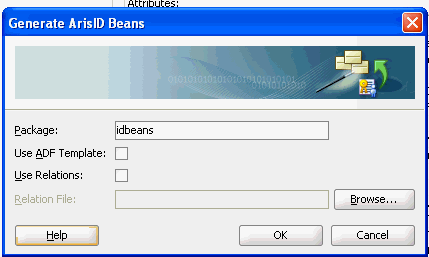
Description of the illustration igfdg_dialog_genbeans.gif
-
If you want to use a relation file, select Use Relations and specify or browse to the Relation File.
-
Click OK.
You can now incorporate these beans into your application.
How to Use the ArisID Beans in an Application
The Identity Governance Framework ArisID API extension to JDeveloper initially creates the ArisId beans. These beans are from a developer perspective, like any other Java bean. They can be called from any Java application using standard bean semantics. This enables more interesting use cases depending upon the frameworks a developer wants to use.
For example, if building an ADF (Oracle's Java-based Web application framework), the beans can be converted into a Data Control and dragged into an ADF page. This enables developers to quickly wire applications together that utilize the bean - either for searching, updating or displaying on a page - without having to write a single line of code.
Another use case is a developer who wants to expose identity data as a Web Service from Oracle SOA Suite. In this case, the beans could be accessed using a Java call-out instead of using a DSML query against a directory server, such as Oracle Virtual Directory or Oracle Directory Server Enterprise Edition. This can be easier to construct and more efficient because there is less XML parsing being utilized in the SOA process.
By focusing their efforts on describing objects and attributes and worrying less about specific protocols, developers can be more productive in accessing identity information. Because ArisID has privacy and security built-in, this can be done in a secure, standards compliant way.
Editing the Mapping File
The Oracle implementation maps CARML declarations to an LDAP-based server, such as Oracle Virtual Directory. The mapping editor enables you to map CARML attributes to LDAP attributes, objectclasses and search parameters. You can customize your mapping file for the LDAP-based server at your site. LDAP terms are defined by the Internet Engineering Task Force in RFC's 2251 through 2256. For more information, see http://www.ietf.org.
To edit the mapping file:
-
In the Projects pane, highlight the mapping file.
-
Double-click to open the file in the mapping file overview editor.
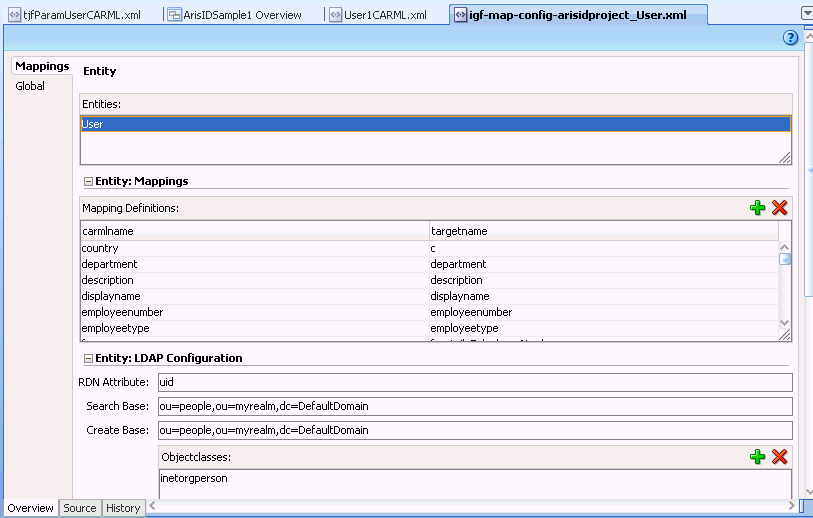
Description of the illustration igfdg_mapping_file.gif
-
On the Mappings page, highlight an entity that you want to modify.
-
Highlight a mapping definition you want to modify for that entity.
-
Edit the RDN Attribute, Search Base, and Create Base if necessary.
-
To add Objectclasses, Filter Objectclasses, Password Attributes, and Multilanguage Attributes, click the corresponding Add icon.
-
Repeat Steps 3 - 6 for other entities that you want to modify.
-
If necessary, change the Paging setting on the Global page.