10 Using Images and Videos
This chapter describes how to quickly find, group, convert, and download images and videos of various sizes, formats, and resolutions from within Oracle WebCenter Content Server using the Digital Asset Manager functionality.
This functionality is installed but disabled by default. Your system administrator chooses whether to enable this functionality for your site. The chapter covers the following topics:
10.1 About Digital Asset Manager
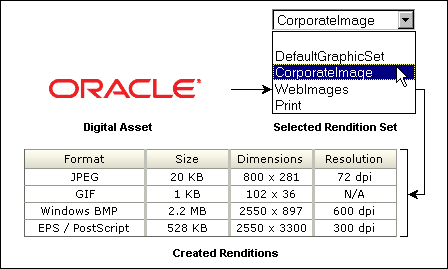
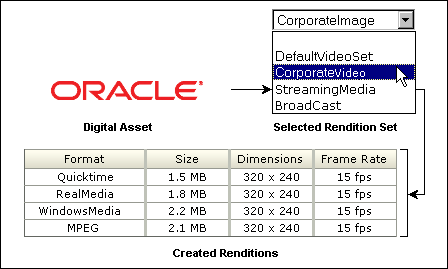
Digital Asset Manager enables you to quickly find, group, convert, and download images and videos of various sizes, formats, and resolutions to meet your business requirements, while maintaining a consistency of use across your organization. For example, an organization may have a logo in a variety of sizes for advertisements, Web pages, and presentation, or a training video in a variety of formats for streaming on an intranet, presenting to an audience, or copying to tape.
Work with your system administrator and other contributors to define the appropriate size and output. At check in, the digital asset is automatically converted into the defined formats and sizes, known as renditions. You can then search for the asset using standard metadata or closed-caption text if it is a video asset. From the Rendition Information page you can add renditions to a digital asset basket and download a single compressed file that contains all of the renditions.
Digital Asset Manager adds the following pages to Oracle Content Server:
-
DAM Search Fields Administration for content-server page
-
Link E-Mail Confirmation
-
Image Data page
-
Add/Edit Attachments page
Digital Asset Manager also adds functionality to the Content Check In, Content Information, Content Information Update pages, all search result pages, and the My Content Server tray.
10.2 Working with Digital Asset Manager
This section covers the following topics:
10.2.1 About Using Digital Asset Manager
Digital Asset Manager enables you to create and find images and videos in specified formats and sizes. Digital Asset Manager can help your organization maintain consistent standards for branding and asset use, while providing the right content to the right people in the right format.
Digital Asset Manager creates multiple formats of digital assets automatically when they are checked in to Oracle Content Server, and lists the formats under one content ID. Digital assets, such as a corporate artwork or commercial videos, maintain a standard size and quality in each format required by your organization. The content management and workflow features of Oracle Content Server uses only approved versions because Digital Asset Manager creates them from a single source managed by Oracle Content Server.
If you use digital assets, Digital Asset Manager gives you the confidence that you are using the approved asset in the proper format. For example, an image of the logo in a format for use on a Web-site can be bundled and downloaded with other formats of the logo for use in office presentations or print collateral, all from a single digital asset checked in to Oracle Content Server. Or, a low-bandwidth version of a training video can be posted to a streaming server while a high-bandwidth version can be provided to a vendor for replication to tape or DVD.
Each format created by Digital Asset Manager is called a rendition. Each image rendition includes information about size, color, format, and other criteria defined by your system administrator. Each video rendition includes information about display size, bandwidth, and expected use. Renditions are grouped into rendition sets. When you check in a digital asset, you choose a rendition set, which then determines what renditions are created for the asset. When finding a digital asset for use, all renditions of the asset are listed on the asset's Rendition Information page, and are available for download.
10.2.2 Supported Input Formats
Supported input formats are determined by the graphic or video conversion application as set up by your system administrator.
Common image input formats include the following:
Common video input formats include the following:
-
Flash Media Format
-
MPEG Layer 3 and 4 Elementary Stream Media Format
-
PacketVideo MPEG4 Format
-
QuickTime Media Format
-
QuickTime Streaming Format
-
Windows Media Format
-
AVI Media Format
-
DVD Stream Media Format
-
MPEG1 System Stream Media Format
-
MPEG2 Program Stream Media Format
-
MPEG2 Transport Stream Format
-
MPEG4 Media Format
-
Pinnacle MediaStream Media Format
For a comprehensive listing of supported format, see the conversion application documentations.
Formats supported by the conversion application must also be associated with the conversion process within Oracle Content Server by the system administrator using the Oracle Content Server Configuration Manager. If a supported format is not rendering, see your system administrator.
10.2.3 Supported Video Output Formats
Output formats are limited to what your browser displays effectively. Only output formats supported by Windows Media Player, Real Player, Flash Player, or Quicktime Player are available for viewing in your Web browser. Any assets rendered in a format not supported by those players is still be managed by Oracle Content Server, but is available only for download only.
Digital Asset Manager currently supports the following video output formats:
-
MPEG Layers 1, 2, and 4 (.mpg, .mpeg, .mp2, .mp4)
-
Quicktime (.mov)
-
Audio Video Interleave (.avi)
-
Flash Video (.flv)
Other output formats not listed here but supported by your media player may work when set up properly by your system administrator. For additional format requests, see your system administrator. For information on formats supported by your media player, see the player's help system.
10.2.4 Checking In a Digital Asset
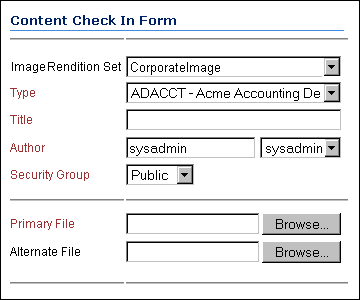
With Digital Asset Manager installed, the Rendition Set list is displayed.
To check in a digital asset, perform these steps:
-
Open the content check-in form.
-
Choose a rendition set from the Rendition Set list.
-
Enter a title and any additional metadata for the asset. The title you enter must be 249 or fewer characters in length.
-
Click Browse to locate the primary file.
-
Click Check In. The Check In Confirmation page opens.
Oracle Content Server uses the file extension, such as .psd, .jpg, .mov, or .avi, to determine if an item is a digital asset. Digital assets checked in to Oracle Content Server must have the correct file extension appended to the file name. For example, a Photoshop file named CorporateLogo.psd is correctly identified by Oracle Content Server as a digital asset, but one named CorporateLogo is not.
Do not select an alternate file when checking in a digital asset. Doing so prevents the primary file from rendering.
10.2.5 Finding Renditions and Information
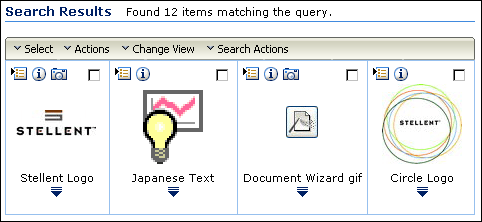
Digital Asset Manager builds on the functionality of Oracle Content Server. Searching for digital assets is identical to searching for other types of content. Digital assets have an additional icon displayed in the standard search results page. The Rendition Information icon links to the Rendition Information page of the asset.
Because you are working with images and videos, you may want to set your default search result view to Thumbnail View. To do so, choose Thumbnail View from the Content Actions menu on a search results page.
10.2.6 Rendition Information Page
When a digital asset is checked in to Oracle Content Server, multiple renditions are created based on the rendition set chosen at the time of check in. Just like with standard content, information about the original content item is indexed and displayed on the Content Information page. However, with a digital asset, information about the created renditions is also displayed on the Rendition Information page, and on the story board and any closed-captioned text for video assets.
To access the Rendition Information page, click the associated link on the Content Information page, or from a search result page using the Rendition Information icon or the Rendition information link in the item Actions menu.
The Rendition Information page lists the renditions of an asset and provides a variety of information about each rendition.
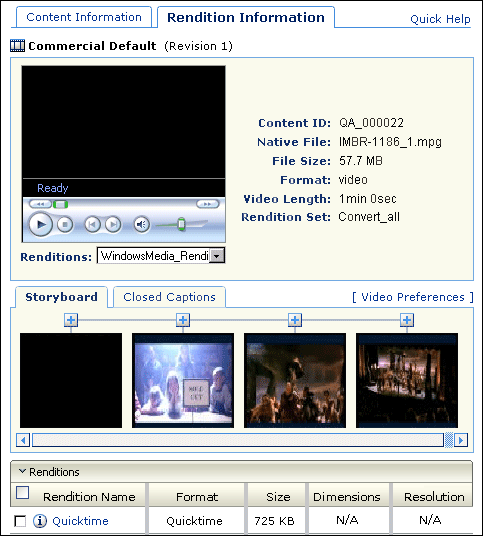
| Page Item | Description |
|---|---|
|
Displays the Content Information page for the digital asset, showing metadata indexed by Oracle Content Server and a listing of any revision history of the asset. It also provides access to actions for content items. |
|
|
Preview section |
Shows a Web-viewable rendition of the content item with minimal metadata. For an image asset, click the preview image to display the primary rendition in a new window. The system administrator specifies the primary image. It is typically larger than the preview image. |
|
Renditions list (video asset only) |
Switches the rendition format in the preview section, based on available rendition formats. |
|
The unique identifier used by Oracle Content Server to manage the digital asset. Specified at check in. |
|
|
The name of the source file of the digital asset. |
|
|
The storage size of the source file. |
|
|
Identifies the format of the native file, the |
|
|
Video Length (video asset only) |
Specifies how much time it takes to play the full video. |
|
Identifies the metadata option selected when the digital asset was checked in that determines what renditions are created. |
|
|
Navigation section (video asset only) |
Provides options for navigating through a digital asset using keyframes in a storyboard, or closed caption text if it is available. |
|
Storyboard (video asset only) |
Displays a series of keyframes from various intervals in the video. Click a keyframe to initiate the video at that point in the preview section. You can configure the number of keyframes displayed on the Video Preferences page. Click the plus icon above a keyframe to expand the storyboard, inserting additional keyframes after the one whose icon was clicked. The storyboard enables you to drill down to view keyframes representing shorter intervals of time in the video. |
|
Closed Captions (video asset only) |
Displays the closed captioned text of a video if it is available. Click the icon next to a line of text to initiate the video at that point in the preview section. If no closed captioned text is available in the video, this tab is not displayed. |
|
Video Preferences (video asset only) |
Displays the Video Preferences page, on which you can specify the video format and bandwidth preference for the preview on the Rendition Information page, and the number of keyframes displayed. |
|
Plus/Minus icon (video asset only) |
Click the plus icon above a keyframe to expand the storyboard, inserting additional keyframes after the one whose icon was clicked. Click Refresh in the upper right of page to collapse all opened keyframes. |
|
Renditions section |
Lists the renditions stored under the content ID. |
|
Name for each rendition, defined in the rendition set chosen at the time the digital asset was checked in or updated. |
|
|
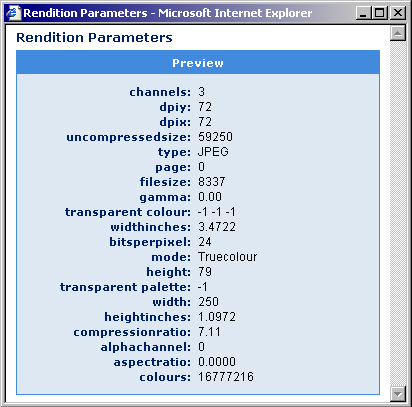
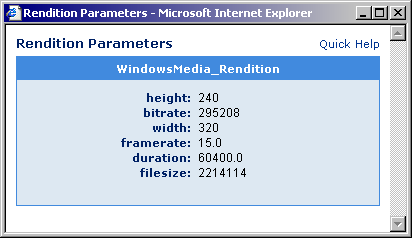
Displays the Rendition Parameters page. The Rendition Parameters page lists information about the parameters of the specific rendition as logged by the conversion application when the rendition was created. This information is valuable to you if you want detailed information about the rendition creation process, or about rendition parameters otherwise unavailable to you. |
|
|
Displays a more detailed description of the rendition. If no icon is present, then no description exists for the rendition. |
|
|
Identifies the rendition's file format, or way of organizing and storing the information in the rendition file, as the If an image rendition fails, then the format column displays |
|
|
Lists the required storage size of a rendition. |
|
|
Lists the height and width, in pixels, of a rendition. |
|
|
Framerate (video asset only) |
The rate at which each frame of a video is presented, specified in Frames Per Second. |
|
Download: Bundles the selected renditions into a single compressed file and copies the file to a local or networked storage space. Add to Basket: Adds the selected renditions and the native file to the digital asset basket. E-mail Links: Opens a prompt that enables the user to enter one or more e-mail addresses. Then the e-mail is generated and sent from within the server, after which a confirmation page is shown that displays the format of the e-mail. The URL links to the selected rendition or native file are copied into the body of a new message. Delete: (image asset only) Removes selected renditions from the rendition set. Add a New Rendition: (image asset only) Displays the Add a Rendition page, enabling a user to manually attach a file to the existing rendition set. |
Accessing The Rendition Information Page
To access the Rendition Information page of a digital asset from any page in Oracle Content Server, perform one of these steps:
-
Search for the digital asset for which to view rendition information.
-
Click the Rendition Information icon next to the appropriate digital asset on a search results page, or choose Rendition Information from the item Action menu. The Rendition Information page opens.
Alternately, you can access the Rendition Information page from the digital asset basket by performing these steps:
-
Click the My Content Server tray, click My Baskets, and then click Digital Asset Basket.
-
Click the Rendition Information icon next to the appropriate digital asset in your digital asset basket. The Rendition Information page opens.
When the Rendition Information page opens, click the tabs at the top of the page to switch between the Content Information page, the Rendition Information page, and the Image Data page for the asset.
10.2.7 Image Data Page
The Image Data page displays information about the native image file checked in to Content Server. However, what that information is and how it is displayed is contingent on:
-
The specific information the camera or application captures, and
-
Whether the image is generated by a digital camera or an application (such as Photoshop).
The specific information that is displayed is dependent on the type of camera or application used to generate the image. Different digital cameras collect different information, depending on the camera features and capabilities.
Additionally, one camera might have a built-in GPS system and can record GPS coordinates into the image file. Another camera might not have that capability, and so wouldn't be able to output that information to the Image Data page. Similarly, an application such as Photoshop may generate information specific to its feature set while Paint Shop Pro would generate different information specific to its different feature set.
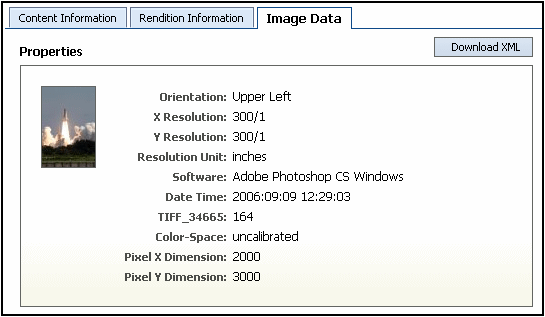
How the information is displayed on the Image Data tab is dependent on whether the native image file is a JPEG from a digital camera or if it is from an application. Digital cameras store information using the EXIF standard (Exchangeable Image File format), which is a subset of the XMP standard (Extensible Metadata Platform). Both methods use the Oracle Outside In filters to generate XML to structure the data.
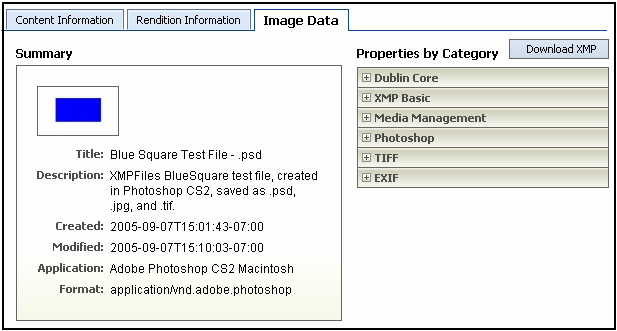
If the image is a JPEG from a digital camera, Outside In specifies the document type as JPEG File Interchange, and the EXIF data is displayed on the Image Data tab in a flat listing. If the image is from an application such as Adobe Photoshop, Outside In specifies the document type as coming from the application (for example, document type="Adobe Photoshop"), and the XMP data is displayed on the Image Data tab with some hierarchical structure.
Note:
If the image is a digital photograph that has been manipulated in Photoshop, the EXIF data gets aggregated and formatted as part of the XMP data, because EXIF is a subset of XMP.
Figure 10-8 shows the contents of the Image Data tab for a checked in digital photo. In this case, the information includes the image thumbnail and the photo's digital properties.
Figure 10-9 shows the contents of the Image Data tab for a Photoshop document with the XMP data displayed in a hierarchy.
To access the Image Data page of a digital asset from any page in Oracle Content Server, perform one of these steps:
-
Search for the digital asset for which to view rendition information.
-
Navigate to either the Rendition Information page or the Content Information pages, and click the Image Data tab
-
Click the Image Data tab.
Alternately, you can access the Image Data page from the digital asset basket by performing these steps:
-
Click the My Content Server tray, click My Baskets, and then click Digital Asset Basket.
-
Click the Rendition Information icon next to the appropriate digital asset in your digital asset basket. The Rendition Information page opens.
When the Image Data page opens, click the links at the top of the page to switch between the Content Information page, the Rendition Information page, and the Image Data page for the asset.
10.2.8 Rendition Parameters Page
To access the Rendition Parameters page, click the Rendition Name Information icon next to a rendition name on the Rendition Information page.
If an image rendition fails, the format column in the Renditions section of the Rendition Information page displays Not Converted for that rendition. In the case of a failed rendition, the Rendition Parameters page displays information about the cause of the failure.
Accessing The Rendition Parameters Page
To access the parameters of each specific rendition, perform these steps:
-
Access the Rendition Information page.
-
Click the Rendition Name Info icon. The Rendition Parameters page opens.
10.2.9 Video Preferences Page
To play a video rendition, use the preview section of the Rendition Information Page or click a Web-viewable link on the Content Information, digital asset basket, or search results pages. Digital Asset Manager determines what format to use as the default for the preview window based on information you specify on the Video Preferences page. You can also specify the number of keyframes displayed in the storyboard on the Rendition Information page, and your preferred bandwidth for the preview.
Other features of the Video Preferences page enable you to specify a video player for each rendition format and to set a No Player Option and a No Format Option for both that affect the preview display on the Rendition Information Page. To open and play renditions in a standalone player, click the rendition name in the rendition section of the Rendition Information page. The player chosen is then determined by file format and helper application settings unique to your computer and browser, outside of Video Manager.
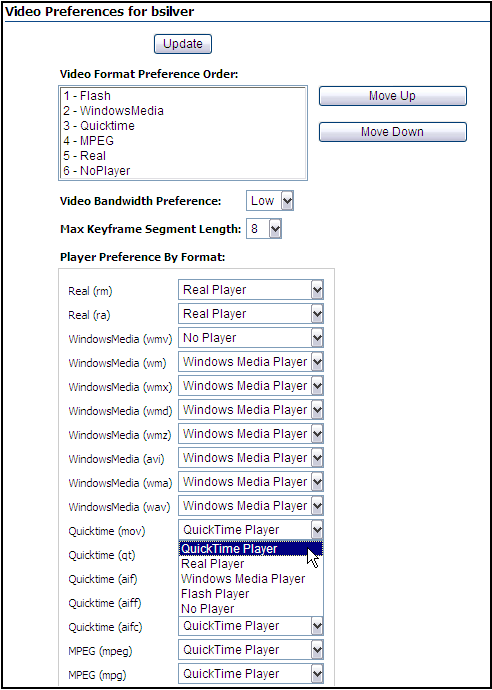
Accessing the Video Preferences Page
To access the Video Preferences page, perform these steps:
-
Access the Rendition Information page, or click the My Content Server tray.
-
Click Video Preferences. The Video Preferences page opens.
Page Item Description Video Format Preference Order
Specifies the preferred media format used in the Rendition Information page preview section for renditions, and with a rendition's Web-viewable link in a search result, digital asset basket, or content information page. Because a rendition set may not have a rendition in the preferred format, Video Manager plays the rendition using the first available format found in the order listed here.
The NoPlayer option enables you to suppress one or more of the media formats here, depending on your preference. The placement of the NoPlayer option determines what media format is available. For example, if you move the NoPlayer option immediately following WindowsMedia, then all other formats are ignored. For more information, see Section 10.2.9.1, "No Format Option."
Move Up
Moves a selected media format up in the preference order.
Move Down
Moves a selected media format down in the preference order.
Video Bandwidth Preference
Specifies the preferred size of streaming and local videos by using the size information from the rendition listing.
Low: Smaller video best suited when connecting to Video Manager using a modem to dial in.
High: Larger video best suited when connecting to Video Manager through a high speed connection, such a corporate network or broadband internet connection.
Max Keyframe Segment Length
Specifies the maximum number of keyframes displayed at each drill-down level in the storyboard section of a Rendition Information page.
Player Preference By Format
Enables you to specify a video player for each media format included in the list. For more information, see Section 10.2.9.2, "No Player Option."
Update
Submits changes made to the Video Preferences page.
10.2.9.1 No Format Option
Depending on what priority you have assigned to the No Format option in the Video Format Preference Order section on the Video Preferences Page, the preview area of the Rendition Information Page may or may not display the video preview player. For example, the following graphic illustrates that this rendition set does not contain any preferred video format. That is, all formats available in this set appear below the No Format option in the Video Format Preference Order which means that they have been suppressed.
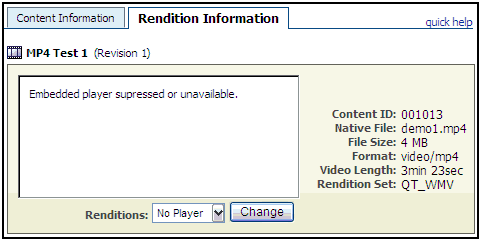
10.2.9.2 No Player Option
The Player Preference By Format section of the Video Preferences Page enables you to set a video player for each media format included in the list. For example, if you set the preference for Quicktime to be No Format, then this option suppresses that format in the preview area of the Rendition Information Page as illustrated in the following graphic. Click Access this rendition directly to open a new window and play the video using the applicable default player.
Note:
The No Format Option placement always overrides the selected settings for media formats listed in the Player Preference By Format section.
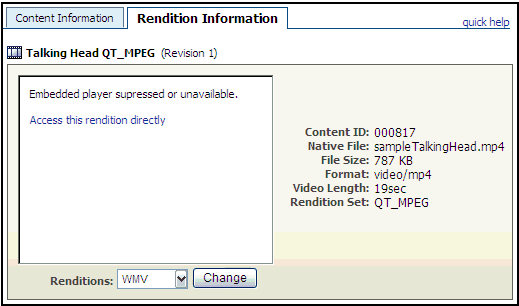
10.2.10 Working with Renditions
Digital Asset Manager not only creates renditions automatically, it provides a personal space where you can store renditions you are currently working on, called the digital asset basket. Your digital asset basket is unique to you, and contains only the renditions you choose to include.
You can add items to your digital asset basket from a search results page, from the Rendition Information page, or from the Content Information page. To view the items in your digital asset basket, click My Baskets and then Digital Asset Basket in the My Content Server tray.
By design, the digital asset basket can contain renditions from different revisions of the same digital asset. If you use your basket to quickly find a rendition of an asset, such as a corporate logo or video, remember that you may not be accessing the most recent revision of the asset. If a newer revision has been checked in to Oracle Content Server, a notification is displayed next to the revision number in the Description column. Click the notification to display the Content Information page of the latest revision.
You can do the following tasks with renditions:
-
Section 10.2.10.1, "Storing Renditions in Your Digital Asset Basket"
-
Section 10.2.10.2, "Viewing Items in Your Digital Asset Basket"
-
Section 10.2.10.3, "Removing Items from Your Digital Asset Basket"
-
Section 10.2.10.4, "Adding and Removing Renditions in a Rendition Set"
10.2.10.1 Storing Renditions in Your Digital Asset Basket
You can store any rendition from any revision of a digital asset in your digital asset basket, and the Web-viewable or native file from any revision of a content item, provided the revision is released by Oracle Content Server.
From the digital asset basket, you can select renditions from one or multiple assets to be compressed into a single file and downloaded to a local or networked drive, or send links to selected renditions in an e-mail. You can also use the digital asset basket to access the content information and rendition information pages of content items and digital assets.
You can add items to your digital asset basket from the following pages:
-
Rendition Information page (native file and all renditions)
-
Content Information page (native and Web-viewable files only)
-
Search Results page (native and Web-viewable files only)
When you add a rendition to the digital asset basket, it may not be listed at the top of the digital asset basket page. Items in the digital asset basket are listed in descending order first by content ID and then by revision number. If a rendition of a content item revision is in the digital asset basket, additional renditions are added to that revision's listing. Additionally, if a newer revision of a content item in your digital asset basket has been checked in to Oracle Content Server, a notification is displayed next to the revision number in the Description column. Click the notification to display the Content Information page of the latest revision.
To add renditions to your digital asset basket from the Rendition Information page, perform these steps:
-
Access the rendition information page of an asset. The rendition information page opens.
-
Select the check box next to a rendition to add the rendition to your digital asset basket.
-
From the Renditions list, choose Add to Basket. The Digital Asset Basket page opens with the renditions you selected listed in the Selected Renditions column of the item.
To add all renditions to your digital asset basket, select all items. You do not have to select the check box next to any rendition if using this option.
To add the native or Web-viewable file to your digital asset basket from the Content Information page, perform the following steps:
-
Access the Content Information page of an item.
-
From the Content Actions menu, choose one of these:
-
Add Native File to Digital Asset Basket
-
Add Web-Viewable File to Digital Asset Basket
-
The Digital Asset Basket page opens with the selected items listed in the Selected Renditions column of the item.
You cannot add both the native file and the Web-viewable file to the digital asset basket at the same time using the Content Information page. If the item is a digital asset and has a Rendition Information page, use it to add multiple items to the digital asset basket at the same time.
To add the native or Web-viewable file to your digital asset basket from a search results page, perform the following steps:
-
From a search results page, select the check box next to the item or items you want to add to your digital asset basket.
-
From the Content Actions menu, choose either of these items:
-
Add Native Files to Digital Asset Basket
-
Add Web-Viewable Files to Digital Asset Basket
The Digital Asset Basket page opens with the selected items listed in the Selected Renditions column of the item.
-
To add all native or Web-viewable items on a search results page to your digital asset basket, choose All from the Select menu. You do not have to select the check box next to any item if using this option. Also, Web-viewable files of video renditions added to the digital asset basket are suitable for viewing only from the digital asset basket. You cannot download them from the digital asset basket. To download a rendition, use the Rendition Information page.
10.2.10.2 Viewing Items in Your Digital Asset Basket
To access the digital asset basket, click My Basket and then Digital Asset Basket in the My Content Server tray. From the digital asset basket, you can select renditions from one or multiple assets to be compressed into a single file and downloaded to a local or networked drive, or send links to selected renditions in an e-mail. You can also use the digital asset basket to access the content information and rendition information pages of content items and digital assets.
To access the Digital Asset Basket page, perform these steps:
-
Click the My Content Server tray.
-
Click My Baskets.
-
Click Digital Asset Basket.
The digital asset basket page opens.
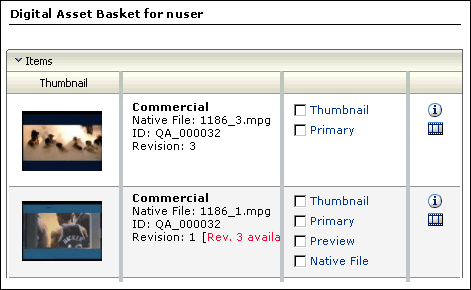
| Page Item | Description |
|---|---|
|
Opens the Web-viewable rendition in a separate window. Your system administrator specifies the Web-viewable rendition. It is typically larger than the thumbnail or preview renditions. For video assets, you determine the Web-viewable rendition based on the choices you make on the Video Preferences Page. |
|
|
Title, native file, Content ID, and Revision metadata of the content item. If a newer revision of the content item has been checked in to Oracle Content Server, a notification is displayed next to the revision number. Click the notification to display the Content Information page of the latest revision. |
|
|
Listing of all renditions of a content item saved to the digital asset basket. |
|
|
Links to the Content Information page of an item. |
|
|
Links to the Rendition Information Page of an item. |
|
|
Items in the digital asset basket are listed in descending order first by content ID and then by revision number. If a rendition of a content item revision is in the digital asset basket, additional renditions are added to that revision's listing.
10.2.10.3 Removing Items from Your Digital Asset Basket
Because you can store renditions from different revisions of a digital asset in the digital asset basket, renditions listed in the digital asset basket are not necessarily the latest revision. It is a good idea to remove the renditions from your digital asset basket when you no longer require them.
You can store a link to the most recent revision of any content item in Oracle Content Server by searching for the item's content ID, then choosing Save Search from the Content Actions menu on the search result page. The link is saved in the My Saved Queries folder in your My Content Server tray. Click the saved search link to always access the most recent revision of a content item.
To remove individual renditions from your digital asset basket:
-
Click the My Content Server tray, click My Baskets, and then click Digital Asset Basket.
The digital asset basket page opens.
-
Select the check box next to the renditions to be removed in the Selected Renditions column on the digital asset basket page.
-
Choose Remove from the Items menu.
The items are removed from the digital asset basket.
To remove all items from your digital asset basket:
-
Click the My Content Server tray, click My Baskets, and then click Digital Asset Basket.
The digital asset basket page opens.
-
Choose Empty Basket from the Items menu.
All items in the digital asset basket are removed. You do not have to select the check box next renditions when removing them all from your basket.
Removing renditions and other items from your digital asset basket does not remove them from Oracle Content Server. You can remove renditions and other items from Oracle Content Server using the Rendition or Content Information pages. Renditions and other items listed in your digital asset basket are not available if they have been removed from Oracle Content Server.
10.2.10.4 Adding and Removing Renditions in a Rendition Set
Digital Asset Manager automatically creates multiple renditions of digital assets and manages them in Oracle Content Server under one content ID. Digital Asset Manager provides the content management and workflow benefits of Oracle Content Server while ensuring that you have access to all the types of renditions you need. One content ID provides single-point access to all items relevant to the digital asset.
In some situations, you may want to associate an additional rendition or other file to a digital asset, or remove a rendition that is no longer useful. For example, you may need a rendition that is a slightly different size than the one created by the rendition set, or uses a different color palette, so you want to add the new one and remove the old one. Or, you may have a text file with instructions to a vendor on how they are to use a logo. Files such as these can be added to a digital asset's existing set of renditions using the Add a Rendition page, accessed from the Rendition Information page, and removed directly from the Rendition Information page.
You can access the Add a Rendition page from the Renditions menu on the Rendition Information page of an asset. An added rendition is assumed to be a graphic file, and metadata fields on the Add a Rendition page allow you to manually add information pertinent to graphic renditions. Added renditions can be any type of file, however. For example, if you have a text file with instructions on how to output a PDF file, you can attach the text file as a rendition of the original asset. You should note, though, that Oracle Content Server does not manipulate added renditions. It does not modify a rendition based on information entered into the metadata fields, nor does it convert an added rendition to a Web-viewable format, nor index it for searching.
-
Metadata on the Add a Rendition page is for information only. It does not change the size of an added graphic file, and it does not get indexed for searching.
-
You can add any type of file as a rendition. It does not have to be a graphic file. To view added renditions, you must have the native application or suitable viewer for the added rendition's file format.
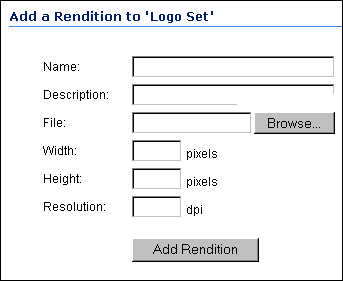
To add a rendition to an existing rendition set:
-
Access the Rendition Information page.
-
Choose Add New Rendition from the Renditions menu. The Add a Rendition page opens.
-
Enter a name for the rendition in the Name field (required). The name is displayed in the Rendition Name column of the Rendition Information page.
-
Enter a description for the rendition in the Description field (optional). To display the description, click the Rendition Name Description icon in the Rendition Name column of the Rendition Information Page.
-
Click Browse to locate the rendition or other file you want to add to the rendition set (required). You can select any type of file.
-
Fill in the pixel dimensions and resolution information in the Width, Height, and Resolution fields (optional).
-
Click Add Rendition. The Rendition Information page opens, showing the added rendition.
Metadata on the Add a Rendition page is for information only. It does not change the size of an added graphic file, and it is not indexed for searching.
To delete a rendition from an existing rendition set:
-
Access the Rendition Information page.
-
Select the check box next to the rendition you want to delete. You can select multiple renditions to delete.
-
Choose Delete from the Renditions menu. The Rendition Information page opens without the deleted rendition.
Renditions and other items are not available if they have been removed from Oracle Content Server. When you delete a rendition from the system, it disappears from the basket display.
10.2.10.5 Downloading Multiple Items
You can compress renditions and other content items into a single file and downloaded to a local or networked drive, for example, when you want to send multiple renditions or native files to others. You can do this from the Digital Asset Basket page or Rendition Information page.
To download multiple renditions:
-
Access the digital asset basket or Rendition Information page.
-
Select the check box next to the renditions you want to download. The renditions are listed in the Selected Renditions column of the Digital Asset Basket page, or the Rendition Name column of the Renditions Information page.
-
Choose Download from the Renditions menu on the Rendition Information page or from the Items menu on the Digital Asset Basket page.
-
Follow the download instructions as they are displayed on screen.
Notes:
-
To download all renditions in your digital asset basket, or on the Rendition Information page, select all items, and then choose the Download menu option. You do not have to select the check box next to any rendition if using this option.
-
Web-viewable files of video renditions added to the digital asset basket are suitable for viewing only from the digital asset basket. You cannot download them from the digital asset basket. To download a rendition, use the Rendition Information page.
-
You can remove renditions and other items from Oracle Content Server using the Rendition or Content Information pages.
10.2.10.6 Creating Renditions
Renditions are created automatically when a digital asset is checked in. The types of renditions created are determined by criteria defined in the selected rendition set.
-
Access the Content Check In form.
-
Choose a rendition set from the Rendition Set list.
-
Enter a title and any additional metadata for the asset. The title you enter must be 249 or fewer characters in length.
-
Click Browse to locate the primary file.
-
Click Check In. The Check In Confirmation page opens.
-
Oracle Content Server uses the file extension, such as .psd, .jpg, .mov, or .avi, to determine if an item is a digital asset. You must append the correct extension to the file name for all digital assets checked in to Oracle Content Server. For example, a Photoshop file named CorporateLogo.psd is correctly identified by Oracle Content Server as a digital asset, but one named CorporateLogo is not.
-
Do not select an alternate file when checking in a digital asset. Doing so prevents the primary file from rendering.
10.2.10.7 Updating Renditions
If an incorrect rendition set was selected when a digital asset was checked in, or if a new rendition set has been created, you may want to update the renditions created for a digital asset.
To update to a different rendition set, perform these steps:
-
Choose Update from the Content Actions menu on the Content Information page.
-
Choose a different rendition set from the Rendition Set list.
-
Click Submit Update. The Content Information page opens.
-
You cannot display rendition information while an asset is being processed by Oracle Content Server and Digital Asset Manager. If an asset is being processed, the status in the revision history on the Content Information page is GenWWW, and the Rendition Information page displays a message saying the content item is not released yet.
-
Updating a rendition set replaces the previous renditions with a new set, effectively removing the previous set from Oracle Content Server.
10.2.11 Working with Standard Content Items
Digital Asset Manager adds functionality to Oracle Content Server that extends to content items that are not digital assets. You can add native and Web-viewable versions of content items to your digital asset basket, and add or delete attachments to content items from the Content Information page.
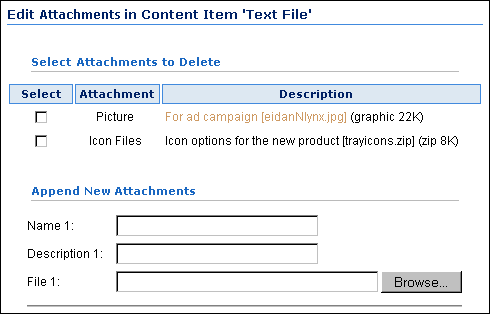
In some situations, you may want to associate an additional rendition or other file to a content item that is not a digital asset, or remove an attachment that is no longer useful. For example, you may attach a customer's new logo to a piece of collateral that uses it and remove the old one, or you may attach a text file with project contact information to a project plan. You can add files such as these to a content item using the Add/Edit Attachments page, accessed from the Content Actions menu on the Content Information page. Attached files are not converted to a Web-viewable format, and are not indexed for searching by Oracle Content Server.
| Page Item | Description |
|---|---|
|
Lists the name given to an existing attached file at the time it was attached. |
|
|
Lists the description given to an existing attached file at the time it was attached. |
|
|
Used to enter the name of the file to be attached. Displayed in the Attachments section of the Content Information page. |
|
|
Used to enter the description of the file to be attached. Displayed in the Attachments section of the Content Information page. |
|
|
Used to locate the file to be attached. |
|
|
Add/Edit Attachment Button |
Submits the information to Oracle Content Server. |
To add an attachment to a content item:
-
Access the Content Information page.
-
Choose Add/Edit Attachments from the Content Actions menu. The Add/Edit Attachments page opens.
-
Enter a name for the attachment in the Name field (required). The name is displayed in the Attachments section of the Content Information page.
-
Enter a description for the rendition in the Description field (optional). The description is displayed in the Attachments section of the Content Information page.
-
Click Browse to locate the rendition or other file you want to attach to the content item (required). It can be any type of file.
-
Click Add/Edit Attachments. The Content Information page opens, showing the attached file in the Attachments section.
Metadata on the Add/Edit Attachments page is for information only. It does not get indexed for searching.
To delete an attachment from a content item:
-
Access the Content Information page.
-
Choose Add/Edit Attachments from the Content Actions menu. The Add/Edit Attachments page opens.
-
Select the check box next to the attachment you want to delete. You can select multiple attachments to delete.
-
Click Edit Attachments. The Content Information page opens without the attachment.
10.2.12 Digital Asset Manager on a Macintosh Client
Digital Asset Manager renders digital assets when checked in using a Macintosh client provided the filename of the asset has a valid file extension. However, files created on Macintosh operating systems before OS X may have information stored in a file resource fork. Information in a resource fork may include custom fonts used by the file and is not transferred.
Depending on your organization's requirements, removing the resource fork generally does not create a problem. One exception to this is if the asset uses custom fonts and the rendition set includes a PDF rendition.
10.3 FlipFactory Supported Formats
Digital Asset Manager currently supports use of Telestream's FlipFactory for video conversion. Visit the Telestream site or consult the FlipFactory help system for additional documentation on FlipFactory (www.telestream.net).
Formats supported by the video conversion application must also be associated with Oracle Content Server by the system administrator using the Oracle Content Server Configuration Manager. If a supported format does not render, see your system administrator.
FlipFactory supports the following formats:
10.3.1 Streaming Media Formats
| Format | Description |
|---|---|
|
3GP Media Format |
.3gp |
|
Flash Media Format |
.flv |
|
MPEG Layer 3 Elementary Stream Media Format |
MPEG Layer 3 is compliant with the MPEG-3 global standard; it interoperates with MPEG-3 compliant hardware and software from other companies. |
|
MPEG Layer 4 Elementary Stream Media Format |
MPEG Layer 4 is compliant with the MPEG-4 global standard; it interoperates with MPEG-4 compliant hardware and software from other companies. |
|
PacketVideo MPEG4 Format |
PacketVideo MPEG-4 is compliant with the MPEG-4 global standard; it interoperates with MPEG-4 compliant hardware and software from other companies. PacketVideo MPEG-4 is compliant with the following standards: MPEG-4 (ISO/IEC), H.263 baseline (ITU), 3G-324M (3GPP), RTSP/RTP/RTCP (IETF). |
|
QuickTime Media Format |
FlipFactory uses the Basic Sorenson codec by default. If the Sorenson codec is to be used for professional work, Telestream recommends that you replace the Basic Sorenson codec with the Sorenson Professional codec. You can obtain the Professional codec directly from Sorenson at www.sorenson.com. |
|
QuickTime Streaming Format |
FlipFactory uses the Basic Sorenson codec by default. If the Sorenson codec is to be used for professional work, Telestream recommends that you replace the basic codec with the Sorenson Professional codec. You can obtain the Professional codec directly from Sorenson at www.sorenson.com. |
|
VideoClipStream Media Format |
.asf |
|
WAVE Audio Media Format |
.wav |
|
Windows Media Format |
.wmf |
10.3.2 Broadcast Media Formats
| Format | Description |
|---|---|
|
Abekas 6000 Format |
Connection to an Abekas 6000 server is through its network ports: 10/100 Ethernet, Gigabit Ethernet, or Fibre Channel. Contact Accom or Telestream technical support for details. |
|
Grass Valley Group Profile GXF Media Format |
Connection to Grass Valley Group server's real-time system must be made through a 10/100 Ethernet card (XP) or Fibre Channel (PDR and XP). Contact the Grass Valley Group or Telestream technical support for details. Profile Direct Convert Codec Profile Direct Convert video codec converts any MPEG2 video directly into Grass Valley Profile format. This does not require decoding to baseband and then re-encoding to the new format. The media file is deconstructed from one format and reconstructed into the Profile format. Generally, this is done many times faster than real time. The video profile, GOP structure and bit rate are retained. For example, If the input file is standard MPEG2 50Mbps, I-frame only, then the resulting converted file is GVG GXF 50Mpbs I-frame only. |
|
Leitch Media Format |
|
|
MXF Media Format |
.mxf |
|
Omneon Media Format |
.omf |
|
SeaChange Media Format |
|
|
Sony MAV70 Media Format |
|
|
Vortex Media Format |
10.3.3 Professional Media Formats
| Format | Description |
|---|---|
|
AVI Media Format |
|
|
Avid OMF Media Format |
|
|
Avid TransferManager DV Media Format |
|
|
ClipMail MPEG Format |
|
|
DV Stream Media Format |
|
|
DVD Stream Media Format |
|
|
IPV SpectreView Media Format |
|
|
MPEG1 System Stream Media Format |
|
|
MPEG2 Program Stream Media Format |
|
|
MPEG2 Transport Stream Format |
|
|
MPEG4 Media Format |
|
|
MXF Stream Format |
|
|
Pinnacle Liquid Media Format |
|
|
Pinnacle MediaStream Media Format |
|
|
VOD Transport Stream Media Format |
10.4 Included Image Rendition Sets
Digital Asset Manager installs three predefined rendition sets for rendering image assets. By default, these rendition sets are configured for use with Oracle Outside In Technology (ImageExport).
If your system administrator has modified the default image rendition sets or set up Digital Asset Manager to use a different conversion application, then the rendition sets listed here might not be applicable. For more information about the conversion application used and any custom rendition set, check with your system administrator.
The predefined rendition sets follow:
Digital Asset Manager requires the BasicRenditions rendition set. Your system administrator can add or delete other rendition sets, depending on your company's requirements.
10.4.1 BasicRenditions
| Rendition Name | Rendition Description |
|---|---|
|
Web |
A 72 dpi JPEG no bigger than 800x600 pixels (primary Web-viewable image) |
|
Thumbnail |
A 72 dpi PNG exactly 80 pixels high (displayed in the Classic and Thumbnail search results views) |
|
Preview |
A 72 dpi GIF exactly 250 pixels wide (displayed on Rendition Information page) |
10.4.2 ThumbnailOnly
| Rendition Name | Rendition Description |
|---|---|
|
Thumbnail |
A 72 dpi PNG exactly 80 pixels high |
10.4.3 MultipleFormats
| Rendition Name | Rendition Description |
|---|---|
|
Web |
A 72 dpi JPEG no bigger than 800x600 pixels |
|
Thumbnail |
A 72 dpi PNG exactly 80 pixels high |
|
Preview |
A 72 dpi GIF exactly 250 pixels wide |
|
Jpeg2000 |
A 72 dpi JPEG 2000 no bigger than 800x600 wide |
|
Tiff |
A TIFF |
|
Bitmap |
A Bitmap |
10.5 Oracle Outside In Technology Image Formats
Digital Asset Manager can be configured to work with many different conversion applications. By default, Digital Asset Manager provides predefined image asset rendition sets for use with Oracle Outside In Technology. To determine which conversion application your organization uses, check with your system administrator. If it is Oracle Outside In Technology, the following output formats are available to you.
Formats supported by the graphic conversion application must also be associated with Content Server by the system administrator, using the Configuration Manager. If a supported format does not render, see your system administrator.
For more information about Oracle Outside In Technology, see its Documentation Library at:
https://download.oracle.com/docs/cd/E14154_01/index.htm
| Format | Version |
|---|---|
|
Raster Image |
|
|
CALS Raster (GP4) |
Type I |
|
CALS Raster (GP4) |
Type II |
|
Computer Graphics Metafile |
ANSI |
|
Computer Graphics Metafile |
CALS |
|
Computer Graphics Metafile |
NIST |
|
Encapsulated PostScript (EPS) |
TIFF header only |
|
GEM Image (Bitmap) |
|
|
Graphics Interchange Format (GIF) |
|
|
IBM Graphics Data Format (GDF) |
1.0 |
|
IBM Picture Interchange Format |
1.0 |
|
JBIG2 |
Graphic Embeddings in PDF |
|
JFIF (JPEG not in TIFF format) |
|
|
JPEG |
|
|
JPEG 2000 |
JP2 |
|
Kodak Flash Pix |
|
|
Kodak Photo CD |
1.0 |
|
Lotus PIC |
|
|
Lotus Snapshot |
|
|
Macintosh PICT |
BMP only |
|
Macintosh PICT2 |
BMP only |
|
MacPaint |
|
|
Microsoft Windows Bitmap |
|
|
Microsoft Windows Cursor |
|
|
Microsoft Windows Icon |
|
|
OS/2 Bitmap |
|
|
OS/2 Warp Bitmap |
|
|
Paint Shop Pro (Win32 only) |
5.0, 6.0 |
|
PC Paintbrush (PCX) |
|
|
PC Paintbrush DCX (multi-page PCX) |
|
|
Portable Bitmap (PBM) |
|
|
Portable Graymap PGM |
|
|
Portable Network Graphics (PNG) |
|
|
Portable Pixmap (PPM) |
|
|
Progressive JPEG |
|
|
StarOffice Draw |
6.x – 8.0 |
|
Sun Raster |
|
|
TIFF |
Group 5 & 6 |
|
TIFF CCITT |
Group 3 & 4 |
|
TruVision TGA (Targa) |
2.0 |
|
WBMP wireless graphics format |
|
|
Word Perfect Graphics |
1.0 |
|
X-Windows Bitmap |
x10 compatible |
|
x10 compatible |
x10 compatible |
|
X-Windows Pixmap |
x10 compatible |
|
WordPerfect Graphics |
1.0 - 10.0 |
|
Vector Image |
|
|
Adobe Illustrator |
4.0 - 7.0, 9.0 |
|
Adobe Illustrator (XMP only) |
11 – 13 (CS 1 – 3)) |
|
Adobe InDesign (XMP only) |
3.0 – 5.0 (CS 1 - 3) |
|
Adobe InDesign Interchange (XMP only) |
|
|
Adobe Photoshop (XMP only) |
8.0 – 10.0 (CS 1 – 3) |
|
Adobe PDF |
1.0 – 1.7 (Acrobat 1 - 9) |
|
Adobe Photoshop |
4.0 |
|
Ami Draw |
SDW |
|
AutoCAD Drawing |
2.5, 2.6 |
|
AutoCAD Drawing |
9.0 – 14.0 |
|
AutoCAD Drawing |
2000i - 2007 |
|
AutoShade Rendering |
2 |
|
Corel Draw |
2.0 – 9.0 |
|
Corel Draw Clipart |
5.0, 7.0 |
|
Enhanced Metafile (EMF) |
|
|
Escher graphics |
|
|
FrameMaker Graphics (FMV) |
3.0 – 5.0 |
|
Gem File (Vector) |
|
|
Harvard Graphics Chart DOS |
2.0 – 3.0 |
|
Harvard Graphics for Windows |
|
|
HP Graphics Language |
2.0 |
|
IGES Drawing |
5.1 – 5.3 |
|
Micrografx Designer |
through 3.1 |
|
Micrografx Designer |
6.0 |
|
Micrografx Draw |
through 4.0 |
|
Microsoft XPS (Text only) |
|
|
Novell PerfectWorks Draw |
2 |
|
OpenOffice Draw |
1.1 – 3.0 |
|
Visio (Page Preview mode WMF/EMF) |
4.0 |
|
Visio |
5.0 - 2007 |
|
Visio XML VSX (File ID only) |
2007 |
|
Windows Metafile |

