15 Developing Lookup Definitions, UDFs, and Remote Manager
This chapter describes how to use the Design Console to administer Oracle Identity Manager. It contains the following topics:
15.1 Overview
The Design Console Administration folder provides system administrators with tools for managing Oracle Identity Manager administrative features. This folder contains the following forms:
-
Lookup Definition: You use this form to create and manage lookup definitions. A lookup definition represents a lookup field and the values you can access from that lookup field.
-
User Defined Field Definition: You use this form to create and manage user-defined fields. A user-defined field enables you to store additional information for the Design Console forms.
-
Remote Manager: You use this form to display information about the servers that Oracle Identity Manager uses to communicate with third-party programs. These servers are known as remote managers.
-
Password Policies: You use this form to set password restrictions for the users and view the rules and resource objects that are associated with a password policy. See "Managing Password Policies" in the Oracle Fusion Middleware Administrator's Guide for Oracle Identity Manager for detailed information about password policies.
Note:
With this release, the System Configuration Form and the Task Scheduler Form are part of the Administrative and User Console. Refer to the Oracle Identity Manager Administrator's Guide for details.
15.2 Lookup Definition Form
A lookup definition represents one of the following:
-
The name and description of a text field
-
A lookup field and the values that are accessible from that lookup field by double-clicking it
-
A box, and the commands that can be selected from that box
These items, which contain information pertaining to the text field, lookup field, or box, are known as lookup values. Users can access lookup definitions from one of two locations:
-
A form or tab that comes packaged with Oracle Identity Manager
-
A user-created form or tab built by using the Form Designer form
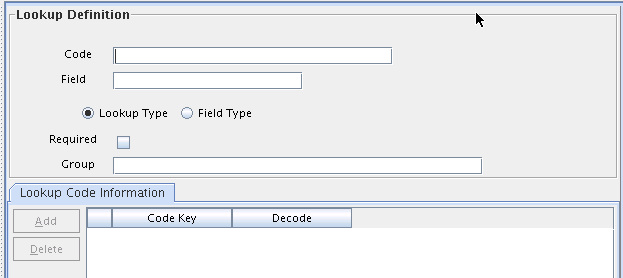
The Lookup Definition form shown in Figure 15-1 is in the Design Console Administration folder. You use this form to create and manage lookup definitions.
Table 15-1 describes the data fields of the Lookup Definition form.
Table 15-1 Fields of the Lookup Definition Form
| Field Name | Description |
|---|---|
|
Code |
The name of the lookup definition. |
|
Field |
The name of the table column of the form or tab from which the text field, lookup field, or box field will be accessible. |
|
Lookup Type/Field Type |
These options designate if the lookup definition is to represent a text field, a lookup field, or a box. If you select the Field Type option, the lookup definition will represent a text field. If you select the Lookup Type option, the lookup definition is to represent either a lookup field or a box, along with the values that are to be accessible from that lookup field or box. Note: For forms or tabs that come packaged with Oracle Identity Manager, the lookup definition has already been set as either a lookup field or a box. This cannot be changed. However, you can add or modify the values that are accessible from the lookup field or box. For forms or tabs that are user defined, the user determines whether the lookup definition represents a lookup field or a box through the Additional Columns tab of the Form Designer form. For more information about specifying the data type of a lookup definition, see "Additional Columns Tab". |
|
Required |
By selecting this check box, the lookup definition is designated as required. As a result, Oracle Identity Manager will not allow the contents of the corresponding form or tab to be saved to the database until the field or box, represented by the lookup definition, is supplied with data. |
|
Group |
The name of the Oracle Identity Manager or user-defined form on which the lookup definition is to be displayed. |
The following sections describe how to create a lookup definition.
15.2.1 Creating a Lookup Definition
To create a lookup definition:
-
Open the Lookup Definition form.
-
In the Code field, enter the name of the lookup definition.
-
In the Field field, enter the name of the table column of the Oracle Identity Manager or user-created form or tab, from which the text field, lookup field, or box field will be accessible.
-
If the lookup definition is to represent a lookup field or box, select the Lookup Type option.
If the lookup definition is to represent a text field, select the Field Type option.
-
Optional. To save the contents of this form or tab only when the field or box represented by the lookup definition is supplied with data, select the Required check box. Otherwise, go to Step 6.
-
In the Group field, enter the name of the Oracle Identity Manager or user-defined form on which the lookup definition is displayed.
You must follow naming conventions for the text you enter into the Code, Field, and Group fields.
See Also:
See "Lookup Definition Form" for more information about naming conventions
-
Click Save.
The lookup definition is created. The associated text field, lookup field, or box will be displayed in the Oracle Identity Manager or user-defined form or tab you specified.
15.2.2 Lookup Code Information Tab
The Lookup Code Information tab is in the lower half of the Lookup Definition form. You use this tab to create and manage detailed information about the selected lookup definition. This information includes the names, descriptions, language codes, and country codes of a value pertaining to the lookup definition. These items are known as lookup values.
The following procedures show how to create, modify, and delete a lookup value.
15.2.2.1 Creating and Modifying a Lookup Value
To create or modify a lookup value:
Note:
For internationalization purpose, you must provide both a language and country code for a lookup value.
When creating a new lookup definition, you must save it before adding lookup values to it.
-
Open the Lookup Definition form.
-
Access a lookup definition.
-
If you are creating a lookup value, click Add.
A blank row is displayed in the Lookup Code Information tab.
If you are modifying a lookup value, select the lookup value that you want to edit.
-
Add or edit the information in the Code Key field.
This field contains the name of the lookup value.
In addition, if the Lookup Type option is selected, this field also represents what is displayed in the lookup field or box once the user makes a selection.
-
Add or edit the information in the Decode field.
This field contains a description of the lookup value.
Note:
The decode value is a humanly readable description of the field. The encode value is the actual code value that is used for provisioning. For example, decode value can be an LDAP group name, and encode value is the LDAP group GUID.
If the Lookup Type option is selected, this field also represents one of the following:
-
The items that is displayed in a lookup window after the user double-clicks the corresponding lookup field
-
The commands that are to be displayed in the associated box
-
-
Click Save.
The lookup value you created or modified now reflects the settings you have entered.
15.2.2.2 Deleting a Lookup Value
To delete a lookup value:
Caution:
Deleting a lookup value might cause problems depending on what the lookup represents. For example, if a lookup value represents an entitlement and it is deleted, then it must be removed from various locations, such as any access policy with that entitlement or any user account having that entitlement granted. Therefore, Oracle recommends that you check all the possible effects before deleting a lookup value.
-
Open the Lookup Definition form.
-
Search for a lookup definition.
-
Select the lookup value that you want to remove.
-
Click Delete. The selected lookup value is deleted.
15.2.3 Configuring Challenge Questions for the User
You can configure challenge questions for the users by using the Lookup Definition Form. These challenge questions are prompted if the user forgets the password and tries to retrieve it. The user must enter the same answers provided while creating a password.
To configure challenge questions for the user:
-
Login to Oracle Identity Manager Design Console.
-
Navigate to Administration, Lookup Definition.
-
Search for the Lookup for challenge questions, that is, lookup Code = Lookup.WebClient.Questions.
-
In the Lookup Code Information tab, add questions by entering the appropriate values in the Code Key and Decode fields.
-
Click Add.
-
Add this key to the custom resource bundle.
15.3 User Defined Field Definition Form
You might want to augment the fields that Oracle Identity Manager provides by default. You can create new fields and add them to various Oracle Identity Manager forms. These fields are known as user-defined fields (UDFs). In other words, Oracle Identity Manager provides the administrator the capability to extend the schema of some Oracle Identity Manager tables. This is provided in the form of UDFs.
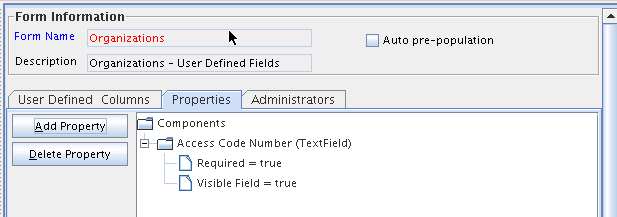
User-defined fields are displayed on the User Defined Fields tab of the form that is displayed in the Form Name data field. For example, Figure 15-2 shows an Access Code Number user-defined field added to the User Defined Fields tab of the Organizations form.
The User Defined Field Definition form is displayed, as shown in Figure 15-2, in the Design Console Administration folder. You use this form to create and manage user-defined fields for the organizations, resource objects, roles, and Form Designer forms.
Table 15-2 describes the data fields of the User Defined Field Definition form.
Table 15-2 Fields of the User Defined Field Definition Form
| Field Name | Description |
|---|---|
|
Form Name |
The name of the form that contains the user-defined fields. These fields are displayed in the User Defined Columns tab. Note: Because the user-defined fields for a user pertain to the user's profile information, they are displayed in the User Profile tab of the Users form. |
|
Description |
Additional information about the user-defined field. |
|
Auto Pre-Population |
This check box designates if user-defined fields for a form that have prepopulated adapters attached to them will be populated by Oracle Identity Manager or a user. Select the Auto Pre-Population check box if these fields are populated by Oracle Identity Manager. Deselect this check box if these fields must be populated by a user by clicking the Pre-Populate button on the toolbar or by manually entering the data. Note: This setting does not control triggering of the pre-populate adapter. It only determines if the contents resulting from the execution of the adapter are displayed in the associated user-defined field or fields because of Oracle Identity Manager or a user. For more information about prepopulate adapters, see Oracle Identity Manager Tools Reference. Note: This check box is relevant only if you have created a user-defined field, and a prepopulate adapter is associated with that field. |
The following section describes how to select a target form for user-defined fields.
15.3.1 Selecting the Target Form for a User-Defined Field
To select the target form for a user-defined field:
-
Open the User Defined Field Definition form.
-
Double-click the Form Name lookup field.
From the Lookup window that is displayed, select the Oracle Identity Manager form (Resource Objects, Organizations, Roles, or Form Designer) that will display the user-defined field you will be creating.
-
Click OK.
The form to which you will be adding the user-defined field is selected.
15.3.2 Tabs on the User Defined Field Definition Form
After you start the User Defined Field Definition form and select a target form for the user-defined fields, the tabs of this form become functional.
The User Defined Field Definition form contains the following tabs:
Each of these tabs is covered in greater detail in the sections that follow.
15.3.2.1 User Defined Columns Tab
You use this tab to do the following:
-
Create a user-defined field.
-
Set the variant type, length, and field type for the user-defined field.
-
Specify the order in which the user-defined field is displayed on the User Defined Fields tab of the target form.
The field's order number determines the order in which a user-defined field is displayed on a form. In Figure 15-2, the Access Code Number user-defined field has an order number of 1, so it is displayed first on the User Defined Fields tab of the Organizations form.
-
Determine if the information that is associated with the user-defined field is encrypted when it is exchanged between the client and the server.
-
Remove a user-defined field.
Figure 15-2 shows the User Defined Columns tab of the User Defined Field Definition Form.
The following sections describe how to add and remove a user-defined field in an Oracle Identity Manager form.
Adding a User-Defined Field to an Oracle Identity Manager Form
To add a user-defined field:
-
Click Add.
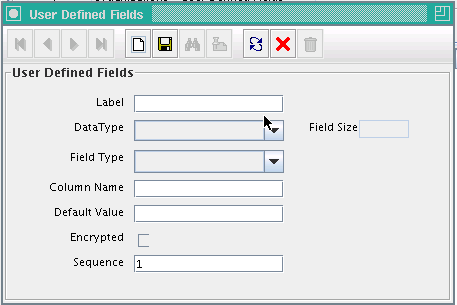
The User Defined Fields dialog box is displayed, as shown in Figure 15-3.
The following table describes the fields in the User Defined Fields dialog box.
Table 15-3 Fields of the User Defined Fields Dialog Box
Field Name Description The label for the user-defined field. This label is displayed next to the user-defined field on the User Defined Fields tab of the target form.
The maximum length for a label is 30 characters.
From this box, select one of the following data types for the user-defined field:
-
String. A user can enter a series of alphanumeric characters in this field.
-
Date. When a user double-clicks this field, the Date and Time dialog box is displayed.
-
Integer. A user can enter a number without a decimal point (for example, 3) in this user-defined field.
-
Boolean. A user can enter two values into this field: True (1) or False (0).
-
Double. A user can enter a double-precision floating-point number (or a double number) in this field.
The Field Size text field is enabled only for the String data type.
In this field, enter the maximum amount of numbers or characters that a user can enter in the field. If the size is 4000 characters or less, then it is a varchar2 field. If the size is more than 4000, then it is CLOB.
From this box, select one of the following field types for the user-defined field:
-
Text Field. The field is displayed on the User Defined Fields tab of the target form as a text field.
-
Lookup Field. The field is displayed on the User Defined Fields tab of the target form as a lookup field.
-
Combo Box. The field is displayed on the User Defined Fields tab of the target form as a box.
-
Text Area. The field is displayed on the User Defined Fields tab of the target form as a text area.
-
Password Field. The field is displayed on the User Defined Fields tab of the target form as a text field. When you query for the entity and get the entity details, the password value, which is encrypted and displayed as a series of asterisks [*], is retrieved.
-
Check Box. The field is displayed on the User Defined Fields tab of the target form as a check box.
-
Date Field with Dialog. This field is displayed on the User Defined Fields tab of the target form as a lookup field. Once the user double-clicks this lookup field, a Date & Time window is displayed. Oracle Identity Manager will populate the data field with the date and time that the user selects from this window.
Note: The field types that are displayed in this box reflect the data type that is displayed in the Data Type box.
The name of the user-defined field that is recognized by the database.
Note: This name consists of a
TABLE NAME_UDF_prefix, followed by the label that is associated with the user-defined field.For example, if the Table Name field of the Organizations form is ACT, and the name for the data field is ACN, the name of the user-defined field, which the database recognizes, would be ACT_UDF_ACN.
Note: The name in Column Name field cannot contain any spaces.
This value is displayed in a user-defined field on the target form. Oracle recommends that you do not specify default values for passwords and encrypted fields.
This check box determines if the information that is displayed in the associated user-defined field is encrypted when it is exchanged between the client and the server.
Select this check box to encrypt the information displayed in the user-defined field.
Deselect this check box to not encrypt the information in the user-defined field.
Note: Here, encrypted means that the field is encrypted in the database, but is displayed as clear text in the UI. A password field means that the field is encrypted in the database, and is displayed as asterisk characters (***) in the UI.
This field represents the order in which the user-defined field is displayed on the form. For example, if a 2 is displayed in the Sequence field, it is displayed below the user-defined field with a sequence number of 1.
Note: The same sequence number cannot be assigned to two user-defined fields.
-
-
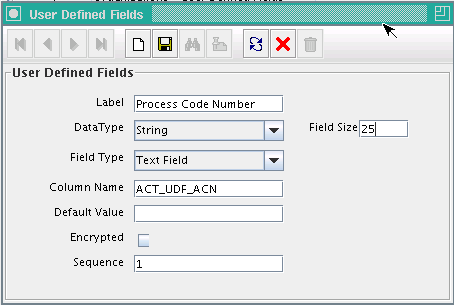
Set the parameters for the user-defined field you are adding to a form, as shown in Figure 15-4.
In Figure 15-4, the Process Code Number user-defined field is displayed first on the User Defined Fields tab of the Organizations form. The data type of this field is String, and a user can enter up to 25 characters into it.
-
From this window, click Save.
-
Click Close.
The user-defined field is displayed in the User Defined Columns tab. Once the target form is started, this user-defined field usually is displayed in the User Defined Fields tab of that form. Because the user-defined fields for a user pertain to the user's profile information, they are displayed in the User Profile tab of the Users form.
Removing a User-Defined Field from an Oracle Identity Manager Form
To remove a user-defined field:
-
Select the desired user-defined field.
-
Click Delete.
The user-defined field is removed.
15.3.2.2 Properties Tab
You use this tab to assign properties and property values to the data fields that are displayed on the User Defined Fields tabs of various Oracle Identity Manager forms.
For this example, the User Defined Fields tab of the Requests form displays one data field: Issue Tracking Item. This data field contains the following properties:
-
Required, which determines whether or not the data field must be populated for the Requests form to be saved. The default property value for the Required property is false.
-
Visible Field, which determines whether or not the data field is displayed on the Requests form. The default property value for the Visible Field property is true.
Because the property values for the Required and Visible Field properties are true for this data field, once the Requests form is started, the Issue Tracking Item data field is displayed in the User Defined Fields tab. In addition, this field must be populated for the form to be saved.
Figure 15-5 shows the Properties tab of the User Defined Field Definition form.
The following section describes how to add and remove a property and property value for a data field.
See Also:
See "Form Designer Form" for more information about how to add a property and property value to a data field, or remove a property and property value from a data field
15.3.2.3 Administrators Tab
Figure 15-6 shows the Administrators tab of the User Defined Field Definition form.
You use this tab to specify the roles that have administrative privileges over the current record of the User Defined Field Definition form. The Write and Delete check boxes on this form designate if these administrative roles can modify or delete information about the current user-defined field (UDF) definition.
15.4 Remote Manager Form
The Remote Manager is a lightweight network server that enables you to integrate with target systems whose APIs cannot communicate over a network, or that have network awareness but are not secure. The Remote Manager works as a server on the target system, and an Oracle Identity Manager server works as its client. The Oracle Identity Manager server sends a request for the Remote Manager to instantiate the target system APIs on the target system itself, and invokes methods on its behalf.
The Remote Manager form shown in Figure 15-7 is in the Design Console Administration folder. It displays the following:
-
The names and IP addresses of the remote managers that communicate with Oracle Identity Manager
-
Whether or not the remote manager is running
-
Whether or not it represents IT resources that Oracle Identity Manager can use
For this example, you can define only one remote manager that can communicate with Oracle Identity Manager: RManager.
Although this remote manager can handshake with Oracle Identity Manager, it is unavailable because the Running check box is deselected. Since the IT Resource check box is selected, this remote manager represents an IT resource or resources that can be used by Oracle Identity Manager.


