5 Using Oracle Site Guard
This chapter describes how to set up Oracle Site Guard for your existing Oracle Fusion Middleware disaster recovery solution to automate operations like switchover and failover on the production site and the standby site.
It contains the following topics:
5.1 Important Notes Before You Begin
Read the following notes before you start configuring Oracle Site Guard for Oracle Fusion Middleware components:
-
Read Section 1.1.2, "Terminology" to understand disaster recovery and Oracle Site Guard terminology used in this chapter.
-
Read Section 2, "Recommendations for Fusion Middleware Components" before you configure Oracle Site Guard for Oracle Fusion Middleware.
-
Ensure that host names are configured, as described in Section 3.1.1, "Planning Host Names".
-
Ensure that virtual IP addresses and virtual host names are configured, as described in Section 3.1.2, "Virtual IP and Virtual Hostname Considerations".
-
Ensure that you have configured Oracle Data Guard to provide disaster recovery for Oracle database, as described in Section 3.3, "Database Considerations".
Note:
You must configure Oracle Data Guard Broker for Oracle Data Guard, as described in Oracle Data Guard Broker.
-
Ensure that you have an existing Oracle Fusion Middleware disaster recovery setup, as described in Chapter 4, "Setting Up and Managing Disaster Recovery Sites".
5.2 Oracle Site Guard Overview
Oracle Site Guard primarily orchestrates switchover and failover between two disaster recovery sites. These sites should be created, as described in this chapter. Oracle Site Guard offers the following features:
-
Ensures high availability, data protection, and disaster recovery for enterprise data.
-
Automates disaster recover operation like switchover and failover. If the primary site becomes unavailable due to a planned or an unplanned outage, Site Guard can automatically switch any standby site to the production role, thus minimizing the downtime associated with the outage.
This section includes the following topics:
5.2.1 Benefits of Oracle Site Guard
Oracle Site Guard, which is available as a feature of the Enterprise Manager Cloud Control12c Release 1 (12.1.0.2), can be configured with Oracle Fusion Middleware components. It provides the following benefits:
Reduction of Errors Due to Prepared Responses
Oracle Site Guard helps in reducing the possibility of human error in case of disasters. The recovery strategies are mapped out, tested, and rehearsed in prepared responses within the application. After starting an Oracle Site Guard operation for disaster recovery, human intervention is not required.
Oracle Site Guard provides an easy mechanism to integrate with any storage appliance. It integrates with storages appliances to perform switchover or failover, by using callouts to any user-specified storage role reversal scripts, in the operation workflow.
Oracle Site Guard automatically handles dependencies between the targets while starting or stopping a site.
End-to-End Disaster Recovery Automation
Oracle Site Guard provides an end-to-end orchestration of the disaster recovery operations by loosely integrating with storage appliances, to perform storage role reversals. It simultaneously integrates with Oracle Data Guard broker to perform database role reversals. Oracle Site Guard then shuts down the primary site before performing disaster recovery operations like switchover or failover and brings up the standby site after the disaster recovery operation is completed.
After Site Guard is configured, it manages all components in an application during an operation such as failover and switchover and ensures that these operations are complete.
5.2.2 Oracle Site Guard Operations
Oracle Site Guard ensures high availability, data protection, and disaster recovery for Oracle Fusion Middleware 11g. It automates the following disaster recovery operations:
-
Stopping a site
-
Starting a site
-
Site Switchover
-
Site Failover
5.2.3 Site Representation in Enterprise Manager Cloud Control
A site is a collection of related targets in a datacenter, for which Oracle Site Guard performs disaster recovery operations like switchover and failover. It is required to run a group of applications simultaneously. For example, a site could consist of Oracle Fusion Middleware instances, databases, and storage devices. Oracle Site Guard uses the Enterprise Manager Cloud Control generic system target to represent a site. Every site, whether primary or standby, is represented as a generic system, which is a collection of other target types, such as Oracle Database and Oracle Fusion Middleware Domain. Oracle Site Guard supports Enterprise Manager deployments where both primary and standby sites are managed by single Enterprise Manager Cloud Control.
Figure 5-1 shows an overview of an Oracle Fusion Middleware Disaster Recovery topology managed by single Enterprise Manager Cloud Control instance.
Figure 5-1 Production and Standby Site for Oracle Fusion Middleware Disaster Recovery Topology Managed by Enterprise Manager Cloud Control
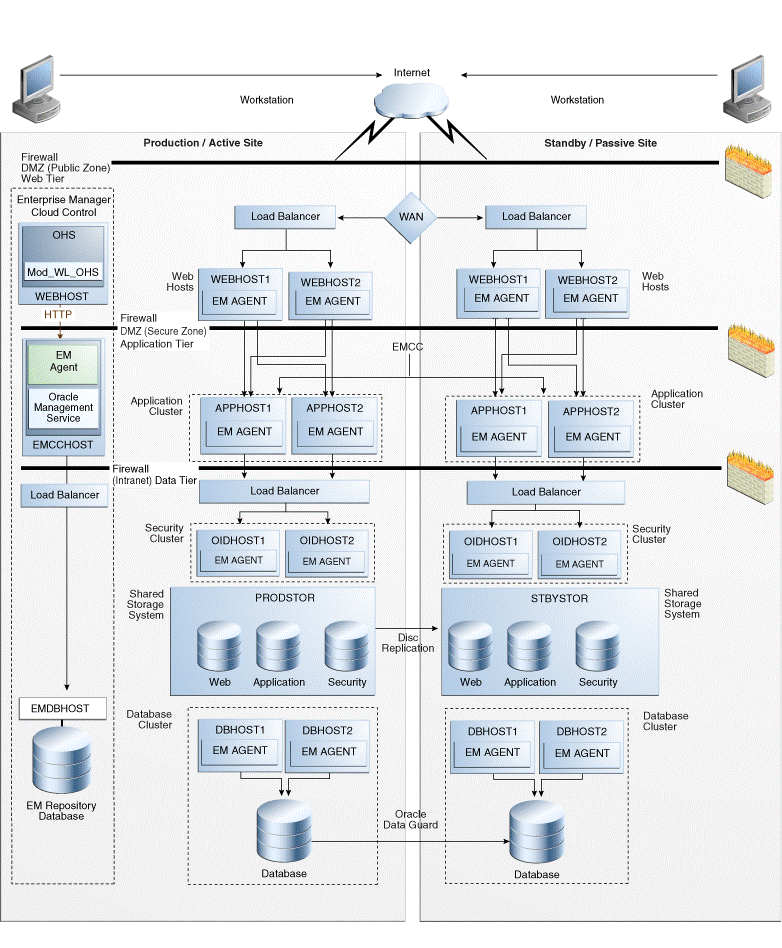
Description of "Figure 5-1 Production and Standby Site for Oracle Fusion Middleware Disaster Recovery Topology Managed by Enterprise Manager Cloud Control"
Some of the key aspects of the topology in Figure 5-1 are:
-
Single Enterprise Manager Cloud Control instance monitors the production site and standby site.
-
Oracle Management Agent (EM Agent) is installed on all hosts in the production site and the standby site. For example:
-
OPMN managed system components (
WEBHOST1andWEBHOST2) -
Oracle Fusion Middleware Applications (
APPHOST1andAPPHOST2) -
Oracle RAC Database (
DBHOST1andDBHOST2)
Oracle Management Agent (EM Agent) is one of the core components of Enterprise Manager Cloud Control that enables you to convert an unmanaged host to a managed host in the Enterprise Manager system. The Management Agent works in conjunction with the plug-ins to manage the targets running on that managed host.
-
-
When there is a failure or planned outage of the production site, Oracle Site Guard automates the following steps to enable the standby site to assume the production role in the topology:
-
Stops the replication from the production site to the standby site (when a failure occurs, replication may have already been stopped due to the failure).
-
Performs a failover or switchover of the Oracle databases using Oracle Data Guard.
-
Mounts the storage on the standby site.
-
Starts the services and applications on the standby site.
-
5.3 Installing Oracle Site Guard
Oracle Site Guard is included with the Enterprise Manager Cloud Control12c Release 1 (12.1.0.2) software. You can manage a Site Guard configuration by using Enterprise Manager command-line interface (EM CLI). You must complete the following:
Note:
For information on Oracle Site Guard licensing, see Oracle Fusion Middleware Licensing Information.
-
Install Enterprise Manager Cloud Control 12c Release 1 (12.1.0.2) for your existing Oracle Fusion Middleware enterprise deployment. For information about installing Enterprise Manager Cloud Control 12 c Release 1 (12.1.0.2), see "Oracle Enterprise Manager Cloud Control Basic Installation Guide.
Notes:
-
Ensure that you install Oracle Management Agent (EM Agent) on each of the hosts managed by Enterprise Manager, as described in the chapter "Installing Oracle Management Agent" in the Oracle Enterprise Manager Cloud Control Basic Installation Guide.
-
After Installing Oracle Management Agent, ensure that you run the
root.shscript from the Enterprise Manager Cloud host and all hosts managed by Enterprise Manager, as described in the section "After You Install" in the Oracle Enterprise Manager Cloud Control Basic Installation Guide.
-
-
Install the Enterprise Manager Command Line Interface (EM CLI), as described in the chapter "Command Line Interface Concepts and Installation" in the Oracle Enterprise Manager Command Line Interface Guide.
Note:
Oracle recommends that you install EM CLI in the same Middleware home where Oracle Management Service is installed. For example,
<OMS_HOME>/bin/emctl.
5.4 Prerequisites
The following are the prerequisites for configuring Oracle Fusion Middleware 11g products for Oracle Site Guard:
5.4.1 Discovering Targets on the Primary Site and the Standby Site
For information about discovering targets on the primary site, see "Adding Targets" in the Oracle Enterprise Manager Cloud Control Administrator's Guide.
Oracle Site Guard supports the following target types that you must discover:
-
Oracle Fusion Middleware farm
-
Oracle Fusion Middleware managed system components, such as Oracle HTTP Server and Oracle Internet Directory part of the Oracle Fusion Middleware farm
-
Real Application Cluster (RAC) databases
-
Single Instance database
Before you discover the targets on the standby site, you must manually perform a switchover operation, so that the standby site takes over the production role, as described in Section 4.5.2, "Performing a Switchover".
After performing a switchover, you can discover the targets for the standby site by completing the steps described in "Adding Targets" in the Oracle Enterprise Manager Cloud Control Administrator's Guide.
Note:
After you discover the targets for the standby site, you must manually perform a switchover operation, so that the primary site takes over the production role, as described in Section 4.5.2, "Performing a Switchover".
5.4.2 Creating Production and Standby Systems
You must create the generic system for the primary site and the standby site. Each generic system must include all targets (Oracle Fusion MiddlewareFarm(s) and Database(s)) pertaining to the site which it is representing.
You can create the system using one of the following options:
5.4.2.1 Creating Generic Systems Using Enterprise Manager Cloud Control Console
To create the primary generic system, complete the following steps:
-
Log in to Enterprise Manager as an
EM_CLOUD_ADMINISTRATORuser. -
Select Targets and then select Systems.
The Systems page is displayed.
-
Select Generic System from the drop-down menu and click Add.
-
In the General section, enter the name for your primary system.
-
In the Member section, click Add.
-
Choose the targets, and click Select. You must associate the following:
-
Oracle Fusion Middleware Farm which includes:
-
Administration Server
-
Managed Servers
-
OPMN managed system components
-
-
If you are using Oracle RAC Database instance then you must associate it with a Cluster Database target. For a single database instance, you must associate it with a Database Instance target.
Note:
The following target types are not supported:
-
Database System
-
Individual RAC instances
-
-
Select the time zone from the drop-down menu.
-
Click Next.
The Define Associations page is displayed.
-
Click Next.
The Availability Criteria page is displayed.
-
From Availability Criteria, select the Any Of The Key Members option.
-
Select AdminServer in the Members pane and double-click.
The AdminServer is removed from the Members pane and added in the Key Members pane.
-
Click Next.
The Charts page is displayed.
-
Click Next.
The Review page is displayed.
-
Review your settings, and click Finish.
-
Use the above steps to create a generic system for the standby site.
5.4.2.2 Creating Generic System Using EMCLI Commands
You can create the generic system by running the following emcli commands (located at <OMS_HOME>/bin/emctl) on the command line:
Note:
For information about setting up a new EMCLI client, see the Enterprise Manager Command Line Interface Download page within the Cloud Control console. To access that page, in Cloud Control, from the Setup menu, select My Preferences, and then click Command Line Interface.
emcli create_system
      -name="name"
      -type=<system>
      -add_members="name1:type1;name2:type2;..."]...
      -timezone_region="actual timezone region"
Note:
To get status and alert information for targets, you can run get_targets command. For more information, see the chapter "Verb Reference" in the Oracle Enterprise Manager Command Line Interface Guide.
| Parameter | Description |
|---|---|
|
|
Enter a name of the system. |
|
|
Enter |
|
- |
Add existing targets to the system. Each target is specified as a name-value pair |
|
- |
Specify the time zone region. |
See "create_system" in the Oracle Enterprise Manager Command Line Interface Guide.
Note:
Use the above steps to create a generic system for the standby site.
5.4.3 Creating Credentials for Oracle Site Guard
You must create the named credentials for the following targets associated with Oracle Site Guard using Enterprise Manager Cloud Control Console:
-
Host (for normal user)
-
Host (users with root privileges)
-
Oracle WebLogic Server
-
Oracle Database
Notes:
-
The credentials created here are later associated with the Site Guard configuration. Site Guard supports specifying the same credentials for all targets of the same target type. For example, all databases in a system can have the same
sysdbacredentials. Site Guard also allows the targets of same kind to have different credentials. -
If the credentials are same across the nodes (primary and standby site), you do not need to create credentials for the targets running on the standby site.
To create the credentials using Enterprise Manager Cloud Control Console, complete the following steps:
-
Log in to Enterprise Manager as an
EM_CLOUD_ADMINISTRATORuser. -
Click Setup > Security > Named Credentials.
The Named Credentials page is displayed.
-
Click Create.
The Create Credential page is displayed.
-
In the General Properties section, specify the following:
-
Credential name: Specify the name for the credential.
-
Authenticating Target Type: Select Host for Host, Oracle WebLogic Server for Oracle WebLogic Server, and Database Instance for Oracle Database, from the drop-down menu.
-
Credential type: Select credentials from the drop-down menu.
-
Host: Host Credentials
-
Host (users with root privileges): Host Credentials
-
Oracle WebLogic Server: Oracle WebLogic Credentials
Specify the Oracle WebLogic Server Administration user credential.
-
Oracle Database: Database Credentials
Specify the Oracle Database SYS user credential.
-
-
Target type: Select targets from the drop-down menu.
-
Host: Host
-
Host (users with root privileges): Host
-
Oracle WebLogic Server: Oracle WebLogic Server
-
Oracle Database: Database Instance
-
-
-
In the Credential Properties section, specify the following:
-
UserName: Enter username.
-
Password: Enter password.
-
Confirm Password: Confirm the password.
-
Run Privilege: Set privileged credentials from the drop-down menu.
-
Host: None
-
Host (users with root privileges): Select Sudo and enter values in the Run As fields.
-
Oracle Database: SYSDBA
-
-
-
Click Test and Save. Enter the host name for which you want to test the credentials.
5.4.4 Configuring the Software Library
Oracle Software Library (Software Library) is a repository that stores scripts required by Oracle Site Guard to execute the operation plan. To configure the storage location for the Software Library, complete the following steps:
-
Log in to Enterprise Manager as an
EM_CLOUD_ADMINISTRATORuser. -
Click Setup > Provisioning and Patching > Software Library.
The Software Library: Administration page is displayed.
-
Select OMS Shared Filesystem from the Storage Type drop-down box.
-
Click Add.
-
Specify a Name and Location that is accessible to all OMSes and click OK.
Note:
As the storage location for the Software Library must be accessible to all OMSes as local directories, in a multi-OMS scenario, you must set up a clustered filesystem using OCFS2 or NFS. For single OMS systems, any local directory is sufficient.
A job is executed to upload all the out-of-box content. This may take 15 to 30 minutes depending on your disk speed.
Note:
For more information, see "Configuring Software Library" in the Oracle Enterprise Manager Cloud Control Administrator's Guide.
5.4.5 Creating Custom Scripts
You can create custom scripts to be executed at the site level (each script can be associated with more then one host in a site) for the disaster recovery operation (stop, start, switchover, or failover) workflow. You can create the following scripts:
-
Pre-Script
-
Post-Script
Create the required scripts and save them to the destination folder on each of the hosts from where the script is executed. After creating the script, you must associate a custom script with Oracle Site Guard, as described in Associating Pre-Scripts and Post-Scripts.
Notes:
-
A custom script should have clearly defined return codes. The script must return
0on success, and non-zero values on failure. -
Ensure that you have the required privilege to run the script.
5.4.6 Creating Storage Scripts
You must create the following storage scripts:
-
Mount Script
-
Unmount Script
-
Switchover script
-
Failover Script
Create the required scripts and save them to the destination folder on each of the hosts from where the script is executed. You must associate a storage script with Oracle Site Guard, as described in Associating Storage Scripts.
Note:
After running the script, verify that the execution return code value is 0. If you get any other value for the return code, then the script fails. Ensure that you implement the script with the proper return code.
5.5 Setting Up Oracle Site Guard
This section describes the setup and configuration of Oracle Site Guard in Enterprise Manager Cloud Control to manage Oracle Fusion Middleware Disaster operations on the primary site and the standby site. You must complete the following steps:
5.5.1 Creating Oracle Site Guard Configuration
Oracle Site Guard associates the primary site and the standby site (created in Section 5.4.2, "Creating Production and Standby Systems") and automates disaster recovery operation like switchover and failover. Before you run Oracle Site Guard, you must configure the primary site and the standby site and associate it with Oracle Site Guard. To add the configuration for the primary and standby sites, you must run the following emcli commands on the command line:
Note:
For information on login to emcli, see chapter "Command Line Interface Concepts and Installation" in the Oracle Enterprise Manager Command Line Interface Guide.
emcli create_siteguard_configuration
      -primary_system_name="system_name"
      -standby_system_name="system_name"
| Parameter | Description |
|---|---|
|
|
Enter the name of your system, which is associated with the primary site. |
|
|
Enter the name of your system, which is associated with the standby site. |
See Appendix B, "Sample Oracle Site Guard Scripts" for an example Site Guard configuration.
To display information about the association between existing primary and standby sites, run the following emcli commands on the command line:
emcli get_siteguard_configuration
         -primary_system_name="system_name"
         -standby_system_name="system_name"
5.5.2 Associating Credentials for Site
You must associate the credentials created in Section 5.4.3, "Creating Credentials for Oracle Site Guard" with the targets in a site.
You must associate the credentials for the following targets:
-
Host, where Oracle Fusion Middleware is installed and configured (for normal user and users with root privileges)
-
Oracle WebLogic Administration Server
-
Oracle Database
Associate the name credentials for the targets by running the credential framework emcli commands on the command line:
emcli create_siteguard_credential_association
        -system_name="name"
        -credential_type="type"
        -credential_name="name"
        -credential_owner="owner"
| Parameter | Description |
|---|---|
|
|
Specify the name of the system, which is associated with the site. |
|
|
Specify the credential type depending on the target:
|
|
|
Specify a name for the credential. |
|
|
Specify the owner of the credential. |
See Appendix B, "Sample Oracle Site Guard Scripts", for an example credentials association configuration.
5.5.3 Associating Pre-Scripts and Post-Scripts
You can create custom scripts for the disaster recovery operation workflow. The custom scripts are created for components that are not managed by Enterprise Manager Cloud Control.
Note:
You can specify the script arguments as name-value pairs with the script. For example, test.pl -param1 value1 -param2 value2.
To associate a custom script with Oracle Site Guard, run the following emcli commands on the command line:
emcli create_siteguard_script
        -system_name= "name"
        -operation="operation_name"
        -script_type="script_type"
        -host_name="name of the host"
        -path="path of the script"
        -all_hosts="true"
| Parameter | Description |
|---|---|
|
|
Specify the system on which you are performing the switchover operation. |
|
|
The function of the operation. Example: |
|
- |
The type of script, depending on the function you want to perform select one of the following options:
|
|
|
Enter the path to the script. |
|
|
The name of the host where the script will be run. Note: Ensure that you specify the host name associated with the system for which you are performing an operation. |
|
|
Specify this optional flag to enable the script to run on all the hosts in the system. This parameter overrides the |
5.5.4 Associating Storage Scripts
You must associate the following storage scripts:
Mount Scripts for Primary and Standby Sites
To associate a mount script, run the following emcli commands on the command line:
emcli create_siteguard_script
        -system_name="system_name"
        -operation="operation_name"
        -script_type="Mount"
        -host_name="name of the host"
        -path="path of the script"
        -all_hosts= "true"
Unmount Script for Primary and Standby Sites
To associate a custom script, run the following emcli commands on the command line:
emcli create_siteguard_script
        -system_name="system_name"
        -operation="operation_name"
        -script_type= "UnMount"
        -host_name="name of the host"
        -path="path of the script"
        -all_hosts="true"
Switchover Script for Primary and Standby Sites
To associate a custom script, run the following emcli commands on the command line:
emcli create_siteguard_script
        -system_name="system_name"
        -operation="operation_name"
        -script_type="Storage-Switchover"
        -host_name="name of the host"
        -path="path of the script"
       -all_hosts="true"
Failover Script for Primary and Standby Sites
To associate a custom script, run the following emcli commands on the command line:
emcli create_siteguard_script
        -system_name="system_name"
        -operation="operation_name"
        -script_type="Storage-Failover"
        -host_name="name of the host"
        -path="path of the script"
        -all_hosts="true"
5.6 Using Operation Plans
An operation plan contains the execution flow for the Site Guard operation. You can use an operation plan to define the order in which steps of an operation are executed. For example, stopping Oracle HTTP Server, stopping the Administration Server in a domain, and so on.
To use an operation plan, you must complete the following steps:
5.6.1 Creating an Operation Plan
You can create an operation plan by running the following emcli commands on the command line:
emcli create_operation_plan
        -primary_system_name="name"
        -standby_system_name="name"
        -system_name="name"
        -operation="name"
        -name="name"
For more information, see Appendix C, "create_operation_plan".
5.6.2 Running Pre Check Utility
Oracle Site Guard automatically runs the pre check utility before performing any operation. You can also run the pre check utility before executing any Site Guard operations. Site Guard performs the following pre checks:
-
Checks whether the Fusion Middleware Farm(s) running on the primary is down before performing a failover operation.
-
Checks the agent status on all hosts involved in the operation.
-
Checks whether all targets involved in the operation plan exist in the Enterprise Manager repository.
-
Asserts the existence of all configured scripts (pre/post/mount/umount/storage role reversal) on their respective target hosts.
-
Runs broker pre checks to ascertain whether database is ready for role reversal (for switchover/failover operation)
-
Performs Database Role Checks
You must run the following emcli commands on the command line:
emcli run_prechecks
       -operation_plan="operation_plan_name"
| Parameter | Description |
|---|---|
|
|
Enter the name of your operation plan. |
You can also monitor the status of a pre check operation using Enterprise Manager Cloud Control.
5.6.3 Submitting an Operation Plan
You must submit an operation plan by running the following emcli commands on the command line:
emcli submit_operation_plan
        -name="operation plan_name"
       [-run_prechecks={true|false}]
| Parameter | Description |
|---|---|
|
|
Enter the name of the operation plan. |
|
|
Specify if you want to run precheck. For more information, see Running Pre Check Utility. |
5.6.4 Monitoring an Operation Plan
To monitor an operation plan, complete the following steps:
-
Log in to Enterprise Manager Cloud Control Console as an
EM_CLOUD_ADMINISTRATORuser. -
Click Enterprise > Provisioning and Patching > Procedure Activity Credentials.
The Provisioning page is displayed.
-
Click the Procedure Activity tab.
Note:
You can also verify the status by running the following emcli command on the command line:
get_instance_status_instance="GUID"
To get the GUID information, run the following command:
emcli get_instances
       -type="SiteGuard"
5.7 Error Management Framework
Oracle Site Guard uses the Enterprise Manager Cloud Control deployment procedures framework to orchestrate disaster operations on remote hosts. The framework provides error management support through error modes (stop and continue), which can be enforced at the top level of a step (for example, Start WLS Managed Server) but not at the individual target level in the step. However, in a disaster recovery scenario, it is very likely that things may go wrong. For example, some hosts might go down, become unreachable, or some servers might not start. To address such failures, Oracle Site Guard provides an option to define the error mode at the target level in a step and also lets you enable or disable steps. By default, the error mode is stop and the run mode is continue. This section includes the following topics:
Note:
For more information, see Chapter 7, "Troubleshooting Oracle Site Guard.".
5.7.1 Error Modes
You can define the following error modes for individual targets in a step for any given operation plan:
5.7.1.1 Stop Error Mode
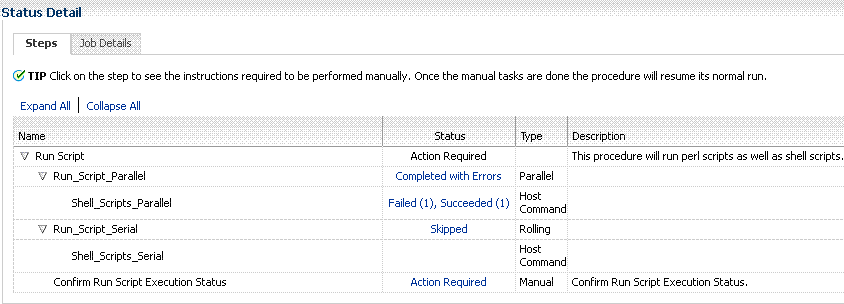
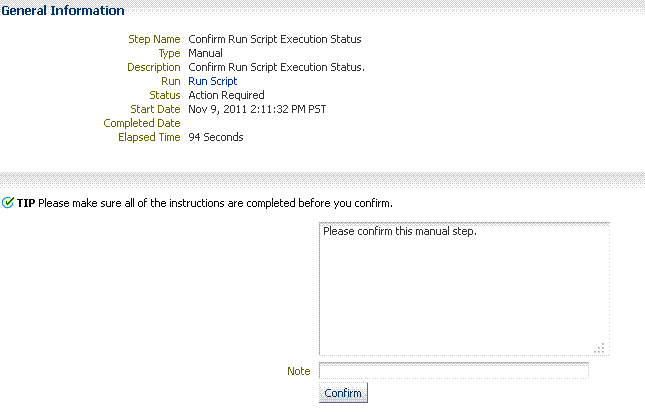
The execution flow stops if the step fails. The status of the step becomes Action Required. You must manually confirm this failure from Enterprise Manager Cloud Control console to restart the execution. The execution flow continues after the confirmation, but the failed step is not retried. The failed step can be retried at the job level from the console but the status of the retry operation is not reflected at the target level status or at the top-level step status. This is the default error mode. See Figure 5-2 and Figure 5-3.
5.7.1.2 Continue Error Mode
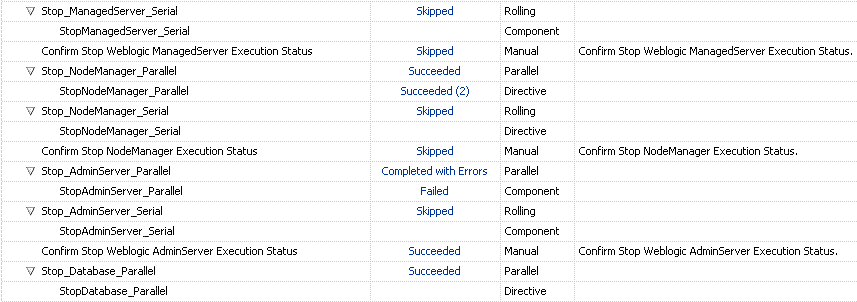
In this error mode, execution flow continues even if the step fails. The status of the step shows Failed, but the operation continues and the top-level step status shows Completed with Errors. Figure 5-4 shows an example of continue error mode.
5.7.2 Updating Error Modes in an Operation Plan
You can update the error modes (error and run) in an operation plan by running the following emcli command on the command line:
emcli update_operation_plan
        -name="plan_name"
        -step_number={step number}
        -target_host={host name}
        -error_mode={error mode}
        -enabled={true|false}
| Parameter | Description |
|---|---|
|
|
The name of the operation plan. |
|
|
Number of the step which should be updated |
|
|
The name of the system. Enter this option for |
|
|
The error mode type. For example, |
|
|
Specify |
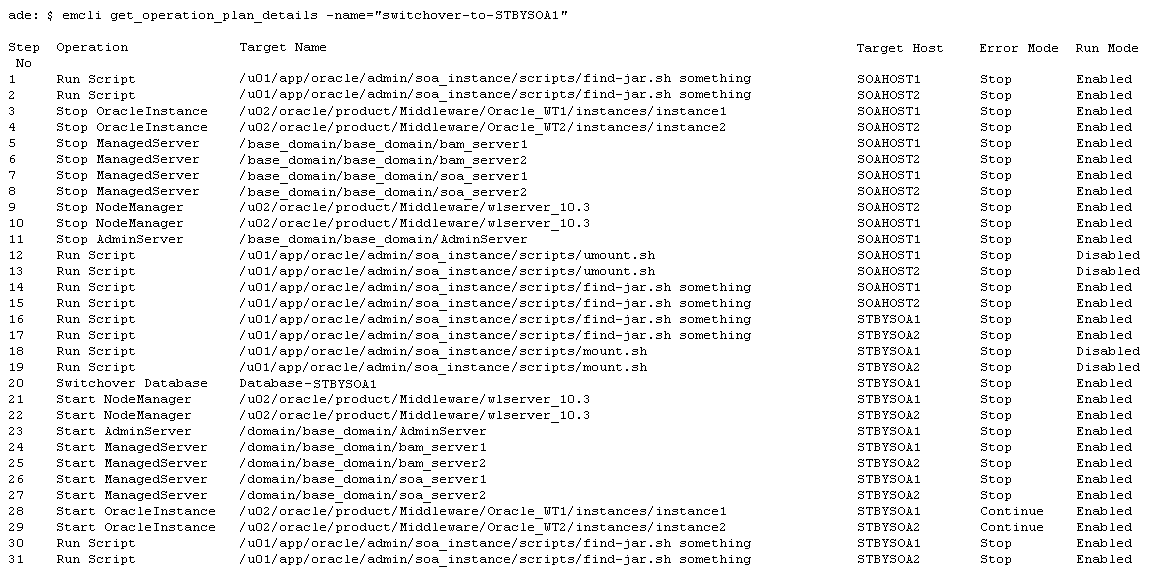
ThFigure 5-5 shows an example of a user defined update operation plan.
5.7.3 Retrying a Failed Operation
To retry a failed operation, complete the following steps:
-
Log in to Enterprise Manager Cloud Control Console as an
EM_CLOUD_ADMINISTRATORuser. -
Click Enterprise > Provisioning and Patching > Procedure Activity Credentials.
The Provisioning page is displayed.
-
Click the Procedure Activity tab.
-
Select the failed operation, and click Action Required.
-
Under Embedded Procedure Step section, click Action Required.
-
Select the failed operation, and click Failed.
-
Under Target section, select the failed operation, and click Failed.
-
Click Retry.
-
Click Enterprise > Provisioning and Patching > Procedure Activity Credentials.
-
Click the Procedure Activity tab.
-
Select the failed operation, and click Action Required.
-
Under Embedded Procedure Step section, click Action Required.
-
Select the failed operation, and click Action Required.
-
Click Confirm.
Note:
You must click Confirm several times, before the button is disabled.
-
Click Done.
5.8 Managing Site Guard Configuration
You can use emcli commands to manage the following Site Guard configuration:
See:
Appendix C, "Oracle Site Guard Command-Line Interface Reference" for the list of emcli commands to manage a site guard configuration directly from the command line.
5.8.1 Adding a Host
To add a host, complete the steps, as described in Appendix C, "add_siteguard_script_hosts". For information on viewing and deleting a host, see Appendix C, "get_siteguard_script_hosts" and Appendix C, "delete_siteguard_script_hosts".
5.8.2 Stopping a Site
To stop a site, run the following emcli command on the command line:
emcli submit_operation_plan
              -name="name"
              -run_prechecks="true"
| Parameter | Description |
|---|---|
|
|
Enter the operation plan name. |
|
|
Enter |
See Appendix B, "Sample Oracle Site Guard Scripts" for an example Site Guard configuration.
5.8.3 Starting a Site
To start a site, run the following emcli command on the command line:
emcli submit_operation_plan
             -name="name"
             -run_prechecks="true"
| Parameter | Description |
|---|---|
|
|
Enter the operation plan name. |
|
|
Enter |
See Appendix B, "Sample Oracle Site Guard Scripts" for an example Site Guard configuration.
5.8.4 Performing Site Switchover
To perform a site switchover, run the following emcli command on the command line:
emcli create_operation_plan
        -name="switchover-site1"
        -run_prechecks="true"
| Parameter | Description |
|---|---|
|
|
Specify the name of the site for which you want to perform a switchover. |
|
|
Enter |
See Appendix B, "Sample Oracle Site Guard Scripts" for an example Site Guard configuration.
5.8.5 Performing Site Failover
To perform a site failover run the following emcli command on the command line:
emcli create_operation_plan
        -name="failover-site1"
        -run_prechecks="true"
| Parameter | Description |
|---|---|
|
|
Specify the name of the site for which you want to perform a failover. |
|
|
Enter |
See Appendix B, "Sample Oracle Site Guard Scripts" for an example Site Guard configuration.
After performing a failover operation, you must manually reinstitate the database. For more information, see "How to Reinstate a Database" in the Oracle Data Guard Broker.
5.9 Example Scenario: Oracle BI Enterprise Edition
This section uses the Oracle Business Intelligence Enterprise Edition (EE) enterprise deployment topology as an examples to illustrate the steps required to set up Oracle Site Guard to manage disaster recovery on the production site and standby site. You must complete the following tasks:
-
Task 1: Setting Up Oracle Business Intelligence Enterprise Deployment
-
Task 2: Discovering Targets for the Primary Site and the Standby Site
-
Task 3: Creating Production and Standby Systems for Oracle Business Intelligence
5.9.1 Task 1: Setting Up Oracle Business Intelligence Enterprise Deployment
Set up your Oracle Business Intelligence enterprise deployment, as described in Oracle Fusion Middleware Enterprise Deployment Guide for Oracle Business Intelligence.
Ensure that the following requirements are met:
-
Ensure that host names are configured, as described in Host Names for the Oracle Business Intelligence Production Site and Standby Site Hosts.
-
Ensure that virtual IP addresses and virtual host names are configured, as described in Virtual IP Addresses and Virtual Host Names for the Oracle Business Intelligence Production Site and Standby Site Hosts.
-
Read Section 4.1.1.6, "Directory Structure Recommendations for Oracle Business Intelligence".
-
Ensure that the Oracle Business Intelligence production site is configured, as described in Section 4.2.5, "Creating the Production Site for the Oracle Business Intelligence Topology".
-
Ensure that the Oracle Business Intelligence standby site is configured, as described in Section 4.3.1, "Creating the Standby Site".
5.9.2 Task 2: Discovering Targets for the Primary Site and the Standby Site
You must discover the targets for the Oracle BI Enterprise Edition Primary Site and the Standby Site on the Enterprise Manager Cloud Control 12c Release 1 (12.1.0.2). For more information, see Discovering Targets on the Primary Site and the Standby Site.
The following targets are available:
-
Administration Server
-
Managed Servers (
bi_server1andbi_server2) -
OPMN managed system components (
WEBHOST1andWEBHOST2) -
Oracle RAC Database instances (
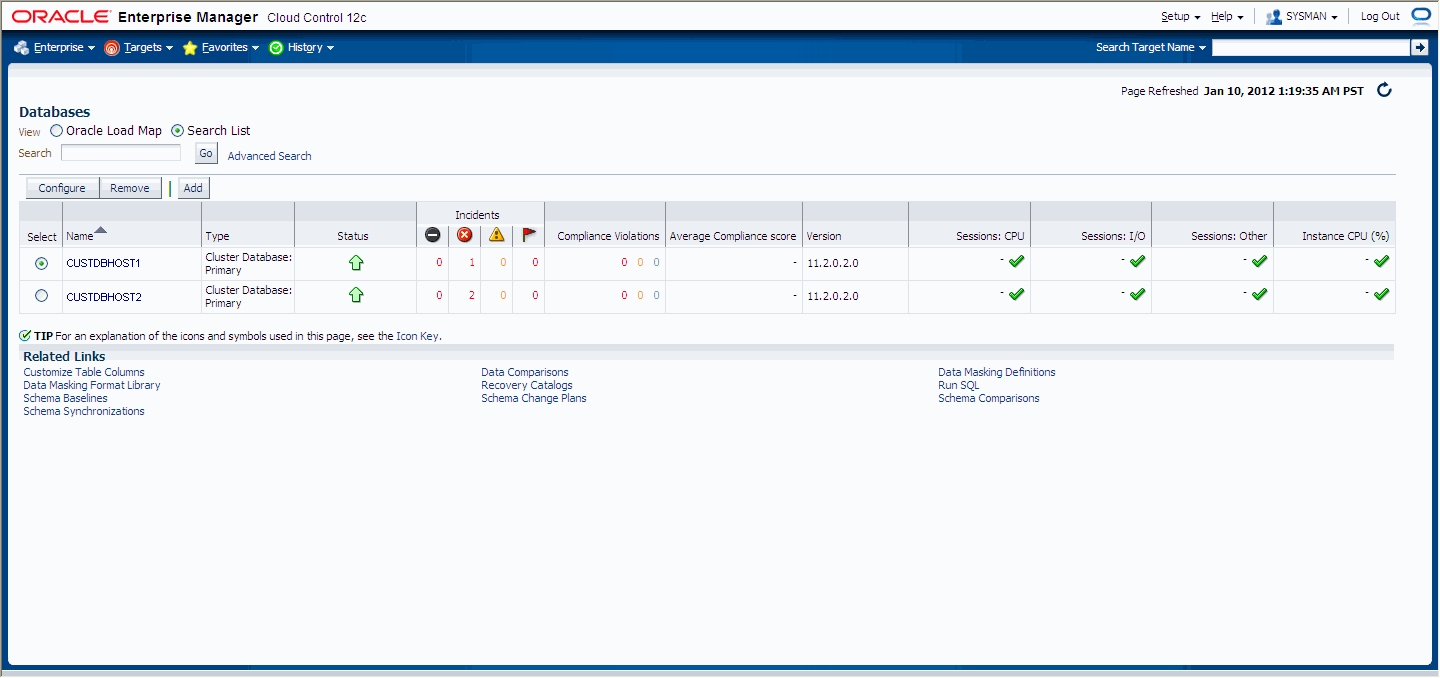
CUSTDBHOST1andCUSTDBHOST2)
Note:
Oracle Business Intelligence OPMN managed system components are not discovered in Enterprise Manager Cloud Control. To manage Oracle Business Intelligence OPMN managed system components, create custom scripts, as described in Creating Start and Stop Scripts.
Figure 5-6 and Figure 5-7 show the available Oracle Fusion Middleware Farm and RAC Database target.
Figure 5-6 Oracle Fusion Middleware Targets
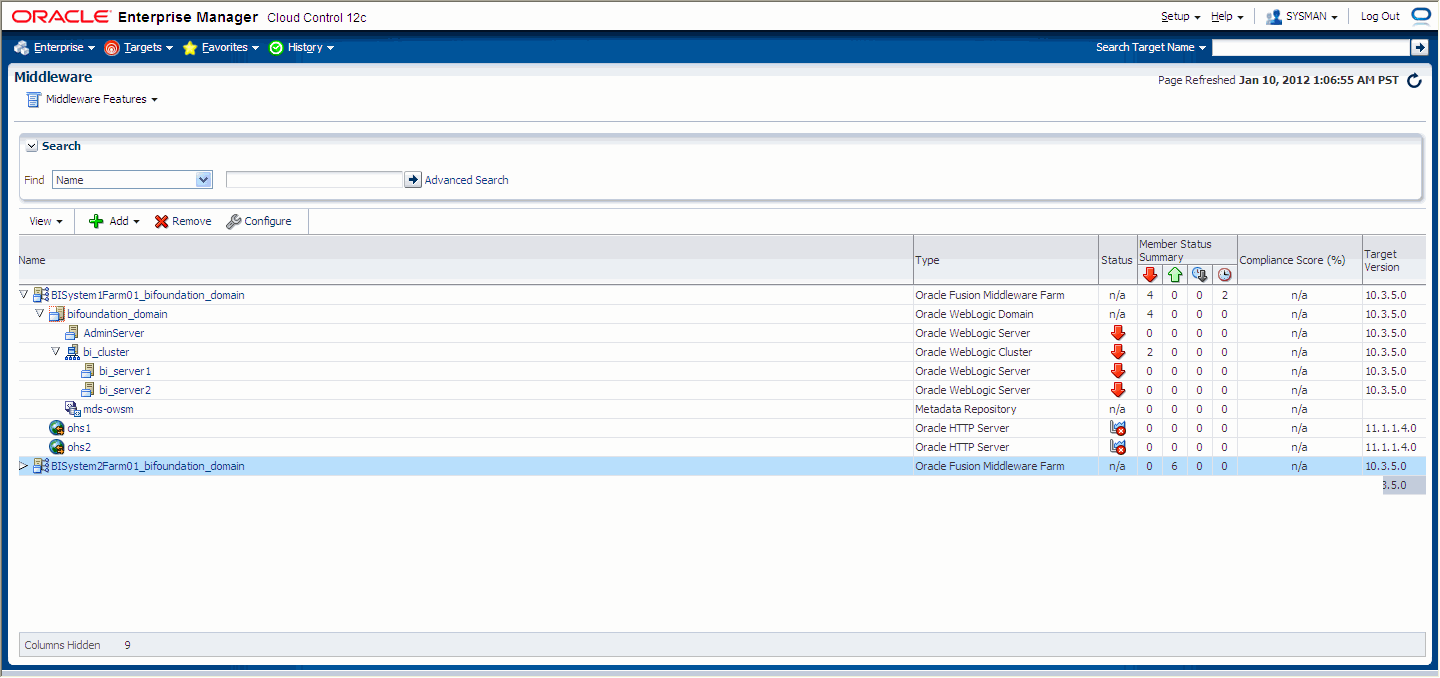
Description of "Figure 5-6 Oracle Fusion Middleware Targets"
5.9.3 Task 3: Creating Production and Standby Systems for Oracle Business Intelligence
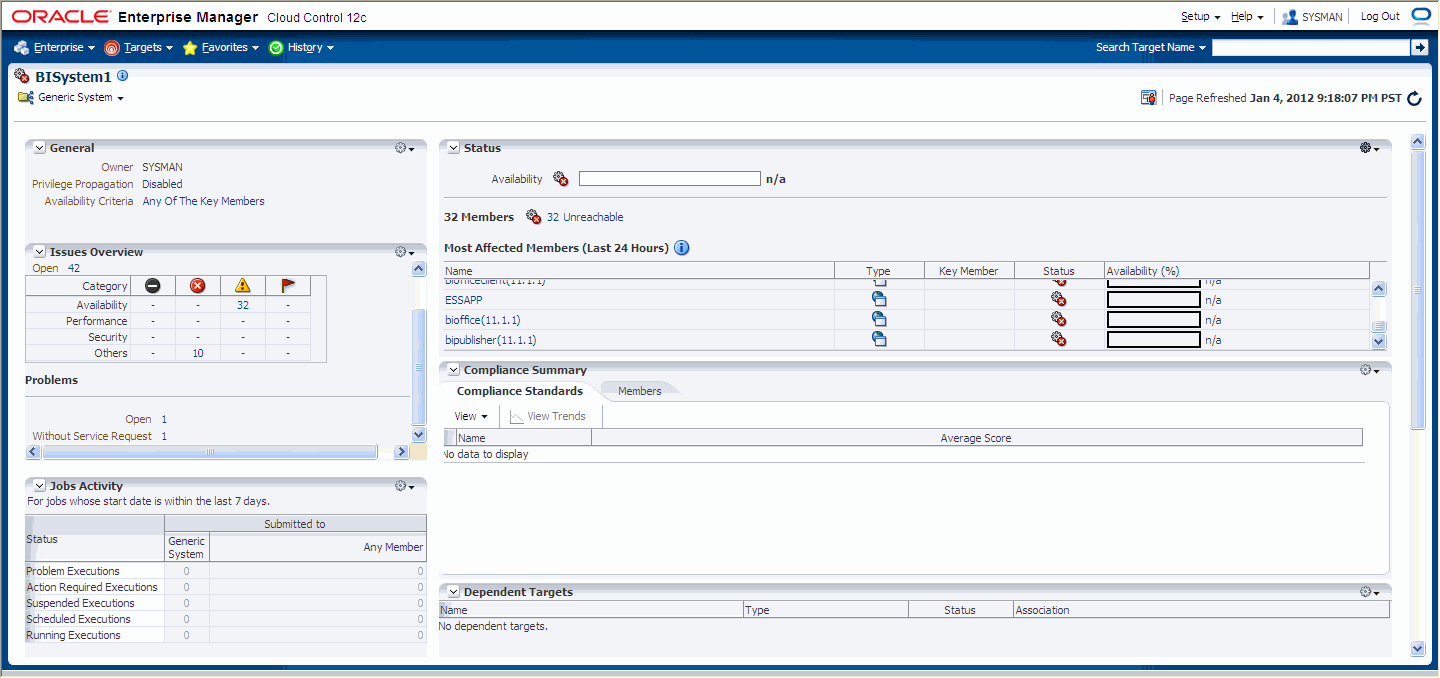
Complete the procedure described in Creating Production and Standby Systems. Enter BISystem1 and BISystem2 as the name for the production and standby systems respectively.
Figure 5-8 shows the BISystem1 system.
Figure 5-8 Generic System for the Production and Standby Site
Description of "Figure 5-8 Generic System for the Production and Standby Site"
5.9.4 Task 4: Creating Credentials
For more information, see Creating Credentials for Oracle Site Guard.
5.9.5 Task 5: Creating Oracle Site Guard Configuration
To add the configuration for the primary and standby sites, you must run the following emcli commands on the command line:
emcli create_siteguard_configuration
      -primary_system_name="BISystem1"
      -standby_system_name="BISystem2"
See Appendix C, "create_siteguard_configuration" for more information.
To display information about the association between existing primary and standby sites, run the following emcli commands on the command line:
emcli get_siteguard_configuration
        -primary_system_name="BISystem1"
        -standby_system_name="BISystem2"
5.9.6 Task 6: Associating Credentials for Site
You must associate the named credentials for the following targets:
-
Host (for normal user and users with root privileges)
-
Host (users with root privileges)
-
Oracle WebLogic Server
-
Oracle Database
Create the name credentials by running the credential framework emcli commands for the following:
Creating Credentials for Host Targets
You must specify credentials for the host where Oracle Business Intelligence Enterprise Edition (EE) is installed and configured. Run the following emcli commands on the command line:
BISystem1 for Host (Normal User)
emcli create_siteguard_credential_association
        -system_name="BISystem1"
        -credential_type="HostNormal"
        -credential_name="NC_HOSTNORMAL"
        -credential_owner="sysman"
BISystem1 for Host (Users with Root Privileges)
emcli create_siteguard_credential_association
        -system_name="BISystem1"
        -credential_type="HostPrivileged"
        -credential_name="NC_HOSTSUDO"
        -credential_owner="sysman"
BISystem2 for Host (Normal User)
emcli create_siteguard_credential_association
        -system_name="BISystem1"
        -credential_type="HostNormal"
        -credential_name="NC_HOSTNORMAL"
        -credential_owner="sysman"
BISystem2 for Host (Users with root Privileges)
emcli create_siteguard_credential_association
        -system_name="BISystem1"
        -credential_type="HostPrivileged"
        -credential_name="NC_HOSTSUDO"
        -credential_owner="sysman"
See Appendix C, "create_siteguard_credential_association" for more information.
Creating Credentials for Oracle WebLogic Server Targets
You must specify the credentials for Oracle WebLogic Server by running the following emcli commands on the command line:
BISystem1
emcli create_siteguard_credential_association
        -system_name="BISystem1"
        -credential_type="WLSAdmin"
        -credential_name="NC_WLSADMIN"
        -credential_owner="sysman"
BISystem2
emcli create_siteguard_credential_association
        -system_name="BISystem2"
        -credential_type="WLSAdmin"
        -credential_name="NC_WLSADMIN"
        -credential_owner="sysman"
See Appendix C, "create_siteguard_credential_association" for more information.
Creating Credentials for Oracle Database Targets
You must specify credentials for the Oracle Database by running the following emcli commands on the command line:
BISystem1
emcli create_siteguard_credential_association
        -system_name="BISystem1"
        -credential_type="DatabaseSysdba"
        -credential_name="NC_BIDBINSTANCES"
        -credential_owner="sysman"
BISystem2
emcli create_siteguard_credential_association
        -system_name="BISystem2"
        -credential_type="DatabaseSysdba"
        -credential_name="NC_BIDBINSTANCES"
        -credential_owner="sysman"
See Appendix C, "create_siteguard_credential_association" for more information.
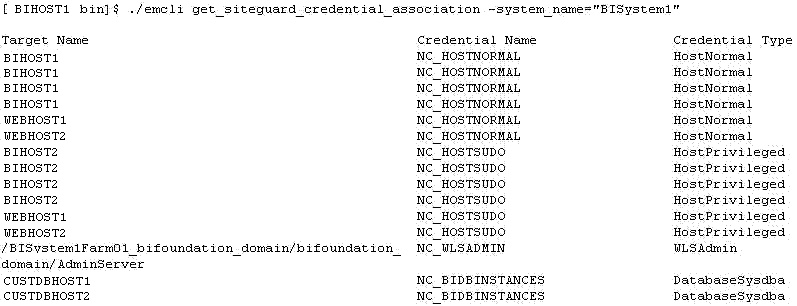
You can validate that the credentials are associated with the system by running the following emcli commands on the command line:
emcli get_siteguard_credential_association
        -system_name="System_Name"
Figure 5-9 shows the credentials associated with BISystem1.
Figure 5-9 Credentials Associated with BISystem1
Description of "Figure 5-9 Credentials Associated with BISystem1"
5.9.7 Task 7: Creating Pre-Scripts and Post-Scripts
Oracle Site Guard provides options to include user- specified scripts in the disaster recovery operation workflow. You must create the following Pre-Scripts and Post-Scripts:
Note:
After you create the required script, you must save them to the destination folder on each of the hosts from where the script is executed. For example, /u01/app/oracle/admin/bi_instance/sgscripts.
For more information, see Associating Pre-Scripts and Post-Scripts.
5.9.7.1 Creating Start and Stop Scripts
You must create Start and Stop scripts for the Oracle Business Intelligence OPMN managed system components. To manage these system components, create the following Start and Stop scripts:
Post-Script for Start Operation on BISystem1
Create a post-script for the start operation by running the following emcli commands on the command line:
emcli create_siteguard_script
        -system_name= "BISystem1"
        -operation="Start"
        -script_type="Post-Script"
        -path="/u01/app/oracle/admin/bi_instance/sgscripts/startbisystemcomponents.sh"
        -host_name="BIHOST1"
        -host_name="BIHOST2"
        -role="Primary"
See Appendix C, "create_siteguard_script" for more information.
Pre-Script for Stop Operation on BISystem1
Create a pre- script for the stop operation by running the following emcli commands on the command line:
emcli create_siteguard_script
        -system_name= "BISystem1"
        -operation="Stop"
        -script_type="Pre-Script"
        -path="/u01/app/oracle/admin/bi_instance/sgscripts/stopbisystemcomponents.sh"
        -host_name="BIHOST1"
        -host_name="BIHOST2"
        -role="Primary"
See Appendix C, "create_siteguard_script" for more information.
Post-Script for Start Operation on BISystem2
Create a post-script for the start operation by running the following emcli commands on the command line:
emcli create_siteguard_script
        -system_name= "BISystem2"
        -operation="Start"
        -script_type="Post-Script"
        -path="/u01/app/oracle/admin/bi_instance/sgscripts/startbisystemcomponents.sh"
        -host_name="STBYBI1"
        -host_name="STBYBI2"
        -role="Primary"
See Appendix C, "create_siteguard_script" for more information.
Pre-Script for Stop Operation on BISystem2
Create a post-script for the stop operation by running the following emcli commands on the command line:
emcli create_siteguard_script
        -system_name= "BISystem2"
        -operation="Stop"
        -script_type="Pre-Script"
        -path="/u01/app/oracle/admin/bi_instance/sgscripts/stopbisystemcomponents.sh"
        -host_name="STBYBI1"
        -host_name="STBYBI2"
        -role="Primary"
See Appendix C, "create_siteguard_script" for more information.
5.9.7.2 Creating Switchover and Failover Scripts
You must create the following scripts:
Pre-Script for Switchover Operation on BISystem1
Create a pre-script for the Switchover operation by running the following emcli commands on the command line:
emcli create_siteguard_script
        -system_name= "BISystem1"
        -operation="Switchover"
        -script_type="Pre-Script"
        -path="/u01/app/oracle/admin/bi_instance/sgscripts/stopbisystemcomponents.sh"
        -host_name="BIHOST1"
        -host_name="BIHOST2"
        -role="Primary"
See Appendix C, "create_siteguard_script" for more information.
Post-Script for Switchover Operation on BISystem1
Create a post-script for the switchover operation by running the following emcli commands on the command line:
emcli create_siteguard_script
        -system_name= "BISystem1"
        -operation="Switchover"
        -script_type="Post-Script"
        -path="/u01/app/oracle/admin/bi_instance/sgscripts/startbisystemcomponents.sh"
        -host_name="BIHOST1"
        -host_name="BIHOST2"
        -role="Standby"
See Appendix C, "create_siteguard_script" for more information.
Post-Script for Failover Operation on BISystem1
Create a post-script for the failover operation by running the following emcli commands on the command line:
emcli create_siteguard_script
        -system_name= "BISystem1"
        -operation="failover"
        -script_type="Post-Script"
        -path="/u01/app/oracle/admin/bi_instance/sgscripts/startbisystemcomponents.sh"
        -host_name="BIHOST1"
        -host_name="BIHOST2"
        -role="Standby"
See Appendix C, "create_siteguard_script" for more information.
Pre-Script for Switchover Operation on BISystem2
Create a pre-script for the Switchover operation by running the following emcli commands on the command line:
emcli create_siteguard_script
        -system_name= "BISystem2"
        -operation="Switchover"
        -script_type="Pre-Script"
        -path="/u01/app/oracle/admin/bi_instance/sgscripts/stopbisystemcomponents.sh"
        -host_name="STBYBI1"
        -host_name="STBYBI2"
        -role="Primary"
See Appendix C, "create_siteguard_script" for more information.
Post-Script for Switchover Operation on BISystem2
Create a post-script for the switchover operation by running the following emcli commands on the command line:
emcli create_siteguard_script
        -system_name= "BISystem2"
        -operation="Switchover"
        -script_type="Post-Script"
        -path="/u01/app/oracle/admin/bi_instance/sgscripts/startbisystemcomponents.sh"
        -host_name="STBYBI1"
        -host_name="STBYBI2"
        -role="Standby"
See Appendix C, "create_siteguard_script" for more information.
Post-Script for Failover Operation on BISystem2
Create a post-script for the failover operation by running the following emcli commands on the command line:
emcli create_siteguard_script
        -system_name= "BISystem2"
        -operation="failover"
        -script_type="Post-Script"
        -path="/u01/app/oracle/admin/bi_instance/sgscripts/startbisystemcomponents.sh"
        -host_name="STBYBI1"
        -host_name="STBYBI2"
        -role="Standby"
See Appendix C, "create_siteguard_script" for more information.
5.9.8 Task 8: Associating Storage Scripts
You must create storage scripts, as described in Creating Custom Scripts and then complete the following:
Storage Switchover Script for BISystem1
Associate a storage switchover script for the failover operation by running the following emcli commands on the command line:
emcli create_siteguard_script
        -system_name= "BISystem1"
        -operation="Switchover"
        -script_type="Storage-Switchover"
        -path="/u01/app/oracle/admin/bi_instance/sgstoragescripts/switchovertobisystem1.sh"
        -host_name="BIHOST1"
See Appendix C, "create_siteguard_script" for more information.
Storage Switchover Script for BISystem2
Associate a storage switchover script for the failover operation by running the following emcli commands on the command line:
emcli create_siteguard_script
        -system_name= "BISystem2"
        -operation="Switchover"
        -script_type="Storage-Switchover"
        -path="/u01/app/oracle/admin/bi_instance/sgstoragescripts/switchovertobisystem2.sh"
        -host_name="STBYBI1"
See Appendix C, "create_siteguard_script" for more information.
Storage Failover Script for BISystem1
Associate a storage switchover script for the failover operation by running the following emcli commands on the command line:
emcli create_siteguard_script
        -system_name= "BISystem1"
        -operation="Failover"
        -script_type="Storage-Failover
        -path="/u01/app/oracle/admin/bi_instance/sgstoragescripts/failovertobisystem1.sh"
        -host_name="BIHOST1"
See Appendix C, "create_siteguard_script" for more information.
Storage Failover Script for BISystem2
Associate a storage switchover script for the failover operation by running the following emcli commands on the command line:
emcli create_siteguard_script
        -system_name= "BISystem2"
        -operation="Failover"
        -script_type="Storage-Failover"
        -path="/u01/app/oracle/admin/bi_instance/sgstoragescripts/failovertobisystem2.sh"
        -host_name="STBYBI1"
See Appendix C, "create_siteguard_script" for more information.
5.9.9 Task 9: Creating Operation Plans
You must create the following operation plans:
For more information, see Using Operation Plans.
Operation Plan for Start Operation on BISystem1
Create a start operation plan by running the following emcli commands on the command line:
emcli create_operation_plan
        _system_name="BISystem1"
        -operation="Start"
        -name="start-bisystem1"
        -role="Primary"
See Appendix C, "create_operation_plan" for more information.
Operation Plan for Stop Operation on BISystem1
Create a stop operation plan by running the following emcli commands on the command line:
emcli create_operation_plan
        -system_name="BISystem1"
        -operation="Stop"
        -name="stop-bisystem1"
        -role="Primary"
See Appendix C, "create_operation_plan" for more information.
Operation Plan for Start Operation on BISystem2
Create a start operation plan by running the following emcli commands on the command line:
emcli create_operation_plan
        -system_name="BISystem2"
        -operation="Start"
        -name="start-bisystem2"
        -role="Primary"
See Appendix C, "create_operation_plan" for more information.
Operation Plan for Stop Operation on BISystem2
Create a stop operation plan by running the following emcli commands on the command line:
emcli create_operation_plan
        -system_name="BISystem2"
        -operation="Stop"
        -name="stop-bisystem2"
        -role="Primary"
See Appendix C, "create_operation_plan" for more information.
Operation Plan for Switchover Operation on BISystem2
Create a switchover operation plan by running the following emcli commands on the command line:
emcli create_operation_plan
        -primary_system_name="BISystem1"
        -standby_system_name="BISystem2"
        -operation="Switchover""
        -name="switchover-to-bisystem2"
See Appendix C, "create_operation_plan" for more information.
Operation Plan for Switchover Operation on BISystem1
Create a switchover operation plan by running the following emcli commands on the command line:
emcli create_operation_plan
        -primary_system_name="BISystem2"
        -standby_system_name="BISystem1"
        -operation="Switchover""
        -name="switchover-to-bisystem1"
See Appendix C, "create_operation_plan" for more information.
Operation Plan for Failover Operation on BISystem2
Create a failover operation plan by running the following emcli commands on the command line:
emcli create_operation_plan
        -primary_system_name="BISystem1"
        -standby_system_name="BISystem2"
        -operation="Failover"
        -name="Failover-to-bisystem2"
See Appendix C, "create_operation_plan" for more information.
Operation Plan for Failover Operation on BISystem1
Create a failover operation plan by running the following emcli commands on the command line:
emcli create_operation_plan
        -primary_system_name="BISystem2"
        -standby_system_name="BISystem1"
        -operation="Failover"
        -name="Failover-to-bisystem1"
See Appendix C, "create_operation_plan" for more information.
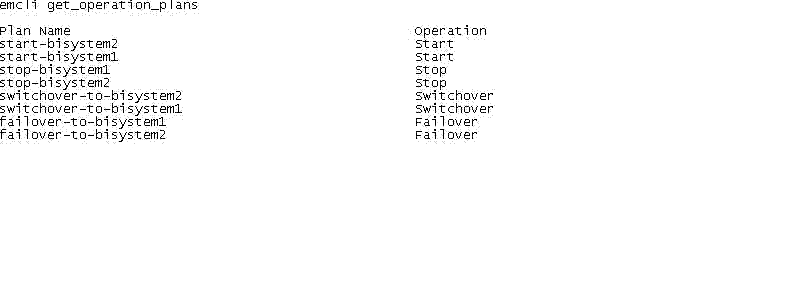
To list all operation plans, run the following emcli commands on the command line:
emcli get_operation_plan
        -name={plan name}
Figure 5-10 shows an example of all operation plans for BISystem1 and BISystem2.
Figure 5-10 Operation Plans for BISystem1 and BISystem2
Description of "Figure 5-10 Operation Plans for BISystem1 and BISystem2"
To obtain information about an operation plan, run the following emcli commands on the command line:
emcli get_operation_plan_details
        -name={plan name}
See Appendix C, "get_operation_plan_details" for more information.
5.9.10 Task 10: Starting BISystem1
Start BISystem1 by submitting the start-bisystem1 operation using emcli commands on the command line:
emcli submit_operation_plan
              -name="start-bisystem1"
See Appendix C, "submit_operation_plan" for more information.
Figure 5-11 shows the start-bisystem1 operation status.
You can also monitor the status from the Enterprise Manager Cloud Control console by completing the following steps:
-
Log in to Enterprise Manager Cloud Control Console as an
EM_CLOUD_ADMINISTRATORuser. -
Click Enterprise > Provisioning and Patching > Procedure Activity.
The Provisioning page is displayed.
-
Click the Procedure Activity tab.
5.9.11 Task 11: Stopping BISystem1
Stop BISystem1 by submitting the stop-bisystem1 operation using emcli commands on the command line:
emcli submit_operation_plan
              -name="stop-bisystem1"
See Appendix C, "submit_operation_plan" for more information.
Figure 5-12 shows the stop-bisystem1 operation status.
5.9.12 Task 12: Running the Oracle Site Guard Pre-Check Utility
Oracle Site Guard runs the pre-check utility after you submit the operation plan.
To run the pre-check utility for an operation plan, run the following emcli commands on the command line:
emcli run_prechecks
       -operation_plan="name"
See Appendix C, "run_prechecks" for more information.
Figure 5-13 shows an example of a pre-check utility emcli command on the command line.
5.9.13 Task 13: Performing Site Switchover
You must complete the following:
To perform a site switchover to BISystem1, run the following emcli commands on the command line:
emcli submit_operation_plan
        -name="switchover-to-bisystem1"
        -run_prechecks="true"
See Appendix C, "submit_operation_plan" for more information.
Figure 5-14 shows the switchover operation status.
Figure 5-14 Switchover Status for BISystem1

Description of "Figure 5-14 Switchover Status for BISystem1"
To perform a site switchover to BISystem2, run the following emcli commands on the command line:
emcli submit_operation_plan
        -name="switchover-to-bisystem2"
        -run_prechecks="true"
See Appendix C, "submit_operation_plan" for more information.
Figure 5-15 shows the switchover operation status.
Figure 5-15 Switchover Status for BISystem2

Description of "Figure 5-15 Switchover Status for BISystem2"
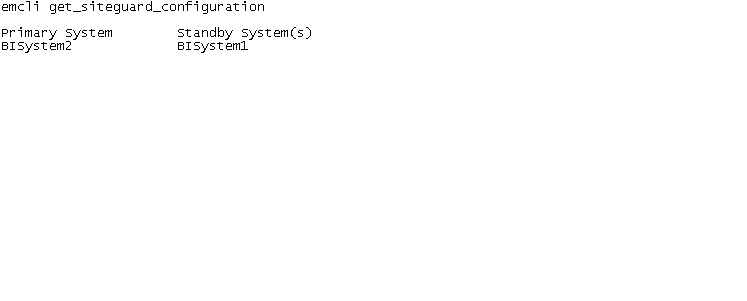
After you perform switchover the associations in the Site Guard configuration will be updated, as shown in Figure 5-16.
5.9.14 Task 14: Performing Site Failover
You must complete the following:
To perform a site failover to BISystem1, run the following emcli commands on the command line:
emcli submit_operation_plan
        -name="failover-to-bisystem1"
        -run_prechecks="true"
See Appendix C, "submit_operation_plan" for more information.
Figure 5-17 shows the failover operation status.
Figure 5-17 Failover Status for BISystem1

Description of "Figure 5-17 Failover Status for BISystem1"
To perform a site failover to BISystem2, run the following emcli commands on the command line:
emcli submit_operation_plan
        -name="failover-to-bisystem2"
        -run_prechecks="true"
See Appendix C, "submit_operation_plan" for more information.
Figure 5-18 shows the failover operation status.
Figure 5-18 Failover Status for BISystem2

Description of "Figure 5-18 Failover Status for BISystem2"
