A Imaging Solution Screens
This appendix describes the Imaging Solution user interface screens, including screens for selecting and editing tasks, and for selecting items, users, and groups.
The Imaging Solution includes the follow screens:
Note:
To close the screen's tab, press Ctrl + Alt + F4.A.1 Task List Screen
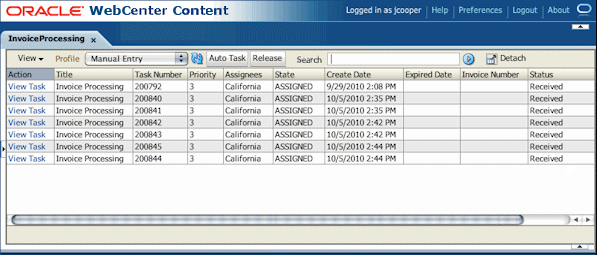
Use this screen to view and select from a list of tasks available to you, based on a selected profile. You can also select related links (if present), and activate auto task mode for automatically selecting tasks.

To display this screen, start the Imaging Solution in your business application by clicking the button or link or selecting the menu command that activates the solution. For example, if using an Invoice Processing solution, you might click a Process Invoices button.
Note:
To sort the task list, hover your cursor over a column heading, and click one of the sort options that displays (a triangle for sorting in ascending order or an inverted triangle for sorting in descending order).| Element | Description |
|---|---|
| Task List Links | Depending on configuration, a side panel may list task list-related links. (This side panel may not be displayed.) For example, it might include links to external informational sites, shortcuts to commonly used instructions, or internal organization links. |
| View | Use this menu to reorder columns, hide or display columns, or detach the task list to a floating screen. |
| Profile | If needed, select a profile (category to which tasks are assigned) to view its tasks. You may be assigned multiple profiles. |
| Click this Refresh button to update the task list display. | |
| Auto Task | After selecting a profile, click this button to activate auto task mode, in which tasks are automatically selected and displayed in the Task Viewer Screen, instead of you selecting them manually from the Task List Screen. |
| Release | Click to make a previously selected task available to all users assigned its profile.
Note: When you select a task, it becomes acquired by you, until you either complete or release it. If you close your browser without completing a task, the task remains listed in your task list when you next view it. |
| Search | Search for a specific task by entering the value to find in the search entry field and clicking the adjacent search button. |
| Detach | Click to expand the task list to a floating window you can reposition on the screen. To attach, click Detach again. |
| Table | The task list table lists available tasks and their related information. The columns listed depend on configuration. Note that you can hide, display, or reorder columns using View menu options. |
| View Task | Click this link to view the selected task in the Task Viewer Screen. |
A.2 Task Viewer Screen
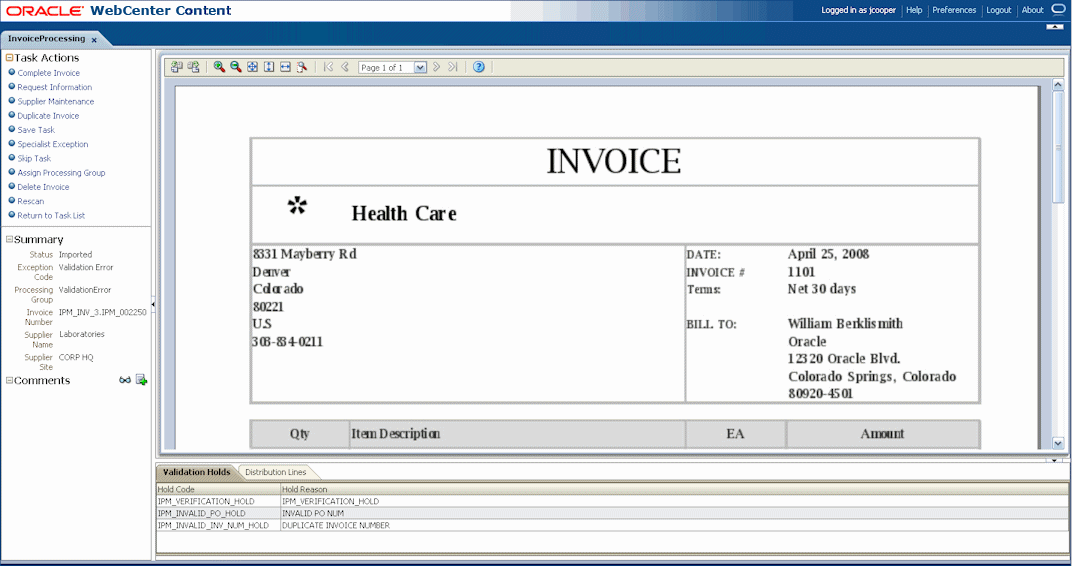
Use this screen to view information about the selected task and perform actions for it.

Display this screen from the Task List Screen in one of two ways: by clicking a specific task's View Task link or by clicking Auto Task.
| Element | Description |
|---|---|
| Action Commands | This side panel typically lists action commands for the selected task. Common tasks include: Complete Task, Skip Task, and Return to Task List, plus tasks specific to the business use. |
| Summary | Displays metadata values stored in Imaging for the document, for reference. |
| Comments | Displays the first line of comments users have entered for the selected task. Use this area to view or enter comments. |
| Imaging Viewer | Displays the task's associated images in basic or advanced Imaging viewer mode. For more information on the Imaging viewer, see the Oracle WebCenter Content User's Guide for Imaging. |
A.3 Select Item Screen
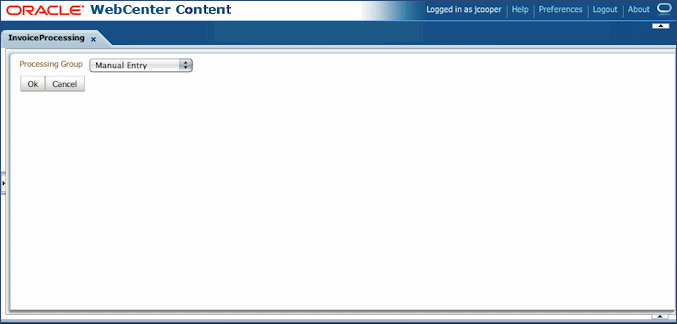
Use this screen to select an item from a list of choices.

Display this screen by choosing a command requiring a selection. For example, clicking an action command called Assign Processing Group on the Task Viewer Screen might display the Select Item screen for assigning the task to a selected processing group.
| Element | Description |
|---|---|
| Item Selector | From the field listing choices, select an item and click OK. |
| OK | Exit the screen and use the selection made. |
| Cancel | Exit the screen, discarding any selection made. |
A.4 Select User/Group Screen
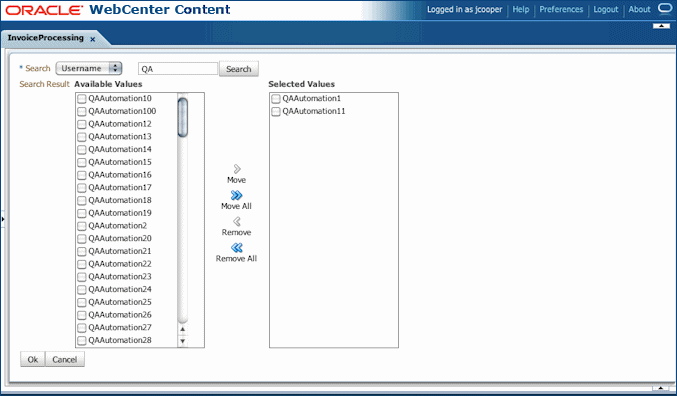
Use this screen to search for and select a user or group of users.

Display this screen by selecting a command requiring a user or group selection. For example, clicking an action command called Approval on the Task Viewer Screen might display the Select User/Group screen for selecting a group to request approval for a selected document.