9 Understanding Framework Applications
This chapter introduces the architecture, components, and features of a WebCenter Portal: Framework application. This chapter includes these topics:
-
Section 9.4, "Creating a WebCenter Portal: Framework Application"
-
Section 9.5, "Understanding the Features of a WebCenter Portal: Framework Application"
-
Section 9.8, "Using Iterative and Round-Trip Development Techniques"
-
Section 9.13, "Changing the Default Home Page and Login/Logout Target Pages"
9.1 What is a Framework Application?
A WebCenter Portal: Framework application is a portal. From an end user perspective, a portal is a web site with pages that are organized by tabs or some other form(s) of navigation. Each page can contain a nesting of sub-pages that are related hierarchically. Any page can contain multiple portlets, task flows, or other elements, giving users access to different information and tools in a single place. An administrator can modify a portal at runtime by, for example, adding new pages or changing the look and feel. If authorized through delegated administration, individual users can modify their view of a portal as well.
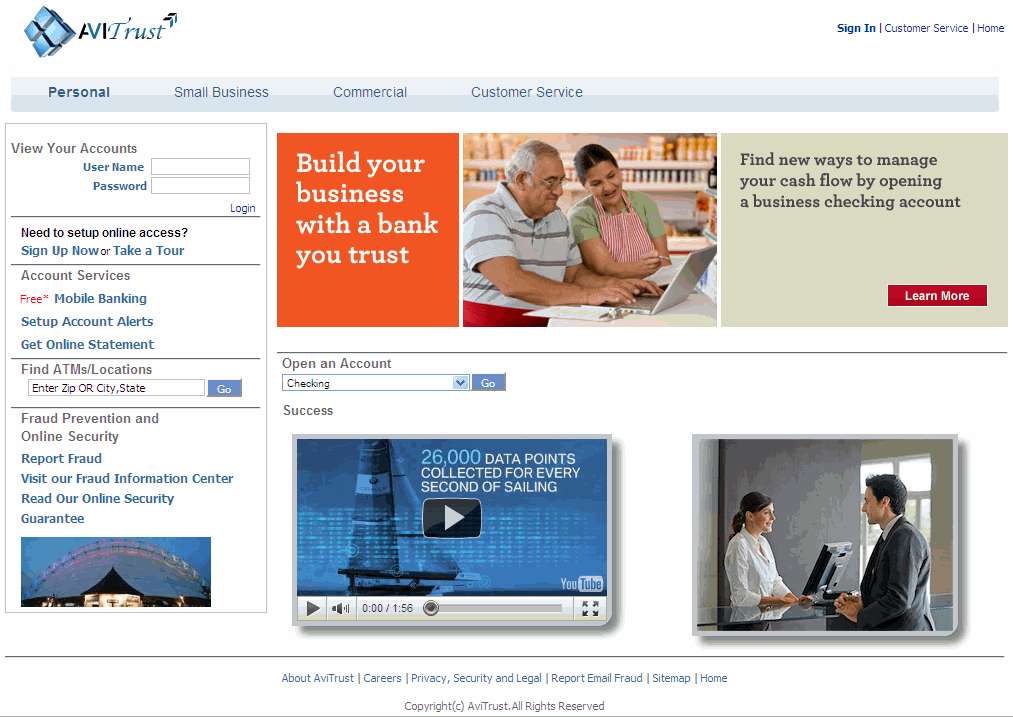
Figure 9-1 shows an example portal. It includes navigation (tabs, bread crumbs, links), content (portlets, task flows, images), administration features, and so on.
Figure 9-1 Example WebCenter Portal: Framework Application
Description of "Figure 9-1 Example WebCenter Portal: Framework Application"
Portal end users may also see personalized views of a portal page. A personalized view is a view that has been modified with content that is based on information collected about that user. For example, a site that sells books might "remember" that you recently purchased several detective novels, and based on that information, recommend several other similar kinds of detective novels when you next log in to that site. See Chapter 67, "Personalizing WebCenter Portal Applications."
A portal presents diverse content and applications to users through a consistent, unified web-based interface. Portal administrators and users can customize portals, and content can be presented based on user preferences or personalization. Each portal is associated with a web application that contains all of the resources required to run portals on the web.
As you can see, some key elements of portals include pages and sub-pages, navigation, delegated administration and other security features, runtime customization, and personalization.
Portals also typically include features like:
-
Search – Enterprise and web-based search facilities
-
Content Integration – Creation, management, and delivery of content to the portal through integration with an enterprise content management system, like Oracle WebCenter Content.
-
Single Sign-On – Allows users to log on once for all applications within the portal.
-
Look and Feel Management – Allows developers to create custom page templates and users to apply different skins to customize their portal experience. The portal includes tools to ensure a consistent look and feel across the portal.
9.2 What is Oracle WebCenter Portal: Framework?
Oracle WebCenter Portal: Framework adds a number of portal-specific features to a Framework application, like page hierarchies and navigation models, as explained in this section.
-
Section 9.2.1, "How Do I Add Oracle WebCenter Portal: Framework to a Project?"
-
Section 9.2.2, "What Features Does the Oracle WebCenter Portal: Framework Provide?"
9.2.1 How Do I Add Oracle WebCenter Portal: Framework to a Project?
If you create a Framework application using the WebCenter Portal: Framework Application template, the framework is automatically included. No further steps are required. See also Section 5.2, "Creating a Framework Application."
Note:
Migrating a non-portal Framework application to a Framework application is not supported.
9.2.2 What Features Does the Oracle WebCenter Portal: Framework Provide?
Oracle WebCenter Portal: Framework adds a number of portal-specific features to a Framework application. These features are included by default when you create a new application using the WebCenter Portal: Framework Application template. See also Section 5.1, "What Are Application Templates?."
The basic features provided by the framework include:
-
Page hierarchies – Traditional ADF page security allows you to control page security on a page-by-page basis. However, portals typically include many pages – in some cases hundreds of pages – and it's not always practical to specify access to individual pages. The page hierarchy organizes pages into a tree structure, with a parent-child relationship between pages. This hierarchical structure allows the convenient propagation or inheritance of security settings from pages to sub pages. See Section 9.5.1, "Understanding Pages, Page Templates, and the Portal Page Hierarchy."
-
Navigation models – A navigation model provides the back-end data to the navigation user interface that is displayed in the portal. Navigation models are highly flexible, with a wide set of APIs that control navigation to pages, task flows, external sites, portlets, and specific content items. These APIs let you control all aspects of the way the navigation user interface is rendered. For example, you can add a tree navigation UI by including a simple EL expression in a portal page or page template. WebCenter also provides runtime tooling for configuring and modifying navigation models. See Section 9.5.3, "Understanding the Navigation Model and the Navigation Registry."
-
Navigation Registries – A navigation registry defines the set of elements that a user can add to a navigation at runtime using the Resource Manager. See also Chapter 17, "Adding and Using the Resource Manager" and Chapter 11, "Building a Navigation Model for Your Portal."
-
Delegated administration – Delegated administration provides a mechanism for securing portal resources based on user roles. For example, you can allow users in one role (managers, for instance) to access all portal features, but deny certain features to users in another role (employees, for instance). Page hierarchies are the primary container for delegated administration. In both the design time and runtime environments, you apply delegated administration to a page hierarchy, and the specific security assignments are automatically propagated down through the hierarchy through pages and sub pages. See Chapter 69, "Securing Your WebCenter Portal: Framework Application."
-
Customization – Users can customize their own portal pages by, for example, adding or removing portlets, changing skins, or rearranging the portal layout. See Section 17, "Adding and Using the Resource Manager."
-
Page templates – Page templates allow you to define entire page layouts and apply them to pages to create a consistent layout across the portal. When you create pages using a template, they all inherit the defined layout. For more information, see Chapter 12, "Designing the Look and Feel of Your Portal." See also "Using Page Templates" in the Oracle Fusion Middleware Web User Interface Developer's Guide for Oracle Application Development Framework.
-
Catalogs and the Catalog Registry – Catalogs are arbitrary collections of task flows, portlets, content items, and other elements that can be added to an application at runtime. A catalog registry defines the set of items that are available for inclusion in your resource catalog. See Chapter 16, "Creating and Managing Resource Catalogs."
-
Skins – Skins define the colors, fonts, images, and some dimensional details like heights and widths, of your application components to present a consistent look and feel across the portal. See Chapter 15, "Creating and Managing Skins."
-
Portal Preferences – You can change default preferences for a portal, including default navigation model, page template, and other components. See Section 9.7, "Changing Default Portal Preferences."
JDeveloper includes tooling for portal development. This tooling includes editors for creating and modifying page hierarchies, navigation models, catalogs and the catalog registry, page templates, page styles, skins, and delegated administration. In addition, runtime tools are provided to allow end users and administrators to perform some of these functions. See also Section 9.11.2, "Runtime WebCenter Portal Administration Console."
9.3 What is the Portal Life Cycle?
The portal life cycle describes the process of creating a portal from development through deployment to a production server. Many actors participate in the life cycle including software developers, content modelers, content contributors, IT administrators, portal site administrators. For detailed information on managing all the stages of the portal life cycle, see Chapter 10, "Understanding the WebCenter Portal Life Cycle."
9.4 Creating a WebCenter Portal: Framework Application
Use the WebCenter Portal: Framework Application template to create a new framework application in JDeveloper. Application templates are a standard JDeveloper feature, and the portal template simply configures the application with the required portal components and features.
Tip:
The Framework application template is basically identical to the Framework application template in earlier versions of WebCenter, but with certain portal-specific features added in. In addition to these portal features, framework applications include all of the features you'll find in a traditional Framework application, like task flows, data controls, security features, ADF Faces layout components, and so on.
The basic steps for creating a framework application are described in Section 5, "Creating Framework and Portlet Producer Applications."
9.5 Understanding the Features of a WebCenter Portal: Framework Application
This section discusses some of the main portal features you'll need to know about.
-
Section 9.5.1, "Understanding Pages, Page Templates, and the Portal Page Hierarchy"
-
Section 9.5.3, "Understanding the Navigation Model and the Navigation Registry"
-
Section 9.5.4, "Understanding Resource Catalogs and the Catalog Registry"
-
Section 9.5.6, "Tips for More Advanced Development Use Cases"
9.5.1 Understanding Pages, Page Templates, and the Portal Page Hierarchy
This section introduces three related pieces of the Oracle WebCenter Portal: Framework: pages, page templates, and page hierarchies.
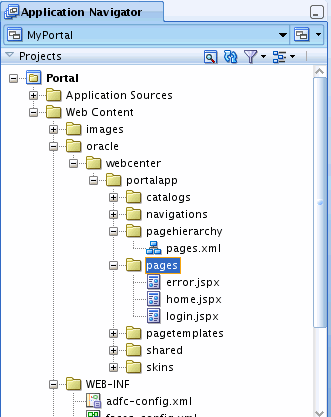
A portal consists of one or more pages, and pages play a crucial role in a portal's structure and organization. Generally, a page is a container for one or more entities like task flows, portlets, and content. Pages also typically include a navigation interface, like a navigation tree, tabs, or bread crumbs. In a Framework application, you can find a set of default pages in the Portal project under the folder oracle/webcenter/portalapp/pages, as shown in Figure 9-2. The placement of these pages is for organizational purposes, and new pages do not necessarily need to be created under the pages folder.
Note:
For important information on the organization of files in Framework applications, see Section 9.12, "How are WebCenter Portal Files Organized?."
Note:
For pages to be used in the page hierarchy, they must be located under oracle/webcenter/portalapp.
A page template lets you specify view elements that you wish to be common to all of your pages. A page template is a JSPX file that includes ADF layout components and other elements. Typically, page templates define a page layout, with headers, footers, and content areas. In addition, the page template usually specifies the positioning and style of the navigation UI for your pages. For example, if you want all of your pages to include the same set of tabs, or if you want each page to have a tree navigation panel and bread crumbs, you can add these components to the template.
Tip:
Page templates are referenced by the pages that use them. If you change the underlying page template, all the pages that reference the template automatically inherit the change.
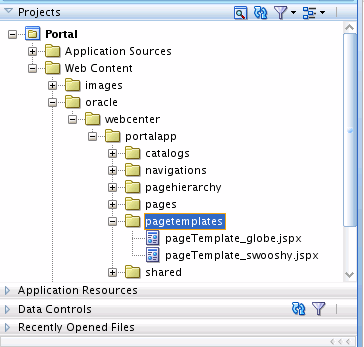
You can find the page template folder in oracle/webcenter/portalapp/pagetemplates, as shown in Figure 9-3. Notice that the folder contains two default page templates that are included out of the box.
Figure 9-3 Contents of the pagetemplates Folder
Description of "Figure 9-3 Contents of the pagetemplates Folder"
A page hierarchy is a logical structure that arranges pages through a set of parent-child relationships, where any page can have one or more sub pages. This hierarchical model not only helps define the overall structure of the portal, but also allows child pages to inherit the security policies specified by their parent. The ability for pages to propagate security policies down the hierarchy is particularly convenient for very large portals with dozens or even hundreds of pages: you don't have to set security for every page. Note that when you create a new page, its security policy is automatically set based on where it resides in the page hierarchy.
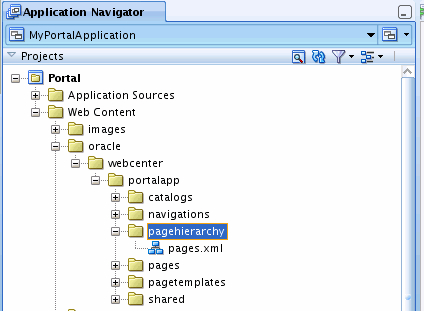
You can find the page hierarchy files in the oracle/webcenter/portalapp/pagehierarchy folder, as shown in Figure 9-4.
Figure 9-4 Contents of the pagehierarchy Folder
Description of "Figure 9-4 Contents of the pagehierarchy Folder"
Note:
The page hierarchy files are XML files that contain the metadata that define the page hierarchy structure. It is not recommended that you attempt to edit these files directly; rather, use the Page Hierarchy editor to create and work with page hierarchies, as explained below.
A basic page hierarchy model is included with applications created from the WebCenter Portal: Framework Application template. You can modify the page hierarchy with the Page Hierarchy editor in JDeveloper. To access this editor:
-
Open the portal project in the Application Navigator, as shown in Figure 9-4.
-
Right-click the
pagehierarchyfolder. -
Select Edit Page Hierarchy from the menu.
Tip:
You can also bring up the Page Hierarchy editor by right-clicking a portal page file (JSPX file) and selecting Edit Page Hierarchy from the menu or by opening a page hierarchy file directly.
After you have created pages for your portal, use the editor to build up the site structure. You can drag and drop pages (one or several at a time) from anywhere in the oracle/webcenter/portalapp folder in the Application Navigator directly into the Page Hierarchy editor and position them in the hierarchy as you wish.
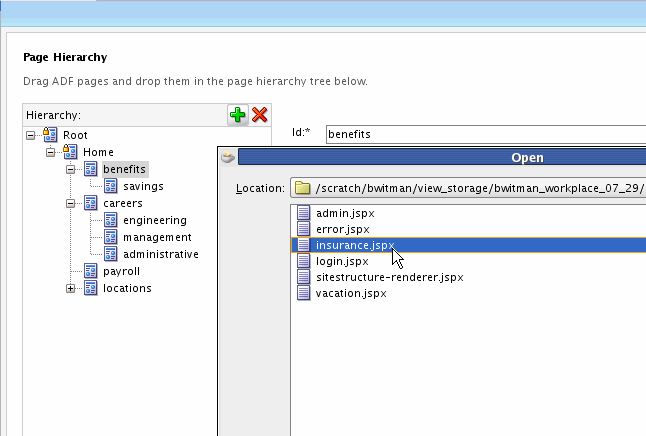
Alternatively, you can use the Add button located above the hierarchy pane. Clicking this button pops up a dialog that allows you to choose a page from within your project. This page is added as a child of the page that is currently selected in the editor, as shown in Figure 9-5.
Figure 9-5 Adding a Page to the Page Hierarchy
Description of "Figure 9-5 Adding a Page to the Page Hierarchy"
In the editor, you can rearrange page nodes within the tree display simply by dragging and dropping them. For large hierarchies, you may also find it useful to use the Change Parent dialog by right-clicking a page in the hierarchy and choosing Change Parent Page. This dialog allows you to choose a new parent for the selected page from a separate window, instead of having to scroll through a hierarchy that may be too large to view all at once.
Tip:
Right-click a node in the Page Hierarchy editor and select Go to Page to open the associated JSPX (portal page) file.
Note:
For each new level you create in the page hierarchy, a pagehierarchy/pages/*Pages.xml file is created. These files contain a reference to the pages in that level. For more information, see Section 69.6.2, "Building a Page Hierarchy."
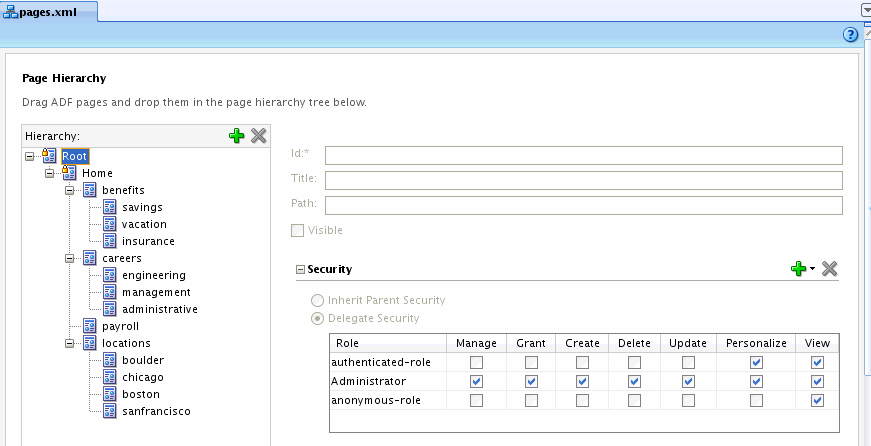
Figure 9-6 shows the structure of a simple human resources site that includes top level pages Benefits, Careers, Payroll, and Location. The Benefits, Careers, and Location pages each have multiple child pages.
Notice how this hierarchy is realized when you run the portal, shown in Figure 9-7. In this example, the pages use the default page template, which includes a navigation bar. The bar is rendered as tab-like links across the page. Because this navigation UI was added to the page template, it will appear consistently on all pages that use the template. In addition to the default navigation component, you could add a navigation tree, bread crumbs, or other styles of navigation UI to the page template. In many cases, the template will include two or more navigation components.
For more information on page templates, see Section 12, "Designing the Look and Feel of Your Portal." For more information on the default navigation model and on creating navigation models and user interfaces, see Section 11, "Building a Navigation Model for Your Portal."
For more information on page hierarchies, see Section 69.6.2, "Building a Page Hierarchy."
9.5.2 Securing Your Portal Pages
At design time, you can set up security for your portal's pages in the Page Hierarchy editor. As mentioned previously, the page hierarchy defines the structural relationships between pages (parent-child) and it allows for child pages to inherit the security policies of their parents.
Note:
You can secure pages either through the ADF page security model or through the hierarchical WebCenter Portal page security model. When a page is added to the page hierarchy, it implies that it's secured through the hierarchical security model. See also Section 69.6, "Using the Page Hierarchy Security Editor."
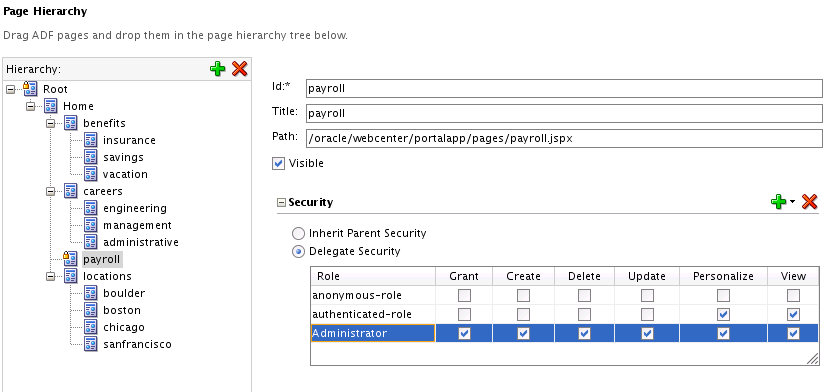
As shown in Figure 9-8, the Page Hierarchy editor includes a Security section that lets you specify role-based security policies for pages. The security interface lets you decide whether you want the policies to be inherited or delegated. If you specify inheritance, then the security policies for that page will be inherited from its parent page. If you delegate security, then that policy will override the parent's security and the policy will be propagated to all child pages that are inheriting security.
Tip:
A small padlock icon appears next to pages for which the inherited security settings are overwritten. In other words, you'll see this icon to indicate pages that have delegated security set on them.
For example, in Figure 9-8, the Payroll page is configured so that Administrators have full access to the page, while authenticated users can only view and personalize the page. Anonymous users cannot access the page at all. Later, in Section 9.5.3, "Understanding the Navigation Model and the Navigation Registry," we'll discuss how the security policy set for a page also affects the appearance of the navigation UI. In this example, because the Payroll page is only available to Administrators and authenticated users, the navigation UI will only show the Payroll page link to authenticated users and Administrators. For all other users, the Payroll link will not show up at all.
Figure 9-8 Security Setting for the Payroll Page
Description of "Figure 9-8 Security Setting for the Payroll Page"
9.5.3 Understanding the Navigation Model and the Navigation Registry
It's important to distinguish the navigation model from the page hierarchy. First, the page hierarchy specifies a parent-child relationship between pages. As discussed previously, pages can have one or more child pages. Secondly, the page hierarchy allows for security policies to be inherited from parent pages to child pages, or sub pages, down through the hierarchy. Note that page hierarchy only specifies a relationship between pages; other resources, like task flows, portlets, and external links cannot be included in a page hierarchy.
The page hierarchy provides a security inheritance model that allows administrators to easily control security on portals that have a very large number of pages. For example, if your portal has 100 pages, you can specify security policies on the root of the page hierarchy, and all 100 pages will inherit those policies. Then, if you wish to modify the settings on any page below the root, you can do that, and those settings will propagate to any of that page's sub-pages. You can also override the inherited settings and apply security settings to individual pages anywhere in the hierarchy.
The navigation model, by contrast, defines a navigational structure, keeps track of navigational data, and provides that data to the view layer of the application. While a page hierarchy only consists of pages, a navigation model can consist of a variety of resources, like task flows, pages, external links, and others.
It's important to note that the navigation model is aware of the security policies that have been applied to the elements (pages, links, task flows, and so on) that the navigation model controls. If the authenticated user is not authorized to see a particular page, the navigation model, by default, hides any navigational links to that page. For any resources that do not have security defined in the portal, like external links, the developer has to control visibility manually. One way to do this is to add an EL expression to the page or page template to control visibility (show/hide) of the resource. For more information, see Chapter 14, "Visualizing Your Portal Navigation."
For example, if your portal pages include a tree navigation UI, that UI asks the navigation model questions like: what pages or other elements can the user navigate to and what is the current navigational state of the portal. The first question informs which links the UI can display. The second informs the UI how to display those links. If the navigation view is a tree, the model tells the UI, for example, which page is currently selected. This allows the tree UI to display the node representing that page correctly, as an open folder for example, or as a selected page.
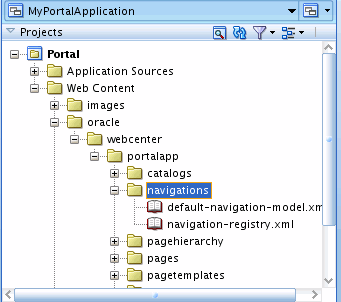
In JDeveloper, use the Navigation Editor to modify the navigation model. To open the editor, double-click the file default-navigation-model.xml in the navigations folder, shown in Figure 9-9.
Figure 9-9 Contents of the navigations Folder
Description of "Figure 9-9 Contents of the navigations Folder"
The navigation-registry.xml file is used by the Resource Manager when a user creates or edits a navigation model. The registry defines the superset of all items that are available to be included in a model that you create or edit. You can create multiple navigation models for an application, but an application can only have one navigation registry file. For more information on the navigation model, the Navigation Editor, and the registry, see Chapter 11, "Building a Navigation Model for Your Portal."
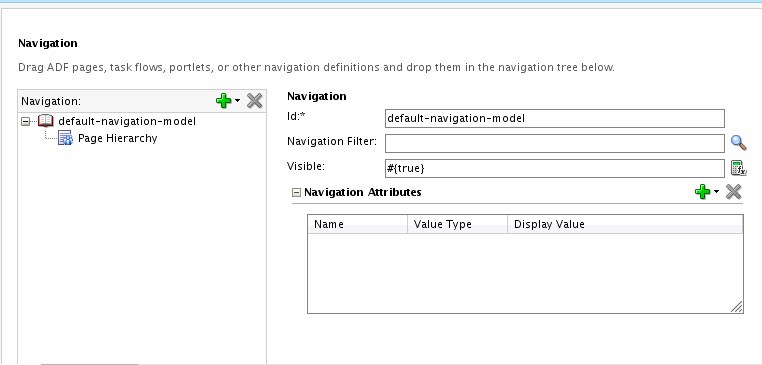
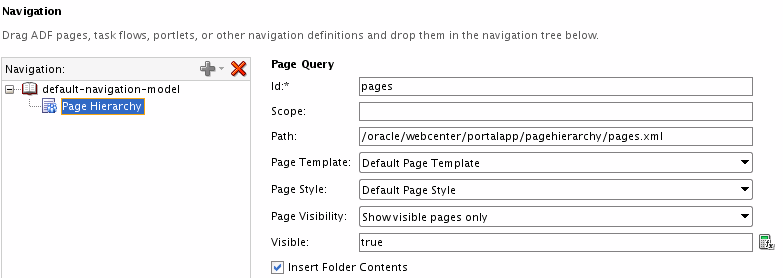
The default navigation model, shown in Figure 9-10, includes one node called Page Hierarchy. By default, this node points to the default page hierarchy file, pages.xml, in the pagehierarchy folder. This node tells the navigation model to refer to the page hierarchy's structure and communicate that structure to the navigation UI so that it can be rendered. As seen previously in Figure 9-7, the default UI displays the page hierarchy as tab-like links. The information provided by the model allows each link to display its sub-page links in a drop-down menu whenever the mouse pointer hovers over it.
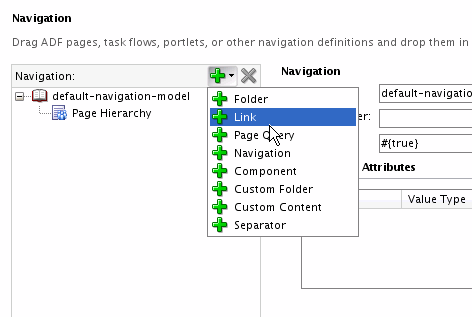
The navigation model can include several kinds of navigation elements. As we've seen, the model can include both page hierarchies and single pages. But you can also create navigation to other elements, like links to external web pages or specific content.
Figure 9-11 Adding a Link to the Navigation Model
Description of "Figure 9-11 Adding a Link to the Navigation Model"
For more information, see Chapter 11, "Building a Navigation Model for Your Portal."
9.5.4 Understanding Resource Catalogs and the Catalog Registry
A catalog specifies a collection of an otherwise unrelated group of elements, like layout components, task flows, portlets, documents, and others, that an authorized user can add to a portal at runtime. Oracle WebCenter Portal's Composer uses catalogs at runtime to determine which elements an authorized user can add to a portal page.
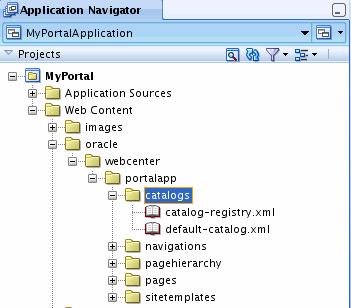
The Framework application template includes a default resource catalog (default-catalog.xml) and a catalog registry file (catalog-registry.xml). These files are located in oracle/webcenter/portalapp/catalogs.
When a user edits pages at runtime using Composer, the default catalog file specifies all of the items that are available to be added to a page. The catalog registry file is used by the Resource Manager when a user creates or edits a resource catalog. The registry defines the superset of all items that are available to be included in a catalog that you create or edit.
You can create multiple catalogs for an application, but an application can only have one catalog registry file. For more information, see Chapter 16, "Creating and Managing Resource Catalogs."
At development time, you can edit existing catalogs using the Resource Catalog editor. To open the editor, open the catalog file (for example, default-catalog.xml) in the catalogs folder in Application Navigator, as shown in Figure 9-12.
To create a new catalog, select New from the File menu. In the New Gallery dialog, select Portal under the Web Tier node. Then, select Application Resource Catalog and click OK. Use the Create Application Resource Catalog dialog to create the new catalog.
Tip:
You can also edit navigation registries using the Resource Catalog editor.
Figure 9-12 Contents of the catalogs Folder
Description of "Figure 9-12 Contents of the catalogs Folder"
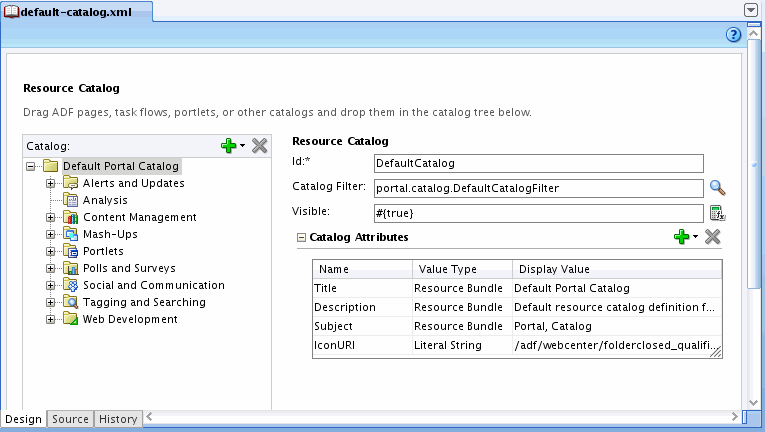
The Resource Catalog editor is shown in Figure 9-13.
Figure 9-13 Resource Catalog Editor in JDeveloper
Description of "Figure 9-13 Resource Catalog Editor in JDeveloper"
Figure 9-14 shows the resource catalog editor in the runtime administration tool.
Figure 9-14 Resource Catalogs Editor at Runtime

Description of "Figure 9-14 Resource Catalogs Editor at Runtime"
For example you can create separate catalogs for each of several departments.
Tip:
Individual catalog entries can be shown or hidden based on user roles.
9.5.5 Other Design Time Folders
Other folders you'll see in the Application Navigator at design time are:
-
images – Contains images that are referenced by the page template.
-
WEB-INF – Contains configuration files used by the web application. These files are generally typical files found in all ADF-based web applications.
-
Page Flows – Another standard ADF folder that contains the
adfc-config.xmlconfig file.
9.5.6 Tips for More Advanced Development Use Cases
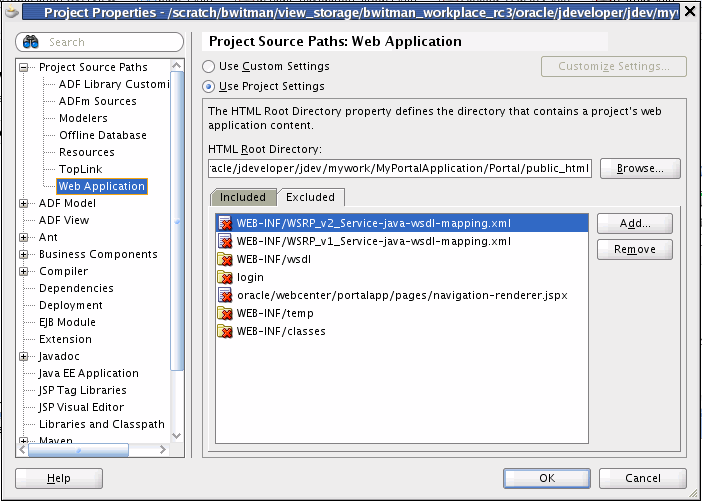
By default, a few files are excluded from view in the Application Navigator. These files are excluded because it is unlikely you'll ever need to edit them. However, because there are some use cases where you might want to edit them, you need to be able to add them back to the JDeveloper UI.
To locate the excluded files:
-
Right-click the project folder and select Project Properties from the menu.
-
In the Project Properties dialog, select Web Application under the Project Source Paths node.
-
Select the Excluded tab, as shown in Figure 9-15.
-
Select an element from the excluded list and click Remove to remove it from the excluded list. As a result, the element is automatically included in the appropriate folder in the Application Navigator.
As an example, the navigation-renderer.jspx file is used to render resources in the context of a page template. If you wanted to change the way an external URL is displayed within a page, you would first remove the navigation-renderer.jspx file from the excluded list in order for it to appear under the pages folder in the Application Navigator. Then, you could open the page and edit it as desired.
9.6 Developing Your Portal's Look and Feel
You can design the look and feel by adding certain presentation elements, such as banners, navigations, and footers, around the content area. Once you settle on a look and feel that is suitable for your portal structure, you can save these settings as a page template, which can be used to create a portal. In addition, you may want use the same settings across pages in your portal. With the use of page templates and page styles, you can achieve some consistency across pages in your portal. See Chapter 12, "Designing the Look and Feel of Your Portal."
You can also develop custom skins for your portal. A skin is a style sheet based on the CSS 3.0 syntax specified in one place for an entire application. Instead of providing a style sheet for each component in your application or inserting a style sheet on each page, you can create one skin for the entire application. Every component automatically uses the styles as described by the skin. When you use a skin, you do not have to make design-time changes to portal pages to change their appearance. See Chapter 15, "Creating and Managing Skins."
Although the basic look and feel design can be created in JDeveloper at design time, the Resource Manager enables administrators and users with the appropriate privileges to continue developing the portal's look and feel after the application has been deployed. For example, the Resource Manager lets you add and remove pages, add navigation user interfaces, and change the page templates, skins, and page styles. For more information about these and other Resource Manager features, see Chapter 17, "Adding and Using the Resource Manager."
9.7 Changing Default Portal Preferences
A Framework application includes a set of preferences that specify certain default portal components. This section describes these preferences and explains how to change their default values.
9.7.1 What Are the Default Portal Preferences?
Table 9-1 lists the portal preferences and their default settings.
| Preference | Default Setting |
|---|---|
|
Navigation Model |
|
|
Resource Catalog |
|
|
Page Template |
|
|
Navigation Renderer |
|
|
Skin |
|
9.7.2 How to Change the Default Preferences at Design Time
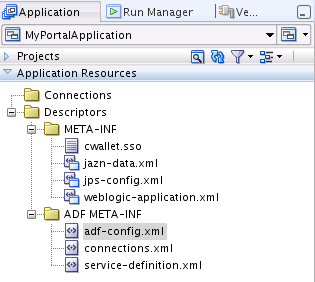
To change the default preferences at design time, directly edit the adf-config.xml file. To locate this file in JDeveloper, open the Application Resources part of the Application Navigator. Then, open the Descriptors folder and the ADF META-INF folder, as shown in Figure 9-16.
Figure 9-16 Location of the adf-config.xml File in JDeveloper
Description of "Figure 9-16 Location of the adf-config.xml File in JDeveloper"
For example, to change the default navigation model file, edit the value of this preference:
<portal:preference id="oracle.webcenter.portalapp.navigation.model"
   desc="Default Navigation Model"
   value="/oracle/webcenter/portalapp/navigations/default-navigation-model.xml"
   resourceType="navigation" display="true"
/>
Preferences can also be changed at runtime under the Configurations tab of the Administration page. From this page, you can configure the default page template, skin, resource catalog, and navigation component in a runtime application. For details, see "Configuring Application Defaults" in the Oracle Fusion Middleware Administrator's Guide for Oracle WebCenter Portal.
9.8 Using Iterative and Round-Trip Development Techniques
Iterative development is a productivity feature that helps speed up the development process. Iterative development lets you make and save changes to your Framework application in JDeveloper while the app is running on the Integrated WebLogic Server and immediately see the effect of those changes simply by refreshing the current page in your browser. The iterative development feature is enabled by default in a framework application. For more information, see Section 1.5.3, "Enabling Iterative Development."
Round-trip development refers to features and techniques that allow you to retrieve resources from a deployed, runtime portal back to JDeveloper for maintenance or enhancement. After modifying a resource in JDeveloper, you can use the Resource Manager to upload the resource back to the deployed portal. WebCenter Portal's round-trip development features provide a simple, convenient way to modify portal resources without redeploying the entire application.
For more information on round-trip development, see Section 17.3, "Enabling Runtime Administration of Your Portal" and Section 17.4, "Enabling Round-Trip Development of Resources."
9.9 What is the Application Sources Folder?
The Application Sources folder appears as one of two top-level portal project folders generated by JDeveloper when you create a portal. In addition to any Java classes you write for your application, Application Sources includes:
-
oracle.webcenter.portalapp – Includes XML definition files for pages, page templates, page catalogs, navigations. A page definition file specifies ADF bindings, page parameters, and permission settings. Page definition files specify various mappings and bindings that are used by pages and page templates. For example, the page definition file specifies the page's parent and child pages, if any. The file also specifies security policy information, like the operations that are permitted on the page. Default page definition files are created automatically when you add a portal page to a page hierarchy.
-
portal – Includes resource bundles, source code, and other Java artifacts.
-
META-INF – Includes files for specifying data bindings and page template metadata.
9.10 Running and Testing a Portal
JDeveloper provides several ways to run an application:
-
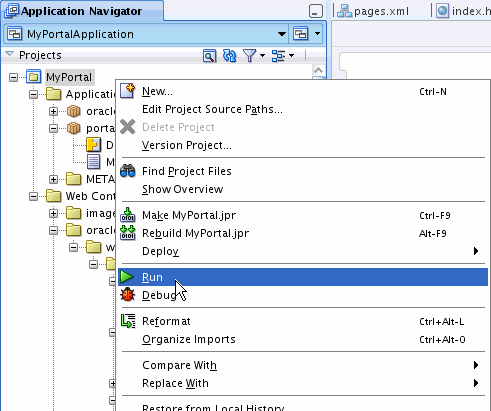
Right-click the portal project name in the Application Manager and select Run, as shown in Figure 9-17. If the server is not running, this action starts the server and (re)deploys the application.
Tip:
You can change the default portal home page. For details, see Section 9.13, "Changing the Default Home Page and Login/Logout Target Pages."
-
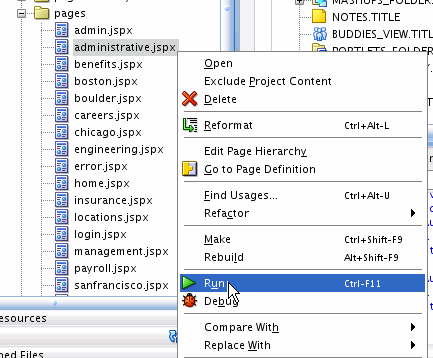
Right-click a page in the pages folder in the Application Manager and select Run, as shown in Figure 9-17. If the server is not running, this action starts the server, (re)deploys the application, and displays the selected page.
-
You can also run a portal by selecting Run <portal name> from the Run menu.
9.11 WebCenter Portals at Runtime
Oracle WebCenter Portal: Framework provides a number of interesting runtime features.
-
Section 9.11.1, "Preserving Runtime Customizations on the Integrated WebLogic Server"
-
Section 9.11.2, "Runtime WebCenter Portal Administration Console"
-
Section 9.11.3, "How Security Settings Affect the Runtime Portal?"
9.11.1 Preserving Runtime Customizations on the Integrated WebLogic Server
If you are using the Integrated WebLogic Server in a development environment (running the portal through JDeveloper) any changes you make to the portal at runtime (using the Resource Manager) are discarded upon redeployment by default. For example, if you use the Resource Manager to make changes like adding entitlements to a page, changing the layout, or modifying the navigation model, these changes will not be preserved the next time you redeploy the application. For more information on the Resource Manager, see Chapter 17, "Adding and Using the Resource Manager."
Note:
The information in this section only applies to a portal that is running with the Integrated WebLogic Server in a development environment. When you deploy the portal to a production environment, runtime changes are never discarded.
Note:
Customizations are not preserved by default as a convenience for developers working in the JDeveloper environment. When you modify a file at runtime, a new version of the file is written to the MDS write directory. This new version then takes precedence over the version in JDeveloper. At that point, if you change a setting in JDeveloper and click Refresh in your browser, the change will not show up. Therefore, while you're working in JDeveloper, it's much more convenient and natural not to preserve runtime customizations.
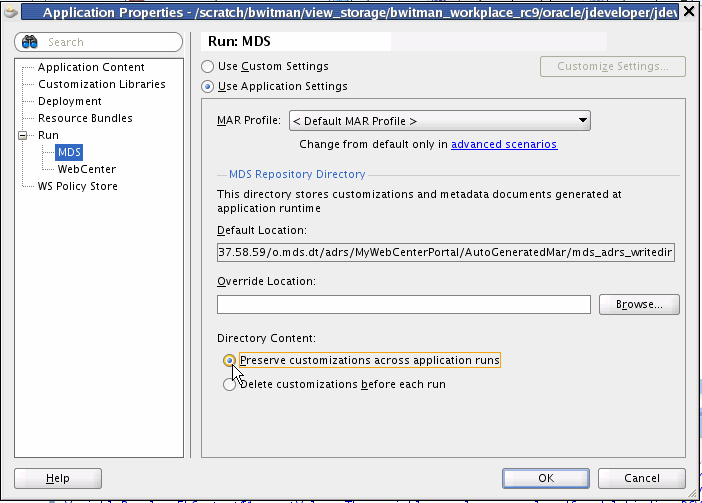
It is possible to change the default behavior, and preserve runtime customizations between runs. For example, you may wish to do this to enable certain testing scenarios. To allow customizations to be preserved between application deployments (runs):
-
Select Application Properties from the Application Menu.
-
In the Application Properties dialog, select MDS under the Run node.
-
Under Directory Content, select Preserve customizations across application runs to disable the default, which is to discard customizations before each run. See Figure 9-19.
Figure 9-19 Selecting Preserve Customizations Across Application Runs
Description of "Figure 9-19 Selecting Preserve Customizations Across Application Runs"
9.11.2 Runtime WebCenter Portal Administration Console
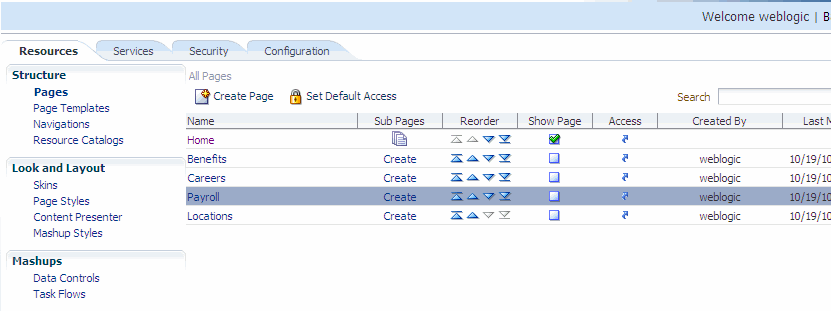
The WebCenter Portal Administration Console lets you work with resources, services, security, and portal configurations. The WebCenter Portal Administration Console is located at this URL: http://<server>:<port>/<context_root>/admin, and is shown in Figure 9-20.
Figure 9-20 The WebCenter Portal Administration Console
Description of "Figure 9-20 The WebCenter Portal Administration Console"
Tip:
You can change the default URL for the WebCenter Portal Administration Console by editing the <url-pattern> attribute of the <servlet-mapping> element in the web.xml file. The default <url-pattern> is admin, but you can change it to something else if you want.
For more information on the Resource tab (the Resource Manager), see Section 9.11.4, "Runtime Editing of Portal Resources" and Chapter 17, "Adding and Using the Resource Manager." Security topics are discussed in Chapter 69, "Securing Your WebCenter Portal: Framework Application."
9.11.3 How Security Settings Affect the Runtime Portal?
Role based security policies control which pages, resources, and navigational elements visitors can see and manipulate (create, delete, update, and so on). The design time (JDeveloper) page editor lets you set these policies on pages or hierarchies of pages, as discussed in Section 9.5.2, "Securing Your Portal Pages." Oracle WebCenter Portal: Framework respects these security polices in the following ways:
-
Pages (and certain other resources, like task flows) can only be viewed by users who are authorized to see them. The same principle holds for operations users can perform on pages, like Grant, Create, Delete, Update, and Personalize.
-
Navigation to a resource (like a page or task flow) is hidden if that page is unavailable to the authenticated user. For example, if a user is not authorized to visit the Payroll page, the link to that page will not show up in any of the navigational user interfaces.
-
Resources that are available within a Resource Catalog are adjusted based on security policies. If a user is not authorized to access a particular resource, such as a task flow, that resource will not appear in the Resource Catalog.
9.11.4 Runtime Editing of Portal Resources
The WebCenter Portal Administration Console includes a Resources tab that lets you work with several portal-specific features at runtime:
-
Pages
-
Page templates
-
Navigation models
-
Resource Catalogs
-
Skins
-
Page styles
-
Content Presenter display templates
-
Mashup styles
-
Data controls
-
Task flows
Using the Resource Manager, portal users can also download resources, or an entire application, from the runtime environment, edit them in JDeveloper, and then upload them back into the deployed application. For more information on downloading and uploading resources, see Section 17.3, "Enabling Runtime Administration of Your Portal" and Section 17.4, "Enabling Round-Trip Development of Resources."
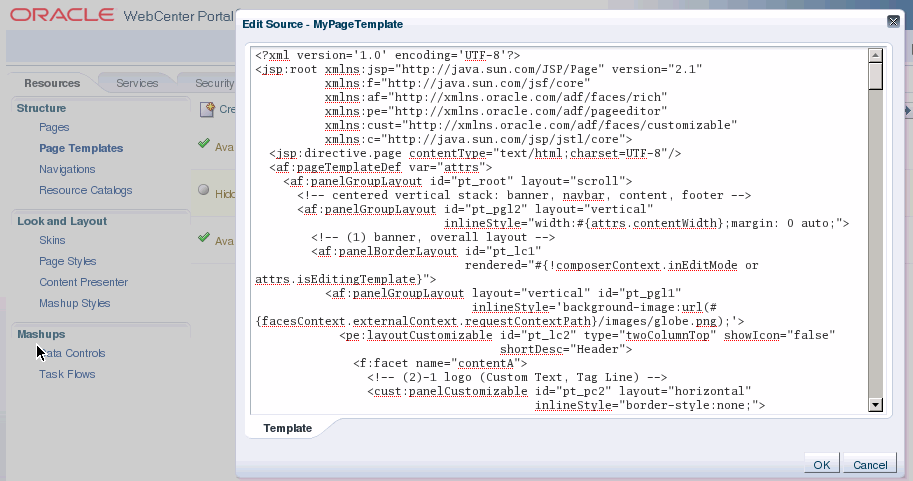
The Edit Source feature in the Resource Manager lets you edit the source code of resources in the runtime application. For example, if you upload a portal resource (like a page template), you can then edit it directly in the Resource Manager. Just select the resource, and choose Edit Source from the Edit menu. A source editing window appears, as shown in Figure 9-21.
Note:
Some resources, like the default-navigation-model, are not editable. If you want to edit these resources, make a copy first and edit the copy.
Figure 9-21 Editing a Page Template Source File at Runtime
Description of "Figure 9-21 Editing a Page Template Source File at Runtime"
9.12 How are WebCenter Portal Files Organized?
When you run through the Framework application wizard, a large number of project artifacts are configured and installed in the project directory. JDeveloper presents a streamlined view of your project. You can also view your portal project directly on your filesystem.
-
Section 9.12.1, "Understanding the Organization of a WebCenter Portal: Framework Application"
-
Section 9.12.2, "Viewing Your Portal Project on the Filesystem"
9.12.1 Understanding the Organization of a WebCenter Portal: Framework Application
This section explains how a Framework application is organized, and then why it is organized the way it is.
9.12.1.1 How is a WebCenter Portal: Framework Application Organized?
When you create a new Framework application in JDeveloper, a large number of files are automatically placed in the project. You can see these files organized in the Application Navigator view in JDeveloper.
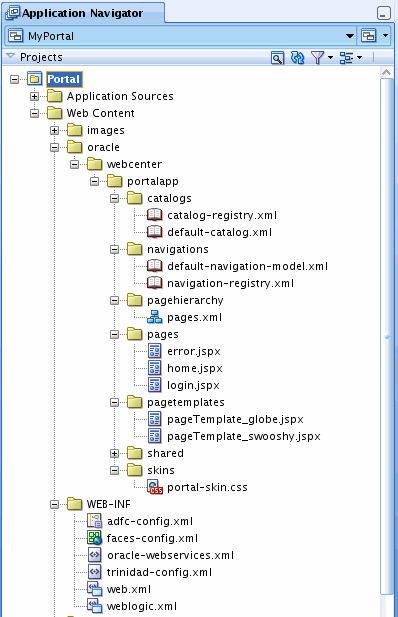
Looking at the Application Navigator, the first thing you will notice is that a framework application consists of one project, which is called (by default) Portal, as shown in Figure 9-22. You can, of course, change this name when you create the application or anytime afterwards. Most of the files in a project are placed in the <application_root>/<project_root>/public_html/oracle/webcenter/portalapp directory.
Figure 9-22 WebCenter Portal: Framework Application in the Application Navigator
Description of "Figure 9-22 WebCenter Portal: Framework Application in the Application Navigator"
9.12.1.2 Why Is a WebCenter Portal: Framework Application Organized the Way It Is?
It is important to understand the following distinctions between files that are stored in your application:
Note:
It is important to understand these distinctions because some files, like XML files, you might not expect to find under public_html. (Because in a standard web application, most files under this directory are directly URL accessible from a browser once the application is deployed.) Developers must keep in mind that portal files require this particular structure; you must not attempt to create portal artifacts in other locations.
-
Files located in the
<application_root>/<project_root>/public_html/oracle/webcenter/portalappdirectory:-
are deployed to the Metadata Services (MDS) repository.
-
can be registered as portal resources and managed at runtime with the Resource Manager.
-
are generally secured using WebCenter Permissions (if they are portal resources).
-
-
Files located elsewhere under
<application_root>/<project_root>/public_html:-
are deployed to the application WAR file.
-
cannot be registered as portal resources and therefore cannot be managed with the Resource Manager.
-
are secured using the native permission class of the artifact.
-
It is important to understand that a Framework application is structured this way specifically so that you can make informed decisions when you create your own pages. In some cases, specifically with JSPX pages, you might not want to create a page under oracle/webcenter/portalapp. It depends on the intended use of the page in your application.
9.12.2 Viewing Your Portal Project on the Filesystem
The simplest way to locate your project files on the file system is to select a file or folder in the Application Navigator and then select Copy Path from the Edit menu. This function places the path to the file or folder on the clipboard, which you can then paste into a command shell or file browser.
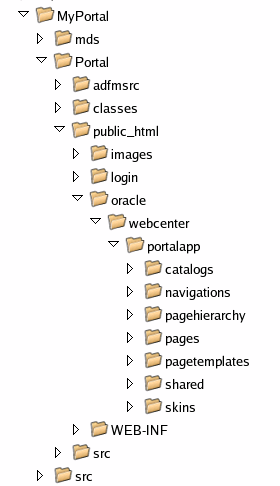
Figure 9-23 shows the filesystem organization of a sample Framework application. Many of the project's files are organized under the public_html folder.
Figure 9-23 Sample WebCenter Portal: Framework Application on the Filesystem
Description of "Figure 9-23 Sample WebCenter Portal: Framework Application on the Filesystem"
As you will see, JDeveloper presents a somewhat different, more streamlined view of your project, as discussed in the next section, Section 9.12.3, "Viewing Your Portal Project in JDeveloper."
9.12.3 Viewing Your Portal Project in JDeveloper
The intent of the project view in JDeveloper is to present the project files that a developer is likely to work with. These files include pages, page hierarchies, navigation models, page templates, catalogs, XML configuration files, Java source files, images, and so on.
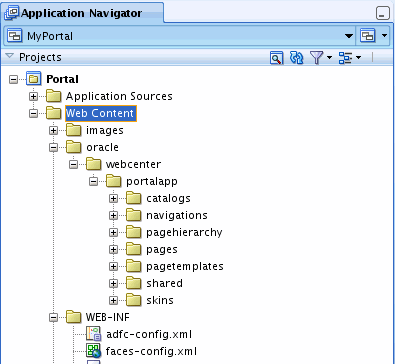
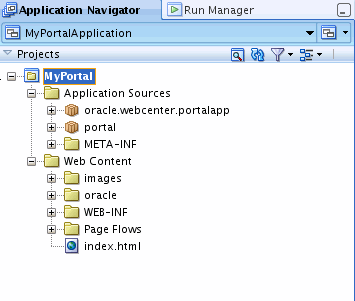
In JDeveloper, portal projects are organized into two folders: Application Sources and Web Content, as shown in Figure 9-24.
Figure 9-24 Organization of a Portal Project in JDeveloper
Description of "Figure 9-24 Organization of a Portal Project in JDeveloper"
The Application Sources folder is primarily a repository for source code and page definition files. See also Section 9.9, "What is the Application Sources Folder?."
The Web Content folder contains all of the files that make up your web project, like pages, page hierarchies, navigation models, and so on. These are the files that you will actively create and modify as you develop your Framework application.
Figure 9-25 shows the basic structure of the Web Content folder. Note that many of the files you will create and modify are located in the oracle/webcenter/portalapp sub folder. This folder's contents – catalogs, navigations, page hierarchy, pages, skins, and pagetemplates – make up the basic components of a portal. For detailed information on these portal components, see Section 9.12.1, "Understanding the Organization of a WebCenter Portal: Framework Application."
Tip:
If you prefer to view the local file system hierarchy in the Application Navigator, click the Navigator Display Options icon in the Projects panel and select Group by Directory.
The PortalWebAssets project includes static application resources like HTML and image files. By separating the static resources into a separate project, it is possible to deploy those resources to a dedicated server. For more information, see Section 5.4, "Understanding the PortalWebAssets Project.".
9.13 Changing the Default Home Page and Login/Logout Target Pages
The file oracle/portalapp/pages/home.jspx is the default home page for a new Framework application. This section explains how to change this default home page to another page or any navigable resource like a URL, portlet, or task flow.
-
Section 9.13.1, "Understanding How the Home Page is Specified"
-
Section 9.13.4, "Specifying the Target Page After a Login or Logout"
9.13.1 Understanding How the Home Page is Specified
The default Framework application includes an index.html file, which is located in the portal project directory. This index file contains the following redirect statement:
<meta http-equiv="refresh" content="0;url=./faces/pages_home" />
Note:
The redirect statement in index.html refers to the portal navigation model, not to a page as you might expect. Pointing the redirect to the navigation model allows the currentSelection attribute to be set properly, which allows the current selection to be highlighted in the user interface.
The URL element pages_home refers to the "home" page specified in the page hierarchy. (The prefix "pages_" is added to the folder name simply to ensure a unique ID.) As Figure 9-26 shows, the Insert Folder Contents checkbox is selected in the Navigation dialog. The Insert Folder Contents option replaces the specified folder ("home" in this case) with the contents of the folder. Therefore, in this example, the portal looks for a folder called "home" in the page hierarchy. Note too that Page Hierarchy is specified as an element in the navigation model.
To help you understand how the default portal home page is specified, note that in the navigation model a default node called pages is created by default. This node's navigation path points to the page hierarchy file, pages.xml, as shown in Figure 9-26.
Upon navigating to pages.xml, the node called home is located, and that node's path is /oracle/webcenter/portalapp/pages/home.jspx, as shown in Figure 9-27.
9.13.2 How to Change the Default Home Page
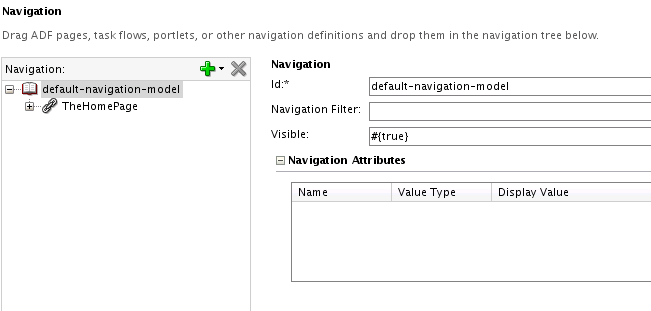
To change the default home page, simply change the redirect statement in index.html to the pretty URL of another resource that is referenced in the navigation model. For example, you might create a new home page and redirect to it – a common use case. Simply specify the new page to be your portal's home page by changing the redirect in index.html to the new page's pretty URL. (You can drag the new page in the navigation model to create a page link element.) For example, if the link ID in the navigation model is TheHomePage:
<meta http-equiv="refresh" content="0;url=./faces/TheHomePage" />
where.faces/TheHomePage is the pretty URL that points to the link element defined in the navigation model.
Figure 9-28 Navigation Model with New Home Page Element
Description of "Figure 9-28 Navigation Model with New Home Page Element"
Using this example, if access the portal in a browser using this URL:
http://myserver:myport/MyPortalApp-Portal-context-root
the portal will render a home page that contains the content from the new home page, as shown in Figure 9-29.
Figure 9-29 The Oracle Website Displays as the Content for the Portal Home Page

Description of "Figure 9-29 The Oracle Website Displays as the Content for the Portal Home Page"
9.13.3 How is the Default Index Page Specified?
The default index page for the Integrated Weblogic Server instance is index.html. A new portal project includes this file, by default, in the Web Content folder.
To change the default index file, index.html to another file, you have two choices. One way to change this default index file is to edit the <welcome-file-list> element in the web.xml file:
<welcome-file-list>
    <welcome-file>/index.html</welcome-file>
</welcome-file-list>
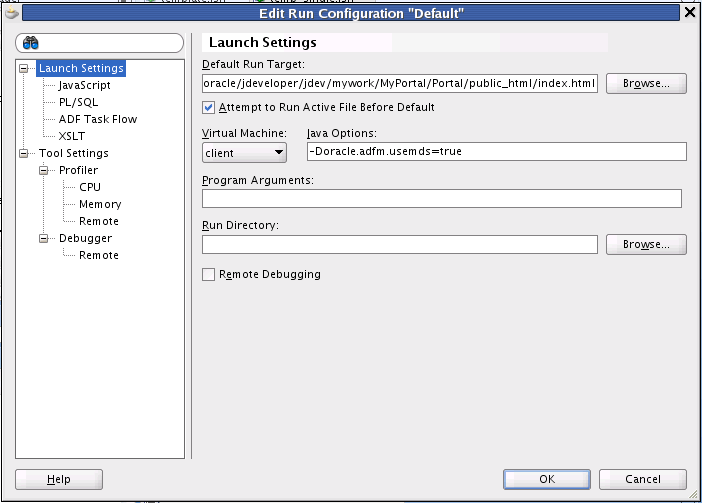
Another way to change the default index page is to use the Edit Run Configuration "Default" dialog box. To access this dialog, open the project properties dialog, then, select the Run/Debug/Profile option. Click Edit to bring up the Edit Run Configuration "Default" dialog where you can change the default index page, as shown in Figure 9-30.
Figure 9-30 Edit Run Configuration "Default" Dialog
Description of "Figure 9-30 Edit Run Configuration "Default" Dialog"
9.13.4 Specifying the Target Page After a Login or Logout
To specify the target page after a login or logout, edit the <navigation-rule> element in the WebContent/WEB-INF/faces-config.xml configuration file in your portal project, as shown in Example 9-1. You can change the target pages to any other navigation resource's pretty URL or Faces page.
Example 9-1 Specifying the Target Page for Login and Logout
<navigation-rule>
    <from-view-id>*</from-view-id>
    <navigation-case>
      <from-outcome>login_success</from-outcome>
      <to-view-id>/pages_home</to-view-id>
      <redirect/>
    </navigation-case>
    <navigation-case>
      <from-outcome>logout_success</from-outcome>
      <to-view-id>/pages_home</to-view-id>
      <redirect/>
    </navigation-case>
</navigation-rule>
For example, to redirect the user to a post-logout page follow these steps:
-
Create the post-logout page and add content to it. For example:
/oracle/webcenter/portalapp/pages/postlogout.jspx
-
Modify the navigation rule in
faces-config.xml. For example:<navigation-case> <from-outcome>logout_success</from-outcome> <to-view-id>/oracle/webcenter/portalapp/pages/postlogout.jspx</to-view-id> <redirect/> </navigation-case>
After a successful logout, the user is redirected to the specified page.
9.14 Basic Portal Development Tasks
This section lists some of the basic tasks involved with developing Framework applications.
-
Set up an integrated team development environment with source control, a common database, and common content repository.
-
Create a Framework application using the WebCenter Portal: Framework Application template.
-
Design the overall structure of your portal, sketching out the top level pages and sub pages that will comprise your portal.
-
Consider security for your portal. Decide which pages users will be allowed to visit. Create appropriate roles to accommodate these decisions.
-
Begin thinking about your portal's overall look and feel, and begin working on a page template.
-
Consider which WebCenter Portal services you want to include in your portal. For example, do you want to add a wiki or a blog or an activity stream? See Section 2.4, "Introducing Oracle WebCenter Portal: Services."
-
Create pages based on your overall portal structure. The pages can be blank at this point, but creating them now allows you to begin assembling the page hierarchy.
-
Create a page hierarchy using the Page Hierarchy editor.
-
Create a navigation model. Think about the kinds of resources you want users to be able to navigate to. Examples include pages, external URLs, task flows, and content folders.
-
Add navigation UI to the page template. Oracle WebCenter Portal: Framework provides several options for navigation UI. The most commonly used option is to use EL directly in the page template. WebCenter also provides navigation task flows and a Java API for navigation.
-
Begin applying security policies to the page hierarchy. Start by applying policies to the root node of the hierarchy. Those policies will be inherited by all other pages in the hierarchy. Then, fine-tune the security settings on individual pages or on sub-branches of the overall hierarchy.
-
Work on the pages themselves, adding and configuring portlets, task flows, content, and other features.
