35 Setting Your Personal Preferences
Your personal preferences provide easy configuration settings for tailoring the application to your particular working style. These include settings for your preferred application display language; your preferred application look and feel; your Spaces application password; and the like. Additionally, Spaces application preferences provide an accessibility setting to optimize the application user interface for use with a screen reader, such as JAWS.
Preferences settings are a user-level customization that affects only your view of the Spaces application.
This chapter describes how to specify your personal preferences. It includes the following sections:
-
Section 35.4, "Enabling or Disabling Application Accessibility Options"
-
Section 35.5, "Changing the Home Space Look and Feel in Your View"
-
Section 35.7, "Providing Login Information for External Applications"
See Also:
Preferences associated with specific services are discussed in the chapters that cover each service.
For information about Messaging, Subscription, and Notifications preferences, see:
For information about People Connections preferences, see:
For information about Instant Messaging and Presence preferences, see Section 62.2, "Identifying Your Preferred Instant Messaging Provider"
For information about Search preferences, see Section 56.5, "Setting Individual Preferences for Search Results"
For information about Mail preferences, see Section 65.3, "Selecting Your Preferred Mail Connection"
This chapter is intended for users minimally assigned the authenticated-role (that is, users who can log in to the Spaces application) who want to set general preferences. This includes selecting a display language, identifying preferred date and time formats, specifying a time zone, providing external application login information, and the like.
35.1 Accessing the Preferences Dialog
The easiest way to open the Preferences dialog is to click the Preferences link (Figure 35-1).
The availability of navigational links, such as the Preferences link, is determined by the people who design and build your portal. This being so, you may not see a Preferences link. In such a case, ask your application administrator to make the Preferences link available.
35.2 Choosing Your Preferred Display Language
The display language controls the language in which user interface (UI) elements are rendered in your browser. UI elements include button and field labels, application links, screen text, and so on. The display language also provides options for reflecting the current locale. Locale controls the appearance of symbols, such as monetary symbols, and the reading direction in which UI text is rendered.
To set a display language:
-
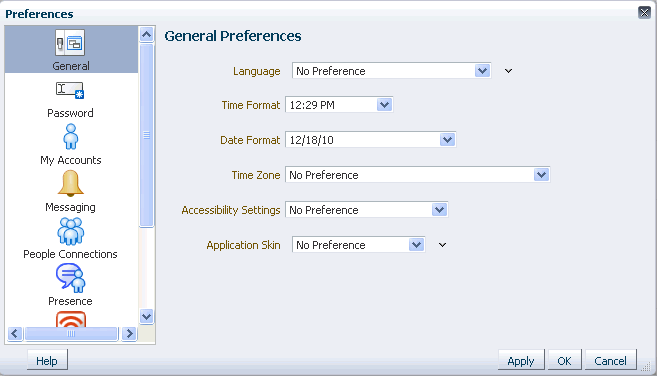
Open the Preferences dialog (Figure 35-2).
See Also:
For information about accessing the Preferences dialog, see Section 35.1, "Accessing the Preferences Dialog."
-
Click General to access general preferences.
-
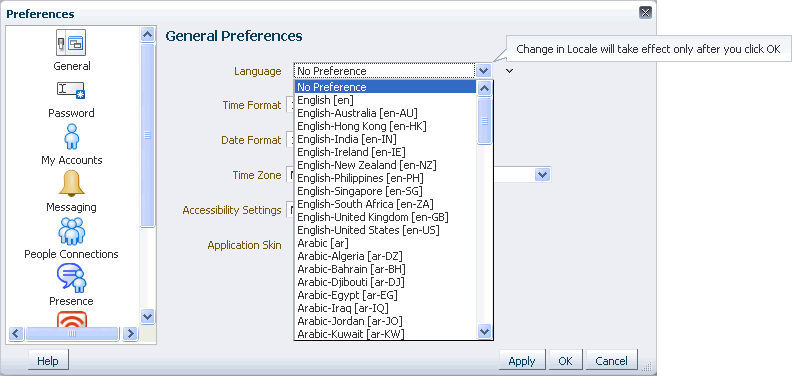
From the Language dropdown list, select your preferred display language-locale (Figure 35-3).
Alternatively, select No Preference to accept the application-level default set by your Spaces application administrator.
See Also:
For information about setting the application-level default display language, see Chapter 5, "Configuring Global Defaults." For information about display languages in the Spaces application, see Chapter 24, "Working with Multilanguage Portals."
-
Click OK to save your change and exit the Preferences dialog, or click Apply to save your change without exiting.
35.3 Setting Date and Time Preferences
Use date and time preferences to specify your preferred date and time formats and your current locale's time zone:
Note:
Some services may be developed with an intrinsic time display format. In such cases, these services are not influenced by your date and time format selections.
To set your preferred time format, date format, and time zone:
-
Open the Preferences dialog (for more information, see Section 35.1, "Accessing the Preferences Dialog").
-
Click General to access general preferences.
-
Set your date and time preferences.
Table 35-1 lists and describes the date and time options available on the General panel in the Preferences dialog.
Table 35-1 Date and Time Preference Settings
Preference Setting Options Time Format
The following list shows time formats; the formats in the Preferences dialog show the current time:
-
No Preference—To display the default Time Format established by the administrator
-
H:M AM/PM—To display hour, minutes, and AM or PM, such as
4:47 PM -
H:M:S AM/PM—To display hour, minutes, seconds, and AM or PM, such as
4:47:52 PM -
H:M:S AM/PM Time Zone—To display hour, minutes, seconds, AM or PM, and the abbreviation of the specified time zone, such as
4:47:52 PM PDT
Date Format
The following list shows date formats; the formats in the Preferences dialog show the current date:
-
No Preference—To use the default date format set by the administrator
-
M/D/YY—To use a number format, such as
6/18/10 -
MON D, YYYY—To use an abbreviation format and the full year, such as
Jun 18, 2010 -
MONTH D, YYYY—To display the full month name and the full year, such as
June 18, 2010 -
DAY, MONTH D, YYYY—To display the full month name, the full year, and include the day of the week, such as
Friday, June 18, 2010
Time Zone
From the Time Zone pick list, select your preferred time zone. Alternatively select No Preference to accept the application-level default set by the application administrator.
-
-
Click OK to save your changes and exit the Preferences dialog, or click Apply to save your changes without exiting.
35.4 Enabling or Disabling Application Accessibility Options
The General panel in the Preferences dialog provides options related to user accessibility. Select an option to optimize the application user interface (UI) for use with a screen reader, such as JAWS; for users with non-visual impairments, such as mouse usage issues; or to disable such optimizations.
This section provides information about application accessibility options and steps you through the process of enabling or disabling such optimizations.
This section includes the following subsections:
35.4.1 What You Should Know about Application Accessibility Options
The Spaces application provides accessibility features to enable visually and non-visually impaired users to navigate successfully through the application user interface. This section contains some tips to assist you in using them successfully.
Use the Accessibility Settings option Disable Screen Reader to enable keyboard-centric accessibility capabilities for a sighted user with non-visual impairments, such as mouse usage issues. This option also handles color contrasts.
Use the Accessibility Settings option Enable Screen Reader to optimize the UI for the JAWS screen reader. Once you set your screen reader preference to enabled, click OK to exit Preferences. If you want to set other options in Preferences, then reopen the Preferences dialog. The other Preferences panels, Password, My Accounts, Messaging, People Connections, Presence, Subscriptions, Search, and Mail, are redrawn as radio buttons, enabling the screen reader to detect and access them.
Normally, JAWS announces the links associated with a menu selection. With the Actions menu, JAWS does not announce the submenu items. For example, JAWS does not read the submenu items under Manage on the Actions menu. The workaround is to select the menu items using direct keyboard navigation. That is, instead of using JAWS Links Chooser, navigate to the Manage submenu of the Actions menu using the Tab key on your keyboard.
Not all dropdown menus, fields, and radio buttons on Spaces application administration pages are labeled. As a result, the JAWS screen reader renders a pound sign (#) instead of a label when the JAWS command Insert-F7 is invoked. The problem occurs in the following areas:
-
Dropdown menus in space administration pages
-
Radio buttons on space administration pages
-
Fields on the Documents page
The workaround is to use the Tab and arrow keys to navigate to each individual form field in order to hear each form field read.
When you add resources from the Resource Catalog, JAWS announces all Resource Catalog items as Add. This makes it difficult to identify the selected resource. To work around this issue, press the Tab key to get to the Add link for the resource, then press the Down Arrow key. JAWS then reads the description of the resource.
35.4.2 Applying Accessibility Options
To apply accessibility options to the application UI:
-
Open the Preferences dialog (for more information, see Section 35.1, "Accessing the Preferences Dialog").
-
Click General to access general preferences.
-
From the Accessibility Settings pick list, select your preferred accessibility setting.
Choose from the following options:
-
No Preference—Accessibility capabilities are not enabled. Screen readers can still process the application UI, but the UI is not optimized.
-
Enable Screen Reader Mode—Specifically for the visually impaired, enables the use of JAWS, the screen reader software.
Once you enable screen reader mode, click OK to exit the Preferences dialog. If you want to set other preference options, then reopen the Preferences dialog. The other preferences panels: Password, My Accounts, Messaging, People Connections, Presence, Subscriptions, Search, and Mail, are redrawn as radio buttons, enabling the screen reader to detect and access them.
-
Disable Screen Reader Mode—Enables keyboard-centric accessibility capabilities for a sighted users with non-visual impairments, such as mouse usage issues. Additionally, in this mode color contrasts are handled.
-
-
Click OK to save your change and exit the Preferences dialog, or click Apply to save your change without exiting.
Alternatively, click Cancel to cancel your change and exit the Preferences dialog.
35.5 Changing the Home Space Look and Feel in Your View
The General panel in the Preferences dialog provides a pick-list of application skins for your view of the Home space. Application skins specify the application background color, screen fonts, and, with some skins, the shapes and images used for application buttons and icons. The skin you select through the Preferences dialog affects the look and feel of your view of the Home space. No other users' views and no other areas of the application are affected.
To change the Home space skin in your view:
-
Open the Preferences dialog (for more information, see Section 35.1, "Accessing the Preferences Dialog").
-
Click General to access general preferences.
-
From the Application Skin pick list, select your preferred application skin.
Choose from the following options:
-
No Preference—To defer to the application's configured skin setting
-
Skin_Name—To select a predefined application skin from the list of skins available to you
-
-
Click OK to save your change and exit the Preferences dialog, or click Apply to save your change without exiting.
The application refreshes, using the skin you selected for your view of the Home space.
See Also:
Advanced users can create custom application skins and deploy them to the Spaces application. For more information, see the chapter, "Creating and Managing Skins," in Oracle Fusion Middleware Developer's Guide for Oracle WebCenter Portal.
35.6 Changing Your Application Password
Provided your application administrator has enabled you to do so, you can change your Spaces application password. Changing your password on a regular basis is one way you can participate directly in securing your application software.
See Also:
Your application administrator can prohibit you from changing your application password. If this feature is disabled, you cannot take the steps described in this section. For more information, see Section 6.4.3.4, "Configuring Profile."
To change your Spaces application password:
-
Open the Preferences dialog (for more information, see Section 35.1, "Accessing the Preferences Dialog").
-
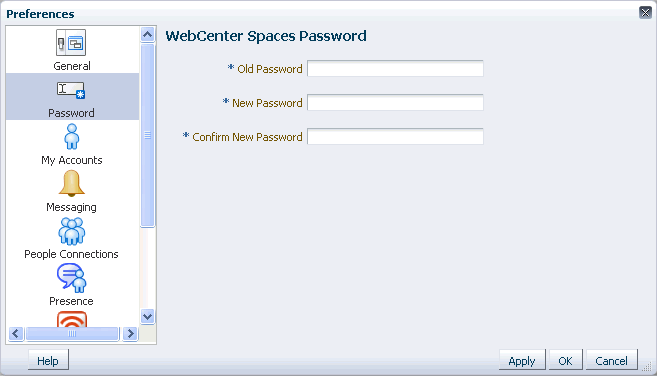
Click Password to open the Password panel (Figure 35-4).
-
In the Old Password field, enter your current password.
-
In the New Password field, enter your new password.
Note:
The requirements for this password are driven by the identity store that manages Spaces application application users. Every ID store has its own password policy that enforces rules such as password length, password history, and so on. If you have issues setting a new password, contact your application administrator for the password requirements and restrictions of your ID store.
-
In the Confirm New Password field, enter your new password again.
-
Click OK to save your change and exit the Preferences dialog, or click Apply to save your change without exiting.
35.7 Providing Login Information for External Applications
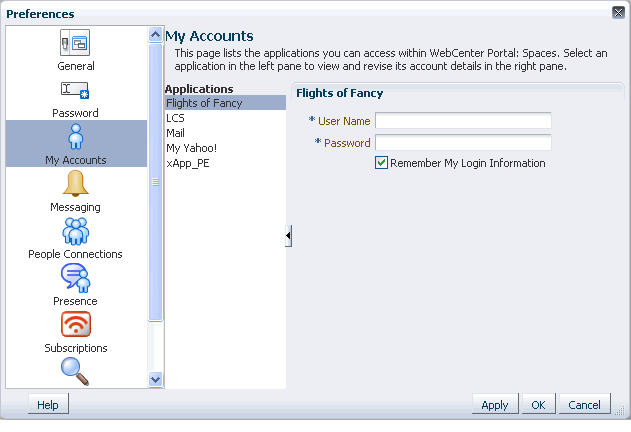
The My Accounts panel in the Preferences dialog provides one-stop access to login credentials for all external applications that have been configured by your application administrator. My Accounts provides a way to store application login credentials so that you provide them only once for the life of the credential. Once you have provided your credentials, every time you access an external application within the Spaces application, the login credentials are provided automatically. This gives you a single-sign-on type of experience where one login (to the Spaces application) provides access to multiple applications.
Note:
If you change the login credentials for an application, you must enter them again into the My Accounts panel in the Preferences dialog as described in this section.
To provide login credentials for external applications:
-
Open the Preferences dialog (see Section 35.1, "Accessing the Preferences Dialog").
-
Click My Accounts to open the My Accounts panel (Figure 35-5).
-
Select an application from the Applications list.
Log-in credential fields and checkboxes for the selected application are shown in the right pane.
Tip:
The applications you see on the My Accounts panel are the ones that were configured by your application administrator. Contact your application administrator to request additional applications.
-
Enter log-in credentials as required for the selected application.
Fields requiring values are marked with an asterisk (*).
Note:
Login credentials vary from one application to another. For example, some applications may require user name and password, while others may require those values along with additional values, such as your mail address.
-
Select Remember my login information to enable automatic authentication to the selected application every time you log in to the Spaces application.
Note:
When you do not select Remember my login information, the login information that you enter is used only for the current user session. This means the next time you log in to the Spaces application, you must also log in to this application.
-
Click OK to save your change and exit the Preferences dialog, or click Apply to save your change without exiting.


