 Navigating the PeopleBooks Interface
This chapter discusses how to:
Navigate the PeopleBooks interface.
Search the Hosted PeopleBooks website.
Search the locally installed PeopleSoft Online Library.
Display and print graphics in PeopleBooks.
Navigating the PeopleBooks InterfaceThis section provides an overview of how to access the PeopleBooks interface and discusses how to:
Show and hide the reference pane.
Navigate between books and chapters.
Navigate within a chapter.
Use the table of contents.
Use the index.
 Understanding How to Access the PeopleBooks Interface
When you click a product line and release link on the Oracle PeopleSoft Enterprise Hosted PeopleBooks homepage, the PeopleBooks Library page appears.
The PeopleBooks are logically grouped by suite, product line, or functional area so that books are easier to find when accessing them online. Select a PeopleBook title on the homepage to display the PeopleBook interface, which includes the following panes:
Document
The pane on the right side of the window displays the document HTML file, which corresponds to a chapter.
Navigation
The pane above the document pane contains display options, navigation controls (breadcrumbs), and the current PeopleBook and chapter titles.
Reference
The pane on the left side of the window contains three tabs: Contents, Index, and Search. Select these tabs to explore the PeopleBooks or to locate a specific topic. You can hide the reference pane to maximize the size of the document pane.
Note. When you access a topic through the Help link on an application page, through context-sensitive (F1) help, or when you access one PeopleBook from another, the reference pane is always hidden initially.
The following example illustrates the three panes in the browser:
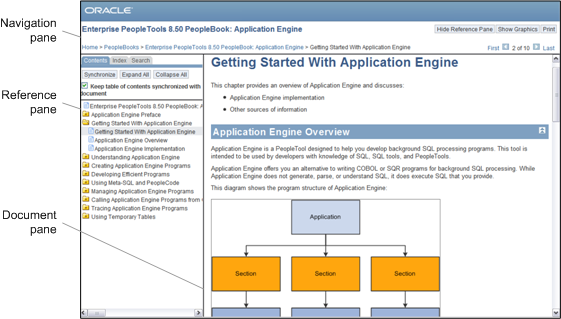
PeopleBook page with panes identified
Showing and Hiding the Reference Pane
If the reference pane (with the Contents, Index, and Search tabs) doesn't appear, click the Show Reference Pane button in the Navigation pane at the top of the browser. To hide the Reference pane, click the Hide Reference Pane button. If you have cookies enabled on your browser, your last Reference pane setting is remembered when you jump between books. Otherwise, jumping to a new book always hides the Reference pane (to speed page loading).
Navigating Between Books and Chapters
Use the Navigation pane to view information about the current PeopleBook and to navigate between PeopleBooks or between chapters in the current PeopleBook. The following example illustrates the Navigation pane elements that are discussed in this section:
Use the following Navigation pane elements for navigating through PeopleBooks:
|
Breadcrumbs |
Click the breadcrumb links at the bottom of the Navigation pane to access the following pages:
The final, text-only breadcrumb is the title of the PeopleBook chapter that you are currently viewing. |
|
|
Click the Previous or Next button to go to the previous or next chapter in the book. Note. These buttons move you to the previous or next chapter in the sequence in which the chapters are organized in the book, not (as with the browser's Forward and Back buttons) in the sequence in which you have opened the chapters. |
|
First and Last |
Click these links to go to the first and last chapter in a book, respectively. |
Navigating Within a Chapter
Use the following navigation features in the Document pane to navigate within a chapter:
|
|
Click the Top button to go to the top of the current page, which is the beginning of the chapter. |
|
|
Click the Previous button to go to the beginning of the parent section within the page. |
Click a cross-reference link to go to a related topic. These links typically appear in sentences that begin with the word See or under subtopic headings that contain the words See Also.
Using the Table of Contents
Select the Contents tab in the Reference pane to drill down to topics in the current PeopleBook, as illustrated in the following example:
Use the following elements to navigate within the Contents tab:
|
|
Click a closed folder icon to expand a chapter. |
|
|
Click an open folder icon to collapse a chapter. |
|
|
Click a section icon to open to the section. |
|
Synchronize |
Click to open the Table of Contents to the topic that currently appears in the Document pane. |
|
Expand All |
Click to open all of the folders in the Table of Contents. |
|
Collapse All |
Click to close all of the folders in the Table of Contents. |
|
Keep table of contents synchronized with document |
Select this check box to automatically synchronize the Table of Contents with the page that appears in the Document page. |
Using the Index
Select the Index tab to browse or search the keyword index for the current PeopleBook.
To display an index topic, enter a keyword in the text box or scroll to the keyword and click it. The document appears at the associated topic, unless there are multiple topics. If multiple topics are related to the keyword, a pop-up menu appears. Click the link for the topic that you want to access.
Searching the Hosted PeopleBooks Website
This section discusses how to:
Perform a simple search
Perform an advanced search
View search results
Performing a Simple Search On the Search tab of the Reference pane, enter a word or phrase and click the Search button. This searches all PeopleBooks for the product line and release that you're viewing.
The following example illustrates the Search tab:
Performing an Advanced Search
Use the advanced search if too few or too many results were obtained from the simple search. Enter a word or phrase in one of the first three search fields, select any of the additional optional fields, then click the Search button. The following example illustrates the search options that are discussed in this section:
Use the following options on the Advanced Search page:
|
Search for all the words and Search for any of the words |
By default, all search terms longer than 3 characters are surrounded by wildcards on both sides. For example, searching for intermedia also finds intermediate. Searching for sql or aq does not use wildcards, because those terms have 3 or fewer characters. If you include typical wildcard characters, such as %, _, *, and ?, in your search terms, they are interpreted as literal characters rather than wildcards. |
|
Search for the exact phrase |
Quotes are not required, and because all searches are not case sensitive, you do not need to enter a word in all capital letters. |
|
Don't show results containing this word or phrase |
(Optional) Enter words or phrases to be excluded from the search results (similar to the Boolean search NOT). |
|
Show this many results on each page |
(Optional) Expand the number of displayed search results by changing the selection from 10 (default), to 20, 50, or 100. |
|
Show results where the words are |
(Optional) Identify whether the search words can be anywhere in the topic or only in the topic title. |
|
Only show results from this book |
(Optional) Select from a list of all books within the product line. For example, if you are searching within PeopleTools PeopleBooks, the list contains every PeopleTools PeopleBook title. |
|
Only show results of this type |
(Optional) Filter the search results by type of content, such as tasks or concepts. Note. The task and concept types may limit your search more than you expect, since some topics are not labeled as either task or concept. The Examples, Error Messages, and Glossary Terms types do not apply to PeopleBooks and may return unexpected results. |
Viewing Search ResultsThe Oracle PeopleSoft Enterprise Search Results page displays information about the current query, the total number of search results that were found, and the number of results on the current page, as illustrated in the following example:
If the results are not sufficient, you can select another product line from the Product Line drop-down list box and perform the search again. If the results contain information that's not relevant for you, you can filter the results by clicking a link in one of the boxes on the right side of the results page:
Refine Results
Filter by Job Role
Top Matching Books
In addition, each topic in the results includes links to show only results from that book or to hide results from that book if the entire book is not relevant.
Searching the Locally Installed PeopleSoft Online Library
This section discusses how to:
Perform a simple search
Perform an advanced search
View search results
Performing a Simple Search Select the Search tab to perform a full-text search of the current PeopleBook or of the entire PeopleBooks Library, as illustrated in the following example:
Note. The Search tab is context sensitive. When you select this tab on the PeopleSoft Online Library homepage, you search all documentation in the library, which includes all product lines that are installed within the same Online Document Library Application (ODLA) folder (ODLA.war). When you select this tab on the PeopleBooks page, you search all PeopleBooks in the library. When you select this tab in a particular PeopleBook, you search within that book only.
Important! The search feature is available only when you are connected to the PeopleSoft Online Library with HTTP (on a web server).
To perform a simple, full-text search, enter the words for which you want to search, and click the Search button. The search tool is not case sensitive, so you can use lowercase or uppercase. The Search list box displays any topics that contain any of the words that you entered. The title of the PeopleBook that contains the topic also appears if you are searching across multiple books. Topics appear in order of relevancy. Click the topic that you want to read.
Note. To search for an exact phrase or to use query syntax, use the Advanced Search page.
Performing an Advanced Search
Use the Advanced Search page to limit or expand your search to one or more documentation types or book titles. You can also define the type of search to perform and how you want to format the search results. Click the Advanced Search link on the Search tab to access the Advanced Search page. The following example illustrates the search options that are discussed in this section:
Use the following search options on the Advanced Search page.
Search for
|
Search |
Enter the words for which you want to search, and click the Search button. The search tool is not case sensitive, so you can use lowercase or uppercase. To search for a phrase, enter the phrase and select the Exact phrase option. To search for similar words with different endings (for example, administration and administrator), enter the letters that the words share, followed by an asterisk (for example, admin*). |
|
Match |
Select one of the following search modes:
|
Limit by
|
Don't show results containing this word or phrase |
(Optional) Enter words or phrases to be excluded from the search results (similar to the Boolean search NOT). |
|
Show results where the words are |
(Optional) Identify whether the search words can be anywhere in the topic or only in the topic title. |
|
Product line |
Select from a list of the product lines that are installed within the same ODLA folder. |
|
Language |
Select from a list of the languages for which you have PeopleBooks installed. |
|
Select books |
Click one or more titles in the list box (using Ctrl+click) to limit your search to those books only. |
Results Formatting
|
Summary |
Select this check box to show include an excerpt from the beginning of the topic text in the search results. |
|
Index term |
Select this check box to include links to index terms that appear in the topics in the search results. This option enables you to find related terms quickly. For example, if you search on hiring within the HRMS product line, the search returns the topic “Reviewing Hire Details and Initiating the Hiring Process for Job Applicants” within the PeopleSoft Enterprise Human Resources 9.1 PeopleBook: Administer Workforce. If you selected the Index term check box, the search results include a related term link to the “Manage Hire Details page.” |
|
Score |
Select to see a score representing how closely the match resembles your search criteria. |
|
Hits per page |
Select the number of topics that you want to appear on each results page. |
Viewing Search ResultsThe search results page displays a list of topic summaries, the total number of topics that were found, and the number of topics on the current page, as illustrated in the following example:
The topic summaries may include the following items, depending on which options you selected for the results formatting on the Advanced Search page:
A link to the topic title.
The relevancy score for the topic (in parentheses following the topic title link).
An excerpt from the beginning of the topic text.
Links to related terms, which are based on index terms that are defined for the topic.
Clicking a link to a related term opens a search results page for the related term.
The title of the PeopleBook that contains the topic.
To modify the search criteria, click the Advanced Search link to return to the Advanced Search page.
Note. You can refine your search using query syntax. To see the query syntax that was used to create your current search results, click the search term link in the “Results x–x of x for <search term link>” line at the top of the page.
Displaying and Printing Graphics in PeopleBooks
In the Document pane, you can display many of the graphics in Pop-up or Inline mode. The default Pop-up mode provides faster document loading and scrolling speeds because each graphic is represented by the following pop-up icon, which you click to display the full-sized graphic:
In Inline mode, graphics appear at full size in the Document pane. This mode is useful when viewing the PeopleBooks locally (when loading and scrolling speeds are not an issue) and with the browser window maximized.
To activate Pop-up mode, click the Hide Graphics button in the Navigation pane. This button then changes to Show Graphics, which you click to activate Inline mode.
To print the current file with graphics displayed inline in the text (instead of pop-up icons), click the Print button in the Navigation pane.
Important! If you use your browser's Print command, the graphics appear exactly as they appear on the screen: pop-up icons are not replaced with the actual graphics, and graphics are not scaled to fit on the printed page.