 Securing PS/nVision Elements
This chapter describes how to:
Secure PS/nVision elements.
Secure report distribution.
Implement PS/nVision ledger-based security.
Implement PS/nVision query-based security.
Securing PS/nVision Elements
This section describes how to:
Secure PS/nVision menu items.
Secure report layouts.
Secure and share report requests in PIA.
Secure and share report request in Windows client.
 Securing PS/nVision Menu Items
Using PeopleSoft Security, you can specify page permissions to control the operations users perform with PS/nVision. Authorizations specified here apply to both the Windows client and the PeopleSoft Pure Internet Architecture (PIA).
This is an example of the Page Permissions page (ACL_PAGES2) (select PeopleTools, Security, Permissions and Roles, Permission Lists, Pages) in PIA:
To set component permissions in PIA:
Select PeopleTools, Security, Permissions & Roles, Permission Lists.
Select the required nVision Permission list.
Select the Pages tab.
Click the Edit component link , corresponding to the required menu, to display the Component Permissions page.
Click the Edit Pages button for a component to display the Page Permissions page.
Change the settings to authorize the action or leave the settings as display-only.
When selecting page permissions, you must select both an action and the Authorized option. For example, when you allow a user to run report requests, you must select the Update/Display button and the Authorized option adjacent to the RUN_REPORT page name on the Page Permissions page.
Click the OK button.
Important! If no items are authorized, you cannot run PS/nVision at all.
nVision is controlled through individual components associated with the REPORT_BOOKS and NVISION menus.
The following table lists the available PS/nVision page permissions and describes the actions they control:
|
Page Permission |
Action Controlled |
|
DEFINE_LAYOUT |
Allows the user to use the Open Layout, Layout Definition, and similar menus in Excel. |
|
OPEN_REPORT |
Enables the Open button in the PeopleSoft nVision Report Request dialog box on the Windows client. |
|
EDIT_REPORT |
Allows the user to modify values in the PeopleSoft nVision Report Request dialog box. Note. The EDIT_REPORT setting does not control access to report layout (Excel XNV) files. To restrict users from accessing XNV files entirely, use the Network Security settings. |
|
RUN_REPORT |
Allows the user to run report requests using the Run button in the PeopleSoft nVision Report Request dialog box, the Run Current Request menu item in the Windows client, and the Run button in the web report request. |
|
SAVE_REPORT |
Enables the Save button in the PeopleSoft nVision Report Request dialog box on both the Windows client and the web. Note. When you make changes to a report request, it is automatically saved when you run the request. To save a report request without running it, click the Save button. You cannot change a report request without saving it. |
|
DELETE_REPORT |
Enables the Delete button in the PeopleSoft nVision Report Request dialog box on both the Windows client and the web. |
|
OPEN_SCOPE |
Enables the Open button in the PeopleSoft nVision Scope Definition dialog box on the Windows client. |
|
EDIT_SCOPE |
Allows the use to modify values in the PeopleSoft nVision Scope Definition dialog box on the Windows client. |
|
SAVE_SCOPE |
Enables the Save button in the PeopleSoft nVision Scope Definition dialog box on the Windows client. |
|
DELETE_SCOPE |
Enables the Delete button in the PeopleSoft nVision Scope Definition dialog box on the Windows client. |
|
PERFORMANCE_OPTS |
Enables the nVision Performance menu item, by which you access the Tree Performance Options dialog box. |
See Also
Securing Report Layouts
Report layouts (XNV files) are stored on a file server and not in the PeopleSoft database. Set up network security so that only appropriate users are able to modify or delete report layout (XNV) files in the report layout directories of the network.
With web-based PS/nVision reporting, reports launched from the browser are run through PeopleSoft Process Scheduler and executed on a report server. The file server that stores the layouts is associated with the report server.
A report server is a Windows NT machine with PS/nVision (PeopleTools client software), Microsoft Excel, and PeopleSoft Process Scheduler installed. Process Scheduler selects the layout from the PS/nVision layout directory path defined in the Process Scheduler configuration. If you restrict access to this directory on the report server, unauthorized users cannot modify shared report layouts. Additionally, access to the PS/nVision directories on the Process Scheduler report server should be restricted.
If the report is run using the Windows client, a user authorized to define layouts can point to the PS/nVision layout directory (as defined in Configuration Manager) on the local drive and then modify and save the layout.
If a user has a PS/nVision user profile defined in PeopleSoft Security where only RUN_REPORT is selected, and all other settings (for example, EDIT_REPORT, SAVE_REPORT) are cleared, the user cannot create a new report request, because the Save button is disabled.
Note. When the report request is run, access to ledger or record data itself is still controlled by the row-level security defined for that user.
See Also
Understanding PeopleSoft Process Scheduler
Securing and Sharing Report Requests in PIAYou can either share and secure nVision reports in PIA or in Windows client.
In web-based PS/nVision reporting, the procedures and processes used to run a report are performed using the different pages of the Report Book menu. Those actions include defining and running report requests, defining and running report books, defining scopes, and running DrillDowns. You can control access to these menu items and customize the pages to allow users restricted access to certain report requests.
Note. For the Scope and Delivery Templates link on the nVision Report Request page (NVS_REPORT_RQST), the system automatically displays an nVision output option page based on the output type. Security permissions for these secondary pages are inherited from the parent Report Request page, and the Display Only option set in the nVision Report Request component for these pages is ignored.
By default, only the creator of a report request has full access to that request. The creator can select to share the report request with other users or to change the access mode using the Share This Report Request link on the nVision Report Request page.
You can select Reporting Tools, PS/nVision, Define Report Request to access the nVision Report Request page. In this page, click the Share This Report Request link to display the nVision Share Report Request page, where report request creators can view or change the access mode.
Note. You can share and secure nVision reports either in PIA or in Windows client.
This is an example of the nVision Share Report Request page:
|
Access Mode |
Specifies the access availability for the report request. Select the Public option for all users to view or modify the request. Select the Secured option to specify which users have full access to the report. By default, users have the right to share report requests and access the Security Report Request page. You can change the default value using the Use Secure Rep Rqst in nVision (Use Secure Report Request in nVision) option on the PeopleTools Options page to restrict the users with this right. See PeopleTools Options. Note. If you change the access mode from secured to public, all the users and groups who had access to the report will be removed. If you then change the access mode back to secured, you will need to reassign the users and groups. |
|
ID Type |
Select the User option to add a user, or the Role option to add a user role. |
|
Distribution ID |
Enter a valid user or role name, or select one from the list. You can add more users by clicking the + sign. If you selected User from the ID Type list, valid users appear; if you selected the Role option in the ID Type field, user roles appear. |
Since report requests are keyed by business unit, the business unit validation is done for each shared user or role when a report request is opened. If a user or role does not have access to a business unit, that user does not have access to the report request even if she or he is given access through the Access Mode page.
Note. If a report book contains a report request to which a user does not have access, that user will not be able to view that report request. A message appears when the user opens the report book.
In Windows-client PS/nVision reporting, you can use the PS/nVision VBA interface to programmatically create a customized report request that will restrict users to certain parameters and functions of the report requests.
You can use the nVision Report Request Admin page to administer your report requests, including:
Removing a request.
Transferring a request from one user to another.
Making a request public.
Access the nVision Report Request Admin page by selecting PeopleTools, Utilities, Administration, nVision Report Request Admin.
This is an example of the nVision Report Request Admin page:
|
Source User ID |
The user whose report requests will be administered. |
|
Target User ID |
The user ID to which the selected report requests will be transferred if the Transfer Report Request button is clicked. |
|
No. of Records Affected |
The number of records that will be affected (moved, transferred, or made public) by the selected operation. |
|
Move Report Request |
Click to remove the source user's report request. If the report request is not shared by any other user, the report request will be deleted. If the report request has been shared by users other than the source user, only the source user will be removed. |
|
Transfer Report Request |
Click to remove the source user from the report request and grant access to the target user. |
|
Make Report Request Public |
Click to make all report requests owned by the source user available for any user to view and edit. |
See Also
Securing and Sharing Report Requests in Windows ClientsIn Windows Client of PeopleSoft nVision, you have the flexibility of making report request either public or private. By default, all nVision report requests created in Windows clients are public.
All users who create and view reports must have the required privileges to use the Business Unit from which the reports are generated. If the report creators define the report as secured, other users can use the secured reports only if the report creators have transferred the reports to them. For example, if user A creates a report request and shares it with user B, then only user B will have access to that report request. However, in the same client session, if the Open PeopleSoft nVision Report Request dialog box or the PeopleSoft nVision Report Request dialog box still retains the shared report request information, user A will have a temporary access to the shared report request. When these dialog boxes are refreshed with other report requests information or the client session is closed, then user A will no longer have the access to the shared report request.
Report creators can use the nVision Share Report Request dialog box to change the access mode of reports from public to private, and vice versa.
This is an example of the nVision Share Report Request dialog box:
Securing Report Requests in PS/nVision Windows Clients
To secure report requests in PS/nVision Windows clients:
Select nVision, Report Request from the nVision toolbar.
The PeopleSoft nVision Report Request dialog box appears.
Enter the required values for the new report request, and click the Save button.
Click the Run button to generate the report instance.
Select nVision, Share Report Request from the nVision menu.
The Share Report Request dialog box appears.
Accept the default settings of Secured.
Double-click the ID Type field.
A list of contain values for ID type appears.
Select an user to share this report instance with.
Alternatively, select a roles to share this report instance to users with certain roles.
After selecting ID type or role, double-click the Distribution ID field or the Distribution List field.
If the ID type cell is User, a list of users appears. If the ID type cell is Roles, a list of roles appears.
Optionally, repeat step 6 to 8 for adding other users and roles.
Click the OK button to make the report instance secured.
Sharing Report Requests in PS/nVision Windows Clients
To share report requests in PS/nVision Windows clients:
Select nVision, Report Request from the nVision toolbar.
The PeopleSoft nVision Report Request dialog box appears.
Enter the required values for the new report request, and click the Save button.
Click the Run button to generate the report instance.
Select nVision, Share Report Request from the nVision menu.
The Share Report Request dialog box appears.
Select the Public option to make the report instance public.
A message appears for confirmation of this report instance to be available to all users.
Click the OK button to make the report instance public.
Alternatively, click the Cancel button to keep the report instance secured and viewed only by the shared users.
Removing User or Role From the Secured Distribution List
To remove an user or a role from the secured distribution list:
Select nVision, Report Request from the nVision toolbar.
The PeopleSoft nVision Report Request dialog box appears.
Enter the required values for the new report request, and click the Save button.
Click the Run button to generate the report instance.
Select nVision, Share Report Request from the nVision menu.
The Share Report Request dialog box appears.
Select the required user to be removed, and click the Delete button.
Alternatively, select the required role to be removed, and click the Delete button.
Click the OK button to confirm that the selected user or role will be deleted.
Optionally, repeat step 5 and 6 for removing other users and roles.
Report creators can also use the PS/nVision Report Request Admin dialog box to transfer the private reports to other users for use.
To access the PS/nVision Report Request Admin dialog box:
Open nVision client by selecting Start, Programs, PeopleSoft 8.x, nVision.
Create a new nVision report, or open an exiting one.
Select nVision, Transfer Report from the menu.
The PS/nVision Report Request Admin dialog box appears.
This is an example of the nVision Report Request Admin dialog box, which enables report creators to move reports from one user to another user:
Securing Report Distribution
You have different security considerations for distribution based on the type of output: file, email, or web.
When you output reports as files, remember that files are stored in the directories and files that you specified in the directory templates and file templates. These directories and files are on your file server and are not stored in the PeopleSoft database. You must set up network security to map the accessibility of the reports and ensure that unauthorized users do not have access to these reports on your file server.
When you output reports as email, you control who receives the reports using the email template in the report request. You can specify precise email addresses in the email template, or indirectly specify email addresses by user ID or role ID. If you specify your email recipients using role or user IDs, then the email addresses from those profiles are used.
When you output reports via the web, the reports are distributed through Report Manager. You control who receives the reports using security templates in the report requests. If nothing is entered in the security template, the default recipient is the user who runs the report.
You can associate a scope with the email template or the web security template using %DES% variables. You must specify who can modify the email template or the security template from the report request, and who can access the values of the %DES% variable in the table associated with the scope.
Additionally, when a report is distributed through email or web, it uses the report server to run the report and then distribute the output. In the report server, the directory templates and file templates from the report requests are used as temporary locations to store the intermediate files before the reports are transferred to the report repository or to the email system. Access to the file server that stores the intermediate reports should be secured through your network security. Set up PeopleSoft Process Scheduler as a Tuxedo Service so that PS/nVision reports can be run in the background and no data can be viewed during the report execution time.
Implementing PS/nVision Ledger-Based Data SecurityThis section provides an overview of PS/nVision ledger-based data security and discusses how to:
Use the Reporting view.
Use the Authorization table.
Use ledger reporting view access.
Restrict ledger access.
Understanding PS/nVision Ledger-Based Data Security
With PS/nVision row-level ledger security, you can restrict access to specified rows of ledger data. PS/nVision employs a view that joins an Authorization table (maintained by you through a page) with the Ledger table to select the rows a user is authorized to see. You can set up an Authorization table based on any ChartField.
When you define a ledger, you specify the physical table that stores the ledger data in the database. You can also define a record (view) for reporting purposes. If you define a reporting view, PS/nVision uses this record in place of the physical Ledger table. By joining the Ledger table with the Authorization table, the user only sees the rows that they’re authorized to see. The following diagram illustrates the approach:
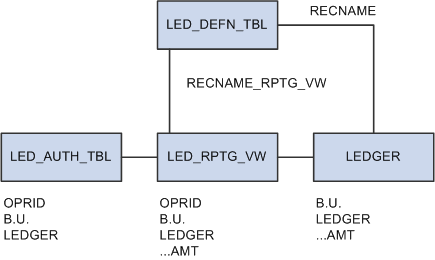
PS/nVision security customization
Using the Reporting View
The reporting view, like the Ledger table, is named on the Ledger template in the Secured Rptg Vw (Secured Reporting View) field.
To open the Ledger template, select General Ledgers, Ledgers, Templates, Record Definitions.
In the following example, this view (LED_RPTG_VW) is defined as:
SELECT A.OPRID, L.BUSINESS_UNIT, L.LEDGER, L.ACCOUNT,...
FROM PS_LEDGER L, PS_AUTH_TBL A
WHERE L.BUSINESS_UNIT = A.BUSINESS_UNIT
  AND L.LEDGER = A.LEDGER
This is an example of the Record Definitions page that include the Secured Rptg Vw field:
Normally, the view includes all the columns in the Ledger table, plus the OPRID field, but you are not required to include all ledger columns. The OPRID field is defined as a key to the view. Reporting views can be defined differently for different ledgers. The OPRCLASS or ROWSECCCLASS fields, or any combination of the OPRID, OPRCLASS, and ROWSECCLASS fields can be used instead of the OPRID field. In the user profile found in PeopleSoft Security, you can use the OPRID field as the user ID, the OPRCLASS field as the primary permission list, and the ROWSECCLASS field as the row-level security permission list for the user.
With this example view, only users that belong to the specified OPRID, OPRCLASS, or ROWSECCLASS from the LED_AUTH_TBL can see those business units and ledgers.
The application provides a template Authorization table and Reporting view. By changing the definition of the view and the underlying Authorization table, you can revise the security to be at the department level or any other ChartField. The personalized view can use BETWEEN, OR, and LIKE statements to implement more flexible (though less efficient) security views.
For example, you could add DEPT_FROM and DEPT_TO to the Authorization table. Each user would have access to all departments that fall within the ranges for their user ID and role. The Reporting view could include:
WHERE ... L.DEPTID BETWEEN A.DEPT_FROM AND A.DEPT_TO
This setting might carry a performance cost on some database platforms, but it can ease the process of maintaining the Authorization table, all transparent to PS/nVision.
Changes to the view are made using Application Designer. Changes to authorizations are made through a page that maintains authorized ChartField values for each user. No changes are required to PS/nVision.
To ignore security on a ledger, leave the Secured Rprt Vw (Secured Reporting View) field on the Ledger Definition page blank. PS/nVision will access the base ledger record.
See Also
Understanding PeopleSoft Security
Using the Authorization Table
The Authorization table is maintained by a page that can be personalized. Each valid combination of user ID or role and the secured ChartField values (or ranges) must be defined in this table. Since the system administrator who has access to this page (through the Administer Security pages) can change all security provisions, trickle-down authority does not occur.
Using Ledger Reporting View Access
To get data from a ledger, PS/nVision uses a Select statement from the Reporting view, not the actual Ledger table, using the user’s ID or primary permission list as part of the Where clause. PS/nVision checks the record definition of the Reporting view and determines whether it includes OPRID, OPRCLASS, or ROWSECCLASS in its keys, and generates the appropriate phrase in its Where clause. Individual users are not given direct database access, for example, using a GRANT to either the Ledger table or the Reporting view. (Using GRANT is specific to Oracle.)
This example shows Select of ledger data as used by PS/nVision, in which both OPRID and OPRCLASS are specified in the Authorization table:
SELECT ACCOUNT, SUM(POSTED_TOTAL_AMT)
 FROM PS_LED_RPTG_VW
WHERE BUSINESS_UNIT = 'NEWGN'
   AND LEDGER = 'ACTUALS'
   AND FISCAL_YEAR = 1993
   AND ACCOUNTING_PERIOD BETWEEN 9 AND 12
   AND ACCOUNT IN ('800100','800200','800300')
   AND DEPTID = '0300'
   AND OPRID = 'GLUSER' and OPRCLASS = ‘MANAGER’
GROUP BY ACCOUNT
Restricting Ledger AccessUsing the nVision Ledger Security page in PeopleSoft Security, you can restrict what ledgers a user is authorized to access.
To access the nVision Ledger Security page, select Set Up Financials/Supply Chain, Security, nVision Ledger Security.
This is an example of the nVision Ledger Security page:
Implementing PS/nVision Query-Based Data Security
PeopleSoft Query restricts users to specific rows of data by employing a similar approach to the ledger Reporting view. Each record definition can have a query security record defined that joins the record data with authorization record data to restrict the returned result set.
This is an example of the Record Properties dialog box (select Start, PeopleTools, Application Designer; open the record on which you want to apply row-level security; select File, Definition Properties; select the Use tab from the Record Properties dialog box).
See Also