 Understanding Steps to Create Trees
This chapter provides an overview of the steps to create trees and discusses how to:
Create detail tree structures.
Create summary tree structures.
Define new trees.
Work with tree branches.
Grant security access to trees or branches.
Perform audits.
Set performance options.
Understanding Steps to Create Trees
Trees are built from the highest level of the hierarchy (root node) to the lowest level of the hierarchy. Every tree is based upon a structure. The structure defines the links between your tree and the underlying tables to which it refers. There are two main kinds of tree structures:
Detail tree structures.
There are two types of detail trees: detail-value (summer) tree and node-oriented (winter) tree.
Summary tree structures.
These are used for PeopleSoft nVision reporting using summary ledgers.
These are some basic steps to create trees:
Create the tree structure or find an existing tree structure to use.
Create the tree definition.
The tree definition specifies:
Tree structure.
The tree name and key values.
How the tree handles detail values.
Whether the tree uses levels.
Specify the levels in the tree, if necessary.
Insert the tree nodes that define the hierarchy of the tree.
Attach detail values as leaves on your nodes.
Most types of trees – detail trees, summary trees, and dynamic detail trees – have detail values. However, you skip this step for node-oriented trees.
Characters Not Used in Tree Name, SetID, Set Control Value, and Tree Branch
SmartNavigation passes the values of several tree-specific fields to the application via URL. Certain characters are inappropriate for use in an URL and should be avoided. When you set up trees, do not use any of the following characters in the tree name, setID, set control value, and tree branch fields:
|
pound (#) |
percent (%) |
dollar ($) |
|
plus (+) |
comma (,) |
forward slash/virgule (/) |
|
semi-colon (;) |
equals (=) |
question mark (?) |
|
space ( ) |
quotation marks(") |
less than symbol (<) |
|
left curly brace ({) |
right curly Brace (}) |
vertical Bar/Pipe (|) |
|
caret (^) |
tilde (~) |
left square bracket ([) |
|
grave accent (`) |
ampersand (&) |
colon (:) |
|
at symbol (@) |
greater than symbol (>) |
backslash (\) |
|
right square bracket (]) |
Creating Detail Tree Structures
This section discusses how to:
Define detail tree structures.
Define levels.
Define node properties.
Define tree details.
When you define a tree structure, you specify the pages and record definitions PeopleSoft Tree Manager uses to store data about the parts of a tree. When you add a new node, level, or detail value to a tree, PeopleSoft Tree Manager uses this information to determine the component (pages) to capture the relevant application data. When the specified component is displayed, all of the standard business logic that is part of that component is invoked.
 Pages Used to Create Detail Tree StructuresDefining Detail Tree Structures
Use these steps to access the Tree Structure Properties page:
Select Tree Manager, Tree Structure.
Search for an existing tree structure or create a new one.
The Tree Structure Properties page appears.
This is an example of the Tree Structure Properties page:
Defining Levels
Use these steps to access the Tree Levels page:
Select Tree Manager, Tree Structure.
Search for an existing tree structure or create a new one.
Select the Levels tab on the Tree Structure Properties page.
The Tree Levels page appears.
This is an example of the Tree Levels page:
When you create a new level in a tree, PeopleSoft Tree Manager displays the page that you specify in the Page Name field on the Tree Levels page and stores the application data that you enter using the record definition in the Record Name field. The default values for these fields come from the standard Tree Manager page.
When using standard pages, you do not need to enter anything in the Menu Name or Menu Bar Name fields. However, if you want to store level information using something other than TREE_LEVEL_TBL, then you have to create a page and component that uses that new record definition. You must also ensure that the component has been defined on a menu somewhere in your system and specify all of this information on this page.
Defining Node Properties
Use these steps to access the Tree Nodes page:
Select Tree Manager, Tree Structure.
Search for an existing tree structure or create a new one.
Select the Nodes tab on the Tree Structure Properties page.
The Tree Nodes page appears.
Note. The Tree Nodes page of a new tree structure includes default values, which are similar as in the previous example of the Tree Levels page.
This is an example of the Tree Nodes page:
Enter the record name, field name, and page name to use for entering and storing information about tree nodes.
For a node-only tree, where each node represents a detail value, use the page, record definition, and field that correspond to the kind of detail value you’re entering. For example, if each node represents a department (as in the Department Security table), use the DEPARTMENT_TREE page, the DEPT_TBL record definition, and the DEPTID field. You would also identify the component that the DEPARTMENT_TREE page is a part of, as well as all of the menu information.
Note. If you are creating a business unit or user-defined
key tree structure, the Tree Nodes page displays a field for entering the
business unit or user-defined key field.
If the TREE_NAME field exists in the User
Node table, then the User node data (node descriptions, and so on) cannot
be shared between trees with different names. For this reason, if you copy
a tree using the Save As function in PeopleSoft Tree Manager or the Copy function
in the Copy/Delete Tree utility, and user node table includes the TREE_NAME field
like one of the key fields, you must manually insert the new tree's node descriptions.
Defining Tree Details
Use these steps to access the Tree Details page:
Select Tree Manager, Tree Structure.
Search for an existing tree structure or create a new one.
Select the Details tab on the Tree Structure Properties page.
The Tree Details page appears.
This is an example of the Tree Details page:
This page is used to define the application data and component used to maintain the detail values for your tree. This page should only be filled in for structures that you plan to use for detail-value trees (summer trees).
Enter the name of the page, component, record definition, and key field name that will be used when adding or updating the application data for a detail value. For example, if each detail value represents a department, use a page, component, and menu path that enables you to create and update department information.
Note. When the PeopleSoft Tree Manager searches for values for dynamic detail and detail ranges, the search is based first on the override search record specified on the detail menu. By doing this, the values displayed are only those that the user would normally have access to through the Application component. If an override search record is not specified on the menu, then the system uses the component’s search record. If there is no component search record, the system uses the tree structure detail record.
Click the Save button to save your new detail tree structure.
Note. Unlike the level and node information, there is no standard page and record for detail values. These are always built on application-specific tables.
Creating Summary Tree Structures
You use summary trees to group nodes from an existing detail tree without duplicating the entire tree structure. Summary trees are used with PeopleSoft nVision reporting off of summary ledgers, where the data is rolled up using a detail tree and stored with nodes from that detail tree instead of detail values.
This section discusses how to:
Define summary tree structures.
Define summary tree levels.
Define summary tree node properties.
Define summary tree details.
Pages Used to Define Summary Trees|
Page Name |
Definition Name |
Navigation |
Usage |
|
Tree Structure Properties |
PSTREESTRCTDEFN |
Tree Manager, Tree Structure Search for an existing tree structure or create a new one. |
Define tree type and select a detail tree to summarize. |
|
Tree Levels |
PSTREESTRCTLEVL |
Tree Manager, Tree Structure Search for an existing tree structure or create a new one. Select the Levels tab on the Tree Structure Properties page. |
Specify the page and record to enter and store information about tree levels. |
|
Tree Nodes |
PSTREESTRCTNODE |
Tree Manager, Tree Structure Search for an existing tree structure or create a new one. Select the Nodes tab on the Tree Structure Properties page. |
Specify the page and record used to enter and store information about tree nodes. |
|
Tree Details |
PSTREESTRCTDETL |
Tree Manager, Tree Structure Search for an existing tree structure or create a new one. Select the Details tab on the Tree Structure Properties page. |
Specify the record and field information used to summarize the tree. |
Defining Summary Tree Structures
To create a summary tree structure:
Select Tree Manager, Tree Structure.
Create a new tree structure.
In the Tree Structure Properties page, enter a description for the tree structure.
Select Summary as the type.
Enter a detail tree name using the search prompt.
Enter a detail setID.
Enter a level number using the search prompt.
The level number defines the level in the detail tree that is used as the detail values for the summary tree. (The lowest level of detail in the summary tree is made up of all of the nodes from the detail tree at a specified level.)
The search results lists only the detail levels related to the selected detail tree.
Defining Summary Tree Levels
To define levels for the summary tree structure:
Select Tree Manager, Tree Structure.
Search for an existing tree structure or create a new one.
Access the Tree Levels page by selecting the Levels tab on the Tree Structure Properties page.
Enter the record name and page names using the search prompts.
When you create a new level in a tree, PeopleSoft Tree Manager displays the page you specify in the Page Name field in the Tree Levels page and stores the data you enter using the record definition in the Record Name field. The default values for these fields come from the standard Tree Manager page.
When using standard pages, you do not need to enter anything in the Menu Name or Menu Bar Name fields. However, if you want to store level information using something other than TREE_LEVEL_TBL, then you have to create a page and component that uses that new record definition. You must also ensure that the component has been defined on a menu somewhere in your system and specify all of this information on this page.
Defining Summary Tree Node Properties
To define nodes in the summary tree structure:
Select Tree Manager, Tree Structure.
Search for an existing tree structure or create a new one.
Access the Tree Nodes page by selecting the Nodes tab on the Tree Structure Properties page.
Enter the record name, field name, and page name to use for entering and storing information about tree nodes.
Defining Summary Tree Details
To define tree details for the summary tree structure in PeopleSoft Application Designer:
Select Start, Programs, PeopleTools 8.x, Application Designer.
Through PeopleSoft Application Designer, create a view with a record type of SQL View.
For example, if you create a summary tree based on a department detail tree that is keyed by setID, and the detail tree uses PS_TREE_NODE_TBL to store the node user data, then your SQL view might contain the following fields:
SETID
DEPTID
EFFDT
DESCR
Use the following SQL:
Select A.SETID
,A.TREE_NODE
,A.EFFDT
,B.DESCR
from PSTREENODE A
,PS_TREE_NODE_TBL B
where A.SETID = ‘<your setid>’
and A.TREE_NAME = ‘<your tree name>’
and A.SETID = B.SETID
and A.TREE_NODE = B.TREE_NODE
and A.TREE_LEVEL_NUM = <your detail tree level number to be summarized>
and B.EFFDT =
(select MAX(EFFDT)
from PS_TREE_NODE_TBL
where SETID = B.SETID
and TREE_NODE = B.TREE_NODE
and EFFDT <= A.EFFDT)
Note. In this SQL statement, TREE_LEVEL_NUM must match the level number specified on the Tree Structure Property page.
Through browser, select Tree Manager, Tree Structure.
Search for an existing tree structure or create a new one.
Select the Details tab on the Tree Structure Properties page.
The Tree Details page appears.
In the Record Name field, enter the SQL view that you created.
Make sure that the setID, tree name, and level number in the view is the same as what you entered on the Tree Structure Properties page.
In the Field Name field, enter the field from the view that you are summarizing.
For example, DEPT_ID.
Click the Save button to save your new summary tree structure.
Defining New Trees
This section discusses how to:
Define basic attributes.
Add a root node.
Insert nodes into trees.
Define detail values.
Pages Used to Define TreesDefining Basic Attributes
Use these steps to access the Tree Definition and Properties page:
Select Tree Manager, Tree Manager.
Search for an existing tree or create a new one.
Click the Tree Definition link on the Tree Manager page.
The Tree Definition and Properties page appears.
This is an example of the Tree Definition and Properties page:
|
Enter a tree name. Note. SmartNavigation passes the values of several tree-specific fields to the application via URL. Certain characters are inappropriate for use in a URL and should be avoided. See Characters Not Used in Tree Name, SetID, Set Control Value, and Tree Branch. |
|
|
Select a tree structure ID. Define structures using the Tree Structure Properties page. |
|
|
Status |
Select a status of Active or Inactive. If you mark a tree as inactive, no other users have access to your tree from other PeopleSoft applications or tools. |
|
Select or add a category. Categorizing is a user-defined way of organizing trees so that they are easier to find when using the tree search pages. Note. Previously, the category determined how trees were arranged at the highest level and was an important visual clue in organizing trees. Category is now used only as a search value. |
|
|
Use of Levels |
Select a method for enforcing levels. Use Strictly Enforced or Loosely Enforced levels unless you have a compelling reason not to. Some features, such as creating summary trees, require levels. Note. For an existing tree, you can change the Use of Levels field. For example, you can change Strictly Enforced levels to Loosely Enforced levels, but you cannot change from not using levels to using them.
|
|
Select to check if all values in the detail value table should be included in the tree. For example, if you want to make sure that all of the department IDs in the DEPT_TBL for a given setID are contained in the DEPT_SECURITY tree for that setID, select this box, and PeopleSoft Tree Manager will check for any department IDs that are not found in the tree. If you select this option and click the Performance Methods link, you can select an option in the Auditing All Detail Values group box on the Performance Options page. Note. This option is not available for use with winter trees. |
|
|
Select to skip the audit that checks for duplicate detail values in the tree. When selected, you can have the same detail value appear under different parent nodes. Note. This option is not available for use with winter trees. |
|
|
Click to run the selected audit option from this page. PeopleSoft Tree Manager also performs audits whenever you save a tree. However, no audits are performed if you save the tree using the Save Draft option. |
|
|
Displays the number of nodes, leaves, levels, and branches in the currently opened tree or branch. It does not count nested branches (branches with a parent branch that is different than a currently opened branch) |
|
|
Click to access the Tree Levels page and add, update, or delete tree levels. See Defining Tree Levels. |
|
|
Performance Options |
Click to access the Performance Options page and set access method, tree selector, or selector options. You can also set the Auditing All Detail Values option as well as Tree Change Service Operation options. Note. The Access Method, Tree Selectors, and Selector options are used mainly for optimizing tree usage with PeopleSoft nVision and Query when using the In Tree criteria option. |
Adding a Root Node
Use these steps to access the Enter Root Node for Tree page:
Select Tree Manager, Tree Manager.
Create a new one.
Click the Tree Definition link on the Tree Manager page.
On the Tree Definition and Properties page, enter the appropriate values and click the OK button.
This is an example of the Enter Root Node for Tree page:
You create a tree from the top down. You start by creating the root node, then add the children of the root node, and continue down to the detail values (if the tree has them). If the tree uses levels, then you must first define the level for the root node. You may want to set up additional levels at this time.
To add a root node for tree:
Note. If your tree does not use levels and the Add Root Node page does not include level configuration, skip to step 5.
In the Enter Root Node for Tree page, add tree levels by clicking the Add Level button.
The Tree Levels page appears.
Enter a name for the level.
Use a name that reflects what the nodes at this level represent. For example, the first level in the Department Security tree is CORPORATE, indicating that the root node is Corporate Headquarters. You can also enter the name of a level from another tree.
Note. You can also use the search box to search for names of existing levels.
Specify whether nodes can skip over the level.
The All Values option specifies whether PeopleSoft Tree Manager permits nodes to skip over the level you’re defining to report to a higher level. Select this option to make sure that all values from lower levels report to a node at this level. Clear this option to allow nodes to skip a level. For example, you might want to do this if you have one or more departments that are not part of any division but report directly to the COMPANY level.
Note. When you are adding a top level (the root node), the All Values option is selected but unavailable. You cannot skip over the top level.
Click the OK button.
The Tree Levels page closes. If you entered the name of an existing level from another tree, the level name is added. If you entered a new name, PeopleSoft Tree Manager displays the page for entering tree level information. The displayed page is the page specified for levels in the tree structure. For most trees, it is the Tree Levels page.
Enter a new root node name or select an existing root node.
If you are entering new node information, you must enter the information in the Tree Nodes page.
Click the OK button.
The tree appears with the root node on the page.
Note. When the multiuser environment is enabled, a newly created tree appears by default in edit mode.
Inserting Nodes into Trees
For more information on inserting nodes into trees, read the following documentation:
See Inserting Nodes.
Adding Detail Values
For more information on adding detail values, read the following documentation:
See Adding Detail Values.
See Working with Detail Values.
Working with Tree Branches
This section provides an overview of tree branches and discusses how to:
Create tree branches.
Open tree branches.
Remove tree branches.
Understanding Tree Branches
Branching means taking a limb of the tree – a section of the tree that reports into a single node – and creating an actual tree object to hold that limb. Branching a tree can improve PeopleSoft Tree Manager performance (by reducing the amount of data it needs to load when you open a large tree). After you branch a tree, you can specify different object security settings for the branches. When a tree is branched, multiple users can maintain separate sections of the tree while working simultaneously.
When you branch a tree, you’re splitting the original tree into two parts. PeopleSoft Tree Manager creates one new object for your branch and another object to hold the remaining part of the tree. After branching, you have two objects:
The new branch, or subtree, that you created.
A branch that corresponds to the rest of the original tree (minus the new branch).
You can use PeopleSoft Object Security to give users different security access to these objects. For example, by restricting access to the new branch, you can give users access only to that branch.
Assigning different security access to different parts of the tree prevents users from making unauthorized changes to the parts of the original tree (tree branches) which they do not have access granted.
Note. Users can make copies of the entire tree by using the Save As option.
After you have created a branch, you can use it as you use any other tree. You can open it independently of the larger tree, modify it, or even create branches from it. When you’re using the original tree, you cannot edit the branch’s nodes or details until you open that branch.
The following restrictions have been applied to tree branches due to the risk of conflicts when multiple users are performing modifications to a branch tree at the same time:
Moving nodes with subbranches.
Switching levels on nodes with subbranches.
Unbranching nodes with subbranches.
Note. A message will appear if a user attempts to perform
any of these actions.
When the multiuser environment is enabled, a user cannot check out a
tree branch if another user working with a different branch of the same tree
has modified the tree definition and either has or has
not saved the changes.
If users edit specific branches without modifying the tree definition,
other users can still edit different branches of the same tree at the same
time.
Creating Tree Branches
To create a tree branch:
Select Tree Manager, Tree Manager.
Search for an existing tree in the Tree Manager page or create a new one.
Highlight the node that will be the root node of the branch.
PeopleSoft Tree Manager replaces the node icon with a branch node icon. None of the nodes or detail values reporting to the branched node appears in the tree display.
This is an example of a branch node:
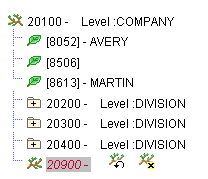
Example of the 20900 as a branch node
Opening Tree Branches
To open a tree branch:
Select Tree Manager, Tree Manager.
Search for an existing tree in the Tree Manager page or create a new one.
Highlight the tree branch, and click the Open Branch icon.
Alternatively, in the Tree Manager search page, click a tree name link for the branch that is being defined by a value in the Tree Branch section.
Removing Tree Branches
To remove a tree branch:
Select Tree Manager, Tree Manager.
Search for an existing tree in the Tree Manager page or create a new one.
Highlight the tree branch node and click the Unbranch icon.
PeopleSoft Tree Manager replaces the branch icon with the node icon. Any nodes that report to the selected node are now available in the tree.
When you remove a tree branch, do not forget to update PeopleSoft Object Security.
See Also
Implementing Definition Security
Granting Security Access to Trees or Branches
You can use PeopleSoft Object Security to impose restrictions on your trees, tree branches, and tree structures with one of the following security levels:
Full access.
Read-only access.
No access.
You can also use PeopleSoft Definition Security to restrict access to branches. You can give users access to an entire tree except for a branch or give them access to the particular branch without granting access to the tree itself. This task should be performed using Application Designer – Definition Security dialog box.
The following examples show the QE_PERS_DATA tree that has three branches and the definition security for user permission lists are set differently.
Example 1, branch 00001-Corporate Headquaters is defined with a full access:
Example 2, branch 10100 - Office of the President is defined with a read-only access:
Example 3, branch 10100 - Office of the President is opened with read-only access:
Note. When a branch is opened, a parent entry in a tree
navigation path points to the parent branch to enable user navigating from
a current branch to higher level branches.
Branch security with No access or Read
Only access restricts user modification to the specific branch
of the specific tree. It does not prevent a specific user from seeing the
content of a secured branch. Users can work around the limited access by copying
a tree with a different name and have unlimited access to that new branch.
To prevent users from seeing the content of the tree branch, a root node of
the branched tree should be secured with No Access or Read
Only access as well.
The following example shows PeopleSoft Tree Manager with read-only access:
In the All Jobs branch, which has read-only access, only the Open Branch icon is available.
When users open the branch, a message warns that users cannot make changes to the branch.
When the read-only branch opens, no edit icons and no Save link appear.
If users try to access a tree or branch that does not allow access, they receive a warning message.
See Also
Understanding Definition Security
Performing Audits
After you have completed your tree, you can have PeopleSoft Tree Manager verify that it meets the restrictions you set for it. For example, if you selected the All Detail Values in this Tree option when you created the tree definition, PeopleSoft Tree Manager audit verifies that you have included all detail values.
You can perform a tree audit from the Tree Definition and Properties page, by saving the tree, by running the Repair Tree batch program, or by using the Tree Maintenance page. If you want to audit a closed tree, use the Tree Maintenance page. To get a report of all of the problems that have been found with the tree, use the Repair Tree program.
When you perform an audit and find problems, PeopleSoft Tree Manager displays a warning message. Some examples of the problems are:
One or more nodes have no detail values reporting to them.
You selected the All Detail Values option, but one or more defined values for the database field do not appear in the tree.
If you have not selected the Allow Duplicate Details option, then PeopleSoft Tree Manager checks for duplicate detail values and detail values with overlapping ranges.
Note. Although PeopleSoft Tree Manager attempts to detect overlapping detail values when the user inserts or modifies each detail value, the final audit process may detect overlapping or duplicate detail values that are not caught when the detail value is created or modified.
PeopleSoft Tree Manager also indicates where the problem is.
The warning message flags that the tree is invalid. You can save the tree as a draft tree only, and you cannot use it with other PeopleTools, such as PeopleSoft Query or PeopleSoft nVision, until the tree is valid.
The warning message flags that the tree is invalid. You can save the tree as a draft tree only, and you cannot use it with other PeopleTools, such as PeopleSoft Query, PeopleSoft nVision, and SmartNavigation pages until the tree is valid.
At this point, you can either correct the problem that is causing the tree to be invalid, or use the Save As Draft feature to save the tree in an invalid (unfinished) state.
All audits report the first occurrence found of any problem listed in the table. The audits are performed first on the displayed nodes and details, and then on the nodes in the database.
Node audits are only performed on open trees. If you run an audit from the Tree Maintenance page (from a closed tree), you run only the Detail audit. When you audit a tree branch, the node audits are performed on the nodes in the current branch only, while the detail audits are performed on all branches.
Note. These audits report only problems, not values. Run the Repair Tree program to get a complete list of problems with the tree.
The following table shows a complete list of audit checks:
|
Check For |
Purpose |
When Check Occurs |
|
Reports first occurrence of two nodes whose internal node numbering is overlapping. |
Always. |
|
|
Reports first occurrence of a node whose internal node number does not fall within the parent node's internal node number range. |
Always. |
|
|
Reports first occurrence of a node whose internal node number for a parent does not have an actual node with that number. |
Always. |
|
|
Reports the first duplicate node name when it finds a node with the same name reporting to a different parent node. |
Always. |
|
|
In a detail tree, reports when it finds any detail whose from and to range overlaps the to and from range of a different detail. Note. If your system runs on the Informix platform, this audit may take a inordinate amount of time to complete. If you are dissatisfied with the time required for this audit to run, your database administrator can tune the performance of this audit by editing the audit's PeopleSoft SQL object so the audit can perform optimally with your environment. Database administrators working with platforms other than Informix can also use this PeopleSoft SQL object to tune the performance of this audit. See Tuning the Performance of the Overlapping Detail Ranges Audit. |
Always. |
|
|
In a detail tree, reports when any terminal node has no leaves. |
Always. |
|
|
Reports if you have not included all detail values. |
When the All Detail Values In This Tree option is selected on the Tree Definition and Properties page. |
|
|
Reports if there are any duplicate detail values. |
When the Allow Duplicate Detail Values option is not selected on the Tree Definition and Properties page. |
|
|
Reports when a level is skipped. |
When the All Levels option is selected on the Tree Levels page. |
Tuning the Performance of the Overlapping Detail Ranges AuditIf your system runs on the Informix database platform, you may notice that it requires an inordinate amount of time to complete the running of the Overlapping Detail Ranges audit. When this is the case, your database administrator can edit the audit's PeopleSoft SQL object to tune the performance of the audit.
The name of the PeopleSoft SQL object used for this audit is PS_TDM_SQLOVERLAP, and it is stored in the PeopleSoft database. Edit this object in PeopleSoft Application Designer.
To tune the performance of the Overlapping Detail Ranges audit:
Select Start, Programs, PeopleTools 8.x, Application Designer.
Select File, Open in PeopleSoft Application Designer.
Select the SQL option in the Definition drop-down list box.
Enter PS_TDM_SQLOVERLAP in the Name field of the Selection Criteria group box.
Click the Open button.
The default SQL used for detecting overlapping leaves appears in the Definition workspace.
Edit the SQL object as needed.
Specifying Information for Tree Keys
In order for the PS_TDM_SQLOVERLAP_SQL object to work properly, you must insert the following PeopleSoft-delivered tree-specific metavariables into the SQL:
#setid# = SETID
#efftdatein# = EFFTDATEIN
#setcntrlvalue# = SETCNTRLVALUE
#treename# = TREENAME
Each time the audit reaches one of these metavariables, the audit inserts the appropriate value.
Note. These metavariables work only for this SQL object. They are not systemwide metavariables.
Using Metavariables in the SQL Object
The following code provides an example of using metavariables:
SELECT /*+ USE_HASH( B ), ORDERED */
A.RANGE_FROM
 , A.RANGE_TO
 ,B.RANGE_FROM
 , B.RANGE_TO
  FROM PSTREELEAF A
  , PSTREELEAF B
 WHERE A.SETID = '#setid#'
   AND A.SETCNTRLVALUE = '#setcntrlvalue#'
   AND A.TREE_NAME = '#treename#'
   AND A.EFFDT = %DateIn('#effdtdatein#')
   AND A.DYNAMIC_RANGE = 'N'
   AND B.SETID = A.SETID
   AND B.SETCNTRLVALUE = A.SETCNTRLVALUE
   AND B.TREE_NAME = A.TREE_NAME
   AND B.EFFDT = A.EFFDT
   AND B.DYNAMIC_RANGE = A.DYNAMIC_RANGE
   AND (A.RANGE_FROM <> B.RANGE_FROM
    OR A.RANGE_TO <> B.RANGE_TO)
   AND B.RANGE_FROM <> B.RANGE_TO
   AND (A.RANGE_FROM BETWEEN B.RANGE_FROM AND B.RANGE_TO
    OR (A.RANGE_TO >= B.RANGE_FROM
   AND A.RANGE_TO < B.RANGE_TO))
The code in this example includes #setid# at each point where the SETID value should be inserted. The same applies to the #treename#, #effdtdatein#, and #setcntrlvalue# metavariables.
Using Metavariables Multiple Times Within the SQL Object
The following example shows how to use metavariables multiple times within the PS_TDM_SQLOVERLAP_SQL object. Specifically, the code from the previous example has been rewritten using metavariables in both the top SELECT and bottom SELECT statements in the Union.
SELECT A.RANGE_FROM
 , A.RANGE_TO
 ,B.RANGE_FROM
 , B.RANGE_TO
  FROM PSTREELEAF A
  , PSTREELEAF B
 WHERE A.SETID = '#setid#'
   AND A.SETCNTRLVALUE = '#setcntrlvalue#'
   AND A.TREE_NAME = '#treename#'
   AND A.EFFDT = '#effdtdatein#'
   AND A.DYNAMIC_RANGE = 'N'
   AND B.SETID = A.SETID
   AND B.SETCNTRLVALUE = A.SETCNTRLVALUE
   AND B.TREE_NAME = A.TREE_NAME
   AND B.EFFDT = A.EFFDT
   AND B.DYNAMIC_RANGE = A.DYNAMIC_RANGE
   AND (A.RANGE_FROM <> B.RANGE_FROM
    OR A.RANGE_TO <> B.RANGE_TO)
   AND B.RANGE_FROM <> B.RANGE_TO
   AND A.RANGE_FROM BETWEEN B.RANGE_FROM AND B.RANGE_TO
  UNION
 SELECT A.RANGE_FROM
 , A.RANGE_TO
 ,B.RANGE_FROM
 , B.RANGE_TO
  FROM PSTREELEAF A
  , PSTREELEAF B
 WHERE A.SETID = '#setid#'
   AND A.SETCNTRLVALUE = '#setcntrlvalue#'
   AND A.TREE_NAME = '#treename#'
   AND A.EFFDT = '#effdtdatein#'
   AND A.DYNAMIC_RANGE = 'N'
   AND B.SETID = A.SETID
   AND B.SETCNTRLVALUE = A.SETCNTRLVALUE
   AND B.TREE_NAME = A.TREE_NAME
   AND B.EFFDT = A.EFFDT
   AND B.DYNAMIC_RANGE = A.DYNAMIC_RANGE
   AND (A.RANGE_FROM <> B.RANGE_FROM
    OR A.RANGE_TO <> B.RANGE_TO)
   AND B.RANGE_FROM <> B.RANGE_TO
   AND (A.RANGE_TO >= B.RANGE_FROM
   AND A.RANGE_TO < B.RANGE_TO)
Note. In this SQL example, the statement which uses a UNION has been used instead of a PeopleSoft-delivered statement which uses the OR condition. This statement also uses Informix-specific hints.
Setting Tree Performance Options
You can set performance-enhancing options to improve the database performance of queries that use trees as selection criteria. This includes queries to which tree criteria are added by PeopleSoft nVision layouts and scopes. Both PeopleSoft Query and PeopleSoft nVision use the tree performance options. The performance options do not impact PeopleSoft Tree Manager itself, only the performance of programs that use the tree data.
Because of the many variations of data distributions, indexes, queries, and optimizers, you can select SQL techniques that will tune your queries for optimum performance. By specifying these options at the tree level, your trees can be used in queries whether they are run through PeopleSoft nVision. Those options, however, can be overridden by the performance options set at the PeopleSoft nVision level.
Selecting Performance Options
Use these steps to access the Performance Options page (PSTREEDEFNPRPTY):
Select Tree Manager, Tree Manager.
Create a new tree, or search for an existing tree.
On the Tree Manager page, click the Tree Definition link.
Click the Performance Options link on the Tree Definition and Properties page.
The Performance Options page appears.
This is an example of the Performance Options page:
Use the Performance Options page to select options to enhance tree performance as well as performance for queries that involve trees and nVision.