 Understanding Worklist Records
This chapter provides an overview of worklist records and discusses how to:
Create worklist record definitions.
Replicate worklists.
Understanding Worklist Records
This section provides overviews of the worklist and worklist records.
 The Worklist
The worklist can include several different types of items at once. For example, a manager might have entries related to approving both employee course enrollments and orders for supplies.
Although both types of entries appear in the manager’s worklist, the underlying data is different. The course enrollment entries might display information about the course name and start date, while the orders might have information about the descriptions and prices of ordered items.
Worklist Records
Entries in worklists are stored in database tables. You define the structure content of these tables by creating worklist records. The worklist record determines which fields of information the system stores for each work item and in what order the work items appear.
When a business event routes a work item to a worklist, it adds a row to the table. When a user finishes with a work item, the system marks the row as worked.
The basic procedure for creating a worklist record definition is the same as for any record definition, but worklist record definitions have some special requirements.
When you create a worklist record definition, you define what a work item in a worklist looks like. The system uses the worklist record definition to:
Link each work item with the underlying workflow tracking information, which is stored in a workflow system record (PSWORKLIST).
Display relevant information about each work item on the Worklist page so that users can select the item on which they want to work.
Retrieve the record that is associated with the work item so that the user can work on it.
The first fields in a worklist record definition must always be the following system fields:
|
System Field |
Description |
|
BUSPROCNAME |
The business process that includes the work item. |
|
ACTIVITYNAME |
The activity that triggers the worklist routing. |
|
EVENTNAME |
The business event that triggers the worklist routing. |
|
WORKLISTNAME |
The worklist in which the work item is waiting. |
|
INSTANCEID |
The system-assigned ID for the work item. |
|
The system-assigned transaction ID for the work item. When an event triggers multiple routings, each work item has the same transaction ID, but a different instance ID. |
The system uses these fields to link the items in the worklist with their tracking information, which is stored in the PeopleSoft-defined table PSWORKLIST. They must be defined as ascending key fields in the worklist record definition.
Virtual Approver, a specialized type of workflow used for approval processes, requires one additional system field. If you are using Virtual Approver, you must also add the APPR_INSTANCE field as a non-key field in the worklist record definition. This field stores the ID assigned to the work item for Virtual Approver processing.
The next set of fields in a worklist record definition are those specific to the application that creates the worklist. The system uses these fields to retrieve the associated record from the database when the user selects a worklist entry and moves to the page where the work is done. Note that:
Because the system uses the values from these fields to search for the associated database record, you must include all of the key fields for the search record.
Application field names cannot be the same as key words used in field mapping.
All of the application fields appear in the user’s worklist, unless you suppress them by including the special field WORKLIST_DESCR.
The last two fields in a worklist record definition are for descriptive information that appears in the worklist. These fields are optional.
|
Worklist Display Field |
Description |
|
WORLKIST_URL |
The text that links to the page where the user can work on the item. Appropriate values might include the key data for the record in which the item will be worked. For example, for a work item directing a manager to approve an expense report, the text might be the name of the employee who submitted the report. |
|
WORKLIST_DESCR |
A text comment that appears in the user’s worklist. The presence of this field automatically suppresses the display of any application fields, although the key fields are still used to bypass the search page of the target page. |
On the Worklist Details page, these values appear as the Link and Comment fields. The link also appears on the main Worklist page.
Creating Worklist Record Definitions
To create a worklist record definition:
In PeopleSoft Application Designer, add the required system fields to the record definition.
Identify the required system fields as key fields with ascending sort order.
Add the key fields from the search record for the page that group users use to process the worklist entries.
The worklist record must include the search record key fields so that the system can locate the record on which the user must work.
(Optional) If users work on work items using an external program, rather than a PeopleSoft page, add a character field named COMMAND_PARM.
When you define a step in an activity, you can specify that an external program starts when a user selects it. If the activity assigned to this worklist starts with such an activity, you can pass command-line arguments to the external program from the worklist record.
For example, if you map a filename to the COMMAND_PARM field, the system appends the file name to the command line of the external program (as specified in the step definition).
Add fields to provide descriptive information in the user’s worklist.
If you have a compelling reason, you can add other application fields instead. However, do not add other application fields if you have added the WORKLIST_DESCR field; using WORKLIST_DESCR automatically stops the worklist from displaying the application fields.
Save the record definition using a name that ends with _WL.
Create a database table using the record definition that you saved in Step 5.
Replicating Worklists
This section provides overview of worklist replication and discusses how:
Set up worklist replication.
Run the WL_REPLICATE process.
Check the WORKLIST_MSG status.
Understanding Worklist ReplicationTo consolidate worklists from multiple databases, use the worklist replicate process. The worklist replicate process depends on the WORKLIST_MSG service operation definition. The WORKLIST_MSG definition must be active and it must have a valid PeopleSoft Integration Broker routing defined for the worklist replicate process to work. This process uses use the Worklist Replicate (WF_WL_REPLICATE) component to run the replication process.
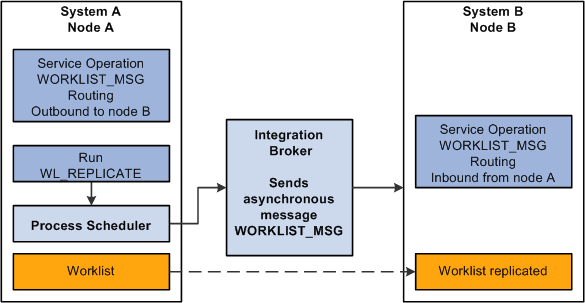
Worklist replication process
Note. Every worklist item has a worklist name—for example, Expense Report Approval, Order Item, and so on. For worklists to replicate successfully, you cannot generate identical worklist names in multiple databases; one database must be the “master” for each worklist name.
Worklist Replication Considerations
When replicating worklists between databases, keep the following behavior in mind.
This PeopleSoft application formats the Worked By Activity field by examining the worklist definition in the target database. If the activity definition is not in the target database, the system cannot format the Worked By Activity field. So, in some cases, this field may appear blank after replication, and as long as the WORKEDBYACTIVITY is not defined in the target database, this field is blank. These are the solutions to this problem:
|
Database Version |
Solution |
|
Databases at the same release level (8.4x to 8.4x) |
From the source database, export the replicated worklist definition (activity) and the worked-by activity (if they are not the same). Import the definitions into the target database. |
|
Databases at different release levels (8.1x to 8.4x) |
Manually recreate the activity in the target database. |
Note. If the worklist status in the source database has been changed to complete or canceled, the target database status will not change until the next replication run. In this case the target database may show the worklist as available but will not find it when clicking the link.
Page Used to Replicate Worklists|
Page Name |
Definition Name |
Navigation |
Usage |
|
Worklist Replicate |
WF_WL_REPLICATE |
PeopleTools, Workflow, Monitor Worklist, Replicate Worklist |
Replicate a worklist. |
Setting Up Worklist ReplicationBefore you run the worklist replication process, you must activate the service operation WORKLIST_MSG and add the appropriate routings on both the source and target system.
To activate the service operation and add a routing:
Select PeopleTools, Integration Broker, Integration Setup, Service Operations.
Search for and select WORKLIST_MSG.
Make sure the Active check box is selected in the Default Service Operation Version section
Click the Service Operation Security link and make sure there is a permission list associated with the service operation. If necessary add a permission list.
Select the Routings tab.
Enter a value in the Routing Name and click Add.
Enter the Sender Node and Receiver Node.
Click Save.
Click Return.
Note. Integration Broker must be configured.
Running the WL_REPLICATE ProcessTo run the WL_REPLICATE process:
Select PeopleTools, Workflow, Monitor Worklist, Replicate Worklist.
Search for an existing run control ID or add a new one.
Use the standard search and add methods to enter a run control ID and access the Worklist Replicate page.
Accept the default value or enter the server URL, in the format http://server (protocol://servername), used by the current database.
Click the Run button.
Click OK.
Checking the WORKLIST_MSG StatusOnce the process completes, the service operation WORKLIST_MSG will update the target system with the worklist items. To verify that the service operation was successful, you can check the service operation status in the Service Operation Monitor.
To check the WORKLIST_MSG status:
On the source system, select PeopleTools, Integration Broker, Service Operations Monitor , Asynchronous Services.
Select the Publication Contracts tab and enter Queue Name WORKLIST_CHNL.
Click Refresh.
The publication contract should have a status of Done. You can click the Details link to view additional details or review the actual XML message that was sent.
On the receiving node, sign on and view the worklist.
If the worklist does not appear on the receiving system, then check the Service Operations Monitor to ensure the subscription contract was processed. Select PeopleTools, Integration Broker, Service Operations Monitor, Asynchronous Services and access the Subscription Contract tab.