Monitoring Settings
This chapter covers the following topics:
Settings to Monitor Oracle E-Business Suite
You can change the configuration with which each Oracle E-Business Suite instance is monitored. You can do two things:
-
Change monitoring schema
-
Change the availability definition of the Oracle E-Business Suite instance
To configure monitoring, go the Oracle E-Business Suite Management page by clicking on the global Targets menu > Oracle E-Business Suite. Select the Oracle E-Business Suite instance and click Configure.

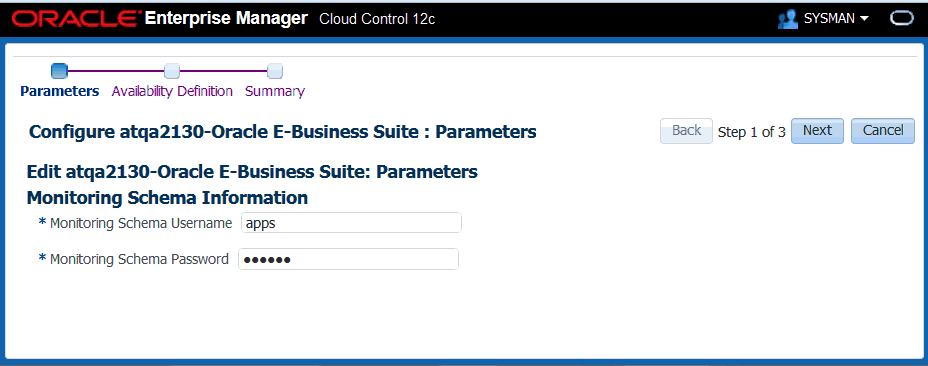
Changing the monitoring schema
After clicking the Configure button, you can change the details of the monitoring schema. You can either change the user name or password here and click Next or directly proceed to change the availability computation by clicking Next.
Extending the Oracle E-Business Suite target model
The status of the Oracle E-Business Suite target is determined by the status of its member targets. It uses AND logic, which means all the members must be up for the Oracle E-Business Suite target to be up. Customers can add more targets or remove existing targets.
Note: Starting with Release 12.1.0.3.0, the management pack availability computation matches the Enterprise Manager computation so that the same status is shown across all pages. The “Partially Up” status is retired now.
Viewing the existing availability definition
Navigate to global Targets menu > Oracle E-Business Suite. From the Oracle E-Business Suite Management page, select an instance and click Configure. After specifying parameters, click Next to go to the Availability Definition page.
You can see all the targets being used to evaluate the status.

You can select a specific target type.
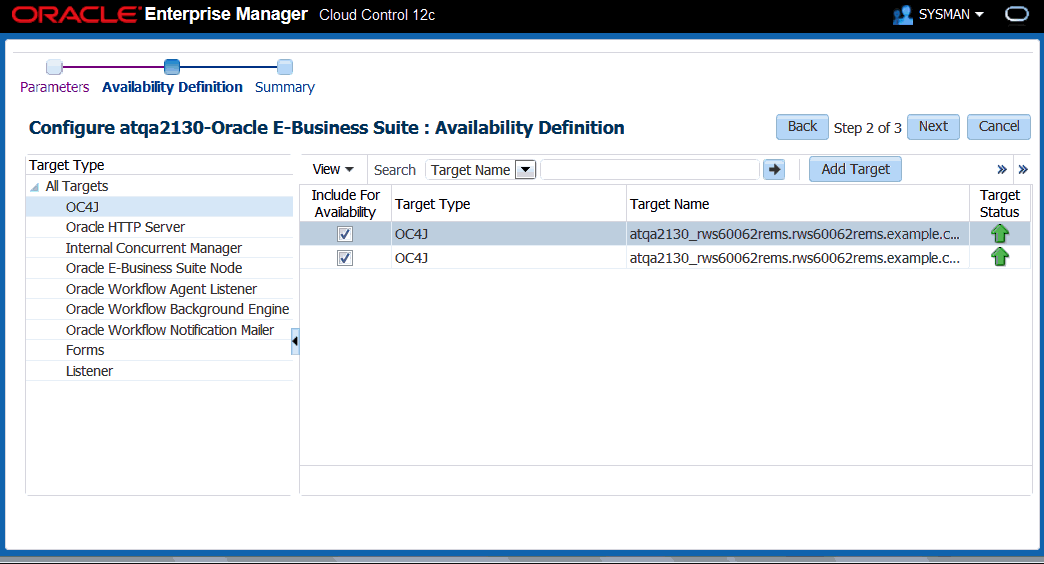
You can also search with a target name.
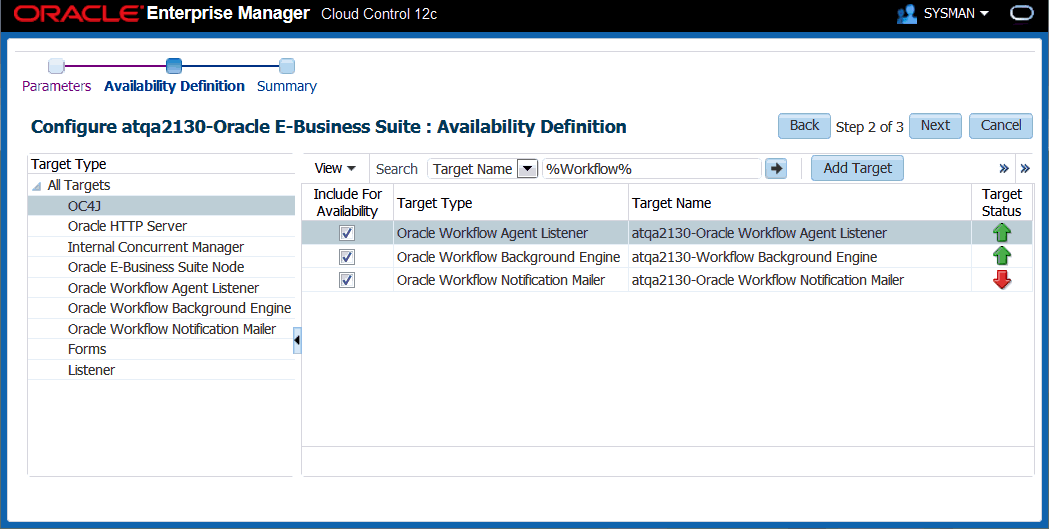
Changing the availability definition
In the above UI, check the targets you wish to include in the availability computation. Uncheck a target if you want to exclude it. Click on the Add Target button to add any other target which is not part of the Oracle E-Business Suite hierarchy, like SSO, LDAP, Load Balancer, and so on. Then click Next. Review the availability computation summary and click Submit to save your changes.

If the Oracle E-Business Suite instance features Online Patching, only run edition targets are shown in the UI. If you remove the current run edition target from the availability computation, the corresponding patch edition target will also be removed so that it works seamlessly once a cutover happens. The summary page where you can review the availability computation shows the details of the run edition and patch edition targets that are affected.
Adding or removing an Oracle E-Business Suite node
If you add or remove a node as part of availability definition, all of its child members will also be added or removed.
Targets That Cannot be Removed as Part of Availability Configuration
You cannot remove the database, database node, or the WLS Administration Server from availability definition.
Configuring Monitoring of HTTPS/SSL Targets
To configure Cloud Control to monitor Oracle E-Business Suite application tiers that are running in SSL, each Management Agent must be able to authenticate the application tier's SSL certificate against its Certificate Authority (CA).
Assumed Prerequisites
-
The HTTP Server that ships with Oracle E-Business Suite is already configured and verified to be running in SSL mode.
-
Basic knowledge of SSL certificates and their configuration.
Obtaining the CA certificate(s)
-
In Microsoft Internet Explorer, connect to the HTTPS URL of the Web site you are attempting to monitor.
-
Double-click the lock icon at the bottom of the browser screen which indicates that you have connected to a secure Web site. The browser displays the Certificate dialog box, which describes the certificate used for this Web site. Other browsers offer a similar mechanism to view the certificate details of a Web site.
-
Click the Certificate Path tab and select the first entry in the list of certificates.
-
Click View Certificate to display a second Certificate dialog box.
-
Click the Details tab on the Certificate window.
-
Click Copy to File to display the Certificate Manager Export wizard.
-
In the Certificate Manager Export wizard, select Base64 encoded X.509 (.CER) as the format you want to export and save the certificate to a text file with an easily identifiable name, such as beacon_certificate.cer.
-
Open the certificate file using a text editor.
Add the Certificate to the Management Agent(s)
Each Management Agent that monitors an Oracle E-Business Suite application tier must have the CA certificate added to it as follows:
-
Locate the b64InternetCertificate.txt file in the following directory of Agent Home of the Beacon host: $AGENT_ORACLE_HOME/sysman/config (This file contains a list of Base64 Certificates).
-
Edit the b64InternetCertificate.txt file and add the contents of the certificate file you just exported to the end of the file, making sure to include all the Base64 text of the certificate including the BEGIN and END lines.
-
Repeat for each Management Agent.
Restart Each Management Agent
Each Management Agent should be restarted:
> $AGENT_ORACLE_HOME/bin/emctl stop agent
> $AGENT_ORACLE_HOME/bin/emctl start agent
Cloud Control may not immediately pick up the change. You may want to give it a few minutes for the agent to run a metrics collection and upload them to the Oracle Management Server (OMS). You can click on the Refresh icon in the upper right of the Oracle E-Business Suite home page (by the Page Refreshed time stamp) in the Cloud Control console to get updated information.
Importing an Oracle E-Business Suite SSL Certificate to the OMS
Oracle Application Management Pack for Oracle E-Business Suite invokes REST services deployed on Oracle E-Business Suite using java.net.HttpURLConnection. The User Monitoring and Diagnostics features use REST services. If the Oracle E-Business Suite instance is SSL-enabled, the SSL certificate must be exported from Oracle E-Business Suite and imported to the trust keystore of the Oracle WebLogic Server (WLS) that runs the OMS. Below are the steps to do this action:
-
Find out the trust keystore of WebLogic Server.
-
Open the WebLogic Server Administration Console by using the following steps.
-
Go to the All Targets page of Enterprise Manager Grid Control.
-
Select the target type Oracle WebLogic Server.
-
Select the WebLogic Server instance that runs the OMS.
-
The target home page will contain the link to open the Administration Console.
-
-
From the Administration Console, select Servers.
-
Select the server that runs the OMS.
-
Click on the subtab Keystores under Configuration.
-
Look for the Java Standard Trust Keystore which points to the location of the keystore.
-
Run the command to import the certificate using the keytool utility. Use the JDK that comes with WebLogic Server.
JDK_HOME/bin/keytool -importcert -alias oracle_ebs_<ebs instance name> -trustcacerts -file <location of EBS SSL certificate> -keystore <location of key store>
Refer to the Java SE documentation on the command keytool for information on passwords.
-
Restart the OMS.
For more information on configuring identity and trust for WebLogic Server, see the Oracle Fusion Middleware manual Securing Oracle WebLogic Server.
A Note on Oracle Forms 6i
Even though your Oracle Forms configuration may be running in SSL, Cloud Control does not require any additional configuration to monitor Forms. The reason for this is that it uses a different method for determining the Forms Server status which does not require SSL communications with the server.
Re-Configuring SSL for Oracle E-Business Suite
If you have implemented SSL or deactivated SSL after the initial discovery of that Oracle E-Business Suite instance in Cloud Control, you will have to re-configure Cloud Control to monitor the new URL with the new protocol. There are two ways to do this:
-
The Easy Way: If you don't care about the metrics data that has been collected for the instance, you can simply remove the instance from Cloud Control and rediscover it.
-
The Hard Way: If metrics history is important, then each HTTP Server Target has to be re-configured to point to the new URL, port, and protocol.
Re-Configuring Release 11i Apache Targets
-
Navigate to the home page of the Oracle E-Business Suite instance. Select Members > Show All from the instance target menu.
-
Search for the target type "HTTP Server for Oracle Applications 11i".
-
From the results listing, select the HTTP Server for Oracle Applications 11i target to go to its home page.
-
In the target menu, select Target Setup > Monitoring Configuration.
-
Edit the Protocol and Port as appropriate.
-
Click OK.
Re-Configuring Release 12 Application Servers
-
Navigate to the home page of the Oracle E-Business suite instance. Select Members > Show All from the instance target menu.
-
Search for the target type "Oracle Application Server".
-
From the results listing, select the HTTP Server for Oracle Applications Server target to go to its home page.
-
In the target menu, select Change Application URL.
-
Edit the "URL to measure application response" as appropriate.
-
Click OK.
References
-
My Oracle Support Knowledge Document 123718.1, A Guide to Understanding and Implementing SSL with Oracle Applications Release 11i
-
My Oracle Support Knowledge Document 376700.1, Enabling SSL in Oracle Applications Release 12
-
My Oracle Support Knowledge Document 391652.1, Problem: Accessing Web Application Gives 'sun.security
-
Oracle Enterprise Manager Cloud Control Administrator's Guide