5 Working with Transactions
A transaction is a sequence of operations that you want to monitor as a single unit. This chapter discusses the advantages of using transactions, how you define and monitor transactions, how you access JVM diagnostics and Request Instance diagnostics, and how you troubleshoot transactions. It includes the following sections:
5.1 About Transactions
You define transactions on the logical level by specifying which operations participate in the transaction. Business Transaction Management monitors transactions by looking at individual endpoints, and it displays the level of information you require. The level of detail it provides ranges from the minimum of aggregate performance information to the maximum of message content logging. Using Business Transaction Management to monitor transactions is an iterative process: initially you want to look at the greatest possible number of endpoints to get an overall feel for service usage and for potential trouble spots. As you identify these, you want to look at a narrower set of elements but in greater detail. By using this approach, you can get exactly the information you need without straining system resources.
You might want to define and monitor transactions in order to do the following:
-
Assess the performance of business transactions. Business Transaction Management provides information about which transactions are completing, which are failing, and which get stuck. It also tells you how long it takes a transaction to complete as a whole and what part of that duration is used by each operation in the transaction.
-
Find transaction instances based on message content.
-
Troubleshoot problems with transactions: analyze bottlenecks and diagnose the reason for bad performance or failed transactions.
Users playing different roles might use information about transaction performance as follows:
-
Operations personnel need to determine which transactions are impacted by server or component downtime. This helps them prioritize their work and schedule maintenance.
-
Developers need to understand which transactions are impacted by implementation changes to components.
-
A business application owner needs to monitor charts that depict the performance and throughput of transactions.
You define transactions by using the discovery process to identify operation flows. Based on the dependencies revealed by discovery, you can define a transaction to include services whose interactions interest you. You can then modify the default transaction definition to enable monitoring features that provide exactly the level of detail needed about performance and usage. Features include segmenting information by user or host address, instance and property logging, and message content logging.
This section describes this iterative process of defining transactions and the level of detail that is made available as you enable each feature. It includes the following sections:
5.1.1 What Defines a Transaction?
A transaction is defined by the following:
-
A primary operation flow. This is specified by providing the start message, which triggers the flow. The start message is typically the request message for the initial operation of the flow.
-
Additional operation flows if needed, which must be manually correlated to the primary flow.
-
The ending message of the transaction. By default this is the response message from the initial operation of the primary operation flow. However, you can change it to model more complex transactions.
You can alter the transaction's view of the operation flows by deleting one or more operations from a flow.
Business Transaction Management allows you to include the same operation in multiple transactions; the only limitation is that the same operation cannot be the starting operation of more than one transaction. If you do include an operation in multiple transactions, Business Transaction Management is able to keep accurate aggregate measurements for each transaction's overall response time, counting the invocation of the shared operation appropriately as it is called by each of its owning transactions. Business Transaction Management is also able to handle situations where services are replicated, accurately collecting performance information as one replicate or another is used in a failover or load balancing architecture.
A transaction executes many times in a given period; Business Transaction Management tracks the flow of messages included in the transaction and can map these to particular transaction instances.
-
A transaction instance starts when an instance of the primary operation flow is started.
-
A transaction instance ends when the system sees an instance of the ending message that correlates to the instance's starting message.
In addition to the operation flows it contains, a transaction is also defined by settings that specify the following information:
-
The scope of the transaction: how long you expect a single transaction to run. Business Transaction Management uses this value to figure out when to stop looking for messages for a given transaction instance
-
How long to retain logged messages that you might want to assemble so that you can view a particular instance of a transaction
-
Whether transaction monitoring is enabled and whether free text search is enabled
-
Whether segmentation, instance logging, and message content logging are enabled
5.1.2 Properties
In order to allow the user to extract as much information from a message without logging the content of every message, Business Transaction Management offers the use of properties, which are associated with transaction operations. Properties can be associated with parts of the message header or message payload. You can use them in the following ways:
5.1.3 Auto and Manual Correlation
Once you define the start and end operation of a transaction, by default Business Transaction Management determines the intervening operations based on traffic flow, and it creates message fingerprints to link together (correlate) the operations of a transaction instance. You can also define manual keys as an alternate means of correlating transaction messages.
You will need to manually correlate operations in the following cases:
-
To add a secondary operation flow to the transaction. This might be necessary in the case of asynchronous systems like JMS, or desirable if you want to connect two operation flows that share underlying data but are not causally connected. For example, you have one flow defined by an order entry, and another flow defined by the fulfillment of the order. The same order is involved in two otherwise disjoint processes.
-
To define a transaction whose end message is not the end message of the operation that starts the flow.
-
To define a missing message condition
See "Correlating Messages in a Transaction Using Manual Keys" for additional information on what you need to correlate in each of these cases.
A single transaction definition can contain operations that are correlated automatically and other operations that are correlated manually.
5.1.4 Default Transaction Definition
When you select an operation and choose to create a transaction, Business Transaction Management displays a Create Transaction Definition tool with default values already filled in. According to this default definition:
-
The start message of the transaction is the request message of the operation you selected; the ending message is the response message of that operation.
-
Transaction monitoring is enabled. That is, Business Transaction Management will collect data that enables it to calculate and display the following measurements: the number of started and completed transactions, throughput, average response time, maximum response time, and faults.
-
Messages in the transaction are correlated using message fingerprints (calculated by Business Transaction Management).
-
Segmentation, instance and property logging, and message content logging are disabled.
The default configuration is sufficient to give you a first broad look at your transaction. It can help you identify slow links, faulty services, and unexpected traffic spikes. It can also show you if overall transaction performance is degrading or not completing on time. You can also create fixed value and baselines service level agreements (SLA's) based on the measurements collected for the transaction.
You can customize the default transaction definition in the following ways:
-
Change the operations that are included in a transaction and change the end operation. You might want to do this because the transaction contains one way operations, because you want to limit the transaction to fewer operations than the overall request flow, or because you want to add services in those cases where services are rarely invoked and therefore cannot be found within the discovery period.
-
Correlate messages using message keys.
-
Turn on features that will give you more detailed information about the transaction.
The following subsections describe the features you can add to your transaction definition.
5.1.5 Additional Features
The following are the features you can add to provide a more detailed picture of transaction performance and message content.
5.1.5.1 Segmentation
You can segment transaction measurements based on host address and by individual consumer. Consumer segmentation might be useful if you have usage contracts with specific customers or if you want to identify customers that make especially heavy or light use of your services.
Segmentation by host address can help you understand the distribution of requests in your network. You can discover whether some network segments or hosts are bearing a disproportionate load of the traffic, or that problematic transactions are all executing on a particular host.
5.1.5.2 Instance and Property Logging
Enabling instance logging allows you to see a list of transaction instances captured in a given time period. You can assemble and inspect a given instance, view any property values for that instance, and create conditions based on these property values.
You can also search on the logged properties and find the related transaction instance.
5.1.6 Service Level Agreements and Conditions
The features you enable for a transaction record information for the entire transaction and for select operations. In addition to this continual monitoring, whose results you must analyze to discover performance issues, you can also configure Business Transaction Management to alert you about special situations by using conditions and service level agreements.
-
Service level agreements define standards of performance for your transactions based on aggregate measurements. Business Transaction Management then monitors deviations from those standards, and when deviations occur, an alert is issued and displayed in the Management Console.
-
Conditions can alert you when an expected message does not arrive, when a specified message property value is encountered, or when a fault occurs. They are tools to help you detect issues in specific transaction instances. When the condition is triggered and satisfied, Business Transaction Management assembles the corresponding transaction instance, allowing you to view its content and perform whatever analysis is needed for troubleshooting or other performance evaluation.
5.2 About Properties
Properties are variables that hold values associated with the request or response phase of an operation. A property value can correspond to a message element, a fragment of an element, the combined value of several elements from the same message, or an expression that uses a message element. You can use a message element from either the message header or body to define a property.
Properties are commonly used to facilitate searches, to surface message elements without having to log message content, to define conditions, and so on.
This section explains the different ways you can define and use properties. It also describes standard properties that are defined by BTM for any operation.
Property definitions are shown in the Properties tab for any transaction that includes the service operation for which a property has been defined. Property definitions are also shown in the Properties tab for the service operation, endpoint operation, service, and endpoint. However, you can modify or delete a property only from the Properties tab for a transaction.
5.2.1 Using Properties
Using properties helps you do the following:
-
Surface aspects of a message that you would otherwise need to drill down to see. The use of properties can improve performance by making it possible for you to view values of message elements without having to log message content.
-
Define keys that allow you to manually correlate the operations that make up a transaction
-
Segment transactions by consumer
-
Define a condition that depends on the value of a message property
For example, imagine you have a service element containing a customer ID. If you wanted to know which customers experience exceptions on a transaction that includes the operation, you could create a property to hold the value of the customer ID element. Then, when you inspect performance results, the ID of customers experiencing exceptions on that transaction would be prominently displayed.
Standard properties, described in the next section, are defined by Business Transaction Management; user-defined properties, as the name suggests, are defined by the user as described in Section 5.2.3, "User-Defined Properties."
5.2.2 Standard Properties
The properties described in the following table are defined by BTM for any message. Standard properties are defined for each phase of a message: request, response, and fault. You can use the aggregateCount, aggregateFaultCount and the ECID-based properties in searches. You can use the ECID-based properties for manual keys.
| Message Phase | Property Name | Description |
|---|---|---|
|
Request |
The number of calls associated with this |
|
|
The number of faults associated with the given |
||
|
The arrival time of the request message measured as milliseconds elapsed since January 1, 1970, 00:00:00 UT. |
||
|
The number of times the requested operation was invoked in the current transaction instance. Each request increments the count even if the operation does not execute successfully. |
||
|
A boolean expression that is true if the request message has arrived as part of the current transaction instance. |
||
|
|
For internal use only. |
|
|
The ECID associated with the request phase of the selected operation. For more information, see Section 5.9.2.1, "ECID Basics." |
||
|
Deprecated. Do not use. This property will be removed from future releases. A string identifying the sender of the request message. This is typically the username portion of the credentials that the sending application provides to the application server in which the receiving service is deployed. This property is set only if the application server authenticates users. |
||
|
Response |
The arrival time of the response message measured as milliseconds elapsed since January 1, 1970, 00:00:00 UT. |
|
|
A boolean expression that is true if the response message has arrived as part of the current transaction instance. |
||
|
|
For internal use only. |
|
|
The ECID associated with the response phase of the selected operation. For more information, see Section 5.9.2.1, "ECID Basics." |
||
|
The time interval between the arrival of the request message and the arrival of its corresponding response message measured in milliseconds. |
||
|
Deprecated. Do not use. This property will be removed from future releases. |
||
|
Fault |
The value of the fault message's |
|
|
The arrival of the fault message measured as milliseconds elapsed since January 1, 1970, 00:00:00 UT. |
||
|
The value of the fault message's |
||
|
The falue of the fault's message's detailcode element, which provides application-specific error information related to the |
||
|
A Boolean expression that is true ifthe fault message has arrived as part of the current transaction instance. |
||
|
The time interval between the arrival of the request message and the arrival of its corresponding fault message measured in milliseconds. |
||
|
Deprecated. Do not use. This property will be removed from future releases. |
||
|
The value of the fault message's faultstring element, which provides a human-readable explanation of the fault and is not intended for algorhithmic processing. |
5.2.3 User-Defined Properties
A property can be based on any XPath expression defined on a request or response message, including message content or message headers (for example, SOAP headers, HTTP headers, or JMS message properties).
The simplest type of property holds the value of a single message element. For example, you might have the following message element:
OrcerServiceImpl.submit.request.order.orderId
You could create a property named Order_ID whose value is the value of this element.
You can also create a property that stores the result of a computation involving one or more message elements. For example, you might multiply an element that holds a price times a constant to compute tax:
OrderServiceImpl.submit.request.order.grandTotal *.0825
You could store the result in a property named Tax_Due.
In some cases, you might not be able to extract the data you need from messages directly. In these cases, you can create a property based on an XPath expression to extract data from your message and perform computations.
For example, if your message contains an indeterminate number of <item> elements, you could create a property to count the number of <item> elements in the message and store that value.
You might also use an XPath expression to extract data from an XML element that itself contains an encoded XML document.
Finally, you might have a service that is missing a WSDL. Using Business Transaction Management you can log a message from this service and then use the XML view to obtain the element you need to define the desired property.
The following subsections provide additional information about creating, modifying, duplicating, and deleting properties.
5.3 Working with Properties
Properties are variables that hold values associated with the request or response phase of an operation (message). This section explains how you use Business Transaction Management to work with properties. It includes the following sections:
5.3.1 Defining Properties
The process you use to define a message property varies depending on whether the property corresponds to a single message element, a fragment of an element, a combination of elements, or an expression that includes an element.
You can access the Create Message Property tool by selecting a service, operation, or endpoint in any view; then select Create Message Propertyon Name from the Create menu.
Independently of the kind of property you create, you will need to specify the following information (in addition to specifying the message element that supplies the property value):
-
A Name for the property
-
The Operation (message) whose content you will use to define the property value
-
An optional Description explaining the purpose of the property or anything other notes you want to retain about this property.
-
The Property Source: where the value of the property is to be obtained.
-
Whether the property should be mapped to a consumer through a particular attribute. If you want the property to be associated with a particular consumer attribute, check the Consumer Mapping check box. By default, the only user attribute defined by the system is Consumer Name. You can define other consumer attributes if you need to.
-
Whether the value of the property can be accessed only by Business Transaction Management users whose role allows them to view sensitive information. To restrict access, click the Treat as sensitive check box.
If you define a new property after messages have been collected, the logged messages will not include the newly defined properties.
The following procedures describe how you can create properties based on a single element, based on an element fragment, or based on more than one message element.
Defining a property based on a single element
-
Select a service, operation, or endpoint in any view.
-
Select Create Message Property on Name from the Create menu.
-
Specify the name of the property. If you do not provide a name, uses the message element name for the property name.
-
Property Source: Specify whether the element of interest is part of the message content or the message header.
If you select Header, Business Transaction Management displays a small dialog you must use to specify the Header Name, the phase (request, response, fault), and the data type. Then skip to Step 8. Steps 5-8 apply if you selected Message Content.
-
Click the Pick from Message link to display the message elements.
-
Use the Message drop down list to select Request or Response.
-
Double click the message element to select it.
-
Click the Consumer Mapping check box if you want to map this property to a consumer attribute.
-
Select the attribute if there is more than one.
-
Click the Sensitivity check box if you want to restrict access to the property value.
-
Click OK.
Defining a property based on an arithmetic expression
-
Select a service, operation, or endpoint in any view.
-
Select Create Message Propertyon Name from the Create menu.
-
Specify the name of the property. If you do not provide a name, Business Transaction Management uses the element name for the property name.
-
Property Source: Select Message Content.
-
Click the Pick from Message link to display the message elements.
-
Use the Message drop down list to select Request or Response.
-
Double click the message element to select it.
-
Click the Convert To XPath item. The display shows the XPath definition of the element.
-
In the XPath box, create the desired expression. For example, if you want to define a Tax property that computes tax, you could take the original XPath expression for the
Priceelement/soapenv:Envelope/soapenv:Body/*[local-name(.)='submit']/^* [1]/^tns1:OrderItems/^tns1:Price
and define it to compute a tax of 10%; for example:
/soapenv:Envelope/soapenv:Body/*[local-name(.)='submit']/^* [1]/^tns1:OrderItems/^tns1:Price * .10
-
Click the Consumer Mapping check box if you want to map this property to a consumer attribute.
-
Select the attribute if there is more than one.
-
Click the Sensitivity check box if you want to restrict access to the property value.
-
Click OK.
Defining a property based on the partial contents of an element
This might be useful if you have nested xml documents and want the property's value to contain a nested element.
-
Select a service, operation, or endpoint in any view.
-
Select Create Message Propertyon Name from the Create menu.
-
Specify the name of the property. If you do not provide a name, Business Transaction Management uses the element name for the property name.
-
Property Source: Select Message Content.
-
Click the Pick from Message link to display the message elements.
-
Use the Message drop down list to select Request or Response.
-
Double click the message element to select it.
-
Click the Convert To XPath item. The display shows the XPath definition of the element.
-
Edit the XPath expression to limit the property value to the nested element.
-
Click the Consumer Mapping check box if you want to map this property to a consumer attribute.
-
Select the attribute if there is more than one.
-
Click the Sensitivity check box if you want to restrict access to the property value.
-
Click OK.
Defining a property based on the combined contents of multiple elements of the same message
This might be useful if you need to provide manual keys to correlate messages but no single message element is unique to a service. You can create a property for the unique value that results from combining two message elements; for example, Customer ID and zip code.
The following procedure assumes you are combining two elements. You can extend this case for additional elements.
-
Select a service, operation, or endpoint in any view.
-
Select Create Message Propertyon Name from the Create menu.
-
Property Source: Select Message Content.
-
Click the Pick from Message link to display the message elements.
-
Use the Message drop down list to select Request or Response.
-
Double click the message element to select it.
-
Click the Convert To XPath item. The display shows the XPath definition of the element.
-
Copy the XPath definition and push the Cancel button to dismiss the Create Message Property tool.
-
Select the same operation again.
-
From the Create menu, select Message Property on Name.
-
Specify the name of the property.
-
Property Source: Select Message Content.
-
Click the Pick from Message link to display the message elements.
-
Use the Message drop down list to select Request or Response (the phase has to be the same as for the message from which you copied the first element).
-
Double click the message element to select it.
-
Click the Convert To XPath item. The display shows the XPath definition of the element.
-
Paste the XPath definition you have copied from the first element. Depending on the element type, use the appropriate operator to form a valid XPath expression.
-
Click the Consumer Mapping checkbox if you want to map this property to a consumer attribute.
-
Select the attribute if there is more than one.
-
Click the Sensitivity checkbox if you want to restrict access to the property value.
-
Click OK.
5.3.2 Properties for Services that Have Missing or Incomplete WSDLs
Business Transaction Management uses the same model to represent interconnected components no matter what the component type: the model shows services that interact by sending request and response XML messages. The model also assumes that each of the services is described by a WSDL specifying the service's location and its interface. However, not all discovered components can be precisely rendered by this model. If the component is not an actual web service, the corresponding WSDL might be missing or incomplete. In such a case, you will need to take some additional action to create properties for the message elements of this component. Basically, you will log a message containing the element of interest, and then copy the XML into the property definition.
The process is the following:
-
Enable message logging for the transaction operation that contains the element for which you want to create a property.
-
Run traffic through your system to capture at least one transaction instance.
-
Select the transaction of interest in the main area of the console.
-
Open the Message Log tab and select the operation for which you have logged messages.
-
Click on the magnifying glass icon to open the Message Content inspector.
-
Select View XML for either the Request or the Response message, depending which of these contains the element of interest.
-
Copy the XML for the message.
-
Select a service, operation, or endpoint in any view. (The service must contain the operation of interest.)
-
Select Create Message Property on Name from the Create menu.
-
Property Source: Select Message Content.
-
Click the Pick from Message link to display the message elements. Ignore the element tree that is already filled in (if any).
-
Select the operation phase: Request or Response.
-
Click the Get XML button to open the Paste XML document window.
-
Paste the text in the window and click OK.
-
The element tree should now contain the message element.
-
Select the element of interest.
-
Click the Consumer Mapping check box if you want to map this property to a consumer attribute.
-
Select the attribute if there is more than one.
-
Click the Sensitivity check box if you want to restrict access to the property value.
-
Click OK.
5.3.3 Viewing Property Definitions
You can view partial property definitions on the Properties tab of an operation, endpoint, service, or transaction. The property name, phase, type, and description are displayed. The property's sensitivity and consumer mapped attribute is also displayed.
To see the full definition, click the Edit button and select Modify.
5.3.4 Viewing Property Values
You can view property values in the following views:
-
Message Log tab for a selected endpoint, operation, service, or transaction
-
Alerts tab for a selected endpoint, operation, service, or transaction
-
Transactions view, Instances tab
-
Transaction Instance inspector
5.3.5 Modifying Properties
You can change the definition of a property. Note that if you change the XPath definition of an existing property, the runtime will start calculating the new XPath definition based on incoming messages. Previously recorded messages will continue to hold the value calculated based on the old XPath definition.
To change the name of a property, you must create a duplicate, assign it a new name, and then delete the original.
Properties play an important role in transaction definitions, segmentation, conditions, and logging; for this reason, modifying a property definition might have the following consequences:
-
If the property is used as a key in a transaction definition, the transaction will be disabled.
-
If the property is used as a key in a transaction definition, the transaction will be disabled.
-
If the property is used by a condition, the condition will be disabled.
To modify any user-created property
-
Select the Properties tab of the operation, endpoint, service, or transaction of interest.
-
Click the Edit button and select Modify.
-
Modify the property definition. Refer to the instructions for creating a property.
-
Click OK to save the new definition.
5.3.6 Duplicating Property Definitions
There are a couple of reasons why you might be interested in duplicating a property definition:
-
You might want to use the original property as a starting point for creating another property that needs a similar complex expression or includes some of the content that is extracted by this property. In this case, you would want to duplicate the property and partly modify its definition.
-
You need to rename a property. In this case, you can duplicate the property, assign it the desired name, and delete the original property. Deleting properties can have significant side effects. See Section 5.11, "Troubleshooting Transactions" to learn more.
To duplicate any user-created property
-
Select the Properties tab of the operation, endpoint, service, or transaction of interest.
-
Click the Edit button and select Duplicate.
-
Modify the property definition. Refer to the instructions for creating a property.
-
Change the name of the duplicate if you wish.
-
Click OK to save the modified copy.
5.3.7 Removing Properties
Properties play a key role in transaction definitions, segmentation, condition definitions, and logging; for this reason deleting a property might have significant consequences:
-
If a property is used as a correlation key, it is considered fundamental to the transaction definition. If one of these properties is deleted, the entire transaction will become disabled and a system alert will be generated.
-
If a property used for transaction consumer segmentation is deleted, or modified so that it is no longer marked as "consumer," the transaction segmentation will no longer be captured. If the transaction is marked enabled for segmenting by consumer, a system alert will be generated and consumer segmentation will be disabled.
-
If a property used by a condition definition is deleted, the condition will be disabled and a system alert will be generated.
-
If a property is deleted which is defined on an operation in a transaction and logged (but not explicitly used for other purposes), the user will no longer be able to see that property and associated content when viewing instances of logged messages.
To delete any user-created property
-
Select the Properties tab of the operation, endpoint, service, or transaction of interest.
-
Click the Edit button and select Delete.
-
Click OK to save the new definition.
5.4 Defining, Modifying, and Deleting Transactions
A transaction is a sequence of service operations that you want to monitor and manage as one unit. This section explains how you use Business Transaction Management to define transactions, to modify transaction definitions, and to delete transactions.
Keep in mind that the more features you turn on for your transactions, the greater the impact on Business Transaction Management performance, especially with high volume. For example, it is best to restrict message logging to narrow areas of interest rather than to enable it for all operations in a transaction. The following guidelines indicate the relative performance cost of transaction monitoring options:
-
Low: core measurements when the start and end message are the same
-
Medium: segmentation, condition evaluation
-
High: instance logging and message logging
5.4.1 Defining a Transaction
Defining a transaction involves specifying the following information:
-
The operations that participate in the transaction, and the start and end message for the transaction.
-
Whether the transaction should be actively monitored or temporarily quiesced.
-
Whether you want information to be segmented by ip address or consumer.
-
Whether you want to log transaction instances or message content.
-
How you want the system to correlate messages: using fingerprints or using manual keys that you define
-
How long transaction messages should be held by the system.
The following subsections explain how you specify each aspect of the transaction definition.
5.4.1.1 Selecting Operations and Enabling the Transaction
Once you have defined the operations that participate in a transaction and enabled transaction monitoring, you will be able to view transactions and related services in the Transaction view, create fixed-value and baseline Service Level Agreements (SLA), view summary of link measurements on the Summary tab and other measurements in the appropriate views. For measurements, you will be able to see the number of started and completed transactions, throughput, average response time, maximum response time, and faults.
-
Select any operation that you want to include in transaction. You can select the operation from any view: service graph, dependency diagram, data grid, or message search tool.
-
Select Transaction from the Create menu. Business Transaction Management brings up the Transaction tool, which allows you to define all aspects of the transaction.
-
Select the Definition tab if it is not already selected. Note the basic elements required for a definition as shown on this tab: start message, end message, and maximum transaction duration. The Enable Transaction Monitoring checkbox is enabled by default. Disabling the box allows you to keep a transaction definition while temporarily turning off monitoring.
In the upper pane, the tool displays all the operations that are dependent upon the operation you selected. By default, the request message of the left-most operation in the dependency chain is designated to be the start operation and the response message of the left-most operation is designated to be the end message. The tool displays the specified starting operation along with all the service operations in the consequent dependency chain. By default message fingerprints are used to correlate messages in a transaction. These are represented in the transaction map with a fingerprint icon. You can choose to have Business Transaction Management correlate messages using manual keys if you like.
-
By default, the transaction name is based on the starting operation. To assign another name, specify it in the Transaction Name text box.
-
If you want to change the start and end message selected by default, click on the Start message or End message drop down lists and select an alternate start and end message.
If the start and end message are not the request/response messages of the same operation, you will need to specify keys with common content for Business Transaction Management to measure performance. You will be prompted for the required information. You can specify an ECID value as a common key if you like.
-
To further customize the transaction, use the buttons to the right of the graph to add an operation, connect it to existing operations, to indicate message flow direction, or to remove an operation. You will also need to specify manual keys to connect the operation you have added to an existing operation in your transaction.
-
A new transaction is enabled by default. This means that Business Transaction Management is monitoring transaction performance, collecting measurements, and evaluating conditions if these have been defined for the transaction.
To disable a transaction, click the Enable Transaction Monitoring check box. This will turn off measurement collection (segmented and non-segmented), condition evaluation, instance logging and content logging. However, SLA's applied to the transaction will continue to evaluate and potentially fire unless you explicitly disable them. Disabling a transaction is a way of quiescing transaction monitoring without losing the transaction definition.
-
By default the scope of the transaction (how long it takes for it to complete) is set to one minute. Business Transaction Management uses this value as a guideline in locating transaction messages; it defines the time window within which unique content is expected to appear. You can change this value to a longer duration for Maximum Transaction Duration), depending on the characteristics of your transactions. (The one minute value is both the minimum and the default setting.) The intent here is to close out transactions that tare not likely to complete normally, and to free needed resources.
If you decide to change the setting of JDBC Summary mode after creating a transaction, you will need to run more traffic and then update your transaction definition. For details, see Section 4.1.4.2, "Updating Transaction Definitions After Changing Summary Options."
5.4.1.2 Enabling Segmentation
Business Transaction Management allows you to segment transaction measurements based on ip address and by individual consumer. You use the Segmentation tab of the Transaction tool to enable segmentation. Enabling segmentation allows you to create usage SLAs for the transaction, to see transaction usage by client IP address, and to see transaction measurements by consumer. You can see on the Profile tab which segments are enabled and which property is being used as the consumer property.
You can choose to enable either or both of the segmentation options. The image below show what the tab looks like after segmentation has been enabled and a particular property has been mapped to a consumer. Note the consumer icon.
To enable segmentation:
-
Select the Segmentation tab of the Transaction tool
-
To enable client address (ip) segmentation, click the check box Enable client address segmentation.
-
To enable consumer segmentation, click the check box Enable consumer segmentation.
Consumer segmentation depends upon defining a property for the transaction's starting message. This property refers to the message element that you want to map to the consumer business object. If you have not already defined this property before you define the transaction, you can do so as shown in steps 4 through 9. If you have defined the property, select it now.
-
Click the New Property button. Business Transaction Management displays the Create Property tool.
-
Specify a name for the property, and provide a description if desired.
-
Property Source: Select the source for the property value: Message content or Header.
-
Select the Pick from Message.... link, and select the element you want to map to the consumer business object.
-
Consumer Mapping: Click on the check box Map to consumer through attribute Consumer Name. You can change your selection later if you wish, but you cannot have more than one property mapped to a consumer object.
-
If you do not want the consumer name displayed exactly because it contains sensitive information, check the Treat as sensitive check box.
-
Click OK.
5.4.1.3 Enabling Instance and Message Content Logging
Enabling instance logging allows you to see a list of transaction instances captured in a given time period. These are displayed in the Instances tab of the Transaction view. You can inspect a given instance, view any property values for that instance, and create conditions based on property values. You can also assemble any of these instances.
To enable instance logging:
-
Select the Logging tab.
-
Click the check box titled Enable instance and property logging.
Enabling message content logging allows you to view message content for the operations you specify. (In this case, Business Transaction Management logs all messages for the specified operations, not just those belonging to this particular transaction flow.) You can get to the message content in different ways: use the Message Log Search tool to find an operation based on free text search and then open the related transaction instance, or you can drill through to the message log from the Analysis tab and alerts.
To enable message content logging:
-
Select the Logging tab, and click the check box titled Enable message content logging on selected operations.
-
Select the operations (messages) whose content you want to log. Logging message content is an expensive operation. It is best to narrow the scope of messages that interest you before you start logging messages.
The example above shows that message content is enabled for the operation checkCredit of the service CreditService.
5.4.1.4 Correlating Messages in a Transaction Using Manual Keys
By default Business Transaction Management correlates messages in a transaction by computing fingerprints (hash values) based on the content of each message and by pairing incoming messages with outgoing messages all the way to the end of the call chain. Defining manual keys provides an alternate means of correlating messages. Manual correlation is used to add a secondary operation flow to a transaction, to define a transaction whose end message and start message do not belong to the same operation, and to define a missing message condition.
Transaction messages do not have to be correlated by a single method: some messages can be auto-correlated; others can be correlated using manual keys. In order to define a manual key, you must map it to a message property and that property must satisfy certain requirements as explained next.
A manual key is mapped to a message property.
The property can correspond to a single element in a message, to a combination of elements, or to a fragment of an element. You can define the property before you define the manual key
The property you define for the manual key must satisfy two requirements:
-
Its value must be the same for the messages you are correlating.
-
Its value must be unique for the scope of the transaction (the scope is defined by the value of Maximum transaction duration).
For example, in a shopping type application, the order ID is often an excellent choice for a manual key.
You will need to manually correlate operations in the following cases:
-
To add a secondary operation flow to the transaction. This might be necessary in the case of asynchronous systems like JMS or desirable if you want to connect two operation flows that share underlying data but are not causally connected. For example, you have one flow defined by an order entry, and another flow defined by the fulfillment of the order. The same order is involved in two otherwise disjoint processes.
In this case, you will need to figure out which two operations you want to link, and to find a common element for those two operations that you can map to a message property. The process would be as follows: add the operation to the transaction; connect it to an existing operation in your transaction, and indicate the direction in which the request is going. The two operations will then be shown in the Message Keys tab, where you can connect them using a manual key.
-
To define a transaction whose end message is not the end message of the operation that starts the flow.
In this case, you will need to find a common element in the starting message and the desired end message that you can map to a message property. When you specify the end message, the system will prompt you for the manual key that will connect the start and end message.
-
To define a missing message condition.
In a missing message condition, an alert is generated if the target message you specify does not arrive within a given period of time after the start message occurs. In this case, you must define a key for some element that is common to the start and target message. When you define the missing message condition, the system will prompt you for the key that will connect the start and target message.
You use the Message Keys tab of the Create Transaction tool to define the means by which Business Transaction Management correlates operations when you are adding a secondary flow. Note that if a given operation correlates to more than one operation in a dependency flow, you have the option of creating manual keys for each correlation. You do not have to use the same key to correlate to the three different operations nor do you have to use the same means of correlation.
To create a manual key to correlate messages:
You can define the properties you need before you define the correlations or you can access the property tool from the Message Keys tab and define the property at the same time that you are defining the correlation.
-
Select the Message Keys tab.
-
Select the start operation for the pair of operations you want to correlate.
-
Click the Message Fingerprint item for the Start operation of interest to see the key drop down list. Business Transaction Management displays a list of properties for the operation from which you can pick one to use as a manual key.
-
Select the desired property to use as a key.
-
If no property is displayed that will have a unique value on each invocation of the operation, select New Property from the drop down list to open the Property tool and use that tool to define the property you want to use as a message key.
-
Select the End operation that corresponds to the Start operation for which you have just created the key.
-
Repeat Steps 4 through 5 to select or define a key for the end operation. (Although the property names might be different, the value of the property must be the same, and it must be unique to the transaction instance.)
-
Repeat Steps 4 through 7 for each pair of operations that you want to correlate. (The properties you have created for the manual keys are displayed in the Profile tab for the selected transaction, in the Properties pane.) When you are done defining the transaction, the graphic that represents the transaction will be changed to show key icons rather than fingerprint icons for all operations that are correlated using a manual key.
5.4.1.5 Defining Storage Settings
The final step in defining a transaction is to define archival settings and to enable the indexing of message content.
Use the Storage Settings tab to define these values. The table below shows the default settings and explains the meaning of the settings.
5.4.2 Modifying a Transaction Definition
Modifying a transaction definition changes the definition of the transaction in the environment. You can modify any part of a transaction definition, but keep in mind that Business Transaction Management does not track definition versions. For this reason changing some aspects of the definition might confuse things. For example, if you add or delete operations to a transaction definition or if you change the keys used to correlate operations, and then you try to assemble a transaction instance that preceded the modified definition, you might get odd results. On the other hand, enabling or disabling the transaction, or changing storage options should not be a problem.
To modify a transaction definition:
-
Select the transaction of interest in the Explorer > Transactions summary view.
-
Select Edit TransactionName from the Modify menu.
-
Use the Modify Transaction tool to modify the transaction definition. Refer to Section 5.4.1, "Defining a Transaction" for information about definition elements.
-
Click OK.
Business Transaction Management offers you a short cut you can use to enable or disable a transaction without having to edit its definition.
To enable or disable a transaction:
-
Select the transaction of interest in the Explorer > Transactions summary view.
-
Select Enable TransactionName or Disable TransactionName from the Modify menu. The appropriate action will be available, depending on the current status of the selected transaction.
5.5 Viewing and Monitoring Transaction Performance
After a transaction is defined and if monitoring is enabled for the transaction, Business Transaction Management applies the default transaction measurement policy. In addition, if instance logging or message content logging is enabled for the transaction, it starts logging the appropriate information.
As traffic flows through the services that participate in a transaction, Business Transaction Management displays core measurements for the selected transaction in the Main area. This includes the number of started and completed transactions, the throughput, and the average response time. In the Tabs area it displays more detailed information about transaction performance and its definition. This includes the following:
-
A Summary tab that presents summary performance information for the transaction and a map of the operations it includes.
-
An Analysis tab that presents a graphic view of transaction performance over time as well as summary information for conditions, performance segmented by consumer usage or client address, and violation alerts. This tab also gives you the option of creating your own custom chart and breakdown.
-
An Alerts tab that lists the alerts triggered for this transaction in a given period.
-
An Instances tab. If you have instance logging enabled, you can use this tab to assemble an instance and view performance information for the instance.
-
A Message Log tab. If you have message logging enabled, you can use this tab to view the contents of any request or response message for a logged operation.
-
An SLA Compliance tab that shows the status and definition of service level agreements currently associated with this transaction.
-
Definitional tabs. These tabs contain information about the transaction definition and the policies, conditions, and properties associated with the transaction.
This section explains how you use transactions attributes to filter your transaction view, how you view summary and analysis performance information for a transaction, and how you view and respond to alerts.
See Section 6.3, "About Instruments" for a detailed discussion of the instruments used to measure transaction performance.
5.5.1 Filtering the Main View of Transactions
By default all transactions are shown in the Main area when you select Transactions from the Navigator. You can have Business Transaction Management display a subset of currently defined transactions by using the Filter link or drop-down list. Using filters allows you to customize your view and to focus on the characteristics of interest.
5.5.2 Summary and Analysis of Performance Information
Business Transaction Management uses the Summary and Analysis tabs of the Transaction view to present summary and detailed analysis of transaction performance. This section describes these views.
5.5.2.1 Summary Tab
The Summary tab uses four panes and a grid view to present performance information in a Transaction Summary Dashboard. These are mostly self-explanatory, except for the Delay Analysis pane, which is described in greater detail below.
The Transaction Summary Dashboard includes the following:
-
A Status pane showing the overall compliance for the transaction.
-
A Measurement and Baselines pane showing the number of started and completed transactions, average response times and maximum response times. If you have defined baselines, these are shown as gray lines in the picture.
-
A map of the transaction showing average response times for each transaction link. Place the cursor over each service icon to get detailed performance information for that service. The thickness of the arrows indicates throughput.
-
The Delay analysis pane, which you can use in conjunction with the map pane, shows graphically what proportion of the overall response time is spent in each hop (link) of the transaction.
Each colored area of the grid corresponds to a transaction link. Clicking in a colored region highlights its corresponding link in the map and displays the percentage of the response time taken up by that hop.
At the bottom of this pane, a graph shows the average and maximum response times and the started transactions. Clicking in the pane displays a vertical red line that shows how the colored proportions correspond to message traffic flows.
-
A grid view showing the logical and physical operations that make up the transaction, and the following instruments for each: violation alerts, average response time, maximum response time, throughput, and faults.
5.5.2.2 Analysis Tab
The Analysis tab of the Transaction view allows you to see the measurements in the Summary tab graphically rendered as trends across time. The Analysis tab offers six views of transaction performance data. These are described in the table below.
| View | Description |
|---|---|
| Performance | Provides two color-coded charts: one that tracks started transactions, completed transactions, and conditions; the other tracks average response time versus maximum response time. |
| Conditions | Lists information about the conditions that have been triggered in a given time period: the name of the condition that was met, the endpoint where the condition alert was triggered, and the number of condition alerts triggered. |
| Consumer usage | If you have chosen to segment by consumer: Lists service consumers and the number of started and completed transactions in which they were involved and the average and maximum response time for each consumer. |
| Breakdown by Client Address | If you have chosen to segment by ip address: Lists the hosts for the services involved in the transaction, the number of transactions started and completed on each, and the average and maximum response time for each host. |
| Custom charting | Displays performance results for custom charts. Lets you set up a customized chart and table with instruments of your choosing.
Click Choose Instruments and select the instruments you want displayed in the chart and table. You can select multiple instruments. |
| Custom breakdown | Defines the custom performance information to measure and the segment on behalf of which measurement is done.
Click Choose Instruments and select the instruments you want displayed in the table. You can select multiple instruments. Click Choose Segments and select how you want to segment the measurements. You can select multiple segments. |
5.5.3 Viewing and Responding to Alerts
Alerts are shown on the Alerts tab for the selected transaction. You can use the Filter button in that tab to determine the range of time for which alerts should be displayed.
The system automatically generates alerts when one of the following happens:
-
An SLA enforcement policy issues a failure, warning, or compliance alert.
-
A condition evaluates to true
You can respond to alerts triggered by a condition by examining the assembled transaction instance and taking appropriate action.
5.6 Top 10 Transactions Dashboards
The Top 10 Transactions dashboard enables you to quickly identify and assess the health of the most stressed components in your system.
To display the dashboard, choose Dashboards > Top 10 Transactions
The dashboard provides four tables. Each table is based on a particular instrument and lists the transactions with the ten highest measurements for that instrument (except for uptime, which is lowest).
The default evaluation period for the data displayed for transactions is seven days. To change the evaluation period, click the Time Period control at the top of the display. You can change the period to the last day, hour, or 10 minutes.
The Top 10 Transactions dashboard provides tables that list the 10 transaction types with the following characteristics:
-
highest number of started transactions (Most Started table)
-
highest number of completed transactions (Most Completed table)
-
slowest average response time (Slowest Avg Response Time table)
-
highest number of condition alerts (Most Condition Alerts table)
Each table provides numeric instrument values as well as charts. Hover the cursor over a chart to view detailed information for a particular time segment.
For in-depth information and analysis, double-click a transaction or service to display the Tabs area, and select the Analysis tab.
5.7 Viewing Transaction Instances
A transaction usually executes many times in a given period. If you have enabled transaction instance logging or if you have enabled fault monitoring, Business Transaction Management tracks the flow of messages included in the transaction and maps these to particular transaction instances. It assembles the messages for a transaction instance in the following cases:
-
when an alert is generated as a result of a fault, or a condition being met
-
when you explicitly ask for assembly
Once a transaction instance is assembled, you can use the Instances tab to view detailed performance information for that instance. You can also use the Message Log tab to search for messages containing particular property values. To view the content of a message, you must also enable message content logging.
This section explains how you do the following:
-
View a summary of all transaction instances and search for a subset of these
-
Assemble and inspect an instance
5.7.1 Viewing Captured Transaction Instances
The Instances tab in the Transactions Tabs area allows you to view captured transaction instances.
The ID column of the table displays both instances that have been assembled (these have an ID value assigned) and instances that have not been assembled (these have an Assemble button).
Information for each instance shows when it was captured, what the overall response time for the transaction instance was, and values for properties if you have created these.
The Show instances filtering control allows you to list instances that have occurred in a set time period or to show only assembled instances.
Which instances you choose to assemble depends on what interests you. For example, you might want to assemble an instance with an unusually slow response time; or you might want to assemble an instance with an unexpected property value.
If you are capturing a very large set of messages, you might want to use the Message Log tab to search for a smaller set of messages, based on property values, and then assemble one or more of these.
5.7.2 Assembling Instances and Using the Instance Inspector
You can assemble an instance by clicking the Instance Inspector icon (magnifying glass) in the Instances tab:
Business Transaction Management brings up a Transaction Instance Inspector. This view consists of three parts: identifying information for the transaction instance at the top, a map view in the middle, and a grid view at the bottom showing all the operations included in the transaction instance.
The top part of the inspector shows the name of the transaction, the time the assembled instance started executing, its ID, the number of message exchanges, the total messages exchanged, and the response time between the starting and ending message. Any warnings or faults will also be displayed in this area.
In the instance map that follows, you can view the entire transaction instance, with the response time given for each request/response link. Move the cursor over the operation name to display the service type, the endpoint name, and the host name and port. You have the option to hide uncalled operations and to hide JDBC calls. Hiding JDBC calls can greatly simplify the call graph for complicated transanctions with many operations that call the database.
At the bottom of the inspector window, a grid view shows you detailed information for each message included in the transaction instance. The view includes columns to show property values if you have defined these. The information displayed might be affected by the setting of JDBC summary mode; for more information, see Section 4.1.4.1, "Understanding the Display of JDBC Summary Data."
Clicking on the magnifying glass (tear-off control) for any operation, opens a Message Content inspector window and displays the contents of the selected message if you have enabled message content logging for that operation.
5.8 Viewing Logged Messages and Properties
You can use the Message Log tab for a transaction to view the following information:
-
If instance logging is enabled, you can view information about each message logged in a specified time period as well as the value of any property associated with a message. You can also use the Message Log Search tool to search for a message or messages that contain property values of interest or based on the ECID value associated with the message.
-
If message content logging is enabled, you can view information about each message logged in a specified time period as well as its content. In this case, in addition to searching for messages based on property and ECID values, you can also search based on the content of any message element (free text search).
Business Transaction Management logs message content or instance and property values only if you have done the following:
-
You have enabled monitoring for the transaction
-
You have enabled the appropriate type of logging for the transaction (instance or message)
-
For message logging, you have selected one or more operations
Logged information is stored according to storage settings that you define when you create the transaction.
This section explains how you view information about messages, search message logs for messages, and enable or disable logging.
5.8.1 Viewing Information About Logged Messages and Properties
The Message Log tab for a given transaction displays information using a grid view that displays a list of messages, showing the arrival time of the request message, the service that includes the selected operation, the location of the endpoint that implements the service, the operation (message), and the type of operation. If there are any properties associated with the operation, their values are shown in additional columns whose title is the property name.
If you have message content logging enabled, double clicking on any message shows you the contents of the message.
The set of messages shown in the grid varies depending on the setting of the filters shown at the top of the tab. These allow you to see
-
All operations or specific operations chosen from a drop down list
-
Any response, only successful operations, only failures
-
Messages that arrived within a time interval denoted by the last specified time period, since a certain time, or between two given times.
You can use these controls to narrow the selection of messages shown in the grid. After you change filter settings, click Search again to repopulate the grid.
You can further narrow your search by using the Message Search tool accessed from the Choose Content... link. This allows you to search for messages based on their property values or, if message content is enabled, based on message content. This tool is described in the next section.
5.8.2 Using the Message Log Search Tool
The Message Log Search tool enables you to further refine the scope and the criteria of your search (in addition to the strictures defined by the view filters). To bring up this tool, choose Search Message Log from the View menu. This allows you to find messages belonging to any monitored transaction for which logging is enabled.
You can also find messages belonging to the currently selected transaction, by clicking the Choose Content... link from the Message Log tab of the transaction. However, this more restricted search does not give you the additional option of searching for related transactions when you obtain the search results.
The Message Log Search tool has four main areas you can use to define search criteria: one area for searches using user-defined properties, an area for ECID-based searches, one area for searches related to the properties aggregateCount and aggregateFaultCount, and one labeled Free text search. You use controls in these areas to search for a set of messages that match you criteria. As you specify criteria, a search expression is constructed in the text box at the top of the tool. To clear the box and start over, press the Clear button.
For additional information about using Oracle query language to formulate your query, look at the following:
https://download.oracle.com/docs/cd/B28359_01/text.111/b28304/cqoper.htm#BABBJGFJ
When you are done defining the expression to be used in the search, click the OK button. Then click the Search button to repopulate the grid according to your newly defined search criteria.
The following sections provide additional information for each type of search; however, note that you are not restricted to a single type: you can use them in any combination. For example, you can search for messages that have a given property and ECID value.
5.8.2.1 ECID-Based Search
If a message (operation) has been assigned a request or response ECID, you can search for those messages that have been assigned a specific ECID value. For information on the meaning and assignment of ECIDs, see Section 5.9, "Accessing Other Diagnostic Tools."
To do an ECID-based search, select the matching criteria in the ECID field and enter or paste the ECID value in the ECID entry field. You can copy the ECID value from anywhere it is displayed. If you are copying from a column, expand the column to make sure you have the full string value. The Message Log Search tool, displays all operations with the specified ECID in all transaction instances in a grid view.
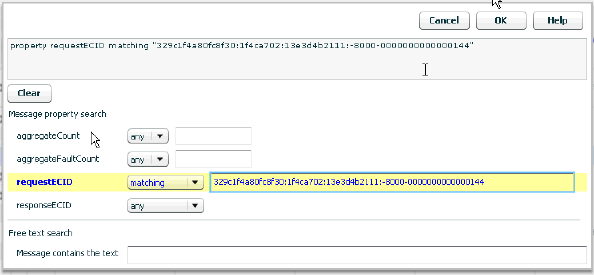
If you want to look at a specific transaction instance that contains a given ECID, select the operation of interest in the grid view of the Message Log Search tool and select View > Related Transaction > target_Transaction in the Message Log Search tool. The instance of interest is displayed in the Instance Inspector window.
5.8.2.2 Property-Based Search
The properties that have been defined for the transactions in question are shown in the Message property search area. Use the drop-down lists to specify your property-based search criteria.
-
For a numeric value, the drop down list allows you to search for messages whose properties are less than, equal to, greater than, not equal to, and so on.
-
For a string value, the drop-down list provides a similar set of matching options.
5.8.3 Enabling and Disabling Message Logging and Instance Logging
Do the following to enable or disable message logging and instance logging:
-
Select the transaction of interest.
-
Select Modify > Edit TransactionName.
-
In the ensuing dialog, select the Logging tab.
-
Use the check boxes shown to enable or disable message content logging and instance logging.
-
If enabling message logging, select the specific operations you want to log.
5.9 Accessing Other Diagnostic Tools
In addition to the metrics it provides about transactions, services, endpoints, and operations, Business Transaction Management allows you to view additional information about the JVM context within which a request executes and to see more detailed information about the request as it executes across distributed JVMs.
The additional views are the following:
-
The JVMD view allows you to view the details of an executing Java Virtual Machine (JVM) process for the period within which a given operation executes. You can see stack frames for executing threads, thread state information, aggregate information about the frequency and cost of method execution, information regarding the holding of Java and DB locks, and details about the objects in the Java heap. JVMD also stores historical data for each JVM it monitors so you can view data relating to things that have happened in the past and get a sense for historical trends.
-
The Request Instance Diagnostics view allows you to trace the path of a request in a WebLogic domain and to generate a report of all the metrics associated with a particular instance of the request.
The following sections describe the information you can get from these views as they relate to transaction operations and explain how you can access these views from the Business Transaction Management console.
For information on how to configure Business Transaction Management to access these views, see Section 5.9.3, "Enabling Access to the JVMD and RID Views."
5.9.1 Using the JVMD View
Using JVMD to access additional information can be useful in situations like the following:
-
You are viewing summary information for a transaction and see that a particular operation is unusually slow or faulty. You want to get more information about the execution of that step, and you initiate a drill through to JVMD from this point.
-
You are viewing the details of a logged transaction instance and you notice that one of the steps in the transaction did not behave as expected. You would like more details about the execution of this step from JVMD, and you initiate a drill through to JVMD from this point.
-
You are viewing a collection of logged messages in the message log search tool and you notice a message that appears abnormal or unusual. You would like to get more details of the handling of that message using JVMD, and you initiate a drill through to JVMD from this point.
You can access the JVMD console from the following entry points:
-
Message Log tab for a service, endpoint, logical operation, physical operation, or transaction. Right-click on row and select Drilldown to JVMD from the drop-list.
-
Transaction Instance Inspector. Right click on an operation (either in the graph or grid view) and select Drilldown to JVMD from the drop-list. When a step is executed repetitively, the first endpoint on which it was executed is selected.
-
Message Search Log tool Right-click on a message row and select Drilldown to JVMD from the drop-list.
In each of these cases, a new window is displayed showing the JVMD view. In the multi-VM case, JVMD shows a VM group target and aggregate information for that group.
For information on how to enable access to the JVMD page, see Section 5.9.3, "Enabling Access to the JVMD and RID Views."
5.9.2 Using the Request Instance Diagnostic View
To view information about an operation (message) in the Request Instance Diagnostic view, that message must be assigned an Execution Context Identifier (ECID). This section explains what an ECID is, how ECIDs are assigned, how they map to transactions, and how you can access and use the Request Instance Diagnostic view from the Business Transaction Management console.
Data is displayed in the Request Instance Diagnostics view only for operations executing in a WebLogic (10.3.x) domain with JRF 11.1.1.1.0 or higher. (The installation of SOA 11g, OSB 11g, and Fusion Applications already includes the JRF.)
For information on how to enable access to the Request Instance Diagnostics page, see Section 5.9.3, "Enabling Access to the JVMD and RID Views."
ECID information for a message request or response is displayed in the Business Transaction Management console even if you have not installed a JVMD agent or configured a connection to the EM console; however, without having satisfied these pre-requisites, you will not be able to open the Request Instance Diagnostic view for a given ECID.
You can use the Message Log Search tool to find all messages that have a given ECID. For more information, see Section 5.8.2, "Using the Message Log Search Tool."
5.9.2.1 ECID Basics
An ECID is an identifier for tracking a request, for components into the Oracle technology stack. It is usually generated by the outer-most Oracle component handling the request and may be propagated by the Oracle components handling that request, even crossing server boundaries. The creation and propagation of ECIDs enable the sharing of context and of diagnostic data between components.
Transaction operations (messages) that have been handled by Execution Context aware components represent steps in a request that were assigned an ECID shared by all the request steps. If Business Transaction Management observes that a message has an associated ECID, it assigns the ECID as an intrinsic property of the message request and response, and it notes the value of the ECID in the message header. The ECID value for a given operation and phase is stored in the standard properties requestECID and responseECID.
Because transactions might span multiple Oracle execution contexts, it is possible for different messages in a transaction to have different ECIDs. It is also possible for the same ECID to be shared by operations in different transactions. The next section describes how ECIDs are mapped to transaction operations (messages).
In addition to using ECIDs to drill down to the JVMD or RID views, ECIDs are also useful in the following situations:
-
You want to define a transaction where the start and end message are not the same. In this case, you can use a common ECID value to correlate the start and end message. This enables BTM to measure performance for such a transaction.
-
You want to manually correlate two disconnected operations using ECID as the shared key value.
-
You want to search for a message that has a specific ECID value.
5.9.2.2 The Correspondence between ECIDs and Transaction Operations
Depending on how a transaction has been defined and deployed, the messages it contains might have one or more ECIDs. It's important to understand the mapping between ECIDs and transaction messages. This section describes two possibilities.
-
Multiple transaction definitions; one ECID
Consider a call chain A -> B ->C ->D ->. If I define transaction X to include ABC, and transaction Y to include CDE, the messages in an instance of X and an instance of Y that resulted from a single invocation will have the same ECID.
-
Multiple ECIDs; one transaction.
If transaction X includes the call chain A -> B ->C, and B executes on a non-Oracle platform, the message that corresponds to operation B will have no ECID, and the messages for A and C will have different ECIDs.
-
For a given operation, the ECID for a request may not be the same as the ECID for a response.
In short, seeing multiple ECIDs for a single transaction, or the inverse, does not mean that anything is wrong; it can provide valuable information about operation flows and invocation boundaries.
5.9.2.3 Accessing the Request Instance Diagnostics View
The Request Instance Diagnostics view, which provides information about a given ECID, is accessible from the following locations:
-
Transaction Summary tab. Right-click on an operation (in the graph or grid view) and select Request Instance Diagnostics from the drop-list.
-
Message Log tab for a service, endpoint, logical operation, physical operation, or transaction. Right-click on row and select Request Instance Diagnostics from the drop-list.
-
Transaction Instance Inspector. Right click on an operation (either in the graph or grid view) and select Request Instance Diagnostics from the drop-list.
-
Message Search Log tool Right-click on a message row and select Request Instance Diagnostics from the drop-list.
It is possible that the Request Instance Diagnostics page displays no information for a given ECID. This can be because the default sample rate for the JVM monitoring tool is longer than the step duration, and the specified ECID executed outside of the sampled period.
The Request Instance Diagnostics page displays a list of the JVMs through which request steps with the specified ECID executed. For each JVM the following details are displayed:
-
One or more target JVMs where the request executed.
JVMs can show up more than once with the same ECID if the RID (relationship ID) is different for a request step. (The RID is a sequence of digits that represents the relationship of the current step's execution to the execution of the request as a whole.)
-
The start time and duration of the request.
-
The request name, the individual step in the request; for example, jsp, EJB, or DB.
-
The CPU and memory use by the JVM.
-
Garbage collection statistics (GC Major/Minor).
The bar graph displayed at the bottom of the Request Instance Diagnostics view shows the thread state in each JVM snapshot taken within the duration of the request. Each color represents a different thread state; a color key is shown on the right.
You can click on any bar in the bar graph to display a pane with detailed information for the given thread and the thread stack.
The Request Aggregate tab does not contain information relevant to transactions.
You can access the Request Instance diagnostics page in different ways. For example, you notice that a particular operation is taking an unusual amount of time and you want more information about its runtime context. If an ECID is supplied for the operation, you can drill in to the Request Instance Diagnostics page and get additional information. Alternately, you obtain an ECID from an external source and you want to see whether messages bearing this ECID participate in any transaction. You would use the Message Log Search tool to search for all messages associated with this ECID. Having found the messages, you can see the corresponding services and operations, view related instances, and find the transaction instance that included the message of interest.
5.9.3 Enabling Access to the JVMD and RID Views
Note:
You can only access JVM Diagnostics from BTM if the machines where JVMD is installed are known to the Enterprise Manager instance by their fully qualified domain names (FQDN). If a machine has been discovered/registered by the EM in its short form (for exampleserver1 instead of server1.oracle.com) then you will not be able to access JVM Diagnostics for that specific server. Access to JVM Diagnostics for machines that have an FQDN will continue to work.To enable access to the JVM Diagnostics and Request Instance Diagnostics views, you must do the following:
-
Install the JVMD agent on all nodes hosting your monitored services.
-
Deploy the JVMD manager in EM.
-
Install a Business Transaction Management observer on all nodes hosting your monitored services. (This would already be the case if you are able to observe traffic.)
-
For RID only: enable instance logging. To access message content, you must also enable message content logging.
-
Configure Business Transaction Management to access the EM console as explained next.
Note:
ECID information is displayed in the Business Transaction Management console even if you have not installed a JVMD agent or configured a connection to the EM console; however, without having satisfied these pre-requisites, you will not be able to open the Request Instance Diagnostic view for a given ECID.The following procedure explains how you connect to the EM console. This is required to enable drill down to the JVM Diagnostics page and to the Request Instance Diagnostics page.
-
Select System Services from the Navigator.
-
Find and select the AP_Sphere_Service entry.
-
Select Admin > Edit Setup Data for AP_Sphere_Service.
-
Click the Edit XML button.
-
Scroll to the bottom of the XML document and find the emgcURL element.
-
Edit this XML element so that it contains the base URL for the EM console. For example, if you have an EM console running at
https://adc2101158:4473/em, you would enterhttps://adc2101158:4473, and the edited entry would look like this:<pfx6:emgcURL>https://adc2101158:4473</pfx6:emgcURL>
Note that the namespace prefix might be other than
pfx6; use whatever value appears in the XML text. -
Click the Apply button to save changes.
You will have to supply login information for the JVM Diagnostics console when you access it. Single sign on is not supported.
5.10 Getting Information About a Transaction
Once you have defined a transaction, you can use detail area tabs to get information about policies, conditions, and properties applied to a transaction. You can also display the transaction's profile. In some cases, you can modify the definition or status of elements shown in a tab.
5.10.1 Getting Profile Information
Use the Profile tab of the Transaction view to see a map of the transaction and to see its definition.
The Profile tab provides essentially the same information you would see if you displayed the transaction definition by choosing Edit TxName from the Modify menu. Selecting the Profile tab instead, makes it easy to switch to other tabs or views, prevents your making unintentional changes, and provides three additional pieces of information:
-
the date the definition was last modified,
-
any user attributes defined for the transaction
-
the transaction identifier, which is sometimes needed to identify the transaction in CLI commands.
5.10.2 Getting Policy Information
Use the Policies tab to view information about policies associated with a transaction.
By default, the tab shows information about applied policies. You can use the filter control to view changed policies, disabled policies, pending policies, rejected policies and unapplied policies.
The name of the applied policy is shown in a tree view in the Name column. Expanding the policy node shows the following information:
-
Policy Status Details lists any issues arising from the application of the policy.
-
Monitored Object Type specifies the targets to which the policy is applied.
-
Location specifies the address of a target endpoint
-
Management Intermediary specifies the Business Transaction Management agent that is applying the policy.
Double clicking the policy name in the Policy tab, opens a new window that you can use to view alert, profile, and target information for the selected policy.
5.10.3 Getting and Changing Condition Definitions
Use the Condition tab for the Transaction view, to display the conditions you have defined for a transaction. This tab allows you to do the following:
5.10.4 Getting Property Information
Use the Properties tab for the Transaction view, to display a list of all the properties defined for messages included in a given transaction. In addition to listing the properties, the tab shows information about the following:
-
The service and operation for which the property is defined
-
The phase (request/response) of the operation
-
The data type of the property value
-
Whether the value is deemed sensitive
-
Whether it is mapped to a consumer (denoted by a human icon on the left) and what consumer mapped attribute it is associated with.
-
A description if you have supplied one when you created the property.
An Edit drop down list for each property listed allows you to modify, duplicate, or delete the property definition.
5.11 Troubleshooting Transactions
This section offers information to help you resolve problems in working with transactions.
If performance monitoring is not working as expected for transactions, the two most common issues to consider are the following:
-
Has there been any traffic flowing through your services in the period of time for which you are expecting results? Business Transaction Management cannot measure the performance of inactive services.
-
Has the feature upon which measurement or analysis depends been enabled? Feature refers to consumer segmentation, instance logging, message content logging, and most fundamentally, transaction monitoring. Check the Profile tab for the transaction to make sure that the desired features are enabled.
If monitoring is enabled for the transaction, if traffic is flowing during the period for which you seek results, and if the required features are activated, you should be seeing complete and correct data. If not, read through the following discussion for possible issues and resolutions.
Note:
Remember to check Alerts in the last hour > System Alerts for information that might pertain to your problem.You cannot create a transaction
Business Transaction Management is unable to validate your transaction definition and cannot create the defined transaction. Possible causes include the following:
-
The name of an operation in the transaction contains a special character. Business Transaction Management can process names with periods in them, but other special characters might pose a problem.
-
You selected a start operation that is used by another transaction.
-
You chose an end operation that differs from the start operation, but did not specify manual keys to correlate the start/end messages.
-
There are disconnected flows in your transaction definition.
-
The start and end operations are different and use different message log databases.
Your transaction has been disabled
You have not explicitly disabled monitoring for the transaction, but no measurements are gathered, and logging and condition processing are disabled. When you check the status shown in the Profile tab, you find that the status for a transaction is disabled or system disabled.
This can happen for a number of reasons:
-
You have modified or deleted a property that was used as a key in the transaction definition.
-
You have deleted a service or operation that was included in the transaction definition.
-
You have disabled a service that was included in the transaction definition.
-
For transactions where the start operation is not the same as the end operation, one or more of the start/end operation endpoints no longer shares the same message log database.
-
You delete a property used for consumer segmentation, or user edits a consumer property used for consumer segmentation and removes consumer mapping information.
Performance measurements are incomplete or inaccurate
This can happen for a number of reasons:
-
The value you specified for Maximum transaction duration is too short for your transaction.
-
You have defined two or more transactions that share an operation. Total response time for each of the transactions will be accurate, but the link measurements to the shared operation will show the sum of the invocations from each caller. In the following diagram, showing transaction ABC and YBC, response time for the BC link will be a sum.
Description of the illustration txs_w_shared_svc.gif
-
The transaction has not finished executing.
-
Business Transaction Management uses the start and end operations to define response time. It is assumed that these operations are called only once within the interval defined for Maximum transaction duration. It is also assumed that the content that appears during that interval is unique. If these requirements are not satisfied, performance measurements generated for the transaction might not be accurate.
Segmented information is missing
Consumer segmentation is enabled but information for the consumer is not collected.
-
Check to see whether a property used for consumer segmentation has been deleted or modified so that it is no longer mapped to a consumer.
-
If you have imported the transaction definition from a previous release, consumer mapping information is not imported. You will have to modify the transaction definition and recreate the mapping information.
Logged instances or messages do not contain the expected information
For logged instances, check to see whether the property that is associated with the expected information has been deleted.
It is a requirement that all messages for one transaction be logged to the same database. Sometimes, it is not possible to satisfy this requirement because the transaction crosses a firewall. In this case, you might need the assistance of Business Transaction Management support.
For logged message problems, you might need to check log policy settings and report what you find to Business Transaction Management support.
Check to see whether a property used in the condition definition has been modified or deleted.
You disable instance logging and there is at least one enabled condition for the transaction that depends on it.
A condition has not triggered an alert
The Transaction server was down when a condition needed to be evaluated; check the status of your servers.
A missing message condition is erroneously triggered
A missing message condition is triggered, but the message exists and has been collected. This can happen when monitor processing is especially slow and the missing message condition is evaluated after the transaction's time to live interval has expired. A rare situation.
5.11.1 Viewing Log Policy Settings
Based on the storage settings for the transaction, Business Transaction Management creates a log policy for each transaction and refers to this policy when monitoring the transaction and storing logged messages. Log policy settings are partly derived from the information you provide when you define a transaction. The following table shows the correspondence between log policy settings and transaction definition runtime settings.
| Log policy fields | Transaction definition runtime settings | Description |
|---|---|---|
| Guaranteed storage time | Retain individual messages
Default: 24 hours |
The amount of time Business Transaction Management must retain unassembled messages in the transaction server's database. These messages are thus available for assembly. |
| Rotation interval (minutes) | Rotate message log
Default: 720 minutes |
Specifies the rotation interval for the log policy that backs the transaction. Messages that are rotated out, are held for the amount of time defined for Retain individual messages. |
| Text index message content | Text index message content | Creates a text index in the oracle database that enables faster keyword-based searches (free text search) at the expense of additional storage and initial processing. |
The log policy is named System Generated Log Policy for TransactionName. The only time you might need to view this policy is when troubleshooting logging problems.
To view log policy settings for a transaction
-
In the Navigator, select Administration > System Policies.
-
In the Main area, select the System Generated Log Policy forTransactionName entry.
-
Open the tab area if it is not already open and select the Profile tab. Settings for the transaction's log policy are displayed.