8 Installing Monitors
This chapter describes how to install Business Transaction Management monitors. Instructions are provided for installing both singleton monitors and monitor groups.
A singleton monitor is a single instance of a monitor that receives observations directly from an observer. A monitor group is a group of replicated monitor instances situated behind a load balancer. In the case of a monitor group, the observer sends observations to the load balancer, which then distributes the observations to the monitors in the group.
A monitor can receive observations from an unlimited number of observers. Theoretically, you could deploy a single monitor to process observations from all the observers in your system. However, if the rate and/or size of observations produced by your system is large, a single monitor might be overwhelmed. Such a situation could result in reduced performance of your monitoring system and possible loss of monitoring data.
You can eliminate such a potential bottleneck by deploying multiple monitors. You can deploy as many monitors as required for your monitoring needs. You can deploy the monitors as singleton monitors, as monitor groups, or as a mix of the two. You could, for example, deploy a dedicated monitor for each observer. Note that an observer can send observations to only one singleton monitor or one monitor group. If you have an observer that produces observations faster than a singleton monitor can process them, you will need to deploy a monitor group for that observer.
Using monitor groups not only gives you the ability to scale your monitoring system, but makes it more fault tolerant. Monitor groups require a third-party load balancer that supports TCP for routing messages from your observers to your monitors. Monitor groups also require access to an Oracle 10g or 11g database, which is used to share data between the replicated instances of the monitor. This database can be the same database used by other Business Transaction Management components. Although the replicated instances of any one monitor group can be widely dispersed across your network, they must all have access to this same database (for more information about the monitor group database, see Section 5.4.1, "Setting up a Monitor Group Database."). A generalized deployment of a monitor group is shown below.
Figure 8-1 Generalized deployment of a monitor group
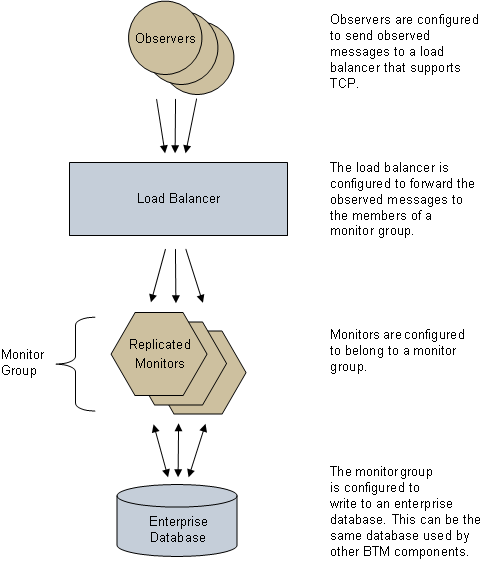
Description of "Figure 8-1 Generalized deployment of a monitor group"
8.1 Overview of Installing Monitors
This section provides an overview of the tasks you must perform to install monitors. Subsequent sections provide details on how to perform these tasks. To ensure a properly configured system, you must perform the steps in the order shown.
-
Configure security if needed (see Chapter 4, "Configuring Security").
Note:
If you configured the assertion secret and encryption key on your central servers, then you must also configure your monitors to use the same assertion secret and encryption key. If, on the other hand, you are using the default security configuration on your central servers, then you must use the default security configuration on your monitors (see Section 4.3, "Configuring the Assertion Secret and Encryption Key"). -
Ensure that all prerequisite requirements and setup described in Chapter 5 are satisfied, including:
-
Optional – Configure the persistent storage directories for the monitors. Use the same procedure as described for the central servers in Section 7.2.
-
Deploy and register the monitors (see Section 8.2).
-
Ensure that the central servers are installed and running.
-
Deploy monitors to the target application servers using your application server's deployment tools.
-
Register your monitors using the registerMonitor CLI command.
-
-
For replicated monitors only – Set up a monitor group (see Section 8.3).
-
Create a monitor group.
-
Assign monitors to the monitor group.
-
-
For replicated monitors only – Configure your load balancer (see Section 8.4).
-
Apply an Observer Communication Policy (see Section 8.5).
8.2 Deploying and Registering Monitors
This section pertains to both singleton and replicated monitors. You must perform this task for all installation scenarios.
-
Ensure that the Business Transaction Management central services are installed and running.
-
Using your application server's deployment tools, install the btmMonitor.ear deployment package on each application server that will host a monitor.
Notes:
Do not deploy more than one monitor per application server. Also, do not deploy the monitor into an application server that is hosting any of the Business Transaction Management central services.(An application server is sometimes referred to as a container in the Business Transaction Management Console and elsewhere in the documentation.)
-
Start the monitor deployments.
-
Use the registerMonitor CLI command to register each of the monitors that you deployed, for example:
btmcli registerMonitor -e http://my_monitor_host:8080/btmmonitor/agent/agent
                       -fn My_BTM_Monitor
                       -s http://localhost:8080/btmcentral/sphere
                       -l my_admin_username:my_admin_password
Table 8-1 Flags for the registerMonitor CLI command
Flag Description -e | -endpointUrl
Required.
Specify the URL of the monitor to register, for example:
http://my_monitor_host:8080/btmmonitor/agent/agent
Replace the host name and port number with appropriate values. This URL always ends with btmmonitor/agent/agent.
-fn | -friendlyName
Optional.
Specify a friendly name for the endpoint of the monitor.
-s | -sphereUrl
Required unless the AP_SPHERE_URL environment variable is set.
Specify the URL of the sphere, for example:
http://mySphereHost:8080/btmcentral/sphere/
Replace the host name and port number with appropriate values. This URL always ends with btmcentral/sphere/.
-l | -userLogin
Required unless the AP_USER_LOGIN environment variable is set.
Specify the credentials of a user belonging to the btmadmin role in the format: username:password.
You can encrypt passwords using the encryptPassword CLI command, for example:
btmcli encryptPassword -password "myPassword"
See Chapter 15, "Invoking the CLI" for information about how to invoke a CLI command. Refer to the Business Transaction Management online help for other information about the CLI.
-
Verify that all monitors and system services are running properly.
8.3 Setting Up a Monitor Group
This section pertains to replicated monitors, only. You must perform this task if you plan to use replicated monitors.
-
Create a monitor group:
-
In the Business Transaction Management Console, choose Admin > Create System Policy > Monitor Agent Group.
-
Enter a name for your monitor group (you can optionally provide descriptive information in the Version and Notes fields).
-
Specify the connection string for your database.
If you use the default string, replace the text within the curly braces (and the curly braces themselves) with values appropriate for your database. Each member of the monitor group must have access to this database. For more information about the monitor group database, see Section 5.4.1, "Setting up a Monitor Group Database."
-
Specify a user name and password for accessing your database.
-
Click Apply.
-
-
Assign monitors to the monitor group you just created:
Note:
If your monitor will not be using the default Observer Communication policy, you must complete Section 8.5, "Applying an Observer Communication Policy" before continuing with this section. One scenario in which this would be necessary is if multiple monitors are running on the same machine, in which case they would have to listen on different socket ports and would therefore require separate Observer Communication policies.-
In the Business Transaction Management Console's Navigator, choose Administration > Monitors.
-
In the main area, select the monitor that you want to assign to a group.
-
Choose Modify > Edit Profile for Monitor Agent.
-
Type the name of the monitor group in the Monitor Group field.
This name must match the value of the Name field in the monitor group policy you used to register the monitor group.
-
Click Apply.
-
8.4 Configuring Your Load Balancer
This section pertains to replicated monitors, only. You must perform this task if you plan to use replicated monitors.
-
Configure your load balancer to communicate with the observers by defining both an HTTP virtual server and a socket virtual server.
Your load balancer requires two observer communication channels—one referred to as the HTTP virtual server, and the other referred to as the socket virtual server:
-
The HTTP virtual server is used for administrative purposes. For example, observers retrieve their configurations from any one of the replicated monitors by way of the HTTP virtual server.
-
The observers transmit observational data to the socket virtual server, and the load balancer distributes this data across the replicated monitors. We refer to the messages containing such data as observation messages.
Note:
The replicated monitors communicate with the Business Transaction Management central servers and database directly—not by way of the load balancer.
-
-
Take note of the IP address and port of your socket virtual server.
You will need this information when you configure the Observer Communication policy (see Section 8.5).
-
Configure your load balancer to distribute observation messages across the replicated monitors as follows:
-
Create a pool for the socket virtual server.
-
Assign each monitor to the pool by assigning the port on which the monitor will receive observations.
-
-
Take note of the monitor port number(s) that you assign to the socket virtual server's pool.
You will need this information when you configure the Observer Communication policy (see Section 8.5).
Note:
Configuring the Observer Communication policy will be easier if all the monitors listen on the same port number. -
Configure your load balancer to distribute administrative messages across the replicated monitors as follows:
-
Create a pool for the HTTP virtual server.
-
Assign each monitor to the pool by assigning the port on which the monitor's application server listens.
-
-
Ensure that the application servers that host the observers have their AP_NANO_CONFIG_URL Java system property or AmberPoint:NanoConfigUrl Windows key (depending on the platform) set to the URL of the monitor by way of the load balancer's HTTP virtual server.
For example, if the HTTP virtual server's IP address is 10.147.46.152, and its port number is 5072, then the URL of the monitor by way of the HTTP virtual server would be:
http://10.147.46.152:5072/btmmonitor/agent/agent/
For more information on this topic, see Chapter 9, "Installing Observers Overview".
8.5 Applying an Observer Communication Policy
This section pertains to both singleton and replicated monitors. You must ensure that a correctly configured Observer Communication policy is applied to all of your monitors. The following subsections explain how to configure and apply this policy:
-
Section 8.5.2, "Procedure for Applying an Observer Communication Policy"
-
Section 8.5.3, "How Many Observer Communication Policies Do I Need to Apply?"
-
Section 8.5.4, "Preconfigured Observer Communication Policies"
8.5.1 About the Observer Communication Policy
The Observer Communication policy sets up communication between observers and a monitor or monitor group. By default, this policy configures both monitors and observers by:
-
setting up the observer-to-monitor communication channel (including security settings)
-
configuring the runtime settings for the observer (including selection of the types of components discovered and monitored)
Prior to release 12.1.0.4, you could apply only a single Observer Communication policy to any one monitor, which meant that all observers associated with the same monitor would receive the same configuration. To provide greater flexibility in configuring observers, release 12.1.0.4 introduces the ability for you to apply multiple Observer Communication policies to a single monitor and to then target each of these policies at a different observer or set of observers.
In such a scenario, you designate one policy as the source for generating the monitor configuration (we will refer to this as the ”monitor” policy). You then designate each remaining policy as the source for generating an observer configuration (we will refer to these as ”observer-only” policies).
Note that the monitor policy generates an observer configuration in addition to the monitor configuration. You can either target this configuration at a set of observers, just as you would with an observer-only policy, or leave it untargeted, in which case it serves as the default configuration for observers that are not targeted by a configuration.
As in previous releases, you can use a single policy for configuring monitors and all of their associated observers, if you desire (in other words, you don't have to target specific observers). In such a scenario, you would use a ”monitor policy” that is not targeted at specific observers. This policy will generate a default observer policy, and, since no specific observers are targeted, all observers associated with the monitors will receive this default configuration.
8.5.2 Procedure for Applying an Observer Communication Policy
The following procedure describes at a high level how to apply an Observer Communication policy. This procedure is followed by subsections that detail how to configure the monitor-related and observer-related fields of the policy.
-
Open the Observer Communication policy you will use for configuring your monitor (this is your ”monitor” policy).
You can either edit one of the preconfigured policies or create a new policy (see Section 8.5.4, "Preconfigured Observer Communication Policies" for descriptions of the preconfigured policies):
-
To edit one of the preconfigured Observer Communication policies:
Select Administration > System Policies in the Navigator.
Select the preconfigured policy you want to edit in the main area.
Choose Modify > Edit Definition for My_Policy, where My_Policy is the name of the policy.
-
To create a new Observer Communication policy:
Choose Admin > Create System Policy > Observer Communication.
Note:
By default, the preconfigured policy named Observer Communication Policy - Default both generates a monitor configuration and applies it to every monitor in the system. You should use this default policy for configuring your monitors if possible. If you use a different policy for configuring your monitors, then you must first edit the default policy and ensure that it either does not generate a monitor configuration or is not applied to the monitors that you want to configure (or both). You are allowed to target a monitor with only one monitor configuration. -
-
Designate this policy as the source for generating the monitor configuration by ensuring that the Generate Configuration for Observers Only checkbox is disabled.
-
Configure the policy fields that pertain to the monitor.
Refer to Section 8.5.2.1, "Configuring Monitor-Related Fields in the Observer Communication Policy" for detailed instructions.
-
Decide whether you want to use the observer configuration generated by your monitor policy as a default observer configuration or whether you want to target it at specific observers.
Note:
By default, the policy named Observer Communication Policy - Default generates an untargeted observer configuration and is applied it to all monitors in the system. This means that by default this observer configuration serves as the default configuration for all observers in the system. If you want a default configuration for your observers, then you could simply leave this policy untargeted in regards to observers. If, on the other hand, you don't want a default observer configuration, then you must edit this policy by targeting it at some number of observers. -
Configure the policy fields that pertain to the observer.
Refer to Section 8.5.2.2, "Configuring Observer-Related Fields in the Observer Communication Policy" for detailed instructions.
-
Optional - Target additional observers:
-
Open one of the preconfigured policies or create a new policy for use as an ”observer-only” policy.
-
Designate this policy as the source for generating only an observer configuration by ensuring that the Generate Configuration for Observers Only checkbox is enabled.
-
Ensure that the values in the monitor-related fields match the corresponding fields in your monitor policy.
-
Configure the policy fields that pertain to the observer.
Refer to Section 8.5.2.2, "Configuring Observer-Related Fields in the Observer Communication Policy" for detailed instructions.
-
8.5.2.1 Configuring Monitor-Related Fields in the Observer Communication Policy
The following procedure describes how to configure the monitor-related fields of the Observer Communication policy. This procedure assumes that you have already opened the policy you want to edit as described in Section 8.5.2, "Procedure for Applying an Observer Communication Policy."
-
The way you perform this step depends on whether your monitors are singleton or replicated.
For singleton monitors:
-
Set the Communication path field to: Direct to monitor (this is the default setting).
-
Specify the port number on which your monitors listen in the Monitor port number field.
This is the port to which the observers send observations and at which the monitors receive observations. This setting configures both the monitors and observers.
Note:
You do not have to specify the host name for the monitor. The host name is obtained from the AP_NANO_CONFIG_URL Java system property or AmberPoint:NanoConfigUrl Windows key. You will set this system property/key on the application servers on which you install observers (see Section 9.2).
For replicated monitors:
-
Set the Communication path field to: Through router to monitor group
-
Specify the IP address and port number of your load balancer's socket virtual server in the Router IP address and Router port number fields.
These settings configure your observers to send their observations to your load balancer's incoming address (that is, to the load balancer's socket virtual server that you configured in Section 8.4).
-
Specify the port number on which your monitors will receive observations in the Monitor port number field.
This setting configures the monitors to listen on the specified port. This port number should coincide with the monitor port number that you assigned in the pool of your load balancer's socket virtual server in Section 8.4.
Note:
If you later add or delete a monitor to or from a monitor group, you must reconfigure your load balancer accordingly. -
-
If you want to use a secure connection for transporting observation messages from observers to monitors, leave the Enable SSL checkbox enabled and continue to the next step (SSL is enabled by default).
If, on the other hand, you prefer to use a nonsecured connection, disable the checkbox and then skip to step 6.
Additional fields are displayed if the Enable SSL checkbox is enabled.
-
If SSL is enabled, specify the protocol for the connection in the Protocol field.
Choose TLSv1 to use TLS 1.0.
Choose SSLv3 to use SSL 3.0 (SSLv3 is not supported by the .NET-based observers.).
Choose Any to let the components decide on the best protocol at runtime. This is the default setting.
-
By default, built-in, preconfigured security stores are used when SSL is enabled. If you want to use these built-in security stores, proceed to substep d.
If you would rather use your own security stores, disable the Use Default Stores checkbox and complete all of the following substeps (in this case, additional fields are displayed):
-
Specify the information for the Monitor's key store as follows:
Key Store Location – The location of the key store. You can specify this location as either an absolute path, if the key store file is local to your monitor, or as an HTTP(S) URL, if the file is accessible by HTTP GET.
Key Store Password – The password for accessing the key store.
Key Store Type – The type of the key store, for example, JKS, JCEKS, or PKCS12.
Key Name – The certificate and private key. You can specify a key alias or a certificate attribute of the form CN=value, UID=value, etc.
Key Password – The password for accessing the certificate and private key. If unspecified, the password for the key store is used.
-
If you want the monitor to automatically dispatch the trust store to your Java-based observers, enable the Auto Dispatch Trust Store to Java Observers checkbox.
-
Specify the information for the trust store as follows:
Trust Store Location – The location of the trust store. You can specify this location as either an absolute path, if the key store file is local to your observer (or local to your monitor, if you are using auto dispatch), or as an HTTP(S) URL, if the file is accessible by HTTP GET.
Trust Store Password – The password for accessing the trust store.
Trust Store Type – The type of the trust store, for example, JKS, JCEKS, or PKCS12.
-
If you are using .NET-based observers, ensure that you have deployed the appropriate certificate to the machines hosting those observers as described in Section 4.4, "Setting up a Secure Socket (SSL) for Observation Messages."
-
-
Enabling SSL requires the monitor to authenticate itself to the observer. Whether the observer authenticates itself to the monitor, however, depends on the setting of the Observer Authentication field. Adjust the setting of this field to one of the following values:
Use Connection Authentication – This is the default value and requires the observer to authenticate itself to the monitor each time it establishes a connection.
None – This value turns observer authentication off.
Use Message Authentication – This value requires the observer to authenticate itself each time it sends a message to the monitor. Note that the use of message authentication can significantly degrade performance. You should use this setting only when necessary. If your observer sends its messages to a monitor group whose load balancer is configured for per-message balancing (rather than per-connection), then you cannot use connection authentication. In this case, you must set this field to either None or Use Message Authentication.
-
In the Criteria section, ensure that the policy is applied to the correct monitors.
You can apply the policy to all monitors in a particular monitor group by adding a Monitor Group clause, for example:

Note:
You can apply only one Observer Communication policy that generates a monitor configuration to any one monitor. You must ensure that the Criteria section of all other Observer Communication policies that generate a monitor configuration either do not include, or explicitly exclude the monitors to which you apply this policy. -
Click Apply.
For information about advanced settings, refer to the Business Transaction Management online help.
8.5.2.2 Configuring Observer-Related Fields in the Observer Communication Policy
The following procedure describes how to configure the observer-related fields of the Observer Communication policy. This procedure assumes that you have already opened the policy you want to edit as described in Section 8.5.2, "Procedure for Applying an Observer Communication Policy."
-
In the Active Probes section, choose the types of business components you want to discover and monitor by activating or deactivating the appropriate probes.
Notes:
A probe is the component within an observer that is responsible for discovering and monitoring a particular type of business component. Most types of observers contain multiple probes. For more information about probes, see Section 1.1, "Architecture".The JAVA probe monitors local Java calls, which in most cases is not needed and can be distracting because of the typically large number of local Java calls that occur. In order to use the JAVA probe, you must first deploy and configure it. For information about deploying and configuring the JAVA probe, enter a service request at My Oracle Support (support.oracle.com).
In most situations, you should deactivate the RMI probe if it is not already deactivated. Most applications utilize RMI by way of higher level APIs, such as JAX-RPC, JAX-WS, EJB, and JMS. In such cases, it is better to activate only the probes for these higher-level components. However, if your application makes RMI calls directly you might want to activate the RMI probe.
There is no need to explicitly deactivate probes that are not installed—neither for the sake of performance nor for any other reason. Uninstalled probes are inherently not activated (a probe is installed if an observer that contains that probe is installed). The only reason to deactivate a probe is if: (1) the probe is installed, AND (2) you do not want to monitor the type of business component the probe monitors. Furthermore, if you deactivate (or activate) any of the SOA probes, you must deactivate (or activate) all of the SOA probes as a group.
Enable/disable the Enable Discovery checkbox to activate/deactivate the discovery mechanism for the associated component type. When discovery is activated for a component type, the components are discovered and displayed in the Management Console the next time they receive a message or call.
Enable the Monitor Upon Discovery checkbox for a component type if you want to immediately begin monitoring those components as they are discovered. Disable the checkbox if you don't want to monitor components of that type.
Note:
If you enable discovery but not monitoring and then later edit the policy and enable monitoring, the system will not begin monitoring previously discovered components. The system will begin monitoring only the components discovered after you enable monitoring. For information on enabling monitoring for previously discovered components, see the topic ”Start and Stop Monitoring of Endpoints” in the online help. -
If you are using this policy to configure observers only, complete the following substeps:
-
Set all the fields in the Communication Channel section (except for the Generate Observer Configuration Only checkbox, but including the fields in the SSL Configuration section) so that they match the policy you use to configure your monitor.
-
Enable the Generate Observer Configuration Only checkbox.
-
-
If you want only specific observers to receive the configuration generated by this policy, target those observers by completing the following substeps:
-
Use the Configuration Label and/or Observer Base Address fields to specify which observers you want to target (for more information about these and related fields, refer to Section 8.5.5.1, "Observer Configuration Labels" and Section 8.5.5.4, "Field Reference for Targeting Observers").
-
Ensure that labels and addresses specified in one ”observer policy” are not specified in any other policy that is applied to the same monitor (for additional information, see Section 8.5.5.2, "Rejection of Observer Communication Policies").
-
Optional – Enable the Validate Addresses checkbox to ensure that all targeted observers are known to Business Transaction Management.
If you target an unknown observer and enable this field, the policy will be rejected. If you want to target an observer that is not currently known but will be later, you should disable this field.
-
Optional – (Do not enable this checkbox if you apply the policy to multiple monitors.) Enable the Enforce to Monitor field to validate that all the targeted observers are associated with the monitor to which you apply the policy.
-
-
In the Criteria section, ensure that the policy is applied to the appropriate monitors.
If you are using this policy to configure observers only, these settings must match the settings in the policy you use to configure your monitor.
-
Click Apply.
For information about advanced settings, refer to the Business Transaction Management online help.
8.5.3 How Many Observer Communication Policies Do I Need to Apply?
The preconfigured Observer Communication policy named Observer Communication Policy - Default generates both a monitor and an observer configuration and by default is applied to all monitors in the Business Transaction Management sphere. This means that by default all monitors and observers are configured by way of this single policy. For simple deployment topographies and monitoring needs, you can simply edit this default policy as needed. For more complicated deployment topographies and monitoring needs, you might need to configure some monitors and observers differently than others by applying additional policies.
If all of the following points are true for your environment, then you require only a single Observer Communication policy and you can simply edit the default policy:
-
All monitors are either singleton or are replicated behind a single load balancer. You cannot use a single policy if you have a mix of singleton and replicated monitors or if you use multiple load balancers.
-
All monitors receive observations on the same port number.
-
If monitors receive observations over SSL, they all use the same private key/certificate and the security stores are in the same relative locations for all monitors and observers.
-
All observers will be configured to have the same component monitoring capabilities (in other words, they will all have the same probes enabled).
-
Advanced settings do not need to be edited for a subset of monitors or observers. In most cases you can leave the advanced settings at their default values.
Each of the following scenarios require you to apply additional Observer Communication policies:
-
Your monitors receive observations on different port numbers. In this case, you must apply a separate policy for each port number.
-
Your monitors are replicated behind multiple load balancers. In this case, you must apply a separate policy for each load balancer. In addition, if you want to configure the individual monitors to receive observations (from the load balancer) on different port numbers, you must apply a separate policy for each port number, per load balancer.
-
You have a mix of singleton and replicated monitors. In this case, you must apply one policy per port number for the singleton monitors and one policy per port number per load balancer for the replicated monitors.
-
Monitors will receive observations over SSL but not all monitors will use the same private key/certificate pairs. In this case, you must apply a separate policy for each private key/certificate pair.
-
Monitors will receive observations over SSL but the location of the key store is different for different monitors, or the location of the trust store is different for different observers. In this case, you must apply a separate policy for each location.
-
Different observers require different component monitoring capabilities. For example, some observers need their OSB probe activated but their SOA probes deactivated, while others need their SOA probes activated but their OSB probe deactivated. In this case, you must apply a separate policy for each combination of activated probes that your observers require.
-
You need to edit the advanced settings for a subset of monitors or observers. In this case, every combination of advanced settings requires a separate policy.
8.5.4 Preconfigured Observer Communication Policies
Business Transaction Management provides a number of Observer Communication policies that are preconfigured for monitoring particular types of applications. You can edit any of these policies and tailor them to your monitoring needs. The name of each policy is displayed in bold, followed by a description:
-
Observer Communication Policy - Default
This policy generates both a monitor configuration and an untargeted (default) observer configuration. By default, this policy is applied to all monitors in the system. The observer configuration is distributed to all associated observers that are not specifically targeted by a different policy.
-
Observer Communication Policy - Fusion Applications
This policy generates only an observer configuration. By default, this policy is applied to all monitors in the system. The observer configuration is targeted at observers tagged with the label CONFIG_LABEL_FAPPS. This configuration activates probes and adjusts observer runtime settings for monitoring Oracle Fusion Application components.
-
Observer Communication Policy - JavaEE
This policy generates only an observer configuration. By default, this policy is applied to all monitors in the system. The observer configuration is targeted at observers tagged with the label CONFIG_LABEL_JAVAEE. This configuration activates probes and adjusts observer runtime settings for monitoring JavaEE components.
-
Observer Communication Policy - OSB
This policy generates only an observer configuration. By default, this policy is applied to all monitors in the system. The observer configuration is targeted at observers tagged with the label CONFIG_LABEL_OSB. This configuration activates probes and adjusts observer runtime settings for monitoring Oracle Service Bus components.
-
Observer Communication Policy - SOA
This policy generates only an observer configuration. By default, this policy is applied to all monitors in the system. The observer configuration is targeted at observers tagged with the label CONFIG_LABEL_SOA. This configuration activates probes and adjusts observer runtime settings for monitoring Oracle SOA components.
8.5.5 Targeting Observers Reference
The following subsections provide background and reference information related to the targeting of observers:
8.5.5.1 Observer Configuration Labels
An observer configuration label is a simple text string that conceptually identifies a set of observers (for example, CONFIG_LABEL_MY_OBSERVERS). You target an observer by specifying either a label or the address of the application server in which the observer is deployed (for example, http://my_host.com:7011). You can specify any number of labels and/or addresses, and target any number of observers with a single policy.
Note:
Labels are supported only on Java platforms. If you want to target an observer deployed to .NET, you must use an address.Labels enable you to group observers logically rather than physically for configuration purposes. Applying a label is a two-step procedure that you can perform in either order:
-
In the application server that hosts the observer, create a system property named ap.nano.config.label and set its value to your label string (this task is described in the instructions for installing observer libraries in your application server).
-
Set the Configuration Label field of the Observer Communication policy that you will use to configure your observer to the same value as ap.nano.config.label (this task is described in Section 8.5.2.2, "Configuring Observer-Related Fields in the Observer Communication Policy").
8.5.5.2 Rejection of Observer Communication Policies
There are a numbers of ways, related to the targeting of observers, in which you might inadvertently cause an Observer Communication policy to be rejected. All of the following scenarios will cause a policy to be rejected:
-
Attempting to apply more than one untargeted policy (default observer configuration) to the same monitor
-
Attempting to specify the same observer configuration label in two different policies that are applied to the same monitor
-
Attempting to specify the same observer base address in two different policies that are applied to the same monitor
Labels are scoped to the monitor to which a policy is applied. This means that you can reuse a particular label name across policies if the policies are applied to different monitors, but you cannot reuse a label name across policies applied to the same monitor. This scoping principle also pertains to untargeted policies.
If a policy is rejected, select the policy in the work area of the console and display the Targets tab. This tab provides information about the cause of a rejected policy.
8.5.5.3 Order of Precedence
The order of precedence that determines which configuration an observer receives is as follows:
-
Observer base address
If a policy specifies the observer's base address, then the observer will receive the configuration generated by that policy.
-
Observer configuration label
If a policy specifies the observer's configuration label and no policy specifies the base address, then the observer will receive the configuration generated by the policy that specifies the configuration label.
-
Untargeted policy
If an untargeted policy exists and no policy specifies the observer's base address or configuration label, then the observer will receive the configuration generated by the untargeted policy.
8.5.5.4 Field Reference for Targeting Observers
| Field Name (boldface denotes a section name) | Description |
|---|---|
| Generate Configuration for Observers Only | Leave this checkbox disabled if you want this policy to generate both a monitor and observer configuration. You can apply only one such policy to any monitor. If you apply additional policies to a monitor, they must all have this checkbox enabled. With this checkbox enabled, the policy generates only an observer configuration. Even if this checkbox is enabled, you must still provide values for all other fields in the Communication Channel section of the policy, and their values must match all other policies applied to the same monitor. |
| Targeted Observers | ---------- This is a section label ----------
Use this section to specify which observers receive the observer configuration generated by this policy. |
| Target Specific Observers | Enable this checkbox if you want to configure only specific observers with the observer configuration generated by this policy. Enabling this checkbox displays additional fields that let you specify which observers should receive the configuration. These additional fields let you target observers by way of addresses and/or labels.
If you leave this checkbox disabled, the policy is untargeted and will generate a default configuration for all observers associated with the monitors to which the policy is applied. If an associated observer is not targeted by a policy, it will receive this default configuration. You can apply only one untargeted policy to any monitor. If you attempt to apply a second untargeted policy to a monitor, the policy will be rejected. Notes: You can target observers by way of two different mechanisms—addresses and labels. But, only one policy can target any particular observer by way of the same mechanism. For example, if policy A targets an observer by way of a label, then policy B cannot target that same observer by way of a label. In this case, policy B would be rejected. Policy B could, however, target the observer by way of an address. In this case, the observer would receive its configuration from policy B because addresses take precedence over labels. |
| Configuration Label | Optional – Specify a comma-delimited list of observer configuration labels. Observers tagged with any of the specified labels will receive configurations generated by this policy (unless a different policy targets the observer by way of an address). This field accepts text input and is case insensitive.
Note: You tag observers by way of a system property named ap.nano.config.label in the application server hosting the observer. Labels are supported only on Java platforms. If you want to target an observer deployed to .NET, you must use an address. |
| Known Address | ---------- This is a section label ----------
Optional – Use this section to choose observer addresses from a drop-down list of addresses known by Business Management Transaction. The specified observers will receive configurations generated by this policy. |
| Observer Base Address | Use this drop-down list to select the address of the container where the observer is deployed. |
| [add observer address] | Click this link to add an Observer Base Address drop-down list. |
| Any Address | ---------- This is a section label ----------
Optional – Use this section to manually enter observer addresses into a text field. The specified observers will receive configurations generated by this policy. |
| Observer Base Address | Use this field to manually enter the address of the application server where the observer is deployed, for example, http://my_host.com:7011. |
| [add observer address] | Click this link to add an Observer Base Address text field. |
| Validate Addresses | Enable this checkbox to ensure that all observers targeted by the policy are known to Business Transaction Management. If you target an unknown observer and enable this field, the policy will be rejected.
If you want to target an observer that is not currently known but will be later, you should disable this field. |
| Enforce to Monitor | Enable this checkbox to validate that all the targeted observers are associated with the monitor to which you apply the policy.
Do not enable this checkbox if you apply the policy to multiple monitors. |
8.6 Adding and Removing Monitor Group Members
Replicated monitors in a monitor group are known as members. After setting up a monitor group, you might find that you need to add or remove members. You are free to do this, but you must perform the steps of the procedure as described in this section.
8.6.1 Adding Members to a Monitor Group
-
Deploy, and then register the monitor you want to add as described in Section 8.2, "Deploying and Registering Monitors".
-
Assign the monitor to membership in the monitor group as described in Section 8.3, "Setting Up a Monitor Group".
-
Assign the monitor to your load balancer's socket virtual server pool as described in Section 8.4, "Configuring Your Load Balancer".
8.6.2 Removing Members from a Monitor Group
-
Remove the member from your load balancer's socket virtual server pool.
-
Remove the member from the monitor group as follows:
-
In the Business Transaction Management Console's Navigator, choose Administration > Monitors.
-
In the main area, select the member that you want to remove from the monitor group.
-
Choose Modify > Edit Profile for Your_Monitor, where Your_Monitor is the name of your member you want to remove.
The Edit Profile tool opens.
-
Delete the name of the monitor group from the Monitor Group field.
-
Click Apply.
-
If you want to remove the monitor from membership in the monitor group but leave it as part of your Business Transaction Management system, stop now. If you want to remove the monitor completely from your system, perform the remaining steps.
-
-
Use your application server's management tools to undeploy the monitor.
-
Unregister the monitor as follows:
-
In the Business Transaction Management Console's Navigator, choose Administration > Monitors.
-
In the main area, select the monitor.
-
Choose Modify > Delete Your_Monitor Registration, where Your_Monitor is the name of your monitor.
The Delete Monitor Registration tool opens.
-
Click Delete.
-