34 Provisioning Oracle BPEL Processes
Business Process Execution Language (BPEL) is an XML-based language for enabling task sharing across multiple enterprises using a combination of Web services. BPEL is based on the XML schema, simple object access protocol (SOAP), and Web services description language (WSDL). BPEL provides enterprises with an industry standard for business process orchestration and execution.
Oracle BPEL Process Manager (BPEL Process Manager) provides a framework for easily designing, deploying, monitoring, and administering processes based on BPEL standards.
While Oracle Enterprise Manager Cloud Control (Cloud Control) allows you to discover and monitor these BPEL Process Managers, it also provides Deployment Procedures that help you provision BPEL processes on BPEL Process Managers.
This chapter explains how you can provision BPEL processes on BPEL Process Managers. In particular, this chapter covers the following:
34.1 Getting Started with Oracle BPEL Processes
This section helps you get started with this chapter by providing an overview of the steps involved in provisioning Oracle BPEL processes. Consider this section to be a documentation map to understand the sequence of actions you must perform to successfully provision Oracle BPEL processes. Click the reference links provided against the steps to reach the relevant sections that provide more information.
Table 34-1 Getting Started with Provisioning Oracle BPEL Processes
| Step | Description | Reference Links |
|---|---|---|
|
Step 1 |
Knowing About The Supported Releases Know what releases of Oracle BPEL Process Manager are supported by the Deployment Procedure. |
To learn about the releases supported by the Deployment Procedure, see Section 34.2. |
|
Step 2 |
Meeting the Prerequisites Before you run any Deployment Procedure, you must meet the prerequisites, such as setting up of the provisioning environment, applying mandatory patches, and setting up of Oracle Software Library. |
To learn about the prerequisites for provisioning Oracle BPEL processes, see Section 34.3. |
|
Step 3 |
Running the Deployment Procedure Run the Deployment Procedure to successfully provision Oracle BPEL processes. |
To provision Oracle BPEL processes, follow the steps explained in Section 34.3. |
34.2 Supported Releases for Oracle BPEL Processes
Using this Deployment Procedure, you can provision BPEL processes for Oracle BPEL Process Manager 10.1.3.1, 10.1.3.3, and 10.1.3.4.
34.3 Provisioning Oracle BPEL Processes
This section describes how you can provision BPEL processes for Oracle BPEL Process Manager.
Before running the Deployment Procedure, meet the following prerequisites:
Prerequisites for Designers
-
Ensure that you meet the prerequisites described in Chapter 2.
-
Ensure that BPEL Process Manager on which the process suitcase files have to be deployed is already discovered and monitored in Cloud Control.
-
Store the BPEL process suitcase files as generic components in the Software Library. For instructions to create generic components, see Section 2.2.
Note:
While adding a generic component for BPEL processes, on the Create Component: Describe page of the Software Library Wizard, select Generic Component from the Type list, provide a name for the parent folder, and navigate to the Upload File page to upload the files. You DO NOT have to provide details for Customize and Set Directives page. -
If you want to use a deployment plan that can be associated with a BPEL process suitcase file (JAR file), then store this deployment file as a generic component in the Software Library. For instructions to create generic components, see Section 2.2.
Prerequisites for Operators
-
If you have PAM/LDAP enabled in your environment, then ensure that the target agents are configured with PAM/LDAP. For more information, see My Oracle Support note 422073.1.
-
Ensure that you use an operating system user that has the privileges to run the Deployment Procedure, and that can switch to root user and run all commands on the target hosts. For example, commands such as mkdir, ls, and so on.
If you do not have the privileges to do so, that is, if you are using a locked account, then request your administrator (a designer) to either customize the Deployment Procedure to run it as another user or ignore the steps that require special privileges.
For example, user account A might have the root privileges, but you might use user account B to run the Deployment Procedure. In this case, you can switch from user account B to A by customizing the Deployment Procedure.
For information about customization, see Chapter 51.
To provision BPEL processes to a target BPEL Process Manager, follow these steps:
-
From the Enterprise menu, select Provisioning and Patching, then select Middleware Provisioning.
-
From the Deployment Procedures section, select the BPEL Process Provisioning procedure from the list and click Launch.
-
On the Source Selection page, do the following:
-
In the Source section, click Add and select the BPEL Process suitcase files that you want to deploy to a target BPEL Process Manager. The table is populated based on the selection made.
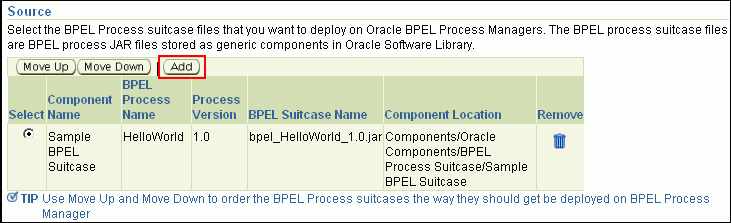
If you have selected multiple suitcase files, then from the table, select the BPEL process suitcase file and use Move Up and Move Down to order the components the way they should be deployed by the Deployment Procedure.
-
In the Select Deployment Plan, select a deployment plan that can be associated with a BPEL process suitcase file (JAR file).

The deployment plan helps you modify the configuration details and partner link binding properties, which have been set for a particular environment, at run time. You can also use it to search and replace strings and URLs that have been set for a particular environment. This way, you can deploy the same BPEL processes on BPEL Process Managers that are in development, test, and production environments; without having to reconfigure your settings across these environments.
-
Click Next.
-
-
On the Target Selection page, in the Target section, click Add and select the BPEL Process Managers on which you want to deploy the BPEL processes. If there are multiple domains available for a BPEL target, then you can select an appropriate domain from the BPEL Domain list, on which the suitcase files can be deployed. Click Next.

Note:
When you click Next, Cloud Control internally checks to see if the Context Provider URL is captured. If this URL is not captured, then you may see some errors. To resolve this issue, set the URL in the Monitoring Configuration page of the BPEL target. -
On the Credentials page, specify the following:
-
Credentials of application server instances on which the selected BPEL Process Managers are running.

-
BPEL administrator credentials (and RMI credentials for 10.1.2 BPEL targets) for the selected Oracle BPEL Process Managers.

The credentials required for BPEL Process Managers vary according to the supported BPEL Process Manager version. For BPEL 10.1.3 targets, you need to provide only one set of credentials that will be used for accessing the BPEL Process Manager. However, for BPEL 10.1.2 targets, you need to provide the BPEL administrator password and another set of OC4J RMI Access credentials for remote access.
If the preferred credentials are already set and stored in the Management Repository, then by default, they are prefilled on this page. You can choose to either use these prefilled preferred credentials or edit them to use the changed credentials. If the preferred credentials are not stored, then the fields are blank. In this case, you have to specify the credentials. The credentials specified here apply only to the current deployment procedure session and do not get stored in the Management Repository for future use.
Note that if you change the credentials, the change applies only to the current deployment procedure session and does not override the preferred credentials stored in the Management Repository.
-
Click Next.
-
-
In the Schedule page, specify a Deployment Instance name. If you want to run the procedure immediately, then retain the default selection, that is, One Time (Immediately). If you want to run the procedure later, then select One Time (Later) and provide time zone, start date, and start time details. You can set the notification preferences according to deployment procedure status. If you want to run only prerequisites, you can select Pause the procedure to allow me to analyze results after performing prerequisite checks to pause the procedure execution after all prerequisite checks are performed. Click Next.
-
On the Review page, review the details you have provided for the Deployment Procedure. If you are satisfied with the details, then click Submit to run the Deployment Procedure according to the schedule set. If you want to modify the details, click the Edit link in the section to be modified or click Back repeatedly to reach the page where you want to make the changes.
-
In the Procedure Activity page, view the status of the execution of the job and steps in the deployment procedure. Click the Status link for each step to view the details of the execution of each step. You can click Debug to set the logging level to Debug and click Stop to stop the procedure execution.