23 Provisioning Fusion Middleware Domain and Oracle Homes
Provisioning is a solution offered as a part of Lifecycle Management by Enterprise Management Cloud Control. As a part of Middleware Provisioning solution, Cloud Control enables you to provision Oracle WebLogic Domain (WebLogic Domain), Service-Oriented Architecture (SOA), Oracle Service Bus (OSB), and Oracle WebCenter. In addition to provisioning a domain, you can extend an existing domain to include new Oracle Homes. For provisioning any of the middleware entities, you can create profile, save it, and then use the saved profile as the source for provisioning. Doing this, ensures that the future installations follow a standard, consistent configuration.
Note:
The term Middleware Home is applicable only for WebLogic Server versions 10.3.x and 12.1.x. For WebLogic Server version 12.1.2.0.0 and higher, Middleware Home is referred to as Oracle Home.To provision a new Middleware Domain or an Oracle Home, you must have configured JDK version 1.6 or higher. Oracle recommends using the latest and the most updated JDK version of the product. To do so, log in to support.oracle.com, then click Certifications tab. In the Certification Search section, enter Oracle WebLogic Server in the Product field. From the Release menu, select a valid WebLogic Server version and from the Platform menu, select a valid operating system, and click Search.
To clone an existing domain, you must ensure that the JDK version configured on the cloned destination host is equal to or higher than the JDK version available on the source host. Oracle recommends using the latest and the most updated JDK version of the product. To do so, log in to support.oracle.com, then click Certifications tab. In the Certification Search section, enter Oracle WebLogic Server in the Product field. From the Release menu, select a valid WebLogic Server version and from the Platform menu, select a valid operating system, and click Search.
This chapter explains how you can automate common provisioning operations for Middleware Homes and WebLogic Domains using Oracle Enterprise Manager Cloud Control. In particular, this chapter covers the following:
-
Different Approaches to Launch the Provision Fusion Middleware Deployment Procedure
-
Prerequisites for Provisioning from the Middleware Provisioning Profiles
-
Provisioning a Fusion Middleware Domain from an Existing Oracle Home
23.1 Getting Started with Fusion Middleware Provisioning
This section helps you get started by providing an overview of the steps involved in provisioning WebLogic Domain and Middleware Home using the Fusion Middleware Deployment procedure.
Table 23-1 Getting Started with Fusion Middleware Provisioning
| Step | Description | Reference Links |
|---|---|---|
|
Step 1 |
Different approaches to launch the Fusion Middleware Deployment Procedure. Understanding the various approaches to launch the Fusion Middleware Deployment Procedure, which is used to provision the Middleware entities |
To learn about the approaches to launch the Deployment Procedure, see Section 23.2 |
|
Step 2 |
Creating the Middleware Provisioning Profiles. This chapter covers three types of provisioning profiles. Select the profile that best matches your requirement |
To learn about the various Provisioning Profiles, see Section 23.5 |
|
Step 3 |
Meeting Prerequisites to Provision a Middleware Profile Before you run the Fusion Middleware Deployment Procedure, there are a few prerequisites that you must meet. |
To learn about the prrequisites for provisioning an Installation Media/Oracle Home profile, see Section 23.4.1 To learn about the Prerequisites for provisioning a WebLogic Domain profile, see Section 23.4.2 |
|
Step 4 |
Running the Fusion Middleware Deployment Procedure Run this deployment procedure to successfully provision a Weblogic Domain and/or an Oracle Home. |
To learn about provisioning from an Installation Media Profile or an Oracle Home Profile, see Section 23.6 To learn about provisioning from a WebLogic Domain Profile, see Section 23.7 To provision from an existing home, see Section 23.8 |
23.2 Different Approaches to Launch the Provision Fusion Middleware Deployment Procedure
You can use any of the following approaches to launch the Middleware Provisioning deployment procedure:
-
(Recommended Option) For all the out of the box deployment procedures, launch the Provision Fusion Middleware procedure from the Profiles table. For this, from Enterprise menu, select Provisioning and Patching, and then click Middleware Provisioning. On the Middleware Provisioning page, from the Profiles table select a profile, and click Provision.
-
If you are provisioning a new domain from an existing Middleware home, or if you are using a customized deployment procedure, then you can directly run the Provision Fusion Middleware deployment procedure. For this, from Enterprise menu, select Provisioning and Patching, and then click Middleware Provisioning. On the Middleware Provisioning page, from the Deployment Procedures table, click Provision Fusion Middleware.

-
To automate the process of provisioning using the command line, submit your procedure using the Enterprise Manager Command Line Interface (EMCLI) utility. The EMCLI enables you to access Enterprise Manager Cloud Control functionality from text-based consoles (shells and command windows) for a variety of operating systems. You can call Enterprise Manager functionality using custom scripts, such as SQL*Plus, OS shell, Perl, or Tcl, thus easily integrating Enterprise Manager functionality with your company's business process.
Note:
For more information about related EM CLI verbs, see Oracle Enterprise Manager Command Line Interface.
23.3 High-Level Steps for Middleware Provisioning
Typically, for provisioning, you will need to create a profile and use the profile as the source for creating new WebLogic Domains and Oracle Homes. Use of profiles ensures that the future installations follow a standard, consistent configuration. Oracle additionally supports fresh install, which means that you can create a profile from install media, and then provision this profile by running the Provision Fusion Middleware deployment procedures. For this, you do not need any Oracle home or WebLogic Domain to have already been manually installed/configured and discovered by Enterprise Manager Cloud Console.
Middleware Provisioning is a two-step process as follows:
23.3.1 Step1: Creating a Profile
Profiles are templates that you create and internally store in the Software Library. Once a profile is created, it can be launched numerous times to provision WebLogic Domain and/or Oracle Home with the same characteristics.
Before going ahead with the profile creation, you must identify the profile that suits your requirements:
-
If you do not have an existing WebLogic Domain, or an Oracle Home, use the Installation Media profile. This profile allows you to create a domain and a home using the shiphome (installation media files) that you have downloaded from the OTN. For further details, see Section 23.5.1.
-
If you have an Oracle Home that needs to be patched to fix some bugs, use the Oracle Home profile. This profile allows you to apply the relevant patches to the Oracle home, and then create a profile out of the patched Oracle home which can be your source of truth. Use the patched profile to provision all the Oracle Homes in your data center. For further details, see Section 23.5.2.
-
If you have an existing Weblogic Domain that you want to clone, use the WebLogic Domain Profile. This profile allows you to create a copy of the source domain. For further details, see Section 23.5.3.
23.3.2 Step2: Running Provision Fusion Middleware Procedure to Provision the Profile
A deployment procedure is a pre-defined sequence of steps that is meant to perform a set of operations on one or most hosts monitored by Cloud Control. You can provision a domain or an Oracle home using the profiles you have already created. This section describes the various methods to provision a profile. In particular, it covers the following:
Note:
Meet the Prerequisites before going ahead with the provisioning procedure. For a detailed list of prerequisites, see Section 23.4.For information about the other approaches to launch the Provision Fusion Middleware procedure, see Section 23.2.
-
Provisioning a fresh domain from an Installation Media Profile or Oracle Home Profile, see Section 23.6.
-
Provisioning a fresh domain from an existing Oracle Home, see Section 23.7
-
Cloning an existing domain, see Section 23.8.
23.4 Prerequisites for Provisioning from the Middleware Provisioning Profiles
This section describes all the prerequisites to be met before actually launching the Provision Fusion Middleware deployment procedure. In particular, it covers the following:
Important:
Before provisioning using a domain profile or an Oracle Home profile, you must apply the following patches:-
For SOA: 20046866, 20046898
-
For OSB: 20046866
If you are provisioning from a domain profile using an existing Middleware Home, then ensure that the Middleware Home is patched appropriately.
Note:
Meet the basic prerequisites mentioned in Chapter 2. This chapter describes the prerequisites based on the privileges and accesses you have been granted.23.4.1 Prerequisites for Provisioning the Installation Media Profile or the Oracle Home Profile
Meet the following prerequisites:
-
Write permission on the Working Directory, which is a temporary directory used for staging and provisioning entities across Cloud Control.
If the working directory is not specified, then the Management Agent's working directory is used, and write permission on that is required.
-
Following permissions on the Oracle Home directory:
-
Write, if a new Oracle Home has to be created. For an Installation Media profile, creating a new Oracle Home is mandatory.
-
Read, if you are using an existing Oracle Home. Note that this is applicable only for an Oracle Home profile, and not for an Installation Media profile.
-
-
If you are using a shared storage, then mount the drives/directories on all the hosts beforehand.
-
All the hosts involved in the provisioning operation should be monitored as targets in Enterprise Manager.
-
Server and Node Manager Ports should be free.
-
If the domain uses a database or LDAP or Oracle HTTP Server, then ensure that the respective servers are monitored as targets in Enterprise Manager.
-
Write permission on Domain /Application/Node Manager Directories.
23.4.2 Prerequisites for Provisioning the WebLogic Domain Profile
In addition to the requirements mentioned in Section 23.4.1, you need to meet the following for cloning using a WebLogic Domain profile:
-
Before cloning an existing Fusion Middleware domain, you must have cloned the source database, so that the data in the schema is in sync with the source database. If you haven't already cloned your source database, you can do so using the Cloning Database feature available in Enterprise Manager Cloud Control. For more information about cloning your database, see Chapter 14.
Note:
Before cloning the domain, run the following data scrubbing SQL scripts on the database.For SOA
Create a Generic Component and upload
truncate_soa_oracle.sqlscript to Software Library. For more information on creating generic components, see Oracle Enterprise Manager Cloud Control Administrator's Guide. Note that the truncate script (truncate_soa_oracle.sql) is located in the following directory under SOA Installation:/MW_HOME/SOA_ORACLE_HOME/rcu/integration/soainfra/sql/truncateFor OSB
Create a Generic Component and upload
llr_table.sqlscript to Software Library. To create this script, for each server present in the OSB domain, you need to add the following statement in the SQL script:DROP table WL_LLR_<SERVER_NAME>For example, if the OSB domain has administrator server and two managed servers with name
OSB_SERVER1andOSB_SERVER2, then the content of the sql script would look like:DROP table WL_LLR_ADMINSERVERDROP table WL_LLR_OSB_SERVER1DROP table WL_LLR_OSB_SERVER2 -
If the source domain was wired with LDAP, then before cloning an existing Fusion Middleware domain, ensure that the data (users, roles and policies) has been migrated from the source LDAP to a new LDAP and the new LDAP has been discovered in Enterprise Manager as a target.
23.4.3 Using Custom Scripts Stored in the Software Library
This section describes how to use the custom scripts available in the Software Library to customize your deployment procedure. In particular, this section covers the following:
23.4.3.1 Using Custom Scripts with Input Parameters
To use the custom scripts as a part of the Provision Fusion Middleware procedure, you must ensure that you have stored these scripts on the Software Library as a directive.
To store custom scripts with input parameters on the Software Library, follow these steps:
-
In Cloud Control, from Enterprise menu, select Provisioning and Patching, then click Software Library.
-
Create a folder called Directive.
-
On the Software Library page, from the Actions menu, select Create Entity, then click Directives.
-
On the Describe page, provide a unique name for the parent folder. For example, My Custom Script With Parameters. Click Next.
-
On the Configure page, in the Command Line Arguments section, click Add.
-
In the Add Command Line Argument dialog box, enter the property name INPUT_FILE, then click OK. Verify that the Command Line contains the value:
"${INPUT_FILE}" -
On the Select Files page, select Upload Files. In the Specify Destination section, select an upload location. In the Specify Source section, select the scripts to be uploaded. Ensure the directly executable file is in the Main File menu.
For example,
myscript.plis the main executable file, andlistMyServers.pyis another file that is uploaded. Following are example scripts that you can refer:Contents of the Perl script:
myscript.pl#!/usr/local/bin/perl print "**********************\n"; print "* This is a *\n"; print "* test script *\n"; print "**********************\n"; my $inputFile = $ARGV[0]; my %properties; open (FILE, "<$inputFile") or die "can't open $inputFile for reading: $!"; print "Input properties:\n"; while (<FILE>) { chomp; my ($key, $val) = split /=/; $properties{$key} = $val; print "\t$key=$val\n"; } close FILE; my $mwHome = $properties{MIDDLEWARE_HOME}; my $protocol = $properties{ADMIN_PROTOCOL}; my $host =$properties{ADMIN_SERVER_LISTEN_ADDRESS}; my $port = $properties{ADMIN_SERVER_LISTEN_PORT}; my $cmd = $mwHome."/wlserver_10.3/common/bin/wlst.sh listMyServers.py $protocol $host $port"; print "\nExecuting:\n\t$cmd\n"; print "\nOutput is:\n\n"; system($cmd); exit 0;Contents of the Python script:
listMyServers.py#!/usr/bin/python protocol = sys.argv[1]; host = sys.argv[2]; port = sys.argv[3]; username = 'weblogic'; password = 'welcome1'; connectUrl = protocol + '://' + host + ':' + port; connect(username, password, connectUrl); cd('/Servers'); ls(); disconnect(); exit();Click Next.
-
On the Review page, review the details, and click Save and Upload.
23.4.3.2 Using Custom Scripts Without Inputs Parameters
To use the custom scripts as a part of the Provision Fusion Middleware procedure, you must ensure that you have stored these scripts on the Software Library as a directive.
To store custom scripts without input parameters on the Software Library, follow these steps:
-
In Cloud Control, from Enterprise menu, select Provisioning and Patching, then click Software Library.
-
Create a folder called Directive.
-
On the Software Library page, from the Actions menu, select Create Entity, then click Directives.
-
On the Describe page, provide a unique name for the parent folder. For example, My Custom Script Without Parameters. Click Next.
-
On the Configure page, in the Command Line Arguments section, click Next.
-
On the Select Files page, select Upload Files. In the Specify Destination section, select an upload location. In the Specify Source section, select the scripts to be uploaded. Ensure the directly executable file is in the Main File menu.
For example,
myscript1.plis the main executable file, andlistMyServers.pyis another file that is uploaded. Following are example scripts that you can refer:Contents of the Perl script:
myscript1.pl#!/usr/local/bin/perl print "**********************\n"; print "* This is a *\n"; print "* test script *\n"; print "**********************\n"; my $mwHome = "/scratch/bbanthia/soa/middleware"; my $protocol = "t3"; my $host = "slc01mpj.us.example.com"; my $port = "7001"; my $cmd = $mwHome."/wlserver_10.3/common/bin/wlst.sh listMyServers.py $protocol $host $port"; print "Executing:\n\t$cmd\n"; print "\nOutput is:\n\n"; system($cmd); exit 0;
Contents of the Python script:
listMyServers.py#!/usr/bin/python protocol = sys.argv[1]; host = sys.argv[2]; port = sys.argv[3]; username = 'weblogic'; password = 'welcome1'; connectUrl = protocol + '://' + host + ':' + port; connect(username, password, connectUrl); cd('/Servers'); ls(); disconnect(); exit();Click Next.
-
On the Review page, review the details, and click Save and Upload.
23.5 Creating Middleware Provisioning Profiles
Profiles are like templates that you can create and store in Software Library. Once a profile is created, it can be launched numerous times to provision WebLogic Domain and/or Oracle Home. The advantage of using a profile is that you can ensure that future WebLogic installations follow a standard, consistent configuration
23.5.1 Creating a Provisioning Profile Based on an Installation Media
You can upload Installation Media from a remote host, create a profile based on the Installation Media selected, and provision this profile from the Middleware Provisioning page.

Before you begin creating the middleware provisioning profile, ensure that you meet the following prerequisites:
-
Download the installation media files from Oracle Technology Network.
-
Create one directory for each product like SOA, OSB, WebCenter, RCU and WLS, and ensure that you add the necessary files under the respective directory.
To create an Installation Media profile, follow these steps:
-
In Cloud Control, from the Enterprise menu, select Provisioning and Patching, then select Middleware Provisioning.
-
On the Middleware Provisioning home page, in the Profiles section, from the Create menu, select From Installation Media.
-
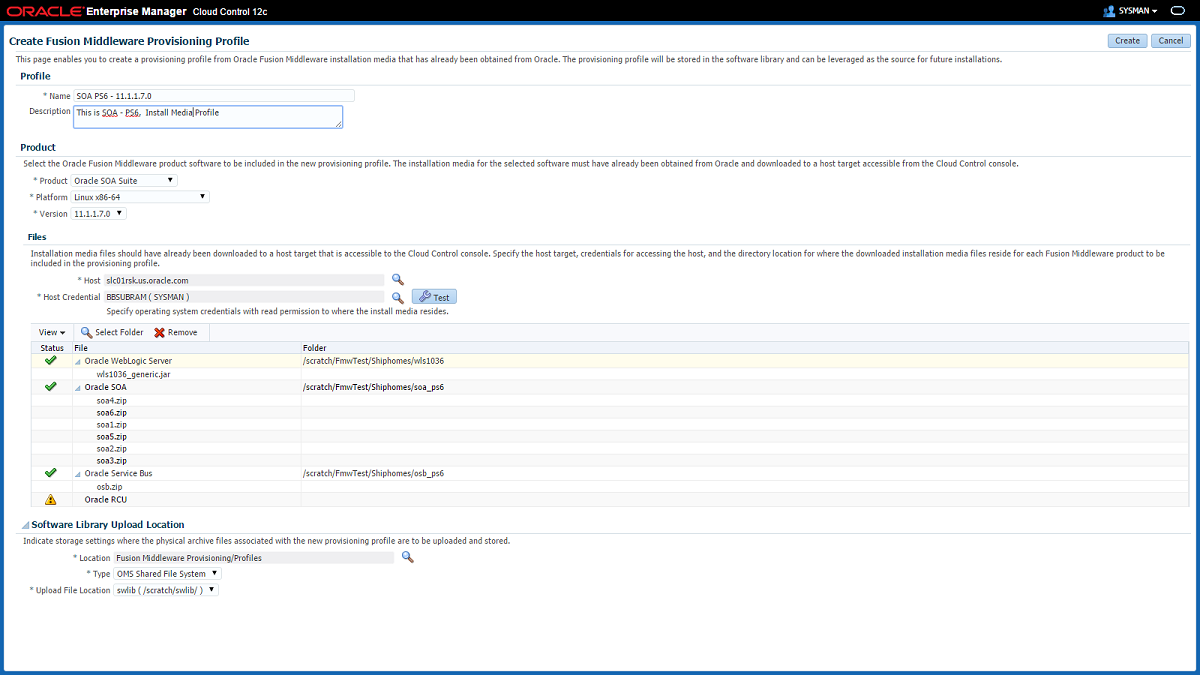
On the Create Fusion Middleware Provisioning Profile page, enter a unique name and description for your profile.
By default, all the profiles are centrally located in Software Library under
Fusion Middleware Provisioning/Profiles directory. -
In the Product Details section, from the Product menu, select Oracle WebLogic Server or Oracle SOA Suite. Depending on the option selected, the Platform and Version menus get updated. Select a suitable platform name and version from the list.
-
In the Files section, do the following:
-
Click the search icon to search for the host. In the Select Target dialog box, search and select the target where the Installation Media files reside, then click Select.
-
To access the files on a remote host, you need to provide the host credentials. To do so, click search, and in the Select Credential dialog box, enter the necessary credentials, and click OK. Click Test to validate these credentials against the selected target.
-
Based on the product selected, the Files table gets updated. One of the following options are possible:
If you select Oracle SOA Suite from the Product menu, then you can upload Oracle WebLogic Server, Oracle SOA, Oracle Service Bus, and Oracle RCU files.
Before actually uploading the files, as a prerequisite, you must do the following:
- Download the Software binaries (Installation Media Files) from Oracle Technology Network.
- Create one directory for each product like SOA, OSB, RCU and WLS on Software Library, and ensure that you add the necessary files under the respective directory.
To add the files, select the product name from the files table, and click Select Folder. Navigate to the directory where the files are present, and click OK. To remove files, select the product type, and click Remove.
If you select Oracle WebLogic Server from the product menu, then you will only need to upload Oracle WebLogic Server files. To do so, select the Oracle WebLogic Server from the files table, and click Select Folder. Navigate to the directory where the files are present, and click OK. To remove this file, select the product name, and click Remove.
Note:
There are some mandatory installation media files for each product that must be available in their respective folders, without which the Installation Media profile creation will fail.In the following example, Oracle WebLogic Server is the folder name, and
wls1036_generic.jaris the installation media file. Similarly, basic installation media files required for Oracle SOA, Oracle Service Bus, Oracle WebCenter and Oracle RCU are listed.-
Oracle WebLogic Server:
wls1036_generic.jar -
Oracle SOA:
soa1.zip, soa2.zip, soa3.zip, soa4.zip, soa5.zip, and soa6.zip -
Oracle Service Bus:
osb.zip -
Oracle RCU:
rcuHome.zip -
Oracle WebCenter Portal:
wc.zip -
Oracle WebCenter Content:
ecm1.zip, ecm2.zip
Note that this is just an example; the jar file names may change depending on the platform and version selected.
-
-
-
In the Storage section, select the Software Library storage details. Ensure that you provide a valid storage type, and upload location to upload the Installation Media profile.
-
Click Create to submit the profile creation job.
-
After the job has successfully run, a new entry is available in the Profiles table. You can click the profile name to view the details.
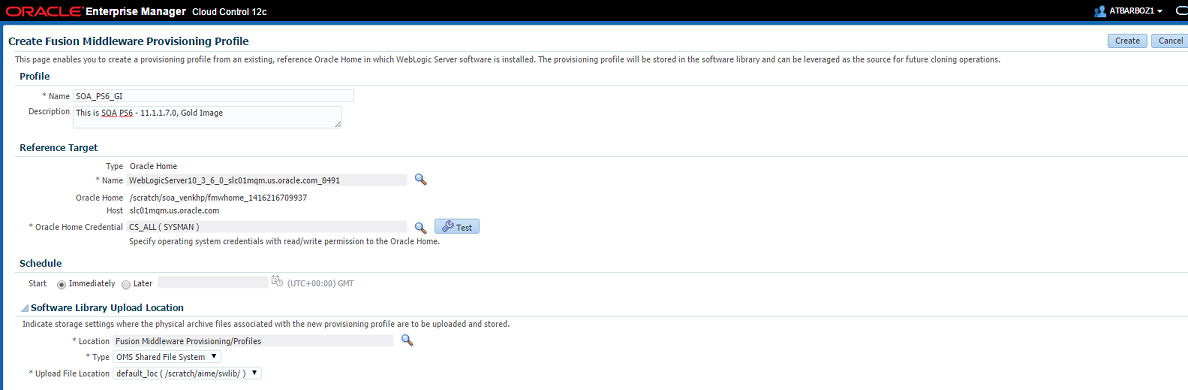
23.5.2 Creating a Provisioning Profile Based on an Oracle Home
Use this page to create a new Oracle home profile, save it in Software Library, then use the saved profile as the source for provisioning new Oracle homes.
Before you begin creating the middleware provisioning profile, ensure that you meet the following prerequisites:
-
Oracle Home should be a managed target that has been discovered in Enterprise Manager Cloud Control.
-
Ensure that you have read permissions on the Oracle Home.
-
Ensure that you have write permissions on Management Agent's working directory. Working directory is a temporary directory used for staging and provisioning entities across Cloud Control.
-
The Management Agent must be running on the Administration Server.
-
Host credentials must be set for the source machine on which Administration Server is running.
-
The disk space required to create a gold image is calculated as follows:
Disk Space = Middleware Home Size + Space for Temporary Scripts
To create a Middleware Home profile, follow these steps:
-
In Cloud Control, from the Enterprise menu, select Provisioning and Patching, then select Middleware Provisioning.
-
On the Middleware Provisioning home page, in the Profiles section, from the Create menu, select From Oracle Home.
-
On the Create Fusion Middleware Provisioning Profile page, enter a unique name and description for your profile.
By default, all the profiles are centrally located in Software Library under
Fusion Middleware Provisioning/Profilesdirectory. -
In the Reference Target section, click the search icon. In the Select Target dialog box, select an Oracle Home, and click Select. The corresponding host details are populated.
You can also launch the Create Middleware Home Profile from the Middleware targets page. How? If you do so, the context of the target is maintained, and the fields like Type, Name, and Host appear pre-populated.
-
Click the search icon to provide the credentials. In the Select Credentials dialog box, provide the necessary credentials for your target that is already set, and click OK. Click Test to validate the credentials against the selected target.
-
In the Storage section, select the Software Library storage details. Ensure that you provide a valid storage type, and upload location details to update the Oracle Home profile.
-
Click Create Profile to submit the profile creation job.
-
After the job has successfully run, a new entry is available in the Profiles table. You can click the profile name to view the details.
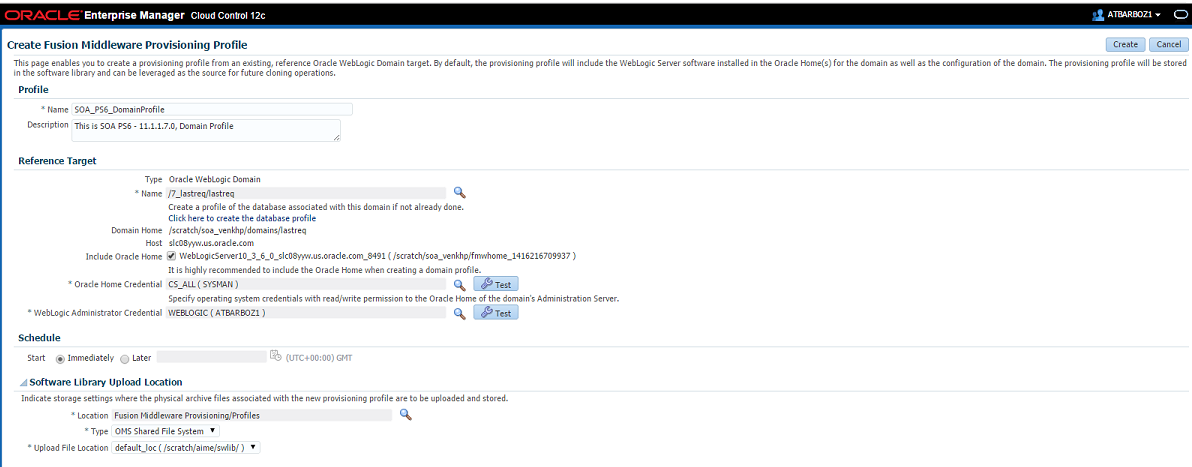
23.5.3 Creating a Provisioning Profile Based on a WebLogic Domain
Use this page to create a profile, save it in Software Library, then use the saved profile as a source for creating new WebLogic domains. This way, you can ensure that future WebLogic installations follow a standard and consistent configuration.
Before you begin creating the middleware provisioning profile, ensure that you meet the following prerequisites:
-
The Management Agent must be running on the Administration Server.
-
Host credentials must be set for the source machine on which Administration Server is running.
-
The WebLogic domain for which the profile is being created must be a monitored target in Cloud Control.
-
The disk space required to create a profile is calculated as follows:
Disk Space = Middleware Home Size + WebLogic Domain Size + Space for Temporary Scripts (about one GB)
To create a WebLogic Domain profile, follow these steps:
-
In Cloud Control, from the Enterprise menu, select Provisioning and Patching, then select Middleware Provisioning.
-
On the Middleware Provisioning home page, in the Profiles section, from the Create menu, select From WebLogic Domain.
-
On the Create Fusion Middleware Provisioning Profile page, in the Profile Details section, enter a unique name and description for your profile. By default, all the profiles are centrally located in Software Library under the
Fusion Middleware Provisioning/Profilesdirectory. -
In the Reference Target section, search and select the WebLogic Domain target. Once you select the target, the Domain Home, the Host, and the Oracle home details for the host get populated.
You must ensure that a database instance is associated with the WebLogic Domain except in the case of a plain WebLogic Domain where it may not be necessary. To associate a database with the domain, create a database profile using the Create Database Provisioning Profile wizard. More.
Enter the Oracle Home credentials required to log into the host target selected.
Enter an existing named credential of weblogic administrator for the domain or create a new named credential by entering the details.
Note: You can also launch the WebLogic Domain Profile from the Middleware target page. If this is done, then the context of the of the target is maintained, and the fields like Type, Name, Host, and Oracle Home details appear pre-populated.
-
Based on the target selection, you may create one of the following profiles:
-
Plain WebLogic Domain Profile: If you do not wish to upload the Oracle Home files, de-select the Include Oracle Home checkbox available in the Reference Target section. If you do so, then while provisioning from this domain profile, you will need to have a pre-deployed Oracle Home that already exists at the destination, and the content of the Oracle Home should match with the one expected by the domain profile.
-
WebLogic Domain Profile: If you retain the default selection of Include Middleware Home, then a WebLogic Domain with the domain configurations, Middleware Home, and binaries is created.
Click the search icon to provide credentials. In the Select Credentials dialog box, select the credentials that you have already set, and click OK. Click Test to validate the credentials against the selected target.
-
-
In the Software Library Upload Location section, select the Software Library storage details. Ensure that you provide a valid storage type, and upload location to update the profile.
-
Click Create to submit the profile creation job. After the job has successfully run, a new entry is available in the Profiles table. You can click the profile name to view the details.
23.6 Provisioning of a new Fusion Middleware Domain from an Installation Media Based-Profile or an Oracle Home Based-Profile
To provision a fresh SOA domain or Oracle home using an Installation Media profile, follow these steps:
Note:
Starting with Enterprise Manager for Oracle Fusion Middleware 12.1.0.7, you can provision SOA and OSB in a single operation. For this, you need to create an Installation Media profile with SOA and OSB installation files, and provision this profile. Until the previous release, you could only provision one domain (for example, SOA), and extend that domain to include the other product (for example, OSB).This release allows the flexibility of provisioning both SOA and OSB at the same time.Middleware Provisioning supports RAC only with GridLink Data Sources.
Note:
To provide inputs and further customize the destination environment, click Advance. To understand the settings and configuration parameters that can be customized, see Customizing the Destination Environment from an Installation Media Based-Profile or an Oracle Home Based-Profile..
-
In Cloud Control, from Enterprise menu, select Provisioning and Patching, and then click Middleware Provisioning.
-
On the Middleware Provisioning home page, from the Profiles table select an Installation Media profile, and click Provision.
-
On the Provision Fusion Middleware page, in the General section, the Installation Media profile appears pre-selected.
Note:
If you are provisioning a WebCenter profile, you can choose to use Development Topology or Production Topology. If you do not specify, by default, the Production Topology is selected. For more information about the topologies, see Section 26.2. -
In the Hosts section, search and select the destination hosts on which the Middleware Home and WebLogic Domain needs to be cloned. Click +Add to add the target hosts, and provide the login credentials for them. If you have selected multiple hosts, and the login credentials for all of them are the same, then you can select Same Credentials for all.
-
In the Middleware section, the Middleware Base and Java Home values appear pre-populated; you can customize these values if required. Provide credentials for the domain Administrator.
-
In the Database section, depending on the profile being provisioned the following options are possible:
-
From an Installation media Profile:
If you are provisioning from an Installation Media profile, you can create a new schema using a profile contains an RCU shiphome. To do so, select the Create Schema option. A default value for the Schema Prefix is populated; you may change this if required. Provide credentials for the database target and the new schema. If you uncheck the default schema creation option, then an existing schema on the database target is used.
-
From an Oracle Home Profile:
If you are provisioning from an Oracle Home profile, you cannot create a new schema. You must, choose an existing schema and provide the schema password.
-
-
(optional) In the Identity and Security section, you must enter the OID target name and the OID credentials. These are mandatory fields for creating an LDAP Authenticator and/or for reassociating the Domain Credential Store.
Note:
If you are provisioning a WebCenter profile, this section is displayed only for the Production Topology which is the default option.In addition to this, you must provide the following sets of inputs in the OID section:
-
Configure LDAP Authenticator Inputs.This section describes how to create the LDAP authenticator:
-
Authenticator Name: Enter a name for the OIDAuthenticator provider. For example: MyOIDAuthenticator.
-
User Base DN: Specify the DN under which your Users start. For example,
cn=users,dc=us,dc=mycompany,dc=com -
Group Base DN: Specify the DN that points to your Groups node. For
example:cn=groups,dc=us,dc=mycompany,dc=com
Note:
As a prerequisite, you must have already provisioned the users and groups in the LDAP. -
-
Configure Security Store Inputs: In this section, provide the JPS Root Node information. The JPS root node is the target LDAP repository under which all data is migrated. The format is
cn=nodeName.Note:
As a prerequisite, you must have already created the root node in the LDAP.
-
-
In the WebTier section, click +Add to search and select an Oracle HTTP Server (OHS) target. In the Credential field provide the credentials to access the target. If you have more than one Oracle HTTP Server, then you need to provide an External Load Balancer URL.
The format of the URL for an External Load Balancer:
(http|https://hostname:port)For example:
http://wcp-prov.example.com:80Note:
If you are provisioning a WebCenter target, you will additionally need to provide an Internal Load Balancer URL.The format of the URL for an Internal Load Balancer: (
http|https|tcp:// hostname:port)For example:
tcp://wcp-prov-ucm.example.com:4444Note:
If you are provisioning a plain WebLogic Domain, this section will not be displayed. -
Click Next to schedule the procedure. If you click Submit, the procedure is submitted for execution right away. Click Save to save this as a template; this feature is particularly useful with lockdowns. For example, you can login with designer role and create a template with lockdowns, and assign the desired privileges to other administrator/operators to run this template. Click Cancel to exit the procedure configuration.
-
After submitting, you can track the progress of the provisioning operation from the Procedure Activity page. For more information about this, see Chapter 50.
-
To view the newly provisioned target, from the Targets menu, select Middleware.
23.6.1 Customizing the Destination Environment from an Installation Media Based-Profile or an Oracle Home Based-Profile.
To customize the destination environment, click Advance option available on the Fusion Middleware Provisioning wizard. Note that the Advance option is enabled only after you select the destination hosts.
Follow these steps:
Note :
Oracle recommends that you allow the default option Typical to remain selected, and provide all the details. Following which, you can click Advance to customize your destination environment. This way, the default values for most of the parameters appear pre-populated, and you will need to enter only the remaining (delta) details.Also, note that if you switch from Advance mode to typical mode, you will lose all the changes that you have made so far.-
In Cloud Control, from Enterprise menu, select Provisioning and Patching, and then click Middleware Provisioning.
-
On the Middleware Provisioning home page, from the Profiles table select an Installation Media profile, and click Provision.
-
On the Provision Fusion Middleware Configuration page, in the General section, the Installation Media profile appears pre-selected.
Note:
If you are provisioning a WebCenter profile, you can choose to use Development Topology or Production Topology. If you do not specify, by default, the Production Topology is selected. For mor information about the topologies, see Section 26.2.By default, the middleware home is selected, you cannot uncheck this option. However, you are allowed to choose whether or not you want to create a new domain for your middleware home. If you select Provision Domain, a middleware home is created on the destination host, and a new domain is set up for this middleware home on the destination host.
Note: If you are provisioning a SOA or a Service Bus profile, you can extend the domain to include the other product. For example, if you are provisioning a SOA domain, and you select the Extend an existing Domain option, then you will be allowed to extend your SOA domain to include Service Bus. To extend a domain, you will need to select the domain and provide the administrator credentials. Note that extend domain feature is different from Scaling a domain where you add additional managed servers to an existing domain. In extend domain, you are able to create a hybrid domain that includes two products. As of now, only a SOA or an OSB domain can be extended. Support for other products like WebCenter is not available.
If you have added more than one destination host, select Use Shared Storage option to use a shared location for these hosts.
To clone only the Middleware Home, deselect the Provision Domain.
-
In the Hosts section, search and select the destination hosts on which the Middleware Home and WebLogic Domain needs to be cloned. Click +Add to add the target hosts, and provide the login credentials for them. If you have selected multiple hosts, and the login credentials for all of them are the same, then you can select Same Credentials for all.
-
In the Middleware section, the values for Middleware Base and Java Home fields appear pre-populated. You can change the location details, if required.
-
For Middleware Home, enter the full path to the directory in which the Middleware Home is to be created.
-
For Java Home, enter the absolute path to the JDK directory to be used on the destination Host. Note that you must have already installed JDK at the same path on all the hosts.
-
-
In the Domain section, the configuration for the source domain is displayed by default. You can change the following attributes to customize the domain properties:

-
Domain Name: The name of the domain. The generated components for the domain are stored under the specified Domain directory. For example, if you enter mydomain, your domain files are stored (by default) in MW_HOME\user_projects\domains\mydomain.
-
Administrator Username: The default Administrator account for the domain. This account is used to boot and connect to the domain's Administration Server. The username must not contain commas, tabs, or any of these characters: < > # | & ? ( ) { }.
-
Administrator Password: The password for the Administrator account. The password must be at least eight characters, and must contain at least one numeric character or at least one of the following characters: ! " # $ % & ' ( ) * + , - . / : ; < = > ? @ [ \ ] ^ _ ` { | } ~
-
Unique Domain Identifier: A farm is a collection of components managed by Enterprise Manager Cloud Control. It can contain Oracle WebLogic Server domains, one Administration Server, one or more Managed Servers, and the Oracle Fusion Middleware components that are installed, configured, and running in the domain. The Unique Domain Identifier is used as a prefix to ensure that the farm names are unique in environments with the same domain name. It is used to name the farm target as a prefix in conjunction with the WebLogic domain name. For example, if the Unique Domain Identifier is farm and the domain name is base_domain then the farm name would be farm_base_domain.
-
Domain Directory: The location in which your domain directory will be stored. By default, this directory is created under the parent directory of the Middleware Home, but can be changed. For example: If the Middleware Home is located at
/user/mwh,the application directory is created as/user/domains. The domain location can be anywhere on your local drive or network. On Windows, you must include the drive letter in this path. -
Applications Directory: The directory in which the applications will be deployed on the destination host. By default, this directory is created under the parent directory of the Middleware Home. For example: If the Middleware Home is located at
/user/mwh,the application directory is created as/user/applications. -
Domain Mode: The domain can operate in one of the following modes:
Production: The domain is used for production. In this mode, the security configuration is relatively stringent, requiring a username and password to deploy applications.
Development: The domain is used for development. In this mode, the security configuration is relatively relaxed, allowing you to auto-deploy applications.
-
Server Startup Mode: you can start the server in one of the following modes depending on your requirement:
Start all Servers and Node Managers: This is the default option. Typically, you will select this option if you have no changes to make, and if the procedure has run as expected.
Start only Administration Server: This option starts only Administrator Server and Node Manger. Typically, you will select this option if you want to add a custom step to invoke the WLST online script, and then start the servers.
Do not start any Server or Node Manager: This option does not start any server or Node Manager. Typically, you will select this option if you have to customize the domain before starting any server.
-
-
In the Clusters section, you can modify the name of the cluster, enter the cluster address that identifies the Managed Servers in the cluster. You can select either Unicast or Multicast as the messaging mode. If you select Multicast mode, enter the address and port number that will be dedicated for multicast communications on the cluster. Click +Add to add one or more clusters to the configuration.
-
In the Machines section, enter configuration information for machines in the domain. A Machine is a logical representation of the system that hosts one or more WebLogic Server instances. The Administration Server and Node Manager use the Machine definition to start remote servers. Click +Add to add one or more machine configurations. Enter the following details:
-
Node Manager Home: The directory in which the Node Manager is installed. By default, the Node Manager is installed under the parent directory of the Middleware Home directory, but this can be modified.
Note that the Node Manager home must always be installed inside the Administration Server domain home.
-
Node Manager Credentials: You can use the same credentials as Administrative Server credentials or uncheck the option to provide separate Node Manager Credentials.
-
Machine Name: Enter a unique name for your machine.
-
Host: Select the host name from the menu.
-
Node Manager Listen Address: Enter the listen address used by Node Manager to listen for connection requests. By default, the IP addresses defined for the local system and localhost are shown in the drop-down list. The default value is the same as specified in the source domain. Note that if multiple machines are running on the same host, the Node Manager Home location must be different for each host.
-
Node Manager Listen Port: Enter a valid value for the listen port used by Node Manager to listen for connection requests. The valid Node Manager listen port range is 1 to 65535. The default value is 5556. The port number must be available on the destination machine.
-
-
In the Server section, enter the configuration information for the Administration Server and one or managed servers.
-
Select the Configure Coherence check box
-
Coherence Port: This field is enabled only when you select the Configure Coherence option. You can retain the port number that is populated by default or change it.
-
Listen Port: By default, this option is selected. The values for the listen ports are pre-populated. You may enter any value from 1 to 65535. The port number you enter here must be available on the destination machine.
Note If a domain was registered on the host with a port number whose status is down, you need to select a different port or manually de-register the domain before launching the deployment procedure.
-
SSL Listen Port: If you enable SSL Listen Port, enter the port number of the SSL Listen Port for secure requests. You must ensure that the port numbers you specify for the Listen Port and SSL Listen Port are available. If you are using the SSL configuration, you must ensure that the security/identity stores are present in the file system under the same path as on the source and are configured with certificates generated for the destination hosts.
-
Administration Port: This port enables the domain to run in Administration Mode. For this, all the servers needs to be SSL enabled.
-
Host: Select the host on which the Administration Server or Managed Server is to be installed.
-
Listen Address: Enter the listen address to be used to connect to the Administration Server or the Managed Server instance.
-
Machine: Select the machine configuration that is to be associated with the Administration Server or the Managed Server
-
Cluster: Select the cluster to be associated with the Managed Server.
-
Server Start: Click to enter the Server Startup Parameters.Usually, the Node Manager can start a server without requiring you to specify startup options, however, since you have customized your environment you must specify the startup options in the Server Startup Parameter dialog box.
-
Transaction Log Directory: Transaction log stores information about committed transactions that are coordinated by the server and that may not have been completed. Oracle WebLogic Server uses this transaction log for recovery from system crashes or network failures. To leverage the migration capability of the Transaction Recovery Service for the Managed Servers within a cluster, store the transaction log in a location accessible to the Managed Server and its backup servers.
-
Domain Directory for Managed Server: The directory in which the Managed Servers are installed. By default, they are installed under the parent directory of the Middleware Home directory, but this can be modified.
-
-
In the JMS Servers section, click +Add to add new JMS persistent stores and JMS servers. The storage type can be one of the following:
-
A JMS file store is a disk-based file in which persistent messages can be saved. You can modify the JMS file stores configured in your domain.
-
A JDBC Store:
-
Data Source
-
Targets
-
-
-
In the Database section, depending on the profile being provisioned the following options are possible:
-
From an Installation Media Profile:
Search and select the database target. A default value for the Schema Prefix is populated; you may change this if required.
-
The Create Schema option allows you to create a new schema for the RCU profile selected by default. Provide credentials for the database target and the new schema.
-
Select Same password for all option if you would like to use the same username and password for all the data sources on the selected database target
If you uncheck the default schema creation option, then an existing schema on the database target is used.
-
-
From an Oracle Home Profile:
If you uncheck the default schema creation option, then an existing schema on the database target is used.
-
-
(optional) In the Identity and Security section, you must enter the OID target name and the OID credentials. These are mandatory fields for creating an LDAP Authenticator and/or for reassociating the Domain Credential Store.
Note:
If you are provisioning a WebCenter profile, this section is displayed only for the Production Topology which is the default option.In addition to this, you must provide the following sets of inputs in the OID section:
-
Configure LDAP Authenticator Inputs.This section describes how to create the LDAP authenticator:
-
Authenticator Name: Enter a name for the OIDAuthenticator provider. For example: MyOIDAuthenticator.
-
User Base DN: Specify the DN under which your Users start. For example,
cn=users,dc=us,dc=mycompany,dc=com -
Group Base DN: Specify the DN that points to your Groups node. For
example:cn=groups,dc=us,dc=mycompany,dc=com
Note:
As a prerequisite, you must have already provisioned the users and groups in the LDAP. -
-
Configure Security Store Inputs: In this section, provide the JPS Root Node information. The JPS root node is the target LDAP repository under which all data is migrated. The format is
cn=nodeName.Note:
As a prerequisite, you must have already created the root node in the LDAP.
-
-
In the WebTier section, click +Add to search and select an Oracle HTTP Server (OHS) target. In the Credential field provide the credentials to access the target. If you have more than one Oracle HTTP Server, then you need to provide an External Load Balancer URL.
The format of the URL for an External Load Balancer:
(http|https://hostname:port)For example:
http://wcp-prov.example.com:80Note:
If you are provisioning a WebCenter target, you will additionally need to provide an Internal Load Balancer URL.The format of the URL for an Internal Load Balancer: (
http|https|tcp:// hostname:port)For example:
tcp://wcp-prov-ucm.example.com:4444Note:
If you are provisioning a plain WebLogic Domain, this section will not be displayed. -
In the Custom Scripts section, you can select the scripts stored as directives in Software Library to customize the deployment procedure. Following options are possible, you may or may not choose to pass the scripts with parameters:
-
You can pass a script with input parameters. For more information, see Section 23.4.3.1.
Note: If you pass the input parameter, ensure that you allow the default option of Input File to be selected. For example, in the Pre Script field, you can choose My Custom Script With Parameters script that you earlier created. For more information see Storing Custom Scripts With Input Parameters. How?
Following are the contents of a sample input properties (
input.properties) file:ADMIN_SERVER_LISTEN_ADDRESS=slc01.example.com ADMIN_SERVER_LISTEN_PORT=7001 ADMIN_PROTOCOL=t3 MIDDLEWARE_HOME=/scratch/usr1/soa/middleware
-
You can alternatively choose to pass a script without any input parameters. For more information, see Section 23.4.3.2.
Note: If you do not want to pass an input parameter, you should deselect the Input File option. For example, in the Pre Script field, you can choose My Custom Script Without Parameters script that you earlier created. For more information, see Storing Custom Scripts Without Input Parameters. How?
You can pass the following scripts to customize your procedure:
-
-
Click Next to schedule the procedure. If you click Submit, the procedure is submitted for execution right away. Click Save to save this as a template; this feature is particularly useful with lockdowns. For example, you can login with designer role and create a template with lockdowns, and assign the desired privileges to other administrator/operators to run this template. Click Cancel to exit the procedure configuration.
-
After submitting, you can track the progress of the provisioning operation from the Procedure Activity page. For more information about this, see Chapter 50.
-
To view the newly provisioned target, from the Targets menu, select Middleware.
23.7 Provisioning a Fusion Middleware Domain from an Existing Oracle Home
To provision a fresh domain from an existing Oracle home, follow these steps:
Note:
To provide inputs and further customize the destination environment, click Advance. To understand the settings and configuration parameters that can be customized, see Customizing the Destination Environment from an Existing Oracle Home.-
On Cloud Control, from Enterprise menu, select Provisioning and Patching, and then click Middleware Provisioning
-
On the Middleware Provisioning home page, from Deployment Procedure section select Provision Fusion Middleware, then click Launch.
-
On the Middleware Provisioning page, in the General section, select Oracle Home. Click the search icon, the Select target dialog box is displayed. Search and select the WebLogic Server home that you want to reuse.
-
In the Hosts section, click +Add to search and select the destination hosts where the cloned Middleware Home will reside. For the cloning operation, you will need to provide the login credentials for the destination hosts. If you have selected multiple hosts, and the login credentials for all of them are the same, then you can select Same Credentials for all option.
-
In the Middleware section, provide the domain Administrator credentials.
-
In the Database section, select a Database Target, choose an existing schema and provide the schema password.
-
(optional) In the Identity and Security section, you must enter the OID target name and the OID credentials. These are mandatory fields for creating an LDAP Authenticator and/or for reassociating the Domain Credential Store.
Note:
If you are provisioning a WebCenter profile, this section is displayed only for the Production Topology which is the default option.In addition to this, you must provide the following sets of inputs in the OID section:
-
Configure LDAP Authenticator Inputs.This section describes how to create the LDAP authenticator:
-
Authenticator Name: Enter a name for the OIDAuthenticator provider. For example: MyOIDAuthenticator.
-
User Base DN: Specify the DN under which your Users start. For example,
cn=users,dc=us,dc=mycompany,dc=com -
Group Base DN: Specify the DN that points to your Groups node. For
example:cn=groups,dc=us,dc=mycompany,dc=com
Note:
As a prerequisite, you must have already provisioned the users and groups in the LDAP. -
-
Configure Security Store Inputs: In this section, provide the JPS Root Node information. The JPS root node is the target LDAP repository under which all data is migrated. The format is
cn=nodeName.Note:
As a prerequisite, you must have already created the root node in the LDAP.
-
-
In the WebTier section, click +Add to search and select an Oracle HTTP Server (OHS) target. In the Credential field provide the credentials to access the target. If you have more than one Oracle HTTP Server, then you need to provide an External Load Balancer URL.
The format of the URL for an External Load Balancer:
(http|https://hostname:port)For example:
http://wcp-prov.example.com:80Note:
If you are provisioning a WebCenter target, you will additionally need to provide an Internal Load Balancer URL.The format of the URL for an Internal Load Balancer: (
http|https|tcp:// hostname:port)For example:
tcp://wcp-prov-ucm.example.com:4444Note:
If you are provisioning a plain WebLogic Domain, this section will not be displayed. -
Click Next to schedule the procedure. If you click Submit, the procedure is submitted for execution right away. Click Save to save this as a template; this feature is particularly useful with lockdowns. For example, if you want to create a template with lockdowns, and allow other users with operator privilege to run the template multiple times with minor modifications.
Click Cancel to exit the procedure configuration.
-
After submitting, you can track the progress of the provisioning operation from the Procedure Activity page. For more information about this, see Chapter 50.
-
To view the newly provisioned target, from the Targets menu, select Middleware.
23.7.1 Customizing the Destination Environment from an Existing Oracle Home
To customize the destination environment, click Advance available on the Fusion Middleware Provisioning wizard. Note that the Advance option is enabled only after you select the destination hosts.
Follow these steps:
Note :
Oracle recommends that you allow the default option Typical to remain selected, and provide all the details. Following which, you can click Advance to customize your destination environment. This way, the default values for most of the parameters appear pre-populated, and you will need to enter only the remaining (delta) details.Also, note that if you switch from Advance mode to typical mode, you will lose all the changes that you have made so far.-
On Cloud Control, from Enterprise menu, select Provisioning and Patching, and then click Middleware Provisioning
-
On the Middleware Provisioning home page, from Deployment Procedure section, select Provision Fusion Middleware, then click Launch.
-
On the Provision Fusion Middleware Configuration page, in the General section, the Oracle Home appears pre-selected.
By default, the Provision Domain option is selected. Basically, a fresh domain is provisioned with an existing Oracle home.
To clone only the Middleware Home, deselect the Provision Domain.
-
In the Hosts section, search and select the destination hosts on which the Middleware Home and WebLogic Domain need to be cloned. Click +Add to add the target hosts, and provide the login credentials for them. If you have selected multiple hosts, and the login credentials for all of them are the same, then you can select Same Credentials for all.
-
In the Domain section, the configuration for the domain is displayed by default. You can change the following attributes to customize the domain properties:
-
Domain Name: The name of the domain. The generated components for the domain are stored under the specified Domain directory. For example, if you enter mydomain, your domain files are stored (by default) in MW_HOME\user_projects\domains\mydomain.
-
Administrator Username: The default Administrator account for the domain. This account is used to boot and connect to the domain's Administration Server. The username must not contain commas, tabs, or any of these characters: < > # | & ? ( ) { }.
-
Administrator Password: The password for the Administrator account. The password must be at least eight characters, and must contain at least one numeric character or at least one of the following characters: ! " # $ % & ' ( ) * + , - . / : ; < = > ? @ [ \ ] ^ _ ` { | } ~
-
Unique Domain Identifier: A farm is a collection of components managed by Enterprise Manager Cloud Control. It can contain Oracle WebLogic Server domains, one Administration Server, one or more Managed Servers, and the Oracle Fusion Middleware components that are installed, configured, and running in the domain. The Unique Domain Identifier is used as a prefix to ensure that the farm names are unique in environments with the same domain name. It is used to name the farm target as a prefix in conjunction with the WebLogic domain name. For example, if the Unique Domain Identifier is farm and the domain name is base_domain then the farm name would be farm_base_domain.
-
Domain Directory: The location in which your domain directory will be stored. By default, this directory is created under the parent directory of the Middleware Home, but can be changed. For example: If the Middleware Home is located at
/user/mwh,the application directory is created as/user/domains. The domain location can be anywhere on your local drive or network. On Windows, you must include the drive letter in this path. -
Applications Directory: The directory in which the applications will be deployed on the destination host. By default, this directory is created under the parent directory of the Middleware Home. For example: If the Middleware Home is located at
/user/mwh,the application directory is created as/user/applications. -
Domain Mode: The domain can operate in one of the following modes:
Production: The domain is used for production. In this mode, the security configuration is relatively stringent, requiring a username and password to deploy applications.
Development: The domain is used for development. In this mode, the security configuration is relatively relaxed, allowing you to auto-deploy applications.
-
Server Startup Mode: you can start the server in one of the following modes depending on your requirement:
Start all Servers and Node Managers: This is the default option. Typically, you will select this option if you have no changes to make, and if the procedure has run as expected.
Start only Administration Server: This option starts only Administrator Server and Node Manger. Typically, you will select this option if you want to add a custom step to invoke the WLST online script, and then start the servers.
Do not start any Server or Node Manager: This option does not start any server or Node Manager. Typically, you will select this option if you have to customize the domain before starting any server.
-
-
In the Clusters section, you can modify the name of the cluster, enter the cluster address that identifies the Managed Servers in the cluster. You can select either Unicast or Multicast as the messaging mode. If you select Multicast mode, enter the address and port number that will be dedicated for multicast communications on the cluster. Click +Add to add one or more clusters to the configuration.
-
In the Machines section, enter configuration information for machines in the domain. A Machine is a logical representation of the system that hosts one or more WebLogic Server instances. The Administration Server and Node Manager use the Machine definition to start remote servers. Click +Add to add one or more machine configurations. Enter the following details:
-
Node Manager Home: The directory in which the Node Manager is installed. By default, the Node Manager is installed under the parent directory of the Middleware Home directory, but this can be modified.
Note that the Node Manager home must always be installed inside the Administration Server domain home.
-
Node Manager Credentials: You can use the same credentials as Administrative Server credentials or uncheck the option to provide separate Node Manager Credentials.
-
Machine Name: Enter a unique name for your machine.
-
Host: Select the host name from the menu.
-
Node Manager Listen Address: Enter the listen address used by Node Manager to listen for connection requests. By default, the IP addresses defined for the local system and localhost are shown in the drop-down list. The default value is the same as specified in the source domain. Note that if multiple machines are running on the same host, the Node Manager Home location must be different for each host.
-
Node Manager Listen Port: Enter a valid value for the listen port used by Node Manager to listen for connection requests. The valid Node Manager listen port range is 1 to 65535. The default value is 5556. The port number must be available on the destination machine.
-
-
In the Server section, enter the configuration information for the Administration Server and one or managed servers.
-
Select the Configure Coherence check box
-
Coherence Port: This field is enabled only when you select the Configure Coherence option. You can retain the port number that is populated by default or change it.
-
Listen Port: By default, this option is selected. The values for the listen ports are pre-populated. You may enter any value from 1 to 65535. The port number you enter here must be available on the destination machine.
Note If a domain was registered on the host with a port number whose status is down, you need to select a different port or manually de-register the domain before launching the deployment procedure.
-
SSL Listen Port: If you enable SSL Listen Port, enter the port number of the SSL Listen Port for secure requests. You must ensure that the port numbers you specify for the Listen Port and SSL Listen Port are available. If you are using the SSL configuration, you must ensure that the security/identity stores are present in the file system under the same path as on the source and are configured with certificates generated for the destination hosts.
-
Administration Port: This port enables the domain to run in Administration Mode. For this, all the servers needs to be SSL enabled.
-
Host: Select the host on which the Administration Server or Managed Server is to be installed.
-
Listen Address: Enter the listen address to be used to connect to the Administration Server or the Managed Server instance.
-
Machine: Select the machine configuration that is to be associated with the Administration Server or the Managed Server
-
Cluster: Select the cluster to be associated with the Managed Server.
-
Server Start: Click to enter the Server Startup Parameters.Usually, the Node Manager can start a server without requiring you to specify startup options, however, since you have customized your environment you must specify the startup options in the Server Startup Parameter dialog box.
-
Transaction Log Directory: Transaction log stores information about committed transactions that are coordinated by the server and that may not have been completed. Oracle WebLogic Server uses this transaction log for recovery from system crashes or network failures. To leverage the migration capability of the Transaction Recovery Service for the Managed Servers within a cluster, store the transaction log in a location accessible to the Managed Server and its backup servers.
-
Domain Directory for Managed Server: The directory in which the Managed Servers are installed. By default, they are installed under the parent directory of the Middleware Home directory, but this can be modified.
-
-
In the JMS Servers section, click +Add to add new JMS persistent stores and JMS servers. The storage type can be one of the following:
-
A JMS file store is a disk-based file in which persistent messages can be saved. You can modify the JMS file stores configured in your domain.
-
A JDBC Store:
-
Data Source
-
Targets
-
-
-
In the Database section, choose an existing schema and provide the schema password. Select Same password for all option if you would like to use the same username and password for all the data sources on the selected database target.
-
(optional) In the Identity and Security section, you must enter the OID target name and the OID credentials. These are mandatory fields for creating an LDAP Authenticator and/or for reassociating the Domain Credential Store.
Note:
If you are provisioning a WebCenter profile, this section is displayed only for the Production Topology which is the default option.In addition to this, you must provide the following sets of inputs in the OID section:
-
Configure LDAP Authenticator Inputs.This section describes how to create the LDAP authenticator:
-
Authenticator Name: Enter a name for the OIDAuthenticator provider. For example: MyOIDAuthenticator.
-
User Base DN: Specify the DN under which your Users start. For example,
cn=users,dc=us,dc=mycompany,dc=com -
Group Base DN: Specify the DN that points to your Groups node. For
example:cn=groups,dc=us,dc=mycompany,dc=com
Note:
As a prerequisite, you must have already provisioned the users and groups in the LDAP. -
-
Configure Security Store Inputs: In this section, provide the JPS Root Node information. The JPS root node is the target LDAP repository under which all data is migrated. The format is
cn=nodeName.Note:
As a prerequisite, you must have already created the root node in the LDAP.
-
-
In the WebTier section, click +Add to search and select an Oracle HTTP Server (OHS) target. In the Credential field provide the credentials to access the target. If you have more than one Oracle HTTP Server, then you need to provide an External Load Balancer URL.
The format of the URL for an External Load Balancer:
(http|https://hostname:port)For example:
http://wcp-prov.example.com:80Note:
If you are provisioning a WebCenter target, you will additionally need to provide an Internal Load Balancer URL.The format of the URL for an Internal Load Balancer: (
http|https|tcp:// hostname:port)For example:
tcp://wcp-prov-ucm.example.com:4444Note:
If you are provisioning a plain WebLogic Domain, this section will not be displayed. -
In the Custom Scripts section, you can select the scripts stored as directives in Software Library to customize the deployment procedure. Following options are possible, you may or may not choose to pass the scripts with parameters:
-
You can pass a script with input parameters. For more information, see Section 23.4.3.1.
Note: If you pass the input parameter, ensure that you allow the default option of Input File to be selected. For example, in the Pre Script field, you can choose My Custom Script With Parameters script that you earlier created. For more information see Storing Custom Scripts With Input Parameters. How?
Following are the contents of a sample input properties (
input.properties) file:ADMIN_SERVER_LISTEN_ADDRESS=slc01.example.com ADMIN_SERVER_LISTEN_PORT=7001 ADMIN_PROTOCOL=t3 MIDDLEWARE_HOME=/scratch/usr1/soa/middleware
-
You can alternatively choose to pass a script without any input parameters. How?
Note: If you do not want to pass an input parameter, you should deselect the Input File option. For example, in the Pre Script field, you can choose My Custom Script Without Parameters script that you earlier created. For more information, see Section 23.4.3.2.
You can pass the following scripts to customize your procedure:
-
Pre Script: This script runs soon after the prerequisite checks and before the Oracle Home or WebLogic Domain is deployed.
-
Post Administration Server Start Script: This script runs after the Administration Server has been started.
-
Post Script: This script runs after all the Managed Servers have started.
-
-
Click Next to schedule the procedure. If you click Submit, the procedure is submitted for execution right away. Click Save to save this as a template; this feature is particularly useful with lockdowns. For example, you can login with designer role and create a template with lockdowns, and assign the desired privileges to other administrator/operators to run this template. Click Cancel to exit the procedure configuration.
-
After submitting, you can track the progress of the provisioning operation from the Procedure Activity page. For more information about this, see Chapter 50.
-
To view the newly provisioned target, from the Targets menu, select Middleware.
23.8 Cloning from an Existing WebLogic Domain Based-Profile
To clone an existing domain, follow these steps:
Note:
To provide inputs and further customize the destination environment, click Advance. To understand the settings and configuration parameters that can be customized, see Customizing the Destination Environment from an Existing WeLogic Domain Based-Profile.
Note:
Middleware Provisioning supports RAC only with GridLink Data Sources.-
In Cloud Control, from Enterprise menu, select Provisioning and Patching, and then click Middleware Provisioning.
-
On the Middleware Provisioning home page, from the Profiles table select a WebLogic Domain profile, then click Provision.
-
On the Provision Fusion Middleware page, in the General section, the WebLogic Domain profile appears pre-selected.
-
In the Hosts section, search and select the destination hosts where the cloned WebLogic Domain will reside. Click +Add to add the target hosts, and provide the login credentials for them. If you have selected multiple hosts, and the login credentials for all of them are the same, then you can select Same Credentials for all.
Note: The domain configuration for the destination host and the source host must be exactly the same for cloning operation to be successful. For example, if the source domain has servers on two different hosts, then you will need to select two different destinations hosts. You will be prompted to do so before you proceed.
-
In the Middleware section the value for Java Home appears pre-populated. Provide the domain Administrator credentials.
-
In the Database section, select the cloned database target, and provide the schema password.
Note:
This section appears only if the source database had data sources. -
(optional) The Identity and Security section, enter the OID target name, and the credential. As a prerequisite, you must have cloned the source OID to a destination environment.
-
In the WebTier section, click +Add to search and select an Oracle HTTP Server (OHS) target. In the Credential field provide the credentials to access the target. If you have more than one Oracle HTTP Server, then you need to provide an External Load Balancer URL.
The format of the URL for an External Load Balancer:
(http|https://hostname:port)For example:
http://wcp-prov.example.com:80Note:
If you are provisioning a WebCenter target, you will additionally need to provide an Internal Load Balancer URL.The format of the URL for an Internal Load Balancer: (
http|https|tcp:// hostname:port)For example:
tcp://wcp-prov-ucm.example.com:4444Note:
If you are provisioning a plain WebLogic Domain, this section will not be displayed. -
Click Next to schedule the procedure. If you click Submit, the procedure is submitted for execution right away. Click Save to save this as a template; this feature is particularly useful with lockdowns. For example, if you want to create a template with lockdowns, and allow other users with operator privilege to run the template multiple times with minor modifications.
Click Cancel to exit the procedure configuration.
-
After submitting, you can track the progress of the provisioning operation from the Procedure Activity page. For more information about this, see Chapter 50.
-
To view the newly provisioned target, from the Targets menu, select Middleware.
23.8.1 Customizing the Destination Environment from an Existing WeLogic Domain Based-Profile
To customize the destination environment, click Advance available on the Fusion Middleware Provisioning wizard. Note that the Advance option is enabled only after you select the destination hosts.
Follow these steps:
Note :
Oracle recommends that you allow the default option Typical to remain selected, and provide all the details. Following which, you can click Advance to customize your destination environment. This way, the default values for most of the parameters appear pre-populated, and you will need to enter only the remaining (delta) details.Also, note that if you switch from Advance mode to typical mode, you will lose all the changes that you have made so far.-
In Cloud Control, from Enterprise menu, select Provisioning and Patching, and then click Middleware Provisioning.
-
On the Middleware Provisioning home page, from Deployment Procedure section, select Provision Fusion Middleware, then click Launch.
-
On the Middleware Provisioning page, in the General section, select the WebLogic domain profile that contains the source domain details that is to be cloned.
By default, you will provision the WebLogic domain along with Oracle home. To provision only the domain (Bitless profile), you must deselect Provision Middleware Home and select Provision Domain. Alternatively, to provision only the middleware home retain Provision Middleware Home option, and deselect Provision Domain.
Use Shared Storage is particularly useful when you have multiple destination hosts. This option allows you to use a mounted location that is accessible by all the hosts.
-
In the Hosts section, search and select the destination hosts where the cloned WebLogic Domain will reside. Click +Add to add the target hosts, and provide the login credentials for them. If you have selected multiple hosts, and the login credentials for all of them are the same, then you can select Same Credentials for all.
Note: The domain configuration for the destination host and the source host must be exactly the same for cloning operation to be successful. For example, if the source domain has servers on 2 different hosts, then you will need to select two different destinations hosts. You will be prompted to do so before you proceed.
-
In the Middleware section, by default, the values for Middleware Home and Java Home are pre-populated. You can change the location details if required.
-
For Middleware Home, enter the full path to the directory in which the Middleware Home is to be created.
-
For Java Home, enter the absolute path to the JDK directory to be used on the destination Host. You need to specify this path if a similar configuration is detected on the source machine.
-
-
In the Domain section, the configuration for the source domain is displayed by default. You can change the following attributes to customize the domain properties:
-
Domain Name: The name of the domain. The generated components for the domain are stored under the specified Domain directory. For example, if you enter mydomain, your domain files are stored (by default) in MW_HOME\user_projects\domains\mydomain.
-
Administrator Username: The default Administrator account for the domain. This account is used to boot and connect to the domain's Administration Server. The username must not contain commas, tabs, or any of these characters: < > # | & ? ( ) { }.
-
Administrator Password: The password for the Administrator account. The password must be at least eight characters, and must contain at least one numeric character or at least one of the following characters: ! " # $ % & ' ( ) * + , - . / : ; < = > ? @ [ \ ] ^ _ ` { | } ~
-
Unique Domain Identifier: A farm is a collection of components managed by Enterprise Manager Cloud Control. It can contain Oracle WebLogic Server domains, one Administration Server, one or more Managed Servers, and the Oracle Fusion Middleware components that are installed, configured, and running in the domain. The Unique Domain Identifier is used as a prefix to ensure that the farm names are unique in environments with the same domain name. It is used to name the farm target as a prefix in conjunction with the WebLogic domain name. For example, if the Unique Domain Identifier is farm and the domain name is base_domain then the farm name would be farm_base_domain.
-
Domain Directory: The location in which your domain directory will be stored. By default, this directory is created under the parent directory of the Middleware Home, but can be changed. For example: If the Middleware Home is located at /user/mwh, the application directory is created as /user/mwh/domains. The domain location can be anywhere on your local drive or network. On Windows, you must include the drive letter in this path.
-
Applications Directory: The directory in which the applications will be deployed on the destination host. By default, this directory is created under the parent directory of the Middleware Home. For example: If the Middleware Home is located at /user/mwh, the application directory is created as /user/mwh/applications.
-
Server Startup Mode: you can start the server in one of the following modes depending on your requirement:
Start all Servers and Node Managers: This is the default option. Typically, you will select this option if you have no changes to make, and if the procedure has run as expected.
Start only Administration Server: This option starts only Administrator Server and Node Manger. Typically, you will select this option if you want to add a custom step to invoke the WLST online script, and then start the servers.
Do not start any Server or Node Manager: This option does not start any server or Node Manager. Typically, you will select this option if you have to customize the domain before starting any server.
-
-
In the Clusters section, all the clusters available in the source domain are provisioned on the destination host.
-
In the Machines section, the configuration information in the source domain are pre-populated. A Machine is a logical representation of the system that hosts one or more WebLogic Server instances. The Administration Server and Node Manager use the Machine definition to start remote servers. You can not customize any of the values here.
-
In the Servers section, all the configuration information for the Administration Server and managed servers are picked up from the source domain. You can customize the following:
a. Select the Configure Coherence check box
b. Coherence Port: the port value is pre-populated that can not be customized.
c. Custom Identity and Custom Trust: Use this option to specify custom certificates when configuring a domain in SSL mode.
-
In the JMS Servers section, all JMS servers configured for the source domain are cloned on the destination hosts. You can not customize any value here.
-
In the Database section, you can change the schema username and password for your data sources.
Note:
This section appears only if the source database had data sources. -
(optional) The Identity and Security section, enter the OID target name, and the credential. As a prerequisite, you must have cloned the source OID to a destination environment.
-
In the WebTier section, click +Add to search and select an Oracle HTTP Server (OHS) target. In the Credential field provide the credentials to access the target. If you have more than one Oracle HTTP Server, then you need to provide an External Load Balancer URL.
The format of the URL for an External Load Balancer:
(http|https://hostname:port)For example:
http://wcp-prov.example.com:80Note:
If you are provisioning a WebCenter target, you will additionally need to provide an Internal Load Balancer URL.The format of the URL for an Internal Load Balancer: (
http|https|tcp:// hostname:port)For example:
tcp://wcp-prov-ucm.example.com:4444Note:
If you are provisioning a plain WebLogic Domain, this section will not be displayed. -
In the Custom Scripts section, you can select the scripts stored as directives in Software Library to customize the deployment procedure. Following options are possible, you may or may not choose to pass the scripts with parameters:
-
You can pass a script with input parameters. For more information, see Section 23.4.3.1.
Note: If you pass the input parameter, ensure that you allow the default option of Input File to be selected. For example, in the Pre Script field, you can choose My Custom Script With Parameters script that you earlier created. For more information see Storing Custom Scripts With Input Parameters. How?
Following are the contents of a sample input properties (
input.properties) file:ADMIN_SERVER_LISTEN_ADDRESS=slc01.example.com ADMIN_SERVER_LISTEN_PORT=7001 ADMIN_PROTOCOL=t3 MIDDLEWARE_HOME=/scratch/usr1/soa/middleware
-
You can alternatively choose to pass a script without any input parameters. For more information, see Section 23.4.3.2.
Note: If you do not want to pass an input parameter, you should deselect the Input File option. For example, in the Pre Script field, you can choose My Custom Script Without Parameters script that you earlier created. For more information, see Storing Custom Scripts Without Input Parameters. How?
You can pass the following scripts to customize your procedure:
-
Pre Script: This script runs soon after the prerequisite checks and before the Oracle Home or WebLogic Domain is deployed.
-
Post Administration Server Start Script: This script runs after the Administration Server has been started.
-
Post Script: This script runs after all the Managed Servers have started.
-
-
Click Next to schedule the procedure. If you click Submit, the procedure is submitted for execution right away. Click Save to save this as a template; this feature is particularly useful with lockdowns. For example, if you want to create a template with lockdowns, and allow other users with operator privilege to run the template multiple times with minor modifications.
Click Cancel to exit the procedure configuration.
-
After submitting, you can track the progress of the provisioning operation from the Procedure Activity page. For more information about this, see Chapter 50.
-
To view the newly provisioned target, from the Targets menu, select Middleware.